


概要
本文主要介绍一个前端放大镜插件的设计和实现,该插件可以将图片的指定区域进行局部放大,插件运行不依赖任何第三方库,可以在Chrome或Edge的常见版本上运行。
基本功能
- 可以将图片中指定区域扩大1.5倍
- 放大镜可以跟随鼠标进行移动
- 放大镜或鼠标超出图片区域后自动隐藏
- 鼠标进入图片区域后,放大镜自动显现

设计和实现
将要放大的图片放置于指定区域和放大镜中,将放大镜放大的同时将图片中的指定区域进行放大,放大效果的主要通过css3的动画实现。
本文只介绍关键代码,其它代码请参考附录。
 <div class="magnifier" id="m1">
        <div class="magnifier-area">
            <img src="./images/1.jpeg">
        </div>
        <div class="static-area">
            <img src="./images/1.jpeg">
        </div>
    </div>
整个区域采用relative定位,magnifier-area和内部的图片采用绝对定位。static-area是图片的展示区域,直接继承父级元素的定位方式。
事件绑定
本文主要使用mouseover和mouseout两个事件
 bindEvent = () => {
        this.$magnifier.addEventListener("mouseover", (e)=> {
            this.$magArea.classList.add("active");
            document.addEventListener("mouseover", this.handleMouseover, false);
        }, false);

        this.$magnifier.addEventListener("mouseout",()=>{
            document.removeEventListener("mouseover", this.handleMouseover, false);
        }, false);
    }
在鼠标进入图片区域后,为document绑定mouseover事件,将放大镜区域按照原始长宽的1.5倍显示出来,并随鼠标一起运动。
在鼠标离开图像区域后,为document解绑mouseover事件,隐藏放大镜。
坐标运算
放大镜要在图片区域跟着鼠标一起移动,需要计算鼠标在图片区域内的坐标和放大镜中心点在图片区域内的坐标。
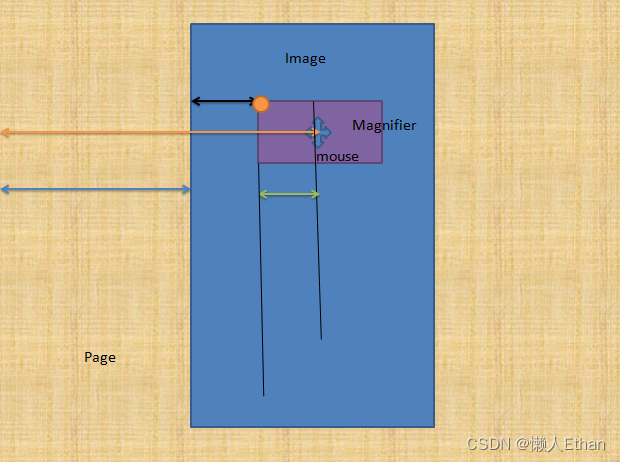
如上图所示,首先我们计算鼠标相对于图片区域的位置,
x = 鼠标的页面坐标(pageX)- 图片左侧和页面间的边距(蓝线)
同理
y = 鼠标的页面坐标(pageY)- 图片顶端和页面间的边距
计算放大镜左上角(橙色点)的坐标
x = 鼠标的页面坐标(pageX)- 图片左侧和页面间的边距(蓝线)- 放大镜区域长度的一半(绿线)
同理
y = 鼠标的页面坐标(pageY)- 图片顶端和页面间的边距 - 放大镜区域高度的一半
 handleMouseover = (e) => {
        const {mousePoint, magPoint} = this.getPointByMouse(e);
        this.moveToMousePoint(magPoint);
        if (this.checkOutMagArea(mousePoint)){
            this.$magArea.classList.remove("active");
            document.removeEventListener("mouseover", this.handleMouseover, false);
        }
    moveToMousePoint(mousePoint){
        this.$magArea.style.left = `${mousePoint.x}px`;
        this.$magArea.style.top = `${mousePoint.y}px`;
        this.$magImg.style.left = `-${mousePoint.x}px`;
        this.$magImg.style.top = `-${mousePoint.y}px`;
    }
- 在mouseover的绑定方法handleMouseover中,首先调用getPointByMouse方法,按照上述公式,计算鼠标和放大镜的相对坐标;
- 调用moveToMousePoint方法,移动放大镜和放大镜中的图片,二者移动方向相反,才能保证是同一块区域被放大;
- 检查鼠标是否在图片区域内,如果不在,隐藏放大镜,解绑mouseover事件。
附录
<!DOCTYPE html>
<html lang="en">
<head>
    <meta charset="UTF-8">
    <meta http-equiv="X-UA-Compatible" content="IE=edge">
    <meta name="viewport" content="width=device-width, initial-scale=1.0">
    <link rel="stylesheet" href="style.css">
    <script src="./magnifier.js" defer></script>
    <title>Magnifier</title>
</head>
<body>
    <div class="magnifier" id="m1">
        <div class="magnifier-area">
            <img src="./images/1.jpeg">
        </div>
        <div class="static-area">
            <img src="./images/1.jpeg">
        </div>
    </div>
</body>
</html>
class Magnifier {
    constructor(options){
        this.$magnifier = document.querySelector(options.el);
        this.$magArea = this.$magnifier.querySelector("div.magnifier-area");
        const {width, height, top, left} = this.$magnifier.getBoundingClientRect();
        this.magnifierWidth = width;
        this.magnifierHeight = height;
        this.magnifierLeft = left;
        this.magnifierTop = top;
        const magAreaStyle = getComputedStyle(this.$magArea);
        this.magAreaWdith = parseInt(magAreaStyle.width);
        this.magAreaHeight = parseInt(magAreaStyle.height);
        this.$magImg = this.$magArea.querySelector("img");
        this.init();
    }
    init = ()=> {
        this.bindEvent();
    }
    bindEvent = () => {
        this.$magnifier.addEventListener("mouseover", (e)=> {
            this.$magArea.classList.add("active");
            document.addEventListener("mouseover", this.handleMouseover, false);
        }, false);

        this.$magnifier.addEventListener("mouseout",()=>{
            document.removeEventListener("mouseover", this.handleMouseover, false);
        }, false);
    }

    getPointByMouse = (mouse) => {
        const x = mouse.pageX - this.magnifierLeft - this.magAreaWdith / 2;
        const y = mouse.pageY - this.magnifierTop - this.magAreaHeight / 2;
        const xMouse = mouse.pageX - this.magnifierLeft;
        const yMouse = mouse.pageY - this.magnifierTop;
        console.log( mouse.pageX, this.magnifierLeft);
        return {
            magPoint: new Point(x,y),
            mousePoint: new Point(xMouse, yMouse)
        };
    }
    moveToMousePoint(mousePoint){
        this.$magArea.style.left = `${mousePoint.x}px`;
        this.$magArea.style.top = `${mousePoint.y}px`;
        this.$magImg.style.left = `-${mousePoint.x}px`;
        this.$magImg.style.top = `-${mousePoint.y}px`;
    }
    checkOutMagArea (mousePoint){
        return (mousePoint.x < 0 ||
            mousePoint.y < 0  ||
            mousePoint.x >= this.magnifierWidth ||
            mousePoint.y >= this.magnifierHeight) ;
    }
    handleMouseover = (e) => {
        const {mousePoint, magPoint} = this.getPointByMouse(e);
        this.moveToMousePoint(magPoint);
        if (this.checkOutMagArea(mousePoint)){
            this.$magArea.classList.remove("active");
            document.removeEventListener("mouseover", this.handleMouseover, false);
        }

    }

}

class Point {
    constructor(x,y){
        this.x = x;
        this.y = y;
    }
}
new Magnifier({
    el:'#m1'
});
*{
    margin: 0;
    top: 0;
}
.magnifier{
    position: relative;
    width: 600px;
    height: 800px;
    margin: 100px auto;
    .magnifier-area {
        position: absolute;
        left: 0;
        top: 0;
        width: 100px;
        height: 100px;
        border-radius: 50%;
        z-index: 3;
        overflow: hidden;
        display: none;
        box-shadow: 0 4px 30px rgba(0, 0, 0, 0.1);
        backdrop-filter: blur(5px);
        border: 1px solid rgba(255, 255, 255, 0.3);
        cursor: move;
        &.active {
            display: block;
            transform: scale(1.5);
        }
        img {
            position: absolute;
            left: 0;
            top: 0;
            width: 600px;
            height: 800px;
        }
    }
    .static-area{
        width: 100%;
        height: 100%;
        img {
            width: 100%;
            height: 100%;
        }
    }
}


 266
266


 被折叠的 条评论
为什么被折叠?
被折叠的 条评论
为什么被折叠?
 到【灌水乐园】发言


