


目录
一、初识组件
1.1 什么是组件?什么是组件化?
组件:可复用的vue实例, 通过封装其标签, 样式,和 JS代码
组件化:封装的思想,把页面上‘可重用的部分’封装为‘组件’,从而方便项目的开发和维护
例如:把一个很大的界面拆分为多个小的界面,每一个小的界面就是一个组件,将大界面拆分成小界面就是组件化

组件化的好处:
独立作用域
可以简化Vue实例代码
可以提高代码的复用性
1.2 Vue中如何创建组件?
每个组件都是一个独立的个体,代码里体现为一个独立的 .vue 文件
- 1.创建组件即创建一个 .vue 文件,封装要复用的标签、样式以及JS代码
- 2.引入并注册已经创建好的组件
- 3.在需要用到组件的.vue文件里直接使用即可
- 使用:把组件名当做标签使用即可
全局注册(全局组件)--main.js里进行如下配置:
在任何一个Vue实例控制的区域中都可以使用
import Vue from 'vue'
import 组件对象 from 'vue文件路径'

Vue.component('组件名', 组件对象)<组件名></组件名>局部注册(局部组件) -- 在需要用到组件的那个 .vue 文件里配置:
只能在自定义的那个Vue实例控制的区域中使用
import 组件对象 from 'vue文件路径'

export default {
    components: {
     "组件名": 组件对象
  }
}<组件名></组件名>注意点:组件文件名/组件名 都以“大写”英文开头
运行:将组件标签换成对应封装的真实标签显示
1.3 组件内的 scoped 是如何工作的?
在当前组件内标签都被随机的添加 data-v-hash值 的属性

css选择器都被添加 [data-v-hash值] 的属性选择器
Vue组件内样式, 只针对当前组件内标签生效如何做?
在style上添加scoped,webpack在打包的时候便会自动给标签添加data-v-hash值属性, 而且所有CSS的选择都会自动加上一个属性选择器
1.4 组件切换
对于普通元素我们可以通过v-if来实现切换
对于组件我们也可以通过v-if来实现切换,因为组件的本质就是一个自定义元素
<script src="js/vue.js"></script><div id="app">
<button @click="toggle">切换</button>
<p v-if="isShow">我是首页</p>
<img v-else src="images/gt2.png" alt="">
<hr>
<!-- 3.使用注册好的组件 -->
<info v-if="isShow"></info>
<me v-else></me>
</div>
<template id="info">
<div>
<p>我是详情页</p>
</div>
</template>
<template id="me">
<div>
<p>我是个人中心页</p>
</div>
</template>
<script>
//全局组件
Vue.component("info", {
data() {
return {
}
},
methods: {
},
template: `#info`,
});
Vue.component("me", {
data() {
return {
}
},
methods: {
},
template: `#me`,
});
let vue = new Vue({
el: '#app',
// 这里就是MVVM中的Model
data: {
isShow: true
},
// 专门用于存储监听事件回调函数
methods: {
toggle() {
this.isShow = !this.isShow;
}
},
// template: `
// `
});
</script>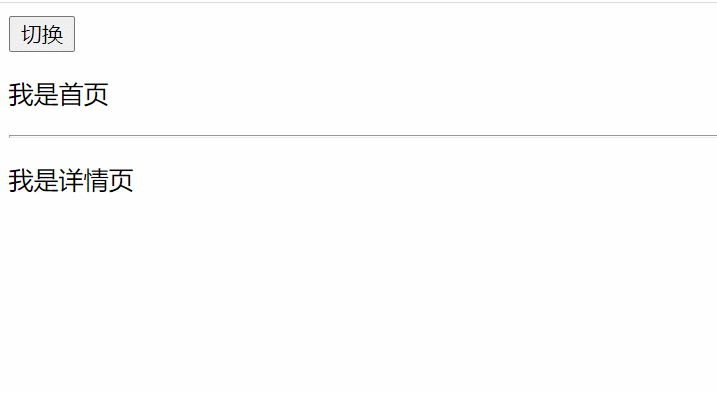
1.5 动态组件--component
什么是动态组件?
在同一个挂载点, 可以切换显示不同组件
如何使用动态组件?
vue内置的component组件, 配合is属性
如何切换?
改变is属性的值, 为要显示的组件名即可
通过v-if/v-else-if/v-else确实能够切换组件,但是在Vue中切换组件还有另一种更专业的方式,那就是动态组件:
根据数据的变化,结合 component 这个标签,来随时动态切换组件
<component v-bind:is="需要显示组件的名称"></component>
步骤:
- 创建要被切换的组件--标签+样式
- 引入到要展示的vue文件内并注册
- 在该vue文件内通过变量来承载要显示的组件名
- 设置挂载点 <component v-bind:is="需要显示组件的名称"></component>
- 通过按钮点击实现切换
App.vue
<template>
  <div>
    <h2>1.动态 Dynamic 组件的使用</h2>
   <useDynamic></useDynamic>
  </div>
</template>

<script>
import  useDynamic from './UseDynamic'
export default {
  components: {
    useDynamic
  }
}
</script>
UserDynamic.vue
<template>
  <div>
    <button @click="comName='UserName'">账号密码填写</button>
    <button @click="comName='UserInfo'">个人信息填写</button>

    <p>下面显示注册组件-动态切换:</p>
    <div style="border: 2px solid red;">
      <component :is="comName"></component>
    </div>
  </div>
</template>

<script>
import UserName from './components/UserName'
import UserInfo from './components/UserInfo'
export default {
  components: {
    UserName,
    UserInfo
  },
  data () {
    return {
      comName: 'UserName'
    }
  }
}
</script>
UserName.vue
<template>
  <div>
    <div>
      <span>用户名:</span>
      <input type="text">
    </div>
    <div>
      <span>密码:</span>
      <input type="password">
    </div>
  </div>
</template>

<script>
export default {

}
</script>
UserInfo.vue
<template>
  <div>
    <div>
      <span>人生格言:</span>
      <input type="text">
    </div>
    <div>
      <span>个人简介:</span>
      <textarea></textarea>
    </div>
  </div>
</template>

<script>
export default {

}
</script>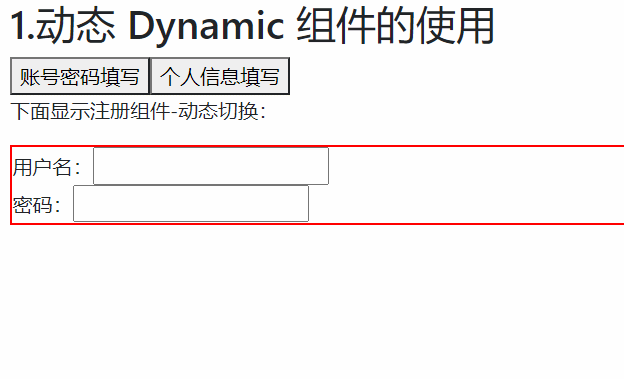
1.6 组件缓存--keep-alive
频繁的切换组件会导致组件频繁地创建和销毁,性能是不高的,那么如何避免呢?

component可以配合keep-alive来保存被隐藏组件隐藏之前的状态
如何进行组件缓存?
vue内置的keep-alive组件把要缓存的组件包起来
组件缓存好处?
不会频繁的创建和销毁组件, 页面更快呈现
keep-alive的用法:
参数:
include- 字符串或正则表达式。只有名称匹配的组件会被缓存exclude- 字符串或正则表达式。任何名称匹配的组件都不会被缓存max- 数字。最多可以缓存多少组件实例
<keep-alive> 包裹动态组件时,会缓存不活动的组件实例,而不是销毁它们。和 <transition> 相似,<keep-alive> 是一个抽象组件:它自身不会渲染一个 DOM 元素,也不会出现在组件的父组件链中
当组件在 <keep-alive> 内被切换,它的 activated 和 deactivated 这两个生命周期钩子函数将会被对应执行
<keep-alive> 是用在其一个直属的子组件被开关的情形。如果你在其中有 v-for 则不会工作
include 和 exclude prop 允许组件有条件地缓存。二者都可以用逗号分隔字符串、正则表达式或一个数组来表示:
App.vue,
<template>
  <div id="app">
    <button @click="toggle">切换</button>
    <keep-alive>
      <component :is="name"></component>
    </keep-alive>
  </div>
</template>

<script>
import info from './components/info'
import me from './components/me'
export default {
  name: 'App',
  data () {
    return {
      isShow: true,
      name: "info"
    }
  },
  components: {
    info,
    me
  },
  // 专门用于存储监听事件回调函数
  methods: {
    toggle () {
      this.isShow = !this.isShow;
      this.name = this.name === "info" ? "me" : "info";
    }
  },
}
</script>
info.vue,
<template>
  <div class="info">
    <p>我是详情页</p>
    <input type="checkbox">
  </div>
</template>

<script>
export default {

}
</script>
me.vue,
<template>
  <div class="me">
    <div>
      <p>我是个人中心页</p>
      <img src="images/gt2.png" alt="">
    </div>
  </div>
</template>

<script>
export default {

}
</script>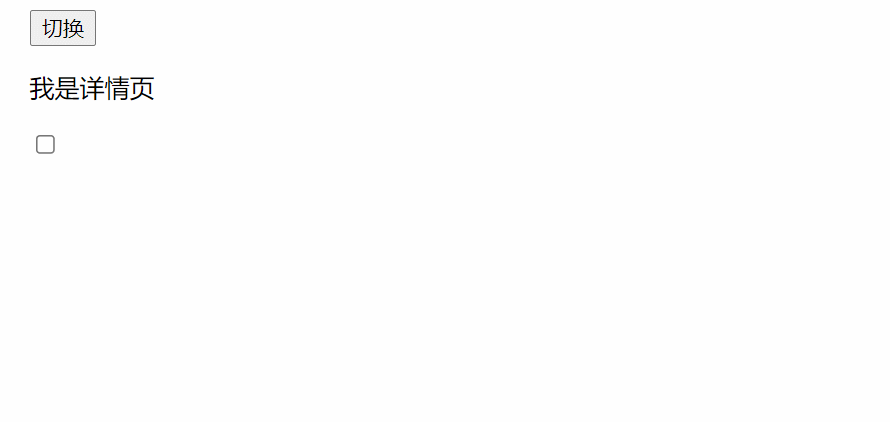
1.7 异步组件
在大型应用中,我们可能需要将应用分割成小一些的代码块,并且只在需要的时候才从服务器加载一个模块
为了简化,Vue 允许你以一个工厂函数的方式定义你的组件,这个工厂函数会异步解析你的组件定义
Vue 只有在这个组件需要被渲染的时候才会触发该工厂函数,且会把结果缓存起来供未来重渲染
App.vue
<template>
  <div id="app">
    <div>
      <h3>动态组件</h3>
      <button @click="clickHandle">切换</button>
      <keep-alive exclude="AComponent" :max="5">
        <component :is="currentComponent"></component>
      </keep-alive>
    </div>
  </div>
</template>

<script>
import SlotsComponent from "./components/SlotsComponent.vue";
import AComponent from "./container/AComponent.vue";
import ErrorComponent from "./container/ErrorComponent.vue";

// const BComponent = ()=> import("./container/BComponent.vue");
//或者
const BComponent = ()=> ({
    // 需要加载的组件 (应该是一个 `Promise` 对象)
  component:import("./container/BComponent.vue"),

   // 异步组件加载时使用的组件
  // loading: LoadingComponent,

  // 加载失败时使用的组件
  error: ErrorComponent,

  // 展示加载时组件的延时时间。默认值是 200 (毫秒)
  //加载权重问题,默认权重200
  delay: 200,

  // 如果提供了超时时间且组件加载也超时了,
  // 则使用加载失败时使用的组件。默认值是:`Infinity`
  timeout: 3000
});

export default {
  name: 'App',
  data () {
    return {
      message:"Hello 我是插槽结构"  ,
      currentComponent:AComponent
    }
  },
  components: {
    // Parent,
    // P
    SlotsComponent,
    AComponent,
    BComponent
  },
  methods: {
    clickHandle(){
      this.currentComponent=this.currentComponent===AComponent?BComponent:AComponent;
    }
  }
}
</script>

<style lang="less">
#app {
  font-family: Avenir, Helvetica, Arial, sans-serif;
  -webkit-font-smoothing: antialiased;
  -moz-osx-font-smoothing: grayscale;
  text-align: center;
  color: #2c3e50;
  margin-top: 60px;
}
</style>
AComponent.vue
<template>
  <div>
      <h3>AComponent</h3>
  </div>
</template>

<script>
export default {
    name: 'AComponent',
}
</script>

<style>

</style>
BComponent.vue
<template>
  <div>
      <h3>BComponent</h3>
      <button @click="message='我是新的字符串'">修改文本</button>
      <p>{{message}}</p>
  </div>
</template>

<script>
export default {
    name: 'BComponent',
    data () {
        return {
            message:"我是BComponent"
        }
    }
}
</script>

<style>

</style>
ErrorComponent.vue
<template>
  <div>
      <p>404</p>
  </div>
</template>

<script>
export default {

}
</script>

<style>

</style>
点击“切换”按钮后,

二、组件动画
2.1 如何给组件添加动画 ?
给组件添加动画和过去给元素添加动画一样,如果是单个组件就使用transition;如果是多个组件就使用transition-group
过渡动画注意点:
默认情况下进入动画和离开动画是同时执行的,如果想一个做完之后再做另一个,需要指定动画模式
同时生效的进入和离开的过渡不能满足所有要求,所以 Vue 提供了过渡模式
-
in-out:新元素先进行过渡,完成之后当前元素过渡离开。 -
out-in:当前元素先进行过渡,完成之后新元素过渡进入。
2.2 组件动画示例
        .v-enter {
            opacity: 0;
            margin-left: 300px;
        }

        .v-enter-to {
            opacity: 1;
        }

        .v-enter-active {
            transition: all 3s;
        }

        .v-leave {
            opacity: 1;
        }

        .v-leave-to {
            opacity: 0;
        }

        .v-leave-active {
            transition: all 3s;
            margin-left: 300px;
        }
<script src="js/vue.js"></script><div id="app">
<button @click="toggle">切换</button>
<transition mode="out-in">
<keep-alive>
<component v-bind:is="name"></component>
</keep-alive>
</transition>
</div>
<template id="info">
<div>
<p>我是详情页</p>
<input type="checkbox">
</div>
</template>
<template id="me">
<div>
<p>我是个人中心页</p>
<img src="images/gt2.png" alt="">
</div>
</template>
<!-- <script src="https://cdnjs.cloudflare.com/ajax/libs/velocity/1.5.0/velocity.min.js"></script> -->
<script>
//全局组件
Vue.component("info", {
template: `#info`,
});
Vue.component("me", {
template: `#me`,
});
let vue = new Vue({
el: '#app',
// 这里就是MVVM中的Model
data: {
isShow: true,
name: "info"
},
// 专门用于存储监听事件回调函数
methods: {
toggle() {
this.isShow = !this.isShow;
this.name = this.name === "info" ? "me" : "info";
}
},
// template: `
// `
});
</script>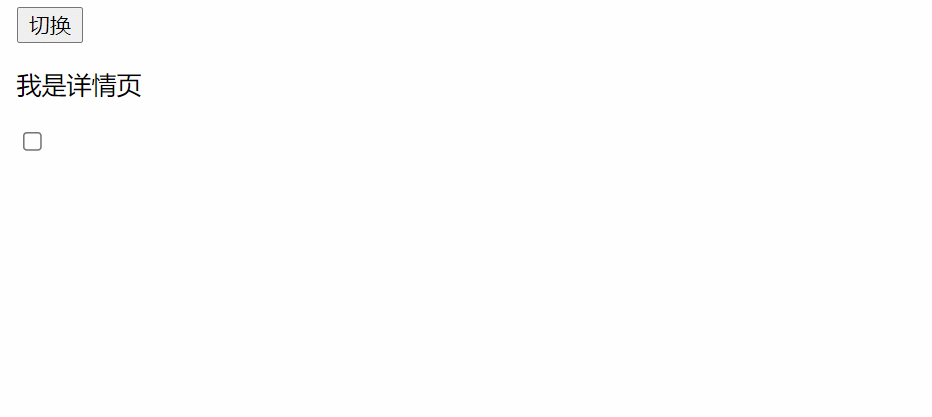
三、父子组件
3.1 什么是父子组件?
在一个组件中又定义了其他组件就是父子组件,其实局部组件就是简单的父子组件,因为我们说过可以把Vue实例看作一个大组件
我们在Vue实例中定义了局部组件,就相当于在大组件里定义了小组件
谁被引入了谁就是“儿子”即子组件
如何定义其他的父子组件?
自定义组件中可以使用data,可以使用methods。当然自定义组件也可以使用components,所以我们也可以在自定义组件中再定义其他组件
注意:
子组件只能在定义它的父组件里面使用
App.vue
<template>
  <div id="app">
    <info></info>
  </div>
</template>

<script>
import info from './components/info'
export default {
  name: 'App',
  components: {
    info,
  },
}
</script>
info.vue,
<template>
  <div class="my-product">
   <h3>标题:口水鸡!!!</h3>
   <p>价格:50元</p>
   <p>开业大酬宾,全场八折洛!</p>
  </div>
</template>

<script>
export default {

}
</script>

<style>
.my-product {
  width: 400px;
  padding: 20px;
  border: 2px solid #000;
  border-radius: 5px;
  margin: 10px;
}
</style>

3.2 父传子--数据传递(props)
父子组件传递?
在Vue中子组件是不能访问父组件里的数据的,如果子组件想要访问父组件的数据,必须通过父组件传递
如何传递?
- 在父组件中通过v-bind传递数据(v-bind:自定义接收名称="要传递的数据")
- 在子组件中通过props接收数据(props:["自定义接收名称"])
props:组件之间的数据交互
单向数据流:自上而下的传递
数组和对象的默认写法:default:[]-->工厂模式
数字和字符串可以直接写:default:0
info.vue,
<template>
  <div class="my-product">
   <h3>标题:{{title}}</h3>
   <p>价格:{{price}}</p>
   <p>{{intro}}</p>
  </div>
</template>

<script>
export default {
  name: 'info',
  props: ['title', 'price', 'intro']
}
</script>

<style>
.my-product {
  width: 400px;
  padding: 20px;
  border: 2px solid #000;
  border-radius: 5px;
  margin: 10px;
}
</style>
App.vue,
<template>
  <div id="app">
    <info title="口水鸡" price="50" intor="八折洛八折洛"></info>
    <info :title="title" :price="price" :intro="intro"></info>
    <info title="大盘鸡" price="88" intro="'麻辣鲜香'"></info>
  </div>
</template>

<script>
import info from './components/info'
export default {
  name: 'App',
  data () {
    return {
      title: '北京烤鸭',
      price: '128',
      intro:  '酥脆可口'
    }
  },
  components: {
    info,
  },
}
</script>
3.3 父传子--配合循环
info.vue,
<template>
  <div class="my-product">
   <h3>标题:{{title}}</h3>
   <p>价格:{{price}}</p>
   <p>{{intro}}</p>
  </div>
</template>

<script>
export default {
  name: 'info',
  props: ['title', 'price', 'intro']
}
</script>

<style>
.my-product {
  width: 400px;
  padding: 20px;
  border: 2px solid #000;
  border-radius: 5px;
  margin: 10px;
}
</style>
App.vue,
<template>
  <div id="app">
    <info v-for="obj in list" :key="obj.id"  :title="obj.proname" :price="obj.proprice" :intor="obj.info"></info>
  </div>
</template>

<script>
import info from './components/info'
export default {
  name: 'App',
  data () {
    return {
      list: [
    { id: 1, proname: "超级好吃的棒棒糖", proprice: 18.8, info: '开业大酬宾, 全场8折' },
    { id: 2, proname: "超级好吃的大鸡腿", proprice: 34.2, info: '好吃不腻, 快来买啊' },
    { id: 3, proname: "超级无敌的冰激凌", proprice: 14.2, info: '炎热的夏天, 来个冰激凌了' },
],
    }
  },
  components: {
    info,
  },
}
</script>

循环使用组件注意事项?
每次循环, 变量和组件, 都是独立的
3.4 单向数据流
子组件内能改变, 父传入的数据吗? 能,但是不推荐
从父到子的数据流向, 叫单向数据流
子组件修改, 不通知父级, 造成数据不一致性
Vue规定props里的变量, 本身是只读的
info.vue,
<template>
  <div class="my-product">
   <h3>标题:{{title}}</h3>
   <p>价格:{{price}}</p>
   <p>{{intro}}</p>
   <button @click="subFn">砍一元</button>
  </div>
</template>

<script>
export default {
  name: 'info',
  props: ['title', 'price', 'intro'],
  methods: {
    subFn () {
      this.price = this.price - 1
    }
  }
}
</script>

<style>
.my-product {
  width: 400px;
  padding: 20px;
  border: 2px solid #000;
  border-radius: 5px;
  margin: 10px;
}
</style>
App.vue,
<template>
  <div id="app">
    <info v-for="obj in list" :key="obj.id"  :title="obj.proname" :price="obj.proprice" :intor="obj.info"></info>
  </div>
</template>

<script>
import info from './components/info'
export default {
  name: 'App',
  data () {
    return {
      list: [
    { id: 1, proname: "超级好吃的棒棒糖", proprice: 18.8, info: '开业大酬宾, 全场8折' },
    { id: 2, proname: "超级好吃的大鸡腿", proprice: 34.2, info: '好吃不腻, 快来买啊' },
    { id: 3, proname: "超级无敌的冰激凌", proprice: 14.2, info: '炎热的夏天, 来个冰激凌了' },
],
    }
  },
  components: {
    info,
  },
}
</script>
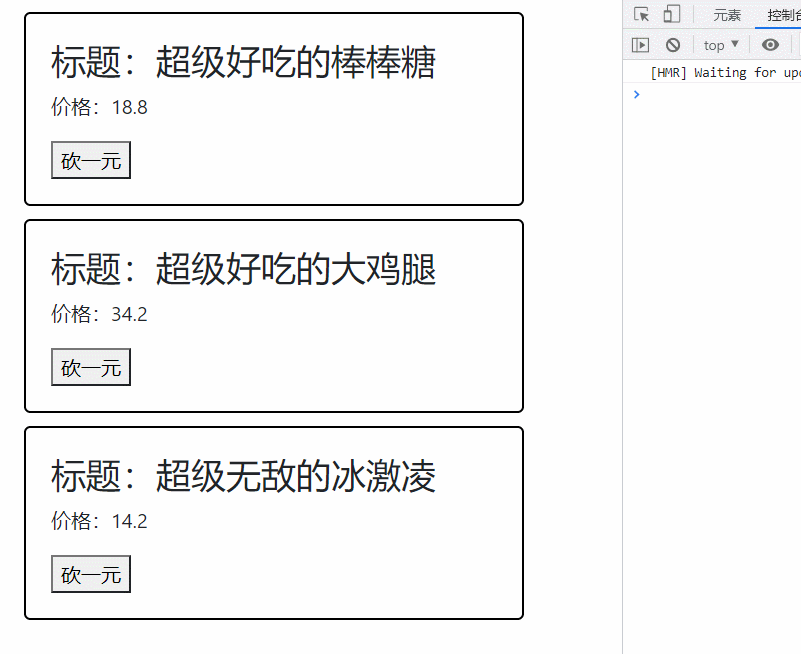
此时会报如下错误:

3.5 子传父--$emit
父子组件方法传递?
在Vue中子组件是不能访问父组件的方法的,如果子组件想访问父组件的方法,必须通过父组件传递
如何传递?
父组件内 <子组件 @自定义事件名="父methods里的函数名" />
子组件:this.$emit('自定义事件名', 值)
示例1:
App.vue,
<template>
  <div id="app">
    <p>我是父组件</p>
    <button @click="say">父按钮</button>
    <p>-------------------------</p>
    <!-- 第一步 -->
    <info @parentsay="say"></info>
  </div>
</template>

<script>
import info from './components/info'
export default {
  name: 'App',
  data () {
    return {

    }
  },
  components: {
    info,
  },
  methods: {
    say () {
      alert('hi')
    }
  }
}
</script>
info.vue,
<template>
  <div class="my-product">
    <p>我是子组件</p>
    <!-- 第二步 -->
    <button @click="sonSay">子按钮</button>
  </div>
</template>

<script>
export default {
  name: 'info',
  methods: {
    // 第三步
    sonSay () {
      this.$emit('parentsay')
    }
  }
}
</script>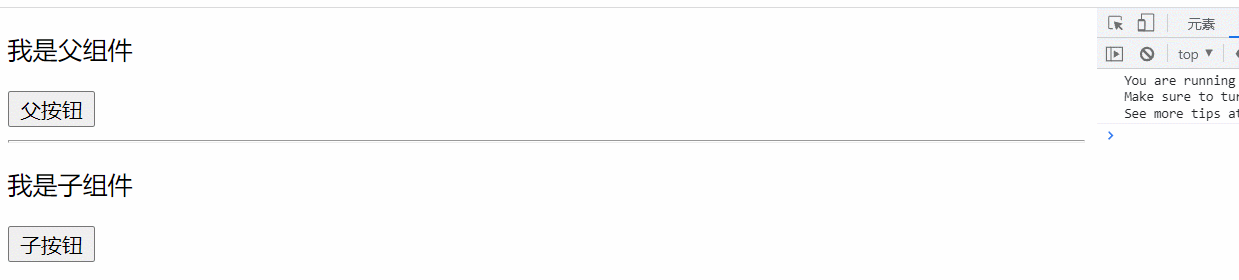
示例2:
App.vue
<template>
  <div>
    <!-- 目标: 子传父 -->
    <!-- 1. 父组件, @自定义事件名="父methods函数" -->
    <info v-for="(obj, ind) in list" :key="obj.id"
    :title="obj.proname"
    :price="obj.proprice"
    :intro="obj.info"
    :index="ind"
    @subprice="fn"
    ></info>
  </div>
</template>

<script>

import info from './components/info'
export default {
  data() {
    return {
      list: [
        {
          id: 1,
          proname: "超级好吃的棒棒糖",
          proprice: 18.8,
          info: "开业大酬宾, 全场8折",
        },
        {
          id: 2,
          proname: "超级好吃的大鸡腿",
          proprice: 34.2,
          info: "好吃不腻, 快来买啊",
        },
        {
          id: 3,
          proname: "超级无敌的冰激凌",
          proprice: 14.2,
          info: "炎热的夏天, 来个冰激凌了",
        },
      ],
    };
  },
  components: {
    info
  },
  methods: {
    // 2.
    fn(inde, price){
      // 逻辑代码
       this.list[inde].proprice -= price
      // this.list[inde].proprice > 1 && (this.list[inde].proprice = (this.list[inde].proprice - price).toFixed(2))
    }
  }
};
</script>
info.vue
<template>
  <div class="my-product">
   <h3>标题:{{title}}</h3>
   <p>价格:{{price}}</p>
   <p>{{intro}}</p>
   <!-- 3. -->
   <button @click="kanFn">砍一元</button>
  </div>
</template>

<script>
export default {
  name: 'info',
  props: ['index', 'title', 'price', 'intro'],
  methods: {
    // 4.
    kanFn () {
      this.$emit('subprice', this.index, 1)
    }
  }
}
</script>

<style>
.my-product {
  width: 400px;
  padding: 20px;
  border: 2px solid #000;
  border-radius: 5px;
  margin: 10px;
}
</style>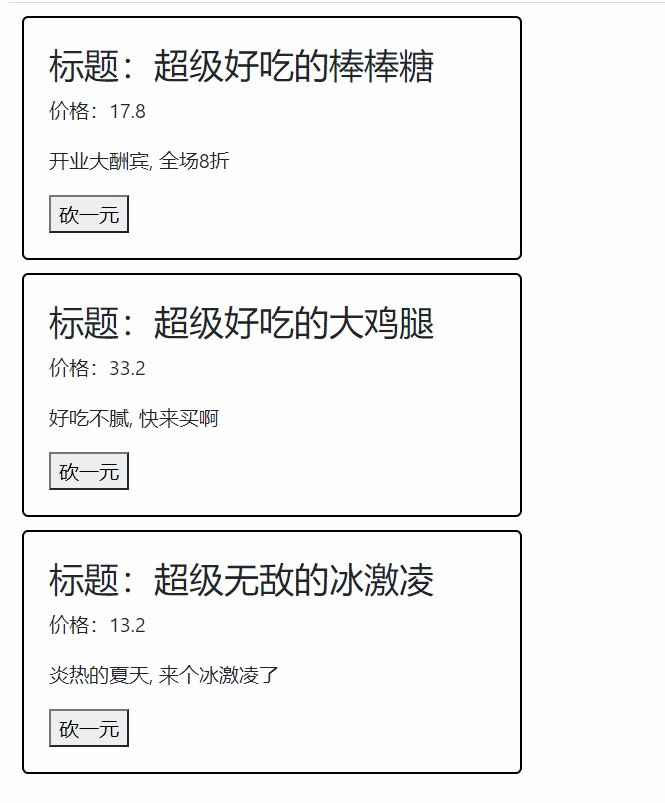
什么时候使用子传父技术?
当子想要去改变父里的数据
子传父如何实现?
父组件内, 给组件@自定义事件="父methods函数"
子组件内, 恰当时机this.$emit('自定义事件名', 值)
3.6 子传父--数据传递
如何传递?
既然我们可以将父组件的方法传递给子组件,我们可以在子组件里调用父组件中的方法,那么我们就可以在调用方法的时候给方法传递参数,传递的参数就是我们需要传递的数据
App.vue,
<template>
  <div id="app">
    <p>我是父组件</p>
    <button @click="say">父按钮</button>
    <p>-------------------------</p>
    <!-- 第一步 -->
    <info @parentsay="say"></info>
  </div>
</template>

<script>
import info from './components/info'
export default {
  name: 'App',
  data () {
    return {

    }
  },
  components: {
    info,
  },
  methods: {
    say (data) {
      console.log(data)
    }
  }
}
</script>
info.vue,
<template>
  <div class="my-product">
    <p>我是子组件</p>
    <!-- 第二步 -->
    <button @click="sonSay">子按钮</button>
  </div>
</template>

<script>
export default {
  name: 'info',
  methods: {
    // 第三步
    sonSay () {
      this.$emit('parentsay', '你好呀')
    }
  }
}
</script>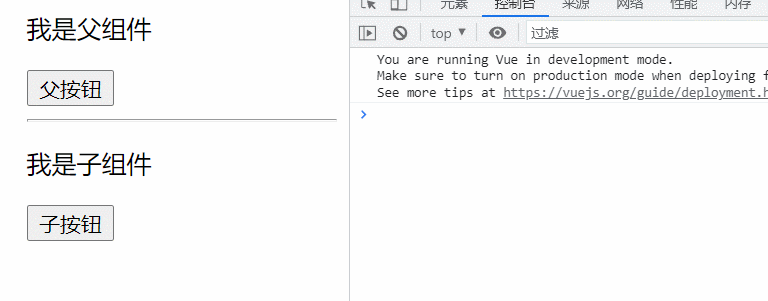
3.7 子传父之sync(语法糖)
在子元素中修改父元素中的数据,可以使用.sync形式处理
在有些情况下,我们可能需要对一个 prop 进行“双向绑定”
不幸的是,真正的双向绑定会带来维护上的问题,因为子组件可以变更父组件,且在父组件和子组件两侧都没有明显的变更来源。
这也是为什么我们推荐以 update:myPropName 的模式触发事件取而代之
然后父组件可以监听那个事件并根据需要更新一个本地的数据 property
为了方便起见,我们为这种模式提供一个缩写,即 .sync 修饰符
注意:
带有 .sync 修饰符的 v-bind 不能和表达式一起使用 (例如 v-bind:title.sync=”doc.title + ‘!’” 是无效的)。取而代之的是,你只能提供你想要绑定的 property 名,类似 v-model。
App.vue
<template>
  <div id="app">
    <P />
  </div>
</template>

<script>
import P from "./ShowDialog/P.vue";

export default {
  name: 'App',
  components: {
    P
  }
}
</script>

<style lang="less">
#app {
  font-family: Avenir, Helvetica, Arial, sans-serif;
  -webkit-font-smoothing: antialiased;
  -moz-osx-font-smoothing: grayscale;
  text-align: center;
  color: #2c3e50;
  margin-top: 60px;
}
</style>
P.vue
<template>
  <div>
      <h3>Parent</h3>
      <button @click="clickHandle">控制Child显示</button>
      <!-- 方式1
          <C v-show="flag" @update:isShow="showAndHideHandle" /> -->

      <!-- 方式2-->
      <C v-show="flag" :isShow.sync="flag" />
  </div>
</template>

<script>
import C from "./C.vue";

export default {
    name: 'Parent',
    data () {
        return {
            flag:false
        }
    },
    components: {
        C
    },
    methods: {
        clickHandle(){
            this.flag=!this.flag;
        },

        //方式2
        // showAndHideHandle(data){
        //     this.flag=data;
        // }
    }
}
</script>

<style>

</style>
C.vue
<template>
   <div>
      <h3>Child</h3>
      <button @click="clickHandle">隐藏child</button>
  </div>
</template>

<script>
export default {
    methods: {
        clickHandle(){
            this.$emit("update:isShow",false);
        }
    }
}
</script>

<style>

</style>

3.8 命名注意点
- 注册组件的时候使用了“驼峰命名”,那么在使用时需要转换成“短横线分隔命名”
例如:注册时:myFather->使用时:my-father
- 在传递参数的时候如果想使用“驼峰名称”,那么就必须写成“短横线分隔命名”
例如:传递时:parent-name="name"->接收时:props:["parentName"]
- 在传递方法时不能使用“驼峰命名”,只能使用“短横线分隔命名”
例如:parent-say="say"->this.$emit("parent-say")
四、跨组件传值及多级传递
4.1 跨组件传值--EventBus
兄弟组件之间进行通信
两个没有任何引入关系的组件, 要如何互相通信呢?
什么时候需要 EventBus 技术:
当2个没有引用关系的组件之间需要通信传值
EventBus 技术的本质是什么:
空白 vue 对象,只负责 $on 注册事件 和 $emit 触发事件
$off -- 移除事件
MyProduct.vue 向 List.vue 传值
语法(步骤):
- 1.src/EventBus/index.js – 创建空白Vue对象并导出
import Vue from 'vue'

// 导出空白的 vue 对象
export default new Vue()- 2.在要接收值的组件(List.vue) eventBus.$on('事件名', 函数体)--接收方
- 3.在要传递值的组件(MyProduct.vue) eventBus.$emit('事件名', 值)--传递方
App.vue,
<template>
  <div>
    <div style="float: left;">
    <!-- 目标: 子传父 -->
    <!-- 1. 父组件, @自定义事件名="父methods函数" -->
    <MyProduct v-for="(obj, ind) in list" :key="obj.id"
    :title="obj.proname"
    :price="obj.proprice"
    :intro="obj.info"
    :index="ind"
    ></MyProduct>
    </div>
    <div style="float: left;">
      <List :arr="list"></List>
    </div>
  </div>
</template>

<script>
import MyProduct from './components/MyProduct'
import List from './components/List'
export default {
  data() {
    return {
      list: [
        {
          id: 1,
          proname: "超级好吃的棒棒糖",
          proprice: 18.8,
          info: "开业大酬宾, 全场8折",
        },
        {
          id: 2,
          proname: "超级好吃的大鸡腿",
          proprice: 34.2,
          info: "好吃不腻, 快来买啊",
        },
        {
          id: 3,
          proname: "超级无敌的冰激凌",
          proprice: 14.2,
          info: "炎热的夏天, 来个冰激凌了",
        },
      ],
    };
  },
  components: {
    MyProduct,
    List
  },
};
</script>
MyProduct.vue,
<template>
  <div class="my-product">
   <h3>标题:{{title}}</h3>
   <p>价格:{{price}}</p>
   <p>{{intro}}</p>
   <button @click="kanFn">砍一元</button>
  </div>
</template>

<script>
import eventBus from '../EventBus'
export default {
  name: 'info',
  props: ['index', 'title', 'price', 'intro'],
  methods: {
    // 4.
    kanFn () {
      eventBus.$emit('send', this.index, 1)
    }
  }
}
</script>

<style>
.my-product {
  width: 400px;
  padding: 20px;
  border: 2px solid #000;
  border-radius: 5px;
  margin: 10px;
}
</style>
List.vue,
<template>
  <ul class="my-product">
    <li v-for="(item, index) in arr" :key="index">
      <span>{{item.proname}}</span>
      <span>{{item.proprice}}</span>
    </li>
  </ul>
</template>

<script>
/**跨组件传值
 *
 * 1.引入空白 vue 对象(EventBus)
 * 2.接收方 -- 用 $on 监听事件
 * 3.组件创建完毕时,监听 send 事件
 * 4.
 */
import eventBus from '../EventBus'
export default {
props:['arr'],
// 3.组件创建完毕时,监听 send 事件
created () {
  eventBus.$on('send', (index, price) => {
    this.arr[index].proprice -= price
  })
}
}
</script>

<style scoped>
.my-product {
  width: 400px;
  padding: 20px;
  border: 2px solid #000;
  border-radius: 5px;
  margin: 10px;
}
</style>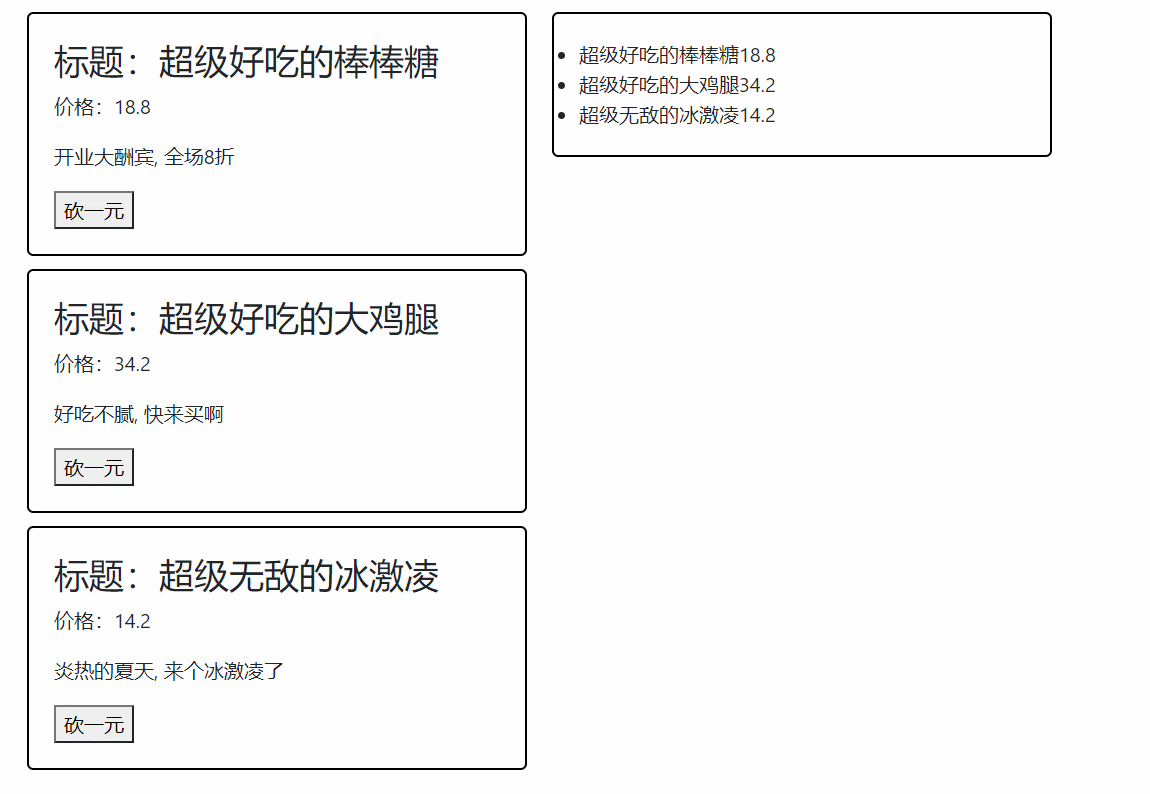
4.2 数据和方法的多级传递
在Vue中如果儿子想使用爷爷的数据,必须一层一层往下传递
在Vue中如果儿子想使用爷爷的方法,必须一层一层往下传递
<script src="js/vue.js"></script><div id="app">
<grandfather></grandfather>
</div>
<template id="grandfather">
<div>
<p>爷爷组件</p>
<p>{{name}}</p>
<button @click="say">按钮</button>
<hr>
<father :gfname="name" @gfsay="say"></father>
</div>
</template>
<template id="father">
<div>
<p>儿子组件</p>
<p>{{gfname}}</p>
<button @click="fatherFn">按钮</button>
<hr>
<son :fname="gfname" @ssay="fatherFn"></son>
</div>
</template>
<template id="son">
<div>
<p>孙子组件</p>
<p>{{fname}}</p>
<button @click="sonFn">按钮</button>
</div>
</template>
<script>
Vue.component("grandfather", {
template: "#grandfather",
data() {
return {
name: 'ls'
}
},
methods: {
say() {
alert('我是爷爷的方法');
}
},
components: {
//父亲组件
"father": {
template: "#father",
props: ["gfname"],
methods: {
fatherFn() {
this.$emit("gfsay");
}
},
//儿子组件
components: {
"son": {
template: "#son",
props: ["fname"],
methods: {
sonFn() {
this.$emit("ssay");
}
}
}
}
},
}
});
let vue = new Vue({
el: '#app',
// 这里就是MVVM中的Model
data: {
isShow: true,
name: "info"
},
// 专门用于存储监听事件回调函数
methods: {},
//专门用于定义局部组件
components: {}
// template: `
// `
});
</script>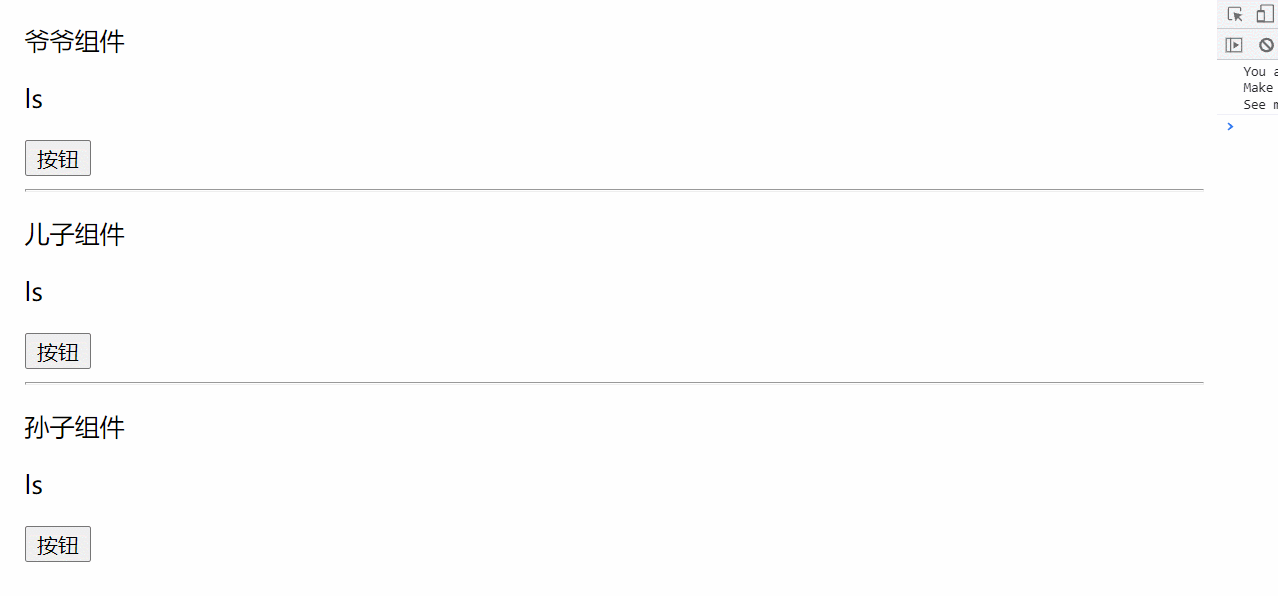
五、组件插槽--v-slot指令
通过 slot 标签, 让组件内可以接收不同的标签结构显示
5.1 什么是v-slot指令?
v-slot指令是Vue2.6中用于替代slot属性的一个指令
在Vue2.6之前,我们通过slot属性告诉Vue当前内容填充到哪一个具名插槽
从Vue2.6开始,我们通过v-slot指令告诉Vue当前内容填充到哪一个具名插槽
语法口诀:
组件内用<slot></slot>占位

注意点:
v-slot指令只能用在template标签上,可以使用#替代v-slot
App.vue
<template>
  <div>
    <UseSlot></UseSlot>
  </div>
</template>

<script>
import UseSlot from './UseSlot'
export default {
  components: {
    UseSlot
  }
}
</script>
UseSlot.vue
<template>
  <div id="container">
    <div id="app">
      <h3>案例:折叠面板</h3>
      <Pannel>
        <img src="./assets/mm.gif" alt="">
        <span>我是内容</span>
      </Pannel>
      <Pannel>
        <p>寒雨连江夜入吴,</p>
        <p>平明送客楚山孤。</p>
        <p>洛阳亲友如相问,</p>
        <p>一片冰心在玉壶。</p>
      </Pannel>
    </div>
  </div>
</template>

<script>
import Pannel from './Pannel'
export default {
  components: {
    Pannel
  }
};
</script>

<style>
#app {
  width: 400px;
  margin: 20px auto;
  background-color: #fff;
  border: 4px solid blueviolet;
  border-radius: 1em;
  box-shadow: 3px 3px 3px rgba(0, 0, 0, 0.5);
  padding: 1em 2em 2em;
}
</style>
Pannel.vue
<template>
  <div>
    <!-- 按钮标题 -->
    <div class="title">
      <h4>芙蓉楼送辛渐</h4>
      <span class="btn" @click="isShow = !isShow">
        {{ isShow ? "收起" : "展开" }}
      </span>
    </div>
    <!-- 下拉内容 -->
    <div class="container" v-show="isShow">
     <slot>默认显示的内容</slot>
    </div>
  </div>
</template>

<script>
// 目标: 组件插槽使用 - 为了让封装的组件显示不同的标签结构(灵活)
// 1. 组件内 <slot></slot> 占位
// 2. 使用组件, 传入具体的标签替换 到slot位置上
export default {
  data() {
    return {
      isShow: false,
    };
  },
};
</script>

<style scoped>
h3 {
  text-align: center;
}

.title {
  display: flex;
  justify-content: space-between;
  align-items: center;
  border: 1px solid #ccc;
  padding: 0 1em;
}

.title h4 {
  line-height: 2;
  margin: 0;
}

.container {
  border: 1px solid #ccc;
  padding: 0 1em;
}

.btn {
  /* 鼠标改成手的形状 */
  cursor: pointer;
}

img {
  width: 50%;
}
</style>
5.2 使用 slot-scope 接收数据
<script src="js/vue.js"></script><div id="app">
<father></father>
</div>
<template id="father">
<div>
<son>
<!--
slot-scope="abc":接收子组件插槽暴露的数据
-->
<template slot-scope="abc">
<li v-for="(name,index) in abc.names">{{name}}</li>
</template>
<template #default="abc">
<li v-for="(name,index) in abc.names">{{name}}</li>
</template>
<template #one="abc">
<li v-for="(name,index) in abc.names">{{name}}</li>
</template>
</son>
</div>
</template>
<template id="son">
<div>
<div>我是头部--{{names}}</div>
<!--将当前子组件的names暴露给父组件-->
<p>作用域插槽方式获取:</p>
<slot :names="names">我是默认数据--{{names}}</slot>
<hr>
<p>v-slot指令方式1方式获取(推荐):</p>
<slot :names="names">我是默认数据--{{names}}</slot>
<hr>
<p>v-slot指令方式2方式获取(推荐):</p>
<slot name="one" :names="names">我是默认数据--{{names}}</slot>
<div>我是底部</div>
</div>
</template>
<script>
Vue.component("father", {
template: "#father",
data() {
return {}
},
methods: {},
components: {
"son": {
template: "#son",
data() {
return {
names: ["zs", "ls", "ww", "zl"]
}
},
methods: {},
},
}
});
let vue = new Vue({
el: '#app',
// 这里就是MVVM中的Model
data: {},
// 专门用于存储监听事件回调函数
methods: {},
//专门用于定义局部组件
components: {}
// template: `
// `
});
</script>
六 、匿名插槽
- 默认情况下不能在使用子组件时,给子组件动态的添加内容
- 如果想在使用子组件时想给子组件动态的添加内容,就必修使用插槽(slot)
- 插槽可以指定默认数据,如果使用者未动态添加数据,就显示默认数据;反之使用使用者动态添加的数据
- 插槽是可以指定名称的,默认情况下未指定名称,我们称之为匿名插槽
- 有多少个匿名插槽,填充的数据就会被拷贝多少份
- 虽然可以指定多个匿名插槽,但是在企业开发中推荐只写一个匿名插槽
<script src="js/vue.js"></script><div id="app">
<father></father>
</div>
<template id="father">
<div>
<son>
<div>我是追加的内容1</div>
<div>我是追加的内容2</div>
<div>我是追加的内容3</div>
</son>
</div>
</template>
<template id="son">
<div>
<div>我是头部</div>
<slot>我是默认数据</slot>
<slot>我是默认数据</slot>
<div>我是底部</div>
</div>
</template>
<script>
Vue.component("father", {
template: "#father",
data() {
return {}
},
methods: {},
components: {
"son": {
template: "#son",
methods: {},
},
}
});
let vue = new Vue({
el: '#app',
// 这里就是MVVM中的Model
data: {
isShow: true,
name: "info"
},
// 专门用于存储监听事件回调函数
methods: {},
//专门用于定义局部组件
components: {}
// template: `
// `
});
</script>
七 、具名插槽
7.1 初识具名插槽
什么是具名插槽?
默认情况下有多少个匿名插槽,我们填充的数据就会被拷贝多少份,这导致了所有插槽中填充的内容都是一样的,为了解决这个问题,因此可以使用具名插槽
具名插槽的使用:
通过slot的name属性给插槽指定名称以此来进行区分
在使用时可以通过slot="name"方式,指定当前内容用于替换哪一个插槽

注意点:
如果没有指定要替换哪个插槽中的内容,则不会被替换
slot属性在Ve2.6中已经废弃,Vue2.6之后使用v-slot指令替代slot属性
v-slot: 指令只能用在template标签上,可以使用#替代v-slot:
7.2 示例
App.vue
<template>
  <div>
    <UseSlot></UseSlot>
  </div>
</template>

<script>
import UseSlot from './components/UseSlot'
export default {
  components: {
    UseSlot
  }
}
</script>
UseSlot.vue
<template>
  <div id="container">
    <div id="app">
      <h3>案例:折叠面板</h3>
      <Pannel>
        <template v-slot:title>
          <h4>图片</h4>
        </template>
        <template v-slot:content>
          <img src="../assets/mm.gif" alt="">
          <span>我是内容</span>
        </template>
      </Pannel>
      <Pannel>
        <template v-slot:title>
          <h4>芙蓉楼送辛渐</h4>
        </template>
        <template v-slot:content>
          <p>寒雨连江夜入吴,</p>
          <p>平明送客楚山孤。</p>
          <p>洛阳亲友如相问,</p>
          <p>一片冰心在玉壶。</p>
        </template>
      </Pannel>
    </div>
  </div>
</template>

<script>
import Pannel from './Pannel'
export default {
  components: {
    Pannel
  }
};
</script>

<style>
#app {
  width: 400px;
  margin: 20px auto;
  background-color: #fff;
  border: 4px solid blueviolet;
  border-radius: 1em;
  box-shadow: 3px 3px 3px rgba(0, 0, 0, 0.5);
  padding: 1em 2em 2em;
}
</style>
Pannel.vue
<template>
  <div>
    <!-- 按钮标题 -->
    <div class="title">
      <slot name="title"></slot>
      <span class="btn" @click="isShow = !isShow">
        {{ isShow ? "收起" : "展开" }}
      </span>
    </div>
    <!-- 下拉内容 -->
    <div class="container" v-show="isShow">
     <slot name="content">默认显示的内容</slot>
    </div>
  </div>
</template>

<script>
// 目标: 具名插槽
// 场景: 2处以上不确定的地方
// 1. slot占位 - name属性起名字
// 2. 使用组件, template配合v-slot:插槽名, 夹着传入具体标签
export default {
  data() {
    return {
      isShow: false,
    };
  },
};
</script>

<style scoped>
h3 {
  text-align: center;
}

.title {
  display: flex;
  justify-content: space-between;
  align-items: center;
  border: 1px solid #ccc;
  padding: 0 1em;
}

.title h4 {
  line-height: 2;
  margin: 0;
}

.container {
  border: 1px solid #ccc;
  padding: 0 1em;
}

.btn {
  /* 鼠标改成手的形状 */
  cursor: pointer;
}

img {
  width: 50%;
}
</style>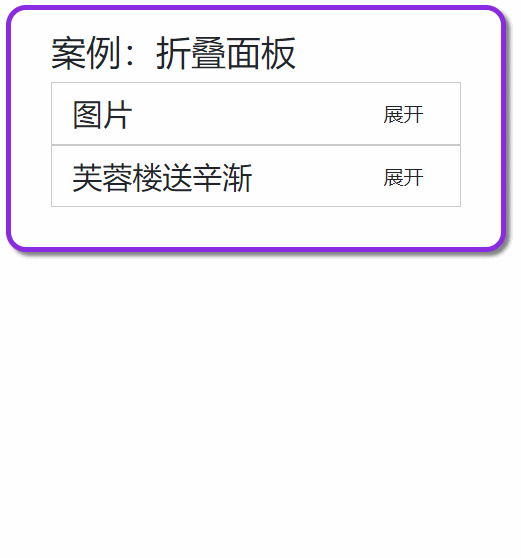
八、作用域插槽
使用插槽时, 想使用组件内的变量?
8.1 初识作用域插槽
什么是作用域插槽?
作用域插槽就是带数据的插槽,就是让父组件填充子组件插槽内容时也能使用子组件的数据
如何使用作用域插槽
在slot中通过v-bind:数据名称="数据名称"方式暴露数据
在父组件中通过<template slot-scope="作用域名称">接收数据
在父组件的<template></template>中通过 作用域名称.数据名称 方式使用数据
使用插槽时,需要使用组件内的变量
App.vue
<template>
  <div>
    <UseSlot></UseSlot>
  </div>
</template>

<script>
import UseSlot from './components/UseSlot'
export default {
  components: {
    UseSlot
  }
}
</script>
Pannel.vue
<template>
  <div>
    <!-- 按钮标题 -->
    <div class="title">
      <slot name="title"></slot>
      <span class="btn" @click="isShow = !isShow">
        {{ isShow ? "收起" : "展开" }}
      </span>
    </div>
    <!-- 下拉内容 -->
    <div class="container" v-show="isShow">
      <!-- 1. -->
     <slot :row="defaultObj">{{defaultObj.defaultOne}}</slot>
    </div>
  </div>
</template>

<script>
// 目标: 作用域插槽
// 场景: 使用插槽, 使用组件内的变量
// 1. slot标签, 自定义属性和内变量关联
// 2. 使用组件, template配合v-slot="变量名"
// 变量名会收集slot身上属性和值形成对象
export default {
  data() {
    return {
      isShow: false,
      defaultObj: {
        defaultOne: '无名氏',
        defaultTwo: '小张同学'
      }
    };
  },
};
</script>

<style scoped>
h3 {
  text-align: center;
}

.title {
  display: flex;
  justify-content: space-between;
  align-items: center;
  border: 1px solid #ccc;
  padding: 0 1em;
}

.title h4 {
  line-height: 2;
  margin: 0;
}

.container {
  border: 1px solid #ccc;
  padding: 0 1em;
}

.btn {
  /* 鼠标改成手的形状 */
  cursor: pointer;
}

img {
  width: 50%;
}
</style>
UseSlot.vue
<template>
  <div id="container">
    <div id="app">
      <h3>案例:折叠面板</h3>
      <Pannel>
        <!-- <template v-slot="scope">
          <p>{{scope.row.defaultTwo}}</p>
        </template> 或 -->
         <template slot-scope="name">
          <p>{{name.row.defaultTwo}}</p>
        </template>
      </Pannel>
    </div>
  </div>
</template>

<script>
import Pannel from './Pannel'
export default {
  components: {
    Pannel
  }
};
</script>

<style>
#app {
  width: 400px;
  margin: 20px auto;
  background-color: #fff;
  border: 4px solid blueviolet;
  border-radius: 1em;
  box-shadow: 3px 3px 3px rgba(0, 0, 0, 0.5);
  padding: 1em 2em 2em;
}
</style>
8.2 其他应用场景
i. 子组件提供数据,父组件决定如何渲染
当子组件要渲染的内容由父组件决定的时候,就可以通过作用域插槽来实现
<script src="js/vue.js"></script> <div id="app">
<father></father>
</div>
<template id="father">
<div>
<son>
<!--
slot-scope="abc":接收子组件插槽暴露的数据
-->
<template slot-scope="abc">
<li v-for="(name,index) in abc.names">{{name}}</li>
</template>
</son>
</div>
</template>
<template id="son">
<div>
<div>我是头部--{{names}}</div>
<!--将当前子组件的names暴露给父组件-->
<slot :names="names">我是默认数据--{{names}}</slot>
<div>我是底部</div>
</div>
</template>
<script>
Vue.component("father", {
template: "#father",
data() {
return {}
},
methods: {},
components: {
"son": {
template: "#son",
data() {
return {
names: ["zs", "ls", "ww", "zl"]
}
},
methods: {},
},
}
});
let vue = new Vue({
el: '#app',
// 这里就是MVVM中的Model
data: {},
// 专门用于存储监听事件回调函数
methods: {},
//专门用于定义局部组件
components: {}
// template: `
// `
});
</script>
ii. 自定义组件内标签+内容
让组件内的标签可以随意地定义和数据的使用
App.vue
<template>
  <div>
    <UseTable></UseTable>
  </div>
</template>

<script>
import UseTable from './UseTable'
export default {
  components: {
    UseTable
  }
}
</script>
UseTable.vue
<template>
  <div>
    <MyTable :arr='list'>
      <template v-slot='scope'>
        <a href="javascript:;">{{scope.row.headImgUrl}}</a>
      </template>
    </MyTable>
    <MyTable :arr='list'>
      <template v-slot='scope'>
        <img style="width: 100px;" :src="scope.row.headImgUrl">
      </template>
    </MyTable>
  </div>
</template>

<script>
import MyTable from './components/MyTable'
export default {
  components: {
    MyTable
  },
  data () {
    return {
      list: [
        {
          name: "小传同学",
          age: 18,
          headImgUrl:
            "http://yun.itheima.com/Upload/./Images/20210303/603f2d2153241.jpg",
        },
        {
          name: "小黑同学",
          age: 25,
          headImgUrl:
            "http://yun.itheima.com/Upload/./Images/20210304/6040b101a18ef.jpg",
        },
        {
          name: "智慧同学",
          age: 21,
          headImgUrl:
            "http://yun.itheima.com/Upload/./Images/20210302/603e0142e535f.jpg",
        },
      ],
    }
  }
}
</script>
MyTable.vue
<template>
  <div>
      <table border="1">
          <thead>
              <tr>
                  <th>序号</th>
                  <th>姓名</th>
                  <th>年龄</th>
                  <th>头像</th>
              </tr>
          </thead>
          <tbody>
              <tr v-for="(obj, index) in arr" :key="index">
                  <td>{{index + 1}}</td>
                  <td>{{obj.name}}</td>
                  <td>{{obj.age}}</td>
                  <td>
                    <slot :row='obj'>
                      <!-- 默认值 -->
                      {{obj.headImgUrl}}
                    </slot>
                  </td>
              </tr>
          </tbody>
      </table>
  </div>
</template>

<script>
export default {
  props: {
    arr: Array
  }
}
</script>
九、自定义指令
9.1 初识自定义指令
a. 全局注册:

b. 局部注册:

main.js
// 全局指令
Vue.directive('gfocus', {
  inserted(el){
    // console.log(el);
    el.focus() // 触发标签的事件方法
  }
})
App.vue
<template>
  <div>
    <UseDirective></UseDirective>
  </div>
</template>

<script>
import UseDirective from './UseDirective'
export default {
  components: {
    UseDirective
  }
}
</script>
UseDirective.vue
<template>
  <div>
    <!-- 全局 -->
    <input type="text" v-gfocus>

    <!-- 局部 -->
    <!-- <input type="text" v-focus> -->
  </div>
</template>

<script>
// 创建一个自定义指令让输入框自动聚焦
/**
 * 1.创建自定义指令:全局/局部
 * 2.在标签上使用自定义指令,通过 v-自定义指令名
 */
export default {
  directives: {
    focus: {
      inserted(el) {
        el.focus()
      }
    }
  }
}
</script>
注意点:
inserted() 会在指令所在的标签被插入到网页上时才触发
9.2 使用只定义指令进行传值
定义color指令-传入一个颜色, 给标签设置文字颜色
App.vue
<template>
  <div>
    <UseDirective></UseDirective>
  </div>
</template>

<script>
import UseDirective from './UseDirective'
export default {
  components: {
    UseDirective
  }
}
</script>
UseDirective.vue
<template>
  <div>
    <!-- 局部 -->
    <p v-color="'red'">修改文字的颜色1</p>
    <p v-color1="colorStr">修改文字的颜色2</p>
  </div>
</template>

<script>
// 创建一个自定义指令让输入框自动聚焦
/**
 * 1.创建自定义指令:全局/局部
 * 2.在标签上使用自定义指令,通过 v-自定义指令名
 */
export default {
  data () {
    return {
      colorStr: 'green'
    }
  },
  directives: {
    color: {
      inserted (el, binding) {
        // console.log(binding);
        el.style.color = binding.value
      }
    },
    color1: {
      inserted (el, binding) {
        // console.log(binding);
        el.style.color = binding.value
      },
      // 当指令对应的数据/标签更新时,此方法执行
      update (el, binding) {
       el.style.color = binding.value
      }
    }
  }
}
</script>


 1934
1934


 被折叠的 条评论
为什么被折叠?
被折叠的 条评论
为什么被折叠?
 到【灌水乐园】发言


