


Spring Security
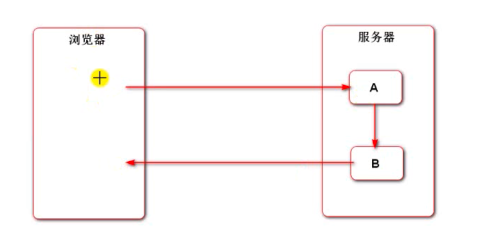
原理图:
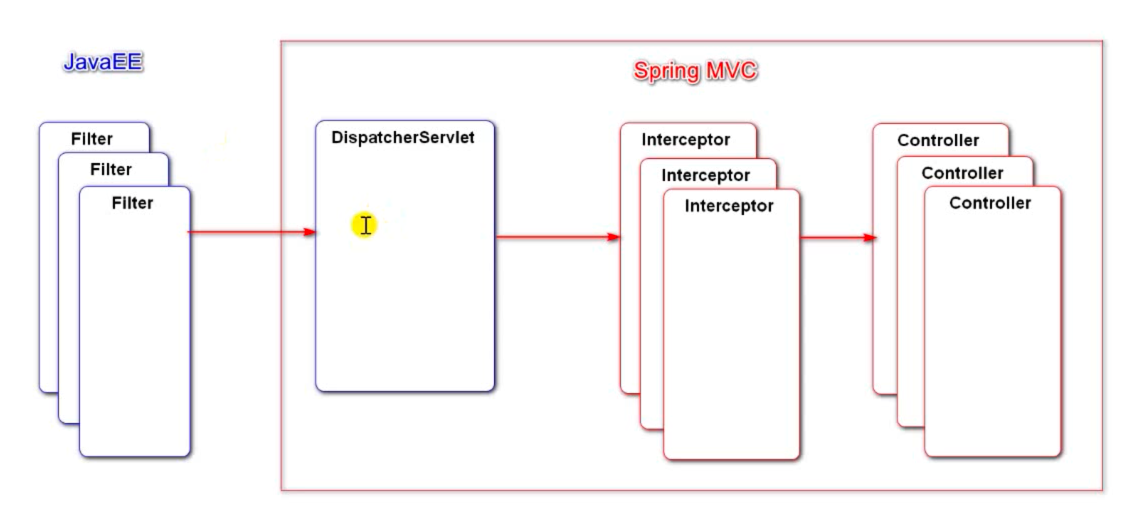
(DispatcherServlet是SpringMVC的,Servlet是JavaEE规范的)
- Filter和DispatchServlet的关系就相当于Interceptor和Controller的关系,拦截。
- SpringSecurity的原理:利用Filter拦截请求进行权限管理。
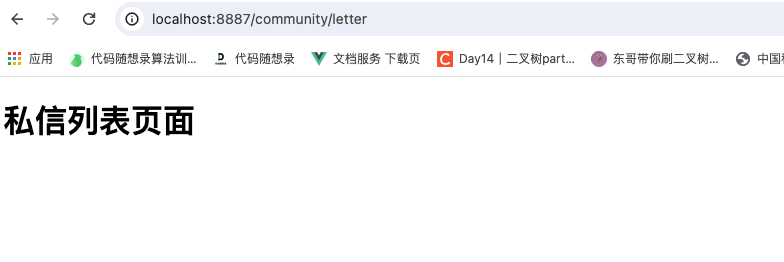
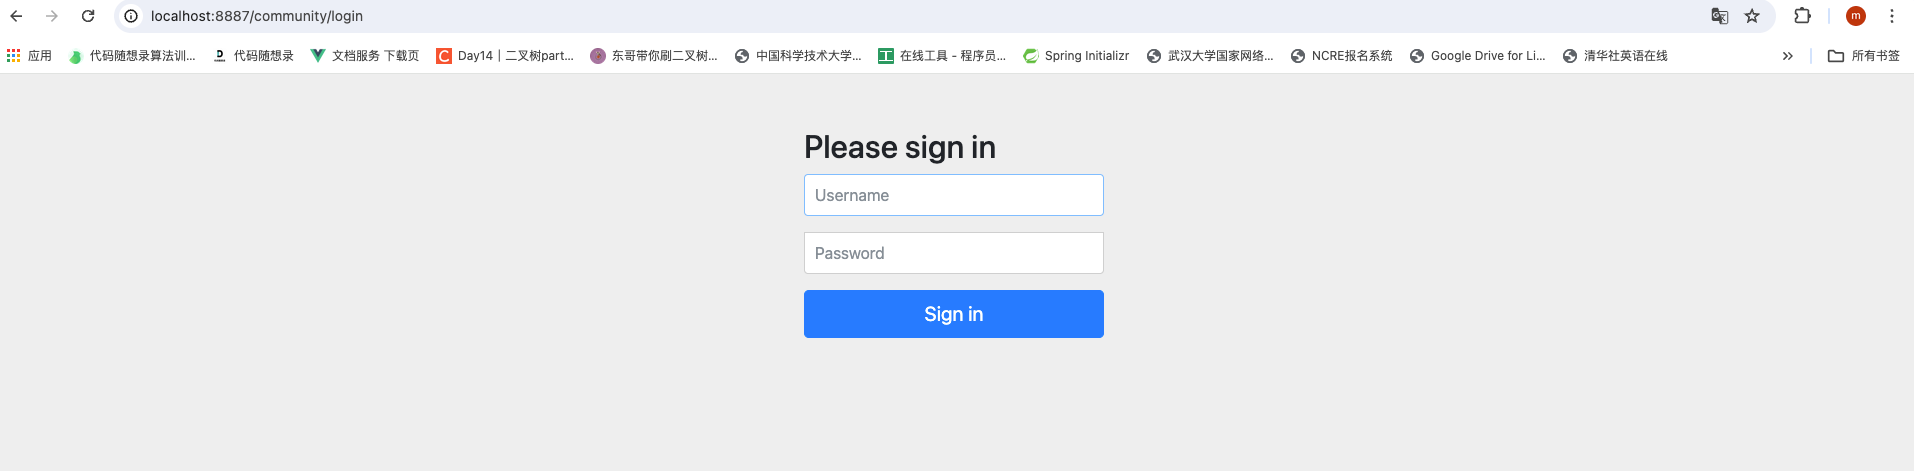
Spring Security demo
打开Spring Security demo,效果如下:
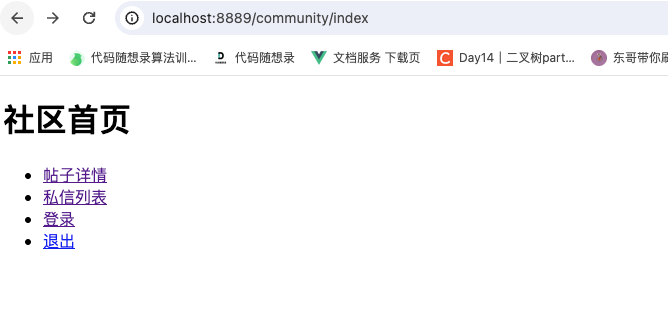
存在问题:
没有登录可以访问私信列表和admin(不应该)
导入依赖
<dependency>
    <groupId>org.springframework.boot</groupId>
    <artifactId>spring-boot-starter-security</artifactId>
</dependency>
(导入立刻进行权限控制,此时再登录,自动跳出登录页面)

用户名user,输入后正常登录。
修改User实体类
public class User implements UserDetails {

    private int id;
    private String username;
    private String password;
    private String salt;
    private String email;
    private int type;
    private int status;
    private String activationCode;
    private String headerUrl;
    private Date createTime;

    public int getId() {
        return id;
    }

    public void setId(int id) {
        this.id = id;
    }

    public String getUsername() {
        return username;
    }

    public void setUsername(String username) {
        this.username = username;
    }

    public String getPassword() {
        return password;
    }

    public void setPassword(String password) {
        this.password = password;
    }

    public String getSalt() {
        return salt;
    }

    public void setSalt(String salt) {
        this.salt = salt;
    }

    public String getEmail() {
        return email;
    }

    public void setEmail(String email) {
        this.email = email;
    }

    public int getType() {
        return type;
    }

    public void setType(int type) {
        this.type = type;
    }

    public int getStatus() {
        return status;
    }

    public void setStatus(int status) {
        this.status = status;
    }

    public String getActivationCode() {
        return activationCode;
    }

    public void setActivationCode(String activationCode) {
        this.activationCode = activationCode;
    }

    public String getHeaderUrl() {
        return headerUrl;
    }

    public void setHeaderUrl(String headerUrl) {
        this.headerUrl = headerUrl;
    }

    public Date getCreateTime() {
        return createTime;
    }

    public void setCreateTime(Date createTime) {
        this.createTime = createTime;
    }

    @Override
    public String toString() {
        return "User{" +
                "id=" + id +
                ", username='" + username + '\'' +
                ", password='" + password + '\'' +
                ", salt='" + salt + '\'' +
                ", email='" + email + '\'' +
                ", type=" + type +
                ", status=" + status +
                ", activationCode='" + activationCode + '\'' +
                ", headerUrl='" + headerUrl + '\'' +
                ", createTime=" + createTime +
                '}';
    }

    //true表示账号未过期,false表示账号已过期
    @Override
    public boolean isAccountNonExpired() {
        return true;
    }

    //true表示账号未被锁定,false表示账号已被锁定
    @Override
    public boolean isAccountNonLocked() {
        return true;
    }

    //true表示凭证未过期,false表示凭证已过期
    @Override
    public boolean isCredentialsNonExpired() {
        return true;
    }

    //true表示账号可用,false表示账号不可用
    @Override
    public boolean isEnabled() {
        return true;
    }

    @Override
    public Collection<? extends GrantedAuthority> getAuthorities() {
        List<GrantedAuthority> authorities  = new ArrayList<>();
        authorities.add(new GrantedAuthority() {
            @Override
            public String getAuthority() {
                switch(type){
                    case 1:
                        return "ADMIN";
                    default:
                        return "USER";
                }
            }
        });
        return authorities;
    }
}
- 实现UserDetails接口,spring security自带的;
- 前面几个is的函数都是判断用户有效性;
- getAuthorities() 返回集合,其中代表权限,根据type属性添加;
修改UserService
@Service
public class UserService implements UserDetailsService {

    @Autowired
    private UserMapper userMapper;

    public User findUserByName(String username) {
        return userMapper.selectByName(username);
    }

    @Override
    public UserDetails loadUserByUsername(String username) throws UsernameNotFoundException {
        return this.findUserByName(username);

    }
}
- 实现UserDetailService接口
编写SecurityConfig配置类
@Configuration
public class SecurityConfig extends WebSecurityConfigurerAdapter {
    @Autowired
    private UserService userService;

    @Override
    public void configure(WebSecurity web) throws Exception {
        //忽略静态资源的拦截
        web.ignoring().antMatchers("/resources/**");

    }

    //认证
    //AuthenticationManager:认证的核心接口
    //AuthenticationManagerBuilder:用于构建AuthenticationManager对象的工具
    //ProviderManager:AuthenticationManager接口的默认实现类
    @Override
    protected void configure(AuthenticationManagerBuilder auth) throws Exception {
        //内置的认证规则
        //123456是salt
        //auth.userDetailsService(userService).passwordEncoder(new Pbkdf2PasswordEncoder("12345"));

        //自定义认证规则
        //AuthenticationProvider: ProviderManager持有一组AuthenticationProvider,每个AuthenticationProvider负责一种认证(比如密码,人脸,短信等)
        // 委托模式:ProviderManager将认证委托给AuthenticationProvider
        auth.authenticationProvider(new AuthenticationProvider() {
            // Authentication用于封装认证信息的接口,不同的实现类代表不同类型的认证信息
            @Override
            public Authentication authenticate(Authentication authentication) throws AuthenticationException {
                String username = authentication.getName();
                String password = (String) authentication.getCredentials();

                //根据用户名查询用户
                User user = userService.findUserByName(username);
                if(user == null){
                    throw new UsernameNotFoundException("账号不存在");
                }
                //校验密码
                password = CommunityUtil.md5(password + user.getSalt());
                if(!user.getPassword().equals(password)){
                    throw new BadCredentialsException("密码不正确");
                }

                //认证成功,返回一个认证成功的Token
                //principal:认证的实体信息,可以是用户的实体类
                //credentials:密码或者凭证(证书)
                //authorities:权限信息
                return new UsernamePasswordAuthenticationToken(user, user.getPassword(), user.getAuthorities());
            }

            //supports方法用于判断当前的AuthenticationProvider是否支持传入的认证信息
            //如果认证接口是UsernamePasswordAuthenticationToken的实例,就返回true
            //当前的接口支持哪种类型的认证
            @Override
            public boolean supports(Class<?> aClass) {
                //UsernamePasswordAuthenticationToken:Authentication接口的实现类,封装了用户名和密码
                return UsernamePasswordAuthenticationToken.class.equals(aClass);
            }
        });

    }

    //授权

    @Override
    protected void configure(HttpSecurity http) throws Exception {
        // 登录相关的配置(用我自己的登录页面)
        // loginPage:登录页面的访问路径
        // loginProcessingUrl:登录表单提交的路径
        // successForwardUrl:登录成功后的跳转路径
        // failureForwardUrl:登录失败后的跳转路径
        http.formLogin()
                .loginPage("/loginpage")
                .loginProcessingUrl("/login")
                .successHandler(new AuthenticationSuccessHandler() {
                    @Override
                    public void onAuthenticationSuccess(HttpServletRequest request, HttpServletResponse response, Authentication authentication) throws IOException, ServletException {
                        User user = (User) authentication.getPrincipal();
                        response.sendRedirect(request.getContextPath() + "/index");
                    }
                })
                .failureHandler(new AuthenticationFailureHandler() {
                    @Override
                    public void onAuthenticationFailure(HttpServletRequest request, HttpServletResponse response, AuthenticationException e) throws IOException, ServletException {
                        request.setAttribute("error", e.getMessage());
                        request.getRequestDispatcher("/loginpage").forward(request, response);
                    }
                });

        // 退出相关的配置
        http.logout()
                .logoutUrl("/logout")
                .logoutSuccessHandler((request, response, authentication) -> {
                    response.sendRedirect(request.getContextPath() + "/index");
                });

        //授权配置
        //hasAnyAuthority:拥有其中一个权限即可访问
        //exceptionHandling():权限错误时异常处理
        http.authorizeRequests()
                .antMatchers("/letter").hasAnyAuthority("USER", "ADMIN")
                .antMatchers("/admin").hasAnyAuthority("ADMIN")
                .and().exceptionHandling().accessDeniedPage("/denied");

    }

}
转发和重定向的区别:
重定向:A和B相互独立(独立的request,不能带数据,对浏览器可见B)

转发:A和B存耦合(一个请求,可以带数据,对浏览器不可见B)
配置html
<!DOCTYPE html>
<html lang="en" xmlns:th="http://www.thymeleaf.org">
<head>
    <meta charset="UTF-8">
    <title>登录</title>
</head>
<body>

    <h1>登录社区</h1>

    <form method="post" th:action="@{/login}">
        <p style="color:red;" th:text="${error}">
            <!--提示信息-->
        </p>
        <p>
            账号:<input type="text" name = "username" th:value="${username}">
        </p>
        <p>
            密码:<input type="password" name="password" th:value="${password}">
        </p>
        <p>
            验证码:<input type="text" >
        </p>
        <p>
            <input type="submit" value="登录">
        </p>
    </form>

</body>
</html>
index.html
<!DOCTYPE html>
<html lang="en" xmlns:th="http://www.thymeleaf.org">
<head>
    <meta charset="UTF-8">
    <title>首页</title>
</head>
<body>

    <h1>社区首页</h1>
    <!-- 欢迎信息 -->
    <p th:if = "${loginUser != null}"
       th:text = "${loginUser.username} + ',欢迎回来!'"></p>

    <ul>
        <li><a th:href="@{/discuss}">帖子详情</a></li>
        <li><a th:href="@{/letter}">私信列表</a></li>
        <li><a th:href="@{/loginpage}">登录</a></li>
<!--        <li><a th:href="@{/loginpage}">退出</a></li>-->
        <li>
            <form method="post" th:action="@{/logout}">
                <a href = "javascript:document.forms[0].submit()">退出</a>
            </form>
        </li>
    </ul>

</body>
</html>
- security要求必须是post请求,故要创建表单;
Controller:
package com.nowcoder.community.controller;

import com.nowcoder.community.entity.User;
import org.springframework.security.core.context.SecurityContextHolder;
import org.springframework.stereotype.Controller;
import org.springframework.ui.Model;
import org.springframework.web.bind.annotation.RequestMapping;
import org.springframework.web.bind.annotation.RequestMethod;

@Controller
public class HomeController {

    @RequestMapping(path = "/index", method = RequestMethod.GET)
    public String getIndexPage(Model model){
        // 认证成功后,结果会通过SecurityContextHolder存储在SecurityContext中

        Object obj = SecurityContextHolder.getContext().getAuthentication().getPrincipal();
        if(obj instanceof User){
            model.addAttribute(" loginUser", obj);
        }
        return "/index";
    }

    @RequestMapping(path = "/discuss", method = RequestMethod.GET)
    public String getDiscussPage() {
        return "/site/discuss";
    }

    @RequestMapping(path = "/letter", method = RequestMethod.GET)
    public String getLetterPage() {
        return "/site/letter";
    }

    @RequestMapping(path = "/admin", method = RequestMethod.GET)
    public String getAdminPage() {
        return "/site/admin";
    }

    @RequestMapping(path = "/loginpage", method = {RequestMethod.GET, RequestMethod.POST})
    public String getLoginPage() {
        return "/site/login";
    }

    // 没有权限时的页面
    @RequestMapping(path = "/denied", method = RequestMethod.GET)
    public String getDeniedPage() {
        return "/error/404";
    }

}
处理验证码
 @Override
    protected void configure(HttpSecurity http) throws Exception {
        // 登录相关的配置(用我自己的登录页面)
        // loginPage:登录页面的访问路径
        // loginProcessingUrl:登录表单提交的路径
        // successForwardUrl:登录成功后的跳转路径
        // failureForwardUrl:登录失败后的跳转路径
        http.formLogin()
                .loginPage("/loginpage")
                .loginProcessingUrl("/login")
                .successHandler(new AuthenticationSuccessHandler() {
                    @Override
                    public void onAuthenticationSuccess(HttpServletRequest request, HttpServletResponse response, Authentication authentication) throws IOException, ServletException {
                        User user = (User) authentication.getPrincipal();
                        response.sendRedirect(request.getContextPath() + "/index");
                    }
                })
                .failureHandler(new AuthenticationFailureHandler() {
                    @Override
                    public void onAuthenticationFailure(HttpServletRequest request, HttpServletResponse response, AuthenticationException e) throws IOException, ServletException {
                        request.setAttribute("error", e.getMessage());
                        request.getRequestDispatcher("/loginpage").forward(request, response);
                    }
                });

        // 退出相关的配置
        http.logout()
                .logoutUrl("/logout")
                .logoutSuccessHandler((request, response, authentication) -> {
                    response.sendRedirect(request.getContextPath() + "/index");
                });

        //授权配置
        //hasAnyAuthority:拥有其中一个权限即可访问
        //exceptionHandling():权限错误时异常处理
        http.authorizeRequests()
                .antMatchers("/letter").hasAnyAuthority("USER", "ADMIN")
                .antMatchers("/admin").hasAnyAuthority("ADMIN")
                .and().exceptionHandling().accessDeniedPage("/denied");

        增加filter,处理验证码
        // 增加Filter,处理验证码
        http.addFilterBefore(new Filter() {
            @Override
            public void doFilter(ServletRequest servletRequest, ServletResponse servletResponse, FilterChain filterChain) throws IOException, ServletException {
                HttpServletRequest request = (HttpServletRequest) servletRequest;
                HttpServletResponse response = (HttpServletResponse) servletResponse;
                if (request.getServletPath().equals("/login")) {
                    String verifyCode = request.getParameter("verifyCode");
                    if (verifyCode == null || !verifyCode.equalsIgnoreCase("1234")) {
                        request.setAttribute("error", "验证码错误!");
                        request.getRequestDispatcher("/loginpage").forward(request, response);
                        return;
                    }
                }
                // 让请求继续向下执行.
                filterChain.doFilter(request, response);

            }
        }, UsernamePasswordAuthenticationFilter.class);

        // 记住我
        http.rememberMe()
                .tokenRepository(new InMemoryTokenRepositoryImpl())
                .tokenValiditySeconds(3600 * 24)
                .userDetailsService(userService);

    }
权限控制
导入依赖
<dependency>
    <groupId>org.springframework.boot</groupId>
    <artifactId>spring-boot-starter-security</artifactId>
</dependency>
废弃原来的拦截器
WebMVCConfig :LoginRequiredInterceptor
package com.newcoder.community.configure;

import com.newcoder.community.controller.Interceptor.AlphaInterceptor;
import com.newcoder.community.controller.Interceptor.LoginRequireInterceptor;
import com.newcoder.community.controller.Interceptor.LoginTicketInterceptor;
import com.newcoder.community.controller.Interceptor.MessageInterceptor;
import org.springframework.beans.factory.annotation.Autowired;
import org.springframework.context.annotation.Configuration;
import org.springframework.web.servlet.config.annotation.InterceptorRegistry;
import org.springframework.web.servlet.config.annotation.WebMvcConfigurer;

@Configuration
public class WebMvcConfig implements WebMvcConfigurer {
    @Autowired private AlphaInterceptor alphaInterceptor;

    @Autowired
    private LoginTicketInterceptor loginTicketInterceptor;

//    @Autowired
//    private LoginRequireInterceptor loginRequireInterceptor;

    @Autowired
    private MessageInterceptor messageInterceptor;

    public void addInterceptors(InterceptorRegistry registry) {
        //拦截除了css,js,png,jpg,jpeg之外的所有请求
        //只拦截注册和登录请求
        //为什么是/**/*:static目录下所有目录下的css,js,png,jpg,jpeg文件
        registry.addInterceptor(alphaInterceptor)
                .excludePathPatterns("/**/*.css", "/**/*.js", "/**/*.png", "/**/*.jpg", "/**/*.jpeg")
                .addPathPatterns("/register", "/login");

        registry.addInterceptor(loginTicketInterceptor)
                .excludePathPatterns("/**/*.css", "/**/*.js", "/**/*.png", "/**/*.jpg", "/**/*.jpeg");

//        registry.addInterceptor(loginRequireInterceptor)
//                .excludePathPatterns("/**/*.css", "/**/*.js", "/**/*.png", "/**/*.jpg", "/**/*.jpeg");

        registry.addInterceptor(messageInterceptor)
                .excludePathPatterns("/**/*.css", "/**/*.js", "/**/*.png", "/**/*.jpg", "/**/*.jpeg");

    }

}
添加表示权限的常量
//权限
    String AUTHORITY_ADMIN = "admin";
    String AUTHORITY_USER = "user";
    String AUTHORITY_MODERATOR = "moderator";
编写配置类
@Configuration
@EnableWebSecurity
public class SecurityConfig implements CommunityConstant {

    @Bean
    public SecurityFilterChain securityFilterChain(HttpSecurity http) throws Exception {
        http.authorizeRequests(authorize -> authorize
                        .requestMatchers(
                                "/user/setting",
                                "/user/upload",
                                "/discuss/add",
                                "/comment/add/**",
                                "/letter/**",
                                "/notice/**",
                                "/like",
                                "/follow",
                                "/unfollow"
                        )
                        .hasAnyAuthority(
                                AUTHORITY_USER,
                                AUTHORITY_ADMIN,
                                AUTHORITY_MODERATOR
                        )
                        .anyRequest().permitAll()
                )
                .csrf(csrf -> csrf
                        .disable()
                )
                .exceptionHandling(exceptionHandling -> exceptionHandling
                        //没有登录时的处理
                        .authenticationEntryPoint(new AuthenticationEntryPoint() {
                            @Override
                            public void commence(jakarta.servlet.http.HttpServletRequest request, jakarta.servlet.http.HttpServletResponse response, AuthenticationException authException) throws IOException {
                                String xRequestedWith = request.getHeader("x-requested-with");
                                if ("XMLHttpRequest".equals(xRequestedWith)) {
                                    //异步请求
                                    response.setContentType("application/plain;charset=utf-8");
                                    PrintWriter writer = response.getWriter();
                                    writer.write(CommunityUtil.getJsonString(403, "你还没有登录哦!"));
                                } else {
                                    //同步请求
                                    response.sendRedirect(request.getContextPath() + "/login");
                                }
                            }
                        })
                        //没有权限时的处理8
                        .accessDeniedHandler(new AccessDeniedHandler() {
                            @Override
                            public void handle(jakarta.servlet.http.HttpServletRequest request, jakarta.servlet.http.HttpServletResponse response, org.springframework.security.access.AccessDeniedException accessDeniedException) throws IOException {
                                String xRequestedWith = request.getHeader("x-requested-with");
                                if ("XMLHttpRequest".equals(xRequestedWith)) {
                                    response.setContentType("application/plain;charset=utf-8");
                                    PrintWriter writer = response.getWriter();
                                    writer.write(CommunityUtil.getJsonString(403, "你没有访问此功能的权限!"));
                                } else {
                                    response.sendRedirect(request.getContextPath() + "/denied");
                                }
                            }
                        })
                )
                // Security默认拦截/logout请求,进行退出处理
                // 覆盖它的默认逻辑,才能执行我们自己的退出代码(随便写一个url)
                .logout(logout -> logout
                        .logoutUrl("/securitylogout")
                );

        return http.build();
    }
}
添加获得权限的service组件
UserService
//用户权限
    public Collection<? extends GrantedAuthority> getAuthorities(int userId) {
        User user = this.findUserById(userId);
        List<GrantedAuthority> list = new ArrayList<>();
        list.add(new GrantedAuthority() {
            @Override
            public String getAuthority() {
                switch (user.getType()) {
                    case 1:
                        return AUTHORITY_ADMIN;
                    case 2:
                        return AUTHORITY_MODERATOR;
                    default:
                        return AUTHORITY_USER;
                }
            }
        });

        return list;

    }
修改loginTicket拦截器
@Override
    public boolean preHandle(HttpServletRequest request, HttpServletResponse response, Object handler) throws Exception {
        //从cookie中获取凭证
        String ticket = CookieUtil.getValue(request, "ticket");
        if(ticket != null) {
            //查询凭证
            LoginTicket loginTicket = userService.findLoginTicket(ticket);
            //检查凭证是否有效
            if(loginTicket != null && loginTicket.getStatus() == 0 && loginTicket.getExpired().after(new Date())) {
                //根据凭证查询用户
                User user = userService.findUserById(loginTicket.getUserId());
                //在本次请求中持有用户,把user暂存一下
                hostHolder.setUser(user);//hostHolder相当于为当前线程的user提供一个临时的容器

                //构建用户认证的结果,并存入SecurityContext,以便于Security进行授权
                Authentication authentication = new UsernamePasswordAuthenticationToken(
                    user, user.getPassword(), userService.getAuthorities(user.getId())
                );
                SecurityContextHolder.setContext(new SecurityContextImpl(authentication));
            }
        }
        return true;
    }


 @Override
    public void afterCompletion(HttpServletRequest request, HttpServletResponse response, Object handler, Exception ex) throws Exception {
        //清除用户
        hostHolder.clear();

        //清除SecurityContext
        SecurityContextHolder.clearContext();
    }
修改LoginController(退出清理context)
@RequestMapping(path = "/logout", method = RequestMethod.GET)
public String logout(@CookieValue("ticket") String ticket) {
    userService.logout(ticket);
    // 清理context
    SecurityContextHolder.clearContext();
    return "redirect:/login";
}
CSRF配置
- 这个一定要配置好,之前那个bug就是这里出现的!!!(没关csrf)
- CSRF:
CSRF,全称是跨站请求伪造(Cross-Site Request Forgery),是一种常见的网络攻击方式。 在CSRF攻击中,攻击者会诱导用户去点击一个链接或者加载一个图片,这个链接或图片的URL中包含了攻击者想要进行的恶意请求。这个请求会在用户的浏览器中执行,并且会带上用户的登录凭证(例如cookies),因此服务器会认为这是一个合法的请求。
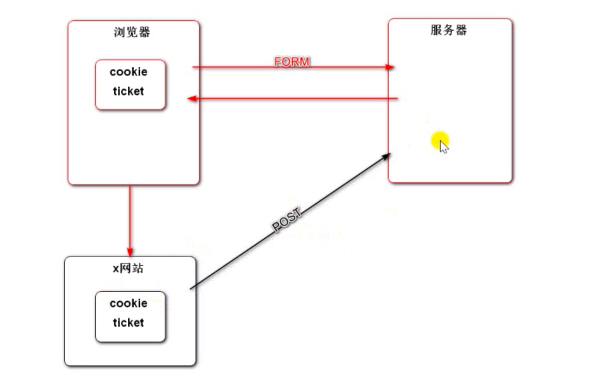
- Security解决方法:在表单中添加隐藏的token,每次都随机生成, 可以窃取cookie,窃取不到token(默认进行)

但是怎么处理异步请求?(没有表单)
修改index.html:
<head>
	<meta charset="utf-8">
	<meta name="viewport" content="width=device-width, initial-scale=1, shrink-to-fit=no">

	<!-- 在此处生成CSRF令牌 -->
	<meta name="_csrf" th:content="${_csrf.token}">
	<meta name="_csrf_header" th:content="${_csrf.headerName}">

    <link rel="icon" th:href= "@{/img/captcha.png}" />
	<link rel="stylesheet" href="https://cdn.jsdelivr.net/npm/bootstrap@5.3.3/dist/css/bootstrap.min.css" integrity="sha384-QWTKZyjpPEjISv5WaRU9OFeRpok6YctnYmDr5pNlyT2bRjXh0JMhjY6hW+ALEwIH" crossorigin="anonymous">
	<link rel="stylesheet" th:href="@{/css/global.css}" />
	<title>首页</title>
</head>
修改index.js
function publish() {
	$("#publishModal").modal("hide");

	//发送AJAX请求之前,将CSRF令牌设置到请求的消息头中
	var token = $("meta[name='_csrf']").attr("content");
	var header = $("meta[name='_csrf_header']").attr("content");
	$(document).ajaxSend(function(e, xhr, options){
		xhr.setRequestHeader(header, token);
	});


	//获取标题和内容
	var title = $("#recipient-name").val();
	var content = $("#message-text").val();
	//发送异步请求(POST)
	$.post(
		CONTEXT_PATH + "/discuss/add",
		{"title":title, "content":content},
		function(data){
			data = $.parseJSON(data);//将字符串转换为json对象
			//在提示框中显示返回的消息
			$("#hintBody").text(data.msg);
			//显示提示框
			$("#hintModal").modal("show");
			//2秒后自动隐藏提示框
			setTimeout(function(){
				$("#hintModal").modal("hide");
				//刷新页面
				if(data.code == 0){//发布成功
					window.location.reload();//刷新页面
				}
			}, 2000);
		}
	);
	$("#hintModal").modal("show");
	setTimeout(function(){
		$("#hintModal").modal("hide");
	}, 2000);
}

(为方便调试,可以禁用CSRF:)
http
                .authorizeRequests(authorize -> authorize
                        .requestMatchers(
                                "/user/setting",
                                "/user/upload",
                                "/discuss/add",
                                "/comment/add/**",
                                "/letter/**",
                                "/notice/**",
                                "/like",
                                "/follow",
                                "/unfollow"
                        )
                        .hasAnyAuthority(
                                AUTHORITY_USER,
                                AUTHORITY_ADMIN,
                                AUTHORITY_MODERATOR
                        )
                        .anyRequest().permitAll()
                )
                .csrf(csrf -> csrf
                        .disable()
                )
                .exceptionHandling(exceptionHandling -> exceptionHandling
                        //没有登录时的处理
                        .authenticationEntryPoint(new AuthenticationEntryPoint() {
                            @Override
                            public void commence(jakarta.servlet.http.HttpServletRequest request, jakarta.servlet.http.HttpServletResponse response, AuthenticationException authException) throws IOException {
                                String xRequestedWith = request.getHeader("x-requested-with");
                                if ("XMLHttpRequest".equals(xRequestedWith)) {
                                    //异步请求
                                    response.setContentType("application/plain;charset=utf-8");
                                    PrintWriter writer = response.getWriter();
                                    writer.write(CommunityUtil.getJsonString(403, "你还没有登录哦!"));
                                } else {
                                    //同步请求
                                    response.sendRedirect(request.getContextPath() + "/login");
                                }
                            }
                        })
测试
未登录情况下,点击发帖自动跳转到登录:

开发置顶加精和删除
导入依赖
<!-- https://mvnrepository.com/artifact/org.thymeleaf.extras/thymeleaf-extras-springsecurity6 -->
<dependency>
    <groupId>org.thymeleaf.extras</groupId>
    <artifactId>thymeleaf-extras-springsecurity6</artifactId>
    <version>3.1.2.RELEASE</version>
</dependency>
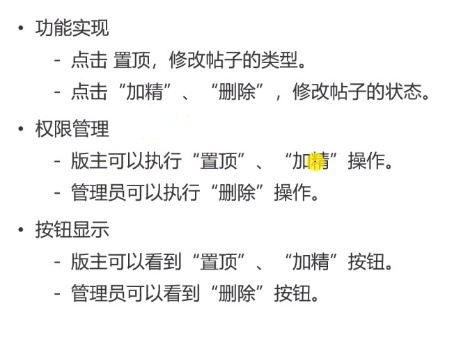
功能实现
修改DiscussPostMapper
@Mapper
public interface DiscussPostMapper {
    //userId为0时,表示查询所有用户的帖子,如果不为0,表示查询指定用户的帖子
    //offset表示起始行号,limit表示每页最多显示的行数
    List<DiscussPost> selectDiscussPosts(int userId, int offset, int limit);

    //查询帖子的行数
    //userId为0时,表示查询所有用户的帖子
    int selectDiscussPostRows(@Param("userId") int userId);
    //@param注解用于给参数取别名,拼到sql语句中,如果只有一个参数,并且在<if>标签里,则必须加别名

    int insertDiscussPost(DiscussPost discussPost);

    DiscussPost selectDiscussPostById(int id);
    //根据id查询帖子

    int updateCommentCount(int id, int commentCount);

    //修改帖子类型
    int updateType(int id, int type);

    //修改帖子状态
    int updateStatus(int id, int status);

}
修改mapper.xml
  <update id="updateType">
        update discuss_post
        set type = #{type}
        where id = #{id}
    </update>

    <update id="updateStatus">
        update discuss_post
        set status = #{status}
        where id = #{id}
    </update>
修改DiscussService
    public int updateType(int id, int type) {
        return discussPostMapper.updateType(id, type);
    }

    public int updateStatus(int id, int status) {
        return discussPostMapper.updateStatus(id, status);
    }
修改DiscussPostController
//置顶
    @RequestMapping(path = "/top", method = RequestMethod.POST)
    @ResponseBody
    public String setTop(int id) {
        //置顶是改type
        discussPostService.updateType(id, 1);
        //触发发帖事件,将帖子存入es服务器
        Event event = new Event()
                .setTopic(TOPIC_PUBLISH)
                .setUserId(hostHolder.getUser().getId())
                .setEntityType(ENTITY_TYPE_POST)
                .setEntityId(id);
        eventProducer.fireEvent(event);
        return CommunityUtil.getJsonString(0);
    }

    //加精
    @RequestMapping(path = "/wonderful", method = RequestMethod.POST)
    @ResponseBody
    public String setWonderful(int id) {
        //加精是改status
        discussPostService.updateStatus(id, 1);

        //触发发帖事件,将帖子存入es服务器
        Event event = new Event()
                .setTopic(TOPIC_PUBLISH)
                .setUserId(hostHolder.getUser().getId())
                .setEntityType(ENTITY_TYPE_POST)
                .setEntityId(id);
        eventProducer.fireEvent(event);
        return CommunityUtil.getJsonString(0);
    }

    //删除
    @RequestMapping(path = "/delete", method = RequestMethod.POST)
    @ResponseBody
    public String setDelete(int id) {
        //删除是改status
        discussPostService.updateStatus(id, 2);
        //触发删帖事件,将帖子从es服务器删除
        Event event = new Event()
                .setTopic(TOPIC_DELETE)
                .setUserId(hostHolder.getUser().getId())
                .setEntityType(ENTITY_TYPE_POST)
                .setEntityId(id);
        eventProducer.fireEvent(event);
        return CommunityUtil.getJsonString(0);
    }
这里触发了删帖事件,需要把EventConsumer进行添加
//消费删帖事件
    @KafkaListener(topics = {TOPIC_PUBLISH})
    public void handleDeleteMessage(ConsumerRecord record){
        if(record == null || record.value() == null){
            logger.error("消息的内容为空");
            return;
        }

        Event event = JSONObject.parseObject(record.value().toString(), Event.class);
        if(event == null){
            logger.error("消息格式错误");
            return;
        };

        //从es中删除帖子
        elasticsearchService.deleteDiscussPost(event.getEntityId());

    }
修改discuss-detail.html
<!-- 标题 -->
            <h6 class="mb-4">
                <img src="http://static.nowcoder.com/images/img/icons/ico-discuss.png"/>
                <span th:utext="${post.title}">备战春招,面试刷题跟他复习,一个月全搞定!</span>
                <div class="float-right">
<!--                    隐藏框存一下帖子id-->
                    <input type="hidden" id="postId" th:value="${post.id}">
                    <button type="button" class="btn btn-danger btn-sm" id="topBtn"
                    th:disabled="${post.type==1}">置顶</button>
                    <button type="button" class="btn btn-danger btn-sm" id="wonderfulBtn"
                    th:disabled="${post.status==1}">加精</button>
                    <button type="button" class="btn btn-danger btn-sm" id="deleteBtn"
                    th:disabled="${post.status==2}">删除</button>
                </div>
修改discuss.js
$(function(){
    $("#topBtn").click(setTop);
    $("#wonderfulBtn").click(setWonderful);
    $("#deleteBtn").click(setDelete);
});


function like(btn, entityType, entityId, entityUserId, postId) {
    $.post(
        CONTEXT_PATH + "/like",
        {"entityType": entityType, "entityId": entityId, "entityUserId": entityUserId, "postId": postId},
        function (data) {
            data = $.parseJSON(data);
            if (data.code == 0) {
                //i和b是btn的子元素(<i>和<b>)
                $(btn).children("i").text(data.likeCount);
                $(btn).children("b").text(data.likeStatus == 1 ? '已赞' : "赞");
            } else {
                alert(data.msg);
            }
        }
    );
}

//置顶
function setTop() {
    $.post(
        CONTEXT_PATH + "/discuss/top",
        {"id": $("#postId").val()},
        function (data) {
            data = $.parseJSON(data);
            if (data.code == 0) {
                $("#topBtn").attr("disabled", "disabled");
            } else {
                alert(data.msg);
            }
        }
    );
}

//加精
function setWonderful() {
    $.post(
        CONTEXT_PATH + "/discuss/wonderful",
        {"id": $("#postId").val()},
        function (data) {
            data = $.parseJSON(data);
            if (data.code == 0) {
                $("#wonderfulBtn").attr("disabled", "disabled");
            } else {
                alert(data.msg);
            }
        }
    );
}

//删除
function setDelete() {
    $.post(
        CONTEXT_PATH + "/discuss/delete",
        {"id": $("#postId").val()},
        function (data) {
            data = $.parseJSON(data);
            if (data.code == 0) {
                //删除成功后跳转到首页
                location.href = CONTEXT_PATH + "/index";
            } else {
                alert(data.msg);
            }
        }
    );
}
配置权限
修改SecurityConfig加上一个匹配即可:
http
                .authorizeRequests(authorize -> authorize
                        .requestMatchers(
                                "/user/setting",
                                "/user/upload",
                                "/discuss/add",
                                "/comment/add/**",
                                "/letter/**",
                                "/notice/**",
                                "/like",
                                "/follow",
                                "/unfollow"
                        )
                        .hasAnyAuthority(
                                AUTHORITY_USER,
                                AUTHORITY_ADMIN,
                                AUTHORITY_MODERATOR
                        )
                        .requestMatchers(
                              "/discuss/top",
                                "/discuss/wonderful"
                        )
                        .hasAnyAuthority(
                                AUTHORITY_MODERATOR
                        )
                        .requestMatchers(
                                "/discuss/delete"
                        )
                        .hasAnyAuthority(
                                AUTHORITY_ADMIN
                        )
                        .anyRequest().permitAll()
                )
按钮显示
配置thymeleaf
<html lang="en" xmlns:th="http://www.thymeleaf.org" xmlns:sec="http://www.thymeleaf.org/extras/spring-security">
也就是sec:xx修改
<div class="float-right">
<!--                    隐藏框存一下帖子id-->
    <input type="hidden" id="postId" th:value="${post.id}">
    <button type="button" class="btn btn-danger btn-sm" id="topBtn"
    th:disabled="${post.type==1}"
    sec:authorize="hasAnyAuthority('moderator')">置顶</button>
    <button type="button" class="btn btn-danger btn-sm" id="wonderfulBtn"
    th:disabled="${post.status==1}"
    sec:authorize="hasAnyAuthority('moderator')"
    >加精</button>
    <button type="button" class="btn btn-danger btn-sm" id="deleteBtn"
    th:disabled="${post.status==2}"
    sec:authorize="hasAnyAuthority('admin')"
    >删除</button>
</div>

Redis高级数据类型
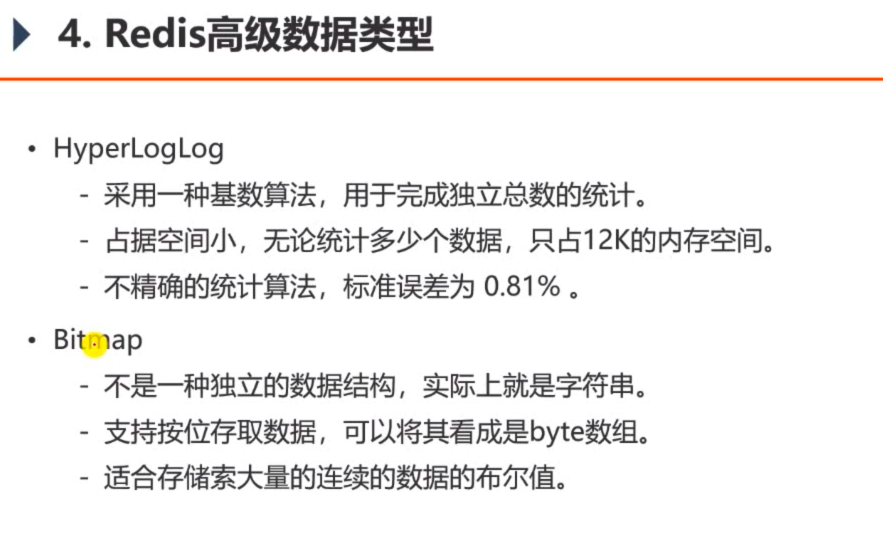
(统计网站数据)
Hyperloglog
测试类:测试单个key
//测试hyperloglog
//统计20万个重复数据的独立总数
@Test
public void testHyperLogLog() {
    String redisKey = "test:hll:01";
    for (int i = 1; i <= 100000; i++) {
        redisTemplate.opsForHyperLogLog().add(redisKey, i);
    }

    for (int i = 1; i <= 100000; i++) {
        int r = (int) (Math.random() * 100000 + 1);
        redisTemplate.opsForHyperLogLog().add(redisKey, r);
    }
    // //肯定是100000
    System.out.println(redisTemplate.opsForHyperLogLog().size(redisKey));
}
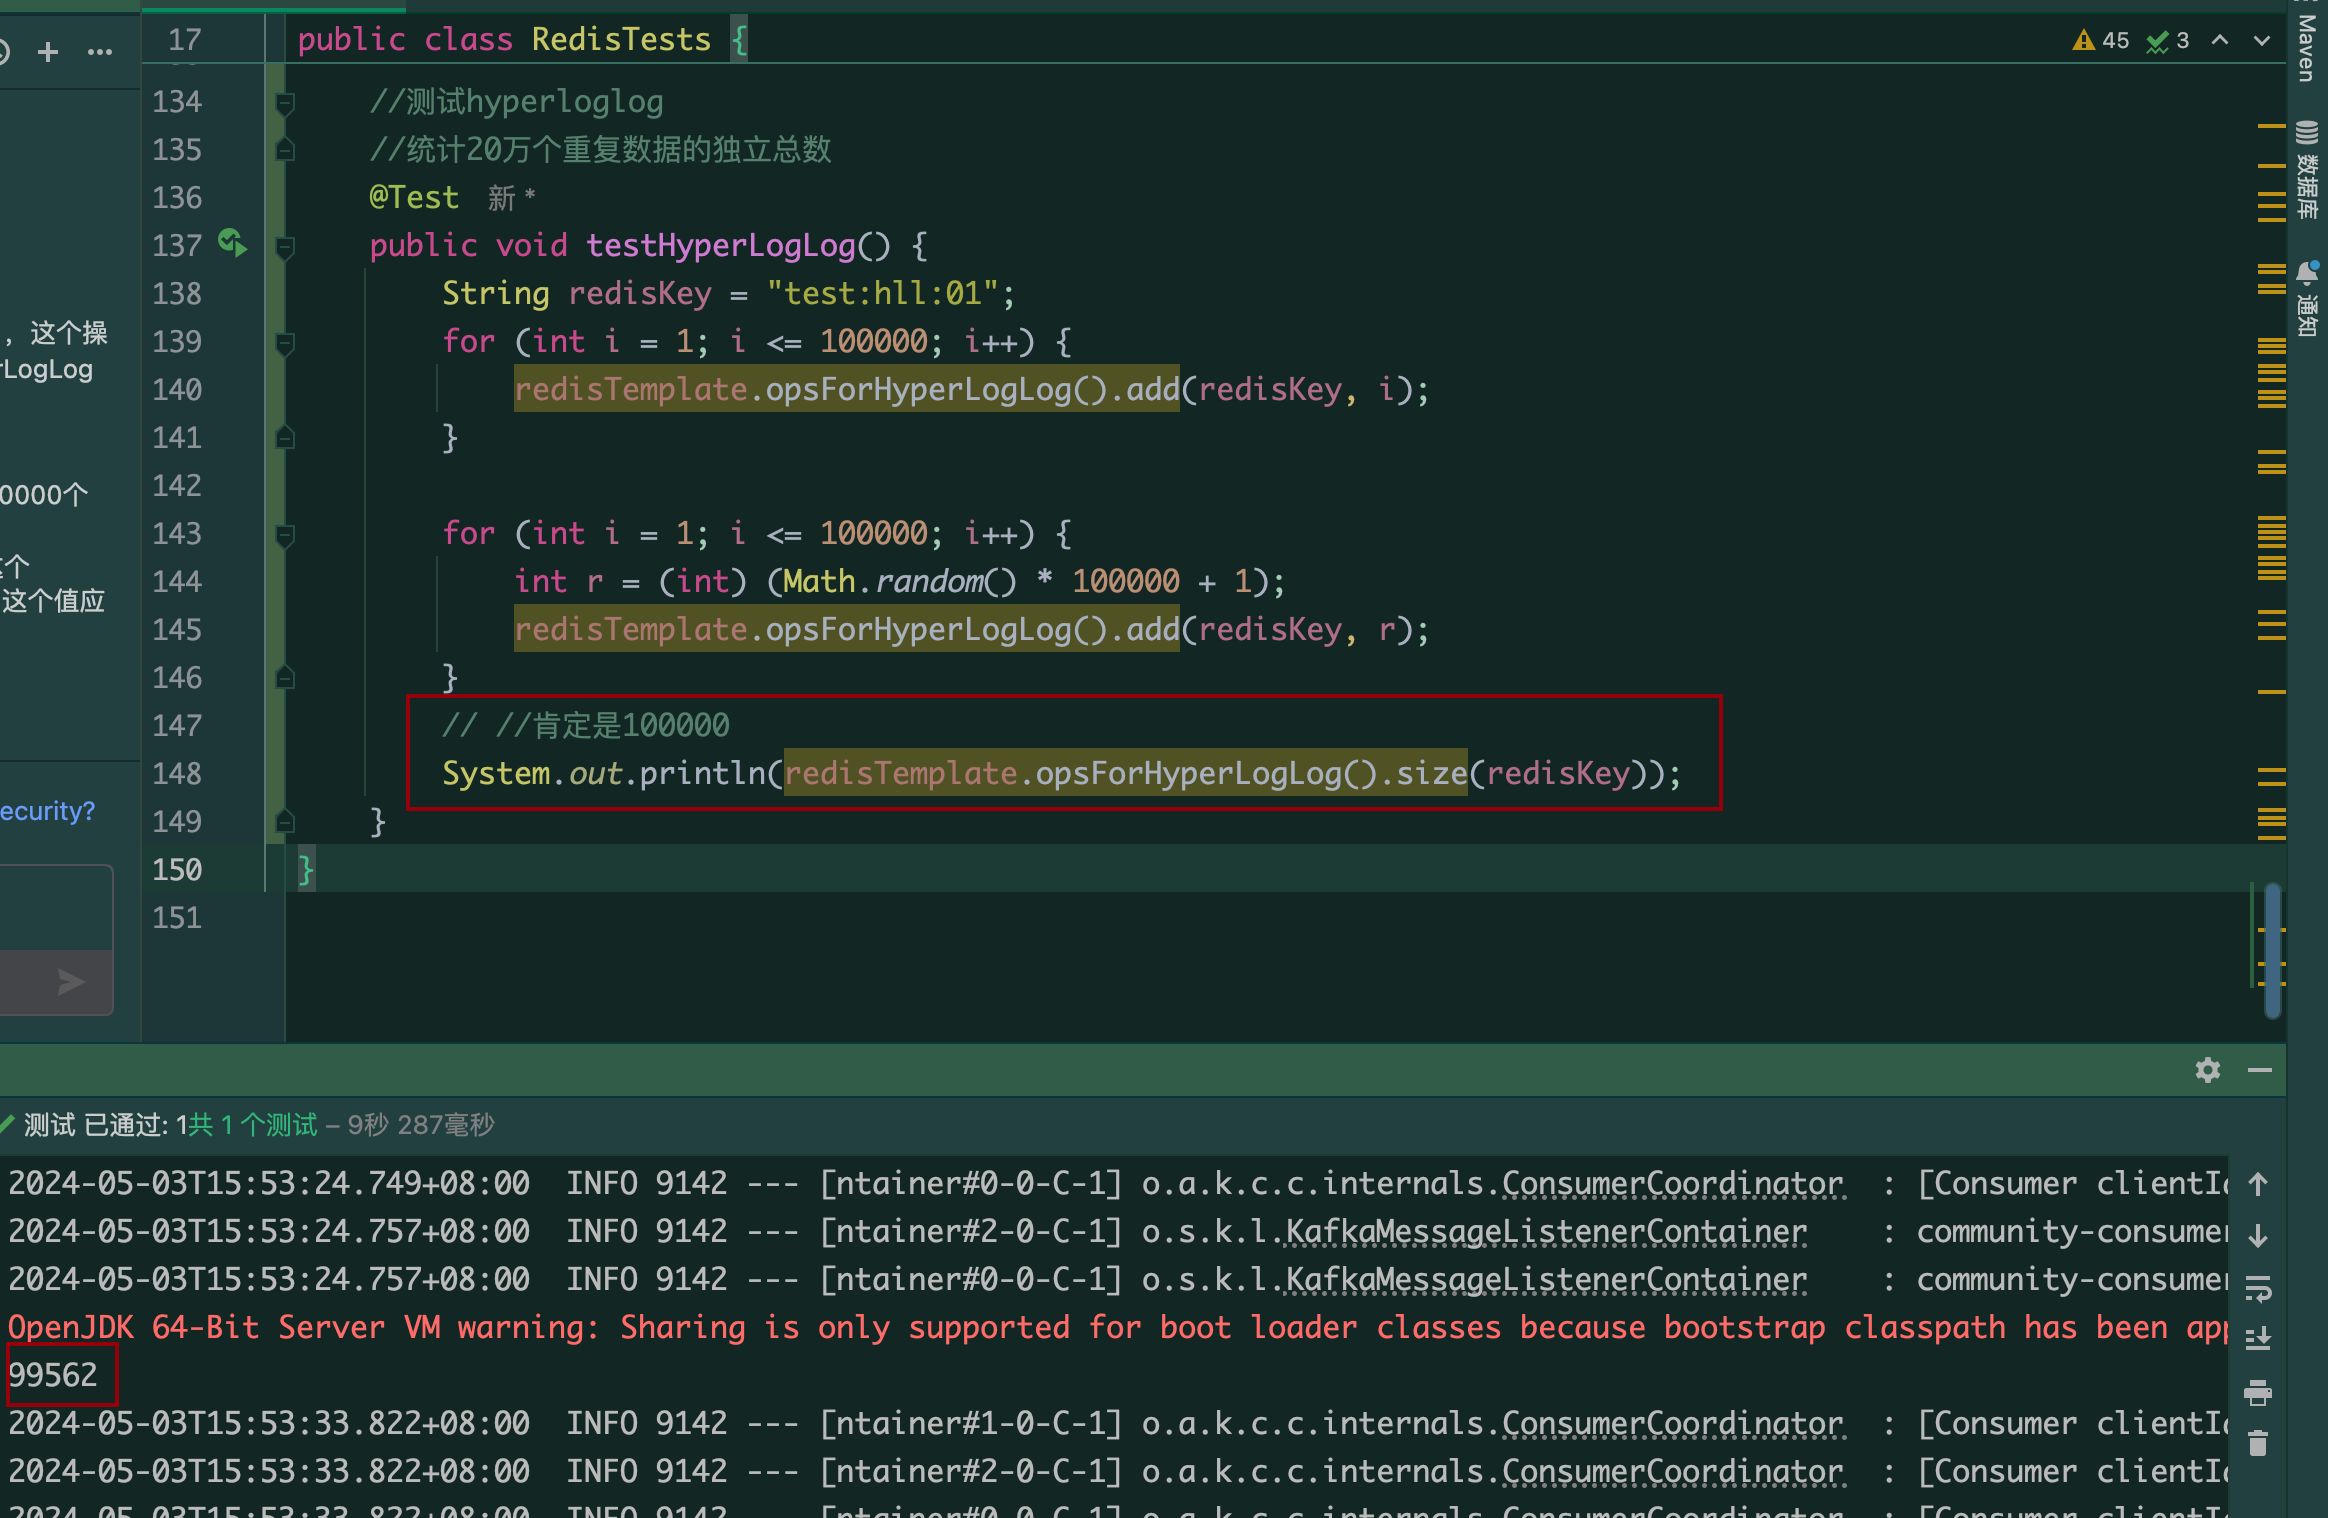
误差(100000-99562)/100000。
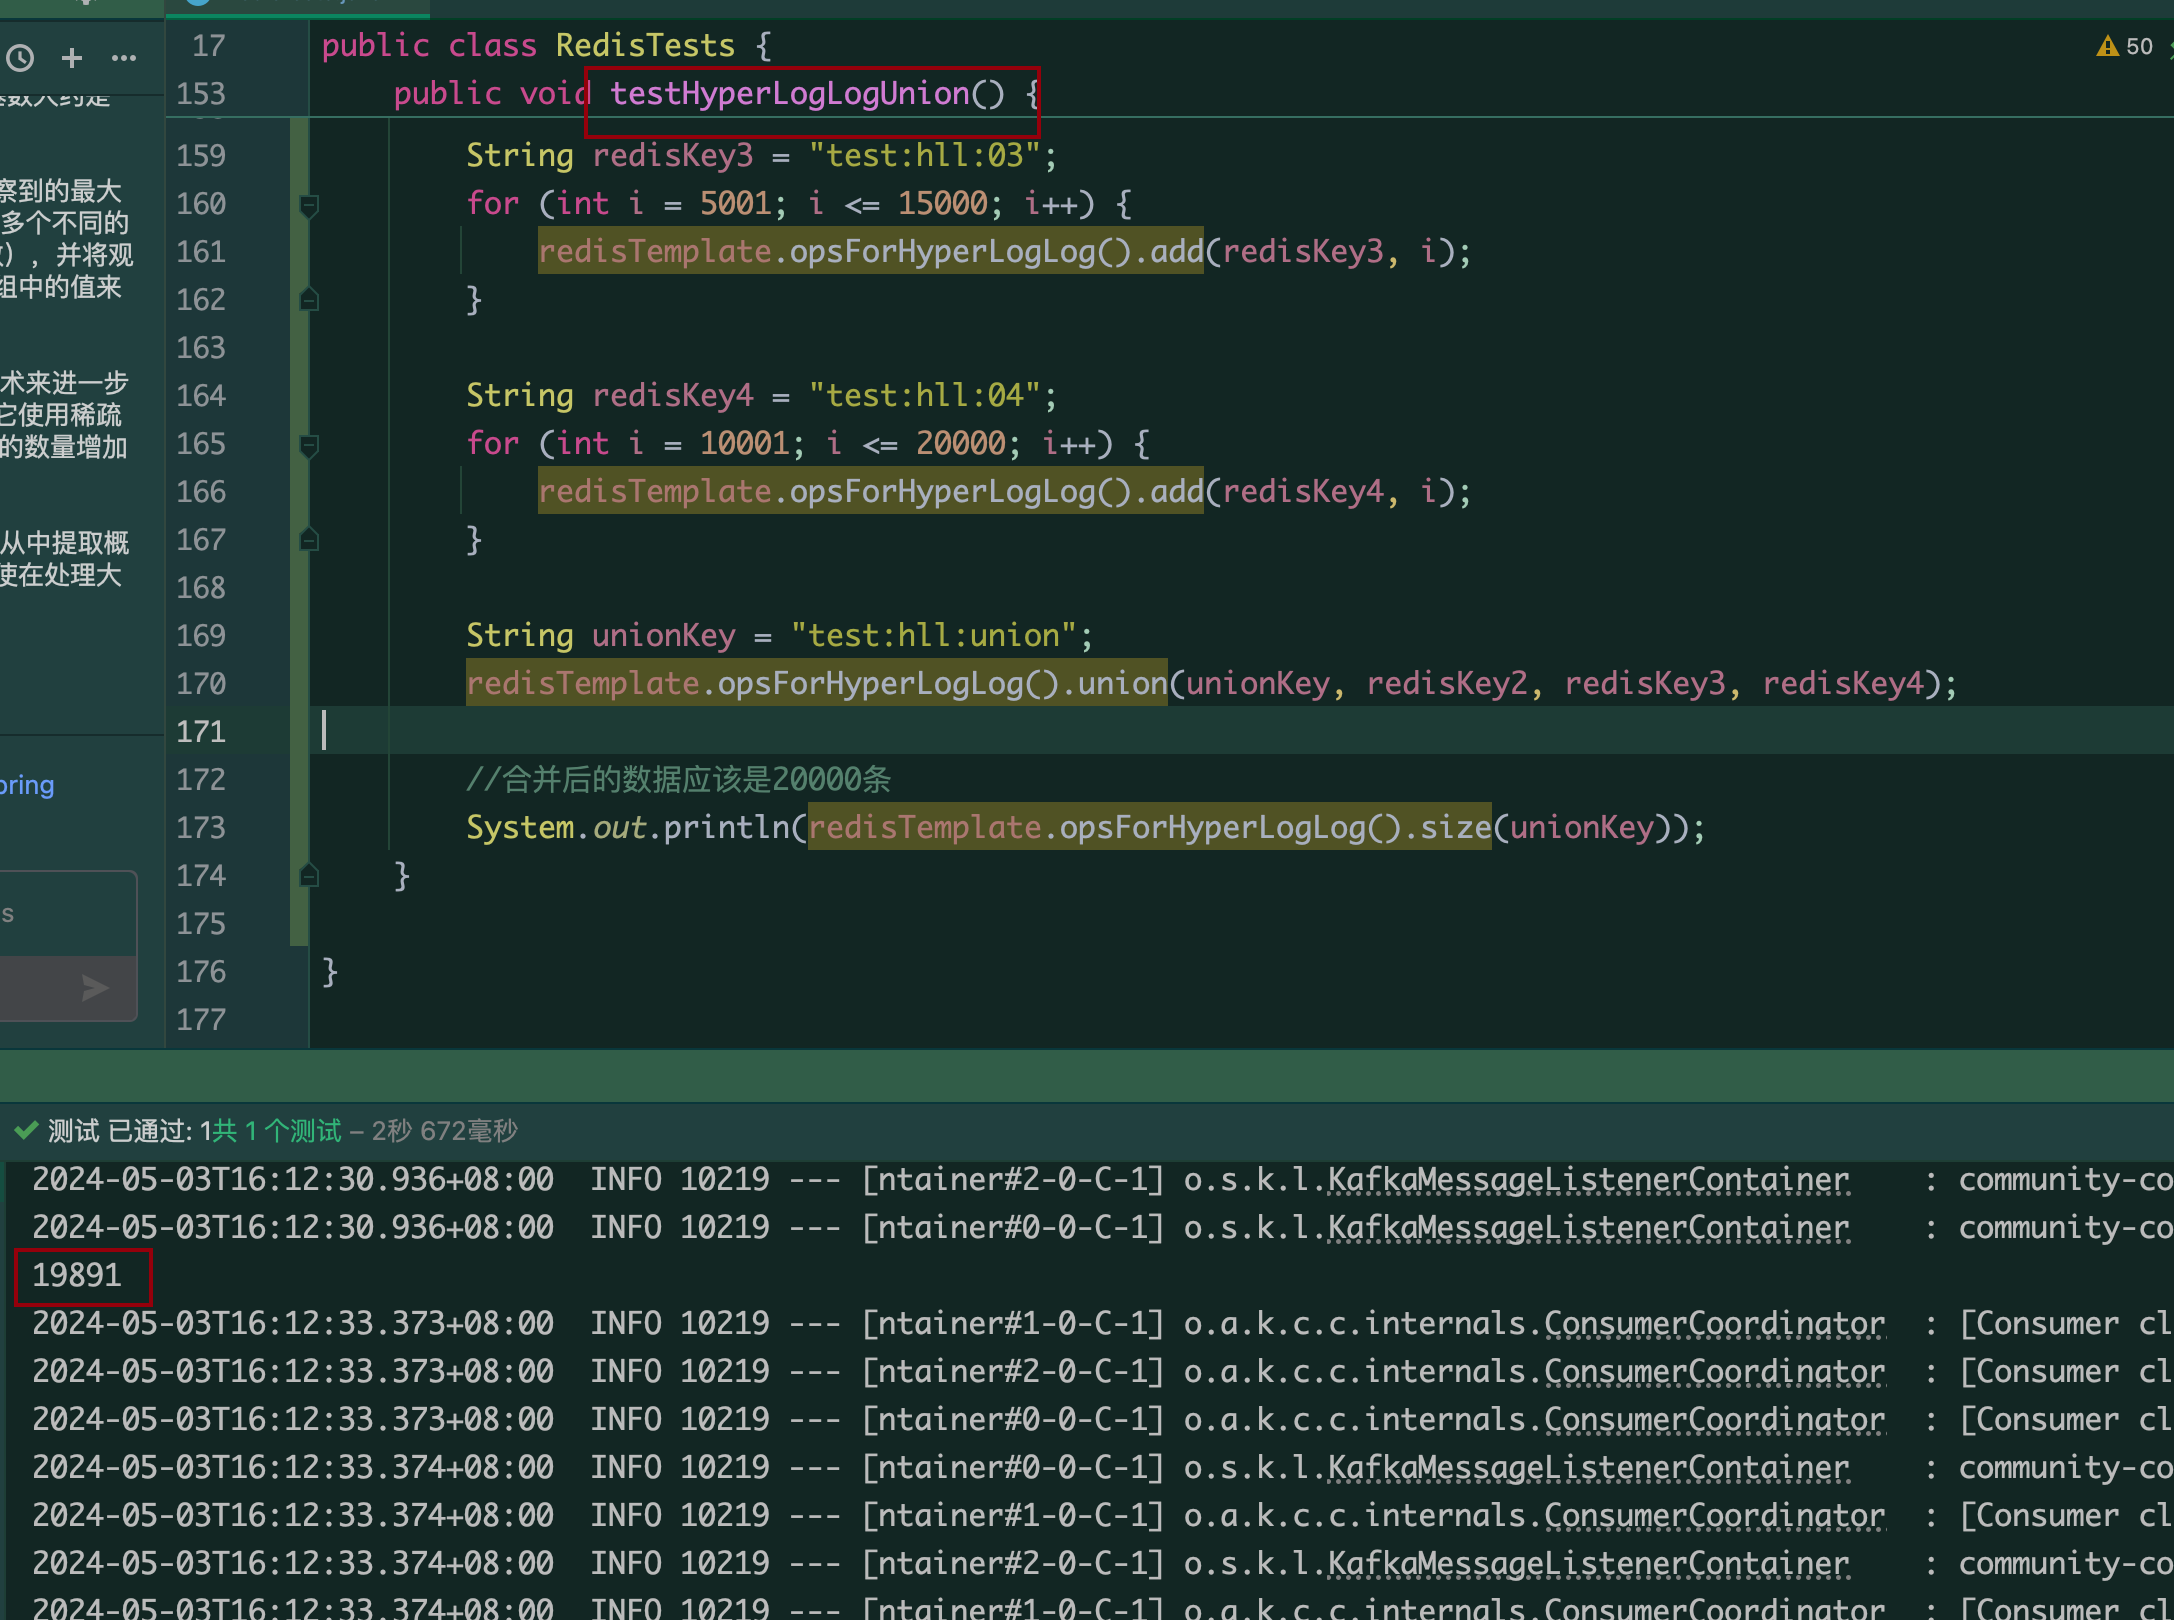
多个key合并:
//将3组数据合并,再统计合并后的重复数据的独立总数
    @Test
    public void testHyperLogLogUnion() {
        String redisKey2 = "test:hll:02";
        for (int i = 1; i <= 10000; i++) {
            redisTemplate.opsForHyperLogLog().add(redisKey2, i);
        }

        String redisKey3 = "test:hll:03";
        for (int i = 5001; i <= 15000; i++) {
            redisTemplate.opsForHyperLogLog().add(redisKey3, i);
        }

        String redisKey4 = "test:hll:04";
        for (int i = 10001; i <= 20000; i++) {
            redisTemplate.opsForHyperLogLog().add(redisKey4, i);
        }

        String unionKey = "test:hll:union";
        redisTemplate.opsForHyperLogLog().union(unionKey, redisKey2, redisKey3, redisKey4);

        //合并后的数据应该是20000条
        System.out.println(redisTemplate.opsForHyperLogLog().size(unionKey));
    }
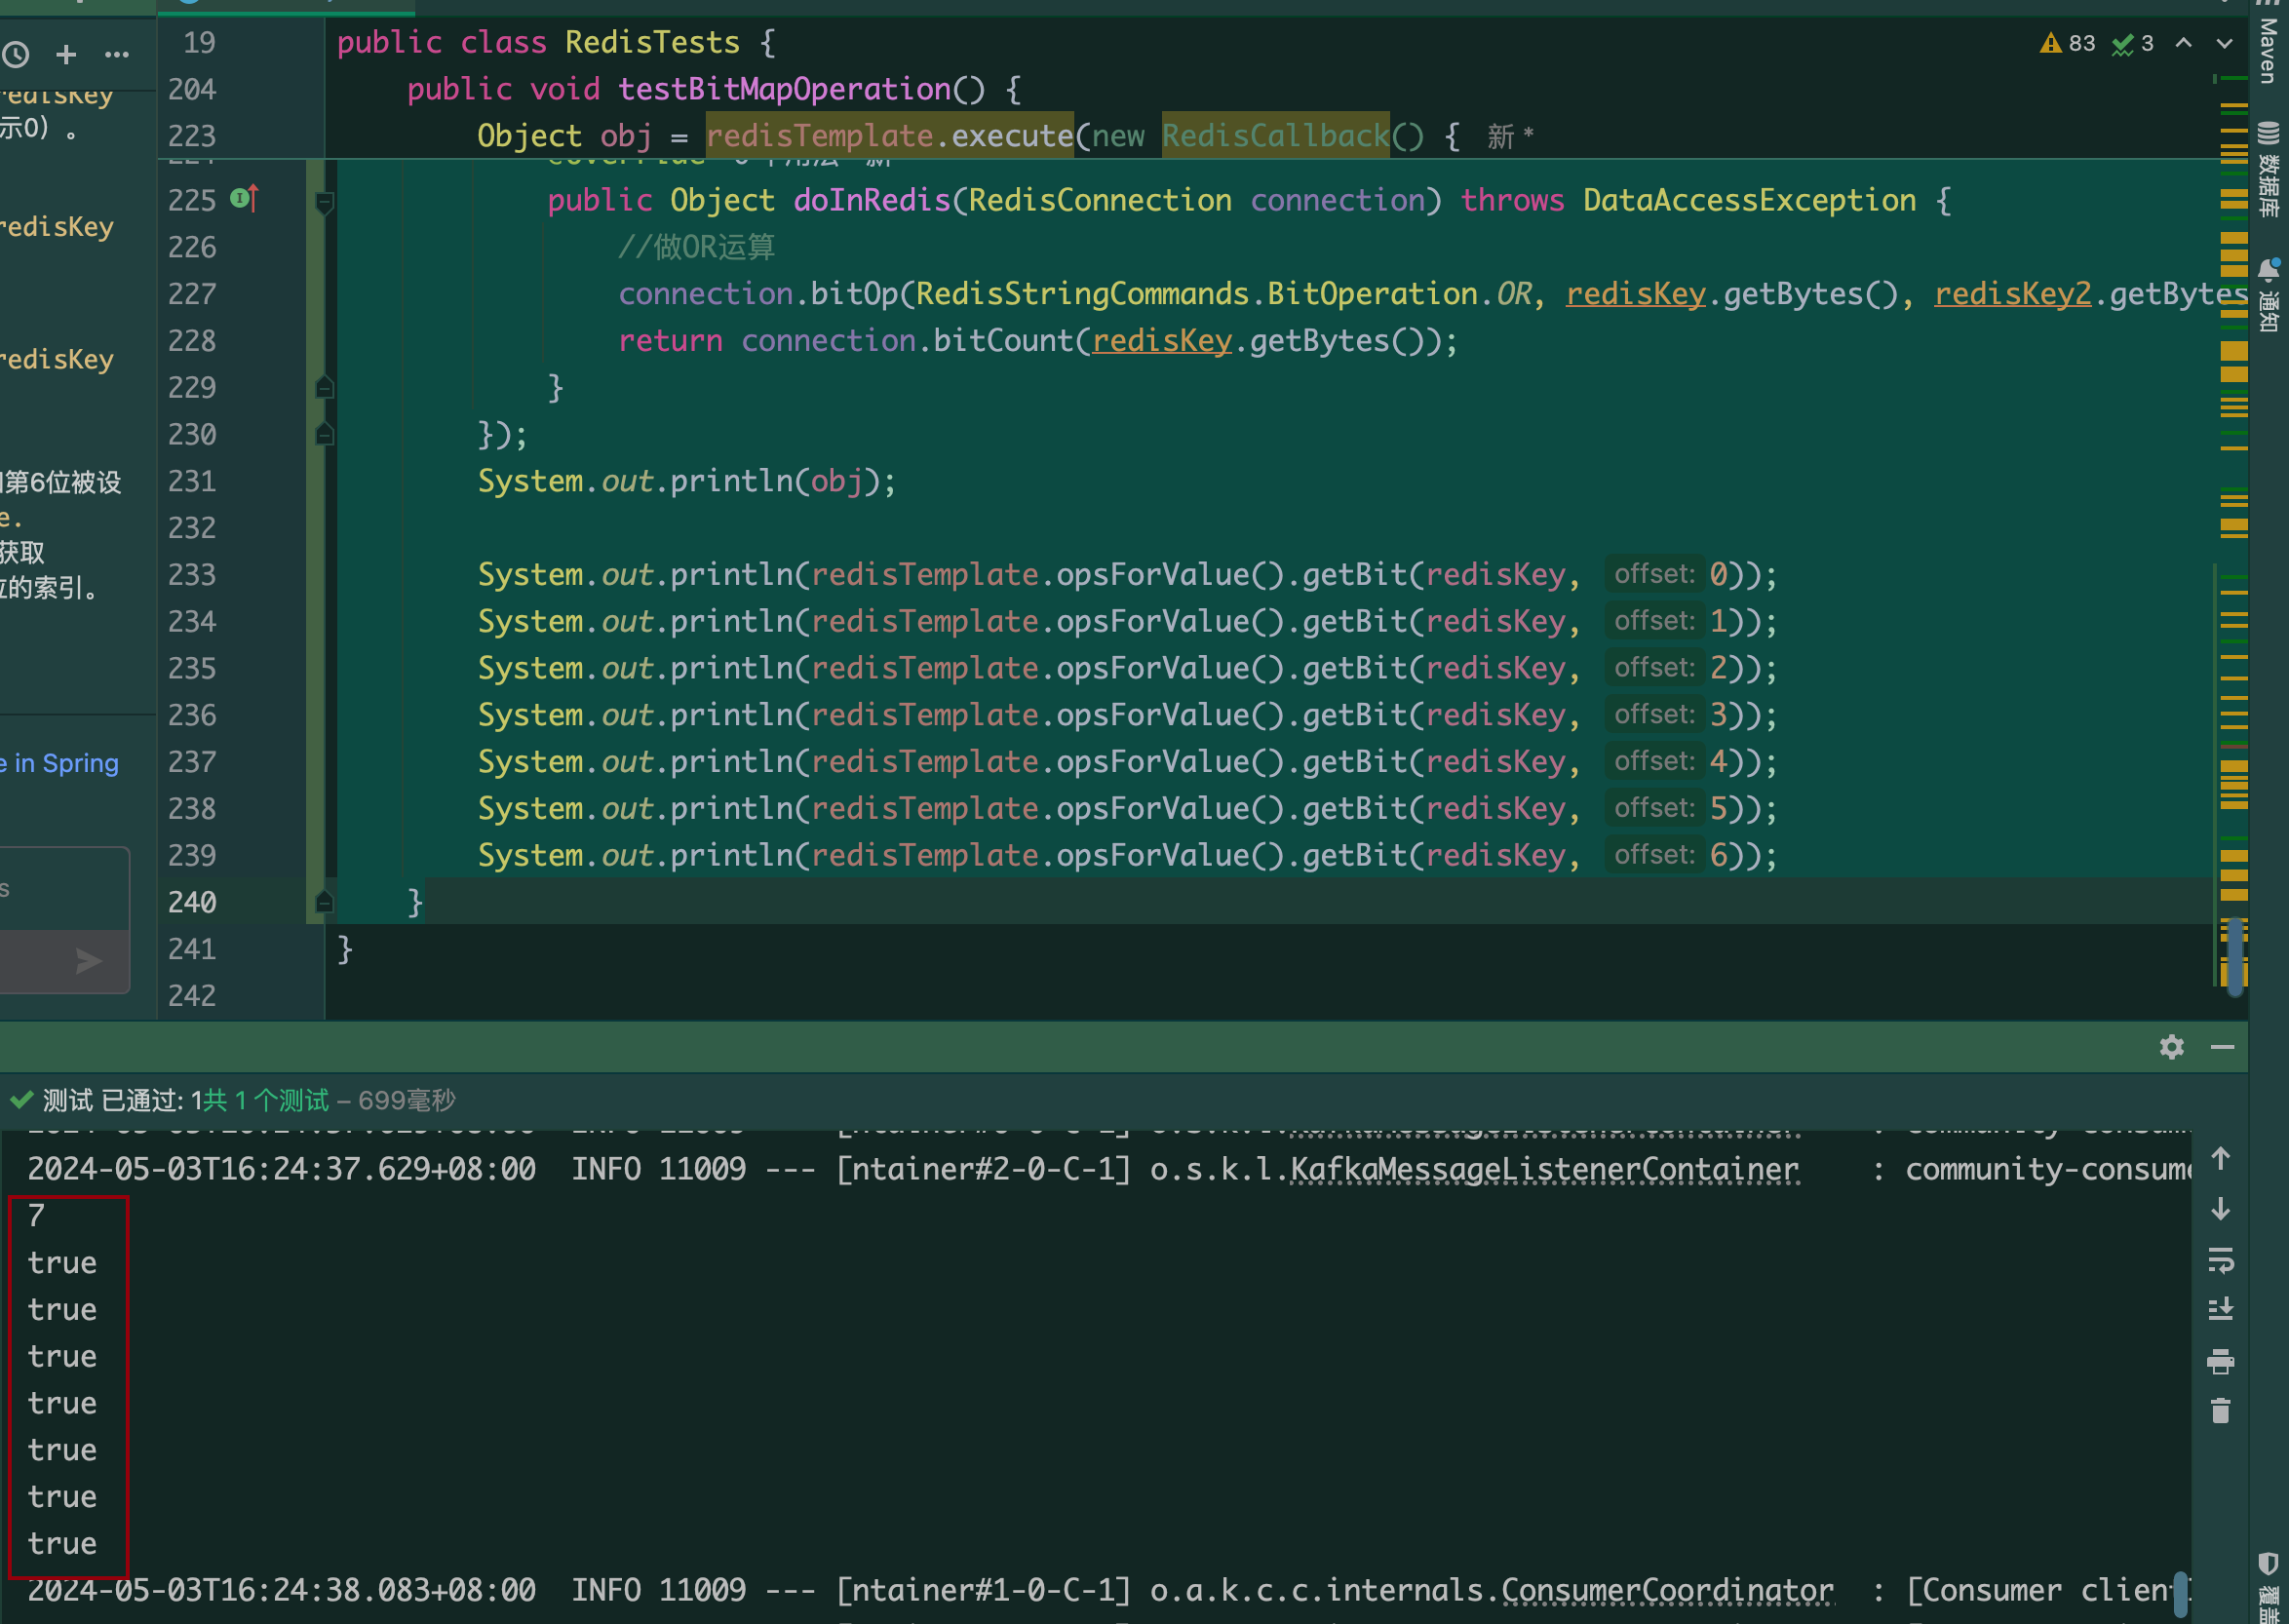
BitMap
//测试一组数据的布尔值
@Test
public void testBitMap() {
    String redisKey = "test:bm:01";
    //记录
    //1位置为true,3位置为true,6位置为true,其他位置为false
    redisTemplate.opsForValue().setBit(redisKey, 1, true);
    redisTemplate.opsForValue().setBit(redisKey, 3, true);
    redisTemplate.opsForValue().setBit(redisKey, 6, true);
    //查询某位的值
    System.out.println(redisTemplate.opsForValue().getBit(redisKey, 0));
    System.out.println(redisTemplate.opsForValue().getBit(redisKey, 1));
    System.out.println(redisTemplate.opsForValue().getBit(redisKey, 2));
    //统计
    Object obj = redisTemplate.execute(new RedisCallback() {
        @Override
        public Object doInRedis(RedisConnection connection) throws DataAccessException {
            return connection.bitCount(redisKey.getBytes());
        }
    });

    System.out.println(obj);
}

Bitmap做or操作:
//统计3组数据的布尔值,并对这3组数据做OR运算
    @Test
    public void testBitMapOperation() {
        String redisKey2 = "test:bm:02";
        redisTemplate.opsForValue().setBit(redisKey2, 0, true);
        redisTemplate.opsForValue().setBit(redisKey2, 1, true);
        redisTemplate.opsForValue().setBit(redisKey2, 2, true);

        String redisKey3 = "test:bm:03";
        redisTemplate.opsForValue().setBit(redisKey3, 2, true);
        redisTemplate.opsForValue().setBit(redisKey3, 3, true);
        redisTemplate.opsForValue().setBit(redisKey3, 4, true);

        String redisKey4 = "test:bm:04";
        redisTemplate.opsForValue().setBit(redisKey4, 4, true);
        redisTemplate.opsForValue().setBit(redisKey4, 5, true);
        redisTemplate.opsForValue().setBit(redisKey4, 6, true);

        String redisKey = "test:bm:or";
        //对redisKey2,redisKey3,redisKey4做OR运算
        //将结果存入redisKey
        Object obj = redisTemplate.execute(new RedisCallback() {
            @Override
            public Object doInRedis(RedisConnection connection) throws DataAccessException {
                //做OR运算
                connection.bitOp(RedisStringCommands.BitOperation.OR, redisKey.getBytes(), redisKey2.getBytes(), redisKey3.getBytes(), redisKey4.getBytes());
                return connection.bitCount(redisKey.getBytes());
            }
        });
        System.out.println(obj);

        System.out.println(redisTemplate.opsForValue().getBit(redisKey, 0));
        System.out.println(redisTemplate.opsForValue().getBit(redisKey, 1));
        System.out.println(redisTemplate.opsForValue().getBit(redisKey, 2));
        System.out.println(redisTemplate.opsForValue().getBit(redisKey, 3));
        System.out.println(redisTemplate.opsForValue().getBit(redisKey, 4));
        System.out.println(redisTemplate.opsForValue().getBit(redisKey, 5));
        System.out.println(redisTemplate.opsForValue().getBit(redisKey, 6));
    }
网站数据统计
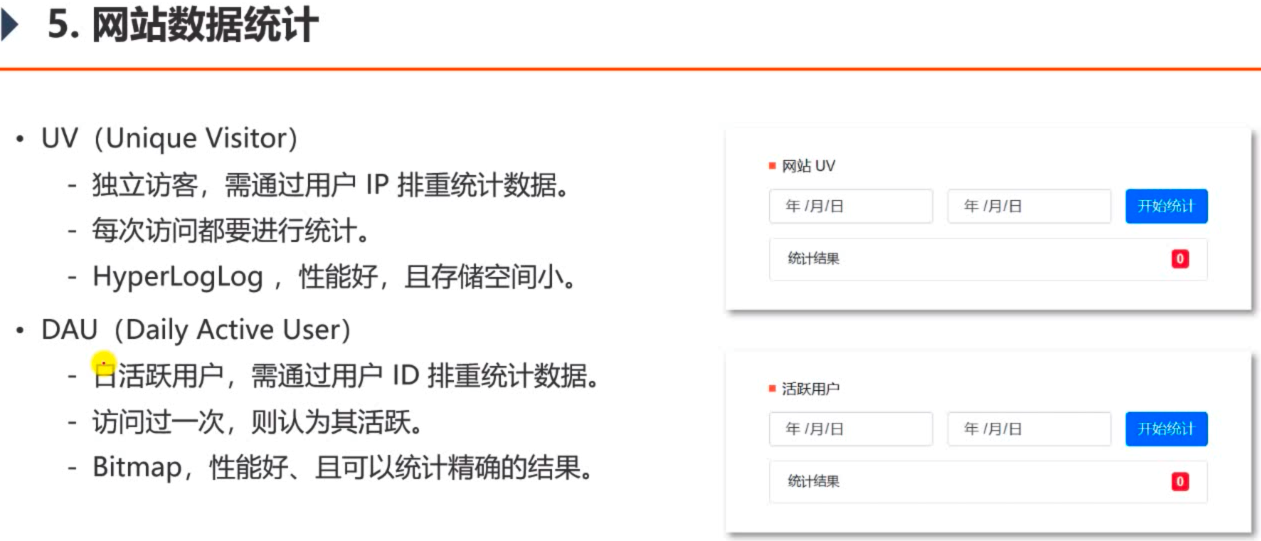
- UV:根据IP排重(包括未登录的);
- DAU:根据用户ID排重(只包括登录用户);
- 用bitMap存:比如在110处存1/0表示活跃/非活跃。
添加RedisKey:
//单日UV
//key:uv:date -> value:userId
public static String getUVKey(String date) {
    return PREFIX_UV + SPLIT + date;
}

//区间UV(Redis合并用)
//key:dau:startDate:endDate -> value:userId
public static String getUVKey(String startDate, String endDate) {
    return PREFIX_UV + SPLIT + startDate + SPLIT + endDate;
}

//单日DAU活跃用户
//key:dau:date -> value:userId
public static String getDAUKey(String date) {
    return PREFIX_DAU + SPLIT + date;
}

//区间DAU(Redis合并用)
//key:dau:startDate:endDate -> value:userId
public static String getDAUKey(String startDate, String endDate) {
    return PREFIX_DAU + SPLIT + startDate + SPLIT + endDate;
}
- 区间UV用作redis合并用。
Service层
新建DataService:
@Service
public class DataService {
    @Autowired
    private RedisTemplate redisTemplate;

    private SimpleDateFormat df = new SimpleDateFormat("yyyy-MM-dd HH:mm:ss");

    // 将指定IP计入UV
    public void recordUV(String ip) {
        String redisKey = RedisKeyUtil.getUVKey(df.format(new Date()));
        redisTemplate.opsForHyperLogLog().add(redisKey, ip);
    }

    // 统计指定日期范围内的UV
    public long calculateUV(Date start, Date end) {
        // 参数校验
        if (start == null || end == null) {
            throw new IllegalArgumentException("参数不能为空!");
        }

        // 整理日期范围内的key
        List<String> keyList = new ArrayList<>();
        Calendar calendar = Calendar.getInstance();
        calendar.setTime(start);
        while (!calendar.getTime().after(end)) {
            String key = RedisKeyUtil.getUVKey(df.format(calendar.getTime()));
            keyList.add(key);
            calendar.add(Calendar.DATE, 1);
        }

        // 合并这些数据
        String redisKey = RedisKeyUtil.getUVKey(df.format(start), df.format(end));
        redisTemplate.opsForHyperLogLog().union(redisKey, keyList.toArray());

        // 返回统计结果
        return redisTemplate.opsForHyperLogLog().size(redisKey);
    }

    // 将指定用户计入DAU
    public void recordDAU(int userId) {
        String redisKey = RedisKeyUtil.getDAUKey(df.format(new Date()));
        redisTemplate.opsForValue().setBit(redisKey, userId, true);
    }

    // 统计指定日期范围内的DAU
    public long calculateDAU(Date start, Date end) {
        // 参数校验
        if (start == null || end == null) {
            throw new IllegalArgumentException("参数不能为空!");
        }

        // 整理日期范围内的key
        List<byte[]> keyList = new ArrayList<>();
        Calendar calendar = Calendar.getInstance();
        calendar.setTime(start);
        while (!calendar.getTime().after(end)) {
            String key = RedisKeyUtil.getDAUKey(df.format(calendar.getTime()));
            keyList.add(key.getBytes());
            calendar.add(Calendar.DATE, 1);
        }

        // 进行OR运算
        return (long) redisTemplate.execute(new RedisCallback() {
            @Override
            public Object doInRedis(RedisConnection connection) throws DataAccessException {
                String redisKey = RedisKeyUtil.getDAUKey(df.format(start), df.format(end));
                connection.bitOp(RedisStringCommands.BitOperation.OR, redisKey.getBytes(), keyList.toArray(new byte[0][0]));
                return connection.bitCount(redisKey.getBytes());
            }
        });
    }
}
- Calendar calendar = Calendar.getInstance(); Calendar抽象类, 用于计算时间;
- calendar.add(Calendar.DATE, 1); 在当前日期加一天。
- 用redisTemplate + 回调函数进行OR运算。
拦截器
编写拦截器
(每次请求都要给,用拦截器)
@Component
public class DataInterceptor implements HandlerInterceptor {

    @Autowired
    private DataService dataService;

    @Autowired
    private HostHolder hostHolder;

    @Override
    public boolean preHandle(HttpServletRequest request, HttpServletResponse response, Object handler) throws Exception {
        // 统计UV
        String ip = request.getRemoteHost();
        dataService.recordUV(ip);

        // 统计DAU
        User user = hostHolder.getUser();
        if (user != null) {
            dataService.recordDAU(user.getId());
        }

        // 返回true,表示继续执行Controller中的方法
        return true;
    }
}
配置拦截器
 registry.addInterceptor(dataInterceptor)
                .excludePathPatterns("/**/*.css", "/**/*.js", "/**/*.png", "/**/*.jpg", "/**/*.jpeg");
DataController
@Controller
public class DataController {

    @Autowired
    private DataService dataService;

    // 统计页面
    @RequestMapping(path = "/data", method = {RequestMethod.GET, RequestMethod.POST})
    public String getDataPage() {
        //用forward,这里如果有逻辑还可以复用
        return "/site/admin/data";
    }

    // 统计UV(区间)
    @RequestMapping(path = "/data/uv", method = RequestMethod.POST)
    public String getUV(@DateTimeFormat(pattern = "yyyy-MM-dd") Date start,
                        @DateTimeFormat(pattern = "yyyy-MM-dd") Date end,
                        Model model) {
        long uv = dataService.calculateUV(start, end);
        model.addAttribute("uvResult", uv);
        model.addAttribute("uvStartDate", start);
        model.addAttribute("uvEndDate", end);

        //转发到getDataPage()方法
        return "forward:/data";
    }

    // 统计DAU(区间)
    @RequestMapping(path = "/data/dau", method = RequestMethod.POST)
    public String getDAU(@DateTimeFormat(pattern = "yyyy-MM-dd") Date start,
                         @DateTimeFormat(pattern = "yyyy-MM-dd") Date end,
                         Model model) {
        long dau = dataService.calculateDAU(start, end);
        model.addAttribute("dauResult", dau);
        model.addAttribute("dauStartDate", start);
        model.addAttribute("dauEndDate", end);
        return "forward:/data";
    }


}
在Spring MVC中,return “forward:/data”; 是一种特殊的视图返回方式,表示请求转发。 当你返回 forward:/data,Spring MVC会将当前请求转发到 /data URL对应的处理器(Handler)进行处理,而不是直接返回一个视图。这意味着请求的生命周期并未结束,仍在服务器内部进行处理。 这种方式的好处是,转发的过程中,请求的所有参数和属性都会被保留,可以在新的处理器中继续使用。这与重定向(redirect:)不同,重定向会结束当前请求,开始一个新的请求。 在你的代码中,return “forward:/data”; 表示将请求转发到 /data URL,也就是 getDataPage() 方法进行处理。
处理html
<!-- 内容 -->
		<div class="main">
			<!-- 网站UV -->
			<div class="container pl-5 pr-5 pt-3 pb-3 mt-3">
				<h6 class="mt-3"><b class="square"></b> 网站 UV</h6>
				<form class="form-inline mt-3" method="post" th:action="@{/data/uv}">
					<input type="date" class="form-control" required name="start" th:value="${#dates.format(uvStartDate,'yyyy-MM-dd')}"/>
					<input type="date" class="form-control ml-3" required name="end" th:value="${#dates.format(uvEndDate,'yyyy-MM-dd')}"/>
					<button type="submit" class="btn btn-primary ml-3">开始统计</button>
				</form>
				<ul class="list-group mt-3 mb-3">
					<li class="list-group-item d-flex justify-content-between align-items-center">
						统计结果
						<span class="badge badge-primary badge-danger font-size-14" th:text="${uvResult}">0</span>
					</li>
				</ul>
			</div>
			<!-- 活跃用户 -->
			<div class="container pl-5 pr-5 pt-3 pb-3 mt-4">
				<h6 class="mt-3"><b class="square"></b> 活跃用户</h6>
				<form class="form-inline mt-3" method="post" th:action="@{/data/dau}">
					<input type="date" class="form-control" required name="start" th:value="${#dates.format(dauStartDate,'yyyy-MM-dd')}"/>
					<input type="date" class="form-control ml-3" required name="end" th:value="${#dates.format(dauEndDate,'yyyy-MM-dd')}"/>
					<button type="submit" class="btn btn-primary ml-3">开始统计</button>
				</form>
				<ul class="list-group mt-3 mb-3">
					<li class="list-group-item d-flex justify-content-between align-items-center">
						统计结果
						<span class="badge badge-primary badge-danger font-size-14" th:text="${dauResult}">0</span>
					</li>
				</ul>
			</div>
		</div>
(之后还需要设置权限)
任务执行和调度

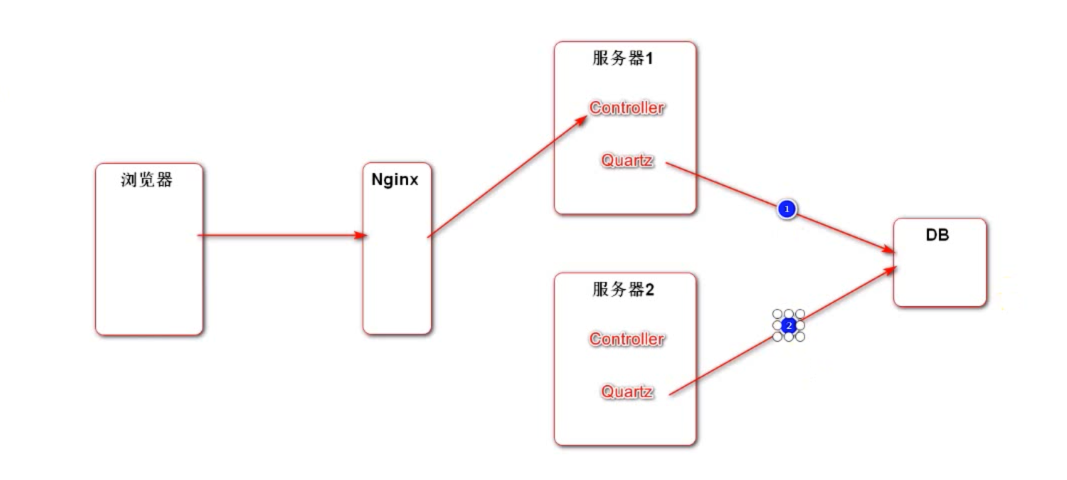
(Quaztz将定时任务参数放在DB中, 各服务器之间共享)
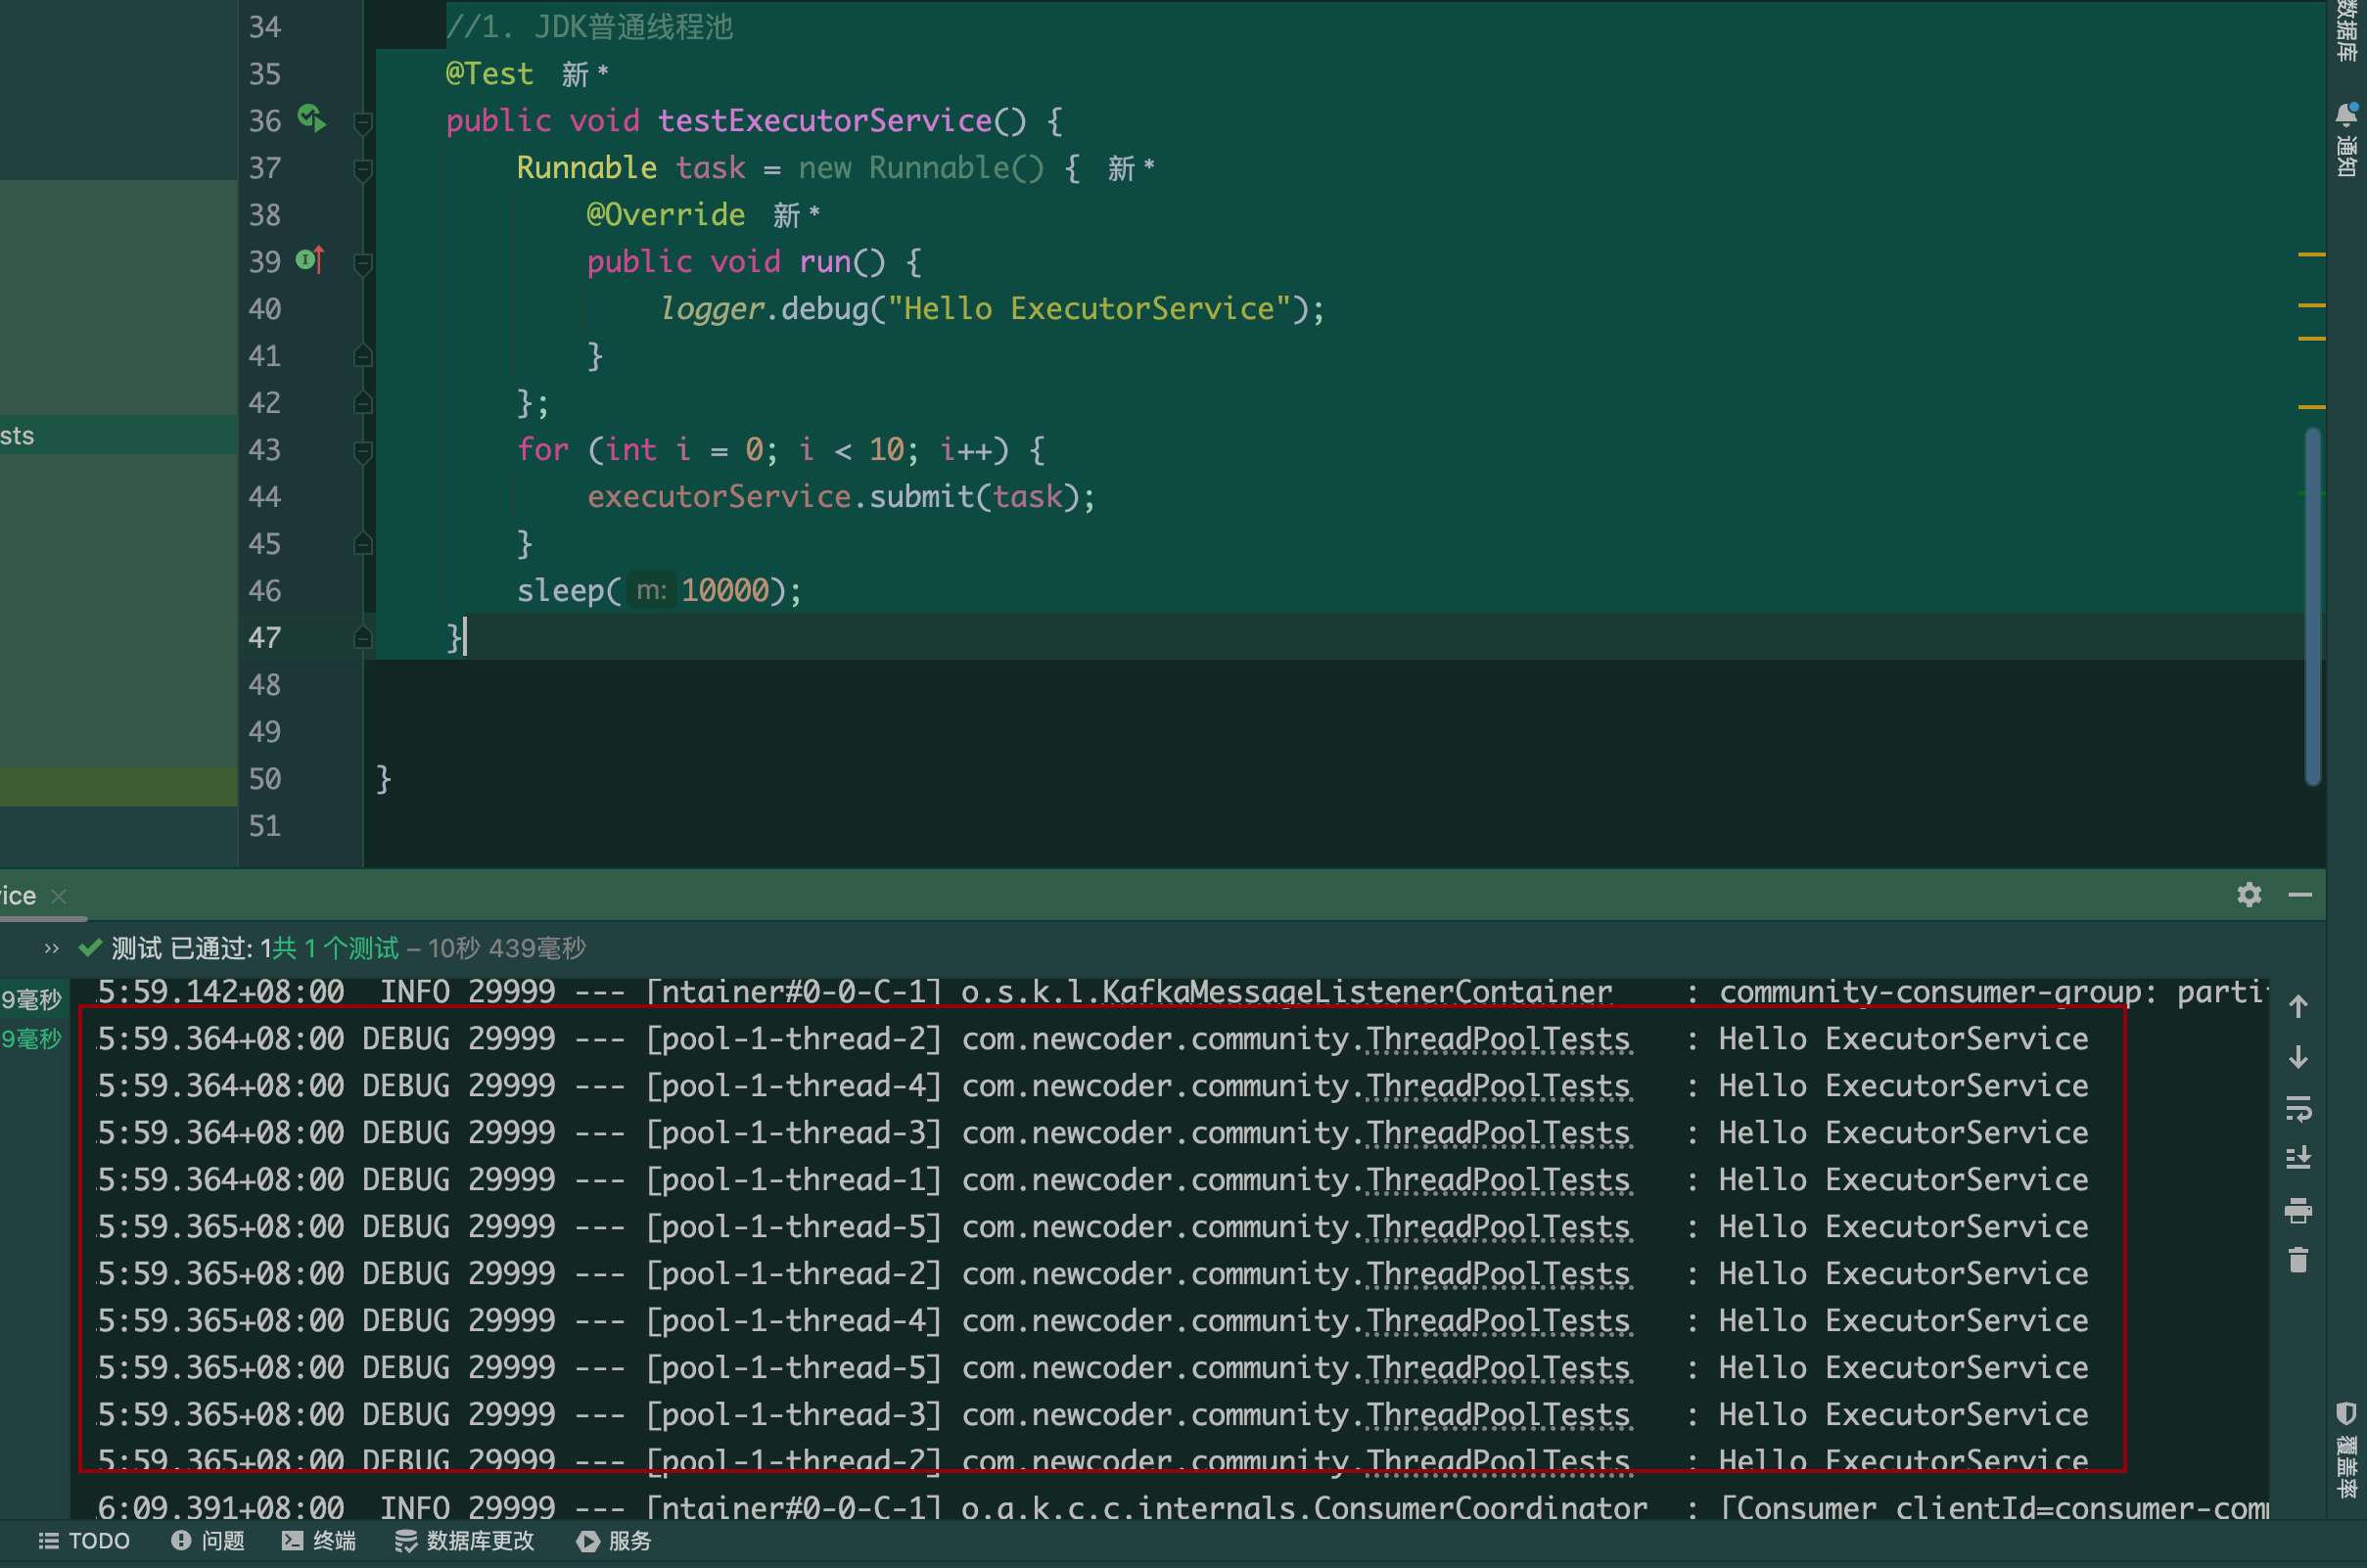
JDK线程池
ExecutorService
//1. JDK普通线程池
    @Test
    public void testExecutorService() {
        Runnable task = new Runnable() {
            @Override
            public void run() {
                logger.debug("Hello ExecutorService");
            }
        };
        for (int i = 0; i < 10; i++) {
            executorService.submit(task);
        }
        sleep(10000);
    }
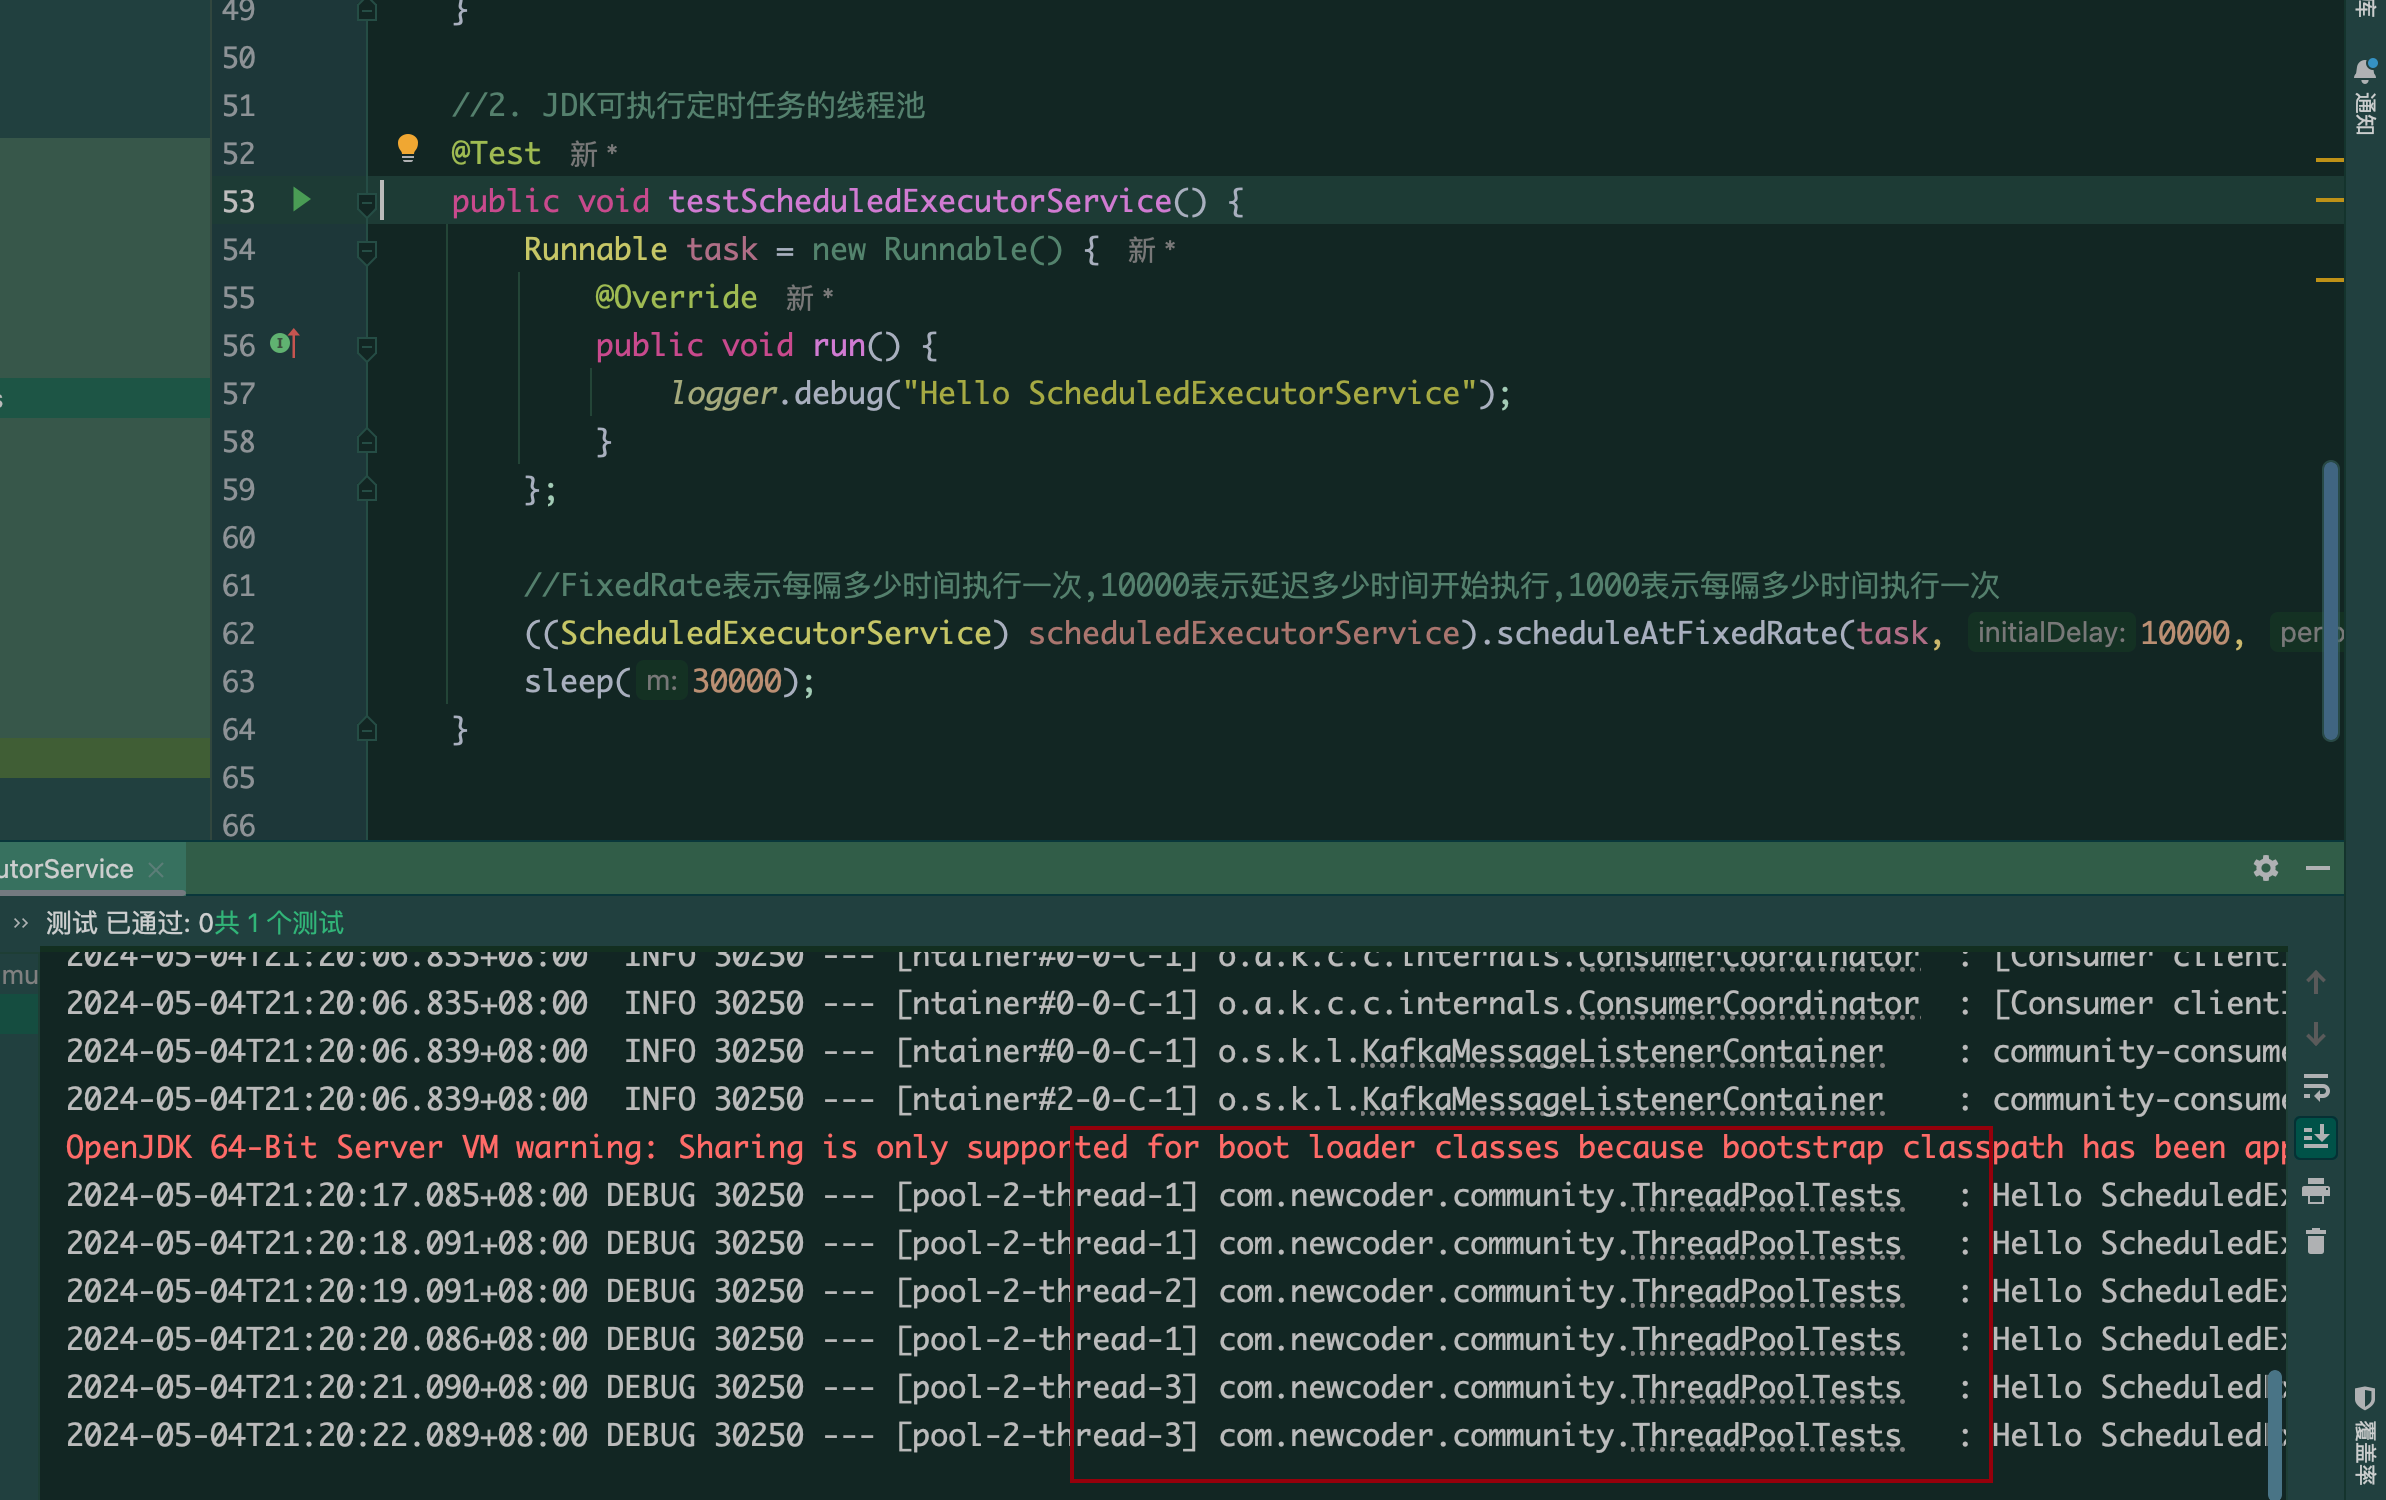
ScheduledExecutorService
//2. JDK可执行定时任务的线程池
    @Test
    public void testScheduledExecutorService() {
        Runnable task = new Runnable() {
            @Override
            public void run() {
                logger.debug("Hello ScheduledExecutorService");
            }
        };

        //FixedRate表示每隔多少时间执行一次,10000表示延迟多少时间开始执行,1000表示每隔多少时间执行一次
        ((ScheduledExecutorService) scheduledExecutorService).scheduleAtFixedRate(task, 10000, 1000, TimeUnit.MILLISECONDS);
        sleep(30000);
    }
Spring线程池
需要配置:
# TaskExecutionProperties
spring.task.execution.pool.core-size=5
spring.task.execution.pool.max-size=15
spring.task.execution.pool.queue-capacity=100

# TaskSchedulingProperties
spring.task.scheduling.pool.size=10
(scheduled的可以提前预判,故不需要设置最大)
编写配置类:
@Configuration
@EnableScheduling
@EnableAsync
public class ThreadPoolConfig {
}
@Autowired
// 3. Spring普通线程池
private ThreadPoolTaskExecutor taskExecutor;

@Autowired
// 4. Spring可执行定时任务的线程池
private ThreadPoolTaskScheduler taskScheduler;
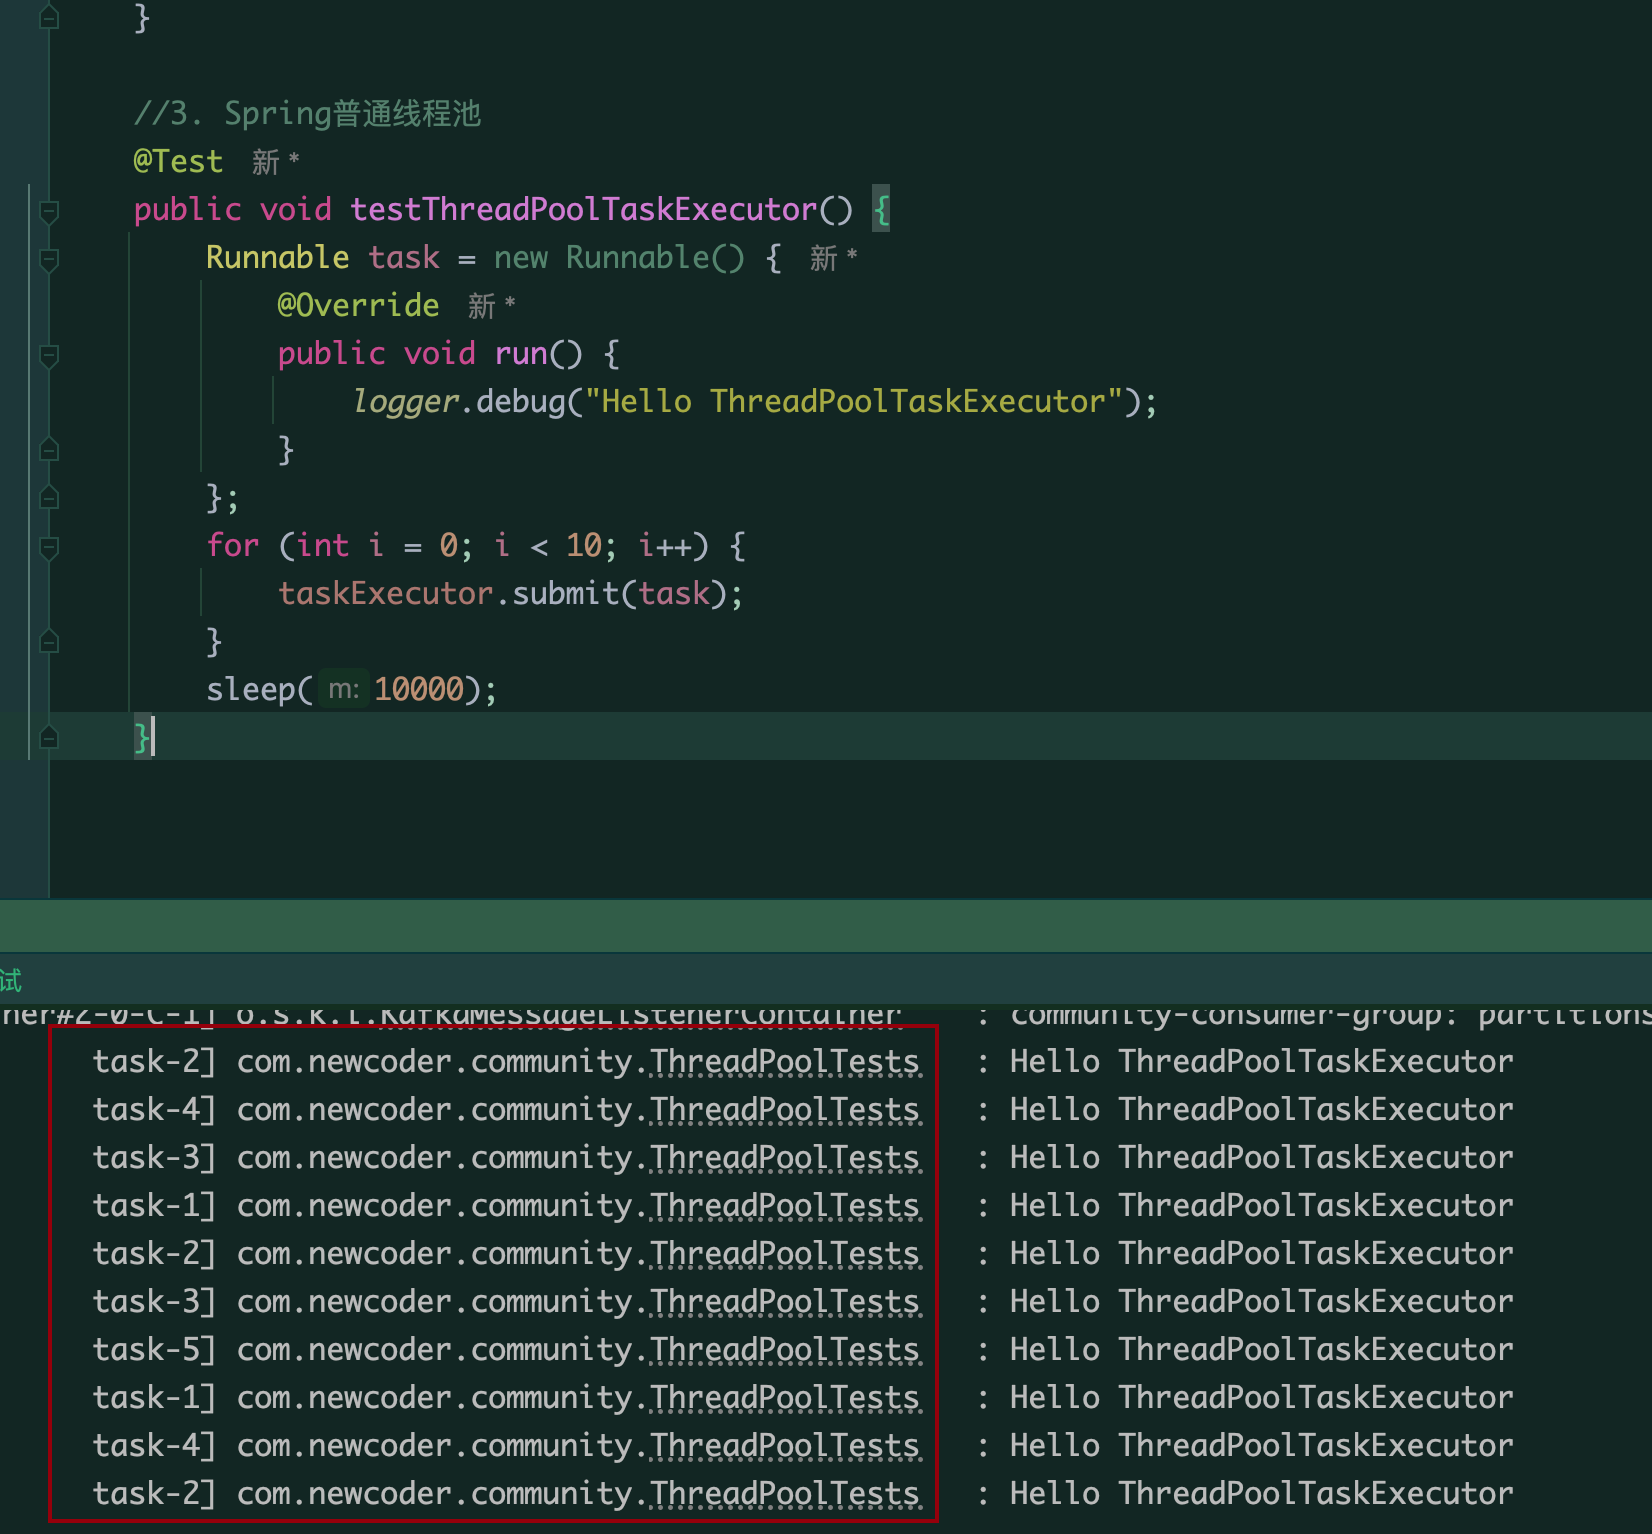
Spring普通线程池
 @Test
    public void testThreadPoolTaskExecutor() {
        Runnable task = new Runnable() {
            @Override
            public void run() {
                logger.debug("Hello ThreadPoolTaskExecutor");
            }
        };
        for (int i = 0; i < 10; i++) {
            taskExecutor.submit(task);
        }
        sleep(10000);
    }
Spring调度线程池
@Test
public void testTaskScheduler() {
Runnable task = new Runnable() {
@Override
public void run() {
logger.debug("Hello TaskScheduler");
}
};
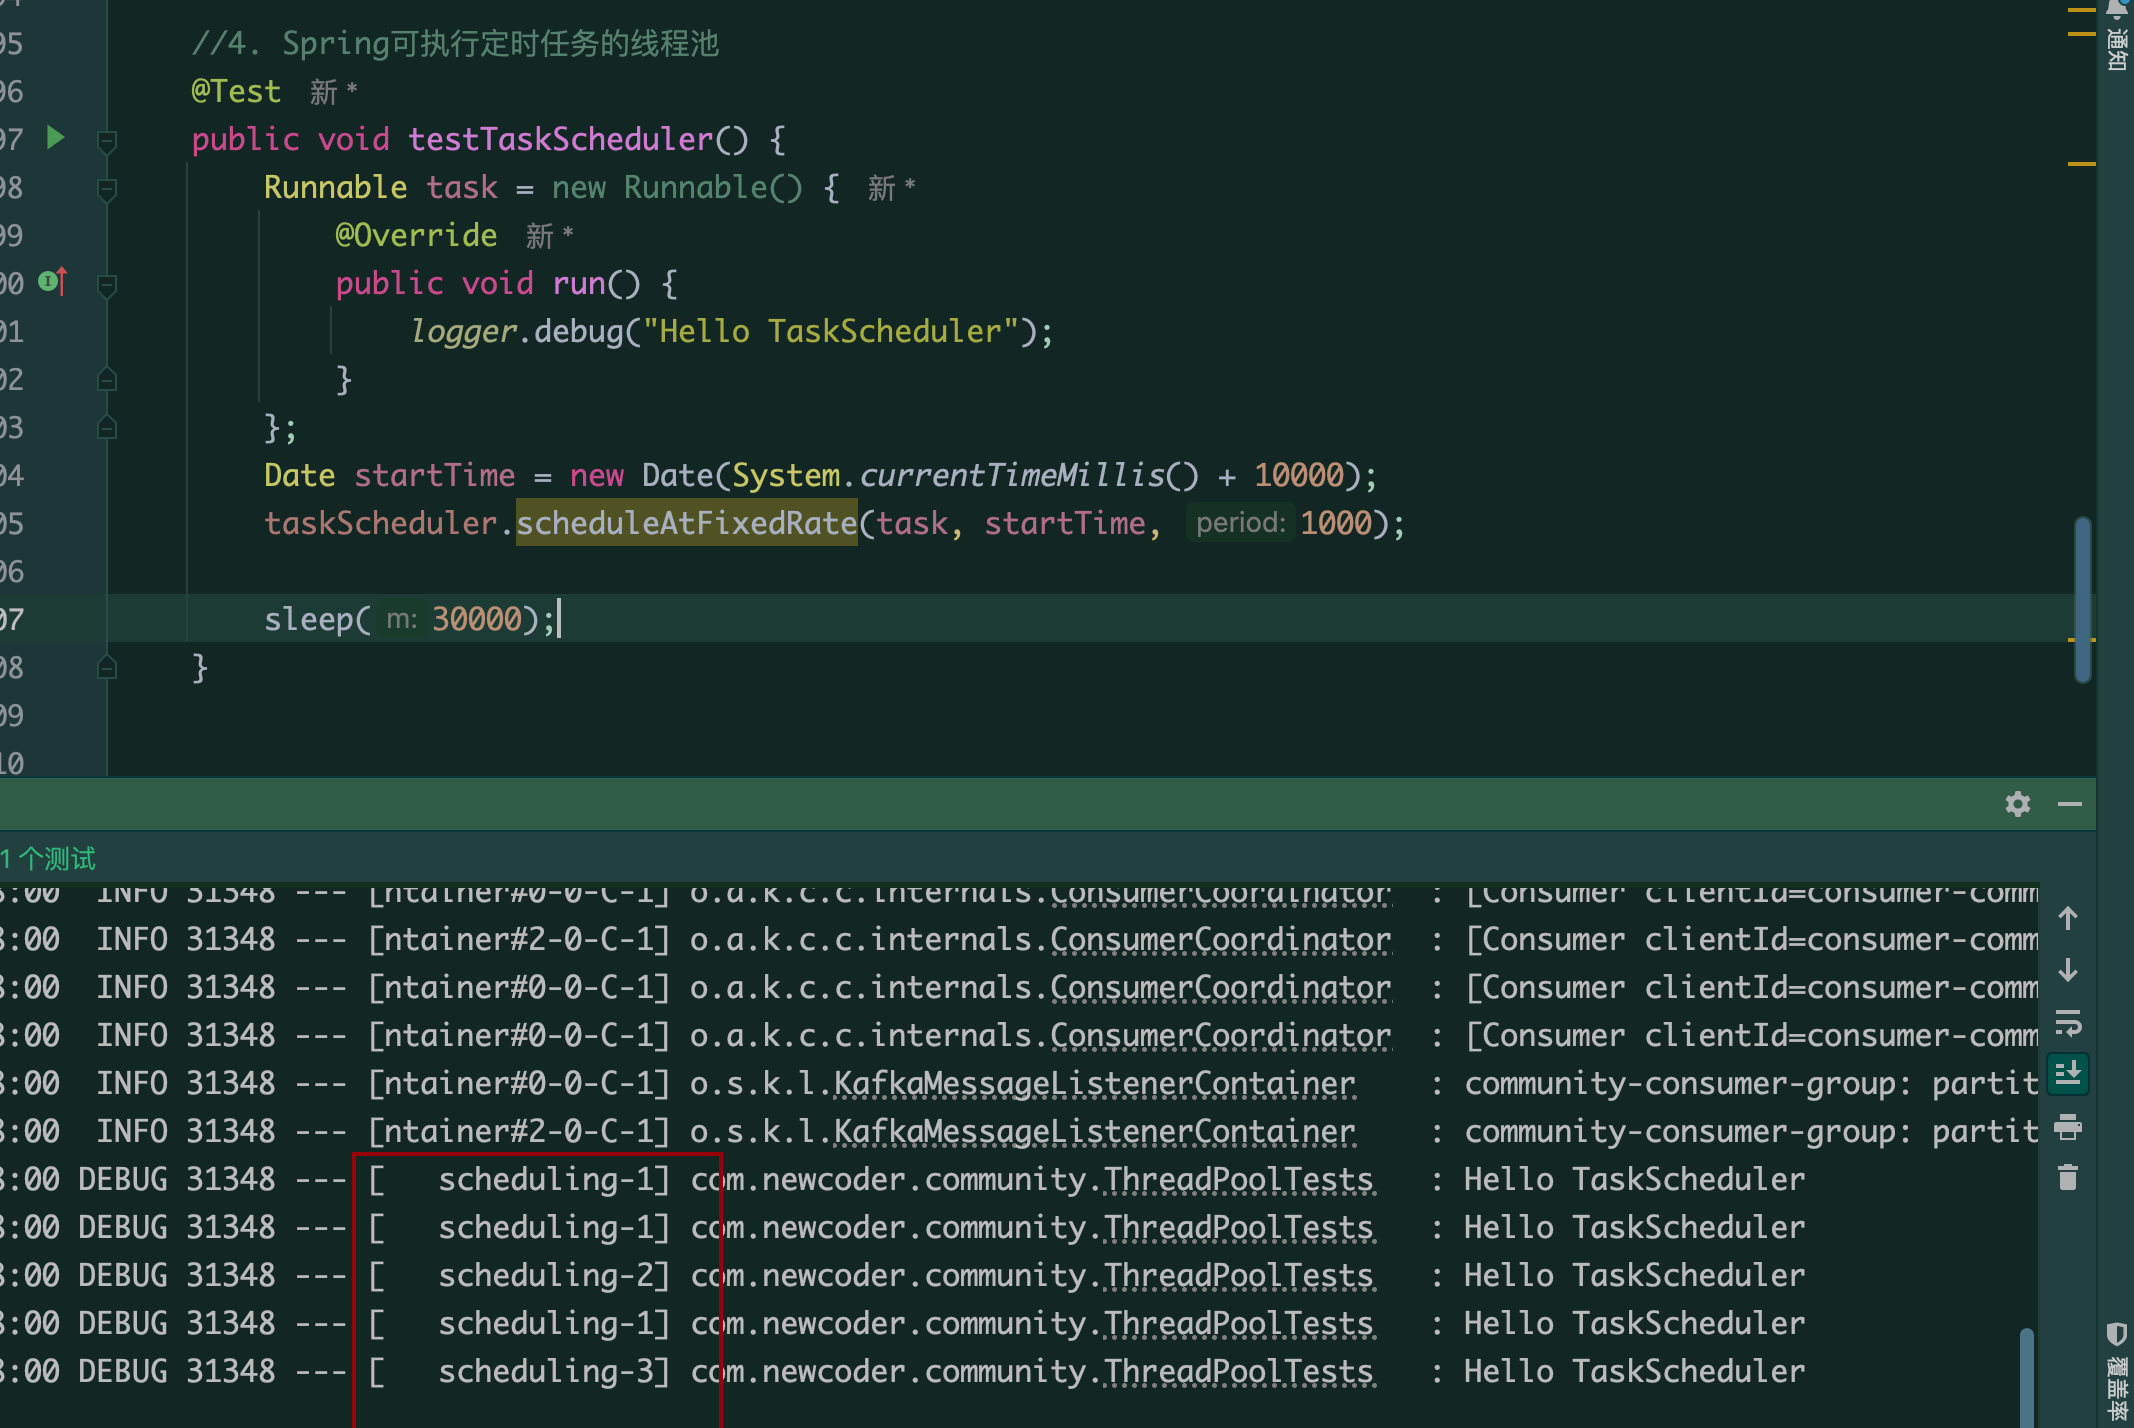
Date startTime = new Date(System.currentTimeMillis() + 10000);
taskScheduler.scheduleAtFixedRate(task, startTime, 1000);
sleep(30000);
}
简便调用方式
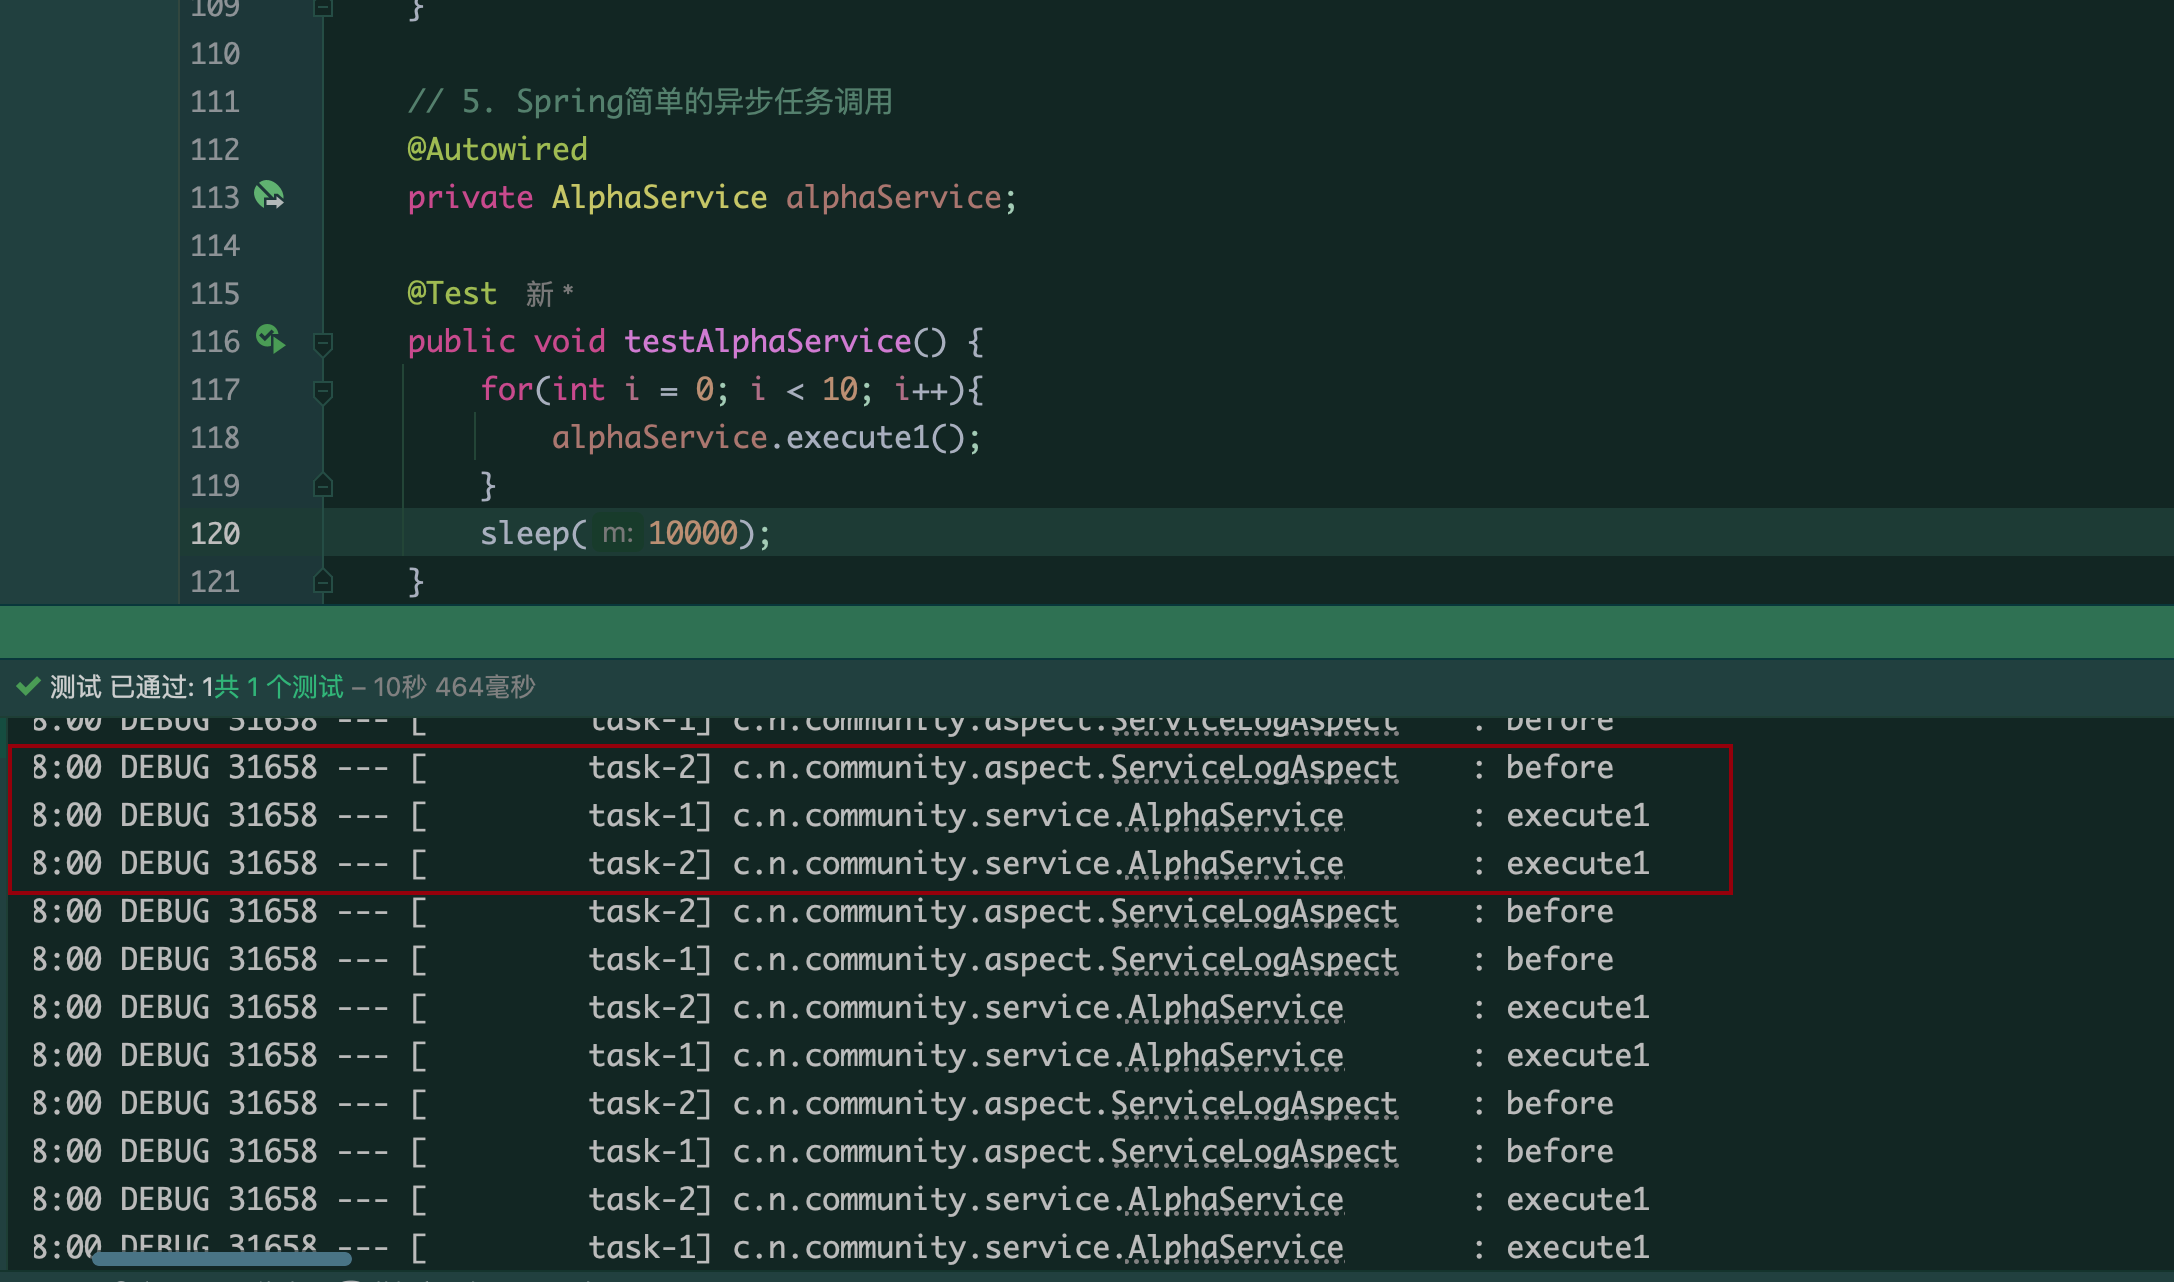
@Async
    @Async
    public void execute1() {
        logger.debug("execute1");
    }
- Async注解,让该方法在多线程环境下,被异步调用
 // 5. Spring简单的异步任务调用
    @Autowired
    private AlphaService alphaService;

    @Test
    public void testAlphaService() {
        for(int i = 0; i < 10; i++){
            alphaService.execute1();
        }
        sleep(10000)
    }
@Scheduled
    //Scheduled注解,让该方法在多线程环境下,被定时调用
    @Scheduled(initialDelay = 10000, fixedRate = 1000)
    public void execute2() {
        logger.debug("execute2");
    }
    @Test
    public void testThreadPoolTaskSchedulerSimple() {
        sleep(30000);
    }
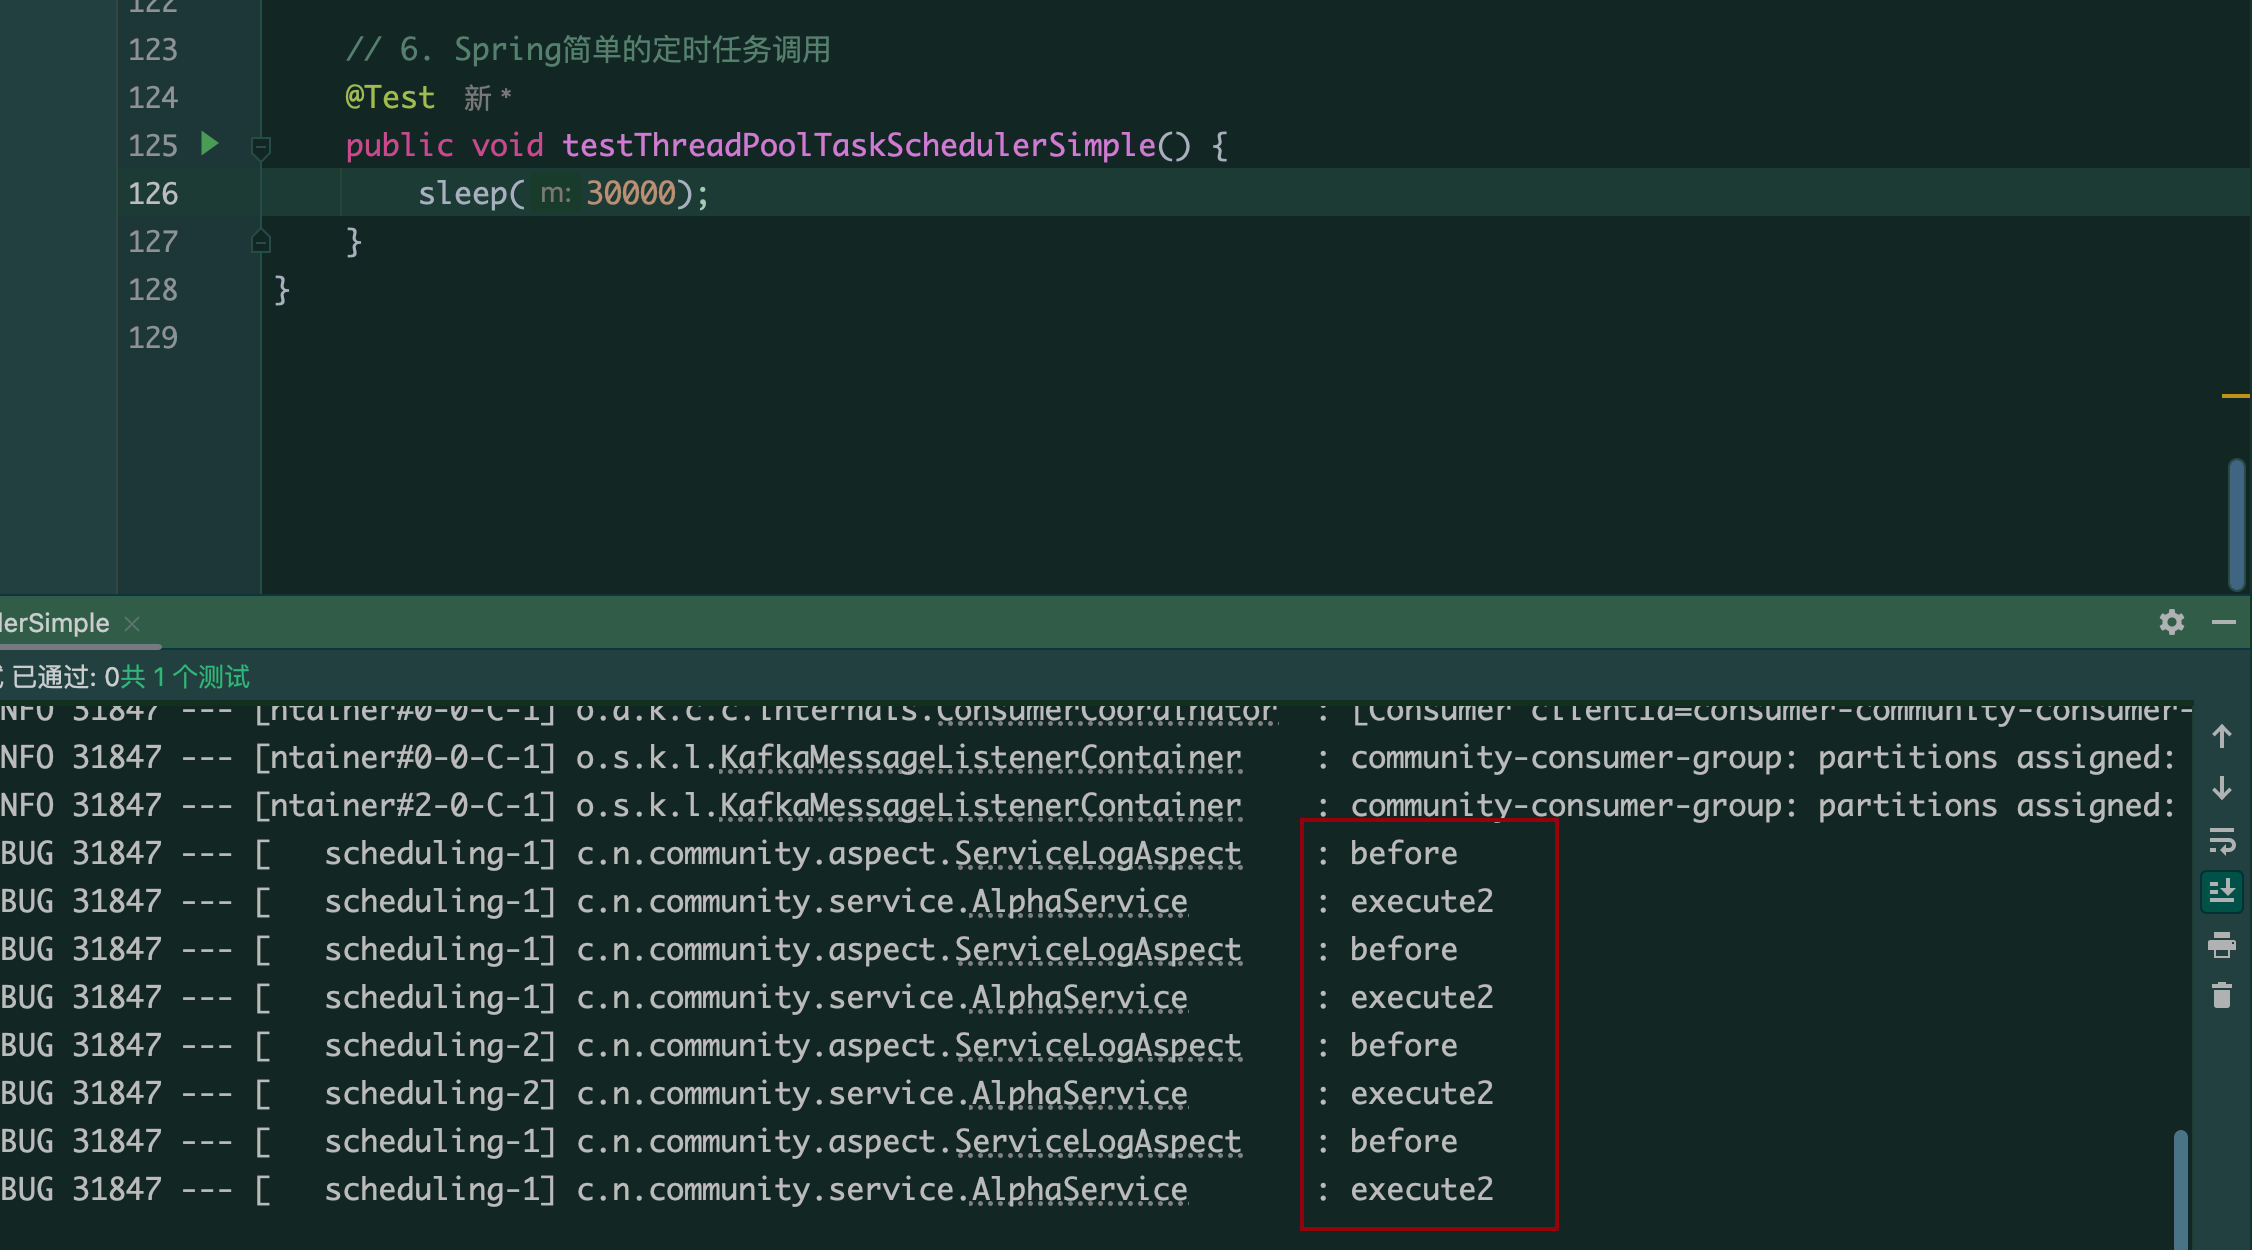
(一但程序运行就会定时自动执行任务)
Quartz
由于quartz的数据存在db中,先导入脚本到db创建:
mysql -u root -p -D community
mysql> source /Users/iris/items/牛客论坛项目/第1章 初识Spring Boot,开发社区首页/第一章素材和源码/素材/community-init-sql-1.5/tables_mysql_innodb.sql

导入依赖
<!-- https://mvnrepository.com/artifact/org.springframework.boot/spring-boot-starter-quartz -->
<dependency>
    <groupId>org.springframework.boot</groupId>
    <artifactId>spring-boot-starter-quartz</artifactId>
</dependency>
配置Quartz
编写Quartz配置类
//  配置->数据库->定时任务(只有第一次需要配置)
@Configuration
public class QuartzConfig {

    // FactoryBean可简化Bean的实例化过程(注意和BeanFactory的区别)
    // 1. 通过FactoryBean封装某些Bean的实例化过程
    // 2. 将FactoryBean装配到Spring容器里
    // 3. 将FactoryBean注入给其他的Bean
    // 4. 该Bean得到的是FactoryBean所管理的对象实例

    // 配置JobDetail
    @Bean
    public JobDetailFactoryBean alphaJobDetail() {
        JobDetailFactoryBean factoryBean = new JobDetailFactoryBean();
        factoryBean.setJobClass(AlphaJob.class);
        factoryBean.setName("alphaJob");
        factoryBean.setGroup("alphaJobGroup");
        // 是否持久保存
        factoryBean.setDurability(true);
        factoryBean.setRequestsRecovery(true);
        return factoryBean;
    }

    // 配置Trigger(SimpleTriggerFactoryBean, CronTriggerFactoryBean复杂)
    @Bean
    public SimpleTriggerFactoryBean alphaTrigger(JobDetail alphaJobDetail) {
        SimpleTriggerFactoryBean factoryBean = new SimpleTriggerFactoryBean();
        factoryBean.setJobDetail(alphaJobDetail);
        factoryBean.setName("alphaTrigger");
        factoryBean.setGroup("alphaTriggerGroup");
        factoryBean.setRepeatInterval(3000);
        factoryBean.setJobDataMap(new JobDataMap());
        return factoryBean;
    }


}
编写执行任务
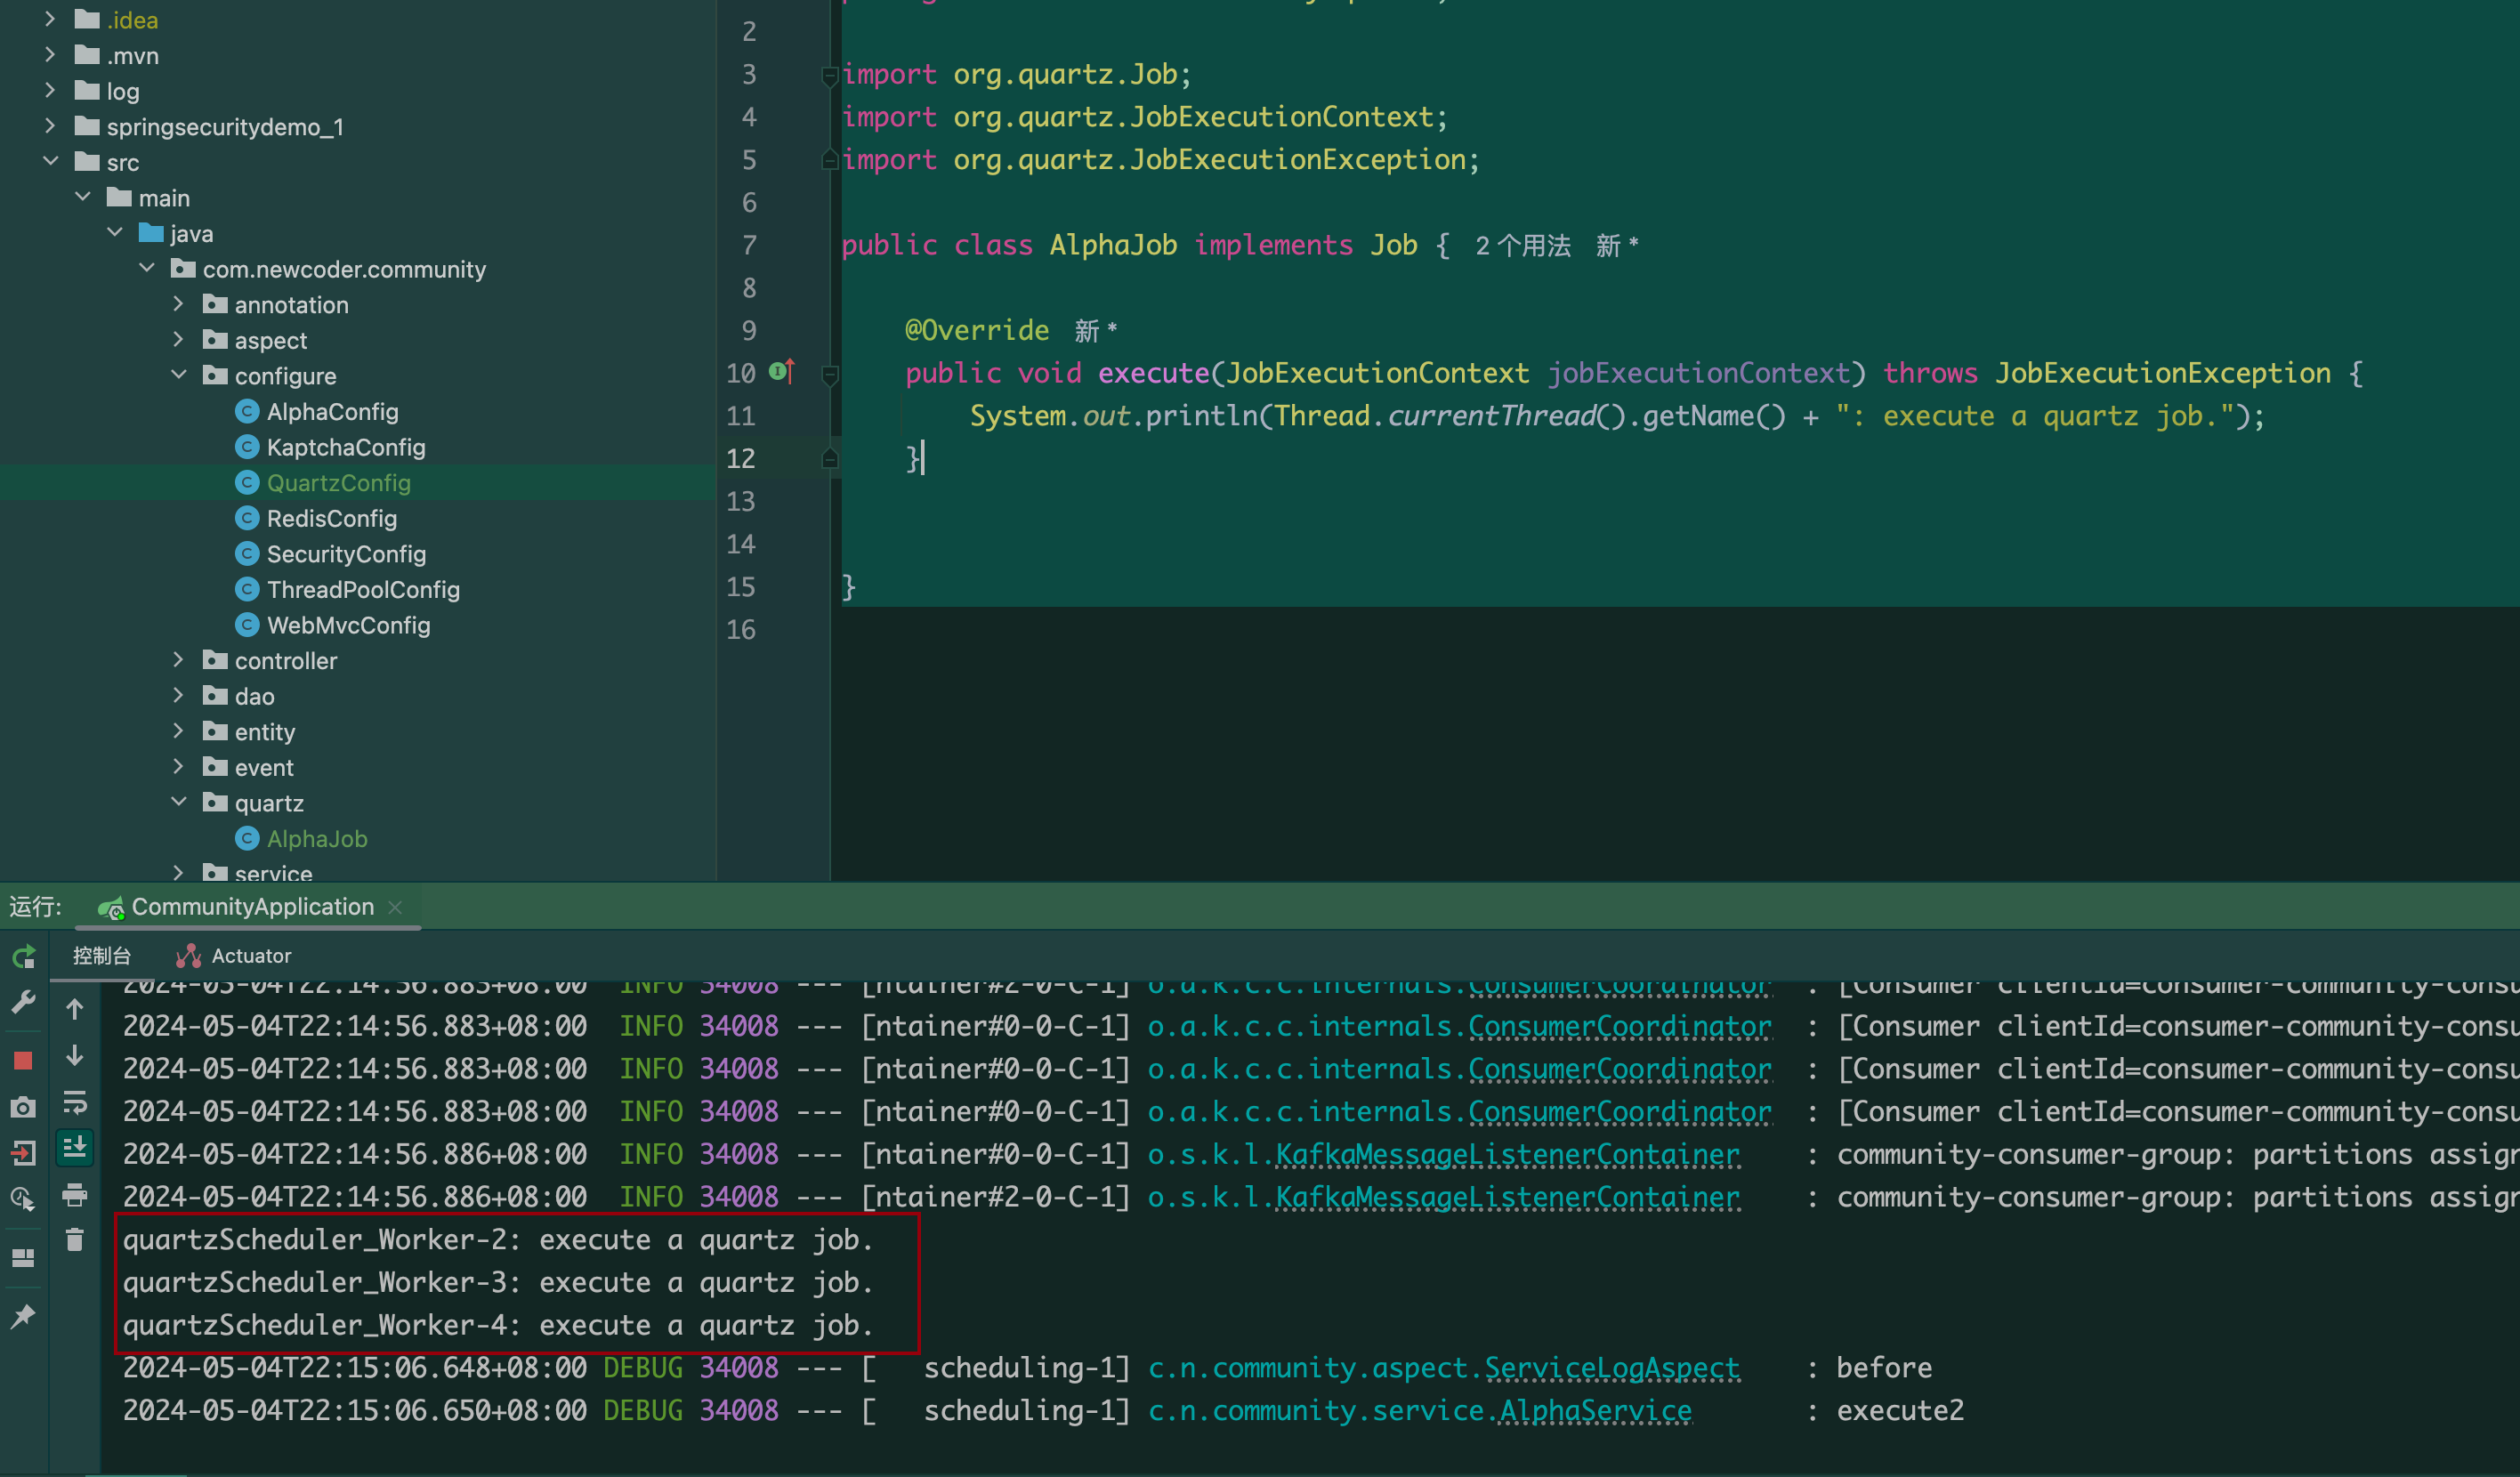
package com.newcoder.community.quartz;

import org.quartz.Job;
import org.quartz.JobExecutionContext;
import org.quartz.JobExecutionException;

public class AlphaJob implements Job {

    @Override
    public void execute(JobExecutionContext jobExecutionContext) throws JobExecutionException {
        System.out.println(Thread.currentThread().getName() + ": execute a quartz job.");
    }


}
直接执行整个项目,可发现:
如何不启动job:
注释掉配置类的Bean注解


 被折叠的 条评论
为什么被折叠?
被折叠的 条评论
为什么被折叠?
 到【灌水乐园】发言


