


准备工作
1、下载apache james ,apacheJames 下载之后可以直接运行,无需安装
注意:此处选择3.5.0版本,因为更高版本与jdk8不配套

2、下载foxmail,用于后续进行测试

3、安装foxmail
双击前一步下载的foxmail包,傻瓜式下一步安装即可
搭建ApacheJames邮件服务器
1、修改 mailetcontainer.xml,修改postmaster的值为postmaster@st.com
注意:下述@st.com为自定义的邮件域名,与@163.com类似
<context>
<!-- When the domain part of the postmaster mailAddress is missing, the default domain is appended.
You can configure it to (for example) <postmaster>postmaster@myDomain.com</postmaster> -->
<postmaster>postmaster@st.com</postmaster>
</context>
2、修改 smtpserver.xml
将authRequired、verifyIdentity值配置为false
将helloName配置为st.com。注意与步骤1中保持一致
<authRequired>true</authRequired>
<verifyIdentity>true</verifyIdentity>
<helloName autodetect="true">st.com</helloName>
3、修改 domainlist.xml
将autodetect、autodetectIP的值配置为false
将defaultDomain配置为st.com。注意与步骤1中保持一致
<domainlist class="org.apache.james.domainlist.jpa.JPADomainList">
<autodetect>false</autodetect>
<autodetectIP>false</autodetectIP>
<defaultDomain>st.com</defaultDomain>
</domainlist>
4、启动james
进入james-server-app-3.5.0/bin目录中,windows执行run.bat,linux执行sh run.sh
注意:windows中先打开dos窗口,然后再执行run.bat,直接在界面双击run.bat文件执行,会启动失败
5、创建域名
进入james-server-app-3.5.0/bin目录中
james-cli.bat -h localhost -p 9999 adddomain st.com
6、创建用户
进入james-server-app-3.5.0/bin目录中,执行如下命令,分别创建两个用户 steven@st.com(密码:123456)、russell@st.com(密码:123456)
james-cli.bat -h localhost -p 9999 adduser steven@st.com 123456
james-cli.bat -h localhost -p 9999 adduser russell@st.com 123456
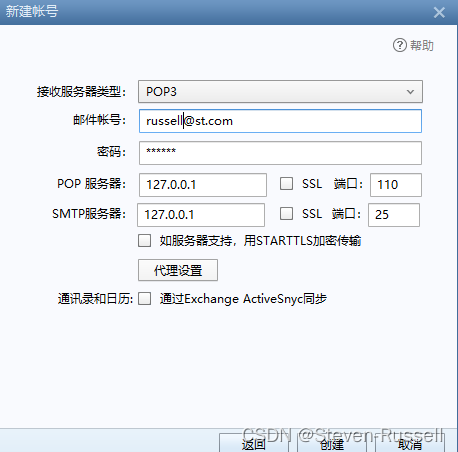
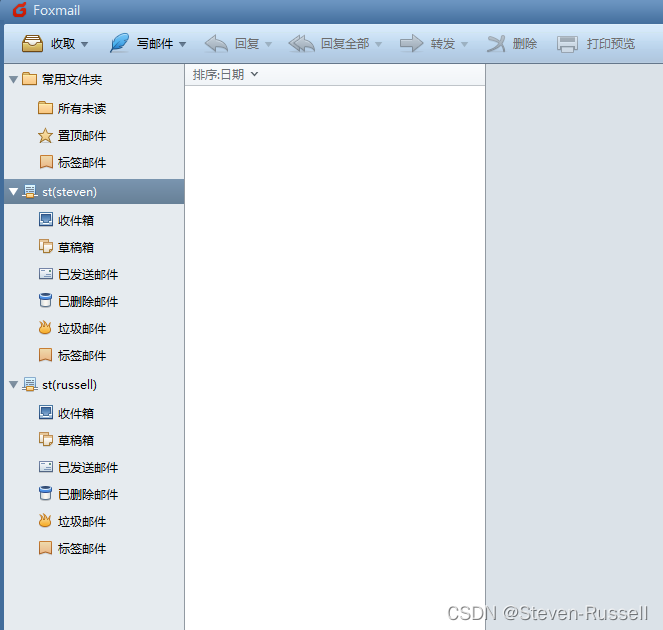
7、使用foxmail 连接james mail
此时james服务器已经启动并且可以使用了,打开foxmail,创建两个用户steven@st.com、russell@st.com,注意密码和前面创建用户的信息对应

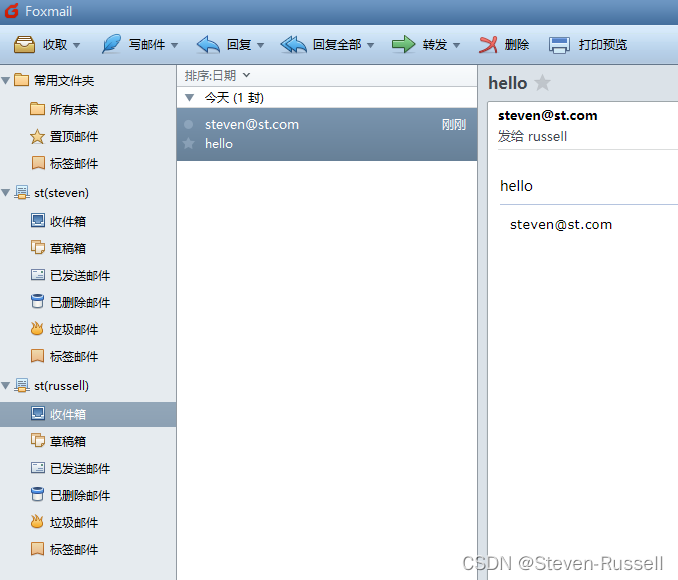
8、发送邮件

9、接收邮件,注意:若是邮件接收不及时,可以手动点击左上角的收取按钮,即可接收到最新的邮件
开启james的ssl
1、从jre/lib/ext中拷贝sunjce_provider.jar到james-server-app-3.5.0/lib
2、在james-server-app-3.5.0/conf下生成keystore,直接在james-server-app-3.5.0/conf下执行keytool命令,后续就不用重新将keystore文件移动了
keytool -genkey -alias james -keyalg RSA -keystore keystore

注意:
- 生成keystore的口令别忘了,后续配置会用到
- 名字与姓氏时输入之前的域名st.com
- 后续的步骤可以直接回车跳过
3、修改smtpserver.xml
修改25端口为465
<bind>0.0.0.0:465</bind>
修改tls标签的属性socketTLS=true,修改secret的值为创建证书时的口令密码
<tls socketTLS="true" startTLS="false">
<!-- To create a new keystore execute:
keytool -genkey -alias james -keyalg RSA -keystore /path/to/james/conf/keystore
-->
<keystore>file://conf/keystore</keystore>
<secret>123456</secret>
<provider>org.bouncycastle.jce.provider.BouncyCastleProvider</provider>
<!-- The algorithm is optional and only needs to be specified when using something other
than the Sun JCE provider - You could use IbmX509 with IBM Java runtime. -->
<algorithm>SunX509</algorithm>
</tls>
4、重启james-mail
进入james-server-app-3.5.0/bin目录中,windows执行run.bat,linux执行sh run.sh
注意:windows中先打开dos窗口,然后再执行run.bat,直接在界面双击run.bat文件执行,会启动失败
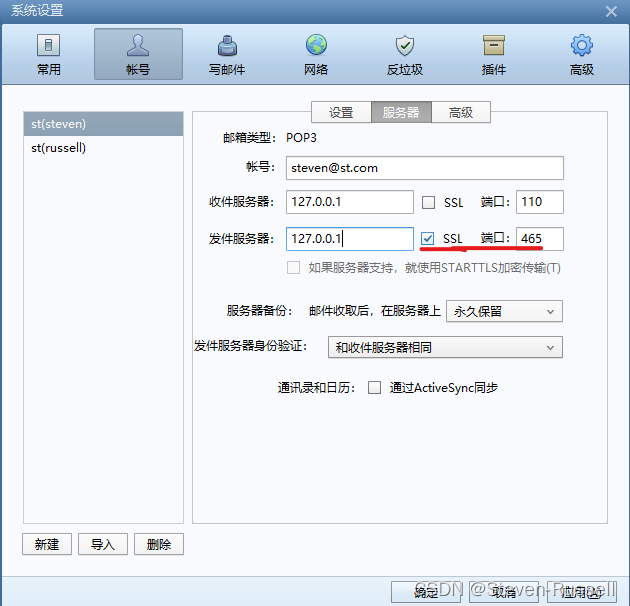
5、修改foxmail中的配置,将账户的服务器配置为465,并且点击应用
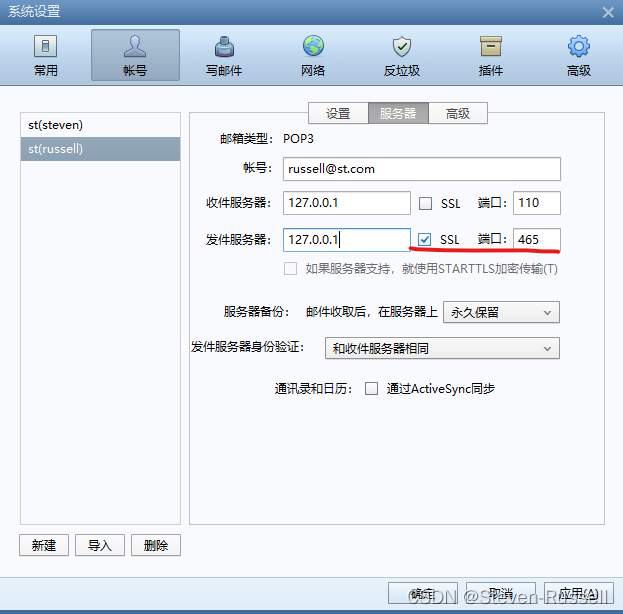
6、进行邮件发送和接收进行验证,此处不再赘述,与前面未开启ssl时的操作一致

7、可以采用wireshark进行抓包,检查是否是ssl传输
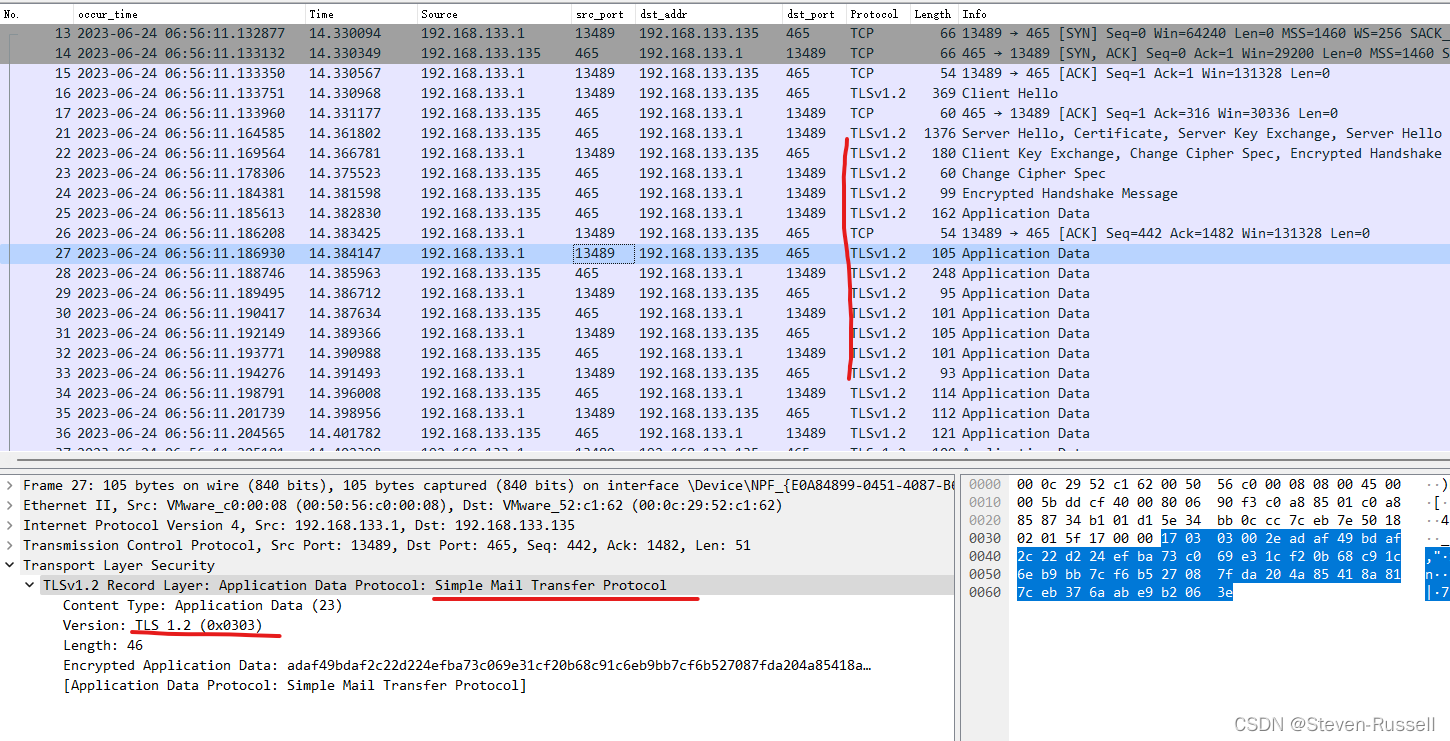
注意:由于博主将服务器部署在虚拟机中,所以ip地址不是127.0.0.1,但是本质上是一致的


 1280
1280


 被折叠的 条评论
为什么被折叠?
被折叠的 条评论
为什么被折叠?
 到【灌水乐园】发言


