


背景
1、对接多个节点上的MQ(如master-MQ,slave-MQ),若读者需要自己模拟出两个MQ,可以部署多个VM然后参考 docker 安装rabbitmq_Steven-Russell的博客-CSDN博客
2、队列名称不是固定的,需要接受外部参数,并且通过模板进行格式化,才能够得到队列名称
3、需要在master-MQ上延迟一段时间,然后将消息再转发给slave-MQ
问题
1、采用springboot的自动注入bean需要事先知道队列的名称,但是队列名称是动态的情况下,无法实现自动注入
2、mq弱依赖,在没有master-mq或者slave-mq时,不能影响到现有能力
解决方案
1、由于mq的队列创建、exchange创建以及队列和exchange的绑定关系是可重入的,所以采用connectFactory进行手动声明
2、增加自定义条件OnMqCondition,防止不必要的bean创建
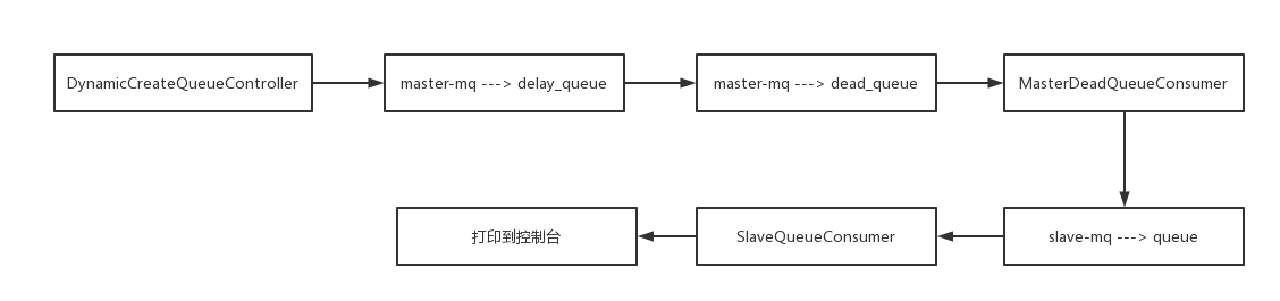
总体流程

实施过程
搭建springboot项目
参考 搭建最简单的SpringBoot项目_Steven-Russell的博客-CSDN博客
引入amqp依赖
<dependency>
    <groupId>org.springframework.boot</groupId>
    <artifactId>spring-boot-starter-amqp</artifactId>
</dependency>
引入后续会用到的工具类依赖
<dependency>
    <groupId>commons-io</groupId>
    <artifactId>commons-io</artifactId>
    <version>2.11.0</version>
</dependency>
<dependency>
    <groupId>org.projectlombok</groupId>
    <artifactId>lombok</artifactId>
    <version>1.18.28</version>
    <scope>provided</scope>
</dependency>
<dependency>
    <groupId>com.alibaba.fastjson2</groupId>
    <artifactId>fastjson2</artifactId>
    <version>2.0.40</version>
</dependency>
创建配置文件
在application.yml中增加如下配置
mq:
  master:
    addresses: 192.168.30.128:5672
    username: guest
    password: guest
    vhost: /
  slave:
    addresses: 192.168.30.131:5672
    username: guest
    password: guest
    vhost: /
创建自定义Condition注解和注解实现
package com.wd.config.condition;

import org.springframework.context.annotation.Conditional;

import java.lang.annotation.*;

@Target({ElementType.TYPE, ElementType.METHOD})
@Retention(RetentionPolicy.RUNTIME)
@Documented
@Conditional(OnMqCondition.class)
public @interface MqConditional {

    String[] keys();

}
package com.wd.config.condition;

import org.springframework.context.annotation.Condition;
import org.springframework.context.annotation.ConditionContext;
import org.springframework.core.type.AnnotatedTypeMetadata;
import org.springframework.lang.NonNull;
import org.springframework.util.ObjectUtils;

import java.util.Map;

public class OnMqCondition implements Condition {

    @Override
    public boolean matches(@NonNull ConditionContext context, @NonNull AnnotatedTypeMetadata metadata) {
        Map<String, Object> annotationAttributes = metadata.getAnnotationAttributes(MqConditional.class.getName());
        if (annotationAttributes == null || annotationAttributes.isEmpty()) {
            // 为空则不进行校验了
            return true;
        }
        String[] keys = (String[])annotationAttributes.get("keys");
        for (String key : keys) {
            String property = context.getEnvironment().getProperty(key);
            if (ObjectUtils.isEmpty(property)) {
                return false;
            }
        }

        return true;
    }
}
创建多个链接工厂connectFactory
package com.wd.config;

import com.wd.config.condition.MqConditional;
import org.springframework.amqp.rabbit.connection.CachingConnectionFactory;
import org.springframework.amqp.rabbit.connection.ConnectionFactory;
import org.springframework.beans.factory.annotation.Value;
import org.springframework.context.annotation.Bean;
import org.springframework.context.annotation.Configuration;
import org.springframework.context.annotation.Primary;

@Configuration
public class MqConnectionFactory {

    @Value("${mq.master.addresses}")
    private String masterAddresses;

    @Value("${mq.master.username}")
    private String masterUsername;

    @Value("${mq.master.password}")
    private String masterPassword;

    @Value("${mq.master.vhost}")
    private String masterVhost;

    @Value("${mq.slave.addresses}")
    private String slaveAddresses;

    @Value("${mq.slave.username}")
    private String slaveUsername;

    @Value("${mq.slave.password}")
    private String slavePassword;

    @Value("${mq.slave.vhost}")
    private String slaveVhost;

    @Bean
    @Primary
    @MqConditional(keys = {"mq.master.addresses", "mq.master.vhost", "mq.master.username", "mq.master.password"})
    public ConnectionFactory masterConnectionFactory() {
        return doCreateConnectionFactory(masterAddresses, masterUsername, masterPassword, masterVhost);
    }

    @Bean
    @MqConditional(keys = {"mq.slave.addresses", "mq.slave.vhost", "mq.slave.username", "mq.slave.password"})
    public ConnectionFactory slaveConnectionFactory() {
        return doCreateConnectionFactory(slaveAddresses, slaveUsername, slavePassword, slaveVhost);
    }

    private ConnectionFactory doCreateConnectionFactory(String addresses,
                                                        String username,
                                                        String password,
                                                        String vhost) {
        CachingConnectionFactory cachingConnectionFactory = new CachingConnectionFactory();
        cachingConnectionFactory.setAddresses(addresses);
        cachingConnectionFactory.setUsername(username);
        cachingConnectionFactory.setPassword(password);
        cachingConnectionFactory.setVirtualHost(vhost);
        return cachingConnectionFactory;
    }

}
创建交换机名称枚举 DeclareQueueExchange
package com.wd.config;

public enum DeclareQueueExchange {
    EXCHANGE("exchange"),

    DEAD_EXCHANGE("deadExchange"),

    DELAY_EXCHANGE("delayExchange");

    private final String exchangeName;

    DeclareQueueExchange(String exchangeName) {
        this.exchangeName = exchangeName;
    }

    public String getExchangeName() {
        return exchangeName;
    }
}
创建消息队列模板枚举 DeclareQueueName
package com.wd.config;

public enum DeclareQueueName {
    DELAY_QUEUE_NAME_SUFFIX("_delay"),

    DEAD_QUEUE_NAME_SUFFIX("_dead"),

    QUEUE_NAME_TEMPLATE("wd.simple.queue.{0}");

    private final String queueName;

    DeclareQueueName(String queueName) {
        this.queueName = queueName;
    }

    public String getQueueName() {
        return queueName;
    }
}
创建消息VO和消息
package com.wd.controller.vo;

import com.wd.pojo.Phone;
import lombok.Data;

@Data
public class DelayMsgVo {
    private String queueId;

    private Phone phone;
}
package com.wd.pojo;

import lombok.AllArgsConstructor;
import lombok.Data;
import lombok.NoArgsConstructor;

import java.io.Serializable;
import java.util.Date;
import java.util.List;

@Data
@AllArgsConstructor
@NoArgsConstructor
public class Phone implements Serializable {
    private static final long serialVersionUID = -1L;

    private String id;

    private String name;

    private Date createTime;

    private List<User> userList;

}
package com.wd.pojo;

import lombok.AllArgsConstructor;
import lombok.Data;
import lombok.NoArgsConstructor;

import java.io.Serializable;
import java.util.Date;

@Data
@AllArgsConstructor
@NoArgsConstructor
public class User implements Serializable {
    private static final long serialVersionUID = -1L;

    private String username;

    private Date create;
}
定义队列id列表缓存,用于替换三方缓存,用于队列名称模板初始化
package com.wd.config;

import java.util.ArrayList;
import java.util.List;

public interface QueueIdListConfig {

    /**
     * 先用本地缓存维护队列id
     */
    List<Integer> QUEUE_ID_LIST = new ArrayList<Integer>() {{
        add(111);
        add(222);
        add(333);
    }};
}
创建消息接受入口 controller
注意:此处就以web用户输入为入口,所以创建controller
package com.wd.controller;

import com.alibaba.fastjson2.JSONObject;
import com.rabbitmq.client.*;
import com.wd.config.DeclareQueueExchange;
import com.wd.config.DeclareQueueName;
import com.wd.controller.vo.DelayMsgVo;
import org.springframework.amqp.rabbit.connection.Connection;
import org.springframework.amqp.rabbit.connection.ConnectionFactory;
import org.springframework.beans.factory.annotation.Qualifier;
import org.springframework.boot.autoconfigure.condition.ConditionalOnBean;
import org.springframework.web.bind.annotation.*;

import java.io.IOException;
import java.nio.charset.StandardCharsets;
import java.text.MessageFormat;
import java.util.HashMap;
import java.util.Map;
import java.util.concurrent.TimeoutException;

@RestController
@ConditionalOnBean(value = ConnectionFactory.class, name = "masterConnectionFactory")
public class DynamicCreateQueueController {

    private final ConnectionFactory masterConnectionFactory;

    public DynamicCreateQueueController(@Qualifier(value = "masterConnectionFactory") ConnectionFactory masterConnectionFactory) {
        this.masterConnectionFactory = masterConnectionFactory;
    }

    @PostMapping(value = "sendDelayMsg")
    public String sendMsg2DelayQueue(@RequestBody DelayMsgVo delayMsgVo) throws IOException, TimeoutException {
        doSendMsg2DelayQueue(delayMsgVo);
        return "success";
    }

    private void doSendMsg2DelayQueue(DelayMsgVo delayMsgVo) throws IOException, TimeoutException {
        // 根据id 动态生成队列名称
        String queueNameTemplate = DeclareQueueName.QUEUE_NAME_TEMPLATE.getQueueName();
        String queueName = MessageFormat.format(queueNameTemplate, delayMsgVo.getQueueId());
        String delayQueueName = queueName + DeclareQueueName.DELAY_QUEUE_NAME_SUFFIX.getQueueName();
        String deadQueueName = queueName + DeclareQueueName.DEAD_QUEUE_NAME_SUFFIX.getQueueName();
        // 注意:下述声明交换机和队列的操作是可以重入的,MQ并不会报错
        try (Connection connection = masterConnectionFactory.createConnection();
             Channel channel = connection.createChannel(false)){
            // 声明死信交换机
            channel.exchangeDeclare(DeclareQueueExchange.DEAD_EXCHANGE.getExchangeName(), BuiltinExchangeType.DIRECT);
            // 声明死信队列
            AMQP.Queue.DeclareOk deadQueueDeclareOk = channel.queueDeclare(deadQueueName,
                    true, false, false, null);
            // 定时任务 绑定消费者,避免出现多个消费者以及重启后无法消费存量消息的问题
            //  注意:因为需要保证消费顺序,所以此处仅声明一个消费者
            // 死信队列和交换机绑定
            channel.queueBind(deadQueueName, DeclareQueueExchange.DEAD_EXCHANGE.getExchangeName(), deadQueueName);

            // 声明延迟队列
            Map<String, Object> args = new HashMap<>();
            //设置延迟队列绑定的死信交换机
            args.put("x-dead-letter-exchange", DeclareQueueExchange.DEAD_EXCHANGE.getExchangeName());
            //设置延迟队列绑定的死信路由键
            args.put("x-dead-letter-routing-key", deadQueueName);
            //设置延迟队列的 TTL 消息存活时间
            args.put("x-message-ttl", 10 * 1000);
            channel.queueDeclare(delayQueueName, true, false, false, args);
            channel.exchangeDeclare(DeclareQueueExchange.DELAY_EXCHANGE.getExchangeName(), BuiltinExchangeType.DIRECT);
            channel.queueBind(delayQueueName, DeclareQueueExchange.DELAY_EXCHANGE.getExchangeName(), delayQueueName);

            // 发送消息到延迟队列
            channel.basicPublish(DeclareQueueExchange.DELAY_EXCHANGE.getExchangeName(), delayQueueName, null,
                    JSONObject.toJSONString(delayMsgVo.getPhone()).getBytes(StandardCharsets.UTF_8));
        }

    }

}
创建master延迟消息消费者
package com.wd.mq.consumer;

import com.rabbitmq.client.*;
import com.wd.config.DeclareQueueExchange;
import com.wd.config.DeclareQueueName;
import org.springframework.amqp.rabbit.connection.Connection;
import org.springframework.amqp.rabbit.connection.ConnectionFactory;

import java.io.IOException;
import java.util.concurrent.TimeoutException;

/**
 * 死信消费者,消费消息转发给targetConnectionFactory对应的目标MQ
 */
public class MasterDeadQueueConsumer extends DefaultConsumer {

    private final ConnectionFactory targetConnectionFactory;

    public MasterDeadQueueConsumer(Channel channel, ConnectionFactory targetConnectionFactory) {
        super(channel);
        this.targetConnectionFactory = targetConnectionFactory;
    }

    @Override
    public void handleDelivery(String consumerTag, Envelope envelope, AMQP.BasicProperties properties, byte[] body) throws IOException {
        // 从死信队列的名称中截取队列名称,作为后续队列的名称
        String routingKey = envelope.getRoutingKey();
        String targetQueueName = routingKey.substring(0, routingKey.length() - DeclareQueueName.DEAD_QUEUE_NAME_SUFFIX.getQueueName().length());
        try (Connection targetConnection = targetConnectionFactory.createConnection();
             Channel targetChannel = targetConnection.createChannel(false)){
            // 声明交换机和队列
            targetChannel.exchangeDeclare(DeclareQueueExchange.EXCHANGE.getExchangeName(), BuiltinExchangeType.DIRECT);
            targetChannel.queueDeclare(targetQueueName, true, false, false, null);
            targetChannel.queueBind(targetQueueName, DeclareQueueExchange.EXCHANGE.getExchangeName(), targetQueueName);
            // 转发消息
            targetChannel.basicPublish(DeclareQueueExchange.EXCHANGE.getExchangeName(), targetQueueName, properties, body);
        } catch (TimeoutException e) {
            e.printStackTrace();
            // 注意此处获取的源队列的channel
            getChannel().basicNack(envelope.getDeliveryTag(), false, true);
        }
        // 注意此处获取的源队列的channel
        getChannel().basicAck(envelope.getDeliveryTag(), false);
    }
}
创建slave队列消息消费者
package com.wd.mq.consumer;

import com.alibaba.fastjson2.JSONObject;
import com.rabbitmq.client.AMQP;
import com.rabbitmq.client.Channel;
import com.rabbitmq.client.DefaultConsumer;
import com.rabbitmq.client.Envelope;
import com.wd.pojo.Phone;

import java.io.IOException;

public class SlaveQueueConsumer extends DefaultConsumer {


    public SlaveQueueConsumer(Channel channel) {
        super(channel);
    }

    @Override
    public void handleDelivery(String consumerTag, Envelope envelope, AMQP.BasicProperties properties, byte[] body) throws IOException {
        Phone phone = JSONObject.parseObject(new String(body), Phone.class);
        System.out.println("SlaveQueueConsumer consume ==> " + phone);
        getChannel().basicAck(envelope.getDeliveryTag(), false);
    }
}
创建定时任务,消费延迟消息
注意:因为采用的是死信队列的方式实现的延迟效果,此处只需要消费对应的死信队列即可
package com.wd.mq.quartz;

import com.rabbitmq.client.AMQP;
import com.rabbitmq.client.BuiltinExchangeType;
import com.rabbitmq.client.Channel;
import com.wd.config.DeclareQueueExchange;
import com.wd.config.DeclareQueueName;
import com.wd.config.QueueIdListConfig;
import com.wd.mq.consumer.MasterDeadQueueConsumer;
import org.springframework.amqp.rabbit.connection.Connection;
import org.springframework.amqp.rabbit.connection.ConnectionFactory;
import org.springframework.beans.factory.annotation.Qualifier;
import org.springframework.boot.autoconfigure.condition.ConditionalOnBean;
import org.springframework.context.annotation.Configuration;
import org.springframework.scheduling.annotation.Scheduled;

import java.io.IOException;
import java.text.MessageFormat;
import java.util.concurrent.TimeoutException;

@Configuration
@ConditionalOnBean(value = ConnectionFactory.class, name = {"slaveConnectionFactory", "masterConnectionFactory"})
public class MasterDeadQueueSubscribeProcessor {

    private final ConnectionFactory masterConnectionFactory;

    private final ConnectionFactory slaveConnectionFactory;

    public MasterDeadQueueSubscribeProcessor(@Qualifier(value = "masterConnectionFactory") ConnectionFactory masterConnectionFactory,
                                             @Qualifier(value = "slaveConnectionFactory") ConnectionFactory slaveConnectionFactory) {
        this.masterConnectionFactory = masterConnectionFactory;
        this.slaveConnectionFactory = slaveConnectionFactory;
    }

    /**
     * 消费死信队列信息,并且转发到其他mq
     */
    @Scheduled(fixedDelay = 10 * 1000)
    public void subscribeMasterDeadQueue() throws IOException, TimeoutException {
        // 根据id 动态生成队列名称
        // 此处的queueIdList可以从第三方缓存查询得到,并且和sendDelayMsg接口保持同步刷新,此处先用本地缓存代替,id同步刷新机制不是重点,此处暂不讨论
        for (Integer id : QueueIdListConfig.QUEUE_ID_LIST) {
            String queueNameTemplate = DeclareQueueName.QUEUE_NAME_TEMPLATE.getQueueName();
            String deadQueueName = MessageFormat.format(queueNameTemplate, id) + DeclareQueueName.DEAD_QUEUE_NAME_SUFFIX.getQueueName();

            try (Connection connection = masterConnectionFactory.createConnection();
                 Channel channel = connection.createChannel(false)){
                AMQP.Queue.DeclareOk queueDeclare = channel.queueDeclare(deadQueueName, true, false, false, null);
                if (queueDeclare.getConsumerCount() == 0) {
                    channel.exchangeDeclare(DeclareQueueExchange.DEAD_EXCHANGE.getExchangeName(), BuiltinExchangeType.DIRECT);
                }
                channel.queueBind(deadQueueName, DeclareQueueExchange.DEAD_EXCHANGE.getExchangeName(), deadQueueName);
                channel.basicConsume(deadQueueName, false, new MasterDeadQueueConsumer(channel, slaveConnectionFactory));
            }
        }
    }

}
创建定时任务,消费slave队列的消息
package com.wd.mq.quartz;


import com.rabbitmq.client.AMQP;
import com.rabbitmq.client.BuiltinExchangeType;
import com.rabbitmq.client.Channel;
import com.wd.config.DeclareQueueExchange;
import com.wd.config.DeclareQueueName;
import com.wd.config.QueueIdListConfig;
import com.wd.mq.consumer.SlaveQueueConsumer;
import org.springframework.amqp.rabbit.connection.Connection;
import org.springframework.amqp.rabbit.connection.ConnectionFactory;
import org.springframework.beans.factory.annotation.Qualifier;
import org.springframework.boot.autoconfigure.condition.ConditionalOnBean;
import org.springframework.context.annotation.Configuration;
import org.springframework.scheduling.annotation.Scheduled;

import java.io.IOException;
import java.text.MessageFormat;
import java.util.concurrent.TimeoutException;

@Configuration
@ConditionalOnBean(value = ConnectionFactory.class, name = "slaveConnectionFactory")
public class SlaveQueueSubscribeProcessor {

    private final ConnectionFactory slaveConnectionFactory;

    public SlaveQueueSubscribeProcessor(@Qualifier(value = "slaveConnectionFactory") ConnectionFactory slaveConnectionFactory) {
        this.slaveConnectionFactory = slaveConnectionFactory;
    }

    /**
     * 消费队列信息
     */
    @Scheduled(fixedDelay = 10 * 1000)
    public void subscribeSlaveDeadQueue() throws IOException, TimeoutException {
        // 根据id 动态生成队列名称
        // 此处的queueIdList可以从第三方缓存查询得到,并且和sendDelayMsg接口保持同步刷新,此处先用本地缓存代替
        for (Integer id : QueueIdListConfig.QUEUE_ID_LIST) {
            String queueNameTemplate = DeclareQueueName.QUEUE_NAME_TEMPLATE.getQueueName();
            String queueName = MessageFormat.format(queueNameTemplate, id);
            try (Connection connection = slaveConnectionFactory.createConnection();
                 Channel channel = connection.createChannel(false)){
                AMQP.Queue.DeclareOk queueDeclare = channel.queueDeclare(queueName, true, false, false, null);
                if (queueDeclare.getConsumerCount() == 0) {
                    channel.basicConsume(queueName, false, new SlaveQueueConsumer(channel));
                }
                channel.exchangeDeclare(DeclareQueueExchange.EXCHANGE.getExchangeName(), BuiltinExchangeType.DIRECT);
                channel.queueBind(queueName, DeclareQueueExchange.EXCHANGE.getExchangeName(), queueName);
            }
        }

    }

}
启动项目
请求接口发送消息 http://localhost:8080/sendDelayMsg
检查消息传递过程
先在master-mq延迟队列发现消息

再到master-mq死信队列中发现消息

再到slave-mq中发现消息

检查日志打印
发现SlaveQueueConsumer打印如下日志:![]()
结论
消息传递流程如下,验证通过


 880
880


 被折叠的 条评论
为什么被折叠?
被折叠的 条评论
为什么被折叠?
 到【灌水乐园】发言


