


单元测试是测试单元代码
junit4
流程
- 添加JUnit 4依赖:在项目的构建工具(如Maven或Gradle)的配置文件中,添加JUnit 4的依赖。
- 创建测试类:创建一个普通的Java类,并在类上添加
@RunWith(SpringJUnit4ClassRunner.class)注解。 - 添加Spring配置:在测试类中,使用
@ContextConfiguration注解指定Spring的配置文件或配置类。 - 编写测试方法:在测试类中,使用
@Test注解标记测试方法,并编写测试逻辑。 - 运行测试:使用IDE或构建工具运行测试类,观察测试结果。
依赖
<?xml version="1.0" encoding="UTF-8"?>
<project xmlns="http://maven.apache.org/POM/4.0.0"
         xmlns:xsi="http://www.w3.org/2001/XMLSchema-instance"
         xsi:schemaLocation="http://maven.apache.org/POM/4.0.0 http://maven.apache.org/xsd/maven-4.0.0.xsd">
    <parent>
        <artifactId>02-Spring</artifactId>
        <groupId>org.example</groupId>
        <version>1.0-SNAPSHOT</version>
    </parent>
    <modelVersion>4.0.0</modelVersion>

    <artifactId>023-jUnit</artifactId>

    <properties>
        <maven.compiler.source>17</maven.compiler.source>
        <maven.compiler.target>17</maven.compiler.target>
    </properties>

    <dependencies>
        <dependency>
            <groupId>org.springframework</groupId>
            <artifactId>spring-context</artifactId>
            <version>6.0.4</version>
        </dependency>
        <dependency>
            <groupId>junit</groupId>
            <artifactId>junit</artifactId>
            <version>4.13.2</version>
            <scope>test</scope>
        </dependency>
        <dependency>
            <groupId>org.springframework</groupId>
            <artifactId>spring-test</artifactId>
            <version>6.0.4</version>
        </dependency>
    </dependencies>
</project>
配置文件
<?xml version="1.0" encoding="UTF-8"?>
<beans xmlns="http://www.springframework.org/schema/beans"
       xmlns:xsi="http://www.w3.org/2001/XMLSchema-instance"
       xmlns:context="http://www.springframework.org/schema/context"
       xsi:schemaLocation="http://www.springframework.org/schema/beans http://www.springframework.org/schema/beans/spring-beans.xsd
                            http://www.springframework.org/schema/context http://www.springframework.org/schema/context/spring-context.xsd">

<!--    开启扫描-->
    <context:component-scan base-package="com.powernode.spring6.bean"/>
</beans>
实体类
package com.powernode.spring6.bean;

import org.springframework.beans.factory.annotation.Value;
import org.springframework.stereotype.Component;

/**
 * @BelongsProject: 02-Spring
 * @BelongsPackage: com.powernode.spring6.bean
 * @Author: dengLiMei
 * @CreateTime: 2023-02-21  09:07
 * @Description: TODO
 * @Version: 1.0
 */
@Component
public class User {
    @Value("张三")
    private String name;

    @Override
    public String toString() {
        return "User{" +
                "name='" + name + '\'' +
                '}';
    }

    public String getName() {
        return name;
    }

    public void setName(String name) {
        this.name = name;
    }
}
主函数
没有使用junit4之前
public class SpringJunit4Test {
    @Test
    public void testUser(){
        ApplicationContext context = new ClassPathXmlApplicationContext("spring.xml");
        User user = context.getBean("user", User.class);
        System.out.println(user.getName());
    }

    public void testUser1(){
        ApplicationContext context = new ClassPathXmlApplicationContext("spring.xml");
        User user = context.getBean("user", User.class);
        System.out.println(user.getName());
    }

    public void testUser2(){
        ApplicationContext context = new ClassPathXmlApplicationContext("spring.xml");
        User user = context.getBean("user", User.class);
        System.out.println(user.getName());
    }
}
}
使用junit4之后
//Spring对Junit4的支持
@RunWith(SpringRunner.class)
@ContextConfiguration("classpath:spring.xml")
public class SpringJunit4Test {
    @Autowired
    private User user;

    @Test
    public void testUser() {
        System.out.println(user.getName());
    }

    public void testUser1() {
        System.out.println(user.getName());
    }

    public void testUser2() {
        System.out.println(user.getName());
    }
通过一张图我们来对比一下更直观,如下图:
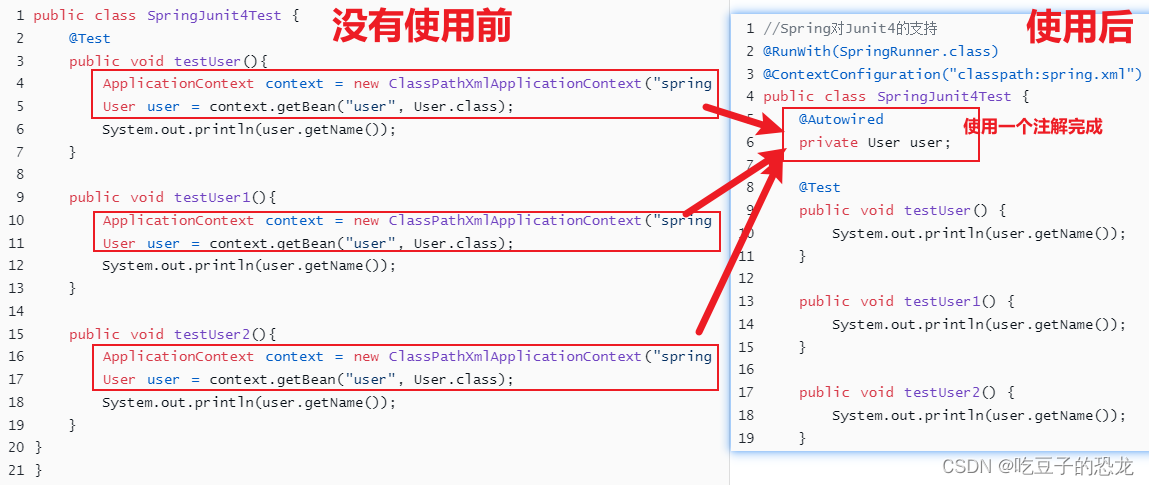
在上面的示例中,User 是要测试的Spring组件。通过使用@Autowired注解,我们可以将该组件注入到测试类中,以便在测试中使用。
然后,我们可以在testUser方法中编写测试逻辑。可以调用testUser的方法,并使用断言来验证方法的行为和结果是否符合预期。
最后,我们可以运行这个测试类,JUnit 4会加载Spring配置文件,并执行测试方法。
这只是一个简单的示例,实际的测试场景可能更复杂。你可以根据自己的需求来编写更多的测试方法,并使用JUnit提供的各种断言和注解来辅助测试。
junit5
流程
- 添加JUnit 5依赖:在项目的构建工具(如Maven或Gradle)的配置文件中,添加JUnit 5的依赖。
- 创建测试类:创建一个普通的Java类,并在类上添加
@ExtendWith(SpringExtension.class)注解。 - 添加Spring配置:在测试类中,使用
@ContextConfiguration注解指定Spring的配置文件或配置类。 - 编写测试方法:在测试类中,使用
@Test注解标记测试方法,并编写测试逻辑。 - 运行测试:使用IDE或构建工具运行测试类,观察测试结果。
依赖
<?xml version="1.0" encoding="UTF-8"?>
<project xmlns="http://maven.apache.org/POM/4.0.0"
         xmlns:xsi="http://www.w3.org/2001/XMLSchema-instance"
         xsi:schemaLocation="http://maven.apache.org/POM/4.0.0 http://maven.apache.org/xsd/maven-4.0.0.xsd">
    <parent>
        <artifactId>02-Spring</artifactId>
        <groupId>org.example</groupId>
        <version>1.0-SNAPSHOT</version>
    </parent>
    <modelVersion>4.0.0</modelVersion>

    <artifactId>023-jUnit5</artifactId>

    <properties>
        <maven.compiler.source>17</maven.compiler.source>
        <maven.compiler.target>17</maven.compiler.target>
    </properties>
    <dependencies>
        <dependency>
            <groupId>org.springframework</groupId>
            <artifactId>spring-context</artifactId>
            <version>6.0.4</version>
        </dependency>
        <dependency>
            <groupId>org.junit.jupiter</groupId>
            <artifactId>junit-jupiter</artifactId>
            <version>5.9.2</version>
            <scope>test</scope>
        </dependency>
        <dependency>
            <groupId>org.springframework</groupId>
            <artifactId>spring-test</artifactId>
            <version>6.0.4</version>
        </dependency>
    </dependencies>
</project>
配置文件
<?xml version="1.0" encoding="UTF-8"?>
<beans xmlns="http://www.springframework.org/schema/beans"
       xmlns:xsi="http://www.w3.org/2001/XMLSchema-instance"
       xmlns:context="http://www.springframework.org/schema/context"
       xsi:schemaLocation="http://www.springframework.org/schema/beans http://www.springframework.org/schema/beans/spring-beans.xsd
                            http://www.springframework.org/schema/context http://www.springframework.org/schema/context/spring-context.xsd">

    <!--    开启扫描-->
    <context:component-scan base-package="bean"/>
</beans>
实体类
package bean;

import org.springframework.beans.factory.annotation.Value;
import org.springframework.stereotype.Component;

/**
 * @BelongsProject: 02-Spring
 * @BelongsPackage: com.powernode.spring6.bean
 * @Author: dengLiMei
 * @CreateTime: 2023-02-21  09:07
 * @Description: TODO
 * @Version: 1.0
 */
@Component
public class User {
    @Value("张三")
    private String name;

    @Override
    public String toString() {
        return "User{" +
                "name='" + name + '\'' +
                '}';
    }

    public String getName() {
        return name;
    }

    public void setName(String name) {
        this.name = name;
    }
}
主函数
import bean.User;
import org.junit.jupiter.api.Test;
import org.junit.jupiter.api.extension.ExtendWith;
import org.springframework.beans.factory.annotation.Autowired;
import org.springframework.test.context.ContextConfiguration;
import org.springframework.test.context.junit.jupiter.SpringExtension;

/**
 * @BelongsProject: 02-Spring
 * @BelongsPackage: PACKAGE_NAME
 * @Author: dengLiMei
 * @CreateTime: 2023-02-21  11:18
 * @Description: TODO
 * @Version: 1.0
 */
@ExtendWith(SpringExtension.class)
@ContextConfiguration("classpath:spring.xml")
public class Main {


    @Autowired
    private User user;

    @Test
    public void testUser() {
        System.out.println(user.getName());
    }

    public void testUser1() {
        System.out.println(user.getName());
    }

    public void testUser2() {
        System.out.println(user.getName());
    }
}在上面的示例中,User是要测试的Spring组件。通过使用@Autowired注解,我们可以将该组件注入到测试类中,以便在测试中使用。
然后,我们可以在testUser方法中编写测试逻辑。使用断言来验证方法的行为和结果是否符合预期。
最后,我们可以运行这个测试类,JUnit 5会加载Spring配置文件,并执行测试方法。
JUnit 5还提供了更多的功能,如参数化测试、动态测试、条件测试等。你可以根据自己的需求来编写更多的测试方法,并使用JUnit提供的各种注解和断言来辅助测试。
总结
无论是JUnit 4还是JUnit 5,都可以使用Spring的依赖注入、事务管理等特性进行单元测试。需要注意的是,JUnit 5相对于JUnit 4有更多的新特性和改进,例如支持Lambda表达式、扩展模型等。因此,如果是新项目或者可以升级到JUnit 5的情况下,推荐使用JUnit 5进行单元测试。


 1064
1064

 被折叠的 条评论
为什么被折叠?
被折叠的 条评论
为什么被折叠?
 到【灌水乐园】发言


