


目录
1 软件运行和编译
1.1 软件相关概念
1.1.1 ABI
ABI : Application Binary Interface
Windows与Linux不兼容
ELF(Executable and Linkable Format) Linux
PE(Portable Executable)Windows
1.1.2 API
API即Application Programming Interface,API可以在各种不同的操作系统上实现给应用程序提供完全相同的接口,而它们本身在这些系统上的实现却可能迥异,主流的操作系统有两种,一种是Windows系统,另一种是Linux系统。由于操作系统的不同,API又分为Windows API和Linux API。在Windows平
台开发出来的软件在Linux上无法运行,在Linux上开发的软件在Windows上又无法运行,这就导致了软件移植困难,POSIX 标准的出现就是为了解决这个问题
POSIX:Portable Operating System Interface 可移植操作系统接口,定义了操作系统应该为应用程序提供的接口标准,是IEEE为要在各种UNIX操作系统上运行的软件而定义的一系列API标准的总称。
Linux和windows都要实现基本的posix标准,程序就在源代码级别可移植了
1.1.3 开发语言
系统级开发
汇编语言
C
C++
应用级开发
java
Python
go
php
perl
delphi
basic
ruby
bash
1.2 C 语言程序的实现过程
C 程序源代码 --> 预处理 --> 编译 --> 汇编 --> 链接
C语言的程序编译主要经过四个过程:

预处理(Pre-Processing)
1)将所有的#define删除,并且展开所有的宏定义
2)处理所有的条件预编译指令,比如#if #ifdef #elif #else #endif等
3)处理#include 预编译指令,将被包含的文件插入到该预编译指令的位置。
4)删除所有注释 "//"和"/* */".
5)添加行号和文件标识,以便编译时产生调试用的行号及编译错误警告行号。
6)保留所有的#pragma编译器指令,因为编译器需要使用它们
编译 (Compiling)
编译过程就是把预处理完的文件进行一系列的词法分析,语法分析,语义分析及优化后,最后生成
相应的汇编代码
汇编 (Assembling)
汇编器是将汇编代码转变成机器可以执行的命令,每一个汇编语句几乎都对应一条机器指令。汇编
相对于编译过程比较简单,根据汇编指令和机器指令的对照表一一翻译即可
链接 (Linking)
通过调用链接器ld来链接程序运行需要的一大堆目标文件,以及所依赖的其它库文件,最后生成可
执行文件
#例:gcc 编译过程

#分步骤编译运行
gcc -E hello.c -o hello.i 对hello.c文件进行预处理,生成了hello.i 文件
gcc -S hello.i -o hello.s 对预处理文件进行编译,生成了汇编文件
gcc -c hello.s -o hello.o 对汇编文件进行编译,生成了目标文件
gcc hello.o -o hello 对目标文件进行链接,生成可执行文件

#一步实现编译过程
gcc hello.c -o hello 直接编译链接成可执行目标文件
1.3 软件模块的静态和动态链接
链接主要作用是把各个模块之间相互引用的部分处理好,使得各个模块之间能够正确地衔接,分为静态和动态链接
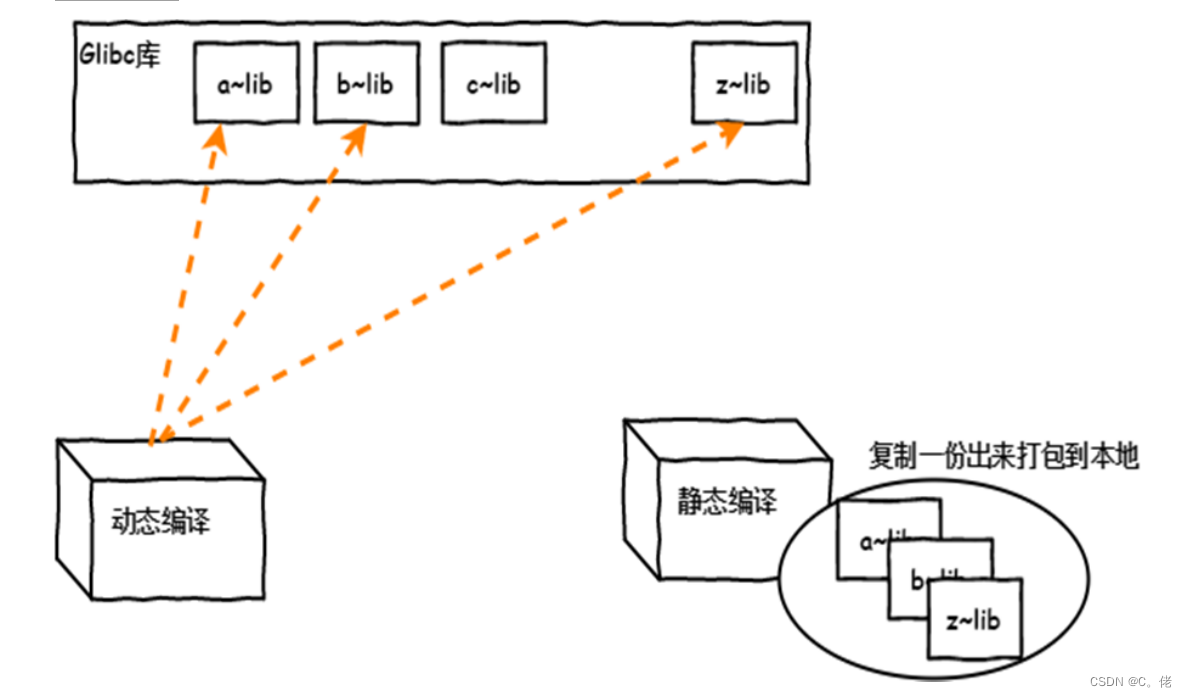
1.3.1 静态链接
把程序对应的依赖库复制一份到包
生成模块文件libxxx.a
嵌入程序包
升级难,需重新编译
占用较多空间,迁移容易
1.3.2 动态链接
只把依赖加做一个动态链接
生成模块文件libxxx.so
连接指向
占用较少空间,升级方便
1.3.3 模块(库)文件
#查看二进制程序所依赖的库文件
ldd /PATH/TO/BINARY_FILE


#管理及查看本机装载的库文件
#加载配置文件中指定的库文件
ldconfig

#显示本机已经缓存的所有可用库文件名及文件路径映射关系
/sbin/ldconfig –p

#配置文件:
/etc/ld.so.conf
/etc/ld.so.conf.d/*.conf


#缓存文件:
/etc/ld.so.cache


#例:库文件破坏后,将导致依赖的程序无法正常运行
[root@centos8 ~]#ldd /bin/ls
linux-vdso.so.1 (0x00007ffc509fd000)
libselinux.so.1 => /lib64/libselinux.so.1 (0x00007fc6ef24a000)
libcap.so.2 => /lib64/libcap.so.2 (0x00007fc6ef044000)
libc.so.6 => /lib64/libc.so.6 (0x00007fc6eec81000)
libpcre2-8.so.0 => /lib64/libpcre2-8.so.0 (0x00007fc6ee9fd000)
libdl.so.2 => /lib64/libdl.so.2 (0x00007fc6ee7f9000)
/lib64/ld-linux-x86-64.so.2 (0x00007fc6ef698000)
libpthread.so.0 => /lib64/libpthread.so.0 (0x00007fc6ee5d9000)
[root@centos8 ~]#ldd /bin/cat
linux-vdso.so.1 (0x00007ffe335dd000)
libc.so.6 => /lib64/libc.so.6 (0x00007fa34749e000)
/lib64/ld-linux-x86-64.so.2 (0x00007fa347a6b000)
[root@centos8 ~]#mv /lib64/libc.so.6 /tmp
[root@centos8 ~]#ls
ls: error while loading shared libraries: libc.so.6: cannot open shared object
file: No such file or directory
[root@centos8 ~]#cat
cat: error while loading shared libraries: libc.so.6: cannot open shared object
file: No such file or directory
2 软件包和包管理器
2.1 软件包介绍
开源软件最初只提供了打包的源码文件,用户必须自已编译每个想在GNU/Linux上运行的软件。用户急需系统能提供一种更加便利的方法来管理这些软件,当Debian诞生时,这样一个管理工具dpkg也就应运而生,可用来管理deb后缀的"包"文件。从而著名的"package"概念第一次出现在GNU/Linux系统中,稍后Red Hat才开发自己的rpm包管理系统
#例: 使用光盘

#CentOS
[root@centos8 ~]#rpm -q autofs || yum -y install autofs
[root@centos8 ~]#systemctl enable --now autofs

#Ubuntu
root@ubuntu2004:~# apt install autofs -y
root@ubuntu2004:~# vim /etc/auto.master
/misc  /etc/auto.misc
root@ubuntu2004:~# systemctl restart autofs
2.2 软件包中的文件分类
二进制文件
库文件
配置文件
帮助文件
#例:利用 cpio工具查看包文件列表
rpm2cpio 包文件|cpio –itv 预览包内文件
rpm2cpio 包文件|cpio –id  "*.conf" 释放包内文件
2.3 程序包管理器
软件包管理器功能:
将编译好的应用程序的各组成文件打包一个或几个程序包文件,利用包管理器可以方便快捷地实现程序包的安装、卸载、查询、升级和校验等管理操作
主流的程序包管理器
redhat:rpm文件, rpm 包管理器,rpm:Redhat Package Manager,RPM Package Manager
debian:deb文件, dpkg 包管理器
2.4 包命名
#源代码打包文件命名:
name-VERSION.tar.gz|bz2|xz
VERSION: major.minor.release


#例:Linux 最新内核的C源码的行数
[root@centos8 ~]#tar xvf linux-5.7.2.tar.xz
[root@centos8 ~]#cd linux-5.7.2/
[root@centos8 linux-5.7.2]#for file in `find -name "*.c"`;do line=`cat $file|wc
-l`;let sum+=line;done;echo $sum
19517994
[root@centos8 linux-5.7.2]#cat `find -name "*.c"` |wc -l
19517994
[root@centos8 linux-5.7.2]#find -name "*.c" | xargs cat |wc -l
19517994


#rpm包命名方式:
name-VERSION-release.arch.rpm
VERSION: major.minor.release
release:release.OS


#常见的arch:
x86: i386, i486, i586, i686
x86_64: x64, x86_64, amd64
powerpc: ppc
跟平台无关:noarch


#例:
bash-3.2-32.el5_9.1.i386.rpm
bash-4.2.46-19.el7.x86_64.rpm
bash-4.4.19-7.el8.x86_64.rpm
bash-4.4.19-7.el8.aarch64.rpm
bash-4.4.19-7.el8.ppc64le.rpm
bc_1.07.1-2_amd64.deb


#例:统计rpm的架构类型及相应的包数量
[root@centos8 Packages]#pwd
/misc/cd/BaseOS/Packages
[root@centos8 Packages]#ls *.rpm | grep -Eo '[^.]+\.rpm$'| grep -Eo
'^[^.]+'|sort |uniq -c
  389 i686
  211 noarch
 1061 x86_64
[root@centos8 Packages]#ls *.rpm |rev|cut -d. -f2|rev |sort |uniq -c
  389 i686
  211 noarch
 1061 x86_64
[root@centos8 Packages]#ls *.rpm | grep -Eo '[^.]+\.rpm$'|cut -d. -f1|sort |uniq
-c
  389 i686
  211 noarch
 1061 x86_64
2.5分类和拆包
软件包为了管理和使用的便利,会将一个大的软件分类,放在不同的子包中。
包的分类
Application-VERSION-ARCH.rpm: 主包
Application-devel-VERSION-ARCH.rpm 开发子包
Application-utils-VERSION-ARHC.rpm 其它子包
Application-libs-VERSION-ARHC.rpm 其它子包
2.6包的依赖
软件包之间可能存在依赖关系,甚至循环依赖,即:A包依赖B包,B包依赖C包,C包依赖A包
安装软件包时,会因为缺少依赖的包,而导致安装包失败。
解决依赖包管理工具:
yum:rpm包管理器的前端工具
dnf:Fedora 18+ rpm包管理器前端管理工具,CentOS 8 版代替 yum
apt:deb包管理器前端工具
zypper:suse上的rpm前端管理工具
2.7程序包管理器相关文件
1. 包文件组成 (每个包独有)
包内的文件
元数据,如:包的名称,版本,依赖性,描述等
可能会有包安装或卸载时运行的脚本
2. 数据库(公共):/var/lib/rpm
程序包名称及版本
依赖关系
功能说明
包安装后生成的各文件路径及校验码信息
2.8获取程序包的途径
2.8.1系统发版的光盘或官方网站
#CentOS 镜像:

https://www.centos.org/download/
http://mirrors.aliyun.com
https://mirrors.huaweicloud.com/
https://mirror.tuna.tsinghua.edu.cn/
http://mirrors.sohu.com
http://mirrors.163.com


#Ubuntu 镜像:
http://cdimage.ubuntu.com/releases/
http://releases.ubuntu.com
2.8.2第三方组织提供
#Fedora-EPEL:Extra Packages for Enterprise Linux
https://fedoraproject.org/wiki/EPEL
https://mirrors.aliyun.com/epel/
https://mirrors.cloud.tencent.com/epel/


#####SCL: Software Collections,提供较高版本的第三方软件包
https://wiki.centos.org/SpecialInterestGroup/SCLo
企业级 Linux 发行版本都被设计成持久可用的。它们的设计亦包括在发行版本使用期内维持 ABI/
API 兼容性,因此只要某个发行版本仍获支持,你在它发行首日所写的程序便可一直运作。现时
CentOS 的寿命是 10 年。然而,这意味著在发行版本使用期的尾段,它所包含的程序语言或数据库版
本(例如 php、python、perl 或 mysql、postgresql)对比新近的Linux 发行版本所提供的就
显得老旧。
不过有很多企业亦希望能以较新的程序创建软件。她们想同时拥有稳定性及较新的软件。她们要求这些
软件兼容其它系统软件,好让她们能选择遁序改进或较新的软件作开发之用。
软件集Software Collections(SCL)源出现了,以帮助解决 RHEL/CentOS 下的这种问题。SCL
的创建就是为了给 RHEL/CentOS 用户提供一种以方便、安全地安装和使用应用程序和运行时环境的多
个(而且可能是更新的)版本的方式,同时避免把系统搞乱。与之相对的是第三方源,它们可能会在已
安装的包之间引起冲突。比如:SCL 容许你执行 CentOS 提供的缺省 python(这样 yum 及其它
CentOS 工具便可用),又容许你同时安装较新版的 python 作创建及执行程序之用。
SoftwareCollections.org 是为 Red Hat Enterprise Linux,Fedora,CentOS 和
Scientific Linux 创建软件集合(SCL)的项目站点


#Community Enterprise Linux Repository:http://www.elrepo.org,支持最新的内核和硬件相关
包

#Rpmforge:官网:http://repoforge.org/, RHEL推荐,包很全,即将关闭
2.8.3 软件项目官方站点
http://yum.mariadb.org/10.4/centos8-amd64/rpms/
http://repo.mysql.com/yum/mysql-8.0-community/el/8/x86_64/
2.8.4搜索引擎
http://pkgs.org
http://rpmfind.net
http://rpm.pbone.net
https://sourceforge.net/

#注意:第三方包建议要检查其合法性,来源合法性,程序包的完整性
2.8.5 自己制作
将源码文件,利用工具,如:rpmbuild,fpm 等工具制作成rpm包文件
3 rpm 包管理器
CentOS 系统上使用rpm命令管理程序包
功能:
安装、卸载、升级、查询、校验、数据库维护
3.1 安装
#格式:
rpm {-i|--install} [install-options] PACKAGE_FILE…


#选项:
-v: verbose
-vv:
-h: 以#显示程序包管理执行进度

#常用组合:
rpm -ivh PACKAGE_FILE ...

#rpm包安装[install-options]
--test: 测试安装,但不真正执行安装,即dry run模式
--nodeps:忽略依赖关系
--replacepkgs | replacefiles
--nosignature: 不检查来源合法性
--nodigest:不检查包完整性
--noscripts:不执行程序包脚本
    %pre: 安装前脚本 --nopre
    %post: 安装后脚本 --nopost
    %preun: 卸载前脚本 --nopreun
    %postun: 卸载后脚本 --nopostun
3.2 升级和降级
升级注意项:
(1) 不要对内核做升级操作;Linux支持多内核版本并存,因此直接安装新版本内核
(2) 如果原程序包的配置文件安装后曾被修改,升级时,新版本提供的同一个配置文件不会直接覆盖老版本的配置文件,而把新版本文件重命名(FILENAME.rpmnew)后保留
#rpm包升级
rpm {-U|--upgrade} [install-options] PACKAGE_FILE...
rpm {-F|--freshen} [install-options] PACKAGE_FILE...

#对应选项:
upgrade:安装有旧版程序包,则"升级",如果不存在旧版程序包,则"安装"
freshen:安装有旧版程序包,则"升级", 如果不存在旧版程序包,则不执行升级操作

--oldpackage:降级
--force: 强制安装

#常用组合:
rpm -Uvh PACKAGE_FILE ...
rpm -Fvh PACKAGE_FILE ...
3.3 包查询
#格式:
rpm {-q|--query} [select-options] [query-options]

#常用选项:
-a:    所有包
-f:    查看指定的文件由哪个程序包安装生成
-p rpmfile:    针对尚未安装的程序包文件做查询操作

[query-options]
--changelog:    查询rpm包的changelog
-c:    查询程序的配置文件
-d:    查询程序的文档
-i:    information
-l:    查看指定的程序包安装后生成的所有文件
--scripts:    程序包自带的脚本
--last     最后安装的包
--changelog     安装包的变更历史


#和CAPABILITY相关
--whatprovides CAPABILITY:    查询指定的CAPABILITY由哪个包所提供
--whatrequires CAPABILITY:    查询指定的CAPABILITY被哪个包所依赖
--provides:    列出指定程序包所提供的CAPABILITY
-R,--requires     查询指定的程序包所依赖的CAPABILITY


#常用查询用法
-qa
-q PACKAGE
-qi PACKAGE
-qc PACKAGE
-ql PACKAGE
-qd PACKAGE
-q --scripts PACKAGE
-qf FILE
-qpi PACKAGE_FILE
-qpl PACKAGE_FILE, ...


#例: 查看最近安装的包
[root@centos8 ~]# rpm -qa --last|head
3.4 包卸载
注意:当包卸载时,对应的配置文件不会删除, 以FILENAME.rpmsave形式保留
#格式:
rpm {-e|--erase} [--allmatches] [--nodeps] [--noscripts] [--notriggers] [--test]
PACKAGE_NAME ...


#例:强行删除rpm包,并恢复
[root@centos7 ~]#rpm -e rpm --nodeps
#重启进入rescue模式
#mkdir /mnt/cdrom
#mount /dev/sr0 /mnt/cdrom
#rpm -ivh /mnt/cdrom/Packages/rpm-4.11.3-40.el7.x86_64.rpm --root=/mnt/sysimage
#reboot
3.5 包校验
在安装包时,系统也会检查包的来源是否是合法的
在检查包的来源和完整性前,必须导入所需要公钥
#检查包的完整性和签名
rpm -K|--checksig rpmfile


#例:
rpm --import /etc/pki/rpm-gpg/RPM-GPG-KEY-CentOS-7
rpm -qa "gpg-pubkey*"


#例:CentOS 8
[root@centos8 ~]#rpm -K /misc/cd/AppStream/Packages/httpd-2.4.37-
16.module_el8.1.0+256+ae790463.x86_64.rpm
/misc/cd/AppStream/Packages/httpd-2.4.37-
16.module_el8.1.0+256+ae790463.x86_64.rpm: digests SIGNATURES NOT OK
[root@centos8 ~]#cat /etc/pki/rpm-gpg/RPM-GPG-KEY-centosofficial
-----BEGIN PGP PUBLIC KEY BLOCK-----
Version: GnuPG v2.0.22 (GNU/Linux)
mQINBFzMWxkBEADHrskpBgN9OphmhRkc7P/YrsAGSvvl7kfu+e9KAaU6f5MeAVyn
rIoM43syyGkgFyWgjZM8/rur7EMPY2yt+2q/1ZfLVCRn9856JqTIq0XRpDUe4nKQ
8BlA7wDVZoSDxUZkSuTIyExbDf0cpw89Tcf62Mxmi8jh74vRlPy1PgjWL5494b3X
5fx
..........................
BsYaHCply0X
407DRx51t9YwYI/ttValuehq9+gRJpOTTKp6AjZn/a5Yt3h6jDgpNfM/EyLFIY9z
V6CXqQQ/8JRvaik/JsGCf+eeLZOw4koIjZGEAg04iuyNTjhx0e/QHEVcYAqNLhXG
rCTTbCn3NSUO9qxEXC+K/1m1kaXoCGA0UWlVGZ1JSifbbMx0yxq/brpEZPUYm+32
o8XfbocBWljFUJ+6aljTvZ3LQLKTSPW7TFO+GXycAOmCGhlXh2tlc6iTc41PACqy
yy+mHmSv
=kkH7
-----END PGP PUBLIC KEY BLOCK-----


[root@centos8 ~]#rpm --import /etc/pki/rpm-gpg/RPM-GPG-KEY-centosofficial
[root@centos8 rpm-gpg]#rpm -K /misc/cd/AppStream/Packages/httpd-2.4.37-
16.module_el8.1.0+256+ae790463.x86_64.rpm
/misc/cd/AppStream/Packages/httpd-2.4.37-
16.module_el8.1.0+256+ae790463.x86_64.rpm: digests signatures OK
[root@centos8 ~]#rpm -qa "gpg-pubkey*"
gpg-pubkey-8483c65d-5ccc5b19
[root@centos8 ~]#rpm -qi gpg-pubkey-8483c65d-5ccc5b19
Name    : gpg-pubkey
Version   : 8483c65d
Release   : 5ccc5b19
Architecture: (none)
Install Date: Wed 08 Apr 2020 10:06:20 AM CST
Group    : Public Keys
Size    : 0
License   : pubkey
Signature  : (none)
Source RPM : (none)
Build Date : Fri 03 May 2019 11:15:37 PM CST
Build Host : localhost
Relocations : (not relocatable)
Packager  : CentOS (CentOS Official Signing Key) <security@centos.org>
Summary   : gpg(CentOS (CentOS Official Signing Key) <security@centos.org>)
Description :
-----BEGIN PGP PUBLIC KEY BLOCK-----
Version: rpm-4.14.2 (NSS-3)
mQINBFzMWxkBEADHrskpBgN9OphmhRkc7P/YrsAGSvvl7kfu+e9KAaU6f5MeAVyn
rIoM43syyGkgFyWgjZM8/rur7EMPY2yt+2q/1ZfLVCRn9856JqTIq0XRpDUe4nKQ
8BlA7wDVZoSDxUZkSuTIyExbDf0cpw89Tcf62Mxmi8jh74vRlPy1PgjWL5494b3X
5fxDidH4bqPZyxTBqPrUFuo+EfUVEqiGF94Ppq6ZUvrBGOVo1V1+Ifm9CGEK597c
aevcGc
.....................
GEAg04iuyNTjhx0e/QHEVcYAqNLhXG
rCTTbCn3NSUO9qxEXC+K/1m1kaXoCGA0UWlVGZ1JSifbbMx0yxq/brpEZPUYm+32
o8XfbocBWljFUJ+6aljTvZ3LQLKTSPW7TFO+GXycAOmCGhlXh2tlc6iTc41PACqy
yy+mHmSv
=kkH7
-----END PGP PUBLIC KEY BLOCK-----


#例:校验包文件
[root@centos8 ~]#rpm -K /misc/cd/BaseOS/Packages/tree-1.7.0-15.el8.x86_64.rpm
/misc/cd/BaseOS/Packages/tree-1.7.0-15.el8.x86_64.rpm: digests signatures OK
[root@centos8 ~]#cp /misc/cd/BaseOS/Packages/tree-1.7.0-15.el8.x86_64.rpm /data
[root@centos8 ~]#cd /data
[root@centos8 data]#ll
total 60
-r--r--r-- 1 root root 60780 Apr  8 10:11 tree-1.7.0-15.el8.x86_64.rpm
[root@centos8 data]#echo >>tree-1.7.0-15.el8.x86_64.rpm
[root@centos8 data]#ll tree-1.7.0-15.el8.x86_64.rpm
-r--r--r-- 1 root root 60781 Apr  8 10:11 tree-1.7.0-15.el8.x86_64.rpm
[root@centos8 data]#cd
[root@centos8 ~]#rpm -K /data/tree-1.7.0-15.el8.x86_64.rpm
/data/tree-1.7.0-15.el8.x86_64.rpm: DIGESTS SIGNATURES NOT OK


#软件在安装时,会将包里的每个文件的元数据,如:大小,权限,所有者,时间等记录至rpm相关的数
据库中,可以用来检查包中的文件是否和当初安装时有所变化


#rpm {-V|--verify} [select-options] [verify-options]

#示例:
[root@centos8 ~]#rpm -V centos-release
S.5....T. c /etc/issue

S file Size differs
M Mode differs (includes permissions and file type)
5 digest (formerly MD5 sum) differs
D Device major/minor number mismatch
L readLink(2) path mismatch
U User ownership differs
G Group ownership differs
T mTime differs
P capabilities differ
. (点) 表示当前位置代表的字符含义一致

c  所在的位置表示文件类型

c 配置文件
d 文件数据文件
g 该文件不属于某个文件(少数情况)
l 许可证文件(license file)
r 自述文件(READ ME)


#例:
[root@centos8 ~]#rpm -qf /etc/issue
centos-release-8.1-1.1911.0.8.el8.x86_64

[root@centos8 ~]#vim /etc/issue
welcome to baidu


\S
Kernel \r on an \m
[root@centos8 ~]#rpm -V centos-release
S.5....T. c /etc/issue

[root@centos8 ~]#vim /etc/issue
[root@centos8 ~]#cat /etc/issue
\S
Kernel \r on an \m

[root@centos8 ~]#
[root@centos8 ~]#rpm -V centos-release
.......T. c /etc/issue
[root@centos8 ~]#rpm -ql centos-release
/etc/centos-release
/etc/centos-release-upstream
/etc/issue
/etc/issue.net
/etc/os-release
/etc/redhat-release
/etc/rpm/macros.dist
/etc/system-release
/etc/system-release-cpe
/usr/lib/systemd/system-preset/85-display-manager.preset
/usr/lib/systemd/system-preset/90-default.preset
/usr/lib/systemd/system-preset/99-default-disable.preset
/usr/share/centos-release/EULA
/usr/share/doc/centos-release/Contributors
/usr/share/doc/centos-release/GPL
/usr/share/doc/redhat-release
/usr/share/redhat-release


[root@centos8 ~]#rpm -Va
.M....... g /run/dbus
.......T.  /usr/bin/tree
.M....... c /etc/machine-id
missing  c /etc/systemd/system/dbus-org.freedesktop.resolve1.service
.M....... g /var/cache/private
.M....... g /var/lib/private
.M....... g /var/log/btmp
.M....... g /var/log/private
S.5....T. c /etc/issue
.M....G.. g /var/log/lastlog
.M....... d /usr/share/info/dir.old
.M....... g /var/cache/dnf/packages.db
.M....... g /var/lib/plymouth/boot-duration
.......T. c /etc/kdump.conf
S.5....T. c /etc/ssh/sshd_config
.M....... c /etc/rc.d/rc.local
S.5....T. c /root/.bashrc
.M....... g /etc/crypto-policies/back-ends/nss.config
.M....... g /etc/udev/hwdb.bin
.M....... g /var/lib/systemd/random-seed
missing  c /etc/yum.repos.d/CentOS-AppStream.repo
missing  c /etc/yum.repos.d/CentOS-Base.repo
missing  c /etc/yum.repos.d/CentOS-CR.repo
missing  c /etc/yum.repos.d/CentOS-Debuginfo.repo
missing  c /etc/yum.repos.d/CentOS-Extras.repo
missing  c /etc/yum.repos.d/CentOS-HA.repo
missing  c /etc/yum.repos.d/CentOS-Media.repo
missing  c /etc/yum.repos.d/CentOS-PowerTools.repo
missing  c /etc/yum.repos.d/CentOS-Sources.repo
missing  c /etc/yum.repos.d/CentOS-Vault.repo
missing  c /etc/yum.repos.d/CentOS-centosplus.repo
missing  c /etc/yum.repos.d/CentOS-fasttrack.repo
.M.......  /var/log/audit
3.6 数据库维护
#rpm包安装时生成的信息,都放在rpm数据库中
    /var/lib/rpm


#可以重建数据库
rpm {--initdb|--rebuilddb}
initdb: 初始化,如果事先不存在数据库,则新建之,否则,不执行任何操作
rebuilddb:重建已安装的包头的数据库索引目录
4 yum和dnf
CentOS 使用 yum, dnf 解决rpm的包依赖关系
YUM: Yellowdog Update Modifier,rpm的前端程序,可解决软件包相关依赖性,可在多个库之间定位软件包,up2date的替代工具,CentOS 8 用dnf 代替了yum ,不过保留了和yum的兼容性,配置也是通用的
4.1 yum/dnf 工作原理
yum/dnf 是基于C/S 模式
yum 服务器存放rpm包和相关包的元数据库
yum 客户端访问yum服务器进行安装或查询等
yum 实现过程
先在yum服务器上创建 yum repository(仓库),在仓库中事先存储了众多rpm包,以及包的相关的元数据文件(放置于特定目录repodata下),当yum客户端利用yum/dnf工具进行安装时包时,会自动下载repodata中的元数据,查询远数据是否存在相关的包及依赖关系,自动从仓库中找到相关包下载并安装。
4.2 yum客户端配置
4.2.1yum客户端配置文件
/etc/yum.conf #为所有仓库提供公共配置
/etc/yum.repos.d/*.repo: #为每个仓库的提供配置文件


#帮助参考: man 5 yum.conf
4.2.2repo仓库配置文件指向的定义:
[repositoryID]
name=Some name for this repository
baseurl=url://path/to/repository/
enabled={1|0}
gpgcheck={1|0}
gpgkey=URL
enablegroups={1|0}
failovermethod={roundrobin|priority}
roundrobin:意为随机挑选,默认值
priority:按顺序访问
cost= 默认为1000
4.2.3yum服务器的baseurl形式
注意:yum仓库指向的路径一定必须是repodata目录所在目录
file:// 本地路径
http://
https://
ftp://
4.2.4相关变量
yum的repo配置文件中可用的变量:
$releasever: 当前OS的发行版的主版本号,如:8,7,6
$arch: CPU架构,如:aarch64, i586, i686,x86_64等
$basearch:系统基础平台;i386, x86_64
$contentdir:表示目录,比如:centos-8,centos-7
$YUM0-$YUM9:自定义变量


#例:
http://server/centos/$releasever/$basearch/
http://server/centos/7/x86_64
http://server/centos/6/i386


#例:CentOS 8 配置文件
[root@centos8 ~]# ll /etc/yum.conf
lrwxrwxrwx. 1 root root 12 May 14  2019 /etc/yum.conf -> dnf/dnf.conf
[root@centos8 ~]#cat /etc/yum.conf
[main]
gpgcheck=1        #安装包前要做包的合法和完整性校验
installonly_limit=3     #同时可以安装3个包,最小值为2,如设为0或1,为不限制
clean_requirements_on_remove=True      #删除包时,是否将不再使用的包删除
best=True     #升级时,自动选择安装最新版,即使缺少包的依赖


#例:CentOS 7 的配置文件
[root@centos7 ~]# ll /etc/yum.conf
-rw-r--r--. 1 root root 970 Aug  8 19:57 /etc/yum.conf
[root@centos7 ~]# cat /etc/yum.conf
[main]
cachedir=/var/cache/yum/$basearch/$releasever  #缓存路径
keepcache=0  #如果为1,则下载rpm并缓存下来,不删除,默认安装rpm后会删除rpm包
debuglevel=2
logfile=/var/log/yum.log
exactarch=1
obsoletes=1
gpgcheck=1
plugins=1
installonly_limit=5
bugtracker_url=http://bugs.centos.org/set_project.php?
project_id=23&ref=http://bugs.centos.org/bug_report_page.php?category=yum
distroverpkg=centos-release

# This is the default, if you make this bigger yum won't see if the metadata
# is newer on the remote and so you'll "gain" the bandwidth of not having to
# download the new metadata and "pay" for it by yum not having correct
# information.
# It is esp. important, to have correct metadata, for distributions like
# Fedora which don't keep old packages around. If you don't like this checking
# interupting your command line usage, it's much better to have something
# manually check the metadata once an hour (yum-updatesd will do this).
# metadata_expire=90m
# PUT YOUR REPOS HERE OR IN separate files named file.repo
# in /etc/yum.repos.d
4.2.5baseurl 指向的路径
#阿里云提供了写好的CentOS,Rocky和ubuntu的仓库文件下载链接
    http://mirrors.aliyun.com/repo/

#阿里巴巴开源软件
https://opsx.alibaba.com/


#EPEL的yum源
#阿里云
https://mirrors.aliyun.com/epel/$releasever/x86_64

#腾讯云
https://mirrors.cloud.tencent.com/epel/$releasever/x86_64

#华为云
https://mirrors.huaweicloud.com/epel/$releasever/x86_64

#清华大学
https://mirrors.tuna.tsinghua.edu.cn/epel/$releasever/x86_64


#Rocky 系统的yum源
#南京大学
https://mirror.nju.edu.cn/rocky/$releasever/

#上海交大
https://mirrors.sjtug.sjtu.edu.cn/rocky/$releasever/

#山东大学
https://mirrors.sdu.edu.cn/rocky/$releasever/


#CentOS系统的yum源
#阿里云
https://mirrors.aliyun.com/centos/$releasever/

#腾讯云
https://mirrors.cloud.tencent.com/centos/$releasever/

#华为云
https://repo.huaweicloud.com/centos/$releasever/

#清华大学
https://mirrors.tuna.tsinghua.edu.cn/centos/$releasever/


#例:为CentOS7用系统安装光盘作的本地yum仓库
#挂载光盘至某目录,如/mnt/cdrom
mount /dev/cdrom /mnt/cdrom

#创建配置文件
[root@centos7 ~]#vim /etc/yum.repos.d/centos7.repo
[CentOS7]
name=CentOS 7
baseurl=file:///mnt/cdrom
gpgcheck=0
enabled=1


#例:为CentOS 8 配置 yum 的系统和EPEL源仓库
[root@centos8 ~]#cat /etc/yum.repos.d/base.repo
[BaseOS]
name=BaseOS
baseurl=file:///misc/cd/BaseOS
gpgcheck=1
gpgkey=/etc/pki/rpm-gpg/RPM-GPG-KEY-centosofficial

[AppStream]
name=AppStream
baseurl=file:///misc/cd/AppStream
gpgcheck=0

[epel]
name=EPEL
baseurl=http://mirrors.aliyun.com/epel/$releasever/Everything/$basearch
gpgcheck=0
enabled=1

[extras]
name=extras
baseurl=https://mirrors.aliyun.com/centos/$releasever/extras/$basearch/os
gpgcheck=0
4.3用脚本实现创建yum仓库配置文件
[root@centos7 ~]# cat yum.sh
#!/bin/bash
mkdir /etc/yum.repos.d/backup
mv /etc/yum.repos.d/*.repo /etc/yum.repos.d/backup
cat > /etc/yum.repos.d/base.repo <<EOF
[base]
name=base
baseurl=https://mirrors.aliyun.com/centos/\$releasever/os/\$basearch
gpgcheck=0
EOF
4.4yum-config-manager命令
可以生成yum仓库的配置文件及启用或禁用仓库,来自于yum-utils包
#增加仓库
yum-config-manager --add-repo URL或file

#禁用仓库
yum-config-manager --disable "仓库名"

#启用仓库
yum-config-manager --enable  "仓库名"


#例:创建仓库配置
[root@centos8 ~]#rpm -qf `which yum-config-manager `
dnf-utils-4.0.2.2-3.el8.noarch
[root@centos8 ~]#yum-config-manager --add-repo
https://mirrors.aliyun.com/docker-ce/linux/centos/docker-ce.repo
Adding repo from: https://mirrors.aliyun.com/docker-ce/linux/centos/docker-
ce.repo
[root@centos8 ~]#ls /etc/yum.repos.d/
backup base.repo docker-ce.repo


例:创建仓库配置
#生成172.16.0.1_cobbler_ks_mirror_8_.repo
[root@centos8 ~]#yum-config-manager --add-
repo=http://172.16.0.1/cobbler/ks_mirror/8/
Adding repo from: http://172.16.0.1/cobbler/ks_mirror/8/
[root@centos8 ~]#cat /etc/yum.repos.d/172.16.0.1_cobbler_ks_mirror_8_.repo
[172.16.0.1_cobbler_ks_mirror_8_]
name=created by dnf config-manager from http://172.16.0.1/cobbler/ks_mirror/8/
baseurl=http://172.16.0.1/cobbler/ks_mirror/8/
enabled=1


#:创建仓库配置
[root@centos8 ~]#ls /etc/yum.repos.d/
backup base.repo
[root@centos8 ~]#yum-config-manager --add-repo /data/docker-ce.repo
Adding repo from: file:///data/docker-ce.repo
[root@centos8 ~]#ls /etc/yum.repos.d/
backup base.repo docker-ce.repo


#例:启用和禁用仓库
[root@centos8 ~]#yum repolist
[root@centos8 ~]#yum-config-manager --disable epel
[root@centos8 ~]#cat /etc/yum.repos.d/base.repo
[BaseOS]
name=BaseOS
baseurl=file:///misc/cd/BaseOS
gpgcheck=0
[AppStream]
name=AppStream
baseurl=file:///misc/cd/AppStream
gpgcheck=0
[epel]
name=EPEL
baseurl=http://mirrors.aliyun.com/epel/$releasever/Everything/$basearch
   http://mirrors.huaweicloud.com/epel/$releasever/Everything/$basearch
gpgcheck=0
enabled=0
[extras]
name=extras
baseurl=https://mirrors.aliyun.com/centos/$releasever/extras/$basearch/os
   http://mirrors.huaweicloud.com/centos/$releasever/extras/$basearch/os
gpgcheck=0
enabled=1
[root@centos8 ~]#yum repolist
BaseOS                3.8 MB/s | 3.9 kB   00:00
AppStream              4.2 MB/s | 4.3 kB   00:00
extras               10 kB/s | 1.5 kB   00:00
repo id         repo name
status
AppStream        AppStream
4,755
BaseOS         BaseOS
 1,659
extras         extras
12
[root@centos8 ~]#yum-config-manager --disable extras
[root@centos8 ~]#yum repolist
BaseOS               3.8 MB/s | 3.9 kB   00:00
AppStream              4.2 MB/s | 4.3 kB   00:00
repo id        repo name                      status
AppStream       AppStream                      4,755
BaseOS        BaseOS                        1,659
[root@centos8 ~]#yum-config-manager --enable extras
[root@centos8 ~]#yum repolist
BaseOS                 3.8 MB/s | 3.9 kB   00:00
AppStream               4.2 MB/s | 4.3 kB   00:00
extras                 12 kB/s | 1.5 kB   00:00
repo id        repo name                      status
AppStream       AppStream                      4,755
BaseOS        BaseOS                        1,659
extras extras                         12
5yum命令
yum命令的用法:
#格式:
yum [options] [command] [package ...]


#常用选项:
-y     #自动回答为"yes"
-q     #静默模式
--nogpgcheck     #禁止进行gpg check
--enablerepo=repoidglob       #临时启用此处指定的repo,支持通配符,如:"*"
--disablerepo=repoidglob     #临时禁用此处指定的repo,和上面语句同时使用,放在后面的生效
5.1 显示仓库列表
#格式:
yum repolist [all|enabled|disabled]


#例:
[root@centos8 ~]#yum repolist
[root@centos8 ~]#yum repolist --disabled
repo id
repo name
epel
[root@centos8 ~]#yum repolist all
Last metadata expiration check: 0:01:32 ago on Sun 29 Dec 2019 12:13:10 AM CST.
repo id         repo name                    status
AppStream        AppStream
enabled: 4,681
BaseOS          BaseOS
enabled: 1,655
epel           EPEL
disabled
extras          extras
disabled
[root@centos8 ~]#yum --enablerepo=ep* --disablerepo=A* repolist
Last metadata expiration check: 0:01:18 ago on Sun 29 Dec 2019 12:13:27 AM CST.
repo id          repo name
status
BaseOS           BaseOS
 1,657
epel            EPEL
 3,733


#例: 显示仓库的详细信息
[root@centos8 ~]#yum repolist -v
Loaded plugins: builddep, changelog, config-manager, copr, debug, debuginfo-
install, download, generate_completion_cache, needs-restarting, playground,
repoclosure, repodiff, repograph, repomanage, reposync
YUM version: 4.2.17
cachedir: /var/cache/dnf
User-Agent: constructed: 'libdnf (CentOS Linux 8; generic; Linux.x86_64)'
repo: downloading from remote: BaseOS
BaseOS

                 77 MB/s | 2.2 MB   00:00
BaseOS: using metadata from Tue 09 Jun 2020 06:06:00 AM CST.
repo: downloading from remote: AppStream
AppStream

                 97 MB/s | 5.7 MB   00:00
AppStream: using metadata from Tue 09 Jun 2020 06:06:04 AM CST.
repo: downloading from remote: epel
EPEL

                 13 MB/s | 7.2 MB   00:00
epel: using metadata from Fri 03 Jul 2020 08:21:13 AM CST.
repo: downloading from remote: extras
extras

                 28 kB/s | 6.7 kB   00:00
extras: using metadata from Fri 05 Jun 2020 08:15:26 AM CST.
Last metadata expiration check: 0:00:01 ago on Sat 04 Jul 2020 12:17:23 PM CST.
Completion plugin: Generating completion cache...
Repo-id      : AppStream
Repo-name     : AppStream
Repo-revision   : 8.2.2004
Repo-distro-tags   : [cpe:/o:centos:centos:8]: , 8, C, O, S, e, n, t
Repo-updated    : Tue 09 Jun 2020 06:06:04 AM CST
Repo-pkgs     : 5,326
Repo-available-pkgs: 4,901
Repo-size     : 6.0 G
Repo-baseurl    : file:///misc/cd/AppStream,
https://mirrors.aliyun.com/centos/8/AppStream/x86_64/os/
Repo-expire    : 172,800 second(s) (last: Sat 04 Jul 2020 12:17:20 PM CST)
Repo-filename   : /etc/yum.repos.d/base.repo
Repo-id      : BaseOS
Repo-name     : BaseOS
Repo-revision   : 8.2.2004
Repo-distro-tags   : [cpe:/o:centos:centos:8]: , 8, C, O, S, e, n, t
Repo-updated    : Tue 09 Jun 2020 06:06:00 AM CST
Repo-pkgs     : 1,674
Repo-available-pkgs: 1,672
Repo-size     : 1.0 G
Repo-baseurl    : file:///misc/cd/BaseOS,
https://mirrors.aliyun.com/centos/8/BaseOS/x86_64/os/
Repo-expire    : 172,800 second(s) (last: Sat 04 Jul 2020 12:17:19 PM CST)
Repo-filename   : /etc/yum.repos.d/base.repo
Repo-id      : epel
Repo-name     : EPEL
Repo-revision   : 1593735642
Repo-updated    : Fri 03 Jul 2020 08:21:13 AM CST
Repo-pkgs     : 5,931
Repo-available-pkgs: 5,930
Repo-size     : 7.7 G
Repo-baseurl    : https://mirrors.aliyun.com/epel/8/Everything/x86_64
Repo-expire    : 172,800 second(s) (last: Sat 04 Jul 2020 12:17:21 PM CST)
Repo-filename   : /etc/yum.repos.d/base.repo
Repo-id      : extras
Repo-name     : extras
Repo-revision   : 1591316131
Repo-updated    : Fri 05 Jun 2020 08:15:26 AM CST
Repo-pkgs     : 20
Repo-available-pkgs: 20
Repo-size     : 236 k
Repo-baseurl    : https://mirrors.aliyun.com/centos/8/extras/x86_64/os
Repo-expire    : 172,800 second(s) (last: Sat 04 Jul 2020 12:17:23 PM CST)
Repo-filename   : /etc/yum.repos.d/base.repo
Total packages: 12,951
[root@centos8 ~]#
5.2显示程序包
#格式:
yum list
yum list [all | glob_exp1] [glob_exp2] [...]
yum list {available|installed|updates} [glob_exp1] [...]


#例:
[root@centos8 data]#dnf list mariadb-server
Last metadata expiration check: 0:05:03 ago on Sun 08 Dec 2019 04:11:17 PM CST.
Available Packages
mariadb-server.x86_64           3:10.3.11-2.module_el8.0.0+35+6f2527ed
          AppStream
[root@centos8 data]#dnf list mariadb-server --showduplicates
Last metadata expiration check: 0:05:11 ago on Sun 08 Dec 2019 04:11:17 PM CST.
Available Packages
mariadb-server.x86_64           3:10.3.11-2.module_el8.0.0+35+6f2527ed
          AppStream
[root@centos8 data]#dnf list mariadb-server  --disablerepo=AppStream
Last metadata expiration check: 0:05:23 ago on Sun 08 Dec 2019 04:11:17 PM CST.
Available Packages
MariaDB-server.x86_64                  10.4.10-1.el8
          mariadb2
[root@centos8 data]#dnf list mariadb-server --showduplicates --
disablerepo=AppStream
Last metadata expiration check: 0:05:41 ago on Sun 08 Dec 2019 04:11:17 PM CST.
Available Packages
MariaDB-server.x86_64                  10.3.17-1.el8
          mariadb
MariaDB-server.x86_64                  10.3.18-1.el8
          mariadb
MariaDB-server.x86_64                  10.3.20-1.el8
。。。。

[root@centos8 ~]#yum --disablerepo="A*" --disablerepo="B*" --disablerepo="e*"
list available


#例: 只查看已经安装的包
[root@centos8 ~]#yum list installed|head

#例: 查看可安装的包
[root@centos8 ~]#yum list available |head

#例: 查看可以升级的包
[root@centos8 ~]#yum list updates

#例: 查看指定的包
[root@centos8 ~]#yum list exim
#支持通配符
[root@centos8 ~]#yum list exim*
5.3安装程序包
yum install package1 [package2] [...]
yum reinstall package1 [package2] [...]  #重新安装
--downloadonly  #只下载相关包默认至/var/cache/yum/x86_64/7/目录下,而不执行
install/upgrade/erase
--downloaddir=<path>, --destdir=<path>  #--downloaddir选项来指定下载的目录,如果不存在
自动创建
5.3.1安装 EPEL 源包.
例:安装epel源
[root@centos7 ~]#yum -y install epel-release
[root@centos7 ~]#yum -y install sl
[root@centos7 ~]#rpm -ql sl
/usr/bin/sl
/usr/share/doc/sl-5.02
/usr/share/doc/sl-5.02/LICENSE
/usr/share/doc/sl-5.02/README.ja.md
/usr/share/doc/sl-5.02/README.md
/usr/share/man/ja/man1/sl.1.ja.gz
/usr/share/man/man1/sl.1.gz

#运行安装sl程序,可以看到火车,这标志着我们可以当老司机了
[root@centos7 ~]#sl -a

#[root@centos8 ~]#dnf -y install cowsay
5.3.2安装 SCL 源包
#安装 SCL 源包
#centos-release-scl 由extras仓库提供
[root@centos7 ~]#yum install centos-release-scl -y
[root@centos7 ~]#rpm -ql centos-release-scl
/etc/pki/rpm-gpg
/etc/pki/rpm-gpg/RPM-GPG-KEY-CentOS-SIG-SCLo
/etc/yum.repos.d/CentOS-SCLo-scl.repo
/usr/share/doc/centos-release-scl/GPL

[root@centos7 ~]#yum install rh-php73-php-fpm -y
5.3.3 升级最新内核
#例:利用elrepo源在CentOS 7 安装新版内核
[root@centos7 ~]#yum install https://www.elrepo.org/elrepo-release-7.0-
4.el7.elrepo.noarch.rpm
[root@centos7 ~]#rpm -ql elrepo-release-7.0-4.el7.elrepo
/etc/pki/elrepo
/etc/pki/elrepo/SECURE-BOOT-KEY-elrepo.org.der
/etc/pki/rpm-gpg
/etc/pki/rpm-gpg/RPM-GPG-KEY-elrepo.org
/etc/yum.repos.d
/etc/yum.repos.d/elrepo.repo
[root@centos7 ~]#yum repolist
yum repolist
Loaded plugins: fastestmirror
Loading mirror speeds from cached hostfile
* elrepo: mirrors.tuna.tsinghua.edu.cn
repo id             repo name
            status
base              CentOS
            10,019
elrepo             ELRepo.org Community Enterprise Linux Repository
- el7           139
epel/7/x86_64          EPEL
            13,501
extras/7/x86_64         extras
             307
repolist: 23,966

[root@centos7 ~]#cat /etc/yum.repos.d/elrepo.repo
# Name: ELRepo.org Community Enterprise Linux Repository for el7
# URL: http://elrepo.org/
[elrepo]
name=ELRepo.org Community Enterprise Linux Repository - el7
baseurl=http://elrepo.org/linux/elrepo/el7/$basearch/
http://mirrors.coreix.net/elrepo/elrepo/el7/$basearch/
http://mirror.rackspace.com/elrepo/elrepo/el7/$basearch/
http://repos.lax-noc.com/elrepo/elrepo/el7/$basearch/
mirrorlist=http://mirrors.elrepo.org/mirrors-elrepo.el7
enabled=1
gpgcheck=1
gpgkey=file:///etc/pki/rpm-gpg/RPM-GPG-KEY-elrepo.org
protect=0
[elrepo-testing]
name=ELRepo.org Community Enterprise Linux Testing Repository - el7
baseurl=http://elrepo.org/linux/testing/el7/$basearch/
http://mirrors.coreix.net/elrepo/testing/el7/$basearch/
http://mirror.rackspace.com/elrepo/testing/el7/$basearch/
http://repos.lax-noc.com/elrepo/testing/el7/$basearch/
mirrorlist=http://mirrors.elrepo.org/mirrors-elrepo-testing.el7
enabled=0
gpgcheck=1
gpgkey=file:///etc/pki/rpm-gpg/RPM-GPG-KEY-elrepo.org
protect=0
[elrepo-kernel]
name=ELRepo.org Community Enterprise Linux Kernel Repository - el7
baseurl=http://elrepo.org/linux/kernel/el7/$basearch/
http://mirrors.coreix.net/elrepo/kernel/el7/$basearch/
http://mirror.rackspace.com/elrepo/kernel/el7/$basearch/
http://repos.lax-noc.com/elrepo/kernel/el7/$basearch/
mirrorlist=http://mirrors.elrepo.org/mirrors-elrepo-kernel.el7
enabled=0
gpgcheck=1
gpgkey=file:///etc/pki/rpm-gpg/RPM-GPG-KEY-elrepo.org
protect=0
[elrepo-extras]
name=ELRepo.org Community Enterprise Linux Extras Repository - el7
baseurl=http://elrepo.org/linux/extras/el7/$basearch/
http://mirrors.coreix.net/elrepo/extras/el7/$basearch/
http://mirror.rackspace.com/elrepo/extras/el7/$basearch/
http://repos.lax-noc.com/elrepo/extras/el7/$basearch/
mirrorlist=http://mirrors.elrepo.org/mirrors-elrepo-extras.el7
enabled=0
gpgcheck=1
gpgkey=file:///etc/pki/rpm-gpg/RPM-GPG-KEY-elrepo.org
protect=0


[root@centos7 ~]#yum --disablerepo="*" --enablerepo="elrepo-kernel" list
available
Loaded plugins: fastestmirror
Loading mirror speeds from cached hostfile
* elrepo-kernel: mirrors.tuna.tsinghua.edu.cn
Available Packages
kernel-lt.x86_64                    4.4.207-1.el7.elrepo
        elrepo-kernel
kernel-lt-devel.x86_64                 4.4.207-1.el7.elrepo
        elrepo-kernel
kernel-lt-doc.noarch                  4.4.207-1.el7.elrepo
        elrepo-kernel
kernel-lt-headers.x86_64                4.4.207-1.el7.elrepo
        elrepo-kernel
kernel-lt-tools.x86_64                 4.4.207-1.el7.elrepo
        elrepo-kernel
kernel-lt-tools-libs.x86_64               4.4.207-1.el7.elrepo
        elrepo-kernel
kernel-lt-tools-libs-devel.x86_64            4.4.207-1.el7.elrepo
        elrepo-kernel
kernel-ml.x86_64                    5.4.6-1.el7.elrepo
        elrepo-kernel
kernel-ml-devel.x86_64                 5.4.6-1.el7.elrepo
        elrepo-kernel
kernel-ml-doc.noarch                  5.4.6-1.el7.elrepo
        elrepo-kernel
kernel-ml-headers.x86_64                5.4.6-1.el7.elrepo
        elrepo-kernel
kernel-ml-tools.x86_64                 5.4.6-1.el7.elrepo
        elrepo-kernel
kernel-ml-tools-libs.x86_64               5.4.6-1.el7.elrepo
        elrepo-kernel
kernel-ml-tools-libs-devel.x86_64            5.4.6-1.el7.elrepo
        elrepo-kernel
perf.x86_64                       5.4.6-1.el7.elrepo
        elrepo-kernel
python-perf.x86_64                   5.4.6-1.el7.elrepo
        elrepo-kernel
[root@magedu ~]#yum -y --enablerepo="elrepo-kernel" install kernel-ml


[root@centos7 ~]#ls /boot
config-3.10.0-957.el7.x86_64               symvers-3.10.0-
957.el7.x86_64.gz
config-5.4.6-1.el7.elrepo.x86_64             symvers-5.4.6-
1.el7.elrepo.x86_64.gz
efi                           System.map-3.10.0-
957.el7.x86_64
grub                           System.map-5.4.6-
1.el7.elrepo.x86_64
grub2                          vmlinuz-0-rescue-
907ef8572fc24762bcbaac846dd46fcc
initramfs-0-rescue-907ef8572fc24762bcbaac846dd46fcc.img vmlinuz-3.10.0-
957.el7.x86_64
initramfs-3.10.0-957.el7.x86_64.img           vmlinuz-5.4.6-
1.el7.elrepo.x86_64
initramfs-5.4.6-1.el7.elrepo.x86_64.img
[root@centos7 ~]#ls /lib/modules
3.10.0-957.el7.x86_64  5.4.6-1.el7.elrepo.x86_64
[root@centos7 ~]#reboot
[root@centos7 ~]#uname -r
5.4.6-1.el7.elrepo.x86_64
5.3.4只下载相关的依赖包,而不安装
注意: 下载包也可以通过启用配置文件实现
#/data/目录如果不存在,会自动创建
[root@centos8 ~]#yum -y install --downloadonly --downloaddir=/data/httpd httpd
[root@centos8 ~]#ls /data/httpd/
apr-1.6.3-9.el8.x86_64.rpm        httpd-2.4.37-
16.module_el8.1.0+256+ae790463.x86_64.rpm
apr-util-1.6.1-6.el8.x86_64.rpm      httpd-filesystem-2.4.37-
16.module_el8.1.0+256+ae790463.noarch.rpm
apr-util-bdb-1.6.1-6.el8.x86_64.rpm    httpd-tools-2.4.37-
16.module_el8.1.0+256+ae790463.x86_64.rpm
apr-util-openssl-1.6.1-6.el8.x86_64.rpm  mailcap-2.1.48-3.el8.noarch.rpm
centos-logos-httpd-80.5-2.el8.noarch.rpm mod_http2-1.11.3-
3.module_el8.1.0+213+acce2796.x86_64.rpm


#例:下载包也可以通过启用配置文件实现
[root@centos7 ~]# cat /etc/yum.conf
[main]
cachedir=/var/cache/yum/$basearch/$releasever  #缓存路径
keepcache=1  #如果为1,则下载rpm并缓存下来,不删除,默认安装rpm后会删除rpm包
5.3.5DNF 介绍
DNF,即DaNdiFied,是新一代的RPM软件包管理器。DNF 发行日期是2015年5月11日,DNF 包管理器采用Python 编写,发行许可为GPL v2,首先出现在Fedora 18 发行版中。在 RHEL 8.0 版本正式取代了 YUM,DNF包管理器克服了YUM包管理器的一些瓶颈,提升了包括用户体验,内存占用,依赖分析,运行速度等
#配置文件:
/etc/dnf/dnf.conf

#仓库文件:
/etc/yum.repos.d/ *.repo


#日志:
/var/log/dnf.rpm.log
/var/log/dnf.log


#DNF 使用帮助:man dnf
dnf 用法与yum一致
dnf [options] <command> [<arguments>...]
dnf --version
dnf repolist
dnf reposync
dnf install httpd
dnf remove httpd
dnf clean all
dnf makecache
dnf list installed
dnf list available
dnf search nano
dnf history undo 1


#CentOS 7 使用 dnf ,下载并安装下面包
wget http://springdale.math.ias.edu/data/puias/unsupported/7/x86_64/dnf-conf-
0.6.4-2.sdl7.noarch.rpm
wget http://springdale.math.ias.edu/data/puias/unsupported/7/x86_64/dnf-0.6.4-
2.sdl7.noarch.rpm
wget http://springdale.math.ias.edu/data/puias/unsupported/7/x86_64/python-dnf-
0.6.4-2.sdl7.noarch.rpm
wget https://mirrors.aliyun.com/centos/7/extras/x86_64/Packages/python2-
libcomps-0.1.8-12.el7.x86_64.rpm
wget https://mirrors.aliyun.com/centos/7/extras/x86_64/Packages/libcomps-0.1.8-
12.el7.x86_64.rpm
5.3.6yum Troubleshooting
yum 和 dnf 失败最主要原因:
yum的配置文件格式或路径错误
解决方法:检查/etc/yum.repos.d/*.repo文件格式
yum cache
解决方法:yum clean all
网络不通:
解决方法:网卡配置
5.4卸载程序包
yum remove | erase package1 [package2] [...]5.5升级和降级
#检查可用升级:
yum check-update


#升级和降级
yum upgrade|update [package1] [package2] [...]
yum upgrade-minimal  #最小化升级
yum downgrade package1 [package2] [...] (降级)


#例:
[root@centos7 ~]# cat /etc/yum.repos.d/base.repo
[base]
name=aliyum base
baseurl=https://mirrors.aliyun.com/centos/$releasever/os/$basearch
gpgcheck=1
gpgkey=https://mirrors.aliyun.com/centos/$releasever/os/x86_64/RPM-GPG-KEY-
CentOS-$releasever
enabled=1
[update]
name=aliyun update
baseurl=https://mirrors.aliyun.com/centos/7/updates/x86_64/
gpgcheck=0
[root@centos7 ~]#yum --disablerepo=* --enablerep=updates list available
[root@centos7 ~]#yum info samba
Loaded plugins: fastestmirror
Repository 'updates' is missing name in configuration, using id
Loading mirror speeds from cached hostfile
* base:
* elrepo: elrepo.0m3n.net
Available Packages
Name    : samba
Arch    : x86_64
Version   : 4.9.1
Release   : 10.el7_7
Size    : 685 k
Repo    : updates
Summary   : Server and Client software to interoperate with Windows machines
URL     : http://www.samba.org/
License   : GPLv3+ and LGPLv3+
Description : Samba is the standard Windows interoperability suite of programs
for Linux and
     : Unix.
[root@centos7 ~]#yum info samba --showduplicates
Loaded plugins: fastestmirror
Repository 'updates' is missing name in configuration, using id
Loading mirror speeds from cached hostfile
* base:
* elrepo: elrepo.0m3n.net
Available Packages
Name    : samba
Arch    : x86_64
Version   : 4.9.1
Release   : 6.el7
Size    : 685 k
Repo    : base/7/x86_64
Summary   : Server and Client software to interoperate with Windows machines
URL     : http://www.samba.org/
License   : GPLv3+ and LGPLv3+
Description : Samba is the standard Windows interoperability suite of programs
for Linux and
     : Unix.
Name    : samba
Arch    : x86_64
Version   : 4.9.1
Release   : 10.el7_7
Size    : 685 k
Repo    : updates
Summary   : Server and Client software to interoperate with Windows machines
URL     : http://www.samba.org/
License   : GPLv3+ and LGPLv3+
Description : Samba is the standard Windows interoperability suite of programs
for Linux and
     : Unix.

[root@centos7 ~]#yum install samba --disablerepo=updates
[root@centos7 ~]#yum update samba
[root@centos7 ~]#yum update
5.6查询
#查看程序包information:
yum info [...]


#查看指定的特性(可以是某文件)是由哪个程序包所提供:
yum provides | whatprovides feature1 [feature2] [...]
注意:文件要写全路径,而不只是文件名,否则可能无法查询到


#例:
[root@centos8 ~]# ll /etc/vsftpd/vsftpd.conf
ls: cannot access '/etc/vsftpd/vsftpd.conf': No such file or directory
#注意要写文件全路径才能查询到
[root@centos8 ~]#yum provides vsftpd.conf
Last metadata expiration check: 0:56:45 ago on Fri 10 Apr 2020 11:24:00 AM CST.
Error: No Matches found
[root@centos8 ~]# yum provides /etc/vsftpd/vsftpd.conf
Last metadata expiration check: 0:33:13 ago on Fri 27 Dec 2019 03:47:34 PM CST.
vsftpd-3.0.3-28.el8.x86_64 : Very Secure Ftp Daemon
Repo    : AppStream
Matched from:
Filename  : /etc/vsftpd/vsftpd.conf
#使用通配符
[root@centos8 ~]#yum provides */vsftpd.conf
[root@centos8 ~]#yum provides */updatedb*


#以指定的关键字搜索程序包名及summary信息
yum search string1 [string2] [...]


#查看指定包所依赖的capabilities:
yum deplist package1 [package2] [...]


#例:
[root@centos8 ~]#dnf info bash
Last metadata expiration check: 0:25:44 ago on Sun 22 Dec 2019 01:56:36 PM CST.
Installed Packages
Name     : bash
Version   : 4.4.19
Release   : 7.el8
Arch     : x86_64
Size     : 6.6 M
Source    : bash-4.4.19-7.el8.src.rpm
Repo     : @System
From repo  : anaconda
Summary   : The GNU Bourne Again shell
URL     : https://www.gnu.org/software/bash
License   : GPLv3+
Description : The GNU Bourne Again shell (Bash) is a shell or command language
      : interpreter that is compatible with the Bourne shell (sh). Bash
      : incorporates useful features from the Korn shell (ksh) and the C
shell
      : (csh). Most sh scripts can be run by bash without modification.


#例:
[root@centos8 ~]#dnf list bash*
Last metadata expiration check: 0:27:28 ago on Sun 22 Dec 2019 01:56:36 PM CST.
Installed Packages
bash.x86_64                       4.4.19-7.el8
          @anaconda
bash-completion.noarch                 1:2.7-5.el8
          @BaseOS
Available Packages
bash-doc.x86_64                     4.4.19-7.el8
          BaseOS


#例:
[root@centos8 ~]#dnf provides /bin/ls
Last metadata expiration check: 0:26:44 ago on Sun 22 Dec 2019 01:56:36 PM CST.
coreutils-8.30-6.el8.x86_64 : A set of basic GNU tools commonly used in shell
scripts
Repo    : @System
Matched from:
Provide  : /bin/ls


#例: CentOS 8 查看未安装包的文件列表
[root@centos8 ~]#rpm -q memcached
package memcached is not installed
[root@centos8 ~]#dnf repoquery -l memcached
Last metadata expiration check: 2:35:45 ago on Tue 14 Jul 2020 08:56:26 AM CST.
/etc/sysconfig/memcached
/usr/bin/memcached
......


#例: CentOS 7 查看未安装包的文件列表
[root@centos7 ~]#rpm -q memcached
package memcached is not installed
[root@centos7 ~]#yum -y install yum-utils
[root@centos7 ~]#repoquery -ql memcached
/etc/sysconfig/memcached
/usr/bin/memcached
......
5.7仓库缓存
#清除目录/var/cache/yum/缓存
yum clean [ packages | metadata | expire-cache | rpmdb | plugins | all ]


#构建缓存:
yum makecache


#例:管理yum缓存
[root@centos7 ~]#du -sh /var/cache/yum
93M /var/cache/yum
[root@centos7 ~]#ls /var/cache/yum/x86_64/7/
base epel extras timedhosts timedhosts.txt
[root@magedu ~]#yum clean all
Loaded plugins: fastestmirror
Cleaning repos: base epel extras
Cleaning up list of fastest mirrors
[root@centos7 ~]#du -sh /var/cache/yum
4.0K /var/cache/yum
[root@centos7 ~]#yum makecache
......
Metadata Cache Created
[root@centos7 ~]#du -sh /var/cache/yum
276M /var/cache/yum
5.8查看yum事务历史
#yum 执行安装卸载命令会记录到相关日志中

#日志 文件:
#CentOS 7以前版本日志
/var/log/yum.log

#CentOS 8 版本日志
/var/log/dnf.rpm.log
/var/log/dnf.log


#日志命令
yum history [info|list|packages-list|packages-info|summary|addon-
info|redo|undo|rollback|new|sync|stats]


#例:
[root@centos8 ~]#dnf history
ID   | Command line       | Date and time  | Action(s)   | Altered
-------------------------------------------------------------------------------
  22 | install yum-utils    | 2019-12-22 13:44 | Install    |   1
  21 | remove vsftpd      | 2019-12-22 13:39 | Removed    |   1
  20 | install vsftpd      | 2019-12-22 13:39 | Install    |   1
  19 | install python3     | 2019-12-22 12:26 | Install    |   3
  18 | install perl       | 2019-12-22 12:25 | Install    |  156
  17 | install httpd -y     | 2019-12-21 20:21 | Install    |  10
...省略...
[root@centos8 ~]#dnf history info 22
Transaction ID : 22
Begin time   : Sun 22 Dec 2019 01:44:08 PM CST
Begin rpmdb  : 607:35cd823ff347e56ceb688a9f72715eabb3c53d41
End time    : Sun 22 Dec 2019 01:44:08 PM CST (0 seconds)
End rpmdb   : 608:24139ec38fc131c182b75fdaad0626692045da94
User      : root <root>
Return-Code  : Success
Releasever   : 8
Command Line  : install yum-utils
Packages Altered:
 Install dnf-utils-4.0.2.2-3.el8.noarch @BaseOS
[root@centos8 ~]#dnf history undo 22 -y
Removed:
dnf-utils-4.0.2.2-3.el8.noarch
Complete!
[root@centos8 ~]#dnf history redo 22 -y
5.9安装及升级本地程序包
yum localinstall|install rpmfile1 [rpmfile2] [...]
yum localupdate|update rpmfile1 [rpmfile2] [...]
5.10查看包的安全警报
#格式:
yum updateinfo --summary|--list|--info


#例:
[root@centos8 ~]#yum updateinfo summary
Repository AppStream is listed more than once in the configuration
Repository extras is listed more than once in the configuration
Last metadata expiration check: 0:07:29 ago on Sun 14 Jun 2020 10:01:18 AM CST.
Updates Information Summary: available
  1 Security notice(s)
    1 Moderate Security notice(s)

[root@centos8 ~]#yum updateinfo
Repository AppStream is listed more than once in the configuration
5.11包组管理的相关命令
yum grouplist [hidden] [groupwildcard] [...]
yum groupinstall group1 [group2] [...]
yum groupupdate group1 [group2] [...]
yum groupremove group1 [group2] [...]
yum groupinfo group1 [...]


#例:最小化安装的系统安装图形环境
[root@centos8 ~]#yum grouplist
Last metadata expiration check: 0:21:21 ago on Sun 22 Dec 2019 01:56:36 PM CST.
。。。。。

[root@centos8 ~]#yum groupinfo "Server with GUI"
Last metadata expiration check: 0:32:00 ago on Wed 08 Apr 2020 04:35:02 PM CST.
Environment Group: Server with GUI
Description: An integrated, easy-to-manage server with a graphical interface.
。。。。。

[root@centos8 ~]#dnf groupinstall GNOME -y
[root@centos8 ~]#init 5
6实现私用 yum 仓库
#下载所有yum仓库的相关包和meta 数据

#CentOS 8 dnf 工具集成
dnf reposync --help #查看帮助

#默认只下载rpm包,不下载 meta数据,需要指定--download-metadata 才能下载 meta
dnf reposync  --repoid=REPOID --download-metadata -p /path

#CentOS 7 以前版本,reposync工具来自于yum-utils包
reposync --repoid=REPOID --download-metadata -p /path


#创建私有yum仓库:
createrepo [options] <directory>

#例:创建局域网的基于Base的私有yum源
#仓库服务器配置
[root@repo-server ~]#yum -y install httpd
[root@repo-server ~]#systemctl enable --now httpd
[root@repo-server ~]#mkdir /var/www/html/centos/8 -pv
[root@repo-server ~]#mount /dev/sr0 /mnt/
[root@repo-server ~]#cp -a /mnt/* /var/www/html/centos/8

#yum客户端配置
[root@repo-client ~]#cat /etc/yum.repos.d/test.repo
[BaseOS]
name=BaseOS
baseurl=http://10.0.0.8/centos/8/BaseOS
gpgkey=file:///etc/pki/rpm-gpg/RPM-GPG-KEY-centosofficial
[AppStream]
name=Appstream
baseurl=http://10.0.0.8/centos/8/AppStream/
gpgkey=file:///etc/pki/rpm-gpg/RPM-GPG-KEY-centosofficial


#例:下载阿里云的extras源,制作私有yum源
[root@repo-server ~]#yum repolist
Last metadata expiration check: 0:10:14 ago on Wed 08 Apr 2020 05:42:07 PM CST.
repo id               repo name           status
AppStream            AppStream            4,755
BaseOS             BaseOS             1,659
epel          EPEL              5,206
extras

[root@repo-server ~]#dnf reposync --repoid=extras --download-metadata -p
/var/www/html/centos
[root@repo-server ~]#ls /var/www/html/centos/
8 extras
[root@repo-server ~]#ls /var/www/html/centos/extras/
Packages repodata
[root@repo-client ~]#yum repolist
Last metadata expiration check: 0:02:31 ago on Wed 08 Apr 2020 06:01:20 PM CST.
repo id         repo name
status
AppStream        Appstream
4,755
BaseOS         BaseOS
 1,659
extras extras
12

[root@repo-client ~]#cat /etc/yum.repos.d/test.repo
[BaseOS]
name=BaseOS
baseurl=http://10.0.0.8/centos/8/BaseOS
gpgkey=file:///etc/pki/rpm-gpg/RPM-GPG-KEY-centosofficial
[AppStream]
name=Appstream
baseurl=http://10.0.0.8/centos/8/AppStream/
gpgkey=file:///etc/pki/rpm-gpg/RPM-GPG-KEY-centosofficial
[extras]
name=extras
baseurl=http://10.0.0.8/centos/extras/

[root@repo-client ~]#yum --disablerepo=* --enablerepo=extras list available
[root@repo-client ~]#yum -y install epel-release


#例:下载阿里云的EPEL源,制作私有yum源
[root@centos8 ~]#cat /etc/yum.repos.d/base.repo
[epel]
name=EPEL
baseurl=https://mirrors.aliyun.com/epel/8/Everything/x86_64/
gpgcheck=0

[root@centos8 ~]#dnf repolist
Last metadata expiration check: 0:07:40 ago on Sun 22 Dec 2019 03:14:16 PM CST.
repo id       repo name                      status
AppStream      AppStream                      4,681
BaseOS        BaseOS                        1,655
epel         EPEL                         3,707

#下载相关仓库包和元数据
[root@centos8 ~]#dnf reposync --repoid=epel --download-metadata  -p
/var/www/html
#--download-metadata 加此选项可以下载元数据

#下载相关的key文件
[root@repo-server ~]#wget -P /var/www/html/epel/
https://mirrors.aliyun.com/epel/RPM-GPG-KEY-EPEL-8

#下面两个步骤只有没meta数据才需要执行
#[root@centos8 ~]#dnf -y install createrepo httpd
#[root@centos8 ~]#createrepo /var/www/html/epel/

[root@centos8 ~]#ls /var/www/html/epel/
Packages repodata
[root@centos8 ~]#systemctl start httpd

[root@repo-client ~]#cat /etc/yum.repos.d/test.repo
[BaseOS]
name=BaseOS
baseurl=http://10.0.0.8/centos/8/BaseOS
gpgkey=file:///etc/pki/rpm-gpg/RPM-GPG-KEY-centosofficial
[AppStream]
name=Appstream
baseurl=http://10.0.0.8/centos/8/AppStream/
gpgkey=file:///etc/pki/rpm-gpg/RPM-GPG-KEY-centosofficial

[extras]
name=extras
baseurl=http://10.0.0.8/centos/extras/
[epel]
name=epel
baseurl=http://10.0.0.8/epel/
gpgkey=http://10.0.0.8/epel/RPM-GPG-KEY-EPEL-8

[root@repo-client ~]#yum repolist
extras                  1.6 MB/s | 4.9 kB   00:00
epel                   88 MB/s | 6.2 MB   00:00
repo id     repo name        status
AppStream    Appstream         4,755
BaseOS     BaseOS          1,659
epel      epel           5,206
extras extras          12

[root@repo-client ~]#dnf install openvpn
7程序包编译
7.1源码编译介绍
程序包编译安装:
源代码-->预处理-->编译-->汇编-->链接-->执行
多文件:文件中的代码之间,很可能存在跨文件依赖关系虽然有很多开源软件将软件打成包,供人们使用,但并不是所有源代码都打成包,如果想使用开源软件,可能需要自已下载源码,进行编译安装。另外即使提供了包,但是生产中需要用于软件的某些特性,仍然需要自行编译安装。但是利用源代码编译安装是比较繁琐的,庆幸的是有相关的项目管理工具可以大大减少编译过程的复杂度
7.2开源程序源代码的获取
项目官方自建站点:
apache.org (ASF:Apache Software Foundation)
mariadb.org
...
代码托管:
Github.com
gitee.com
SourceForge.net
code.google.com
7.3编译源码的项目工具
C、C++的源码编译:使用 make 项目管理器
configure脚本 --> Makefile.in --> Makefile
相关开发工具:
autoconf: 生成configure脚本
automake:生成Makefile.in
java的源码编译: 使用 maven
7.4C 语言源代码编译安装过程
利用编译工具,通常只需要三个大的步骤
./configure
(1) 通过选项传递参数,指定安装路径、启用特性等;执行时会参考用户的指定以及Makefile.in文件生成Makefile
(2) 检查依赖到的外部环境,如依赖的软件包
make 根据Makefile文件,会检测依赖的环境,进行构建应用程序
make install 复制文件到相应路径
注意:安装前可以通过查看README,INSTALL获取帮助
7.4.1 编译安装准备
准备:安装相关的依赖包
开发工具:make, gcc (c/c++编译器GNU C Complier)
开发环境:开发库(glibc:标准库),头文件,可安装开发包组 Development Tools
软件相关依赖包
7.4.1.1基于最小化安装的系统建议安装下面相关包
yum install gcc make autoconf gcc-c++ glibc glibc-devel pcre pcre-devel openssl
openssl-devel systemd-devel zlib-devel vim lrzsz tree tmux lsof tcpdump wget
net-tools iotop bc bzip2 zip unzip nfs-utils man-pages
7.4.2编译安装
第一步:运行 configure 脚本,生成 Makefile 文件
其选项主要功能:
可以指定安装位置
指定启用的特性
#获取其支持使用的选项
./configure --help
安装路径设定
--prefix=/PATH:指定默认安装位置,默认为/usr/local/
--sysconfdir=/PATH:配置文件安装位置
System types:支持交叉编译
软件特性和相关指定:
Optional Features: 可选特性
--disable-FEATURE
--enable-FEATURE[=ARG]
Optional Packages: 可选包
--with-PACKAGE[=ARG] 依赖包
--without-PACKAGE 禁用依赖关系
注意:通常被编译操作依赖的程序包,需要安装此程序包的"开发"组件,其包名一般类似于name-
devel-VERSION
第二步:make
第三步:make install
7.4.3 安装后的配置
1. 二进制程序目录导入至PATH环境变量中
编辑文件/etc/profile.d/NAME.sh
export PATH=/PATH/TO/BIN:$PATH2. 相关用户及文件
有些开源软件编译完成后,还需要创建相关的用户及文件
3. 导入帮助手册
编辑/etc/man.config|man_db.conf文件,添加一个MANPATH
7.5 编译安装实战案例
7.5.1 官网下载并编译安装新版 tree
#例:CentOS 7 编译安装 tree1.8

#1 安装相关的依赖包
[root@centos7 ~]#yum install gcc make

#2 下载源码并解压
[root@centos7 ~]#tar xvf tree-1.8.0.tgz

#3 进入解压缩的目录,README和INSTALL
[root@centos7 ~]#cd tree-1.8.0/
[root@centos7 tree-1.8.0]#cat README
[root@centos7 tree-1.8.0]#cat INSTALL

#4 修改源码的版本号
[root@centos7 tree-1.8.0]#sed -i 's#v1\.8\.0#v8.8.8#' tree.c

#5 编译准备
[root@centos7 tree-1.8.0]#vim Makefile
prefix = /apps/tree

#6 编译
[root@centos7 tree-1.8.0]#make

#7 安装
[root@centos7 tree-1.8.0]#make install

#8 修改PATH变量
#默认无法直接运行tree
[root@centos7 ~]#tree
-bash: tree: command not found
[root@centos7 ~]#echo 'PATH=/apps/tree/bin:$PATH' > /etc/profile.d/tree.sh
. /etc/profile.d/tree.sh
#或者利用软链接实现
[root@centos7 ~]#ln -s /apps/tree/bin/tree /usr/local/bin

#9 验证结果
[root@centos7 ~]#tree --version
tree v8.8.8 (c) 1996 - 2018 by Steve Baker, Thomas Moore, Francesc Rocher,
Florian Sesser, Kyosuke Tokoro

#10 添加man帮助
#默认无法查看man
[root@centos7 ~]#man tree
No manual entry for tree
[root@centos7 ~]#vim /etc/man_db.conf
MANDATORY_MANPATH      /apps/tree/man
[root@centos7 ~]#man tree

#11 运行tree查看生成的文件列表
[root@centos7 ~]#tree /apps/tree
/apps/tree
├── bin
│  └── tree
└── man
 └── man1
   └── tree.1
3 directories, 2 files
7.5.2 编译安装 cmatrix
#例:CentOS 8 编译安装 cmatrix

#1 安装相关包
[root@centos8 ~]#dnf install gcc make autoconf ncurses-devel

#2 下载并解压缩包
[root@centos8 ~]#cd /usr/local/src
[root@centos8 src]#wget
https://github.com/abishekvashok/cmatrix/releases/download/v2.0/cmatrix-v2.0-
Butterscotch.tar
[root@centos8 src]#tar xvf cmatrix-v2.0-Butterscotch.tar

#3 配置
[root@centos8 ~]#cd cmatrix
[root@centos8 cmatrix]#./configure --prefix=/apps/cmatrix

#4 编译并安装
[root@centos8 cmatrix]#make && make install

#5 配置环境
[root@centos8 ~]#echo 'PATH=/apps/cmatrix/bin:$PATH' > /etc/profile.d/cmatrix.sh
[root@centos8 ~]#. /etc/profile.d/cmatrix.sh
#或者用软链接实现
[root@centos8 ~]#ln -sv /apps/cmatrix/bin/cmatrix /usr/local/bin/

#6运行
[root@centos8 ~]#cmatrix -a -b -C yellow

7#帮助
[root@centos8 ~]#vim /etc/man_db.conf
MANDATORY_MANPATH            /apps/cmatrix/share/man
[root@centos8 ~]#man cmatrix
7. 5.3 编译安装 httpd 2.4
#例:centos8 编译安装 httpd-2.4.46
#安装前准备:关闭防火墙和SELinux
#1 安装相关包
[root@centos8 ~]#dnf install gcc make autoconf apr-devel apr-util-devel pcre-
devel openssl-devel redhat-rpm-config

#2 下载并解压缩包
[root@centos8 ~]#wget https://mirror.bit.edu.cn/apache//httpd/httpd-
2.4.46.tar.bz2
[root@centos8 ~]#tar xvf httpd-2.4.46.tar.bz2 -C /usr/local/src

#3 配置
[root@centos8 ~]#cd /usr/local/src/httpd-2.4.43/
[root@centos8 httpd-2.4.46]#./configure --prefix=/apps/httpd --
sysconfdir=/etc/httpd --enable-ssl

#4 编译并安装
[root@centos8 httpd-2.4.46]#make -j 4 && make install

#5 配置环境
[root@centos8 ~]#echo 'PATH=/apps/httpd/bin:$PATH' > /etc/profile.d/httpd.sh
[root@centos8 ~]#. /etc/profile.d/httpd.sh

#6 运行
[root@centos8 ~]#apachectl start

#7 指定用apache用户运行
[root@centos8 ~]#useradd -r -s /sbin/nologin -d /var/www -c Apache -u 48 apache
[root@centos8 ~]#vim /etc/httpd/httpd.conf
user apache
group apache

#8 配置生效和验证
[root@centos8 ~]#apachectl restart

#9 查看进程
[root@centos8 ~]#ps aux

#10 用浏览器打开以下地址,可以看下面页面
7.5.4 一键安装 httpd2.4 脚本
#!/bin/bash

CPUS=`grep -c processor /proc/cpuinfo`
HTTPD_VERSION=2.4.52
INSTALL_DIR=/apps/httpd
COLOR="echo -e \E[32;1m"
END="\E[0m"

systemctl disable --now firewalld
yum -y install gcc make apr-devel apr-util-devel openssl-devel pcre-devel
redhat-rpm-config bzip2

cd /usr/local/src
rpm -q wget || yum -y install wget
wget https://dlcdn.apache.org//httpd/httpd-${HTTPD_VERSION}.tar.bz2 || { $COLOR
"下载失败,退出" $END;exit ; }

tar xf httpd-${HTTPD_VERSION}.tar.bz2

cd httpd-${HTTPD_VERSION}

./configure --prefix=${INSTALL_DIR} --enable-ssl  --disable-status

make -j $CPUS && make install

ln -s /apps/httpd/bin/apachectl /usr/local/bin/

apachectl start && $COLOR"安装成功!"$END
$COLOR"请访问:http://`hostname -I`"$END
8Ubuntu 软件管理
Debian软件包通常为预编译的二进制格式的扩展名".deb",类似rpm文件,因此安装快速,无需编译软件。包文件包括特定功能或软件所必需的文件、元数据和指令
dpkg:package manager for Debian,类似于rpm, dpkg是基于Debian的系统的包管理器。可以安装,删除和构建软件包,但无法自动下载和安装软件包或其依赖项
apt:Advanced Packaging Tool,功能强大的软件管理工具,甚至可升级整个Ubuntu的系统,基于客户/服务器架构,类似于yum
8.1 APT工作原理
在服务器上先复制所有DEB包,然后用APT的分析工具genbasedir根据每个DEB 包的包头(Header)信息对所有的DEB包进行分析,并将该分析结果记录在文件夹base内的一个DEB 索引清单文件中,一旦APT 服务器内的DEB有所变动,要使用genbasedir产生新的DEB索引清单。客户端在进行安装或升级时先要查询DEB索引清单,从而获知所有具有依赖关系的软件包,并一同下载到客户端以便安装。当客户端需要安装、升级或删除某个软件包时,客户端计算机取得DEB索引清单压缩文件后,会将其解压置放于 /var/cache/apt/,而客户端使用apt-get install或apt-get upgrade命令的时候,就会将这个文件夹内的数据和客户端计算机内的DEB数据库比对,知道哪些DEB已安装、未安装或是可以升级的
8.2 dpkg 包管理器
注意:一般建议不要使用dpkg卸载软件包。因为删除包时,其它依赖它的包不会卸载,并且可能无法再正常运行
#帮助参看:man dpkg

#dpkg 常见用法

#安装包,不支持包的依赖
dpkg -i package.deb

#删除包,不建议,不自动卸载依赖于它的包
dpkg -r package

#删除包(包括配置文件)
dpkg -P package

#列出当前已安装的包,类似rpm -qa
dpkg -l

#显示该包的简要说明
dpkg -l package

#列出该包的状态,包括详细信息,类似rpm –qi
dpkg -s package

#列出该包中所包含的文件,类似rpm –ql
dpkg -L package

#搜索包含pattern的包,类似rpm –qf
dpkg -S <pattern>

#配置包,-a 使用,配置所有没有配置的软件包
dpkg --configure package

#列出 deb 包的内容,类似rpm –qpl
dpkg -c package.deb

#解开 deb 包的内容
dpkg --unpack package.deb


#例:
#列出系统上安装的所有软件包
dpkg -l

#列出软件包安装的文件
dpkg -L bash

#查看/bin/bash来自于哪个软件包
dpkg -S /bin/bash

#安装本地的 .deb 文件
dpkg -i /mnt/cdrom/pool/main/z/zip/zip_3.0-11build1_amd64.deb

#卸载软件包
dpkg -r zip
8.3 apt
Debian 使用apt 工具集来管理包系统,apt-get 是其中一个常用的命令行工具,另外一款较为流行的命令行与 GUI 兼顾的工具是 aptitude ,之前最常用的 Linux 包管理命令都被分散在了 apt-get、apt-cache 和 apt-config 这三条命令中
在 2014 年apt 命令发布第一个稳定版,Ubuntu 16.04 引入新特性之一便是 apt 命令,apt 命令解决了命令过于分散的问题,它包括 apt-get 命令出现以来使用最广泛的功能选项,以及 apt-cache 和 apt-config 命令中很少用到的功能。在使用 apt 命令时,用户不必再由 apt-get 转到 apt-cache 或 apt-config,提供管理软件包所需的必要选项
apt 相当于 apt-get、apt-cache 和 apt-config 中最常用命令选项的集合
apt 具有更精减但足够的命令选项,而且参数选项的组织方式更为有效。此外,启用的几个特性也非常有帮助。例如:可以在使用 apt 命令安装或删除程序时看到进度条,apt 还会在更新存储库数据库时提示用户可升级的软件包个数
apt 与 apt-get 有一些类似的命令选项,但它并不能完全向下兼容 apt-get 命令,也即可用 apt 替换部分apt-get 系列命令,但不是全部
#apt 命令用法

#查看帮助:apt help

#apt与apt-get命令对比
apt 命令     被取代的命令     命令的功能
apt         install         apt-get install 安装软件包
apt         remove          apt-get remove 移除软件包
apt         purge           apt-get purge 移除软件包及配置文件
apt         update          apt-get update 刷新存储库索引
apt         upgrade         apt-get upgrade 升级所有可升级的软件包
apt         autoremove      apt-get autoremove 自动删除不需要的包
apt         full-upgrade    apt-get dist-upgrade 在升级软件包时自动处理依赖关系
apt         search          apt-cache search 搜索应用程序
apt         show            apt-cache show 显示安装细节


#apt 特有的命令
apt list 列出包含条件的包(已安装,可升级等)
apt edit-sources 编辑源列表


#APT包索引配置文件
/etc/apt/sources.list
/etc/apt/sources.list.d

#可以修改上面文件为国内的安装源,提高速度
参考链接:https://developer.aliyun.com/mirror/ubuntu?spm=a2c6h.13651102.0.0.53322f70fghx5
6


#例: 修改阿里云的APT源为清华源
root@ubuntu2004:~# sed -i 's/mirrors.aliyun.com/mirrors.tuna.tsinghua.edu.cn/'
/etc/apt/sources.list


#例: 修改APT源为清华源
https://mirrors.tuna.tsinghua.edu.cn/

#apt命令操作(如安装和删除软件包)日志文件
/var/log/dpkg.log


##安装包:
apt install tree zip


#安装deb包,注意:包文件前必须加路径
apt install ./mongodb-database-tools-ubuntu1804-x86_64-100.5.1.deb

#安装图形桌面
apt install ubuntu-desktop

#删除包:
apt remove tree zip
#说明:apt remove中添加--purge选项会删除包配置文件,谨慎使用

#更新包索引,相当于yum clean all;yum makecache
apt update

#升级包:要升级系统,请首先更新软件包索引,再升级
apt upgrade

#apt列出仓库软件包,等于yum list
apt list

#搜索安装包
apt search nginx

#查看某个安装包的详细信息
apt show apache2

#在线安装软件包
apt install apache2

#卸载单个软件包但是保留配置⽂件
apt remove apache2

#删除安装包并解决依赖关系
apt autoremove apache2

#更新本地软件包列表索引,修改了apt仓库后必须执⾏
apt update

#卸载单个软件包删除配置⽂件
apt purge apache2

#升级所有已安装且可升级到新版本的软件包
apt upgrade

#升级整个系统,必要时可以移除旧软件包。
apt full-upgrade

#编辑source源⽂件
apt edit-sources

#查看仓库中软件包有哪些版本可以安装
apt-cache madison nginx

#安装软件包的时候指定安装具体的版本
apt install nginx=1.14.0-0ubuntu1.6

#查看文件来自于哪个包,类似redhat中的yum provides <filename>
apt-file search 'string'  #默认是包含此字符串的文件
apt-file search -x  '正则表达式'
apt-file search -F /path/file
8.4软件管理案例
#例1: 查看文件来自于哪个包
#例: 查找存在的文件来自于哪个包
#dpkg -S filename :在当前安装的包里查找文件
[root@ubuntu1804 ~]#dpkg -S /bin/ls
coreutils: /bin/ls


#例: 查找不存在的文件存在于哪个包
[root@ubuntu1804 ~]#apt -y install apt-file
[root@ubuntu1804 ~]#apt update
[root@ubuntu1804 ~]#apt-file search -x '/sl$'
espeak-data: /usr/lib/x86_64-linux-gnu/espeak-data/voices/test/sl
espeak-ng-data: /usr/lib/x86_64-linux-gnu/espeak-ng-data/lang/zls/sl
language-pack-sl-base: /var/lib/locales/supported.d/sl
python-langdetect: /usr/lib/python2.7/dist-packages/langdetect/profiles/sl
python3-langdetect: /usr/lib/python3/dist-packages/langdetect/profiles/sl
qemu-system-common: /usr/share/qemu/keymaps/sl
rdesktop: /usr/share/rdesktop/keymaps/sl
sl: /usr/games/sl
virtualbox: /usr/share/virtualbox/rdesktop-vrdp-keymaps/sl

[root@ubuntu1804 ~]#apt-file search -F /usr/games/sl
sl: /usr/games/sl


#例2: 查看包相关信息
#显示系统安装包的统计信息,可以统计已经安装包的数量,大小,占用空间等
#apt-cache stats
[root@ubuntu1804 ~]#apt-cache stats
Total package names: 84873 (1,697 k)
Total package structures: 126998 (5,588 k)
Normal packages: 91623
Pure virtual packages: 2648
Single virtual packages: 10275
Mixed virtual packages: 5110
Missing: 17342
Total distinct versions: 115114 (9,209 k)
Total distinct descriptions: 182818 (4,388 k)
Total dependencies: 905746/262881 (22.3 M)
Total ver/file relations: 39954 (959 k)
Total Desc/File relations: 51746 (1,242 k)
Total Provides mappings: 44540 (1,069 k)
Total globbed strings: 188808 (4,354 k)
Total slack space: 25.8 k
Total space accounted for: 51.3 M
Total buckets in PkgHashTable: 50503
Unused: 9337
Used: 41166
Utilization: 81.512%
Average entries: 3.08502
Longest: 60
Shortest: 1
Total buckets in GrpHashTable: 50503
Unused: 9337
Used: 41166
Utilization: 81.512%
Average entries: 2.06173
Longest: 12
Shortest: 1


##显示xxx包的信息,可以看到某个包的源、版本等信息
#apt-cache show xxx #更详细
#apt show xxx
[root@ubuntu1804 ~]#apt show keepalived
Package: keepalived
Version: 1:1.3.9-1ubuntu0.18.04.2
Priority: optional
Section: admin
Origin: Ubuntu
Maintainer: Ubuntu Developers <ubuntu-devel-discuss@lists.ubuntu.com>

[root@ubuntu1804 ~]#apt-cache show keepalived
Package: keepalived
Architecture: amd64
Version: 1:1.3.9-1ubuntu0.18.04.2
Priority: optional
Section: admin
Origin: Ubuntu
Maintainer: Ubuntu Developers <ubuntu-devel-discuss@lists.ubuntu.com>


#例3: 查看仓库中的指定软件的所有版本
[root@ubuntu1804 ~]#apt-cache madison docker-ce
docker-ce | 5:19.03.13~3-0~ubuntu-bionic | https://mirrors.aliyun.com/docker-
ce/linux/ubuntu bionic/stable amd64 Packages
docker-ce | 5:19.03.12~3-0~ubuntu-bionic | https://mirrors.aliyun.com/docker-
ce/linux/ubuntu bionic/stable amd64 Packages
docker-ce | 5:19.03.11~3-0~ubuntu-bionic | https://mirrors.aliyun.com/docker-
ce/linux/ubuntu bionic/stable amd64 Packages
docker-ce | 5:19.03.10~3-0~ubuntu-bionic | https://mirrors.aliyun.com/docker-
ce/linux/ubuntu bionic/stable amd64 Packages
#安装指定版本
[root@ubuntu1804 ~]#apt -y install docker-ce=5:19.03.13~3-0~ubuntu-bionic


#例4: 查看文件的依赖
#查询软件xxx依赖哪些包
#apt  depends xxx
#apt-cache depends xxx
[root@ubuntu1804 ~]#apt depends keepalived
keepalived
Depends: iproute2
 iproute2:i386
Depends: libc6 (>= 2.27)
Depends: libglib2.0-0 (>= 2.26.0)
Depends: libip4tc0 (>= 1.6.0+snapshot20161117)
Depends: libip6tc0 (>= 1.6.0+snapshot20161117)
Depends: libnl-3-200 (>= 3.2.27)
Depends: libnl-genl-3-200 (>= 3.2.7)
Depends: libnl-route-3-200 (>= 3.2.7)
Depends: libsnmp30 (>= 5.7.3+dfsg-1.8ubuntu3.1~dfsg)
Depends: libssl1.1 (>= 1.1.0)
Depends: libxtables12 (>= 1.6.0+snapshot20161117)
Recommends: ipvsadm
[root@ubuntu1804 ~]#


#查询软件xxx被哪些包依赖
#apt rdepends xxx
#apt-cache rdepends xxx
[root@ubuntu1804 ~]#apt rdepends bash
bash
Reverse Depends:
Depends: bash-builtins (= 4.4.18-2ubuntu1.2)
  bash:i386
Recommends: plasma-sdk (>= 4.3)
  bash:i386
PreDepends: foomatic-db-engine (>= 2.05)
  bash:i386
Replaces: bash-doc (<< 4.3-2)
Depends: chromium-browser (>= 4)
  bash:i386
Depends: gdm3 (>= 4.3)
  bash:i386
Depends: votca-csg-tutorials (>= 4)
  bash:i386
Depends: votca-csg-scripts (>= 4)
  bash:i386
Depends: uck (>= 3.0)
  bash:i386
Depends: txt2regex (>> 2.04)
  bash:i386


#例5: 安装桌面
[root@ubuntu1804 ~]#apt install ubuntu-desktop -y
[root@ubuntu1804 ~]#init 5
8.5ubuntu 建议安装的常用包
[root@ubuntu1804 ~]#apt purge ufw lxd lxd-client lxcfs liblxc-common
[root@ubuntu1804 ~]#apt install iproute2 ntpdate tcpdump telnet traceroute nfs-
kernel-server nfs-common lrzsz tree openssl libssl-dev libpcre3 libpcre3-dev
zlib1g-dev gcc openssh-server iotop unzip zip


 1252
1252

 被折叠的 条评论
为什么被折叠?
被折叠的 条评论
为什么被折叠?
 到【灌水乐园】发言


