


目录
1 安全技术和防火墙
入侵检测系统(Intrusion Detection Systems):特点是不阻断任何网络访问,量化、定位来自内
外网络的威胁情况,主要以提供报警和事后监督为主,提供有针对性的指导措施和安全决策依据,类似于监控系统一般采用旁路部署方式
入侵防御系统(Intrusion Prevention System):以透明模式工作,分析数据包的内容如:溢出攻
击、拒绝服务攻击、木马、蠕虫、系统漏洞等进行准确的分析判断,在判定为攻击行为后立即予以
阻断,主动而有效的保护网络的安全,一般采用在线部署方式
防火墙( FireWall ):隔离功能,工作在网络或主机边缘,对进出网络或主机的数据包基于一定的规则检查,并在匹配某规则时由规则定义的行为进行处理的一组功能的组件,基本上的实现都是默认情况下关闭所有的通过型访问,只开放允许访问的策略,会将希望外网访问的主机放在DMZ
(demilitarized zone)网络中.
防水墙
广泛意义上的防水墙:防水墙(Waterwall),与防火墙相对,是一种防止内部信息泄漏的安全产品。网络、外设接口、存储介质和打印机构成信息泄漏的全部途径。防水墙针对这四种泄密途径,在事前、事中、事后进行全面防护。其与防病毒产品、外部安全产品一起构成完整的网络安全体系。

1.2 防火墙的分类
按保护范围划分:
主机防火墙:服务范围为当前一台主机
网络防火墙:服务范围为防火墙一侧的局域网
按实现方式划分:
硬件防火墙:在专用硬件级别实现部分功能的防火墙;另一个部分功能基于软件实现,如:华为,山石hillstone,天融信,启明星辰,绿盟,深信服, PaloAlto , fortinet飞塔, Cisco, Checkpoint,NetScreen(2004年被 Juniper 用40亿美元收购)等
软件防火墙:运行于通用硬件平台之上的防火墙的应用软件,Windows 防火墙 ISA --> ForefrontTMG
按网络协议划分:
网络层防火墙:OSI模型下四层,又称为包过滤防火墙
应用层防火墙/代理服务器:proxy 代理网关,OSI模型七层
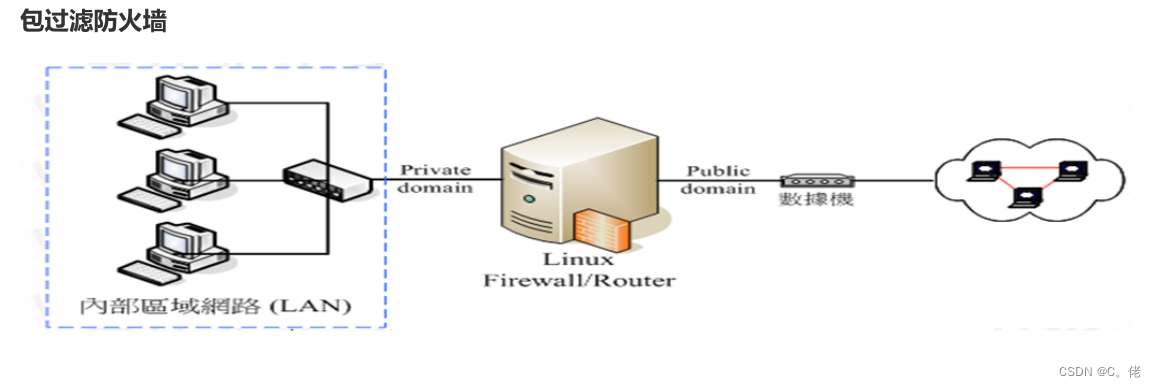
网络层对数据包进行选择,选择的依据是系统内设置的过滤逻辑,被称为访问控制列表(ACL),通过检查数据流中每个数据的源地址,目的地址,所用端口号和协议状态等因素,或他们的组合来确定是否允许该数据包通过
优点:对用户来说透明,处理速度快且易于维护
缺点:无法检查应用层数据,如病毒等

应用层防火墙/代理服务型防火墙,也称为代理服务器(Proxy Server)
将所有跨越防火墙的网络通信链路分为两段
内外网用户的访问都是通过代理服务器上的“链接”来实现
优点:在应用层对数据进行检查,比较安全
缺点:增加防火墙的负载
提示:现实生产环境中所使用的防火墙一般都是二者结合体,即先检查网络数据,通过之后再送到应用层去检查
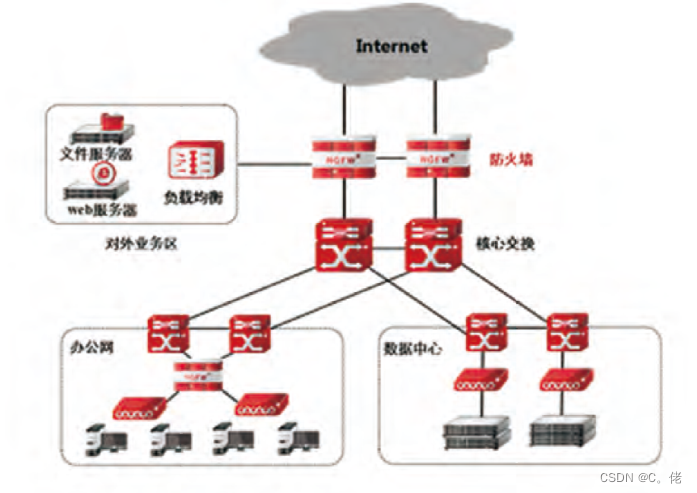
1.3 网络架构
2 防火墙的基本认识
2.1 Netfilter
Linux防火墙是由Netfilter组件提供的,Netfilter工作在内核空间,集成在linux内核中
Netfilter 是Linux 2.4.x之后新一代的Linux防火墙机制,是linux内核的一个子系统。Netfilter采用模块化设计,具有良好的可扩充性,提供扩展各种网络服务的结构化底层框架。Netfilter与IP协议栈是无缝契合,并允许对数据报进行过滤、地址转换、处理等操作
Netfilter官网文档:https://netfilter.org/documentation/
[root@centos8 ~]#grep -m 10 NETFILTER /boot/config-4.18.0-193.el8.x86_64
CONFIG_NETFILTER=y
CONFIG_NETFILTER_ADVANCED=y
CONFIG_BRIDGE_NETFILTER=m
CONFIG_NETFILTER_INGRESS=y
CONFIG_NETFILTER_NETLINK=m
CONFIG_NETFILTER_FAMILY_BRIDGE=y
CONFIG_NETFILTER_FAMILY_ARP=y
# CONFIG_NETFILTER_NETLINK_ACCT is not set
CONFIG_NETFILTER_NETLINK_QUEUE=m
CONFIG_NETFILTER_NETLINK_LOG=m

[root@centos7 ~]#grep -m 10 NETFILTER /boot/config-3.10.0-1127.el7.x86_64
CONFIG_NETFILTER=y
# CONFIG_NETFILTER_DEBUG is not set
CONFIG_NETFILTER_ADVANCED=y
CONFIG_BRIDGE_NETFILTER=m
CONFIG_NETFILTER_NETLINK=m
CONFIG_NETFILTER_NETLINK_ACCT=m
CONFIG_NETFILTER_NETLINK_QUEUE=m
CONFIG_NETFILTER_NETLINK_LOG=m
CONFIG_NETFILTER_NETLINK_QUEUE_CT=y
CONFIG_NETFILTER_SYNPROXY=m

[root@centos6 ~]#grep -m 10 NETFILTER /boot/config-2.6.32-754.el6.x86_64
CONFIG_NETFILTER=y
# CONFIG_NETFILTER_DEBUG is not set
CONFIG_NETFILTER_ADVANCED=y
CONFIG_BRIDGE_NETFILTER=y
CONFIG_NETFILTER_NETLINK=m
CONFIG_NETFILTER_NETLINK_QUEUE=m
CONFIG_NETFILTER_NETLINK_LOG=m
CONFIG_NETFILTER_TPROXY=m
CONFIG_NETFILTER_XTABLES=y
CONFIG_NETFILTER_XT_TARGET_AUDIT=m

[root@ubuntu2004 ~]#grep -m 10 NETFILTER /boot/config-5.4.0-33-generic
CONFIG_NETFILTER=y
CONFIG_NETFILTER_ADVANCED=y
CONFIG_BRIDGE_NETFILTER=m
CONFIG_NETFILTER_INGRESS=y
CONFIG_NETFILTER_NETLINK=m
CONFIG_NETFILTER_FAMILY_BRIDGE=y
CONFIG_NETFILTER_FAMILY_ARP=y
CONFIG_NETFILTER_NETLINK_ACCT=m
CONFIG_NETFILTER_NETLINK_QUEUE=m
CONFIG_NETFILTER_NETLINK_LOG=m

[root@ubuntu1804 ~]#grep -m 10 NETFILTER /boot/config-4.15.0-29-generic
CONFIG_NETFILTER=y
CONFIG_NETFILTER_ADVANCED=y
CONFIG_BRIDGE_NETFILTER=m
CONFIG_NETFILTER_INGRESS=y
CONFIG_NETFILTER_NETLINK=m
CONFIG_NETFILTER_NETLINK_ACCT=m
CONFIG_NETFILTER_NETLINK_QUEUE=m
CONFIG_NETFILTER_NETLINK_LOG=m
CONFIG_NETFILTER_NETLINK_GLUE_CT=y
CONFIG_NETFILTER_SYNPROXY=m
2.2 防火墙工具介绍
2.2.1 iptables
由软件包iptables提供的命令行工具,工作在用户空间,用来编写规则,写好的规则被送往netfilter,告诉内核如何去处理信息包
[root@centos8 ~]#rpm -qi iptables
Name    : iptables
Version   : 1.8.2
Release   : 9.el8
Architecture: x86_64
Install Date: Wed 25 Sep 2019 09:29:06 PM CST
Group    : Unspecified
Size    : 2050086
License   : GPLv2 and Artistic 2.0 and ISC
Signature  : RSA/SHA256, Tue 02 Jul 2019 06:50:00 AM CST, Key ID
05b555b38483c65d
Source RPM : iptables-1.8.2-9.el8.src.rpm
Build Date : Sat 11 May 2019 10:21:57 PM CST
Build Host : x86-01.mbox.centos.org
Relocations : (not relocatable)
Packager  : CentOS Buildsys <bugs@centos.org>
Vendor   : CentOS
URL     : http://www.netfilter.org/
Summary   : Tools for managing Linux kernel packet filtering capabilities
Description :
The iptables utility controls the network packet filtering code in the
Linux kernel. If you need to set up firewalls and/or IP masquerading,
you should either install nftables or this package.
Note: This package contains the nftables-based variants of iptables and
ip6tables, which are drop-in replacements of the legacy tools.


[root@centos8 ~]# iptables --version
iptables v1.8.2 (nf_tables)
[root@centos8 ~]#ll /usr/sbin/iptables
lrwxrwxrwx. 1 root root 17 May 11  2019 /usr/sbin/iptables -> xtables-nft-multi

[root@centos7 ~]#ll /usr/sbin/iptables
lrwxrwxrwx. 1 root root 13 Dec  9  2018 /usr/sbin/iptables -> xtables-multi
[root@centos7 ~]# iptables --version
iptables v1.4.21


[root@centos6 ~]#iptables --version
iptables v1.4.7
[root@centos6 ~]#ll /sbin/iptables
lrwxrwxrwx. 1 root root 33 Dec 12  2018 /sbin/iptables ->
/etc/alternatives/iptables.x86_64
[root@centos6 ~]#ll /etc/alternatives/iptables.x86_64
lrwxrwxrwx. 1 root root 20 Dec 12  2018 /etc/alternatives/iptables.x86_64 ->
/sbin/iptables-1.4.7
[root@centos6 ~]#ll /sbin/iptables
lrwxrwxrwx. 1 root root 33 Dec 12  2018 /sbin/iptables ->
/etc/alternatives/iptables.x86_64


#例:安装iptables的service包
[root@centos8 ~]#dnf -y install iptables-services
[root@centos8 ~]#rpm -ql iptables-services
/etc/sysconfig/ip6tables
/etc/sysconfig/iptables
/usr/lib/systemd/system/ip6tables.service
/usr/lib/systemd/system/iptables.service
/usr/libexec/initscripts/legacy-actions/ip6tables
/usr/libexec/initscripts/legacy-actions/ip6tables/panic
/usr/libexec/initscripts/legacy-actions/ip6tables/save
/usr/libexec/initscripts/legacy-actions/iptables
/usr/libexec/initscripts/legacy-actions/iptables/panic
/usr/libexec/initscripts/legacy-actions/iptables/save
/usr/libexec/iptables
/usr/libexec/iptables/ip6tables.init
/usr/libexec/iptables/iptables.init
2.2.2 firewalld
从CentOS 7 版开始引入了新的前端管理工具
软件包:
firewalld
firewalld-config
管理工具:
firewall-cmd 命令行工具
firewall-config 图形工作
2.2.3 nftables
此软件是CentOS 8 新特性,Nftables最初在法国巴黎的Netfilter Workshop 2008上发表,然后由长期的netfilter核心团队成员和项目负责人Patrick McHardy于2009年3月发布。它在2013年末合并到Linux内核中,自2014年以来已在内核3.13中可用。
它重用了netfilter框架的许多部分,例如连接跟踪和NAT功能。它还保留了命名法和基本iptables设计的几个部分,例如表,链和规则。就像iptables一样,表充当链的容器,并且链包含单独的规则,这些规则可以执行操作,例如丢弃数据包,移至下一个规则或跳至新链。
从用户的角度来看,nftables添加了一个名为nft的新工具,该工具替代了iptables,arptables和
ebtables中的所有其他工具。从体系结构的角度来看,它还替换了内核中处理数据包过滤规则集运行时评估的那些部分。
#例:查看软件包
[root@centos8 ~]#rpm -qi nftables
Name    : nftables
Epoch    : 1
Version   : 0.9.0
Release   : 8.el8
Architecture: x86_64
Install Date: Wed 25 Sep 2019 09:29:06 PM CST
Group    : Unspecified
Size    : 758622
License   : GPLv2
Signature  : RSA/SHA256, Tue 02 Jul 2019 08:19:09 AM CST, Key ID
05b555b38483c65d
Source RPM : nftables-0.9.0-8.el8.src.rpm
Build Date : Sat 11 May 2019 11:06:46 PM CST
Build Host : x86-01.mbox.centos.org
Relocations : (not relocatable)
Packager  : CentOS Buildsys <bugs@centos.org>
Vendor   : CentOS
URL     : http://netfilter.org/projects/nftables/
Summary   : Netfilter Tables userspace utillites
Description :
Netfilter Tables userspace utilities.


#例:CentOS 8 支持三种防火墙服务
[root@centos8 ~]#systemctl status iptables.service
● iptables.service - IPv4 firewall with iptables
 Loaded: loaded (/usr/lib/systemd/system/iptables.service; disabled; vendor
preset: disabled)
 Active: inactive (dead)
[root@centos8 ~]#systemctl status firewalld.service
● firewalld.service - firewalld - dynamic firewall daemon
 Loaded: loaded (/usr/lib/systemd/system/firewalld.service; disabled; vendor
preset: enabled)
 Active: inactive (dead)
  Docs: man:firewalld(1)
[root@centos8 ~]#systemctl status nftables.service
● nftables.service - Netfilter Tables
 Loaded: loaded (/usr/lib/systemd/system/nftables.service; disabled; vendor
preset: disabled)
 Active: inactive (dead)
  Docs: man:nft(8)
2.3 netfilter 中五个勾子函数和报文流向
Netfilter在内核中选取五个位置放了五个hook(勾子) function(INPUT、OUTPUT、FORWARD、
PREROUTING、POSTROUTING),而这五个hook function向用户开放,用户可以通过一个命令工具(iptables)向其写入规则
由信息过滤表(table)组成,包含控制IP包处理的规则集(rules),规则被分组放在链(chain)上
提示:从 Linux kernel 4.2 版以后,Netfilter 在prerouting 前加了一个 ingress 勾子函数。可以使用这个新的入口挂钩来过滤来自第2层的流量,这个新挂钩比预路由要早,基本上是 tc 命令(流量控制工具)的替代品
三种报文流向
流入本机:PREROUTING --> INPUT-->用户空间进程
流出本机:用户空间进程 -->OUTPUT--> POSTROUTING
转发:PREROUTING --> FORWARD --> POSTROUTING
2.4 iptables的组成
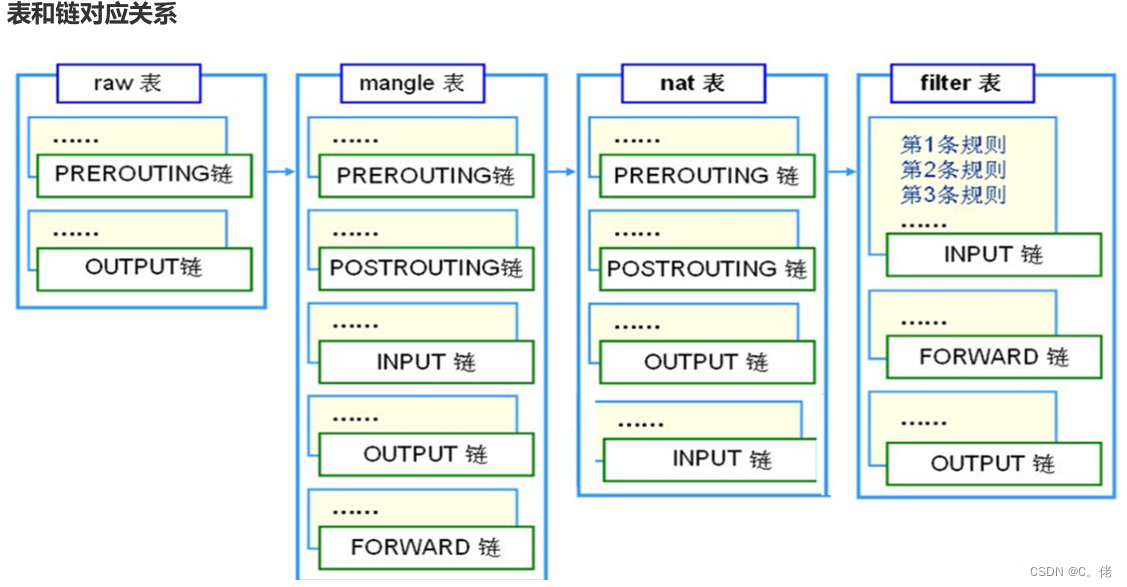
iptables由五个表table和五个链chain以及一些规则组成

链 chain:
内置链:每个内置链对应于一个钩子函数
自定义链:用于对内置链进行扩展或补充,可实现更灵活的规则组织管理机制;只有Hook钩子调用自定义链时,才生效
五个内置链chain:
INPUT,OUTPUT,FORWARD,PREROUTING,POSTROUTING五个表table:filter、nat、mangle、raw、security
filter:过滤规则表,根据预定义的规则过滤符合条件的数据包,默认表
nat:network address translation 地址转换规则表
mangle:修改数据标记位规则表
raw:关闭启用的连接跟踪机制,加快封包穿越防火墙速度
security:用于强制访问控制(MAC)网络规则,由Linux安全模块(如SELinux)实现


#优先级由高到低的顺序为:
security -->raw-->mangle-->nat-->filter
表和链对应关系

内核中数据包的传输过程
当一个数据包进入网卡时,数据包首先进入PREROUTING链,内核根据数据包目的IP判断是否需要转送出去
如果数据包是进入本机的,数据包就会沿着图向下移动,到达INPUT链。数据包到达INPUT链后,
任何进程都会收到它。本机上运行的程序可以发送数据包,这些数据包经过OUTPUT链,然后到达
POSTROUTING链输出
如果数据包是要转发出去的,且内核允许转发,数据包就会向右移动,经过FORWARD链,然后到
达POSTROUTING链输出
#例:
root@centos8 ~]#iptables -vnL -t filter
Chain INPUT (policy ACCEPT 0 packets, 0 bytes)
pkts bytes target   prot opt in   out   source        destination

Chain FORWARD (policy ACCEPT 0 packets, 0 bytes)
pkts bytes target   prot opt in   out   source        destination

Chain OUTPUT (policy ACCEPT 0 packets, 0 bytes)
pkts bytes target   prot opt in   out   source        destination

[root@centos8 ~]#iptables -vnL -t nat
Chain PREROUTING (policy ACCEPT 0 packets, 0 bytes)
pkts bytes target   prot opt in   out   source        destination

Chain INPUT (policy ACCEPT 0 packets, 0 bytes)
pkts bytes target   prot opt in   out   source        destination

Chain POSTROUTING (policy ACCEPT 0 packets, 0 bytes)
pkts bytes target   prot opt in   out   source        destination

Chain OUTPUT (policy ACCEPT 0 packets, 0 bytes)
pkts bytes target   prot opt in   out   source        destination

[root@centos8 ~]#iptables -vnL -t mangle
Chain PREROUTING (policy ACCEPT 0 packets, 0 bytes)
pkts bytes target   prot opt in   out   source        destination

Chain INPUT (policy ACCEPT 0 packets, 0 bytes)
pkts bytes target   prot opt in   out   source        destination

Chain FORWARD (policy ACCEPT 0 packets, 0 bytes)
pkts bytes target   prot opt in   out   source        destination

Chain OUTPUT (policy ACCEPT 0 packets, 0 bytes)
pkts bytes target   prot opt in   out   source        destination

Chain POSTROUTING (policy ACCEPT 0 packets, 0 bytes)
pkts bytes target   prot opt in   out   source        destination


[root@centos8 ~]#iptables -vnL -t raw
Chain PREROUTING (policy ACCEPT 0 packets, 0 bytes)
pkts bytes target   prot opt in   out   source        destination

Chain OUTPUT (policy ACCEPT 0 packets, 0 bytes)
pkts bytes target   prot opt in   out   source        destination

[root@centos8 ~]#iptables -vnL -t security
Chain INPUT (policy ACCEPT 0 packets, 0 bytes)
pkts bytes target   prot opt in   out   source        destination

Chain FORWARD (policy ACCEPT 0 packets, 0 bytes)
pkts bytes target   prot opt in   out   source        destination

Chain OUTPUT (policy ACCEPT 0 packets, 0 bytes)
pkts bytes target   prot opt in   out   source        destination


#CentOS 6 nat表不支持INPUT链
[root@centos6 ~]#iptables -vnL -t nat
Chain PREROUTING (policy ACCEPT 0 packets, 0 bytes)
pkts bytes target   prot opt in   out   source        destination

Chain POSTROUTING (policy ACCEPT 0 packets, 0 bytes)
pkts bytes target   prot opt in   out   source        destination

Chain OUTPUT (policy ACCEPT 0 packets, 0 bytes)
pkts bytes target   prot opt in   out   source        destination
2.5 netfilter 完整流程

3 iptables
3.1 iptables 规则说明
3.1.1 iptables 规则组成
规则rule:根据规则的匹配条件尝试匹配报文,对匹配成功的报文根据规则定义的处理动作作出处理,
规则在链接上的次序即为其检查时的生效次序
匹配条件:默认为与条件,同时满足
基本匹配:IP,端口,TCP的Flags(SYN,ACK等)
扩展匹配:通过复杂高级功能匹配
处理动作:称为target,跳转目标
内建处理动作:ACCEPT,DROP,REJECT,SNAT,DNAT,MASQUERADE,MARK,LOG...
自定义处理动作:自定义chain,利用分类管理复杂情形
规则要添加在链上,才生效;添加在自定义链上不会自动生效
白名单:只有指定的特定主机可以访问,其它全拒绝
黑名单:只有指定的特定主机拒绝访问,其它全允许,默认方式
3.1.2 iptables规则添加时考量点
要实现哪种功能:判断添加在哪张表上
报文流经的路径:判断添加在哪个链上
报文的流向:判断源和目的
匹配规则:业务需要
3.2 iptables 用法
#格式:
iptables [-t table] {-A|-C|-D} chain rule-specification
iptables [-t table] -I chain [rulenum] rule-specification
iptables [-t table] -R chain rulenum rule-specification
iptables [-t table] -D chain rulenum
iptables [-t table] -S [chain [rulenum]]
iptables [-t table] {-F|-L|-Z} [chain [rulenum]] [options...]
iptables [-t table] -N chain
iptables [-t table] -X [chain]
iptables [-t table] -P chain target
iptables [-t table] -E old-chain-name new-chain-name

rule-specification = [matches...] [target]
match = -m matchname [per-match-options]
target = -j targetname [per-target-options]
例:Filter表中INPUT规则
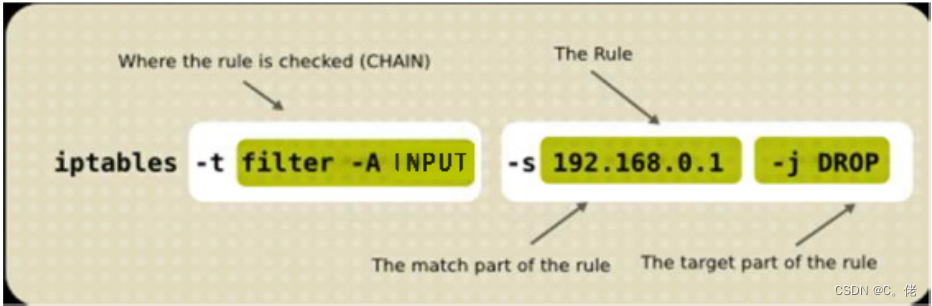
#iptables命令格式详解:
iptables  [-t table]  SUBCOMMAND  chain  [-m matchname [per-match-options]]
-j targetname [per-target-options]


#1、-t table:指定表
raw, mangle, nat, [filter]默认


#2、SUBCOMMAND:子命令

链管理类:
-N:new, 自定义一条新的规则链
-E:重命名自定义链;引用计数不为0的自定义链不能够被重命名,也不能被删除
-X:delete,删除自定义的空的规则链
-P:Policy,设置默认策略;对filter表中的链而言,其默认策略有:ACCEPT:接受, DROP:丢弃


#例:
[root@centos8 ~]#iptables -N web_chain
[root@centos8 ~]#iptables -N web_chain -t nat
[root@centos8 ~]#iptables -X web_chain -t nat
[root@centos8 ~]#iptables -E web_chain WEB_CHAIN
[root@centos8 ~]#iptables -A WEB_CHAIN -s 10.0.0.6 -p tcp -m multiport --dports
80,443 -j REJECT

[root@centos8 ~]#iptables -R WEB_CHAIN 1 -s 10.0.0.6 -p tcp -m multiport --
dports 80,443,8080 -j REJECT
[root@centos8 ~]#iptables -vnL WEB_CHAIN
Chain WEB_CHAIN (1 references)
pkts bytes target   prot opt in   out   source        destination

  1   60 REJECT   tcp  -- *   *    10.0.0.6       0.0.0.0/0
    multiport dports 80,443,8080 reject-with icmp-port-unreachable
[root@centos8 ~]#iptables -AINPUT -j WEB_CHAIN
[root@centos8 ~]#iptables -X WEB_CHAIN
iptables v1.8.2 (nf_tables): CHAIN_USER_DEL failed (Device or resource busy):
chain WEB_CHAIN
[root@centos8 ~]#iptables -F WEB_CHAIN
[root@centos8 ~]#iptables -X WEB_CHAIN
iptables v1.8.2 (nf_tables): CHAIN_USER_DEL failed (Device or resource busy):
chain WEB_CHAIN
[root@centos8 ~]#iptables -D INPUT 1
[root@centos8 ~]#iptables -X WEB_CHAIN


#例: 创建自定义链实现WEB的访问控制
[root@centos8 ~]#iptables -R WEB_CHAIN 1 -s 10.0.0.6 -p tcp -m multiport --
dports 80,443,8080 -j REJECT
[root@centos8 ~]#iptables -vnL WEB_CHAIN
Chain WEB_CHAIN (1 references)
pkts bytes target   prot opt in   out   source        destination

  1   60 REJECT   tcp  -- *   *    10.0.0.6       0.0.0.0/0
    multiport dports 80,443,8080 reject-with icmp-port-unreachable
[root@centos8 ~]#iptables -AINPUT -j WEB_CHAIN
[root@centos8 ~]#iptables -X WEB_CHAIN
iptables v1.8.2 (nf_tables): CHAIN_USER_DEL failed (Device or resource busy):
chain WEB_CHAIN
[root@centos8 ~]#iptables -F WEB_CHAIN
[root@centos8 ~]#iptables -X WEB_CHAIN
iptables v1.8.2 (nf_tables): CHAIN_USER_DEL failed (Device or resource busy):
chain WEB_CHAIN
[root@centos8 ~]#iptables -D INPUT 1
[root@centos8 ~]#iptables -X WEB_CHAI


[root@centos8 ~]#iptables -N web_chain
[root@centos8 ~]#iptables -E web_chain WEB_CHAIN
[root@centos8 ~]#iptables -A WEB_CHAIN -p tcp -m multiport --dports 80,443,8080
-j ACCEPT
[root@centos8 ~]#iptables -IINPUT 3 -s 10.0.0.0/24 -j WEB_CHAIN
[root@centos8 ~]#iptables -AWEB_CHAIN -p icmp -j ACCEPT
[root@centos8 ~]#iptables -IWEB_CHAIN 2 -s 10.0.0.6 -j RETURN
[root@centos8 ~]#iptables -vnL --line-numbers
Chain INPUT (policy ACCEPT 0 packets, 0 bytes)
num  pkts bytes target   prot opt in   out   source
destination
1    10  867 ACCEPT   all  -- lo   *    0.0.0.0/0
 0.0.0.0/0
2   5637 423K ACCEPT   all  -- *   *    10.0.0.1
0.0.0.0/0
3    248 20427 WEB_CHAIN all  -- *   *    10.0.0.0/24
 0.0.0.0/0
4   4278 248K REJECT   all  -- *   *    0.0.0.0/0
 0.0.0.0/0      reject-with icmp-port-unreachable
Chain FORWARD (policy ACCEPT 0 packets, 0 bytes)
num  pkts bytes target   prot opt in   out   source
destination
Chain OUTPUT (policy ACCEPT 0 packets, 0 bytes)
num  pkts bytes target   prot opt in   out   source
destination
Chain WEB_CHAIN (1 references)
num  pkts bytes target   prot opt in   out   source
destination
1    36  2619 ACCEPT   tcp  -- *   *    0.0.0.0/0     0.0.0.0/0    multiport dports 80,443,8080
2    16  1344 RETURN   all  -- *   *    10.0.0.6      0.0.0.0/0
3    184 15456 ACCEPT   icmp -- *   *    0.0.0.0/0    0.0.0.0/0


[root@centos6 ~]#curl 10.0.0.8
centos8 website
[root@centos6 ~]#curl 10.0.0.8
centos8 website
[root@centos6 ~]#ping -c1 10.0.0.8
PING 10.0.0.8 (10.0.0.8) 56(84) bytes of data.
From 10.0.0.8 icmp_seq=1 Destination Port Unreachable
--- 10.0.0.8 ping statistics ---
1 packets transmitted, 0 received, +1 errors, 100% packet loss, time 1ms

[root@centos7 ~]#ping 10.0.0.8 -c1
PING 10.0.0.8 (10.0.0.8) 56(84) bytes of data.
64 bytes from 10.0.0.8: icmp_seq=1 ttl=64 time=1.25 ms
--- 10.0.0.8 ping statistics ---
1 packets transmitted, 1 received, 0% packet loss, time 0ms
rtt min/avg/max/mdev = 1.257/1.257/1.257/0.000 ms
[root@centos7 ~]#curl 10.0.0.8
centos8 website


#例: 删除自定义链
#无法直接删除自定义链,删除自定议链和创建的顺序相反
[root@centos8 ~]#iptables -X WEB_CHAIN
iptables v1.8.4 (nf_tables): CHAIN_USER_DEL failed (Device or resource busy):
chain WEB_CHAIN


[root@centos8 ~]#iptables -D INPUT 3
[root@centos8 ~]#iptables -X WEB_CHAIN
iptables v1.8.4 (nf_tables): CHAIN_USER_DEL failed (Device or resource busy):
chain WEB_CHAIN


[root@centos8 ~]#iptables -F WEB_CHAIN
[root@centos8 ~]#iptables -L WEB_CHAIN
Chain WEB_CHAIN (0 references)
target   prot opt source        destination
[root@centos8 ~]#iptables -X WEB_CHAIN
[root@centos8 ~]#iptables -vnL --line-numbers
Chain INPUT (policy ACCEPT 0 packets, 0 bytes)
num  pkts bytes target   prot opt in   out   source
destination
1    10  867 ACCEPT   all  -- lo   *    0.0.0.0/0     0.0.0.0/0
2   5824 437K ACCEPT   all  -- *   *    10.0.0.1      0.0.0.0/0
3   4279 248K REJECT   all  -- *   *    0.0.0.0/0     0.0.0.0/0      reject-with icmp-port-unreachable

Chain FORWARD (policy ACCEPT 0 packets, 0 bytes)
num  pkts bytes target   prot opt in   out   source       destination
Chain OUTPUT (policy ACCEPT 0 packets, 0 bytes)
num  pkts bytes target   prot opt in   out   source       destination


#查看类:
-L:list, 列出指定鏈上的所有规则,本选项须置后
-n:numberic,以数字格式显示地址和端口号
-v:verbose,详细信息
-vv 更详细
-x:exactly,显示计数器结果的精确值,而非单位转换后的易读值
--line-numbers:显示规则的序号
-S selected,以iptables-save 命令格式显示链上规则


#常用组合:
-vnL
-vvnxL --line-numbers


#规则管理类:
-A:append,追加
-I:insert, 插入,要指明插入至的规则编号,默认为第一条
-D:delete,删除
     (1) 指明规则序号
     (2) 指明规则本身
-R:replace,替换指定链上的指定规则编号
-F:flush,清空指定的规则链
-Z:zero,置零
     iptables的每条规则都有两个计数器
    (1) 匹配到的报文的个数
    (2) 匹配到的所有报文的大小之和


#例:
[root@centos8 ~]#iptables -F OUTPUT


#3、chain:
PREROUTING,INPUT,FORWARD,OUTPUT,POSTROUTING


#4、匹配条件
基本:通用的,PARAMETERS
扩展:需加载模块,MATCH EXTENTIONS


#5、处理动作:
-j targetname [per-target-options]

#简单动作:
ACCEPT
DROP

#扩展动作:
REJECT:--reject-with:icmp-port-unreachable默认
RETURN:返回调用链
REDIRECT:端口重定向
LOG:记录日志,dmesg
MARK:做防火墙标记
DNAT:目标地址转换
SNAT:源地址转换
MASQUERADE:地址伪装
自定义链
3.3 iptables 基本匹配条件
基本匹配条件:无需加载模块,由iptables/netfilter自行提供
[!] -s, --source address[/mask][,...]:源IP地址或者不连续的IP地址
[!] -d, --destination address[/mask][,...]:目标IP地址或者不连续的IP地址
[!] -p, --protocol protocol:指定协议,可使用数字如0(all)
protocol: tcp, udp, icmp, icmpv6, udplite,esp, ah, sctp, mh or“all“
参看:/etc/protocols
[!] -i, --in-interface name:报文流入的接口;只能应用于数据报文流入环节,只应用于INPUT、
FORWARD、PREROUTING链
[!] -o, --out-interface name:报文流出的接口;只能应用于数据报文流出的环节,只应用于
FORWARD、OUTPUT、POSTROUTING链


#例:
[root@centos8 ~]#iptables -A INPUT -s 10.0.0.6,10.0.0.10 -j REJECT
[root@centos8 ~]#iptables -I INPUT -i lo -j ACCEPT
[root@centos8 ~]#curl 127.0.0.1
10.0.0.8
[root@centos8 ~]#curl 10.0.0.8
10.0.0.8
[root@centos8 ~]#iptables -I INPUT 2 -s 10.0.0.6 ! -p icmp -j ACCEPT
3.4 iptables 扩展匹配条件
扩展匹配条件:需要加载扩展模块(/usr/lib64/xtables/*.so),方可生效
扩展模块的查看帮助 :man iptables-extensions
扩展匹配条件:
隐式扩展
显式扩展
3.4.1 隐式扩展
iptables 在使用-p选项指明了特定的协议时,无需再用-m选项指明扩展模块的扩展机制,不需要手动加载扩展模块
#tcp 协议的扩展选项
[!] --source-port, --sport port[:port]:匹配报文源端口,可为端口连续范围
[!] --destination-port,--dport port[:port]:匹配报文目标端口,可为连续范围
[!] --tcp-flags mask comp
  mask 需检查的标志位列表,用,分隔 , 例如 SYN,ACK,FIN,RST
  comp 在mask列表中必须为1的标志位列表,无指定则必须为0,用,分隔tcp协议的扩展选项


#例:
--tcp-flags SYN,ACK,FIN,RST SYN 表示要检查的标志位为SYN,ACK,FIN,RST四个,其中SYN必
须为1,余下的必须为0,第一次握手
--tcp-flags SYN,ACK,FIN,RST SYN,ACK 第二次握手

#错误包
--tcp-flags ALL ALL
--tcp_flags ALL NONE

#[!] --syn:用于匹配第一次握手, 相当于:--tcp-flags SYN,ACK,FIN,RST SYN


#udp 协议的扩展选项
[!] --source-port, --sport port[:port]:匹配报文的源端口或端口范围
[!] --destination-port,--dport port[:port]:匹配报文的目标端口或端口范围


#icmp 协议的扩展选项
[!] --icmp-type {type[/code]|typename}
    type/code
       0/0  echo-reply icmp应答
       8/0  echo-request icmp请求


#例:
[root@centos8 ~]#iptables -A INPUT -s 10.0.0.6 -p tcp --dport 21:23 -j REJECT
[root@centos8 ~]#ipn
Chain INPUT (policy ACCEPT 0 packets, 0 bytes)
num  pkts bytes target   prot opt in   out   source
destination
1     1   60 REJECT   tcp  -- *   *    10.0.0.6
0.0.0.0/0      tcp dpts:21:23 reject-with icmp-port-unreachable
Chain FORWARD (policy ACCEPT 0 packets, 0 bytes)
num  pkts bytes target   prot opt in   out   source       destination
Chain OUTPUT (policy ACCEPT 0 packets, 0 bytes)
num  pkts bytes target   prot opt in   out   source       destination


#例:
[root@centos8 ~]#iptables -A INPUT -p tcp --syn -j REJECT


#例:
[root@centos8 ~]#iptables -A INPUT -s 10.0.0.6 -p icmp --icmp-type 8 -j REJECT
3.4.2 显式扩展及相关模块
显示扩展即必须使用-m选项指明要调用的扩展模块名称,需要手动加载扩展模块
[-m matchname [per-match-options]]3.4.2.1multiport扩展
#以离散方式定义多端口匹配,最多指定15个端口

#指定多个源端口
[!] --source-ports,--sports port[,port|,port:port]...

# 指定多个目标端口
[!] --destination-ports,--dports port[,port|,port:port]...

#多个源或目标端
[!] --ports port[,port|,port:port]...


#例:
[root@centos8 ~]#iptables -A INPUT -s 172.16.0.0/16 -d 172.16.100.10 -p tcp -m
multiport --dports 20:22,80 -j ACCEPT

[root@centos8 ~]#iptables -A INPUT -s 10.0.0.6 -p tcp -m multiport --dports
445,139 -j REJECT
[root@centos8 ~]#ipn
Chain INPUT (policy ACCEPT 0 packets, 0 bytes)
num  pkts bytes target   prot opt in   out   source       destination
1     2  120 REJECT   tcp  -- *   *    10.0.0.6
0.0.0.0/0      multiport dports 445,139 reject-with icmp-port-unreachable
Chain FORWARD (policy ACCEPT 0 packets, 0 bytes)
num  pkts bytes target   prot opt in   out   source       destination
Chain OUTPUT (policy ACCEPT 0 packets, 0 bytes)
num  pkts bytes target   prot opt in   out   source       destination
3.4.2.2iprange扩展
#指明连续的(但一般不是整个网络)ip地址范围

[!] --src-range from[-to] 源IP地址范围
[!] --dst-range from[-to] 目标IP地址范围


#例:
iptables -A INPUT -d 172.16.1.100 -p tcp --dport 80 -m iprange --src-range
172.16.1.5-172.16.1.10 -j DROP
3.4.2.3 mac扩展
#mac 模块可以指明源MAC地址,,适用于:PREROUTING, FORWARD,INPUT chains

[!] --mac-source XX:XX:XX:XX:XX:XX


#例:
iptables -A INPUT -s 172.16.0.100 -m mac  --mac-source 00:50:56:12:34:56 -j
ACCEPT
iptables -A INPUT -s 172.16.0.100  -j REJECT
3.4.2.4 string扩展
#对报文中的应用层数据做字符串模式匹配检测

--algo {bm|kmp} 字符串匹配检测算法
    bm:Boyer-Moore
    kmp:Knuth-Pratt-Morris
--from offset 开始偏移
--to offset   结束偏移
[!] --string pattern 要检测的字符串模式
[!] --hex-string pattern 要检测字符串模式,16进制格式


#例:
iptables -A OUTPUT -p tcp --sport 80 -m string --algo bm --from 62  --string
"google" -j REJECT
3.4.2.5 time扩展
注意:CentOS 8 此模块有问题
根据将报文到达的时间与指定的时间范围进行匹配
--datestart YYYY[-MM[-DD[Thh[:mm[:ss]]]]] 日期
--datestop YYYY[-MM[-DD[Thh[:mm[:ss]]]]]
--timestart hh:mm[:ss]     时间
--timestop hh:mm[:ss]
[!] --monthdays day[,day...]  每个月的几号
[!] --weekdays day[,day...]  星期几,1 – 7 分别表示星期一到星期日
--kerneltz:内核时区(当地时间),不建议使用,CentOS 7版本以上系统默认为 UTC
注意: centos6 不支持kerneltz ,--localtz指定本地时区(默认)


#例: CentOS 8 的 time模块问题
[root@centos8 ~]#rpm -ql iptables |grep time
/usr/lib64/xtables/libxt_time.so
[root@centos8 ~]#iptables -A INPUT -m time --timestart 12:30 --timestop 13:30 -j
ACCEPT
iptables v1.8.4 (nf_tables): Couldn't load match `time':No such file or directory


#例: 关于 -- kerneltz 选项
[root@centos8 ~]#man iptables-extensions
The caveat with the kernel timezone is that Linux distributions may ignore to
set the kernel timezone,and instead only set the system time. Even if a
particular distribution does set the timezone at boot,it is usually does not
keep the kernel timezone offset - which is what changes on DST - up to date.
ntpd will not touch the kernel timezone, so running it will not resolve the
issue. As such,one may    encounter a timezone that is always +0000, or one
that is wrong half of the time of the year. As such,using --kerneltz is highly
discouraged.


#例:
[root@centos7 ~]#iptables -A INPUT -s 172.16.0.0/16 -d 172.16.100.10 -p tcp --
dport 80 -m time --timestart 14:30 --timestop 18:30 --weekdays Sat,Sun --kerneltz
-j DROP
3.4.2.6 connlimit扩展
根据每客户端IP做并发连接数数量匹配
#可防止Dos(Denial of Service,拒绝服务)攻击
--connlimit-upto N #连接的数量小于等于N时匹配
--connlimit-above N #连接的数量大于N时匹配


#例:
iptables -A INPUT -d 172.16.100.10 -p tcp --dport 22 -m connlimit --connlimit-
above 2 -j REJECT
3.4.2.7 limit扩展
#基于收发报文的速率做匹配 , 令牌桶过滤器

--limit-burst number #前多少个包不限制
--limit #[/second|/minute|/hour|/day]


#例:
iptables -I INPUT -d 172.16.100.10 -p icmp --icmp-type 8 -m limit --limit
10/minute --limit-burst 5 -j ACCEPT
iptables -I INPUT 2 -p icmp -j REJECT

#例:
[root@centos8 ~]#iptables -A INPUT -p icmp -m limit --limit-burst 10 --limit
20/minute -j ACCEPT
[root@centos8 ~]#iptables -A INPUT -p icmp -j REJECT


[root@centos6 ~]#ping 10.0.0.8
PING 192.168.39.8 (192.168.39.8) 56(84) bytes of data.
64 bytes from 192.168.39.8: icmp_seq=1 ttl=64 time=0.779 ms
64 bytes from 192.168.39.8: icmp_seq=2 ttl=64 time=0.436 ms
64 bytes from 192.168.39.8: icmp_seq=3 ttl=64 time=0.774 ms
64 bytes from 192.168.39.8: icmp_seq=4 ttl=64 time=0.391 ms
64 bytes from 192.168.39.8: icmp_seq=5 ttl=64 time=0.441 ms
64 bytes from 192.168.39.8: icmp_seq=6 ttl=64 time=0.356 ms
64 bytes from 192.168.39.8: icmp_seq=7 ttl=64 time=0.553 ms
64 bytes from 192.168.39.8: icmp_seq=8 ttl=64 time=0.458 ms
64 bytes from 192.168.39.8: icmp_seq=9 ttl=64 time=0.459 ms
64 bytes from 192.168.39.8: icmp_seq=10 ttl=64 time=0.479 ms
64 bytes from 192.168.39.8: icmp_seq=11 ttl=64 time=0.450 ms
64 bytes from 192.168.39.8: icmp_seq=12 ttl=64 time=0.471 ms
64 bytes from 192.168.39.8: icmp_seq=13 ttl=64 time=0.531 ms
64 bytes from 192.168.39.8: icmp_seq=14 ttl=64 time=0.444 ms
From 192.168.39.8 icmp_seq=15 Destination Port Unreachable
64 bytes from 192.168.39.8: icmp_seq=16 ttl=64 time=0.668 ms
From 192.168.39.8 icmp_seq=17 Destination Port Unreachable
From 192.168.39.8 icmp_seq=18 Destination Port Unreachable
64 bytes from 192.168.39.8: icmp_seq=19 ttl=64 time=0.692 ms
From 192.168.39.8 icmp_seq=20 Destination Port Unreachable
From 192.168.39.8 icmp_seq=21 Destination Port Unreachable
64 bytes from 192.168.39.8: icmp_seq=22 ttl=64 time=0.651 ms
3.4.2.8 state扩展
state 扩展模块,可以根据”连接追踪机制“去检查连接的状态,较耗资源
conntrack机制:追踪本机上的请求和响应之间的关系
状态类型:
NEW:新发出请求;连接追踪信息库中不存在此连接的相关信息条目,因此,将其识别为第一次发出的请求
ESTABLISHED:NEW状态之后,连接追踪信息库中为其建立的条目失效之前期间内所进行的通信状态
RELATED:新发起的但与已有连接相关联的连接,如:ftp协议中的数据连接与命令连接之间的关系
INVALID:无效的连接,如flag标记不正确
UNTRACKED:未进行追踪的连接,如:raw表中关闭追踪
#已经追踪到的并记录下来的连接信息库
[root@centos8 ~]#cat /proc/net/nf_conntrack
ipv4   2 tcp    6 431325 ESTABLISHED src=10.0.0.7 dst=10.0.0.8 sport=49900
dport=80 src=10.0.0.8 dst=10.0.0.7 sport=80 dport=49900 [ASSURED] mark=0 zone=0
use=2
ipv4   2 tcp    6 431325 ESTABLISHED src=10.0.0.7 dst=10.0.0.8 sport=49886
dport=80 src=10.0.0.8 dst=10.0.0.7 sport=80 dport=49886 [ASSURED] mark=0 zone=0
use=2
ipv4   2 tcp    6 431325 ESTABLISHED src=10.0.0.7 dst=10.0.0.8 sport=49892
dport=80 src=10.0.0.8 dst=10.0.0.7 sport=80 dport=49892 [ASSURED] mark=0 zone=0
use=2
ipv4   2 tcp    6 431325 ESTABLISHED src=10.0.0.7 dst=10.0.0.8 sport=49904
dport=80 src=10.0.0.8 dst=10.0.0.7 sport=80 dport=49904 [ASSURED] mark=0 zone=0
use=2
ipv4   2 tcp    6 431325 ESTABLISHED src=10.0.0.7 dst=10.0.0.8 sport=49890
dport=80 src=10.0.0.8 dst=10.0.0.7 sport=80 dport=49890 [ASSURED] mark=0 zone=0
use=2
ipv4   2 tcp    6 431325 ESTABLISHED src=10.0.0.7 dst=10.0.0.8 sport=49888
dport=80 src=10.0.0.8 dst=10.0.0.7 sport=80 dport=49888 [ASSURED] mark=0 zone=0
use=2
ipv4   2 tcp    6 431325 ESTABLISHED src=10.0.0.7 dst=10.0.0.8 sport=49896
dport=80 src=10.0.0.8 dst=10.0.0.7 sport=80 dport=49896 [ASSURED] mark=0 zone=0
use=2
ipv4   2 tcp    6 431325 ESTABLISHED src=10.0.0.7 dst=10.0.0.8 sport=49898
dport=80 src=10.0.0.8 dst=10.0.0.7 sport=80 dport=49898 [ASSURED] mark=0 zone=0
use=2
ipv4   2 tcp    6 431325 ESTABLISHED src=10.0.0.7 dst=10.0.0.8 sport=49894
dport=80 src=10.0.0.8 dst=10.0.0.7 sport=80 dport=49894 [ASSURED] mark=0 zone=0
use=2
ipv4   2 tcp    6 431325 ESTABLISHED src=10.0.0.7 dst=10.0.0.8 sport=49902
dport=80 src=10.0.0.8 dst=10.0.0.7 sport=80 dport=49902 [ASSURED] mark=0 zone=0
use=2


#调整连接追踪功能所能够容纳的最大连接数量
[root@centos8 ~]#cat /proc/sys/net/netfilter/nf_conntrack_max
26624
[root@centos8 ~]#cat /proc/sys/net/nf_conntrack_max
26624


#查看连接跟踪有多少条目
[root@centos8 ~]#cat /proc/sys/net/netfilter/nf_conntrack_count
10


#不同的协议的连接追踪时长
[root@centos8 ~]#ll /proc/sys/net/netfilter/
total 0
-rw-r--r-- 1 root root 0 Mar 19 18:14 nf_conntrack_acct
-rw-r--r-- 1 root root 0 Mar 19 18:14 nf_conntrack_buckets
-rw-r--r-- 1 root root 0 Mar 19 18:14 nf_conntrack_checksum
-r--r--r-- 1 root root 0 Mar 19 18:14 nf_conntrack_count
-rw-r--r-- 1 root root 0 Mar 19 18:14 nf_conntrack_dccp_loose
-rw-r--r-- 1 root root 0 Mar 19 18:14 nf_conntrack_dccp_timeout_closereq
-rw-r--r-- 1 root root 0 Mar 19 18:14 nf_conntrack_dccp_timeout_closing
-rw-r--r-- 1 root root 0 Mar 19 18:14 nf_conntrack_dccp_timeout_open
-rw-r--r-- 1 root root 0 Mar 19 18:14 nf_conntrack_dccp_timeout_partopen
-rw-r--r-- 1 root root 0 Mar 19 18:14 nf_conntrack_dccp_timeout_request
-rw-r--r-- 1 root root 0 Mar 19 18:14 nf_conntrack_dccp_timeout_respond
-rw-r--r-- 1 root root 0 Mar 19 18:14 nf_conntrack_dccp_timeout_timewait
-rw-r--r-- 1 root root 0 Mar 19 18:14 nf_conntrack_events
-rw-r--r-- 1 root root 0 Mar 19 18:14 nf_conntrack_expect_max
-rw-r--r-- 1 root root 0 Mar 19 18:14 nf_conntrack_generic_timeout
-rw-r--r-- 1 root root 0 Mar 19 18:14 nf_conntrack_helper
-rw-r--r-- 1 root root 0 Mar 19 18:14 nf_conntrack_icmp_timeout
-rw-r--r-- 1 root root 0 Mar 19 18:14 nf_conntrack_log_invalid
-rw-r--r-- 1 root root 0 Mar 19 18:13 nf_conntrack_max
-rw-r--r-- 1 root root 0 Mar 19 18:14 nf_conntrack_sctp_timeout_closed
-rw-r--r-- 1 root root 0 Mar 19 18:14 nf_conntrack_sctp_timeout_cookie_echoed
-rw-r--r-- 1 root root 0 Mar 19 18:14 nf_conntrack_sctp_timeout_cookie_wait
-rw-r--r-- 1 root root 0 Mar 19 18:14 nf_conntrack_sctp_timeout_established
-rw-r--r-- 1 root root 0 Mar 19 18:14 nf_conntrack_sctp_timeout_heartbeat_acked
-rw-r--r-- 1 root root 0 Mar 19 18:14 nf_conntrack_sctp_timeout_heartbeat_sent
-rw-r--r-- 1 root root 0 Mar 19 18:14
nf_conntrack_sctp_timeout_shutdown_ack_sent
-rw-r--r-- 1 root root 0 Mar 19 18:14 nf_conntrack_sctp_timeout_shutdown_recd
-rw-r--r-- 1 root root 0 Mar 19 18:14 nf_conntrack_sctp_timeout_shutdown_sent
-rw-r--r-- 1 root root 0 Mar 19 18:14 nf_conntrack_tcp_be_liberal
-rw-r--r-- 1 root root 0 Mar 19 18:14 nf_conntrack_tcp_loose
-rw-r--r-- 1 root root 0 Mar 19 18:14 nf_conntrack_tcp_max_retrans
-rw-r--r-- 1 root root 0 Mar 19 18:14 nf_conntrack_tcp_timeout_close
-rw-r--r-- 1 root root 0 Mar 19 18:14 nf_conntrack_tcp_timeout_close_wait
-rw-r--r-- 1 root root 0 Mar 19 18:14 nf_conntrack_tcp_timeout_established
-rw-r--r-- 1 root root 0 Mar 19 18:14 nf_conntrack_tcp_timeout_fin_wait
-rw-r--r-- 1 root root 0 Mar 19 18:14 nf_conntrack_tcp_timeout_last_ack
-rw-r--r-- 1 root root 0 Mar 19 18:14 nf_conntrack_tcp_timeout_max_retrans
-rw-r--r-- 1 root root 0 Mar 19 18:14 nf_conntrack_tcp_timeout_syn_recv
-rw-r--r-- 1 root root 0 Mar 19 18:14 nf_conntrack_tcp_timeout_syn_sent
-rw-r--r-- 1 root root 0 Mar 19 18:14 nf_conntrack_tcp_timeout_time_wait
-rw-r--r-- 1 root root 0 Mar 19 18:14 nf_conntrack_tcp_timeout_unacknowledged
-rw-r--r-- 1 root root 0 Mar 19 18:14 nf_conntrack_timestamp
-rw-r--r-- 1 root root 0 Mar 19 18:14 nf_conntrack_udp_timeout
-rw-r--r-- 1 root root 0 Mar 19 18:14 nf_conntrack_udp_timeout_stream
dr-xr-xr-x 1 root root 0 Mar 19 18:14 nf_log
-rw-r--r-- 1 root root 0 Mar 19 18:14 nf_log_all_netns
注释:
连接跟踪,需要加载模块: modprobe nf_conntrack_ipv4
当服务器连接多于最大连接数时dmesg 可以观察到 :kernel: ip_conntrack: table full, dropping
packet错误,并且导致建立TCP连接很慢。
各种状态的超时后,链接会从表中删除
#例:
[root@centos8 ~]#echo 1 > /proc/sys/net/netfilter/nf_conntrack_max
[root@centos8 ~]#tail /var/log/messages
Jul  8 10:03:53 centos8 kernel: nf_conntrack: nf_conntrack: table full, dropping
packet
[root@centos6 ~]#tail /var/log/messages
Jul  8 09:51:16 centos6 kernel: nf_conntrack: table full, dropping packet.


#连接过多的解决方法两个:
(1) 加大nf_conntrack_max 值
vi /etc/sysctl.conf
net.nf_conntrack_max = 393216
net.netfilter.nf_conntrack_max = 393216


#(2) 降低 nf_conntrack timeout时间
vi /etc/sysctl.conf
net.netfilter.nf_conntrack_tcp_timeout_established = 300
net.netfilter.nf_conntrack_tcp_timeout_time_wait = 120
net.netfilter.nf_conntrack_tcp_timeout_close_wait = 60
net.netfilter.nf_conntrack_tcp_timeout_fin_wait = 120
iptables -t nat -L -n


#格式:
[!] --state state


#例: 不允许远程主机 10.0.0.7 访问本机,但本机可以访问10.0.0.7
[root@centos8 ~]#iptables -S
-P INPUT ACCEPT
-P FORWARD ACCEPT
-P OUTPUT ACCEPT
-A INPUT -s 10.0.0.1/32 -j ACCEPT
-A INPUT -m state --state ESTABLISHED -j ACCEPT
-A INPUT ! -s 10.0.0.7/32 -m state --state NEW -j ACCEPT
-A INPUT -j REJECT --reject-with icmp-port-unreachable


#例:
iptables -A INPUT -d 172.16.1.10 -p tcp -m multiport --dports 22,80 -m state --
state NEW,ESTABLISHED -j ACCEPT
iptables -A OUTPUT -s 172.16.1.10 -p tcp -m multiport --sports 22,80 -m state --
state ESTABLISHED -j ACCEPT


[root@centos8 ~]#iptables -A INPUT -m state --state ESTABLISHED -j ACCEPT
[root@centos8 ~]#iptables -A INPUT -m state --state NEW -j REJECT


#例:开放被动模式的ftp服务
(1) 装载ftp连接追踪的专用模块:
跟踪模块路径: /lib/modules/kernelversion/kernel/net/netfilter
vim /etc/sysconfig/iptables-config
IPTABLES_MODULES=“nf_conntrack_ftp"
modprobe nf_conntrack_ftp


(2) 放行请求报文:
    命令连接:NEW, ESTABLISHED
    数据连接:RELATED, ESTABLISHED
iptables -I INPUT -d LocalIP -p tcp -m state --state ESTABLISHED,RELATED -j ACCEPT
iptables -A INPUT -d LocalIP -p tcp --dport 21 -m state --state NEW -j ACCEPT


(3) 放行响应报文:
iptables -I OUTPUT -s LocalIP -p tcp -m state --state ESTABLISHED -j ACCEPT


#例:开放被动模式的ftp服务示例
yum install vsftpd
systemctl start vsftpd
modprobe nf_conntrack_ftp
iptables -F
iptables -A INPUT  -m state --state ESTABLISHED,RELATED -j ACCEPT
iptables -A INPUT -p tcp --dport 21 -m state --state NEW -j ACCEPT
iptables -A OUTPUT  -m state --state ESTABLISHED -j ACCEPT
iptables -P INPUT DROP
iptables -P OUTPUT DROP
iptables -vnL
3.5 Target
#target 包括以下类型:
自定义链, ACCEPT, DROP, REJECT,RETURN,LOG,SNAT,DNAT,REDIRECT,MASQUERADE

LOG:非中断target,本身不拒绝和允许,放在拒绝和允许规则前,并将日志记录在/var/log/messages系
统日志中
--log-level level   级别: debug,info,notice, warning, error, crit, alert,emerg
--log-prefix prefix 日志前缀,用于区别不同的日志,最多29个字符


#例:
[root@centos8 ~]#iptables -I INPUT -s 10.0.0.0/24 -p tcp -m multiport --dports
80,21,22,23 -m state --state NEW -j LOG --log-prefix "new connections: "
[root@centos8 ~]#tail -f /var/log/messages
Mar 19 18:41:07 centos8 kernel: iptables tcp connection: IN=eth0 OUT=
MAC=00:0c:29:f8:5d:b7:00:50:56:c0:00:08:08:00 SRC=10.0.0.1 DST=10.0.0.8 LEN=40
TOS=0x00 PREC=0x00 TTL=128 ID=43974 DF PROTO=TCP SPT=9844 DPT=22 WINDOW=4102
RES=0x00 ACK URGP=0
Mar 19 18:41:07 centos8 kernel: new connections: IN=eth0 OUT=
MAC=00:0c:29:f8:5d:b7:00:50:56:c0:00:08:08:00 SRC=10.0.0.1 DST=10.0.0.8 LEN=40
TOS=0x00 PREC=0x00 TTL=128 ID=43975 DF PROTO=TCP SPT=9844 DPT=22 WINDOW=4102
RES=0x00 ACK URGP=0
Mar 19 18:41:08 centos8 kernel: new connections: IN=eth0 OUT=


#例:
[root@centos8 ~]#iptables -R INPUT 2 -p tcp --dport 21 -m state --state NEW -j
LOG --log-prefix "ftp new link: "

[root@centos8 ~]#tail -f /var/log/messages
Dec 21 10:02:31 centos8 kernel: ftp new link: IN=eth0 OUT=
MAC=00:0c:29:f9:8d:90:00:0c:29:10:8a:b1:08:00 SRC=192.168.39.6 DST=192.168.39.8
LEN=60 TOS=0x00 PREC=0x00 TTL=64 ID=15556 DF PROTO=TCP SPT=53706 DPT=21
WINDOW=14600 RES=0x00 SYN URGP=0
3.6 规则优化最佳实践
1. 安全放行所有入站和出站的状态为ESTABLISHED状态连接,建议放在第一条,效率更高
2. 谨慎放行入站的新请求
3. 有特殊目的限制访问功能,要在放行规则之前加以拒绝
4. 同类规则(访问同一应用,比如:http ),匹配范围小的放在前面,用于特殊处理
5. 不同类的规则(访问不同应用,一个是http,另一个是mysql ),匹配范围大的放在前面,效率更高
-s 10.0.0.6 -p tcp --dport 3306 -j REJECT
-s 172.16.0.0/16 -p tcp --dport 80 -j REJECT
6. 应该将那些可由一条规则能够描述的多个规则合并为一条,减少规则数量,提高检查效率
7. 设置默认策略,建议白名单(只放行特定连接)
iptables -P,不建议,容易出现“自杀现象”
规则的最后定义规则做为默认策略,推荐使用,放在最后一条
3.7 iptables规则保存
使用iptables命令定义的规则,手动删除之前,其生效期限为kernel存活期限
持久保存规则:
CentOS 7,8
iptables-save > /PATH/TO/SOME_RULES_FILECentOS 6
#将规则覆盖保存至/etc/sysconfig/iptables文件中
service iptables save
加载规则
CentOS 7,8 重新载入预存规则文件中规则:
iptables-restore < /PATH/FROM/SOME_RULES_FILE


#iptables-restore选项
-n, --noflush:不清除原有规则
-t, --test:仅分析生成规则集,但不提交
CentOS 6:
#会自动从/etc/sysconfig/iptables 重新载入规则
service iptables  restart
开机自动重载规则
*用脚本保存各个iptables命令;让此脚本开机后自动运行
/etc/rc.d/rc.local文件中添加脚本路径 /PATH/TO/SOME_SCRIPT_FILE
*用规则文件保存各个规则,开机时自动载入此规则文件中的规则
在/etc/rc.d/rc.local文件添加
iptables-restore < /PATH/FROM/IPTABLES_RULES_FILE*定义Unit File, CentOS 7,8 可以安装 iptables-services 实现iptables.service
#例: CentOS 7,8 使用 iptables-services
[root@centos8 ~]#yum -y install iptables-services
[root@centos8 ~]#cp /etc/sysconfig/iptables{,.bak}

#保存现在的规则到文件中方法1
[root@centos8 ~]#/usr/libexec/iptables/iptables.init save

#保存现在的规则到文件中方法2
[root@centos8 ~]#iptables-save > /etc/sysconfig/iptables

#开机启动
[root@centos8 ~]#systemctl enable iptables.service
[root@centos8 ~]#systemctl mask firewalld.service nftables.service
3.8 网络防火墙
iptables/netfilter 利用filter表的FORWARD链,可以充当网络防火墙:
注意的问题:
(1) 请求-响应报文均会经由FORWARD链,要注意规则的方向性
(2) 如果要启用conntrack机制,建议将双方向的状态为ESTABLISHED的报文直接放行
3.8.1 FORWARD 链实现内外网络的流量控制

#例: 实现内网访问可以访问外网,反之禁止
##环境准备
[root@internet ~]#hostname -I
192.168.0.6
[root@internet ~]#route -n
Kernel IP routing table
Destination Gateway Genmask Flags Metric Ref Use Iface
192.168.0.0 0.0.0.0 255.255.255.0 U 0 0 0 eth0
169.254.0.0 0.0.0.0 255.255.0.0 U 1002 0 0 eth0
0.0.0.0 192.168.0.8 0.0.0.0 UG 0 0 0 eth0
[root@firewall ~]#hostname -I
10.0.0.8 192.168.0.8
[root@firewall ~]#vim /etc/sysctl.conf
net.ipv4.ip_forward=1
[root@firewall ~]#sysctl -p
[root@lanserver1 ~]#hostname -I
10.0.0.7
[root@lanserver1 ~]#route -n
Kernel IP routing table
Destination Gateway Genmask Flags Metric Ref Use Iface
0.0.0.0 10.0.0.8 0.0.0.0 UG 100 0 0 eth0
10.0.0.0 0.0.0.0 255.255.255.0 U 100 0 0 eth0
[root@lanserver2 ~]#hostname -I
10.0.0.17
[root@lanserver2 ~]#route -n
Kernel IP routing table
Destination Gateway Genmask Flags Metric Ref Use Iface
0.0.0.0 10.0.0.8 0.0.0.0 UG 100 0 0 eth0
10.0.0.0 0.0.0.0 255.255.255.0 U 100 0 0 eth0
#方法1 通过标准模块实现内网访问外网特定服务http和icmp,反之禁止
[root@firewall ~]#iptables -AFORWARD -j REJECT
[root@firewall ~]#iptables -IFORWARD -s 10.0.0.0/24 -p tcp --dport 80 -j ACCEPT
[root@firewall ~]#iptables -IFORWARD -d 10.0.0.0/24 -p tcp --sport 80 -j ACCEPT
[root@firewall ~]#iptables -I FORWARD -s 10.0.0.0/24 -p icmp --icmp-type 8 -j ACCEPT
[root@firewall ~]#iptables -I FORWARD -d 10.0.0.0/24 -p icmp --icmp-type 0 -j ACCEPT
[root@firewall ~]#iptables -vnL --line-numbers
Chain INPUT (policy ACCEPT 0 packets, 0 bytes)
num pkts bytes target prot opt in out source
destination
Chain FORWARD (policy ACCEPT 0 packets, 0 bytes)
num pkts bytes target prot opt in out source
destination
1 174 14616 ACCEPT icmp -- * * 0.0.0.0/0
10.0.0.0/24 icmptype 0
2 218 18312 ACCEPT icmp -- * * 10.0.0.0/24
0.0.0.0/0 icmptype 8
3 10 1084 ACCEPT tcp -- * * 0.0.0.0/0
10.0.0.0/24 tcp spt:80
4 31 1938 ACCEPT tcp -- * * 10.0.0.0/24
0.0.0.0/0 tcp dpt:80
5 312 25632 REJECT all -- * * 0.0.0.0/0
0.0.0.0/0 reject-with icmp-port-unreachable
Chain OUTPUT (policy ACCEPT 0 packets, 0 bytes)
num pkts bytes target prot opt in out source
destination
#方法2 利用state模块实现内网访问可以访问外网,反之禁止
[root@firewall ~]#iptables -DFORWARD 1
[root@firewall ~]#iptables -DFORWARD 2
[root@firewall ~]#iptables -vnL --line-numbers
Chain INPUT (policy ACCEPT 0 packets, 0 bytes)
num pkts bytes target prot opt in out source destination
Chain FORWARD (policy ACCEPT 0 packets, 0 bytes)
num pkts bytes target prot opt in out source
destination
1 342 28728 ACCEPT icmp -- * * 10.0.0.0/24
0.0.0.0/0 icmptype 8
2 47 2898 ACCEPT tcp -- * * 10.0.0.0/24
0.0.0.0/0 tcp dpt:80
3 462 37608 REJECT all -- * * 0.0.0.0/0
0.0.0.0/0 reject-with icmp-port-unreachable
Chain OUTPUT (policy ACCEPT 0 packets, 0 bytes)
num pkts bytes target prot opt in out source destination
[root@firewall ~]#iptables -IFORWARD -m state --state RELATED,ESTABLISHED -j ACCEPT
[root@firewall ~]#iptables -vnL --line-numbers
Chain INPUT (policy ACCEPT 0 packets, 0 bytes)
num pkts bytes target prot opt in out source destination
Chain FORWARD (policy ACCEPT 0 packets, 0 bytes)
num pkts bytes target prot opt in out source
destination
1 40 3429 ACCEPT all -- * * 0.0.0.0/0
0.0.0.0/0 state RELATED,ESTABLISHED
2 443 37212 ACCEPT icmp -- * * 10.0.0.0/24
0.0.0.0/0 icmptype 8
3 49 3018 ACCEPT tcp -- * * 10.0.0.0/24
0.0.0.0/0 tcp dpt:80
4 563 46068 REJECT all -- * * 0.0.0.0/0
0.0.0.0/0 reject-with icmp-port-unreachable
Chain OUTPUT (policy ACCEPT 0 packets, 0 bytes)
num pkts bytes target prot opt in out source destination
[root@lanserver1 ~]#ping 192.168.0.6 -c1
PING 192.168.0.6 (192.168.0.6) 56(84) bytes of data.
64 bytes from 192.168.0.6: icmp_seq=1 ttl=63 time=2.20 ms
[root@lanserver2 ~]#curl 192.168.0.6
internet
[root@internet ~]#ping 10.0.0.7 -c1
PING 10.0.0.7 (10.0.0.7) 56(84) bytes of data.
From 192.168.0.8 icmp_seq=1 Destination Port Unreachable
[root@internet ~]#curl 10.0.0.7
curl: (7) couldn't connect to host
#利用state模块实现允许内网可以访问外网所有资源
[root@firewall ~]#iptables -DFORWARD 2
[root@firewall ~]#iptables -DFORWARD 2
[root@firewall ~]#iptables -IFORWARD 2 -s 10.0.0.0/24 -m state --state NEW -j ACCEPT
[root@firewall ~]#iptables -vnL --line-numbers
Chain INPUT (policy ACCEPT 0 packets, 0 bytes)
num pkts bytes target prot opt in out source destination
Chain FORWARD (policy ACCEPT 0 packets, 0 bytes)
num pkts bytes target prot opt in out source
destination
1 134 15209 ACCEPT all -- * * 0.0.0.0/0
0.0.0.0/0 state RELATED,ESTABLISHED
2 3 204 ACCEPT all -- * * 10.0.0.0/24
0.0.0.0/0 state NEW
3 572 46680 REJECT all -- * * 0.0.0.0/0
0.0.0.0/0 reject-with icmp-port-unreachable
Chain OUTPUT (policy ACCEPT 0 packets, 0 bytes)
num pkts bytes target prot opt in out source destination
[root@lanserver1 ~]#ping 192.168.0.6 -c1
PING 192.168.0.6 (192.168.0.6) 56(84) bytes of data.
64 bytes from 192.168.0.6: icmp_seq=1 ttl=63 time=2.26 ms
[root@lanserver2 ~]#curl 192.168.0.6
internet
[root@lanserver2 ~]#ssh 192.168.0.6
The authenticity of host '192.168.0.6 (192.168.0.6)' can't be established.
RSA key fingerprint is SHA256:ldHMw3UFehPuE3bgtMHIX5IxRRTM7fwC4iZ0Qqglcys.
RSA key fingerprint is MD5:8c:44:d9:3d:22:54:62:d8:27:77:d5:06:09:58:76:92.
Are you sure you want to continue connecting (yes/no)?
[root@internet ~]#curl 10.0.0.7
curl: (7) couldn't connect to host
[root@internet ~]#ping 10.0.0.7 -c1
PING 10.0.0.7 (10.0.0.7) 56(84) bytes of data.
From 192.168.0.8 icmp_seq=1 Destination Port Unreachable
[root@internet ~]#ssh 10.0.0.7
ssh: connect to host 10.0.0.7 port 22: Connection refused
#允许内网指定主机被外网访问
[root@firewall ~]#iptables -IFORWARD 3 -d 10.0.0.7 -p tcp --dport 80 -j ACCEPT
[root@firewall ~]#iptables -vnL --line-numbers
Chain INPUT (policy ACCEPT 0 packets, 0 bytes)
num pkts bytes target prot opt in out source destination
Chain FORWARD (policy ACCEPT 0 packets, 0 bytes)
num pkts bytes target prot opt in out source
destination
1 63 12862 ACCEPT all -- * * 0.0.0.0/0
0.0.0.0/0 state RELATED,ESTABLISHED
2 9 612 ACCEPT all -- * * 10.0.0.0/24
0.0.0.0/0 state NEW
3 1 60 ACCEPT tcp -- * * 0.0.0.0/0
10.0.0.7 tcp dpt:80
4 586 47464 REJECT all -- * * 0.0.0.0/0
0.0.0.0/0 reject-with icmp-port-unreachable
Chain OUTPUT (policy ACCEPT 0 packets, 0 bytes)
num pkts bytes target prot opt in out source
destination
[root@internet ~]#curl 10.0.0.7
lanserver1
[root@internet ~]#ping 10.0.0.7 -c1
PING 10.0.0.7 (10.0.0.7) 56(84) bytes of data.
From 192.168.0.8 icmp_seq=1 Destination Port Unreachable
[root@internet ~]#curl 10.0.0.17
curl: (7) couldn't connect to host
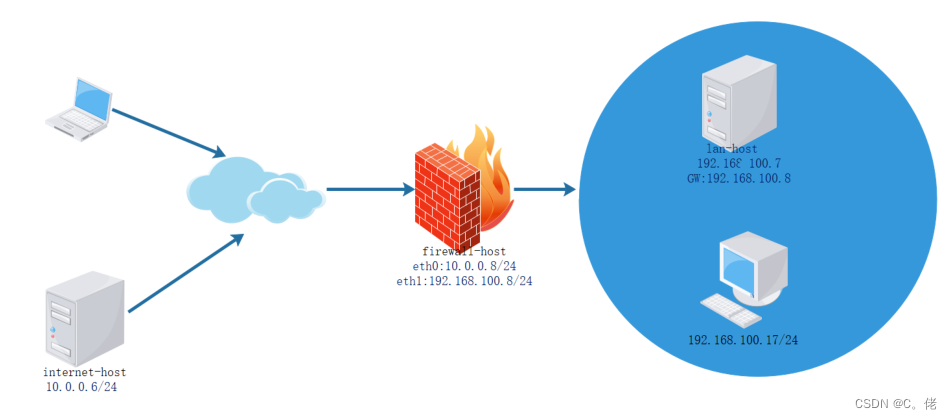
#例:内部可以访问外部,外部禁止访问内部
[root@internet-host ~]#hostname -I
10.0.0.6
[root@internet-host ~]#route -n
Kernel IP routing table
Destination Gateway Genmask Flags Metric Ref Use Iface
10.0.0.0 0.0.0.0 255.255.255.0 U 1 0 0 eth0
0.0.0.0 10.0.0.8 0.0.0.0 UG 0 0 0 eth0
[root@firewall-host ~]#hostname -I
10.0.0.8 192.168.100.8
[root@lan-host ~]#hostname -I
192.168.100.7
[root@lan-host ~]#route -n
Kernel IP routing table
Destination Gateway Genmask Flags Metric Ref Use Iface
0.0.0.0 192.168.100.8 0.0.0.0 UG 100 0 0 eth0
192.168.100.0 0.0.0.0 255.255.255.0 U 100 0 0 eth0
[root@firewall-host ~]#vim /etc/sysctl.conf
net.ipv4.ip_forward=1
[root@firewall-host ~]#sysctl -p
[root@firewall-host ~]#iptables -A FORWARD -d 192.168.100.0/24 -m state --state
NEW -j REJECT
#例:针对内部的特定服务可以允许外部访问,其它服务禁止访问
[root@firewall-host ~]#iptables -I FORWARD -d 192.168.100.0/24 -p tcp --dport 80
-j ACCEPT
[root@firewall-host ~]#iptables -vnL FORWARD --line-numbers
Chain FORWARD (policy ACCEPT 0 packets, 0 bytes)
num pkts bytes target prot opt in out source destination
1 6 486 ACCEPT tcp -- * * 0.0.0.0/0
192.168.100.0/24 tcp dpt:80
2 3 228 REJECT all -- * * 0.0.0.0/0
192.168.100.0/24 state NEW reject-with icmp-port-unreachable3.8.2 NAT 表
NAT: network address translation,支持PREROUTING,INPUT,OUTPUT,POSTROUTING四个链
请求报文:修改源/目标IP,由定义如何修改
响应报文:修改源/目标IP,根据跟踪机制自动实现
NAT的实现分为下面类型:
SNAT:source NAT ,支持POSTROUTING, INPUT,让本地网络中的主机通过某一特定地址访问外部网络,实现地址伪装,请求报文:修改源IP
DNAT:destination NAT 支持PREROUTING , OUTPUT,把本地网络中的主机上的某服务开放给外部网络访问(发布服务和端口映射),但隐藏真实IP,请求报文:修改目标IP
PNAT: port nat,端口和IP都进行修改
3.8.3 SNAT
SNAT:基于nat表的target,适用于固定的公网IP
SNAT选项:
--to-source [ipaddr[-ipaddr]][:port[-port]]
--random
iptables -t nat -A POSTROUTING -s LocalNET ! -d LocalNet -j SNAT --to-source
ExtIP
注意: 需要开启 ip_forward
#例:
iptables -t nat -A POSTROUTING -s 10.0.0.0/24 ! –d 10.0.0.0/24 -j SNAT --to-
source 172.18.1.6-172.18.1.9
MASQUERADE:基于nat表的target,适用于动态的公网IP,如:拨号网络
MASQUERADE选项:
--to-ports port[-port]
--random
#例:
iptables -t nat -A POSTROUTING -s LocalNET ! -d LocalNet -j MASQUERADE


#例:
iptables -t nat -A POSTROUTING -s 10.0.0.0/24 ! -d 10.0.0.0/24 -j MASQUERADE


#例:查看本地主机访问公网时使用的IP
[root@centos8 ~]#curl http://ip.sb
111.199.191.204

#Windows10 支持curl
C:\Users\liang>curl ip.sb
111.199.184.218

[root@centos8 ~]#curl http://ipinfo.io/ip/
111.199.191.204
[root@centos8 ~]#curl http://ifconfig.me
111.199.191.204
[root@centos8 ~]#curl -L http://tool.lu/ip
当前IP: 111.199.191.204
归属地: 中国 北京 北京
[root@centos8 ~]#curl -sS --connect-timeout 10 -m 60
https://www.bt.cn/Api/getIpAddress
111.199.189.164
[root@centos8 ~]#curl "https://api.ipify.org?format=string"
111.199.184.218

[root@firewall ~]#curl cip.cc
IP : 39.164.140.134
地址 : 中国 河南 鹤壁
运营商 : 移动
数据二 : 河南省郑州市 | 移动
数据三 :
URL : http://www.cip.cc/39.164.140.134

#例: SNAT
#启用路由转发
[root@firewall ~]#vim /etc/sysctl.conf
net.ipv4.ip_forward=1
[root@firewall ~]#sysctl -p

#针对专线静态公共IP
[root@firewall ~]#iptables -t nat -A POSTROUTING -s 10.0.0.0/24 -j SNAT --to-
source 192.168.0.8

#针对拨号网络和专线静态公共IP
[root@firewall ~]#iptables -t nat -A POSTROUTING -s 10.0.0.0/24 -j MASQUERADE

#查看监听端口
[root@firewall ~]#ss -ntl
State     Recv-Q     Send-Q         Local Address:Port
   Peer Address:Port
LISTEN     0        128              0.0.0.0:22
      0.0.0.0:*
LISTEN     0        100             127.0.0.1:25
      0.0.0.0:*
LISTEN     0        128               [::]:22
       [::]:*
LISTEN     0        100              [::1]:25
       [::]:*


#内网可以访问外网
[root@lanserver1 ~]#curl 192.168.0.6
internet


#外网不可以访问内网
[root@internet ~]#curl 10.0.0.7
curl: (7) Failed to connect to 10.0.0.7: Network is unreachable


#在外网服务器查看到是firewalld的地址在访问
[root@internet ~]#tail -f /var/log/httpd/access_log
192.168.0.8 - - [08/Jul/2020:17:36:54 +0800] "GET / HTTP/1.1" 200 9 "-"
"curl/7.29.0"


#查看转换状态信息
[root@firewall ~]#cat /proc/net/nf_conntrack

ipv4   2 tcp    6 112 TIME_WAIT src=10.0.0.7 dst=192.168.0.6 sport=58384
dport=80 src=192.168.0.6 dst=192.168.0.8 sport=80 dport=58384 [ASSURED] mark=0
zone=0 use=2


#例:实现SNAT
[root@internet-host ~]#hostname -I
10.0.0.6
[root@internet-host ~]#route -n
Kernel IP routing table
Destination   Gateway     Genmask     Flags Metric Ref  Use Iface
10.0.0.0     0.0.0.0     255.255.255.0  U   1    0     0 eth0


#启用路由转发
[root@firewall ~]#vim /etc/sysctl.conf
net.ipv4.ip_forward=1
[root@firewall ~]#sysctl -p

[root@firewall-host ~]#hostname -I
10.0.0.8 192.168.100.8
[root@firewall-host ~]#sysctl -a |grep net.ipv4.ip_forward
net.ipv4.ip_forward = 1

[root@lan-host ~]#hostname -I
192.168.100.7
[root@lan-host ~]#route -n
Kernel IP routing table
Destination   Gateway     Genmask     Flags Metric Ref  Use Iface
0.0.0.0     192.168.100.8  0.0.0.0     UG   100   0     0 eth0
192.168.100.0  0.0.0.0     255.255.255.0  U   100   0     0 eth0


[root@firewall-host ~]#iptables -t nat -A POSTROUTING -s 192.168.100.0/24 -j SNAT
--to-source 10.0.0.8
[root@firewall-host ~]#iptables -vnL -t nat
Chain PREROUTING (policy ACCEPT 0 packets, 0 bytes)
pkts bytes target   prot opt in   out   source        destination

Chain INPUT (policy ACCEPT 0 packets, 0 bytes)
pkts bytes target   prot opt in   out   source        destination

Chain POSTROUTING (policy ACCEPT 0 packets, 0 bytes)
pkts bytes target   prot opt in   out   source        destination

  0   0 SNAT    all  -- *   *    192.168.100.0/24   0.0.0.0/0
    to:10.0.0.8
Chain OUTPUT (policy ACCEPT 0 packets, 0 bytes)
pkts bytes target   prot opt in   out   source        destination


[root@lan-host ~]#curl 10.0.0.6
internet Server

[root@internet-host ~]#curl 192.168.100.7
curl: (7) Failed to connect to 192.168.100.7: Network is unreachable

[root@internet-host ~]#tail /var/log/httpd/access_log
10.0.0.8 - - [21/Mar/2020:16:31:35 +0800] "GET / HTTP/1.1" 200 16 "-"
"curl/7.29.0"

[root@lan-host ~]#ping 10.0.0.6
PING 10.0.0.6 (10.0.0.6) 56(84) bytes of data.
64 bytes from 10.0.0.6: icmp_seq=1 ttl=63 time=0.989 ms
64 bytes from 10.0.0.6: icmp_seq=2 ttl=63 time=0.544 ms

[root@internet-host ~]#tcpdump -i eth0 -nn icmp
tcpdump: verbose output suppressed, use -v or -vv for full protocol decode
listening on eth0, link-type EN10MB (Ethernet), capture size 65535 bytes
16:34:30.171222 IP 10.0.0.8 > 10.0.0.6: ICMP echo request, id 24718, seq 120,
length 64
16:34:30.171255 IP 10.0.0.6 > 10.0.0.8: ICMP echo reply, id 24718, seq 120,
length 64

[root@firewall-host ~]#iptables -t nat -R POSTROUTING 1 -s 192.168.100.0/24 -j
MASQUERADE

[root@firewall-host ~]#iptables -t nat -nvL
Chain PREROUTING (policy ACCEPT 0 packets, 0 bytes)
pkts bytes target   prot opt in   out   source        destination

Chain INPUT (policy ACCEPT 0 packets, 0 bytes)
pkts bytes target   prot opt in   out   source        destination

Chain POSTROUTING (policy ACCEPT 0 packets, 0 bytes)
pkts bytes target   prot opt in   out   source        destination

  0   0 MASQUERADE all  -- *   *    192.168.100.0/24   0.0.0.0/0

Chain OUTPUT (policy ACCEPT 0 packets, 0 bytes)
pkts bytes target   prot opt in   out   source        destination
[root@firewall-host ~]#cat /proc/net/nf_conntrack
ipv4   2 tcp    6 32 TIME_WAIT src=192.168.100.7 dst=10.0.0.6 sport=39430
dport=80 src=10.0.0.6 dst=10.0.0.8 sport=80 dport=39430 [ASSURED] mark=0 zone=0
use=2
3.8.4 DNAT
DNAT:nat表的target,适用于端口映射,即可重定向到本机,也可以支持重定向至不同主机的不同端口,但不支持多目标,即不支持负载均衡功能
#DNAT选项:
--to-destination [ipaddr[-ipaddr]][:port[-port]]
#DNAT 格式:
iptables -t nat -A PREROUTING -d ExtIP -p tcp|udp --dport PORT -j DNAT --to-
destination InterSeverIP[:PORT]


[root@firewall-host ~]#man iptables-extensions
--to-destination [ipaddr[-ipaddr]][:port[-port]]
 which can specify a single new destination IP address, an inclusive range
of IP addresses. Optionally a port range, if the rule also specifies one of the
following protocols: tcp, udp, dccp or sctp. If no port range is specified,
then the destination port will never be modi-fied. If no IP address is specified
then only the destination port will be modified. In Ker-nels up to  2.6.10
you can add several --to-destination options. For those kernels, if you specify
more than one destination address, either via an address range or multiple  --to-
des-tination options, a simple round-robin (one after another in cycle) load
balancing takes place between these addresses. Later Kernels (>= 2.6.11-rc1)
don't have the ability to NAT to multiple ranges anymore.
注意: 需要开启 ip_forward

#启用路由转发
[root@firewall ~]#vim /etc/sysctl.conf
net.ipv4.ip_forward=1
[root@firewall ~]#sysctl -p

[root@firewall ~]#iptables -t nat -A PREROUTING -d 192.168.0.8 -p tcp --dport 80
-j DNAT --to-destination 10.0.0.7:8080
[root@firewall ~]#ss -ntl
State     Recv-Q     Send-Q         Local Address:Port
   Peer Address:Port

LISTEN     0        128              0.0.0.0:22
      0.0.0.0:*
LISTEN     0        100             127.0.0.1:25
      0.0.0.0:*
LISTEN     0        128               [::]:22
       [::]:*
LISTEN     0        100              [::1]:25
       [::]:*
[root@internet ~]#curl 192.168.0.8
lanserver1
[root@lanserver1 ~]#tail /var/log/httpd/access_log
192.168.0.6 - - [08/Jul/2020:18:10:37 +0800] "GET / HTTP/1.1" 200 11 "-"
"curl/7.19.7 (x86_64-redhat-linux-gnu) libcurl/7.19.7 NSS/3.27.1 zlib/1.2.3
libidn/1.18 libssh2/1.4.2"


[root@firewall ~]#cat /proc/net/nf_conntrack
ipv4   2 tcp    6 117 TIME_WAIT src=192.168.0.6 dst=192.168.0.8 sport=58170
dport=80 src=10.0.0.7 dst=192.168.0.6 sport=8080 dport=58170 [ASSURED] mark=0
zone=0 use=2


#例:
iptables -t nat -A PREROUTING -s 0/0 -d 172.18.100.6 -p tcp --dport 22 -j DNAT -
-to-destination 10.0.1.22
iptables -t nat -A PREROUTING -s 0/0 -d 172.18.100.6 -p tcp --dport 80 -j DNAT -
-to-destination 10.0.1.22:8080


#例:
root@firewall-host ~]#iptables -t nat -A PREROUTING -d 10.0.0.8 -p tcp --dport
80 -j DNAT --to-destination 192.168.100.7
[root@firewall-host ~]#iptables -t nat -vnL PREROUTING
Chain PREROUTING (policy ACCEPT 0 packets, 0 bytes)
pkts bytes target   prot opt in   out   source        destination

  0   0 DNAT    tcp  -- *   *    0.0.0.0/0       10.0.0.8
    tcp dpt:80 to:192.168.100.7
[root@firewall-host ~]#ss -ntl
State    Recv-Q    Send-Q         Local Address:Port
  Peer Address:Port
LISTEN    0       128              0.0.0.0:22
     0.0.0.0:*
LISTEN    0       128               [::]:22
      [::]:*

[root@internet-host ~]#curl 10.0.0.8
lan server
[root@internet-host ~]#telnet 10.0.0.8
Trying 10.0.0.8...
telnet: connect to address 10.0.0.8: Connection refused

[root@lan-host ~]#tail -f /var/log/httpd/access_log
10.0.0.6 - - [21/Mar/2020:17:32:37 +0800] "GET / HTTP/1.1" 200 11 "-"


root@firewall-host ~]#tail -f /proc/net/nf_conntrack
ipv4   2 tcp    6 81 TIME_WAIT src=10.0.0.6 dst=10.0.0.8 sport=59426
dport=80 src=192.168.100.7 dst=10.0.0.6 sport=80 dport=59426 [ASSURED] mark=0
zone=0 use=2
[root@lan-host ~]#vim /etc/httpd/conf/httpd.conf
listen 8000
[root@lan-host ~]#systemctl restart httpd
[root@lan-host ~]#ss -ntl
State   Recv-Q Send-Q     Local Address:Port             Peer
Address:Port
LISTEN   0    100         127.0.0.1:25
   *:*
LISTEN   0    128             *:22
   *:*
LISTEN   0    128           [::]:23
  [::]:*
LISTEN   0    100           [::1]:25
  [::]:*
LISTEN   0    128           [::]:8000
  [::]:*
LISTEN   0    128           [::]:22
  [::]:*
[root@firewall-host ~]#iptables -t nat -R PREROUTING 1 -d 10.0.0.8 -p tcp --dport
80 -j DNAT --to-destination 192.168.100.7:8000
[root@firewall-host ~]#iptables -t nat -vnL
Chain PREROUTING (policy ACCEPT 0 packets, 0 bytes)
pkts bytes target   prot opt in   out   source        destination

  0   0 DNAT    tcp  -- *   *    0.0.0.0/0       10.0.0.8
    tcp dpt:80 to:192.168.100.7:8000
Chain INPUT (policy ACCEPT 0 packets, 0 bytes)
pkts bytes target   prot opt in   out   source        destination

Chain POSTROUTING (policy ACCEPT 0 packets, 0 bytes)
pkts bytes target   prot opt in   out   source        destination

 11  816 MASQUERADE all  -- *   *    192.168.100.0/24   0.0.0.0/0

Chain OUTPUT (policy ACCEPT 0 packets, 0 bytes)
pkts bytes target   prot opt in   out   source        destination
"curl/7.19.7 (x86_64-redhat-linux-gnu) libcurl/7.19.7 NSS/3.27.1 zlib/1.2.3
libidn/1.18 libssh2/1.4.2"
3.8.5 REDIRECT 转发
REDIRECT,是NAT表的 target,通过改变目标IP和端口,将接受的包转发至同一个主机的不同端口,可用于PREROUTING OUTPUT链
REDIRECT选项:
--to-ports port[-port]
注意: 无需开启 ip_forward
#例:
iptables -t nat -A PREROUTING -d 172.16.100.10 -p tcp --dport 80 -j REDIRECT --
to-ports 8080


#例:
[root@lan-host ~]#ss -ntl
State   Recv-Q Send-Q     Local Address:Port             Peer
Address:Port
LISTEN   0    100         127.0.0.1:25
   *:*
LISTEN   0    128             *:22
   *:*
LISTEN   0    128           [::]:23
  [::]:*
LISTEN   0    100           [::1]:25
  [::]:*
LISTEN   0    128           [::]:80
  [::]:*
LISTEN   0    128           [::]:22
  [::]:*
[root@lan-host ~]#iptables -t nat -A PREROUTING -p tcp --dport 8000 -j REDIRECT
--to-ports 80
[root@lan-host ~]#iptables -vnL -t nat
Chain PREROUTING (policy ACCEPT 0 packets, 0 bytes)
pkts bytes target   prot opt in   out   source        destination

  1   60 REDIRECT  tcp  -- *   *    0.0.0.0/0       0.0.0.0/0
    tcp dpt:8000 redir ports 80
Chain INPUT (policy ACCEPT 1 packets, 60 bytes)
pkts bytes target   prot opt in   out   source        destination

Chain OUTPUT (policy ACCEPT 1 packets, 120 bytes)
pkts bytes target   prot opt in   out   source        destination

Chain POSTROUTING (policy ACCEPT 1 packets, 120 bytes)
pkts bytes target   prot opt in   out   source        destination
3.8.4 综合案例: 两个私有网络的互相通迅

3.9 案例:防火墙配置设置
# Generated by iptables-save v1.4.7 on Wed May 18 09:22:34 2016
*filter
:INPUT ACCEPT [85890:4530430]
:FORWARD ACCEPT [76814:55698470]
:OUTPUT ACCEPT [166620:238017546]
-A FORWARD -s 172.16.0.100/32 -j ACCEPT
-A FORWARD -s 172.16.0.200/32 -j ACCEPT
-A FORWARD -s 172.16.0.67/32 -j ACCEPT
#LIANG  ADD NEXT LINE IN 20170627
#-A FORWARD -s 172.16.0.0/16 -j ACCEPT
#LIANG  ADD NEXT LINE IN 20170704
#-A FORWARD -s 172.18.0.0/16 -j ACCEPT
#-A FORWARD -s 172.18.0.0/16 -j REJECT
#-A FORWARD -s 172.16.0.68/32 -j ACCEPT
#-A FORWARD -s 172.16.0.69/32 -j ACCEPT
#-A FORWARD -s 172.16.0.6/32 -j ACCEPT
-A FORWARD -s 172.17.200.200/32 -j ACCEPT
-A FORWARD -s 172.17.136.136/32 -j ACCEPT
-A FORWARD -s 172.17.0.100/32 -j ACCEPT
-A FORWARD -s 172.18.100.1/32 -j ACCEPT
-A FORWARD -s 172.18.0.100/32 -j ACCEPT
-A FORWARD -s 172.18.200.2/32 -j ACCEPT
-A FORWARD -s 172.18.200.3/32 -j ACCEPT
-A FORWARD -s 172.18.211.211/32 -j ACCEPT
-A FORWARD -s 172.18.212.212/32 -j ACCEPT
-A FORWARD -m iprange --src-range 172.16.0.100-172.16.0.110 -j ACCEPT
-A FORWARD -m iprange --src-range 172.17.0.100-172.17.0.110 -j ACCEPT
-A FORWARD -m iprange --src-range 172.18.0.100-172.18.0.110 -j ACCEPT
-A FORWARD -m iprange --src-range 172.17.100.6-172.17.100.16 -j ACCEPT
-A FORWARD -m iprange --src-range 172.18.100.61-172.18.100.70 -j ACCEPT
-A FORWARD -s 172.16.0.0/16 -m string --string "verycd.com" --algo kmp --to
65535 -j REJECT --reject-with icmp-port-unreachable
-A FORWARD -s 172.16.0.0/16 -m string --string "tudou.com" --algo kmp --to 65535
-j REJECT --reject-with icmp-port-unreachable
-A FORWARD -s 172.16.0.0/16 -m string --string "youku.com" --algo kmp --to 65535
-j REJECT --reject-with icmp-port-unreachable
-A FORWARD -s 172.16.0.0/16 -m string --string "iqiyi.com" --algo kmp --to 65535
-j REJECT --reject-with icmp-port-unreachable
-A FORWARD -s 172.16.0.0/16 -m string --string "pptv.com" --algo kmp --to 65535
-j REJECT --reject-with icmp-port-unreachable
-A FORWARD -s 172.16.0.0/16 -m string --string "letv.com" --algo kmp --to 65535
-j REJECT --reject-with icmp-port-unreachable
-A FORWARD -s 172.16.0.0/16 -m string --string "xunlei.com" --algo kmp --to
65535 -j REJECT --reject-with icmp-port-unreachable
-A FORWARD -s 172.18.0.0/16 -m string --string "verycd.com" --algo kmp --to
65535 -j REJECT --reject-with icmp-port-unreachable
-A FORWARD -s 172.18.0.0/16 -m string --string "tudou.com" --algo kmp --to 65535
-j REJECT --reject-with icmp-port-unreachable
-A FORWARD -s 172.18.0.0/16 -m string --string "youku.com" --algo kmp --to 65535
-j REJECT --reject-with icmp-port-unreachable
-A FORWARD -s 172.18.0.0/16 -m string --string "iqiyi.com" --algo kmp --to 65535
-j REJECT --reject-with icmp-port-unreachable
-A FORWARD -s 172.18.0.0/16 -m string --string "pptv.com" --algo kmp --to 65535
-j REJECT --reject-with icmp-port-unreachable
-A FORWARD -s 172.18.0.0/16 -m string --string "letv.com" --algo kmp --to 65535
-j REJECT --reject-with icmp-port-unreachable
-A FORWARD -s 172.18.0.0/16 -m string --string "xunlei.com" --algo kmp --to
65535 -j REJECT --reject-with icmp-port-unreachable

#-A FORWARD -s 172.18.0.0/16 -j REJECT
#-A FORWARD -s 172.16.0.0/16 -j REJECT
#-A FORWARD -i ppp0 -m string --string ".exe" --algo bm --to 65535 -j REJECT --
reject-with icmp-port-unreachable
-A FORWARD -s 172.18.0.0/16 -m time --timestart 08:50:00 --timestop 18:00:00 --
weekdays Mon,Wed,Fri  --datestop 2038-01-19T11:14:07 -j REJECT --reject-with
icmp-port-unreachable
-A FORWARD -s 172.17.0.0/16 -m time --timestart 08:50:00 --timestop 18:00:00 --
weekdays Mon,Wed,Fri  --datestop 2038-01-19T11:14:07 -j REJECT --reject-with
icmp-port-unreachable
-A FORWARD -s 172.16.0.0/16 -m time --timestart 08:50:00 --timestop 12:30:00 --
weekdays Tue,Thu,Sat  --datestop 2038-01-19T11:14:07 -j REJECT --reject-with
icmp-port-unreachable
-A FORWARD -s 172.16.0.0/16 -m time --timestart 13:50:00 --timestop 18:00:00 --
weekdays Tue,Thu,Sat  --datestop 2038-01-19T11:14:07 -j REJECT --reject-with
icmp-port-unreachable
#liang next 2 lines changed in 20170619
#-A FORWARD -s 172.17.0.0/16 -m time --timestart 08:50:00 --timestop 12:30:00 --
weekdays Mon,Wed,Fri --datestop 2038-01-19T11:14:07 -j REJECT --reject-with
icmp-port-unreachable
#-A FORWARD -s 172.17.0.0/16 -m time --timestart 13:30:00 --timestop 18:10:00 --
weekdays Mon,Wed,Fri --datestop 2038-01-19T11:14:07 -j REJECT --reject-with
icmp-port-unreachable
#-A FORWARD -s 172.18.0.0/16 -m time --timestart 08:50:00 --timestop 18:10:00 --
weekdays Mon,Wed,Fri --datestop 2038-01-19T11:14:07 -j REJECT --reject-with
icmp-port-unreachable
#-A FORWARD -s 172.18.0.0/16 -m time --timestart 08:50:00 --timestop 18:10:00 --
weekdays Tue,Thu --datestop 2038-01-19T11:14:07 -j REJECT --reject-with icmp-
port-unreachable
COMMIT
# Completed on Wed May 18 09:22:34 2016
# Generated by iptables-save v1.4.7 on Wed May 18 09:22:34 2016
*nat
:PREROUTING ACCEPT [1429833:65427211]
:POSTROUTING ACCEPT [850518:35452195]
:OUTPUT ACCEPT [120198:9146655]
-A POSTROUTING -s 172.16.0.100/32 -j MASQUERADE
-A POSTROUTING -s 172.18.0.100/32 -j MASQUERADE
#-A POSTROUTING -s 172.16.0.200/32 -j MASQUERADE
#liang add next 1 line in 20170619
#liang add next 1 line in 20170704
-A POSTROUTING -s 172.16.0.69/32 -j MASQUERADE
-A POSTROUTING -s 172.17.200.200/32 -j MASQUERADE
-A POSTROUTING -s 172.17.136.136/32 -j MASQUERADE
-A POSTROUTING -s 172.17.0.100/32 -j MASQUERADE
#-A POSTROUTING -s 172.18.0.0/16 -j MASQUERADE
#-A POSTROUTING -s 172.16.0.6/32 -j MASQUERADE
-A POSTROUTING -m iprange --src-range 172.16.0.100-172.16.0.110 -j MASQUERADE
-A POSTROUTING -m iprange --src-range 172.17.0.100-172.17.0.110 -j MASQUERADE
-A POSTROUTING -m iprange --src-range 172.18.0.100-172.18.0.110 -j MASQUERADE
-A POSTROUTING -s 172.16.0.0/16 -p tcp -m multiport --dports 80,443,53,22,6666 -
j MASQUERADE
-A POSTROUTING -s 172.16.0.0/16 -p udp -m multiport --dports 22 -j MASQUERADE
-A POSTROUTING -s 172.17.0.0/16 -p tcp -m multiport --dports 80,443,53,22,6666 -
j MASQUERADE
-A POSTROUTING -s 172.17.0.0/16 -p udp -m multiport --dports 22 -j MASQUERADE
-A POSTROUTING -s 172.18.0.0/16 -p tcp -m multiport --dports
80,443,53,22,6666,1206,5938,1949 -j MASQUERADE
-A POSTROUTING -s 172.18.0.0/16 -p udp -m multiport --dports 22,1206,5938,1949 -
j MASQUERADE
COMMIT
# Completed on Wed May 18 09:22:34 2016
4 firewalld服务
4.1 firewalld 介绍
firewalld是CentOS 7.0新推出的管理netfilter的用户空间软件工具,也被ubuntu18.04版以上所支持(apt
install firewalld安装即可)
firewalld是配置和监控防火墙规则的系统守护进程。可以实iptables,ip6tables,ebtables的功能
firewalld服务由firewalld包提供
firewalld支持划分区域zone,每个zone可以设置独立的防火墙规则
归入zone顺序:
先根据数据包中源地址,将其纳为某个zone
纳为网络接口所属zone
纳入默认zone,默认为public zone,管理员可以改为其它zone
网卡默认属于public zone,lo网络接口属于trusted zone
firewalld zone 分类
| zone名称 | 默认配置 |
| trusted | 允许所有流量 |
| home | 拒绝除和传出流量相关的,以及ssh,mdsn,ipp-client,samba-client,dhcpv6-client预定义服务之外其它所有传入流量 |
| internal | 和home相同 |
| work | 拒绝除和传出流量相关的,以及ssh,ipp-client,dhcpv6-client预定义服务之外的其它所有传入流量 |
| public | 拒绝除和传出流量相关的,以及ssh,dhcpv6-client预定义服务之外的其它所有传入流量,新加的网卡默认属于public zone |
| external | 拒绝除和传出流量相关的,以及ssh预定义服务之外的其它所有传入流量,属于external zone的传出ipv4流量的源地址将被伪装为传出网卡的地址。 |
| dmz | 拒绝除和传出流量相关的,以及ssh预定义服务之外的其它所有传入流量 |
| block | 拒绝除和传出流量相关的所有传入流量 |
| drop | 拒绝除和传出流量相关的所有传入流量(甚至不以ICMP错误进行回应) |
预定义服务
| 服务名称 | 配置 |
| ssh | Local SSH server. Traffic to 22/tcp |
| dhcpv6-client | Local DHCPv6 client. Traffic to 546/udp on the fe80::/64 IPv6 network |
| ipp-client | Local IPP printing. Traffic to 631/udp. |
| samba- client | Local Windows file and print sharing client. Traffic to 137/udp and 138/udp. |
| mdns | Multicast DNS (mDNS) local-link name resolution. Traffic to 5353/udp to the 224.0.0.251 (IPv4) or ff02::fb (IPv6) multicast addresses. |
firewalld预定义服务配置:
firewall-cmd --get-services 查看预定义服务列表
/usr/lib/firewalld/services/*.xml预定义服务的配置
firewalld 三种配置方法
firewall-config 图形工具: 需安装 firewall-config包
firewall-cmd 命令行工具: firewalld包,默认安装
/etc/firewalld/ 配置文件,一般不建议,如:/etc/firewalld/zones/public.xml
4.2 firewall-cmd 命令
#firewall-cmd 格式
Usage: firewall-cmd [OPTIONS...]


#常用选项:
--get-zones 列出所有可用区域
--get-default-zone 查询默认区域
--set-default-zone=<ZONE> 设置默认区域
--get-active-zones 列出当前正使用的区域

--add-source=<CIDR>[--zone=<ZONE>] 添加源地址的流量到指定区域,如果无--zone= 选项,使用
默认区域

--remove-source=<CIDR> [--zone=<ZONE>] 从指定区域删除源地址的流量,如无--zone= 选项,
使用默认区域

--add-interface=<INTERFACE>[--zone=<ZONE>] 添加来自于指定接口的流量到特定区域,如果无--
zone= 选项,使用默认区域

--change-interface=<INTERFACE>[--zone=<ZONE>] 改变指定接口至新的区域,如果无--zone=
选项,使用默认区域

--add-service=<SERVICE> [--zone=<ZONE>] 允许服务的流量通过,如果无--zone= 选项,使用默
认区域

--add-port=<PORT/PROTOCOL>[--zone=<ZONE>] 允许指定端口和协议的流量,如果无--zone= 选
项,使用默认区域

--remove-service=<SERVICE> [--zone=<ZONE>] 从区域中删除指定服务,禁止该服务流量,如果
无--zone= 选项,使用默认区域

--remove-port=<PORT/PROTOCOL>[--zone=<ZONE>] 从区域中删除指定端口和协议,禁止该端口
的流量,如果无--zone= 选项,使用默认区域

--reload 删除当前运行时配置,应用加载永久配置

--list-services 查看开放的服务

--list-ports  查看开放的端口

--list-all [--zone=<ZONE>] 列出指定区域的所有配置信息,包括接口,源地址,端口,服务等,如
果无--zone= 选项,使用默认区域
–add-interface=<网卡名称>	将源自该网卡的所有流量都导向某个指定区域
–change-interface=<网卡名称>	将某个网卡与区域进行关联
–list-all	显示当前区域的网卡配置参数、资源、端口以及服务等信息
–list-all-zones	显示所有区域的网卡配置参数、资源、端口以及服务等信息
–add-service=<服务名>	设置默认区域允许该服务的流量
–add-port=<端口号/协议>	设置默认区域允许该端口的流量
–remove-service=<服务名>	设置默认区域不再允许该服务的流量
–remove-port=<端口号/协议>	设置默认区域不再允许该端口的流量
–reload	让“永久生效”的配置规则立即生效,并覆盖当前的配置规则
–panic-on	开启应急状况模式
–panic-off	关闭应急状况模式

firewalld服务启动、重启、停止:
    systemctl start firewalld
    systemctl restart firewalld
    systemctl stop firewalld

#重新加载防火墙配置
firewall-cmd --reload

#查看firewalld的运行状态
firewall-cmd --state

#查看默认当前使用的区域
firewall-cmd --get-default-zone

#查看系统默认活动区域名称、来源地址和关联的网卡
firewall-cmd --get-active-zones

#查看所有可用区域
firewall-cmd --get-zones

#查看区域的所有设置
firewall-cmd --zone=internal --list-all   # 查看指定区域设置
firewall-cmd --list-all   # 查看默认区域设置

#查看所有预设的服务
firewall-cmd --get-services

#此时将会列出/usr/lib/firewalld/services/目录中所有的服务名称。

#查看所有区域的设置
firewall-cmd --list-all-zones

#查看指定网卡所在的区域
firewall-cmd --get-zone-of-interface=ens32

#把firewalld的当前默认区域设置为drop,此为永久设置
firewall-cmd --set-default-zone=drop


#例:
#查看默认zone
firewall-cmd --get-default-zone
#默认zone设为dmz
firewall-cmd --set-default-zone=dmz
#在internal zone中增加源地址192.168.0.0/24的永久规则
firewall-cmd --permanent --zone=internal  --add-source=192.168.0.0/24
#在internal zone中增加协议mysql的永久规则
firewall-cmd --permanent --zone=internal  --add-service=mysql
#加载新规则以生效
firewall-cmd  --reload


#例:
[root@centos8 ~]#firewall-cmd --get-zones
block dmz drop external home internal public trusted work


[root@centos7 ~]#firewall-cmd --get-service
RH-Satellite-6 amanda-client amanda-k5-client amqp amqps apcupsd audit bacula
bacula-client bgp bitcoin bitcoin-rpc bitcoin-testnet bitcoin-testnet-rpc ceph
ceph-mon cfengine condor-collector ctdb dhcp dhcpv6 dhcpv6-client distcc dns
docker-registry docker-swarm dropbox-lansync elasticsearch etcd-client etcd-
server finger freeipa-ldap freeipa-ldaps freeipa-replication freeipa-trust ftp
ganglia-client ganglia-master git gre high-availability http https imap imaps ipp
ipp-client ipsec irc ircs iscsi-target isns jenkins kadmin kerberos kibana klogin
kpasswd kprop kshell ldap ldaps libvirt libvirt-tls lightning-network llmnr
managesieve matrix mdns minidlna mongodb mosh mountd mqtt mqtt-tls ms-wbt mssql
murmur mysql nfs nfs3 nmea-0183 nrpe ntp nut openvpn ovirt-imageio ovirt-
storageconsole ovirt-vmconsole plex pmcd pmproxy pmwebapi pmwebapis pop3 pop3s
postgresql privoxy proxy-dhcp ptp pulseaudio puppetmaster quassel radius redis
rpc-bind rsh rsyncd rtsp salt-master samba samba-client samba-dc sane sip sips
slp smtp smtp-submission smtps snmp snmptrap spideroak-lansync squid ssh steam-
streaming svdrp svn syncthing syncthing-gui synergy syslog syslog-tls telnet tftp
tftp-client tinc tor-socks transmission-client upnp-client vdsm vnc-server wbem-
http wbem-https wsman wsmans xdmcp xmpp-bosh xmpp-client xmpp-local xmpp-server
zabbix-agent zabbix-server


#例:配置firewalld
systemctl mask iptables
systemctl mask ip6tables
systemctl status firewalld
systemctl enable firewalld
systemctl start firewalld
firewall-cmd  --get-default-zone
firewall-cmd  --set-default-zone=public
firewall-cmd  --permanent  --zone=public  --list-all
firewall-cmd  --permanent  --zone=public  --add-port  8080/tcp
firewall-cmd ---reload4.3firewalld-cmd 防护墙命令使用
一:查看 firewall-cmd 状态,即查看 firewall 防火墙程序是否正在运行: firewall-cmd --state
[root@localhost ~]#  firewall-cmd --state
running
[root@localhost ~]#二:查看已打开的所有端口,firewall-cmd --zone=public --list-ports
[root@localhost ~]# firewall-cmd --zone=public --list-ports
6379/tcp 22122/tcp 23000/tcp 8080/tcp 8888/tcp 9502/tcp 6662/tcp 9999/tcp 7002/tcp 6661/tcp 6688/tcp 6667/tcp 6689/tcp 8000/tcp 6663/tcp 9070/tcp 9089/tcp 9988/tcp 9222/tcp 4444/tcp
[root@localhost ~]#
三:开启指定端口
1、开启一个端口:firewall-cmd --zone=public --add-port=80/tcp --permanent (--permanent 永久生效,没有此参数重启后失效)
2、重新加载 firewall,修改配置后,必须重新加载才能生效:firewall-cmd --reload
[root@localhost ~]# firewall-cmd --zone=public --list-port
9876/tcp 8090/tcp 80/tcp 8080/tcp
[root@localhost ~]# firewall-cmd --zone=public --add-port=3307/tcp --permanent
success
[root@localhost ~]# firewall-cmd --reload
success
[root@localhost ~]# firewall-cmd --zone=public --list-port
9876/tcp 8090/tcp 80/tcp 8080/tcp 3307/tcp
[root@localhost ~]#
四:关闭指定端口
1、关闭 9876 端口:firewall-cmd --zone=public --remove-port=9898/tcp --permanent(--permanent 表示永久生效,没有此参数重启后失效)
2、重新加载 firewall,修改配置后,必须重新加载才能生效:firewall-cmd --reload
[root@localhost ~]# firewall-cmd --zone=public --list-ports
9876/tcp 8090/tcp 80/tcp 8080/tcp
[root@localhost ~]# firewall-cmd --zone=public --remove-port=9876/tcp --permanent
success
[root@localhost ~]# firewall-cmd --reload
success
[root@localhost ~]# firewall-cmd --zone=public --list-ports
8090/tcp 80/tcp 8080/tcp
[root@localhost ~]#
4.3.1public.xml 文件修改防火墙端口
1、firewall-cmd对端口的操作,如开放端口等信息,都放在在"/etc/firewall/zones/public.xml"中记录
2、所以直接修改此文件也是可以的


注意事项:
1、如下所示,CentOS 7.2 Linux系统防火墙明明开启了指定的端口,tomcat服务器端口也指定正确,启动没有任何问题,最后从windows浏览器访问的时候,却只有80端口有效,其余的端口全部访问失败
2、最后原因居然是因为系统是阿里云服务器,而它的后台为了安全,封掉了其它端口的访问,所以即使防火墙修改了也没用,解决办法是登录阿里云服务器后台,修改它的安全组策略即可。这是生产上遇到的问题。
4.3.2 管理rich规则
rich规则比基本的firewalld语法实现更强的功能,不仅实现允许/拒绝,还可以实现日志syslog和
auditd,也可以实现端口转发,伪装和限制速率
规则实施顺序:
该区域的端口转发,伪装规则
该区域的日志规则
该区域的允许规则
该区域的拒绝规则
每个匹配的规则生效,所有规则都不匹配,该区域默认规则生效
#语法:
rule
    [source]
    [destination]
    service|port|protocol|icmp-block|masquerade|forward-port
    [log]
    [audit]
    [accept|reject|drop]
rich规则选项
| --add-rich-rule='' | Add to the specified zone, or the default zone if no zone is specified. |
| --remove-rich-rule='' | Remove to the specified zone, or the default zone if no zone is specified. |
| --query-rich-rule='' | Query if has been added to the specified zone, or the default zone if no zone is specified. Returns 0 if the rule is present, otherwise 1. |
| --list-rich-rules | Outputs all rich rules for the specified zone, or the default zone if no zone is specified. |
4.3.3 rich规则实现
#拒绝从192.168.0.100的所有流量,当address 选项使用source 或 destination时,必须用family= ipv4
|ipv6

firewall-cmd --permanent --zone=public --add-rich-rule='rule  family=ipv4
source address=192.168.0.100/32 reject'


#限制每分钟只有两个连接到ftp服务
firewall-cmd --add-rich-rule=‘rule service name=ftp limit value=2/m accept’


#抛弃esp( IPsec 体系中的一种主要协议)协议的所有数据包
firewall-cmd --permanent --add-rich-rule='rule protocol value=esp drop'

#接受所有192.168.1.0/24子网端口5900-5905范围的TCP流量
firewall-cmd --permanent --zone=vnc --add-rich-rule='rule family=ipv4 source
address=192.168.1.0/24 port port=5900-5905 protocol=tcp accept'


#rich日志规则
log [prefix="<PREFIX TEXT>" [level=<LOGLEVEL>] [limit value="<RATE/DURATION>"]

<LOGLEVEL> 可以是emerg,alert, crit, error, warning, notice, info, debug.
<DURATION> s:秒, m:分钟, h:小时, d:天
audit [limit value="<RATE/DURATION>"]


#例:
#接受ssh新连接,记录日志到syslog的notice级别,每分钟最多三条信息
firewall-cmd --permanent --zone=work --add-rich-rule='rule service name="ssh"
log prefix="ssh " level="notice" limit value="3/m" accept

#从2001:db8::/64子网的DNS连接在5分钟内被拒绝,并记录到日志到audit,每小时最大记录一条信息
firewall-cmd --add-rich-rule='rule family=ipv6 source address="2001:db8::/64"
service name="dns" audit limit value="1/h" reject' --timeout=300

firewall-cmd --permanent --add-rich-rule='rule family=ipv4 source
address=172.25.X.10/32 service name="http" log level=notice prefix="NEW HTTP "
limit value="3/s" accept'
firewall-cmd --reload
tail -f /var/log/messages
curl http://serverX.example.com
4.3.4 伪装和端口转发
NAT网络地址转换,firewalld支持伪装和端口转发两种NAT方式
#伪装NAT
firewall-cmd --permanent --zone=<ZONE> --add-masquerade
firewall-cmd --query-masquerade  #检查是否允许伪装
firewall-cmd --add-masquerade  #允许防火墙伪装IP
firewall-cmd --remove-masquerade #禁止防火墙伪装IP


#例:
firewall-cmd --add-rich-rule='rule family=ipv4 source address=192.168.0.0/24
masquerade'


#端口转发
端口转发:将发往本机的特定端口的流量转发到本机或不同机器的另一个端口。通常要配合地址伪装才
能实现

firewall-cmd --permanent --zone=<ZONE> --add-forward-port=port=
<PORTNUMBER>:proto=<PROTOCOL>[:toport=<PORTNUMBER>][:toaddr=]
说明:toport= 和toaddr= 至少要指定一个


#例:
#转发传入的连接9527/TCP,到防火墙的80/TCP到public zone 的192.168.0.254
firewall-cmd --add-masquerade 启用伪装
firewall-cmd --zone=public --add-forward-
port=port=9527:proto=tcp:toport=80:toaddr=192.168.0.254


#rich规则的port转发语法:
forward-port port=<PORTNUM> protocol=tcp|udp [to-port=<PORTNUM>] [to-addr=
<ADDRESS>]


#例:
#转发从192.168.0.0/24来的,发往80/TCP的流量到防火墙的端口8080/TCP
firewall-cmd --zone=work --add-rich-rule='rule family=ipv4 source
address=192.168.0.0/24 forward-port port=80 protocol=tcp to-port=8080'

firewall-cmd --permanent --add-rich-rule 'rule family=ipv4 source
address=172.25.X.10/32 forward-port port=443 protocol=tcp to-port=22'
firewall-cmd --reload


#例:限制ssh服务非标准端口访问
cp /usr/lib/firewalld/services/ssh.xml /etc/firewalld/services/ssh.xml
vim /etc/firewalld/services/ssh.xml
<port protocol="tcp" port="999"/>
systemctl restart sshd.service
systemctl status -l sshd.service
sealert -a /var/log/audit/audit.log
semanage port -a -t ssh_port_t -p tcp 999
systemctl restart sshd.service
ss -tulpn | grep sshd
firewall-cmd --permanent --zone=work --add-source=172.25.X.0/24
firewall-cmd --permanent --zone=work --add-port=999/tcp
firewall-cmd --reload
ssh -p 443 serverX.example.com
5 nft
5.1 nft 介绍
nftables 是一个 netfilter 项目,旨在替换现有的 {ip,ip6,arp,eb}tables 框架,为 {ip,ip6}tables 提供一个新的包过滤框架、一个新的用户空间实用程序(nft)和一个兼容层。它使用现有的钩子、链接跟踪系统、用户空间排队组件和 netfilter 日志子系统。
nftables 主要由三个组件组成:内核实现、libnl netlink 通信和 nftables 用户空间。 其中内核提供了一个 netlink 配置接口以及运行时规则集,libnl 包含了与内核通信的基本函数,用户空间可以通过 nft 和用户进行交互。
在 Linux 内核版本高于 3.13 时可用。提供一个新的命令行工具 nft 语法与 iptables 不同。
官方Wiki:https://wiki.nftables.org
官方文档:https://www.netfilter.org/projects/nftables/manpage.html
参考文档:https://www.mankier.com/8/nft
5.2 nft 相关概念
nftables 和 iptables 一样,由表(table)、链(chain)和规则(rule)组成,其中表包含链,链包含规则,规则是真正的 action,规则由地址,接口,端口或包含当前处理数据包中的其他数据等表达式以及诸如drop, queue, continue等声明组成。
与 iptables 相比,nftables 主要有以下几个变化:
iptables 规则的布局是基于连续的大块内存的,即数组式布局;而 nftables 的规则采用链式布局,即数组和链表的区别
iptables 大部分工作在内核态完成,如果要添加新功能,只能重新编译内核;而 nftables 的大部分工作是在用户态完成的,添加新功能更加容易,不需要改内核
nftables不包含任何内置表和链
拥有使用额外脚本的能力, 拥有一些高级的类似编程语言的能力,例如定义变量和包含外部文件iptables 有内置的链,即使只需要一条链,其他的链也会跟着注册;而 nftables 不存在内置的链,可以按需注册。由于 iptables 内置了一个数据包计数器,所以即使这些内置的链是空的,也会带来性能损耗
简化了 IPv4/IPv6 双栈管理
原生支持集合、字典和映射
nftables 的每个表只有一个地址簇,并且只适用于该簇的数据包。表可以指定五个簇中的一个:
| nftables簇 | iptables命令行工具 |
| ip IPv4 地址 | iptables |
| ip6 IPv6 地址 | ip6tables |
| inet IPv4 和 IPv6 地址 | iptables和ip6tables |
| arp 地址解析协议(ARP)地址 | arptables |
| bridge 处理桥接数据包 | ebtables |
inet 同时适用于 IPv4 和 IPv6 的数据包,即统一了 ip 和 ip6 簇,可以更容易地定义规则,注:当没有指定地址簇时,默认为ip
IPv4/IPv6/Inet address family hooks
 ┌────────────┬──────────────────────────────────────┐
 │Hook        │ Description                          │
 ├────────────┼──────────────────────────────────────┤
 │prerouting  │ All packets entering the system are  │
 │            │ processed by the prerouting hook. It │
 │            │ is invoked  before  the  routing     │
 │            │ process and is used for early fil-   │
 │            │ tering or changing packet attributes │
 │            │ that affect routing.                 │
 ├────────────┼──────────────────────────────────────┤
 │input       │ Packets delivered to the local sys-  │
 │            │ tem are processed by the input hook. │
 ├────────────┼──────────────────────────────────────┤
 │forward     │ Packets forwarded to a different     │
 │            │ host are processed by the forward    │
 │            │ hook.                                │
 ├────────────┼──────────────────────────────────────┤
 │output      │ Packets sent by local processes are  │
 │            │ processed by the output hook.        │
 ├────────────┼──────────────────────────────────────┤
 │postrouting │ All packets leaving the system are   │
 │            │ processed by the postrouting hook.
链是用来保存规则的,和表一样,链也需要被显示创建,因为 nftables 没有内置的链。链有以下两种类型:
基本链 : 数据包的入口点,需要指定钩子类型和优先级,相当于内置链
常规链 : 不需要指定钩子类型和优先级,可以用来做跳转,从逻辑上对规则进行分类,类似于自定义链
#例: CentOS 8.2 nftables 包
[root@centos8 ~]#rpm -qi nftables
Name    : nftables
Epoch    : 1
Version   : 0.9.3
Release   : 12.el8
Architecture: x86_64
Install Date: Tue 16 Jun 2020 06:14:10 AM CST
Group    : Unspecified
Size    : 811152
License   : GPLv2
Signature  : RSA/SHA256, Sun 26 Apr 2020 10:33:48 AM CST, Key ID
05b555b38483c65d
Source RPM : nftables-0.9.3-12.el8.src.rpm
Build Date : Fri 24 Apr 2020 09:52:25 PM CST
Build Host : x86-01.mbox.centos.org
Relocations : (not relocatable)
Packager  : CentOS Buildsys <bugs@centos.org>
Vendor   : CentOS
URL     : http://netfilter.org/projects/nftables/
Summary   : Netfilter Tables userspace utillites
Description :
Netfilter Tables userspace utilities.


[root@centos8 ~]#rpm -ql nftables
/etc/nftables
/etc/nftables/main.nft
/etc/nftables/nat.nft
/etc/nftables/osf
/etc/nftables/osf/pf.os
/etc/nftables/router.nft
/etc/sysconfig/nftables.conf
/usr/lib/.build-id
/usr/lib/.build-id/77
/usr/lib/.build-id/77/9a947d234d9faf842b8016c7eb449d3a4c8ac0
/usr/lib/.build-id/9d
/usr/lib/.build-id/9d/fc589c6496ba18fad71d3121539c225fbb346d
/usr/lib/systemd/system/nftables.service
/usr/lib64/libnftables.so.1
/usr/lib64/libnftables.so.1.0.0
/usr/sbin/nft
/usr/share/doc/nftables/examples/ct_helpers.nft
/usr/share/doc/nftables/examples/load_balancing.nft
/usr/share/doc/nftables/examples/secmark.nft
/usr/share/doc/nftables/examples/sets_and_maps.nft
/usr/share/licenses/nftables
/usr/share/licenses/nftables/COPYING
/usr/share/man/man5/libnftables-json.5.gz
/usr/share/man/man8/nft.8.gz
[root@centos8 ~]#cat /etc/sysconfig/nftables.conf
# Uncomment the include statement here to load the default config sample
# in /etc/nftables for nftables service.
#include "/etc/nftables/main.nft"
# To customize, either edit the samples in /etc/nftables, append further
# commands to the end of this file or overwrite it after first service
# start by calling: 'nft list ruleset >/etc/sysconfig/nftables.conf'.


#例:CentOS 8.1 nftables 包
[root@centos8 ~]# rpm -qi nftables
Name    : nftables
Epoch    : 1
Version   : 0.9.0
Release   : 14.el8
Architecture: x86_64
Install Date: Mon 16 Mar 2020 06:55:40 PM CST
Group    : Unspecified
Size    : 867972
License   : GPLv2
Signature  : RSA/SHA256, Thu 05 Dec 2019 09:32:18 AM CST, Key ID
05b555b38483c65d
Source RPM : nftables-0.9.0-14.el8.src.rpm
Build Date : Sat 09 Nov 2019 04:57:16 AM CST
Build Host : x86-02.mbox.centos.org
Relocations : (not relocatable)
Packager  : CentOS Buildsys <bugs@centos.org>
Vendor   : CentOS
URL     : http://netfilter.org/projects/nftables/
Summary   : Netfilter Tables userspace utillites
Description :
Netfilter Tables userspace utilities.
[root@centos8 ~]#rpm -ql nftables
/etc/nftables
/etc/nftables/all-in-one.nft
/etc/nftables/arp-filter.nft
/etc/nftables/bridge-filter.nft
/etc/nftables/inet-filter.nft
/etc/nftables/ipv4-filter.nft
/etc/nftables/ipv4-mangle.nft
/etc/nftables/ipv4-nat.nft
/etc/nftables/ipv4-raw.nft
/etc/nftables/ipv6-filter.nft
/etc/nftables/ipv6-mangle.nft
/etc/nftables/ipv6-nat.nft
/etc/nftables/ipv6-raw.nft
/etc/nftables/netdev-ingress.nft
/etc/sysconfig/nftables.conf
/usr/lib/.build-id
/usr/lib/.build-id/68
/usr/lib/.build-id/68/8ad5e5fdc5ba8d10bf227ba50d77fd99040c1c
/usr/lib/.build-id/cc
/usr/lib/.build-id/cc/43827ec42d27875c99ce6bd0f0537614e0129a
/usr/lib/systemd/system/nftables.service
/usr/lib64/libnftables.so.0
/usr/lib64/libnftables.so.0.0.0
/usr/sbin/nft
/usr/share/licenses/nftables
/usr/share/licenses/nftables/COPYING
/usr/share/man/man8/nft.8.gz
[root@centos8 ~]#cat /etc/sysconfig/nftables.conf
#
# This this will contain your nftables rules and
# is read by the systemd service when restarting
#
# These provide an iptables like set of filters
# (uncomment to include)
# include "/etc/nftables/bridge-filter.nft"
# include "/etc/nftables/inet-filter.nft"
# include "/etc/nftables/ipv4-filter.nft"
# include "/etc/nftables/ipv4-mangle.nft"
# include "/etc/nftables/ipv4-nat.nft"
# include "/etc/nftables/ipv6-filter.nft"
# include "/etc/nftables/ipv6-mangle.nft"
# include "/etc/nftables/ipv6-nat.nft
[root@centos8 ~]#systemctl start nftables
5.3 nft 常见用法
5.3.1 nft 命令格式
[root@centos8 ~]#nft --help
Usage: nft [ options ] [ cmds... ]
选项说明
-h, --help 显示帮书
-v, --version 显示版本信息
-c, --check 检查命令的有效性,而不实际应用更改。
-f, --file <filename> 包含文件内容<filename>
-i, --interactive 从命令行读取输入
-j, --json 以JSON格式化输出
-n, --numeric 指定一次后,以数字方式显示网络地址(默认行为)。指定两次以数字方式显示Internet
服务(端口号)。指定三次以数字方式显示协议,用户ID和组ID。
-s, --stateless 省略规则集的有状态信息
-N 将IP地址转换为名称。
-a, --handle 显示规则句柄handle
-e, --echo Echo what has been added, inserted or replaced.
-I, --includepath <directory> 添加<directory>目录到包含文件的搜索路径中。默认为: /etc
--debug <level [,level...]> 添加调试,在level处(scanner, parser, eval, netlink, mnl,
proto-ctx, segtree, all)


#nft 命令基本格式
nft 操作符 操作目标 操作内容
1 操作符: 增,删,改,查,清除,插入,创建
表操作:add,delete,list,flush
链操作:add,delete,rename,list,flush,create
规则:add,delete,insert
2 操作目标: 簇,表,链,规则
链类型:filter,route,nat
链钩子:hook
3 操作内容:...

1  accept  接受     接受包     停止处理
2  drop    丢弃     丢弃包     停止处理
3  reject  拒绝     驳回包     停止处理
4  queue   队列   发送包到用户空间程序    停止处理
5  continue 继续  继续处理包
6  return  返回   发送到调用的规则链      进行处理
7  jump    跳跃   发送到指定的规则链      进行处理    当完成时或执行了返回的声明,返回到调用的规则链
8  goto    转到   发送到指定的规则链      进行处理    不返回到调用的规则链
9  limit  limit    达到接收包的匹配限制   则根据规则处理包
10 log     log    日志记录包     继续处理
5.3.2 查看
nft list ruleset # 列出所有规则
nft list tables # 列出所有表
nft list table filter # 列出ip簇的filter表
nft list table inet filter # 列出inet簇的filter表
nft list chain filter INPUT # 列出filter表input链
以上命令后面也可以加 -nn 用于不解析ip地址和端口
加 -a 用于显示 handles


#例:CentOS8.1版才支持以下操作,CentOS8.2以后版本默认无任何规则
[root@centos8 ~]#nft list tables
[root@centos8 ~]#vim /etc/sysconfig/nftables.conf
#删除此行前的注释
include "/etc/nftables/inet-filter.nft"
[root@centos8 ~]#systemctl restart nftables.service
[root@centos8 ~]#nft list tables
table inet filter
#默认为ip簇,无规则
[root@centos8 ~]#nft list table filter
Error: Could not process rule: No such file or directory
list table filter
     ^^^^^^

#指定inet簇才有规则
[root@centos8 ~]#nft list table inet filter
table inet filter {
chain input {
type filter hook input priority 0; policy accept;
}
chain forward {
type filter hook forward priority 0; policy accept;
}
chain output {
type filter hook output priority 0; policy accept;
}
}
[root@centos8 ~]#nft list ruleset
table inet filter {
chain input {
type filter hook input priority 0; policy accept;
}
chain forward {
type filter hook forward priority 0; policy accept;
}
chain output {
type filter hook output priority 0; policy accept;
}
}
5.3.3 增加
增加表:nft add table fillter
增加链:nft add chain filter input { type filter hook input priority 0 \; } # 要和hook(钩子)相关连
增加规则:nft add rule filter input tcp dport 22 accept
5.3.4 删
只需要把上面的 add 改为 delete 即可
5.3.5 改
更改链名用rename
更改规则用replace
5.4 nft 案例
5.4.1 创建表和删除表
[root@centos8 ~]#nft add table inet test_table
[root@centos8 ~]#nft list tables
table inet filter
table inet test_table
[root@centos8 ~]#nft delete table inet test_table
[root@centos8 ~]#nft list tables
table inet filter
[root@centos8 ~]#nft add table inet test_table


#列出所有的规则:
[root@centos8 ~]#nft list ruleset
table inet filter {
chain input {
type filter hook input priority 0; policy accept;
}
chain forward {
type filter hook forward priority 0; policy accept;
}
chain output {
type filter hook output priority 0; policy accept;
}
}
table inet test_table {
}
5.4.2 创建链
#创建链
现在表中还没有任何规则,需要创建一个链来保存规则

#创建基本链
[root@centos8 ~]#nft add chain inet test_table test_filter_input_chain { type
filter hook input priority 0 \; }
#反斜线( \ )用来转义,这样 shell 就不会将分号解释为命令的结尾。
#priority 采用整数值,可以是负数,值较小的链优先处理

#创建常规链
[root@centos8 ~]#nft add chain inet test_table test_chain

# 列出链
[root@centos8 ~]#nft list table inet test_table
table inet test_table {
chain test_chain {
}
chain test_filter_input_chain {
type filter hook input priority 0; policy accept;
}
}
[root@centos8 ~]#nft list chain inet test_table test_filter_input_chain
table inet test_table {
chain test_filter_input_chain {
type filter hook input priority 0; policy accept;
}
}
[root@centos8 ~]#nft list chain inet test_table test_chain
table inet test_table {
chain test_chain {
}
}
[root@centos8 ~]#nft list ruleset
table inet filter {
chain input {
type filter hook input priority 0; policy accept;
}
chain forward {
type filter hook forward priority 0; policy accept;
}
chain output {
type filter hook output priority 0; policy accept;
}
}
table inet test_table {
chain test_chain {
}
chain test_filter_input_chain {
type filter hook input priority 0; policy accept;
}
}
5.4.3 创建规则
#创建常规链规则
#有了表和链之后,就可以创建规则了,规则由语句或表达式构成,包含在链中

#创建常规链的规则
[root@centos8 ~]#nft add rule inet test_table test_chain tcp dport http reject
[root@centos8 ~]#nft list chain inet test_table test_chain
table inet test_table {
chain test_chain {
tcp dport http reject
}
}

#常规链规则默认不生效
[root@centos7 ~]#curl 10.0.0.8
rft Http Server


#add 表示将规则添加到链的末尾,如果想将规则添加到链的开头,可以使用 insert 。
[root@centos8 ~]# nft insert rule inet test_table test_chain tcp dport mysql reject


#列出规则:
[root@centos8 ~]#nft list chain inet test_table test_chain
table inet test_table {
chain test_chain {
tcp dport mysql reject
tcp dport http reject
}
}
[root@centos8 ~]#nft list table inet test_table
table inet test_table {
chain test_chain {
tcp dport mysql reject
tcp dport http reject
}
chain test_filter_input_chain {
type filter hook input priority 0; policy accept;
}
}


#创建基本链规则
[root@centos8 ~]#nft add rule inet test_table test_filter_input_chain tcp dport
http reject
[root@centos8 ~]#nft add rule inet test_table test_filter_input_chain ip  saddr
10.0.0.6 reject
[root@centos8 ~]#nft list chain inet test_table test_filter_input_chain
table inet test_table {
chain test_filter_input_chain {
type filter hook input priority 0; policy accept;
tcp dport http reject
ip saddr 10.0.0.6 reject
}
}
[root@centos7 ~]#curl 10.0.0.8
curl: (7) Failed connect to 10.0.0.8:80; Connection refused
5.4.4 插入链的指定位置
将规则插入到链的指定位置,有两种方法:
第一种:
使用 index 来指定规则的索引
index 类似于 iptables 的 -I 选项, index 的值是从 0 开始表示第一条rule
index 必须指向一个存在的规则,比如 nft insert rule … index 0 就是非法的。
add 表示新规则添加在索引位置的规则后面
insert 表示新规则添加在索引位置的规则前面

[root@centos8 ~]#nft insert rule inet test_table test_filter_input_chain index 0
tcp dport mysql reject
[root@centos8 ~]#nft list chain inet test_table test_filter_input_chain
table inet test_table {
chain test_filter_input_chain {
type filter hook input priority 0; policy accept;
tcp dport mysql reject
tcp dport http reject
}
}
[root@centos8 ~]#nft insert rule inet test_table test_filter_input_chain index 1
udp dport 123 accept
[root@centos8 ~]#nft list chain inet test_table test_filter_input_chain
table inet test_table {
chain test_filter_input_chain {
type filter hook input priority 0; policy accept;
tcp dport mysql reject
udp dport ntp accept
tcp dport http reject
}
}


第二种:
在 nftables 中,句柄值是固定不变的,除非规则被删除,这就为规则提供了稳定的索引。而 index 的
值是可变的,只要有新规则插入,就有可能发生变化。一般建议使用 handle 来插入新规则。
add 表示新规则添加在索引位置的规则后面, insert 表示新规则添加在索引位置的规则前面。
handle 的值可以通过参数 --handle 或者 -a 获取
[root@centos8 ~]#nft -a list chain inet test_table test_filter_input_chain
table inet test_table {
chain test_filter_input_chain { # handle 2
type filter hook input priority 0; policy accept;
tcp dport mysql reject # handle 7
udp dport ntp accept # handle 8
tcp dport http reject # handle 6
}
}
[root@centos8 ~]#nft add rule inet test_table test_filter_input_chain handle 7
tcp dport ftp reject
[root@centos8 ~]#nft -a list chain inet test_table test_filter_input_chain
table inet test_table {
chain test_filter_input_chain { # handle 2
type filter hook input priority 0; policy accept;
tcp dport mysql reject # handle 7
tcp dport ftp reject # handle 9
udp dport ntp accept # handle 8
tcp dport http reject # handle 6
}
}
[root@centos8 ~]#nft insert rule inet test_table test_filter_input_chain handle 8
udp dport 8080 reject
[root@centos8 ~]#nft -a -nn list ruleset
table inet filter { # handle 4
chain input { # handle 1
type filter hook input priority 0; policy accept;
}
chain forward { # handle 2
type filter hook forward priority 0; policy accept;
}
chain output { # handle 3
type filter hook output priority 0; policy accept;
}
}
table inet test_table { # handle 7
chain test_chain { # handle 1
tcp dport 3306 reject # handle 5
tcp dport 80 reject # handle 4
}
chain test_filter_input_chain { # handle 2
type filter hook input priority 0; policy accept;
tcp dport 3306 reject # handle 7
tcp dport 21 reject # handle 9
udp dport 8080 reject # handle 10
udp dport 123 accept # handle 8
tcp dport 80 reject # handle 6
}
}


#可以在创建规则时就获取到规则的句柄值,在创建规则时同时加上参数 --echo或者-e 和 --handle
[root@centos8 ~]#nft -a -e add rule inet test_table test_filter_input_chain tcp
dport 6379 reject
add rule inet test_table test_filter_input_chain tcp dport 6379 reject # handle
11
[root@centos8 ~]#nft -a list chain inet test_table test_filter_input_chain
table inet test_table {
chain test_filter_input_chain { # handle 2
type filter hook input priority 0; policy accept;
tcp dport mysql reject # handle 7
tcp dport ftp reject # handle 9
udp dport http-alt reject # handle 10
udp dport ntp accept # handle 8
tcp dport http reject # handle 6
tcp dport 6379 reject # handle 11
}
}
5.4.5 删除规则
#删除单个规则
单个规则只能通过其句柄删除,首先需要找到想删除的规则句柄
[root@centos8 ~]#nft --handle list ruleset
table inet filter { # handle 4
chain input { # handle 1
type filter hook input priority 0; policy accept;
}
chain forward { # handle 2
type filter hook forward priority 0; policy accept;
}
chain output { # handle 3
type filter hook output priority 0; policy accept;
}
}
table inet test_table { # handle 7
chain test_chain { # handle 1
tcp dport mysql reject # handle 5
tcp dport http reject # handle 4
}
chain test_filter_input_chain { # handle 2
type filter hook input priority 0; policy accept;
tcp dport mysql reject # handle 7
tcp dport ftp reject # handle 9
udp dport http-alt reject # handle 10
udp dport ntp accept # handle 8
tcp dport http reject # handle 6
tcp dport 6379 reject # handle 11
}
}
$ nft --handle list ruleset
table inet my_table { # handle 10
   chain my_filter_chain { # handle 2
       type filter hook input priority 0; policy accept;
       tcp dport http accept # handle 4
       tcp dport 2345 accept # handle 8
       tcp dport 1234 accept # handle 6
       tcp dport 3456 accept # handle 9
       tcp dport nfs accept # handle 5
       tcp dport ssh accept # handle 3
       udp dport 3333 accept # handle 10
   }
}


#然后使用句柄值来删除该规则:
[root@centos8 ~]#nft delete rule inet test_table test_filter_input_chain handle
8
[root@centos8 ~]#nft list chain inet test_table test_filter_input_chain
table inet test_table {
chain test_filter_input_chain {
type filter hook input priority 0; policy accept;
tcp dport mysql reject
tcp dport ftp reject
udp dport http-alt reject
tcp dport http reject
tcp dport 6379 reject
}
}
[root@centos8 ~]#nft -a list chain inet test_table test_filter_input_chain
table inet test_table {
chain test_filter_input_chain { # handle 2
type filter hook input priority 0; policy accept;
tcp dport mysql reject # handle 7
tcp dport ftp reject # handle 9
udp dport http-alt reject # handle 10
tcp dport http reject # handle 6
tcp dport 6379 reject # handle 11
}
}
[root@centos8 ~]#


#删除所有规则
[root@centos8 ~]#nft flush ruleset
[root@centos8 ~]#nft list ruleset
5.4.5 列出规则
可以列出所有规则,也可以列出规则的一部分
#列出所有规则
[root@centos8 ~]#nft list ruleset
table inet filter {
chain input {
type filter hook input priority 0; policy accept;
}
chain forward {
type filter hook forward priority 0; policy accept;
}
chain output {
type filter hook output priority 0; policy accept;
}
}
table inet test_table {
chain test_chain {
tcp dport mysql reject
tcp dport http reject
}
chain test_filter_input_chain {
type filter hook input priority 0; policy accept;
tcp dport mysql reject
tcp dport ftp reject
udp dport http-alt reject
tcp dport http reject
tcp dport 6379 reject
}
}


#列出指定表中的所有规则
[root@centos8 ~]#nft list table inet test_table
table inet test_table {
chain test_chain {
tcp dport mysql reject
tcp dport http reject
}
chain test_filter_input_chain {
type filter hook input priority 0; policy accept;
tcp dport mysql reject
tcp dport ftp reject
udp dport http-alt reject
tcp dport http reject
tcp dport 6379 reject
}
}


#出指定链中的所有规则
[root@centos8 ~]#nft list chain inet test_table test_filter_input_chain
table inet test_table {
chain test_filter_input_chain {
type filter hook input priority 0; policy accept;
tcp dport mysql reject
tcp dport ftp reject
udp dport http-alt reject
tcp dport http reject
tcp dport 6379 reject
}
}
5.4.6 备份还原
规则都是临时的,要想永久生效,可以将规则备份,重启后自动加载恢复
#查看service文件
[root@centos8 ~]#cat /lib/systemd/system/nftables.service

[Unit]
Description=Netfilter Tables
Documentation=man:nft(8)
Wants=network-pre.target
Before=network-pre.target

[Service]
Type=oneshot
ProtectSystem=full
ProtectHome=true
ExecStart=/sbin/nft -f /etc/sysconfig/nftables.conf
ExecReload=/sbin/nft 'flush ruleset; include "/etc/sysconfig/nftables.conf";'
ExecStop=/sbin/nft flush ruleset
RemainAfterExit=yes

[Install]
WantedBy=multi-user.target


#备份配置并还原
#备份至文件中
[root@centos8 ~]#nft list ruleset
table inet filter {
chain input {
type filter hook input priority 0; policy accept;
}
chain forward {
type filter hook forward priority 0; policy accept;
}
chain output {
type filter hook output priority 0; policy accept;
}
}
table inet test_table {
chain test_chain {
tcp dport mysql reject
tcp dport http reject
}
chain test_filter_input_chain {
type filter hook input priority 0; policy accept;
tcp dport mysql reject
tcp dport ftp reject
udp dport http-alt reject
tcp dport http reject
tcp dport 6379 reject
}
}
[root@centos8 ~]#nft list ruleset > /etc/sysconfig/nftables.conf
#删除所有规则
[root@centos8 ~]#nft flush ruleset
[root@centos8 ~]#nft list ruleset
#重新启动后全部还原
[root@centos8 ~]#systemctl restart nftables.service
[root@centos8 ~]#nft list ruleset
table inet filter {
chain input {
type filter hook input priority 0; policy accept;
}
chain forward {
type filter hook forward priority 0; policy accept;
}
chain output {
type filter hook output priority 0; policy accept;
}
}
table inet test_table {
chain test_chain {
tcp dport mysql reject
tcp dport http reject
}
chain test_filter_input_chain {
type filter hook input priority 0; policy accept;
tcp dport mysql reject
tcp dport ftp reject
udp dport http-alt reject
tcp dport http reject
tcp dport 6379 reject
}
}


#启用指定的配置文件
[root@centos8 ~]#cat nftables2.conf
table inet test2_table {
chain test2_filter_input_chain {
type filter hook input priority 0; policy accept;
ip saddr { 10.0.0.1, 10.0.0.10 } accept
tcp dport { http, nfs,ssh } reject
}
}
#-f 指定规则配置文件,如果已经有规则,是追加至现有规则后
[root@centos8 ~]#nft -f nftables2.conf
[root@centos8 ~]#nft list ruleset
table inet test2_table {
chain test2_filter_input_chain {
type filter hook input priority 0; policy accept;
ip saddr { 10.0.0.1, 10.0.0.10 } accept
tcp dport { ssh, http, nfs } reject
}
}
5.4.7 迁移iptables规则到nft
#1. To save the existing rules to a file, run below command:
    iptables-save > rules.iptables
#2. Move the step1 file to CentOS/RHEL 8 Server via scp or ftp. You can use vi editor as well tocopy the content from CentOS/RHEL 6 or 7 machine.
#3. Run the below command to generate the nft rules file on CentOS/RHEL 8 with iptables rulesfile.
    iptables-restore-translate -f rules.iptables > rules.nft
#4. Load the rules in CentOS/RHEL 8 machine, make sure nftables service is running on the
system.
    nft -f rules.nft   # load the rule via nft to nftables.
#5. To Display rule in CentOS/RHEL 8 Server .
    nft list ruleset


 2623
2623


 被折叠的 条评论
为什么被折叠?
被折叠的 条评论
为什么被折叠?
 到【灌水乐园】发言


