


前言
在之前的文章中有提到过资源服务器解析access token时会将用户通过客户端请求的scope当做权限放入authorities属性中,当使用注解@PreAuthorize的hasAuthority校验用户权限时,实际上校验的是access token中拥有的scope权限;框架也提供了对应的定制内容,可以使开发者自定jwt(access token)中的claims,同时对应的resource server也提供了对应的自定义解析配置。
OAuth2TokenCustomizer
文档地址
文档中对于OAuth2TokenCustomizer有这样一段描述:
An OAuth2TokenCustomizer<JwtEncodingContext> declared with a generic type of JwtEncodingContext (implements OAuth2TokenContext) provides the ability to customize the headers and claims of a Jwt. JwtEncodingContext.getHeaders() provides access to the JwsHeader.Builder, allowing the ability to add, replace, and remove headers. JwtEncodingContext.getClaims() provides access to the JwtClaimsSet.Builder, allowing the ability to add, replace, and remove claims.
大概意思就是可以通过OAuth2TokenContext的实现类对jwt的header和claims部分进行修改。
所以在认证服务器中实现OAuth2TokenCustomizer并将用户的权限信息放入jwt的claims中,并将实例注入IOC中。代码如下
/**
 * 自定义jwt,将权限信息放至jwt中
 *
 * @return OAuth2TokenCustomizer的实例
 */
@Bean
public OAuth2TokenCustomizer<JwtEncodingContext> oAuth2TokenCustomizer() {
    return context -> {
        // 检查登录用户信息是不是UserDetails,排除掉没有用户参与的流程
        if (context.getPrincipal().getPrincipal() instanceof UserDetails user) {
            // 获取申请的scopes
            Set<String> scopes = context.getAuthorizedScopes();
            // 获取用户的权限
            Collection<? extends GrantedAuthority> authorities = user.getAuthorities();
            // 提取权限并转为字符串
            Set<String> authoritySet = Optional.ofNullable(authorities).orElse(Collections.emptyList()).stream()
                    // 获取权限字符串
                    .map(GrantedAuthority::getAuthority)
                    // 去重
                    .collect(Collectors.toSet());

            // 合并scope与用户信息
            authoritySet.addAll(scopes);

            JwtClaimsSet.Builder claims = context.getClaims();
            // 将权限信息放入jwt的claims中(也可以生成一个以指定字符分割的字符串放入)
            claims.claim("authorities", authoritySet);
            // 放入其它自定内容
            // 角色、头像...
        }
    };
}
这段代码将申请的scope与用户本身自带的权限合并后放入jwt中。
JwtAuthenticationConverter
自定义token部分就完成了,那么接下来就到resource server部分,早在最开始就添加了resource server的配置,将认证服务器也当做一个资源服务器,所以接下就在资源服务器文档中找到关于
JwtAuthenticationConverter的说明文档。文档中有如下一段说明:
However, there are a number of circumstances where this default is insufficient. For example, some authorization servers don’t use the scope attribute, but instead have their own custom attribute. Or, at other times, the resource server may need to adapt the attribute or a composition of attributes into internalized authorities.
正好对应了上文说的自定义token,所以按照示例添加自己的jwt解析器
/**
 * 自定义jwt解析器,设置解析出来的权限信息的前缀与在jwt中的key
 *
 * @return jwt解析器 JwtAuthenticationConverter
 */
@Bean
public JwtAuthenticationConverter jwtAuthenticationConverter() {
    JwtGrantedAuthoritiesConverter grantedAuthoritiesConverter = new JwtGrantedAuthoritiesConverter();
    // 设置解析权限信息的前缀,设置为空是去掉前缀
    grantedAuthoritiesConverter.setAuthorityPrefix("");
    // 设置权限信息在jwt claims中的key
    grantedAuthoritiesConverter.setAuthoritiesClaimName("authorities");

    JwtAuthenticationConverter jwtAuthenticationConverter = new JwtAuthenticationConverter();
    jwtAuthenticationConverter.setJwtGrantedAuthoritiesConverter(grantedAuthoritiesConverter);
    return jwtAuthenticationConverter;
}
这里设置解析jwt时将权限key设置为上文中存入时的key,去除SCOPE_ 前缀。
测试
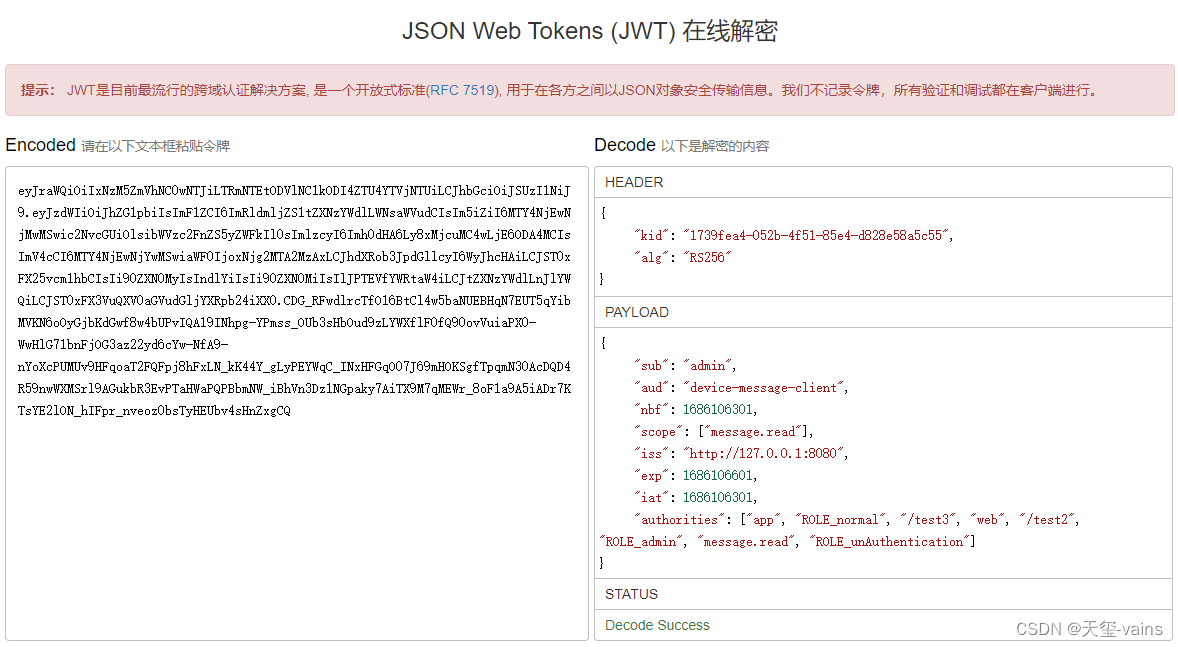
查看token中的信息
生成一个access token,在JSON Web Tokens (JWT) 在线解密中解析token,查看token内容
现在token中已经有权限信息了,接下来就编写一个测试接口并设置需要app的权限,来测试下解析token时是否会按照配置通过authorities来提取权限信息。
测试接口
@GetMapping("/app")
@PreAuthorize("hasAuthority('app')")
public String app() {
    return "app";
}
添加完成后使用postman发起一个请求测试

断点查看拥有的权限
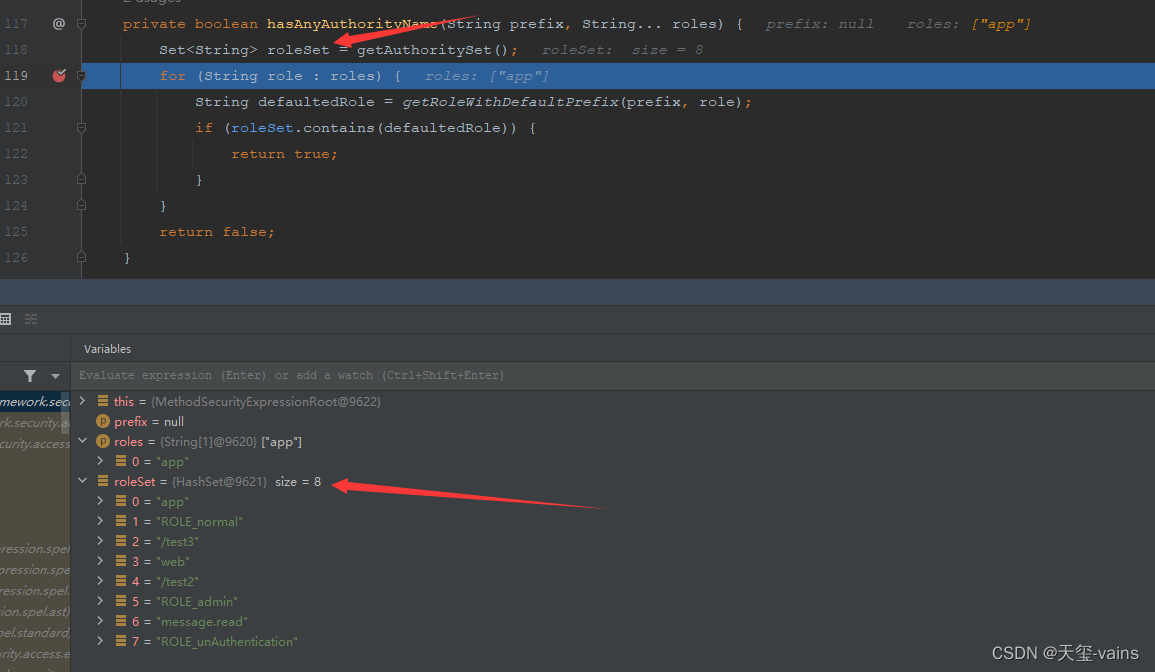
通过断点可以看到之前的自定token内容与自定jwt解析都已经生效了,已经将权限信息解析到当前用户信息的authorities中了。
补一张用户信息的图片

通过对比可以更清楚的观察到前文作出的自定义配置已经生效。
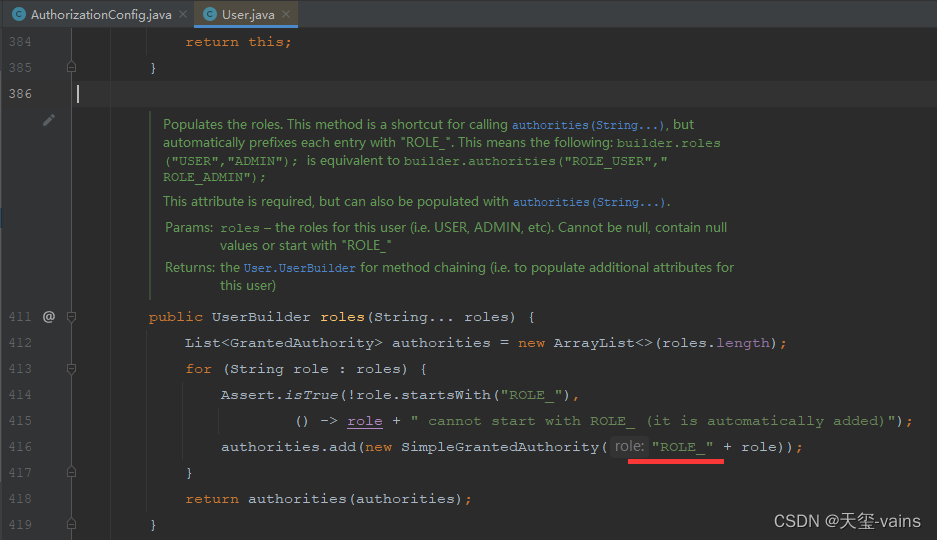
至于设置的角色在权限中有一个 ROLE_ 的前缀是因为roles的方法实际上是调用authorities方法,并且自动加上该前缀,如上图所示,这种情况在自己实现loadUserByUsername时避免这种情况。
总结
最后经过两个简单的配置实现了自定义的token内容与解析器,这也正是框架灵活与支持高度自定义的体现,实际上这些操作的代码部分都比较少,多的是理论部分,结合文档与源码能够更好的理解框架,文档中对于某些类的应用一般会有详细的说明与示例存在。
如果有问题请在评论区指出,谢谢
AuthorizationConfig.java
最后在附一下AuthorizationConfig.java的代码
package com.example.config;

import com.example.authorization.DeviceClientAuthenticationConverter;
import com.example.authorization.DeviceClientAuthenticationProvider;
import com.example.util.SecurityUtils;
import com.nimbusds.jose.jwk.JWKSet;
import com.nimbusds.jose.jwk.RSAKey;
import com.nimbusds.jose.jwk.source.ImmutableJWKSet;
import com.nimbusds.jose.jwk.source.JWKSource;
import com.nimbusds.jose.proc.SecurityContext;
import org.springframework.context.annotation.Bean;
import org.springframework.context.annotation.Configuration;
import org.springframework.http.MediaType;
import org.springframework.jdbc.core.JdbcTemplate;
import org.springframework.security.access.annotation.Secured;
import org.springframework.security.config.Customizer;
import org.springframework.security.config.annotation.method.configuration.EnableMethodSecurity;
import org.springframework.security.config.annotation.web.builders.HttpSecurity;
import org.springframework.security.config.annotation.web.configuration.EnableWebSecurity;
import org.springframework.security.core.GrantedAuthority;
import org.springframework.security.core.userdetails.User;
import org.springframework.security.core.userdetails.UserDetails;
import org.springframework.security.core.userdetails.UserDetailsService;
import org.springframework.security.crypto.bcrypt.BCryptPasswordEncoder;
import org.springframework.security.crypto.password.PasswordEncoder;
import org.springframework.security.oauth2.core.AuthorizationGrantType;
import org.springframework.security.oauth2.core.ClientAuthenticationMethod;
import org.springframework.security.oauth2.core.oidc.OidcScopes;
import org.springframework.security.oauth2.jwt.JwtClaimsSet;
import org.springframework.security.oauth2.jwt.JwtDecoder;
import org.springframework.security.oauth2.server.authorization.JdbcOAuth2AuthorizationConsentService;
import org.springframework.security.oauth2.server.authorization.JdbcOAuth2AuthorizationService;
import org.springframework.security.oauth2.server.authorization.OAuth2AuthorizationConsentService;
import org.springframework.security.oauth2.server.authorization.OAuth2AuthorizationService;
import org.springframework.security.oauth2.server.authorization.client.JdbcRegisteredClientRepository;
import org.springframework.security.oauth2.server.authorization.client.RegisteredClient;
import org.springframework.security.oauth2.server.authorization.client.RegisteredClientRepository;
import org.springframework.security.oauth2.server.authorization.config.annotation.web.configuration.OAuth2AuthorizationServerConfiguration;
import org.springframework.security.oauth2.server.authorization.config.annotation.web.configurers.OAuth2AuthorizationServerConfigurer;
import org.springframework.security.oauth2.server.authorization.settings.AuthorizationServerSettings;
import org.springframework.security.oauth2.server.authorization.settings.ClientSettings;
import org.springframework.security.oauth2.server.authorization.token.JwtEncodingContext;
import org.springframework.security.oauth2.server.authorization.token.OAuth2TokenCustomizer;
import org.springframework.security.oauth2.server.resource.authentication.JwtAuthenticationConverter;
import org.springframework.security.oauth2.server.resource.authentication.JwtGrantedAuthoritiesConverter;
import org.springframework.security.provisioning.InMemoryUserDetailsManager;
import org.springframework.security.web.SecurityFilterChain;
import org.springframework.security.web.authentication.LoginUrlAuthenticationEntryPoint;
import org.springframework.security.web.util.matcher.MediaTypeRequestMatcher;

import java.security.KeyPair;
import java.security.KeyPairGenerator;
import java.security.interfaces.RSAPrivateKey;
import java.security.interfaces.RSAPublicKey;
import java.util.Collection;
import java.util.Collections;
import java.util.Optional;
import java.util.Set;
import java.util.UUID;
import java.util.stream.Collectors;

/**
 * 认证配置
 * {@link EnableMethodSecurity} 开启全局方法认证,启用JSR250注解支持,启用注解 {@link Secured} 支持,
 * 在Spring Security 6.0版本中将@Configuration注解从@EnableWebSecurity, @EnableMethodSecurity, @EnableGlobalMethodSecurity
 * 和 @EnableGlobalAuthentication 中移除,使用这些注解需手动添加 @Configuration 注解
 * {@link EnableWebSecurity} 注解有两个作用:
 * 1. 加载了WebSecurityConfiguration配置类, 配置安全认证策略。
 * 2. 加载了AuthenticationConfiguration, 配置了认证信息。
 *
 * @author vains
 */
@Configuration
@EnableWebSecurity
@EnableMethodSecurity(jsr250Enabled = true, securedEnabled = true)
public class AuthorizationConfig {

    private static final String CUSTOM_CONSENT_PAGE_URI = "/oauth2/consent";

    /**
     * 配置端点的过滤器链
     *
     * @param http spring security核心配置类
     * @return 过滤器链
     * @throws Exception 抛出
     */
    @Bean
    public SecurityFilterChain authorizationServerSecurityFilterChain(HttpSecurity http,
                                                                      RegisteredClientRepository registeredClientRepository,
                                                                      AuthorizationServerSettings authorizationServerSettings) throws Exception {
        // 配置默认的设置,忽略认证端点的csrf校验
        OAuth2AuthorizationServerConfiguration.applyDefaultSecurity(http);

        // 新建设备码converter和provider
        DeviceClientAuthenticationConverter deviceClientAuthenticationConverter =
                new DeviceClientAuthenticationConverter(
                        authorizationServerSettings.getDeviceAuthorizationEndpoint());
        DeviceClientAuthenticationProvider deviceClientAuthenticationProvider =
                new DeviceClientAuthenticationProvider(registeredClientRepository);


        http.getConfigurer(OAuth2AuthorizationServerConfigurer.class)
                // 开启OpenID Connect 1.0协议相关端点
                .oidc(Customizer.withDefaults())
                // 设置自定义用户确认授权页
                .authorizationEndpoint(authorizationEndpoint -> authorizationEndpoint.consentPage(CUSTOM_CONSENT_PAGE_URI))
                // 设置设备码用户验证url(自定义用户验证页)
                .deviceAuthorizationEndpoint(deviceAuthorizationEndpoint ->
                        deviceAuthorizationEndpoint.verificationUri("/activate")
                )
                // 设置验证设备码用户确认页面
                .deviceVerificationEndpoint(deviceVerificationEndpoint ->
                        deviceVerificationEndpoint.consentPage(CUSTOM_CONSENT_PAGE_URI)
                )
                .clientAuthentication(clientAuthentication ->
                        // 客户端认证添加设备码的converter和provider
                        clientAuthentication
                                .authenticationConverter(deviceClientAuthenticationConverter)
                                .authenticationProvider(deviceClientAuthenticationProvider)
                );
        http
                // 当未登录时访问认证端点时重定向至login页面
                .exceptionHandling((exceptions) -> exceptions
                        .defaultAuthenticationEntryPointFor(
                                new LoginUrlAuthenticationEntryPoint("/login"),
                                new MediaTypeRequestMatcher(MediaType.TEXT_HTML)
                        )
                )
                // 处理使用access token访问用户信息端点和客户端注册端点
                .oauth2ResourceServer((resourceServer) -> resourceServer
                        .jwt(Customizer.withDefaults()));

        return http.build();
    }

    /**
     * 配置认证相关的过滤器链
     *
     * @param http spring security核心配置类
     * @return 过滤器链
     * @throws Exception 抛出
     */
    @Bean
    public SecurityFilterChain defaultSecurityFilterChain(HttpSecurity http) throws Exception {
        http.authorizeHttpRequests((authorize) -> authorize
                        // 放行静态资源
                        .requestMatchers("/assets/**", "/webjars/**", "/login").permitAll()
                        .anyRequest().authenticated()
                )
                // 指定登录页面
                .formLogin(formLogin ->
                        formLogin.loginPage("/login")
                );
        // 添加BearerTokenAuthenticationFilter,将认证服务当做一个资源服务,解析请求头中的token
        http.oauth2ResourceServer((resourceServer) -> resourceServer
                .jwt(Customizer.withDefaults())
                .accessDeniedHandler(SecurityUtils::exceptionHandler)
                .authenticationEntryPoint(SecurityUtils::exceptionHandler)
        );

        return http.build();
    }

    /**
     * 自定义jwt,将权限信息放至jwt中
     *
     * @return OAuth2TokenCustomizer的实例
     */
    @Bean
    public OAuth2TokenCustomizer<JwtEncodingContext> oAuth2TokenCustomizer() {
        return context -> {
            // 检查登录用户信息是不是UserDetails,排除掉没有用户参与的流程
            if (context.getPrincipal().getPrincipal() instanceof UserDetails user) {
                // 获取申请的scopes
                Set<String> scopes = context.getAuthorizedScopes();
                // 获取用户的权限
                Collection<? extends GrantedAuthority> authorities = user.getAuthorities();
                // 提取权限并转为字符串
                Set<String> authoritySet = Optional.ofNullable(authorities).orElse(Collections.emptyList()).stream()
                        // 获取权限字符串
                        .map(GrantedAuthority::getAuthority)
                        // 去重
                        .collect(Collectors.toSet());

                // 合并scope与用户信息
                authoritySet.addAll(scopes);

                JwtClaimsSet.Builder claims = context.getClaims();
                // 将权限信息放入jwt的claims中(也可以生成一个以指定字符分割的字符串放入)
                claims.claim("authorities", authoritySet);
                // 放入其它自定内容
                // 角色、头像...
            }
        };
    }

    /**
     * 自定义jwt解析器,设置解析出来的权限信息的前缀与在jwt中的key
     *
     * @return jwt解析器 JwtAuthenticationConverter
     */
    @Bean
    public JwtAuthenticationConverter jwtAuthenticationConverter() {
        JwtGrantedAuthoritiesConverter grantedAuthoritiesConverter = new JwtGrantedAuthoritiesConverter();
        // 设置解析权限信息的前缀,设置为空是去掉前缀
        grantedAuthoritiesConverter.setAuthorityPrefix("");
        // 设置权限信息在jwt claims中的key
        grantedAuthoritiesConverter.setAuthoritiesClaimName("authorities");

        JwtAuthenticationConverter jwtAuthenticationConverter = new JwtAuthenticationConverter();
        jwtAuthenticationConverter.setJwtGrantedAuthoritiesConverter(grantedAuthoritiesConverter);
        return jwtAuthenticationConverter;
    }

    /**
     * 配置密码解析器,使用BCrypt的方式对密码进行加密和验证
     *
     * @return BCryptPasswordEncoder
     */
    @Bean
    public PasswordEncoder passwordEncoder() {
        return new BCryptPasswordEncoder();
    }

    /**
     * 配置客户端Repository
     *
     * @param jdbcTemplate    db 数据源信息
     * @param passwordEncoder 密码解析器
     * @return 基于数据库的repository
     */
    @Bean
    public RegisteredClientRepository registeredClientRepository(JdbcTemplate jdbcTemplate, PasswordEncoder passwordEncoder) {
        RegisteredClient registeredClient = RegisteredClient.withId(UUID.randomUUID().toString())
                // 客户端id
                .clientId("messaging-client")
                // 客户端秘钥,使用密码解析器加密
                .clientSecret(passwordEncoder.encode("123456"))
                // 客户端认证方式,基于请求头的认证
                .clientAuthenticationMethod(ClientAuthenticationMethod.CLIENT_SECRET_BASIC)
                // 配置资源服务器使用该客户端获取授权时支持的方式
                .authorizationGrantType(AuthorizationGrantType.AUTHORIZATION_CODE)
                .authorizationGrantType(AuthorizationGrantType.REFRESH_TOKEN)
                .authorizationGrantType(AuthorizationGrantType.CLIENT_CREDENTIALS)
                // 授权码模式回调地址,oauth2.1已改为精准匹配,不能只设置域名,并且屏蔽了localhost,本机使用127.0.0.1访问
                .redirectUri("http://127.0.0.1:8080/login/oauth2/code/messaging-client-oidc")
                .redirectUri("https://www.baidu.com")
                // 该客户端的授权范围,OPENID与PROFILE是IdToken的scope,获取授权时请求OPENID的scope时认证服务会返回IdToken
                .scope(OidcScopes.OPENID)
                .scope(OidcScopes.PROFILE)
                // 自定scope
                .scope("message.read")
                .scope("message.write")
                // 客户端设置,设置用户需要确认授权
                .clientSettings(ClientSettings.builder().requireAuthorizationConsent(true).build())
                .build();

        // 基于db存储客户端,还有一个基于内存的实现 InMemoryRegisteredClientRepository
        JdbcRegisteredClientRepository registeredClientRepository = new JdbcRegisteredClientRepository(jdbcTemplate);

        // 初始化客户端
        RegisteredClient repositoryByClientId = registeredClientRepository.findByClientId(registeredClient.getClientId());
        if (repositoryByClientId == null) {
            registeredClientRepository.save(registeredClient);
        }
        // 设备码授权客户端
        RegisteredClient deviceClient = RegisteredClient.withId(UUID.randomUUID().toString())
                .clientId("device-message-client")
                // 公共客户端
                .clientAuthenticationMethod(ClientAuthenticationMethod.NONE)
                // 设备码授权
                .authorizationGrantType(AuthorizationGrantType.DEVICE_CODE)
                .authorizationGrantType(AuthorizationGrantType.REFRESH_TOKEN)
                // 自定scope
                .scope("message.read")
                .scope("message.write")
                .build();
        RegisteredClient byClientId = registeredClientRepository.findByClientId(deviceClient.getClientId());
        if (byClientId == null) {
            registeredClientRepository.save(deviceClient);
        }

        // PKCE客户端
        RegisteredClient pkceClient = RegisteredClient.withId(UUID.randomUUID().toString())
                .clientId("pkce-message-client")
                // 公共客户端
                .clientAuthenticationMethod(ClientAuthenticationMethod.NONE)
                // 授权码模式,因为是扩展授权码流程,所以流程还是授权码的流程,改变的只是参数
                .authorizationGrantType(AuthorizationGrantType.AUTHORIZATION_CODE)
                .authorizationGrantType(AuthorizationGrantType.REFRESH_TOKEN)
                // 授权码模式回调地址,oauth2.1已改为精准匹配,不能只设置域名,并且屏蔽了localhost,本机使用127.0.0.1访问
                .redirectUri("http://127.0.0.1:8080/login/oauth2/code/messaging-client-oidc")
                .clientSettings(ClientSettings.builder().requireProofKey(Boolean.TRUE).build())
                // 自定scope
                .scope("message.read")
                .scope("message.write")
                .build();
        RegisteredClient findPkceClient = registeredClientRepository.findByClientId(pkceClient.getClientId());
        if (findPkceClient == null) {
            registeredClientRepository.save(pkceClient);
        }
        return registeredClientRepository;
    }

    /**
     * 配置基于db的oauth2的授权管理服务
     *
     * @param jdbcTemplate               db数据源信息
     * @param registeredClientRepository 上边注入的客户端repository
     * @return JdbcOAuth2AuthorizationService
     */
    @Bean
    public OAuth2AuthorizationService authorizationService(JdbcTemplate jdbcTemplate, RegisteredClientRepository registeredClientRepository) {
        // 基于db的oauth2认证服务,还有一个基于内存的服务实现InMemoryOAuth2AuthorizationService
        return new JdbcOAuth2AuthorizationService(jdbcTemplate, registeredClientRepository);
    }

    /**
     * 配置基于db的授权确认管理服务
     *
     * @param jdbcTemplate               db数据源信息
     * @param registeredClientRepository 客户端repository
     * @return JdbcOAuth2AuthorizationConsentService
     */
    @Bean
    public OAuth2AuthorizationConsentService authorizationConsentService(JdbcTemplate jdbcTemplate, RegisteredClientRepository registeredClientRepository) {
        // 基于db的授权确认管理服务,还有一个基于内存的服务实现InMemoryOAuth2AuthorizationConsentService
        return new JdbcOAuth2AuthorizationConsentService(jdbcTemplate, registeredClientRepository);
    }

    /**
     * 配置jwk源,使用非对称加密,公开用于检索匹配指定选择器的JWK的方法
     *
     * @return JWKSource
     */
    @Bean
    public JWKSource<SecurityContext> jwkSource() {
        KeyPair keyPair = generateRsaKey();
        RSAPublicKey publicKey = (RSAPublicKey) keyPair.getPublic();
        RSAPrivateKey privateKey = (RSAPrivateKey) keyPair.getPrivate();
        RSAKey rsaKey = new RSAKey.Builder(publicKey)
                .privateKey(privateKey)
                .keyID(UUID.randomUUID().toString())
                .build();
        JWKSet jwkSet = new JWKSet(rsaKey);
        return new ImmutableJWKSet<>(jwkSet);
    }

    /**
     * 生成rsa密钥对,提供给jwk
     *
     * @return 密钥对
     */
    private static KeyPair generateRsaKey() {
        KeyPair keyPair;
        try {
            KeyPairGenerator keyPairGenerator = KeyPairGenerator.getInstance("RSA");
            keyPairGenerator.initialize(2048);
            keyPair = keyPairGenerator.generateKeyPair();
        } catch (Exception ex) {
            throw new IllegalStateException(ex);
        }
        return keyPair;
    }

    /**
     * 配置jwt解析器
     *
     * @param jwkSource jwk源
     * @return JwtDecoder
     */
    @Bean
    public JwtDecoder jwtDecoder(JWKSource<SecurityContext> jwkSource) {
        return OAuth2AuthorizationServerConfiguration.jwtDecoder(jwkSource);
    }

    /**
     * 添加认证服务器配置,设置jwt签发者、默认端点请求地址等
     *
     * @return AuthorizationServerSettings
     */
    @Bean
    public AuthorizationServerSettings authorizationServerSettings() {
        return AuthorizationServerSettings.builder().build();
    }

    /**
     * 先暂时配置一个基于内存的用户,框架在用户认证时会默认调用
     * {@link UserDetailsService#loadUserByUsername(String)} 方法根据
     * 账号查询用户信息,一般是重写该方法实现自己的逻辑
     *
     * @param passwordEncoder 密码解析器
     * @return UserDetailsService
     */
    @Bean
    public UserDetailsService users(PasswordEncoder passwordEncoder) {
        UserDetails user = User.withUsername("admin")
                .password(passwordEncoder.encode("123456"))
                .roles("admin", "normal", "unAuthentication")
                .authorities("app", "web", "/test2", "/test3")
                .build();
        return new InMemoryUserDetailsManager(user);
    }

}


 1万+
1万+


 被折叠的 条评论
为什么被折叠?
被折叠的 条评论
为什么被折叠?
 到【灌水乐园】发言


