


SRE笔记 2022.9.8&9.9&9.10&9.12&9.13&9.14&9.15
lsof命令
- 通过已知端口查询服务
[root@aaa ~]# lsof -i :21
COMMAND  PID USER   FD   TYPE DEVICE SIZE/OFF NODE NAME
vsftpd  2021 root    4u  IPv6  26378      0t0  TCP *:ftp (LISTEN)
结束进程命令
kill
- 通过PID和信号,杀掉进程
l 列出全部的信号名称
[root@aaa ~]# kill -l
 1) SIGHUP	 2) SIGINT	 3) SIGQUIT	 4) SIGILL	 5) SIGTRAP
 6) SIGABRT	 7) SIGBUS	 8) SIGFPE	 9) SIGKILL	10) SIGUSR1
11) SIGSEGV	12) SIGUSR2	13) SIGPIPE	14) SIGALRM	15) SIGTERM
16) SIGSTKFLT	17) SIGCHLD	18) SIGCONT	19) SIGSTOP	20) SIGTSTP
21) SIGTTIN	22) SIGTTOU	23) SIGURG	24) SIGXCPU	25) SIGXFSZ
26) SIGVTALRM	27) SIGPROF	28) SIGWINCH	29) SIGIO	30) SIGPWR
31) SIGSYS	34) SIGRTMIN	35) SIGRTMIN+1	36) SIGRTMIN+2	37) SIGRTMIN+3
38) SIGRTMIN+4	39) SIGRTMIN+5	40) SIGRTMIN+6	41) SIGRTMIN+7	42) SIGRTMIN+8
43) SIGRTMIN+9	44) SIGRTMIN+10	45) SIGRTMIN+11	46) SIGRTMIN+12	47) SIGRTMIN+13
48) SIGRTMIN+14	49) SIGRTMIN+15	50) SIGRTMAX-14	51) SIGRTMAX-13	52) SIGRTMAX-12
53) SIGRTMAX-11	54) SIGRTMAX-10	55) SIGRTMAX-9	56) SIGRTMAX-8	57) SIGRTMAX-7
58) SIGRTMAX-6	59) SIGRTMAX-5	60) SIGRTMAX-4	61) SIGRTMAX-3	62) SIGRTMAX-2
63) SIGRTMAX-1	64) SIGRTMAX
- 常见信号列表
| 数字信号 | 描述 |
|---|---|
| 1 HUP | 挂起信号,让进程重新配置,加载,平滑重启 |
| 2 INT | 终端信号,结束进程作用,和ctrl+c效果一样 |
| 3 QUIT | 退出信号,让进程退出,结果是进程退出 |
| 9 kill | 结束信号,直接结束进程,强制结束 |
| 15 TERM | 默认信号进程终止 |
| 18 CONT | 被暂停的进程将继续恢复运行 |
| 19 STOP | 暂停进程 |
| 20 TSTP | 用户停止请求,作用类似ctrl+z把进程放到后台并暂停 |
- 环境测试
- 用FTP服务做测试,连接端口21,数据端口20
[root@aaa ~]# rpm -qa vsftpd
vsftpd-3.0.2-29.el7_9.x86_64
[root@aaa ~]# pgrep vsftpd
2402
[root@aaa ~]# kill 2402
[root@aaa ~]# pgrep vsftpd
[root@aaa ~]# systemctl start vsftpd
[root@aaa ~]# netstat -lunpt| grep vsftpd
tcp6       0      0 :::21                   :::*                    LISTEN      2402/vsftp
- kill -9 +进程名 强制杀进程
- 生产经验:强制杀可能导致服务无法启动,尽量不要操作,可以等;数据服务不能强杀,如mysql,oracle,mongodb;非数据服务可以强杀,如nginx,vsftpd(数据在磁盘上)
s 指定要发送的信号
- s通常可省略
[root@aaa ~]# kill -1 进程ID ,修改配置文件,无需重启服务并生效
- 20 TSTP
[root@aaa ~]# sleep 100

[root@aaa ~]# pgrep sleep
2427
[root@aaa ~]# kill -20 2427    ## 输入该指令后,sleep进程放到后台并暂停
[1]+  Stopped                 sleep 100
[root@aaa ~]# bg 1   # sleep后台运行并启用
[1]+ sleep 100 &
- kill -0 pid 不发送关闭或停止的信号,但是会检查进程是否存在。作用等同于pgrep,示例如下
[root@aaa application]# systemctl status vsftpd
* vsftpd.service - Vsftpd ftp daemon
   Loaded: loaded (/usr/lib/systemd/system/vsftpd.service; disabled; vendor preset: disabled)
   Active: active (running) since Thu 2022-09-08 22:26:31 CST; 2h 33min ago
  Process: 2422 ExecStart=/usr/sbin/vsftpd /etc/vsftpd/vsftpd.conf (code=exited, status=0/SUCCESS)
 Main PID: 2423 (vsftpd)
   CGroup: /system.slice/vsftpd.service
           `-2423 /usr/sbin/vsftpd /etc/vsftpd/vsftpd.conf

Sep 08 22:26:31 aaa systemd[1]: Starting Vsftpd ftp daemon...
Sep 08 22:26:31 aaa systemd[1]: Started Vsftpd ftp daemon.
[root@aaa application]# pgrep vsftpd
2423
[root@aaa application]# pgrep vsftpd && echo 1 || echo 0
2423
1
[root@aaa application]# pgrep vsftpd > /dev/null
[root@aaa application]# pgrep vsftpd > /dev/null && echo 1 || echo 0
1
- 实际应用中,mysql服务关闭的时候。
nginx 生产命令及经验
-
测试配置文件是否异常 /usr/lcoal/nginx/sbin/nignx -t
-
启动 /usr/local/nginx/sbin/nginx
-
指定配置文件启动 /usr/local/nginx/sbin/nginx -c /usr/local/nginx/config/nignx.conf
-
重新打开日志 kiil -USR1 ’ cat /usr/local/nginx/ningx.pid ’
-
发送平滑升级信号 kiil -USR2 ’ cat /usr/local/nginx/ningx.pid ’
-
平缓停止worker process kiil -WINCH ’ cat /usr/local/nginx/ningx.pid.oldbin ’
-
停止老的进程 kill -QUIT ’ cat /usr/local/nginx/ningx.pid.oldbin ’
-
使用之前编译的源码nginx,见SRE笔记2022.9.7
-
关于平滑处理,类似银行下班,没有进去的不能进,进去的继续服务
[root@aaa application]# ln -s /application/nginx-1.20.2/sbin/nginx  /application/nginx
[root@aaa application]# ll
total 0
lrwxrwxrwx.  1 root root  36 Sep  9 00:27 nginx -> /application/nginx-1.20.2/sbin/nginx
drwxr-xr-x. 11 root root 151 Sep  7 18:16 nginx-1.20.2
[root@aaa application]# ./nginx
[root@aaa application]# netstat -lntup | grep nginx
tcp        0      0 0.0.0.0:80              0.0.0.0:*               LISTEN      2611/nginx: master
[root@aaa application]# find  .  -name "nginx.pid"
./nginx-1.20.2/logs/nginx.pid
killall
- 通过进程名字杀掉进程
- 可连续执行,知道提示no process found 则进程处理完毕
- -u 指定用户
- -9 指定进程名
pkill
- 用kill杀进程可能会杀死很慢,需要重复执行多次。
- pkill 选项 进程名
[root@aaa ~]# systemctl status vsftpd
* vsftpd.service - Vsftpd ftp daemon
   Loaded: loaded (/usr/lib/systemd/system/vsftpd.service; disabled; vendor preset: disabled)
   Active: active (running) since Fri 2022-09-09 16:37:44 CST; 1s ago
  Process: 1998 ExecStart=/usr/sbin/vsftpd /etc/vsftpd/vsftpd.conf (code=exited, status=0/SUCCESS)
 Main PID: 1999 (vsftpd)
   CGroup: /system.slice/vsftpd.service
           `-1999 /usr/sbin/vsftpd /etc/vsftpd/vsftpd.conf

Sep 09 16:37:44 aaa systemd[1]: Starting Vsftpd ftp daemon...
Sep 09 16:37:44 aaa systemd[1]: Started Vsftpd ftp daemon.
[root@aaa ~]# pkill vsftpd
[root@aaa ~]# systemctl status vsftpd
* vsftpd.service - Vsftpd ftp daemon
   Loaded: loaded (/usr/lib/systemd/system/vsftpd.service; disabled; vendor preset: disabled)
   Active: inactive (dead)

Sep 09 16:37:44 aaa systemd[1]: Starting Vsftpd ftp daemon...
Sep 09 16:37:44 aaa systemd[1]: Started Vsftpd ftp daemon.
- -t 终端 开启了的会话
- u 用户
- 如何通过数字来看进程是否存在,方便以后写脚本
[root@aaa application]# ps -ef | grep vsftpd | grep -v grep | wc -l
1
kill生产环境实例
- sed命令在替换使用时,先不加参数i,确定没问题后,再加参数 -i.bak,修改并备份
- 修改nginx.conf文件参数
[root@aaa ~]# head -5 /application/nginx-1.20.2/conf/nginx.conf

#user  nobody;
worker_processes  16;

#error_log  logs/error.log;
[root@aaa ~]# sed -i.bak "s#worker_processes  1#worker_processes  16#gp" /application/nginx-1.20.2/conf/nginx.conf | grep worker
- 检查语法
[root@aaa application]# ll
total 0
lrwxrwxrwx.  1 root root  36 Sep  9 00:27 nginx -> /application/nginx-1.20.2/sbin/nginx
drwxr-xr-x. 11 root root 151 Sep  7 18:16 nginx-1.20.2
[root@aaa application]# ng
[root@aaa application]# nginx -t
nginx: the configuration file /etc/nginx/nginx.conf syntax is ok
nginx: configuration file /etc/nginx/nginx.conf test is successful
- 启动
[root@aaa application]# ./nginx
[root@aaa application]# ps -ef | grep nginx   16个=nobody进程
root       2496      1  0 17:48 ?        00:00:00 nginx: master process ./nginx
nobody     2497   2496  0 17:48 ?        00:00:00 nginx: worker process
nobody     2498   2496  0 17:48 ?        00:00:00 nginx: worker process
nobody     2499   2496  0 17:48 ?        00:00:00 nginx: worker process
nobody     2500   2496  0 17:48 ?        00:00:00 nginx: worker process
nobody     2501   2496  0 17:48 ?        00:00:00 nginx: worker process
nobody     2502   2496  0 17:48 ?        00:00:00 nginx: worker process
nobody     2503   2496  0 17:48 ?        00:00:00 nginx: worker process
nobody     2504   2496  0 17:48 ?        00:00:00 nginx: worker process
nobody     2505   2496  0 17:48 ?        00:00:00 nginx: worker process
nobody     2506   2496  0 17:48 ?        00:00:00 nginx: worker process
nobody     2507   2496  0 17:48 ?        00:00:00 nginx: worker process
nobody     2508   2496  0 17:48 ?        00:00:00 nginx: worker process
nobody     2509   2496  0 17:48 ?        00:00:00 nginx: worker process
nobody     2510   2496  0 17:48 ?        00:00:00 nginx: worker process
nobody     2511   2496  0 17:48 ?        00:00:00 nginx: worker process
nobody     2512   2496  0 17:48 ?        00:00:00 nginx: worker process
root       2520   2295  0 17:51 pts/1    00:00:00 grep --color=auto nginx
[root@aaa application]# ps -ef | grep nginx |wc -l
18
- 批量kill进程
[root@aaa application]# ps -ef | grep nginx | awk '{print "kill "$2}'
kill 2496
kill 2497
kill 2498
kill 2499
kill 2500
kill 2501
kill 2502
kill 2503
kill 2504
kill 2505
kill 2506
kill 2507
kill 2508
kill 2509
kill 2510
kill 2511
kill 2512
kill 2538
[root@aaa application]# ps -ef | grep nginx | awk '{print "kill "$2}'|bash
bash: line 18: kill: (2541) - No such process
[root@aaa application]# ps -ef | grep nginx
root       2545   2295  0 17:54 pts/1    00:00:00 grep --color=auto nginx
nginx 报错
[root@aaa application]# ./nginx

nginx: [emerg] "worker_processes" directive is duplicate in /application/nginx-1.20.2/conf/nginx.conf:4
- 查询配置文件。为配置重复问题
进程的前后台切换
作用
- 将持续时间长的操作放到后台,如远程拷贝文件,为了防止中断,一般要放到后台运行
- 需要定时执行的进程
- 需要一直运行的进程(守护进程)
sleep命令
- sleep 1 秒数
- usleep 1000 微秒
相关命令
- ctrl + z 暂停当前进程
- bg 放到后台
- fg 拿回前台
- jobs 查看当前队列,包含ID
- kill %ID
[root@aaa application]# sleep 100
^Z
[1]+  Stopped                 sleep 100
[root@aaa application]# sleep 100
^Z
[2]+  Stopped                 sleep 100
[root@aaa application]# bg
[2]+ sleep 100 &
[root@aaa application]# jobs
[1]+  Stopped                 sleep 100
[2]-  Running                 sleep 100 &
[root@aaa application]# kii %2
-bash: kii: command not found
[root@aaa application]# kill %2
[root@aaa application]# jobs
[1]+  Stopped                 sleep 100
[2]-  Terminated              sleep 100
[root@aaa application]# jobs
[1]+  Stopped                 sleep 100
人工执行程序,前后台切换
- 启动命令(默认放后台)
- shell脚本
- shell脚本放后台,使用&符
[root@aaa application]# sleep 100 &
[2] 2611
[root@aaa application]# jobs
[1]+  Stopped                 sleep 100
[2]-  Running                 sleep 100 &
nohub 命令
定义
- 用户退出系统进程继续工作
- 可以将程序以忽略挂起信号的方式运行起来,被运行的程序的输出信息将不显示到终端
- 开发人员常用
语法格式
- nohup 【选项】
演示
[root@aaa application]# nohup ping baidu.com
nohup: ignoring input and appending output to 'nohup.out'
# 会在当前目录生成文件,如果当前目录的nohup文件不可写,则输出重定向到$HOME/nohup.out文件中。
[root@aaa application]# ll
total 12
lrwxrwxrwx.  1 root root   36 Sep  9 00:27 nginx -> /application/nginx-1.20.2/sbin/nginx
drwxr-xr-x. 11 root root  151 Sep  7 18:16 nginx-1.20.2
-rw-------.  1 root root 9741 Sep  9 19:03 nohup.out
[root@aaa application]# tail -f nohup.out   # 查看文件内容
64 bytes from 110.242.68.66 (110.242.68.66): icmp_seq=141 ttl=128 time=7.54 ms
64 bytes from 110.242.68.66 (110.242.68.66): icmp_seq=142 ttl=128 time=7.40 ms
64 bytes from 110.242.68.66 (110.242.68.66): icmp_seq=143 ttl=128 time=7.48 ms
64 bytes from 110.242.68.66 (110.242.68.66): icmp_seq=144 ttl=128 time=7.56 ms
64 bytes from 110.242.68.66 (110.242.68.66): icmp_seq=145 ttl=128 time=7.64 ms
64 bytes from 110.242.68.66 (110.242.68.66): icmp_seq=146 ttl=128 time=7.35 ms
企业应用
- nohup 路径/shell脚本 & 放到后台执行
screen命令 (推荐)
- 需手动安装
- 保持操作过的窗口连接状态
- 开启一个sleep窗口,并指定名称
[root@aaa ~]# screen -S sleep
# 之后会弹出新的会话端口,可供执行命令
- 查看执行的screen有哪些
[root@aaa ~]# screen -list
There are screens on:
        3478.sleep      (Attached)
        3406.sleep      (Attached)
2 Sockets in /var/run/screen/S-root.
- 进入正在运行的screen
root@aaa ~]# screen -r 3478
There is a screen on:
        3478.sleep      (Attached)
There is no screen to be resumed matching 3478.
- 平滑退出screen,但不会终止screen中的任务 ctrl+a+d
- 如果使用exit,也关闭screen端口
总结
- ctrl +z 等一系列命令是把前台的程序放到后台 #临时用
- screen ##管理员常用,下班了想回家,xshell有没有执行完的任务
- &符 ##后台运行脚本
nice命令 (了解)
- 调整进程运行优先级:进程重要度高需要优先分配cpu,调整优先级
- 常用于修改未运行的程序再运行时的优先级
3w1h
- what
- why
- where
- how
renice
- 对于正在运行的进程,修改优先级
strace 命令(重要)
定义
- 跟踪进程的系统调用,追踪程序运行的整个声明周期,输出每一个系统调用的名称、参数、返回值和执行消耗时间等。
- 系统调用:系统为应用陈故乡提供的接口
- 进程执行会调用很多接口
常用参数
| 参数 | 描述 |
|---|---|
| -c | 统计每一系统调用的所执行的时间,次数和出错的次数等 |
| -d | 输出strace关于标准错误的调试信息 |
| -f | 跟踪目标进程,以及目标进程创建的所有子进程 |
| -ff | 如果提供-o filename,则所有进程的跟踪结果输出到相应的filename中.pid中,pid是进程号 |
| -i | 输出系统调用的入口指针 |
| -q | 禁止输出关于脱离的消息 |
| -r | 输出每一个系统调用的相对时间 |
| -t | 在输出中的每一行前加上时间信息 |
| -tt | 在输出中的每一行前加上信息,精确到微妙 |
| -T | 显示每次系统调用所花费的时间 |
| -v | 对于某些相关调用,把完整的环境变量,文件stat结构等打印出来 |
| -u | username,以userd UID和GID执行被跟踪的命令 |
| -x | 以16进制形式输出非标准字符串 |
| -xx | 所有字符串以十六进制形式输出 |
| -e | expr是输出过滤器,通过表达式,可以过滤掉不想要的输出 |
- -p 指定pid跟踪,要同时跟踪多个pid,可重复多次-p选项即可
- f 跟踪目标进程,以及目标进程创建的所有子进程
- tt 在输出的每一行前加上时间信息,精确到秒;-e trace=file(or process network ipc desc signal )
[root@aaa ~]# strace -tt -f /application/nginx
21:46:20.102164 execve("/application/nginx", ["/application/nginx"], 0x7ffc1d98e8c0 /* 25 vars */) = 0
21:46:20.102913 brk(NULL)               = 0x187c000
21:46:20.103098 mmap(NULL, 4096, PROT_READ|PROT_WRITE, MAP_PRIVATE|MAP_ANONYMOUS, -1, 0) = 0x7fbe3d80e000
21:46:20.103234 access("/etc/ld.so.preload", R_OK) = -1 ENOENT (No such file or directory)
21:46:20.103376 open("/etc/ld.so.cache", O_RDONLY|O_CLOEXEC) = 3
21:46:20.103478 fstat(3, {st_mode=S_IFREG|0644, st_size=28966, ...}) = 0
21:46:20.103542 mmap(NULL, 28966, PROT_READ, MAP_PRIVATE, 3, 0) = 0x7fbe3d806000
21:46:20.103587 close(3)                = 0
21:46:20.103637 open("/lib64/libdl.so.2", O_RDONLY|O_CLOEXEC) = 3
21:46:20.103688 read(3, "\177ELF\2\1\1\0\0\0\0\0\0\0\0\0\3\0>\0\1\0\0\0P\16\0\0\0\0\0\0"..., 832) = 832
21:46:20.103740 fstat(3, {st_mode=S_IFREG|0755, st_size=19248, ...}) = 0
21:46:20.103786 mmap(NULL, 2109744, PROT_READ|PROT_EXEC, MAP_PRIVATE|MAP_DENYWRITE, 3, 0) = 0x7fbe3d3ea000
21:46:20.103863 mprotect(0x7fbe3d3ec000, 2097152, PROT_NONE) = 0
21:46:20.103917 mmap(0x7fbe3d5ec000, 8192, PROT_READ|PROT_WRITE, MAP_PRIVATE|MAP_FIXED|MAP_DENYWRITE, 3, 0x2000) = 0x7fbe3d5ec000
21:46:20.103976 close(3)                = 0
- ==epoll_wait 表示等待连接访问,因此后面的输出都和这一次访问有关
- 只跟踪和文件有关的系统调用
[root@aaa ~]# strace -tt -f -e trace=file /application/nginx
- 通过pid追踪
- 通过访问自身localhostftp目录抓取的追踪流
[root@aaa ~]# strace -tt -f -e trace=file -p 2021
strace: Process 2021 attached
22:05:09.600386 --- SIGCHLD {si_signo=SIGCHLD, si_code=CLD_EXITED, si_pid=11740, si_uid=99, si_status=0, si_utime=0, si_stime=0} ---
strace: Process 11852 attached
[pid 11852] 22:05:35.671469 open("/etc/hosts.allow", O_RDONLY) = 4
[pid 11852] 22:05:35.671749 open("/etc/hosts.deny", O_RDONLY) = 4
[pid 11852] 22:05:35.672311 open("/etc/nsswitch.conf", O_RDONLY|O_CLOEXEC) = 4
[pid 11852] 22:05:35.672611 open("/etc/ld.so.cache", O_RDONLY|O_CLOEXEC) = 4
[pid 11852] 22:05:35.672789 open("/lib64/libnss_files.so.2", O_RDONLY|O_CLOEXE
- 跟踪统计参数c
[root@aaa ~]# strace -c /application/nginx
nginx: [emerg] bind() to 0.0.0.0:80 failed (98: Address already in use)
nginx: [emerg] bind() to 0.0.0.0:80 failed (98: Address already in use)
nginx: [emerg] bind() to 0.0.0.0:80 failed (98: Address already in use)
nginx: [emerg] bind() to 0.0.0.0:80 failed (98: Address already in use)
nginx: [emerg] bind() to 0.0.0.0:80 failed (98: Address already in use)
nginx: [emerg] still could not bind()
% time     seconds  usecs/call     calls    errors syscall
------ ----------- ----------- --------- --------- ----------------
 60.18    0.001741         193         9           socket
  6.43    0.000186           6        31           mmap
  5.29    0.000153           7        20           open
  4.70    0.000136           4        29           close
  3.49    0.000101           6        15           read
  3.11    0.000090          22         4         4 connect
  2.83    0.000082           4        18           mprotect
  2.63    0.000076           6        12           write
  2.18    0.000063          10         6           munmap
  2.04    0.000059          11         5           nanosleep
  1.45    0.000042           6         7         1 stat
  1.35    0.000039           2        17           fstat
  1.31    0.000038           7         5         5 mkdir
  0.66    0.000019           1        10           brk
  0.52    0.000015           3         4         4 access
  0.35    0.000010           3         3           pread64
  0.35    0.000010           5         2           fcntl
  0.31    0.000009           1         5         5 bind
  0.10    0.000003           0         5           setsockopt
  0.10    0.000003           3         1           geteuid
  0.07    0.000002           2         1           lseek
  0.07    0.000002           1         2           rt_sigaction
  0.07    0.000002           0         5           ioctl
  0.07    0.000002           1         2           uname
  0.07    0.000002           1         2           getrlimit
  0.07    0.000002           2         1           epoll_create
  0.07    0.000002           2         1           set_robust_list
  0.03    0.000001           1         1           rt_sigprocmask
  0.03    0.000001           1         1           getppid
  0.03    0.000001           1         1           arch_prctl
  0.03    0.000001           1         1           set_tid_address
  0.00    0.000000           0         1           execve
------ ----------- ----------- --------- --------- ----------------
100.00    0.002893                   227        19 total
- 将追踪结果输出到文件o参数
- 将统计结果输出到文档中
[root@aaa ~]# strace -o total.txt -c /application/nginx
strace实战1
- 加锁 /etc/passwd
- 执行useradd命令,提示失败,通过strace追踪查看
[root@aaa ~]# chattr +i /etc/passwd
[root@aaa ~]# lsattr /etc/passwd
----i----------- /etc/passwd
[root@aaa ~]# useradd huida
useradd: cannot open /etc/passwd
[root@aaa ~]# strace useradd hida
......
open("/etc/passwd", O_RDWR|O_NOCTTY|O_NONBLOCK|O_NOFOLLOW) = -1 EACCES (Permission denied)
write(2, "useradd: cannot open /etc/passwd"..., 33useradd: cannot open /etc/passwd
) = 33
unlink("/etc/passwd.lock")              = 0
........
strace 企业案例
- php进程跑满了%100CPU:pgrep查询进程id,用strace追踪。
- 服务器运行缓慢:没有给充足的资源;上线前压力测试,提前预警,70%是预警时间;开发代码上线,BUG异常消耗资源,strace,pgrep,后知后觉;公司推广部门(合作广告),大流量,广告业(CDN),提前准备,运维人员感受到服务器流量增加,压力增大。
- 所有和网站相关的部门,开发,运维,运营,市场,客服(查询大量历史数据,离线查询 ,和生产用户访问库分开;对于外部用户,监测,根据趋势预判
gdb命令
- 是同strace ,lstrace类似的工具
[root@aaa ~]# gdb
GNU gdb (GDB) Red Hat Enterprise Linux 7.6.1-120.el7
Copyright (C) 2013 Free Software Foundation, Inc.
License GPLv3+: GNU GPL version 3 or later <http://gnu.org/licenses/gpl.html>
This is free software: you are free to change and redistribute it.
There is NO WARRANTY, to the extent permitted by law.  Type "show copying"
and "show warranty" for details.
This GDB was configured as "x86_64-redhat-linux-gnu".
For bug reporting instructions, please see:
<http://www.gnu.org/software/gdb/bugs/>.
(gdb) ?
Undefined command: "".  Try "help".
(gdb) help
List of classes of commands:

aliases -- Aliases of other commands
breakpoints -- Making program stop at certain points
data -- Examining data
files -- Specifying and examining files
internals -- Maintenance commands
obscure -- Obscure features
running -- Running the program
stack -- Examining the stack
status -- Status inquiries
support -- Support facilities
tracepoints -- Tracing of program execution without stopping the program
user-defined -- User-defined commands

Type "help" followed by a class name for a list of commands in that class.
Type "help all" for the list of all commands.
Type "help" followed by command name for full documentation.
Type "apropos word" to search for commands related to "word".
Command name abbreviations are allowed if unambiguous.
(gdb)
ltrace命令
定义
- 跟踪进程库函数调用,用法类似strace,
常用参数
- e expr 输出过滤器,通过表达式,可以过滤掉你不想要的输出
- e printf 只查看printf函数调用
- e !print 表示查看除printf函数以外的所有函数调用
- f 跟踪子进程
- o filename 将ltrace的输出写入文件filename
- p pid指定要跟踪的进程pid
…
[root@aaa ~]# ltrace -o nginx.log /application/nginx # 会在当前路径下生成nginx.log文件
平均负载 load average
定义
- 衡量系统繁忙的一个综合指标,主要是CPU,IO的繁忙程度,企业网站常用参数
进程从产生到持续运行需要占用很多资源:PID;内存;CPU;文件描述符;磁盘 - 平均负载是单位时间内,系统处于可运行状态和不可中断状态的平均进程数,即平均活跃进程数
查询命令 uptime
root@aaa ~]# w
 07:15:47 up 1 day, 56 min,  2 users,  load average: 0.04, 0.06, 0.05
USER     TTY      FROM             LOGIN@   IDLE   JCPU   PCPU WHAT
root     pts/0    10.0.0.1         Fri19    3.00s  0.29s  0.02s w
root     pts/3    10.0.0.1:S.0     Fri19    3days  0.03s  0.01s lftp 127.0.0.1
[root@aaa ~]# uptime   1分钟内的,5分钟内的 15分钟内的
 07:16:02 up 1 day, 56 min,  2 users,  load average: 0.03, 0.05, 0.05

[root@aaa ~]# cat /proc/loadavg
0.04 0.05 0.05 2/146 69540
含义理解
- 平均负载和CPU核数相等的时候,就是CPU的进程临界点。即负载是8,核数是8,此时负载到达70%系统运行已经开始慢了。
- 把一个CPU比作一座桥,进程比做小车;当平均负载等于0.5的时候,意味着桥一半的路程有车;当平均负载为1的时候,桥所有路程都有车,但系统能正常运行;当平均负载大于1的时候,需要过桥的车辆需要等待
- 可运行状态:正在使用CPU,或者正在等待CPU,可运行状态R S
- 不可中断进程:常见的为等待硬件设备的I/O响应,状态符为D(disk sleep)
举例说明
- 1分钟 1.0
- 5分钟 10.0
- 15分钟 5.0
- 上述情况意味着故障在恢复中,如果uptime参数如上
- 需要关注的负载的值是:总核心数*0.7
CPU信息查看
- 实验环境2个CPU,单CPU2个内核
- 查看物理CPU个数
[root@aaa ~]# grep  "physical id" /proc/cpuinfo |uniq |wc -l
2
- 查看cpu总核数(逻辑CPU) ,用于计算负载值
[root@aaa ~]# grep  "processor" /proc/cpuinfo | wc -l
4
平均负载分析实战
- 用stress , mpstat pidstat等工具,找出负载升高的根源
- stress是系统压力测试工具,模拟异常进场提高平均负载
- mpstat是多核cpu性能分析工具,用来实时查看每个cpu的性能指标,以及所有cpu的平均指标
- pidstat是常用的进程性能分析工具,用来实时查看进程的cpu 内存 I/O以及上下文切换等性能指标
- 查询sysstat的包里有啥工具
[root@aaa ~]# rpm -ql sysstat | grep bin
/usr/bin/cifsiostat
/usr/bin/iostat
/usr/bin/mpstat
/usr/bin/nfsiostat-sysstat
/usr/bin/pidstat
/usr/bin/sadf
/usr/bin/sar
/usr/bin/tapestat
cpu密集型
- 消耗cpu
[root@aaa ~]# stress --cpu 1 --timeout 100s  # 给1个消耗cpu的进程持续100s
stress: info: [2324] dispatching hogs: 1 cpu, 0 io, 0 vm, 0 hdd
- 用watch命令查看负载变化情况
- mpstat查看
[root@aaa ~]# mpstat -P ALL 5
Linux 3.10.0-1160.71.1.el7.x86_64 (aaa) 	09/12/22 	_x86_64_	(4 CPU)

19:14:40     CPU    %usr   %nice    %sys %iowait    %irq   %soft  %steal  %guest  %gnice   %idle
19:14:45     all   99.95    0.00    0.05    0.00    0.00    0.00    0.00    0.00    0.00    0.00
19:14:45       0  100.00    0.00    0.00    0.00    0.00    0.00    0.00    0.00    0.00    0.00
19:14:45       1   99.80    0.00    0.20    0.00    0.00    0.00    0.00    0.00    0.00    0.00
19:14:45       2  100.00    0.00    0.00    0.00    0.00    0.00    0.00    0.00    0.00    0.00
19:14:45       3  100.00    0.00    0.00    0.00    0.00    0.00    0.00    0.00    0.00    0.00

19:14:45     CPU    %usr   %nice    %sys %iowait    %irq   %soft  %steal  %guest  %gnice   %idle
19:14:50     all   99.85    0.00    0.10    0.00    0.00    0.05    0.00    0.00    0.00    0.00
19:14:50       0   99.60    0.00    0.40    0.00    0.00    0.00    0.00    0.00    0.00    0.00
19:14:50       1   99.80    0.00    0.00    0.00    0.00    0.20    0.00    0.00    0.00    0.00
19:14:50       2   99.80    0.00    0.20    0.00    0.00    0.00    0.00    0.00    0.00    0.00
19:14:50       3  100.00    0.00    0.00    0.00    0.00    0.00    0.00    0.00    0.00    0.00

19:14:50     CPU    %usr   %nice    %sys %iowait    %irq   %soft  %steal  %guest  %gnice   %idle
19:14:55     all   99.90    0.00    0.10    0.00    0.00    0.00    0.00    0.00    0.00    0.00
19:14:55       0   99.80    0.00    0.20    0.00    0.00    0.00    0.00    0.00    0.00    0.00
19:14:55       1   99.80    0.00    0.20    0.00    0.00    0.00    0.00    0.00    0.00    0.00
19:14:55       2   99.80    0.00    0.00    0.00    0.00    0.20    0.00    0.00    0.00    0.00
19:14:55       3   99.80    0.00    0.00    0.00    0.00    0.20    0.00    0.00    0.00    0.00

19:14:55     CPU    %usr   %nice    %sys %iowait    %irq   %soft  %steal  %guest  %gnice   %idle
19:15:00     all   99.85    0.00    0.10    0.00    0.00    0.05    0.00    0.00    0.00    0.00
19:15:00       0   99.80    0.00    0.20    0.00    0.00    0.00    0.00    0.00    0.00    0.00
19:15:00       1  100.00    0.00    0.00    0.00    0.00    0.00    0.00    0.00    0.00    0.00
19:15:00       2  100.00    0.00    0.00    0.00    0.00    0.00    0.00    0.00    0.00    0.00
19:15:00       3  100.00    0.00    0.00    0.00    0.00    0.00    0.00    0.00    0.00    0.00
- iostat查看
[root@aaa ~]# iostat -x
Linux 3.10.0-1160.71.1.el7.x86_64 (aaa) 	09/12/22 	_x86_64_	(4 CPU)

avg-cpu:  %user   %nice %system %iowait  %steal   %idle
           9.68    0.00    0.43    0.01    0.00   89.88

Device:         rrqm/s   wrqm/s     r/s     w/s    rkB/s    wkB/s avgrq-sz avgqu-sz   await r_await w_await  svctm  %util
sdc               0.00     0.00    0.10    0.00     2.40     0.00    48.62     0.00    0.13    0.13    0.00   0.10   0.00
sdd               0.00     0.00    0.08    0.00     2.03     0.00    52.10     0.00    0.16    0.16    0.00   0.11   0.00
sda               0.00     0.05    3.53    1.04   174.92   339.10   224.77     0.00    0.44    0.38    0.65   0.28   0.13
sdb               0.00     0.00    0.11    0.00     4.21     0.00    78.40     0.00    0.22    0.22    0.00   0.14   0.00
dm-0              0.00     0.00    2.24    1.09   157.19   337.99   297.94     0.00    0.57    0.52    0.67   0.35   0.12
dm-1              0.00     0.00    0.05    0.00     1.20     0.00    50.09     0.00    0.14    0.14    0.0
- top查看
top - 19:18:18 up 32 min,  5 users,  load average: 3.99, 2.38, 1.03
Tasks: 138 total,   5 running, 133 sleeping,   0 stopped,   0 zombie
%Cpu(s): 99.9 us,  0.1 sy,  0.0 ni,  0.0 id,  0.0 wa,  0.0 hi,  0.0 si,  0.0 st
KiB Mem :  1862992 total,   865040 free,   180988 used,   816964 buff/cache
KiB Swap:  2097148 total,  2097148 free,        0 used.  1522344 avail Mem

   PID USER      PR  NI    VIRT    RES    SHR S  %CPU %MEM     TIME+ COMMAND
  2429 root      20   0    7312    100      0 R 100.0  0.0   3:58.02 stress
  2430 root      20   0    7312    100      0 R  99.7  0.0   3:58.31 stress
  2431 root      20   0    7312    100      0 R  99.7  0.0   3:57.68 stress
  2428 root      20   0    7312    100      0 R  99.3  0.0   3:57.66 stress
   301 root      20   0       0      0      0 S   0.3  0.0   0:03.22 kworker/0:3
  2535 root      20   0   58424   2236   1524 R   0.3  0.1   0:00.44 top
     1 root      20   0  193952   7084   4164 S   0.0  0.4   0:02.67 systemd
     2 root      20   0       0      0      0 S   0.0  0.0   0:00.01 kthreadd
- pid查看
[root@aaa ~]# pidstat -u 5 1
Linux 3.10.0-1160.71.1.el7.x86_64 (aaa) 	09/12/22 	_x86_64_	(4 CPU)

19:19:33      UID       PID    %usr %system  %guest    %CPU   CPU  Command
19:19:38        0       301    0.00    0.40    0.00    0.40     0  kworker/0:3
19:19:38        0       990    0.00    0.20    0.00    0.20     0  vmtoolsd
19:19:38        0      2326    0.20    0.40    0.00    0.59     0  watch
19:19:38        0      2428   98.42    0.00    0.00   98.42     0  stress
19:19:38        0      2429   98.81    0.00    0.00   98.81     2  stress
19:19:38        0      2430   99.01    0.00    0.00   99.01     3  stress
19:19:38        0      2431   99.41    0.20    0.00   99.60     1  stress
19:19:38        0      2506    0.00    0.20    0.00    0.20     2  sshd
19:19:38        0      2535    0.00    0.40    0.00    0.40     3  top
19:19:38        0      2819    0.20    0.20    0.00    0.40     2  pidstat
io密集型
[root@aaa ~]# stress --io  4 --timeout 600s
stress: info: [2914] dispatching hogs: 0 cpu, 4 io, 0 vm, 0 hdd
- 负载升高可能是cpu消耗也可能是IO消耗
数据库负载高
- 如果通过top.iostat pidstat mpstat uptime sar ps 等命令无法查询到问题,那就是数据库内部的问题,sql语句等
watch命令
- 时间间隔2s。
[root@aaa ~]# watch uptime
Every 2.0s: uptime                                                                Mon Sep 12 19:11:17 2022

 19:11:17 up 25 min,  3 users,  load average: 0.06, 0.05, 0.05
sar命令(待总结)
- 默认监控: sar 1 1 // CPU和IOWAIT统计状态
(1) sar -b 1 1 // IO传送速率
(2) sar -B 1 1 // 页交换速率
(3) sar -c 1 1 // 进程创建的速率
(4) sar -d 1 1 // 块设备的活跃信息
(5) sar -n DEV 1 1 // 网路设备的状态信息
(6) sar -n SOCK 1 1 // SOCK的使用情况
(7) sar -n ALL 1 1 // 所有的网络状态信息
(8) sar -P ALL 1 1 // 每颗CPU的使用状态信息和IOWAIT统计状态
(9) sar -q 1 1 // 队列的长度(等待运行的进程数)和负载的状态
(10) sar -r 1 1 // 内存和swap空间使用情况
(11) sar -R 1 1 // 内存的统计信息(内存页的分配和释放、系统每秒作为BUFFER使用内存页、每秒被cache到的内存页)
(12) sar -u 1 1 // CPU的使用情况和IOWAIT信息(同默认监控)
(13) sar -v 1 1 // inode, file and other kernel tablesd的状态信息
(14) sar -w 1 1 // 每秒上下文交换的数目
(15) sar -W 1 1 // SWAP交换的统计信息(监控状态同iostat 的si so)
(16) sar -x 2906 1 1 // 显示指定进程(2906)的统计信息,信息包括:进程造成的错误、用户级和系统级用户CPU的占用情况、运行在哪颗CPU上
(17) sar -y 1 1 // TTY设备的活动状态
(18) 将结果输出到文件(-o)和读取记录信息(-f)
(19) sar -h // 查看帮助
Linux 运行级别
定义
- linux启动时处于不同状态表示的集合,如文本模式,重启模式,图形模式,关机模式
级别说明
| init运行级别(c7以前) | Systemd目标/名称(c7) | 作用描述 |
|---|---|---|
| 0 | runlevel0.target/poweroff.target | 关机模式 |
| 1 | runlevel1.target/rescue.target | 单用户模式 |
| 2 | runlevel2.target/multi-user.target | 带NFS多用户模式 |
| 3 | runlevel3.target/multi-user.target | 文本模式 |
| 4 | runlevel4.target/multi-user.target | 还没有被使用 |
| 5 | runlevel5.target/graphical.target | 图形模式 |
| 6 | runlevel6.target/reboot.target | 重启模式 |
运行级别查看
[root@aaa ~]# ll /usr/lib/systemd/system/runlevel[0-9].target
lrwxrwxrwx. 1 root root 15 Aug 16 00:55 /usr/lib/systemd/system/runlevel0.target -> poweroff.target
lrwxrwxrwx. 1 root root 13 Aug 16 00:55 /usr/lib/systemd/system/runlevel1.target -> rescue.target
lrwxrwxrwx. 1 root root 17 Aug 16 00:55 /usr/lib/systemd/system/runlevel2.target -> multi-user.target
lrwxrwxrwx. 1 root root 17 Aug 16 00:55 /usr/lib/systemd/system/runlevel3.target -> multi-user.target
lrwxrwxrwx. 1 root root 17 Aug 16 00:55 /usr/lib/systemd/system/runlevel4.target -> multi-user.target
lrwxrwxrwx. 1 root root 16 Aug 16 00:55 /usr/lib/systemd/system/runlevel5.target -> graphical.target
lrwxrwxrwx. 1 root root 13 Aug 16 00:55 /usr/lib/systemd/system/runlevel6.target -> reboot.target
- 重要目录,该目录有很多服务
[root@aaa ~]# ll /usr/lib/systemd/system/
运行级别切换
- 运行级别查看
[root@aaa ~]# runlevel
N 3
[root@aaa ~]# init 5
[root@aaa ~]# runlevel
3(上一次的运行级别) 5(当前运行级别)
- startx #切换到桌面
- Centos 7
[root@aaa ~]# cat /etc/inittab(C5启动的关键文件,现在已废用)
# inittab is no longer used when using systemd.
#
# ADDING CONFIGURATION HERE WILL HAVE NO EFFECT ON YOUR SYSTEM.
#
# Ctrl-Alt-Delete is handled by /usr/lib/systemd/system/ctrl-alt-del.target
#
# systemd uses 'targets' instead of runlevels. By default, there are two main targets:
#
# multi-user.target: analogous to runlevel 3
# graphical.target: analogous to runlevel 5
#
# To view current default target, run:
# systemctl get-default
#
# To set a default target, run:
# systemctl set-default TARGET.target
#
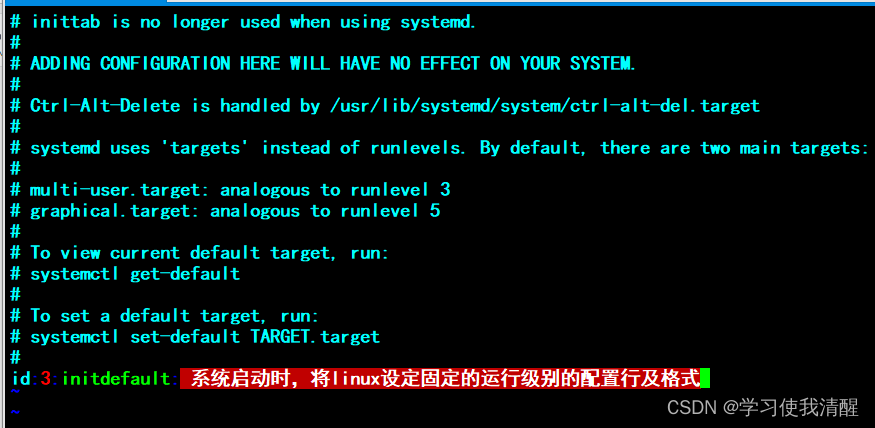
[root@aaa ~]# systemctl get-default
multi-user.target
- c5修改运行级别格式
Systemd介绍
- Systemd(System Daemon)是Centos系统中的系统管理守护进程、工具和库的集合,用于取代早起的init进程。是用于管集中管理和配置Linux系统,Systemd是Centos7系统中启动的第一个进程(PID=1),其他所有进程都是他的子进程
[root@aaa ~]# pgrep systemd
1
533
572
1156
[root@aaa ~]# pstree
systemd-+-NetworkManager---2*[{NetworkManager}]
        |-VGAuthService
        |-abrt-watch-log
        |-abrtd
        |-agetty
        |-auditd---{auditd}
        |-crond
        |-dbus-daemon---{dbus-daemon}
        |-irqbalance
        |-master-+-pickup
        |        `-qmgr
        |-polkitd---6*[{polkitd}]
        |-rsyslogd---2*[{rsyslogd}]
        |-sshd---sshd---bash---pstree
        |-systemd-journal
        |-systemd-logind
        |-systemd-udevd
        |-tuned---4*[{tuned}]
        `-vmtoolsd---2*[{vmtoolsd}]
Systemd的由来
- 早在Centos7之前,采用ini进程作为系统启动后的第一个进程,但是用int启动方式有两个缺点:
- 1.启动时间长,因为mt进程是串行执行的,只有前一个进程启动完成后一个进程才启动。
- 2.启动脚本复杂,以前的系统初始化需要加载很多脚本,依颜关系复杂,靠脚本自己处理。
- 3.相关的管理命念很多,很杂。
- Systend就是为了解决上达问题而诞生的。它的设计目标是,为系統启动和管理提供一套完整的解决方案。
- 从Centos5到Centos7,Centos5系统的启动速度最慢的,因为是串行启动,无论进程相五之间有无依赖关系。Centos6系统的启动速度有所提高。有依赖的进程之间依次启动而其他与之没有依赖关系的则并行同步启动。Centos7系统开始,所有进程无论有无依赖关系都并行启动。
Systemd优势
- 1.Centos7实现开机并行启动,昆著提高开机启动速度。
- 2.自动解决启动间的服务依赖关系。
- 3.服务的启动配曾文件统一语法,管理起来更方便。
- 4.systemd较好的解决原有模式缺陷,比如原有service不会关闭程序产生的子进程。
- 5 从Debian9、Centos7、Ubunut等系统开始,都开始用Systemd管理服务。
- 6.Centos7服务的启动与停止不在使用脚本管理服务,也就是/etc/mit.d下不在有脚本。
C6和C7启动方式比较
C6
[root@aaa ~]# service network restart
Restarting network (via systemctl):                        [  OK  ]
[root@aaa ~]# /etc/init.d/network
force-reload  restart       start         status        stop
[root@aaa ~]# /etc/init.d/network restart
Restarting network (via systemctl):                        [  OK  ]
C7
- systemd相关路径文件
| 路径 | 描述 |
|---|---|
| /usr/lib/systemd/system | /etc/init.d(启动服务程序所在的路径) |
| /etc/systemd/system | /etc/rc.d(不同运行级别启动文件路径) |
| /etc/systemd/system/multi-user.target.wants | /etc/rc.d/rc3.d(3级别路径) |
- systemd管理服务管理相关命令
systemctl相关命令
[root@aaa ~]# systemctl status crond.service
* crond.service - Command Scheduler
   Loaded: loaded (/usr/lib/systemd/system/crond.service; enabled(是否开机自启); vendor preset: enabled)
   Active: active (running) since Tue 2022-09-13 21:51:19 CST; 3h 15min ago
 Main PID: 1179 (crond)
   CGroup: /system.slice/crond.service
           `-1179 /usr/sbin/crond -n

Sep 13 21:51:19 aaa systemd[1]: Started Command Scheduler.
Sep 13 21:51:19 aaa crond[1179]: (CRON) INFO (RANDOM_DELAY will be scaled with factor 4...d.)
Sep 13 21:51:20 aaa crond[1179]: (CRON) INFO (running with inotify support)
Hint: Some lines were ellipsized, use -l to show in full.
- 重新加载,平滑重启 reload,
- 常用start stop status
- 查询服务是否在运行
[root@aaa ~]# systemctl is-active sshd
active
- 当使用systemctl守护一个进程后,systemctl status 查询守护进程状态
| 状态 | 描述 |
|---|---|
| loaded | 服务大暖的配置文件已经被处理 |
| active(running) | 服务持续运行 |
| active(exited) | 服务成功完成一次的配置 |
| active(waiting) | 服务已经运行但在等待某个时间 |
| inactive | 服务没有在运行 |
| enabled | 服务设置为开机运行 |
| disable | 服务设置为开机不运行 |
| static | 服务开机不启动,但可以被其他服务调用 |
- 设置服务自启动相关命令
enable 开机自启
disbale 开机不自启
list-unit-files 查看所有服务器的开机自启动状态
is-enabled 查看特定服务是否为开机自动
daemon-reload 重新载入更改的systemd配置文件 - systemctl enable sshd 原理是创建一个软连接
[root@aaa ~]# systemctl disable crond
Removed symlink /etc/systemd/system/multi-user.target.wants/crond.service.
[root@aaa ~]# systemctl enable crond
Created symlink from /etc/systemd/system/multi-user.target.wants/crond.service to /usr/lib/systemd/system/crond.service.
- 查询软链接所在位置
[root@aaa ~]# cd /etc/systemd/system/multi-user.target.wants/
[root@aaa multi-user.target.wants]# ll
total 0
lrwxrwxrwx. 1 root root 46 Aug 14 18:09 NetworkManager.service -> /usr/lib/systemd/system/NetworkManager.service
lrwxrwxrwx. 1 root root 41 Aug 14 18:09 abrt-ccpp.service -> /usr/lib/systemd/system/abrt-ccpp.service
lrwxrwxrwx. 1 root root 41 Aug 14 18:09 abrt-oops.service -> /usr/lib/systemd/system/abrt-oops.service
lrwxrwxrwx. 1 root root 43 Aug 14 18:09 abrt-vmcore.service -> /usr/lib/systemd/system/abrt-vmcore.service
lrwxrwxrwx. 1 root root 41 Aug 14 18:09 abrt-xorg.service -> /usr/lib/systemd/system/abrt-xorg.service
lrwxrwxrwx. 1 root root 37 Aug 14 18:09 abrtd.service -> /usr/lib/systemd/system/abrtd.service
lrwxrwxrwx. 1 root root 38 Aug 14 18:09 auditd.service -> /usr/lib/systemd/system/auditd.service
lrwxrwxrwx. 1 root root 37 Sep 14 23:33 crond.service -> /usr/lib/systemd/system/crond.service
lrwxrwxrwx. 1 root root 42 Aug 14 18:09 irqbalance.service -> /usr/lib/systemd/system/irqbalance.service
lrwxrwxrwx. 1 root root 37 Aug 14 18:09 kdump.service -> /usr/lib/systemd/system/kdump.service
lrwxrwxrwx. 1 root root 39 Aug 14 18:09 postfix.service -> /usr/lib/systemd/system/postfix.service
lrwxrwxrwx. 1 root root 40 Aug 14 18:09 remote-fs.target -> /usr/lib/systemd/system/remote-fs.target
lrwxrwxrwx. 1 root root 46 Aug 14 18:09 rhel-configure.service -> /usr/lib/systemd/system/rhel-configure.service
lrwxrwxrwx. 1 root root 39 Aug 14 18:09 rsyslog.service -> /usr/lib/systemd/system/rsyslog.service
lrwxrwxrwx. 1 root root 36 Aug 14 18:09 sshd.service -> /usr/lib/systemd/system/sshd.service
lrwxrwxrwx. 1 root root 39 Aug 16 01:00 sysstat.service -> /usr/lib/systemd/system/sysstat.service
lrwxrwxrwx. 1 root root 37 Aug 14 18:09 tuned.service -> /usr/lib/systemd/system/tuned.service
lrwxrwxrwx. 1 root root 40 Aug 14 18:09 vmtoolsd.service -> /usr/lib/systemd/system/vmtoolsd.service
- 在对应的运行级别的target文件下,建立软链接,在启动该运行级别下,就会自动加载该文件下的所有软链接。
systemd文件路径
[root@aaa ~]# ls /etc/rc.d/  #不通的rc.d对应不同的运行级别
init.d  rc.local  rc0.d  rc1.d  rc2.d  rc3.d  rc4.d  rc5.d  rc6.d
[root@aaa ~]# ll /usr/lib/systemd/system | wc -l
271
systemd文件格式(c7,启动文件)
- 以安装的nginx为例,查询启动文件所在位置
[root@aaa ~]# rpm -qa nginx
nginx-1.20.2-1.el7.ngx.x86_64
[root@aaa ~]# rpm -ql nginx
/etc/logrotate.d/nginx
/etc/nginx
/etc/nginx/conf.d
/etc/nginx/conf.d/default.conf
/etc/nginx/fastcgi_params
/etc/nginx/mime.types
/etc/nginx/modules
/etc/nginx/nginx.conf
/etc/nginx/scgi_params
/etc/nginx/uwsgi_params
/usr/lib/systemd/system/nginx-debug.service
/usr/lib/systemd/system/nginx.service        #  启动文件在这
/usr/lib64/nginx
/usr/lib64/nginx/modules
/usr/libexec/initscripts/legacy-actions/nginx
/usr/libexec/initscripts/legacy-actions/nginx/check-reload
/usr/libexec/initscripts/legacy-actions/nginx/upgrade
/usr/sbin/nginx
/usr/sbin/nginx-debug
/usr/share/doc/nginx-1.20.2
/usr/share/doc/nginx-1.20.2/COPYRIGHT
/usr/share/man/man8/nginx.8.gz
/usr/share/nginx
/usr/share/nginx/html
/usr/share/nginx/html/50x.html
/usr/share/nginx/html/index.html
/var/cache/nginx
/var/log/nginx
- 查看nginx启动文件
[root@aaa ~]# cat /usr/lib/systemd/system/nginx.service
[Unit]  # 定义通用选项,比如描述信息,依赖关系等
Description=nginx - high performance web server
Documentation=http://nginx.org/en/docs/
After=network-online.target remote-fs.target nss-lookup.target
Wants=network-online.target

[Service]  # 定义服务类型,具体的启动、关闭、重启选项在这配置
Type=forking
PIDFile=/var/run/nginx.pid  #服务启动后可以查询该文件
ExecStart=/usr/sbin/nginx -c /etc/nginx/nginx.conf  # 启动命令
ExecReload=/bin/sh -c "/bin/kill -s HUP $(/bin/cat /var/run/nginx.pid)" #重新加载配置的绝对路径,平滑生效
ExecStop=/bin/sh -c "/bin/kill -s TERM $(/bin/cat /var/run/nginx.pid)"   #停止服务命令的绝对路径

[Install]   # 定义由开机自启和开机自启命令时实现的选项
WantedBy=multi-user.target
unit说明
- Unit常用说明:
Descrirtion #描述信息
Docunentation #说明文档的在线地址
After #定义启动顺序,表示当前配置的服务应该晚于哪些服务之后启动
Wants #依赖其他的服务 - 更多
Description:简短描述
Documentation:文档地址
Requires:当前Unit依赖的其他Unit,如果它们没有运行,当前Unit会启动失败
wants:与当前Uhit配合的其他Unit,如果它们没有运行,当前Unit不会启动失败
BindsTo:与Requires类似,它指定的Unit如果退出,会导致当前Unit停止运行
Before:如果该字段指定的Unit也要启动,那么必须在当前Unit之后启动
After:如果该字段指定的Unit也要启动,那么必须在当前Unit之前启动
Conflicts:这里指定的Unit不能与当前Unit同时运行
Condition.:当前Unit运行必须满足的条件,否则不会运行
Assert.:当前Unit运行必须满足的条件,否则会报启动失败
service说明
- Service段常用说明:
Type #定义服务类型
forking #需要父进程店动子进程的服务炎型为forking
PIDFile #定义PID文件路径
ExecStart #指定启动服务命令绝对路径
ExecReload # 指定重新加载服务器的配置文件的命令绝对路径
Execstop #指定停上服务命今绝对路径
ExecStartPre #在启动之前运行的命令
ExecStartPost #在启动之居运行的命令
install说明
- Install段常用说明
WantedBy #哪些服务需要被依赖
自定义启动文件
PIDFile=/var/run/nginx.pid  #pid文件的绝对路径
ExecStart=/usr/sbin/nginx -c /etc/nginx/nginx.conf  # 启动命令的绝对路径
ExecReload=/bin/sh -c "/bin/kill -s HUP $(/bin/cat /var/run/nginx.pid)" #停止服务命令的绝对路径
- Centos6和Centos7在启动方式上的区别
| Centos6启动 | Centos7启动 |
|---|---|
| /etc/init.d/nginx start(纯shell脚本)或service nginx start | systemctl start nginx(systemd启动文件) |
| Centos6开机自启 | Centos7开机自启 |
|---|---|
| chkconfig nginx on | systemctl enable nginx |
| chkconfig nginx off | systemctl disable nginx |
| chkconfig --list | grep 3:on | systemctl list-unit-files |
- 之前用rpm安装过nginx, 重新定义nginx启动文件/usr/lib/systemd/system/diy_nginx.service,将service段下的
- ExecStart=/application/nginx/sbin/nginx -c /application/nginx/conf/nginx.conf
- ExecReload=//application/nginx/sbin/nginx -s reload
- ExecStop=//application/nginx/sbin/nginx -s stop
- ExecStartPre=/bin/sh -c "/usr/bin/chown -R www:www /applicaton/nginx/ " # 执行命令之前做的事
- 其中ExecStartPre和PIDfile不是必须的
开机自启动优化
- 除了以下服务全部取消开机启动
[root@aaa multi-user.target.wants]# systemctl list-unit-files |egrep  "network.ta|rsyslog|sshd\.|sysstat"
rsyslog.service                               enabled
sshd.service                                  enabled
sysstat.service                               enabled
sshd.socket                                   disabled
network.target                                static
[root@aaa multi-user.target.wants]# systemctl list-unit-files |egrep -v "network.ta|rsyslog|sshd\.|sysstat|static" | awk '{print "systemctl disable "$1}'|bash
- 重启后查看 基本就三个 sshd rsyslog sysstat
[root@aaa ~]# systemctl list-unit-files | grep enable
autovt@.service                               enabled
getty@.service                                enabled
rsyslog.service   (日志系统)                            enabled
sshd.service                                  enabled
sysstat.service        (性能监控)                       enabled
- 网络服务会用chkconfig启动
- 启动网卡服务发现不能设置为开机启动,用chkconfig查看发现network已启动(chkconfig network on ,在2 3 4 5级别上开机自启动,cenots7以前的设置的开机自启动命令)。
sysstat.service                               enabled
[root@aaa ~]# systemctl enable network
network.service is not a native service, redirecting to /sbin/chkconfig.
Executing /sbin/chkconfig network on
[root@aaa ~]# chkconfig --list | grep network
Note: This output shows SysV services only and does not include native
      systemd services. SysV configuration data might be overridden by native
      systemd configuration.

      If you want to list systemd services use 'systemctl list-unit-files'.
      To see services enabled on particular target use
      'systemctl list-dependencies [target]'.
network        	0:off	1:off	2:on	3:on	4:on	5:on	6:off
企业案例
关于Inode满的问题
- 可以尝试查找文件小于1kd的,多半是邮件存储目录,sendmail、postfix,主要原因是定时任务配置不当,导致系统给 root管理员信件提示,生成大量小文件
磁盘分区
- 一台服务器600G盘6块,raid5后总大小3T,此时无法安装系统,如何解决
- 装系统时选择gpt分区格式,即可安装
- 如果raid做好了,正常分区格式化即可
- 没做raid5前,-2块盘做raid1,装系统;剩余raid5
开机启动流程
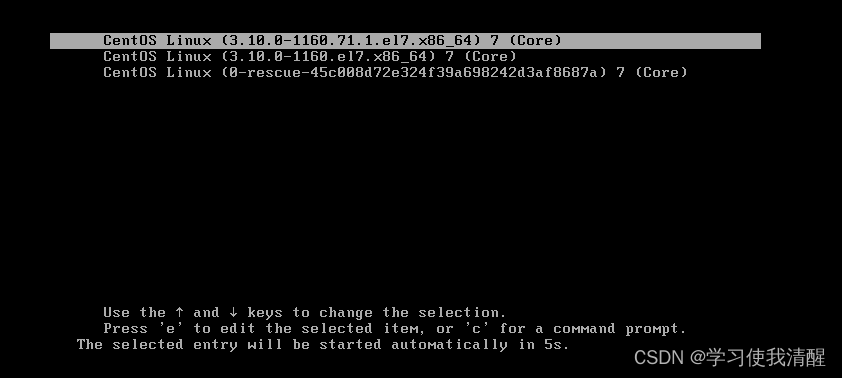
Centos6
- 1 开机后计算机加载BISO自检硬件(CPU,内存等),
- 2 读取MBR信息,读取磁盘0柱面 0磁道1扇区的前446字节的主引导记录。即读取引导程序,
[root@aaa ~]# tree /boot/ -L 1
/boot/
|-- System.map-3.10.0-1160.71.1.el7.x86_64
|-- System.map-3.10.0-1160.el7.x86_64
|-- config-3.10.0-1160.71.1.el7.x86_64
|-- config-3.10.0-1160.el7.x86_64
|-- efi
|-- grub
|-- grub2
|-- initramfs-0-rescue-45c008d72e324f39a698242d3af8687a.img
|-- initramfs-3.10.0-1160.71.1.el7.x86_64.img
|-- initramfs-3.10.0-1160.71.1.el7.x86_64kdump.img
|-- initramfs-3.10.0-1160.el7.x86_64.img
|-- initramfs-3.10.0-1160.el7.x86_64kdump.img
|-- symvers-3.10.0-1160.71.1.el7.x86_64.gz
|-- symvers-3.10.0-1160.el7.x86_64.gz
|-- vmlinuz-0-rescue-45c008d72e324f39a698242d3af8687a
|-- vmlinuz-3.10.0-1160.71.1.el7.x86_64
`-- vmlinuz-3.10.0-1160.el7.x86_64

3 directories, 14 files
- 3 读取grub菜单(boot loader,引导加载程序)
- centos6 grub配置文件
cat /etc/grub.conf # 也可读取/boot/grub/menu.lst或/boot/grub/grub.conf
#省略多行注释信息,此处注释其实足够清楚,初学者还是要多看
default=0 #默认情况下如何加载系统,0表示加载菜单中的对应的第一个名字,多系统时可调节默认加载项
timeout=5 #表示多少秒之后开始加载默认的系统,给管理员提前选择的时间
splashimage=(hd0,0)/grub/splash.xpm.gz #启动时显示的背景图标,在(hd0,0)代表/boot分区
hiddenmenu #系统启动时,会隐藏启动菜单信息,按默认设置启动系统,除非用户案件干预
password [-md5 - encrypted ] STRING #当编辑grub菜单时需认证,Linux优化之一,默认没有
tittle CentOS 6 (2.6.32-696.el6.X86_64)#要启动哦的系统对应的项目名称,可按需修改
root(hd0,0) #引导内核文件和内核所需驱动文件所在的分区,(hd0,0)代表/boot分区,hd0表示计算机的第一块硬盘,(hd0,0)表示第一块磁盘的第一个分区,即/dev/sda1(分区通常最先独立分区的/boot分区,对应的设备就是sda1)
kernel /vmlinuz-2.6.32-696.el6.x86_64 ro root=UUID=491EABE5-4457-9bdb-b37cc6751308 rd_NO_LUKS rd_NO_LVM LANG=en_US.UTF8 rd_NO_MD SYSFONT=latarcyrheb-sun16 crashkernel=auto KEYBOARDTYPE=pc KEYTABLE=us rd_NO_DM rhgb quiet #位于boot分区上的内核文件,及一对可选内核参数 ;vmlinux-2.6.32-696.el6.x86_64为内核文件。root=UUID=后面表示设备信息,其他介绍作用不大,忽略即可 - 4 加载kernel内核及驱动程序、
- 5 加载init进程,读取inittab文件,该文件中注明当系统启动时,将Linux的3级别设定为默认的运行级别
/etc/inittab
centos 7
- 前4步和centos6一样。
- 5 加载systemd进程


 1236
1236


 被折叠的 条评论
为什么被折叠?
被折叠的 条评论
为什么被折叠?
 到【灌水乐园】发言


