


前言
Table 表格widget,其实很少使用到的,等有需要的时候在查看该widget
一、Table 是什么?
表格widget,但是不能像excel 那么强大。
| 项目 | Value |
|---|---|
| 电脑 | $1600 |
| 手机 | $12 |
| 导管 | $1 |
二、使用步骤
| 项目 | Value |
|---|---|
| Table | 一个表格 |
| TableRow | 一行 |
| TableCell | 一个单元格 |
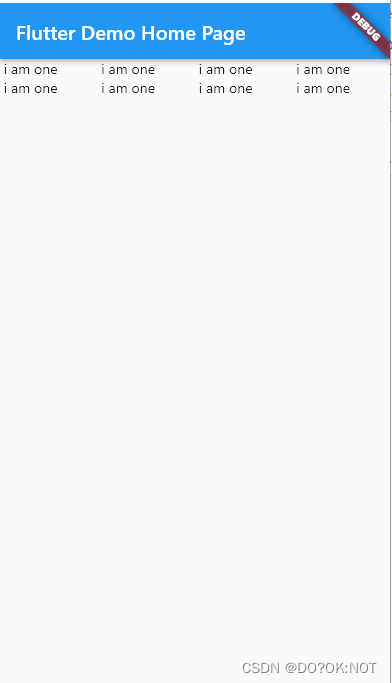
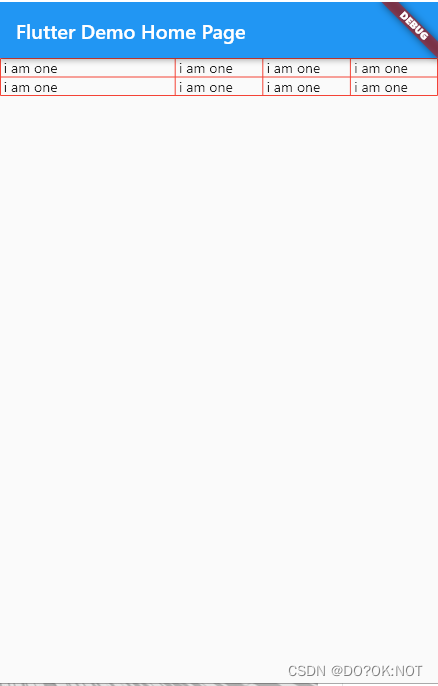
1.Table 基础使用
代码如下(示例):
    return Scaffold(
      appBar: AppBar(
        // Here we take the value from the MyHomePage object that was created by
        // the App.build method, and use it to set our appbar title.
        title: Text(widget.title),
      ),
      body: Table(
        children: [
          TableRow(children: [
            TableCell(
              child: Text(' i am one '),
            ),
            TableCell(
              child: Text(' i am one '),
            ),
            TableCell(
              child: Text(' i am one '),
            ),
            TableCell(
              child: Text(' i am one '),
            )
          ]),
          TableRow(children: [
            TableCell(
              child: Text(' i am one '),
            ),
            TableCell(
              child: Text(' i am one '),
            ),
            TableCell(
              child: Text(' i am one '),
            ),
            TableCell(
              child: Text(' i am one '),
            )
          ])
        ],
      ),
2.宽度
宽度的设置的几种形式
- FlexColumnWidth
 //columnWidths 单元格的宽,map 哪列 :宽度
  columnWidths: {
    0: FlexColumnWidth(20),
    1: FlexColumnWidth(10),
    2: FlexColumnWidth(10),
    3: FlexColumnWidth(10)
  },
如图:
- IntrinsicColumnWidth:以那个最宽的单元格为该列的宽度
   columnWidths: {
     0: IntrinsicColumnWidth(),
     1: FlexColumnWidth(10),
     2: FlexColumnWidth(20),
     3: FlexColumnWidth(10)
   },
如图:
- MaxColumnWidth:以那个最宽的单元格为该列的宽度,设置最大值,如果超过这个最大也是取最大值
        columnWidths: const {
          0: MaxColumnWidth(FlexColumnWidth(20), FlexColumnWidth(200)),
          1: FlexColumnWidth(10),
          2: FlexColumnWidth(10),
          3: FlexColumnWidth(10)
        },
3.设置边框
代码如下(示例):
    return Scaffold(
      appBar: AppBar(
        // Here we take the value from the MyHomePage object that was created by
        // the App.build method, and use it to set our appbar title.
        title: Text(widget.title),
      ),
      body: Table(
        border: TableBorder(
          //添加上行左右的网格线
            top: BorderSide(color: Colors.red),
            left: BorderSide(color: Colors.red),
            bottom: BorderSide(color: Colors.red),
            right: BorderSide(color: Colors.red),
            //水平线
            horizontalInside: BorderSide(color: Colors.red),
            //垂直方向
            verticalInside: BorderSide(color: Colors.red)),
        //columnWidths 单元格的宽,map 哪列 :宽度
        columnWidths: {
          0: FlexColumnWidth(20),
          1: FlexColumnWidth(10),
          2: FlexColumnWidth(10),
          3: FlexColumnWidth(10)
        },
        children: [
          TableRow(children: [
            TableCell(
              child: Text(' i am one '),
            ),
            TableCell(
              child: Text(' i am one '),
            ),
            TableCell(
              child: Text(' i am one '),
            ),
            TableCell(
              child: Text(' i am one '),
            )
          ]),
          TableRow(children: [
            TableCell(
              child: Text(' i am one '),
            ),
            TableCell(
              child: Text(' i am one '),
            ),
            TableCell(
              child: Text(' i am one '),
            ),
            TableCell(
              child: Text(' i am one '),
            )
          ])
        ],
      ),
// This trailing comma makes auto-formatting nicer for build methods.
    );
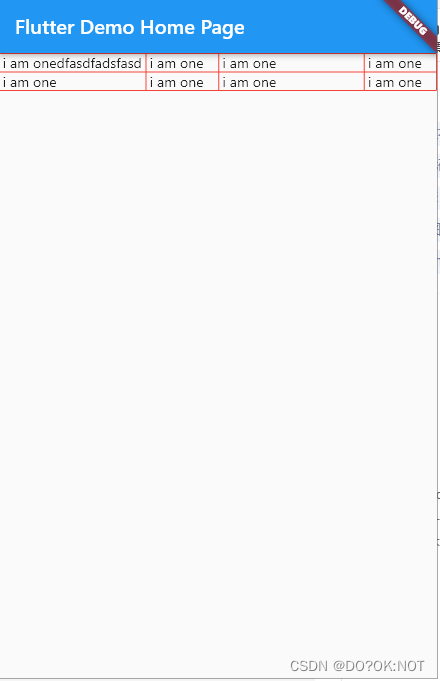
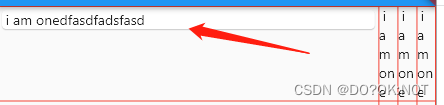
4.TableCell设置单元格式widget等其他设置
- 可以单元的内容设置为widget
  TableCell(
       child: Card(child: Text(' i am onedfasdfadsfasd ')),
     ),
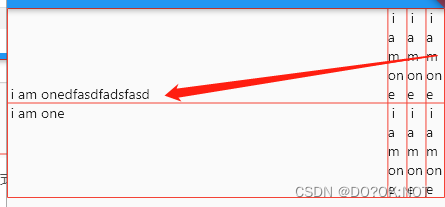
- 设置垂直方向的对齐方式:
    TableCell(
         verticalAlignment: TableCellVerticalAlignment.middle,
        child: Text(' i am onedfasdfadsfasd '),
      ),
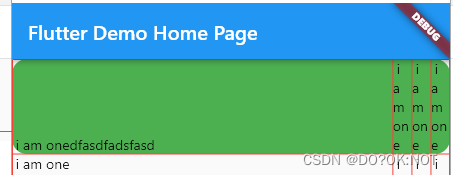
- 设置背景颜色
 TableRow(
              decoration: BoxDecoration(
                  color: Colors.green,
                  borderRadius: BorderRadius.all(Radius.circular(15))),
              children: [
                TableCell(
                  verticalAlignment: TableCellVerticalAlignment.bottom,
                  child: Text(' i am onedfasdfadsfasd '),
                ),
总结
欢迎关注,留言,咨询,交流!


 865
865


 被折叠的 条评论
为什么被折叠?
被折叠的 条评论
为什么被折叠?
 到【灌水乐园】发言


