


雪花算法基础
关于雪花算法,大部分文章都可以看到这个图。这个图很好的诠释了雪花算法生成Id的几个重要组成部分,这里也不展开具体介绍了。
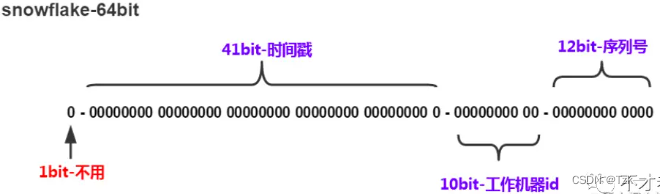
时间戳,工作机器Id,序列号这些位数是可以根据自己的业务场景来进来调整的。
10bit工作机器Id,其实就是上面说到的机器码,雪花算法内部并没有做任何处理,而是交由业务方自己定义,所以业务方需要自己保证这个的唯一性。
大部分情况,会把它分为5bit数据中心标识和5bit机器Id。这样的话可以支持32个数据中心和32个机器Id。
换句话说就是,一个业务可以在一个数据中心部署32个实例,最多部署的32个数据中心。正常来说,大部分项目,都不会需要部署这么多实例。。。
考虑到内网的IP段基本上是固定的,同一个应用基本上也会在连续的IP上面部署。
所以这里采用的是本地IP地址取余做为机器Id,机器的HostName取余做为默认的数据中心Id。
下面来看看具体的实现。
@Component
public class IdGenerate {

    //因为二进制里第一个 bit 为如果是 1,那么都是负数,但是我们生成的 id 都是正数,所以第一个 bit 统一都是 0。

    //机器ID  2进制5位  32位减掉1位 31个
    private long workerId;
    //机房ID 2进制5位  32位减掉1位 31个
    private long datacenterId;
    //代表一毫秒内生成的多个id的最新序号  12位 4096 -1 = 4095 个
    private long sequence;
    //设置一个时间初始值    2^41 - 1   差不多可以用69年
    private long twepoch = 1585644268888L;
    //5位的机器id
    private long workerIdBits = 5L;
    //5位的机房id
    private long datacenterIdBits = 5L;
    //每毫秒内产生的id数 2 的 12次方
    private long sequenceBits = 12L;
    // 这个是二进制运算,就是5 bit最多只能有31个数字,也就是说机器id最多只能是32以内
    private long maxWorkerId = -1L ^ (-1L << workerIdBits);
    // 这个是一个意思,就是5 bit最多只能有31个数字,机房id最多只能是32以内
    private long maxDatacenterId = -1L ^ (-1L << datacenterIdBits);

    private long workerIdShift = sequenceBits;
    private long datacenterIdShift = sequenceBits + workerIdBits;
    private long timestampLeftShift = sequenceBits + workerIdBits + datacenterIdBits;
    private long sequenceMask = -1L ^ (-1L << sequenceBits);
    //记录产生时间毫秒数,判断是否是同1毫秒
    private long lastTimestamp = -1L;
    public long getWorkerId(){
        return workerId;
    }
    public long getDatacenterId() {
        return datacenterId;
    }
    public long getTimestamp() {
        return System.currentTimeMillis();
    }

    public IdGenerate(){}

    public IdGenerate(long workerId, long datacenterId, long sequence) {

        // 检查机房id和机器id是否超过31 不能小于0
        if (workerId > maxWorkerId || workerId < 0) {
            throw new IllegalArgumentException(
                    String.format("worker Id can't be greater than %d or less than 0",maxWorkerId));
        }

        if (datacenterId > maxDatacenterId || datacenterId < 0) {

            throw new IllegalArgumentException(
                    String.format("datacenter Id can't be greater than %d or less than 0",maxDatacenterId));
        }
        this.workerId = workerId;
        this.datacenterId = datacenterId;
        this.sequence = sequence;
    }

    // 这个是核心方法,通过调用nextId()方法,让当前这台机器上的snowflake算法程序生成一个全局唯一的id
    public synchronized long nextId() {
        // 这儿就是获取当前时间戳,单位是毫秒
        long timestamp = timeGen();
        if (timestamp < lastTimestamp) {

            System.err.printf(
                    "clock is moving backwards. Rejecting requests until %d.", lastTimestamp);
            throw new RuntimeException(
                    String.format("Clock moved backwards. Refusing to generate id for %d milliseconds",
                            lastTimestamp - timestamp));
        }

        // 下面是说假设在同一个毫秒内,又发送了一个请求生成一个id
        // 这个时候就得把seqence序号给递增1,最多就是4096
        if (lastTimestamp == timestamp) {

            // 这个意思是说一个毫秒内最多只能有4096个数字,无论你传递多少进来,
            //这个位运算保证始终就是在4096这个范围内,避免你自己传递个sequence超过了4096这个范围
            sequence = (sequence + 1) & sequenceMask;
            //当某一毫秒的时间,产生的id数 超过4095,系统会进入等待,直到下一毫秒,系统继续产生ID
            if (sequence == 0) {
                timestamp = tilNextMillis(lastTimestamp);
            }

        } else {
            sequence = 0;
        }
        // 这儿记录一下最近一次生成id的时间戳,单位是毫秒
        lastTimestamp = timestamp;
        // 这儿就是最核心的二进制位运算操作,生成一个64bit的id
        // 先将当前时间戳左移,放到41 bit那儿;将机房id左移放到5 bit那儿;将机器id左移放到5 bit那儿;将序号放最后12 bit
        // 最后拼接起来成一个64 bit的二进制数字,转换成10进制就是个long型
        return ((timestamp - twepoch) << timestampLeftShift) |
                (datacenterId << datacenterIdShift) |
                (workerId << workerIdShift) | sequence;
    }

    /**
     * 当某一毫秒的时间,产生的id数 超过4095,系统会进入等待,直到下一毫秒,系统继续产生ID
     * @param lastTimestamp
     * @return
     */
    private long tilNextMillis(long lastTimestamp) {

        long timestamp = timeGen();

        while (timestamp <= lastTimestamp) {
            timestamp = timeGen();
        }
        return timestamp;
    }
    //获取当前时间戳
    private long timeGen(){
        return System.currentTimeMillis();
    }

}
使用
@Resource
private IdGenerate idGenerate;
idGenerate.nextId()
原创转载


 7377
7377


 被折叠的 条评论
为什么被折叠?
被折叠的 条评论
为什么被折叠?
 到【灌水乐园】发言


