


 本文介绍了Spring配置的发展历程,从XML配置到注解配置,再到JavaConfig的使用。讨论了SpringBoot之前,XML如何配置数据库连接,以及为何转向注解和JavaConfig。详细解析了配置占位符的处理过程,并通过@ConfigurationProperties和@Value注解展示了如何批量注入配置。最后,文章探讨了@ConfigurationProperties在简化配置方面的作用。
1. 前言
由于公司新项目的搭建,而且选择了 spring boot,对于 spring boot 其中的好处就是我们无需在为其配置大量的 XML,完全可以基于注解的方式来进行配置,但也没有完全采用 java config 配置,至少在我们项目中是结合起来用的,比如 dubbo 的配置等等。
1.1 第一阶段:xml配置
在spring 1.x时代,使用spring开发满眼都是xml配置的bean,随着项目的扩大,我们需要把xml配置文件分放到不同的配置文件中,那时候需要频繁地在开发的类和配置文件间切换。
1.2 第二阶段:注解配置
在spring 2.x时代,随着JDK1.5带来的注解支持,spring提供了声明bean的注解,
大大减少了配置量。这时spring圈子存在一种争论:注解配置和xml配置究竟哪个更好?我们最终的选择是应用的基本配置用xml,业务配置用注解。
1.3 第三阶段:java config
从spring 3.x到现在,spring提供了Java配置的能力,使用Java配置更好的理解
配置的bean。spring 4.x和spring boot都推荐使用Java配置。
Spring IOC有一个非常核心的概念——Bean。由Spring容器来负责对Bean的实例化,装配和管理。XML是用来描述Bean最为流行的配置方式。但随着 Spring 的日益发展,越来越多的人对Spring提出了批评。“Spring项目大量的烂用XML”就是最为严励的一个批评。由于Spring会把几乎所有的业务类都以Bean的形式配置在XML文件中,造成了大量的XML文件。使用XML来配置Bean失去了编译时的类型安全检查。大量的XML配置使得整个项目变得更加复杂。
随着JAVA EE 5.0的发布,其中引入了一个非常重要的特性——Annotations(注释)。注释是源代码的标签,这些标签可以在源代码层进行处理或通过编译器把它熔入到class文件中。在JAVA EE5以后的版本中,注释成为了一个主要的配置选项。Spring使用注释来描述Bean的配置与采用XML相比,因类注释是在一个类源代码中,可以获得类型安全检查的好处。可以良好的支持重构。
java config为开发人员提供了一种纯Java的方法来配置与XML配置概念相似的Spring容器。从技术角度来说,只使用java config配置类来配置容器是可行的,但是实际开发中,很多场景都是java config和xml配置共用是最方便,理想的。
2. XML 文件解析
在 Spring Boot 之前,大部分的配置文件都是通过xml去配置的,比如常见的数据库连接,就是通过xml+properties的方式。
2.1 代码示例
以 druid为例,引入依赖:
<dependency>
    <groupId>com.alibaba</groupId>
    <artifactId>druid</artifactId>
    <version>1.2.6</version>
</dependency>
application.properties
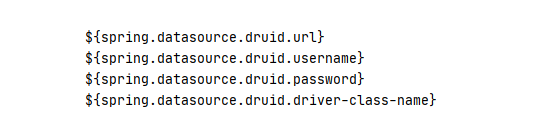
spring.datasource.druid.url=jdbc:mysql://127.0.0.1:3306/test?useUnicode=true&characterEncoding=UTF-8&allowMultiQueries=true&connectTimeout=10000&socketTimeout=10000&useTimezone=true&useLegacyDatetimeCode=false
spring.datasource.druid.username=root
spring.datasource.druid.password=123456
spring.datasource.druid.driver-class-name=com.mysql.cj.jdbc.Driver
xml配置
<beans xmlns="http://www.springframework.org/schema/beans"
xmlns:xsi="http://www.w3.org/2001/XMLSchema-instance"
xmlns:context="http://www.springframework.org/schema/context"
xmlns:aop="http://www.springframework.org/schema/aop"
xsi:schemaLocation="
http://www.springframework.org/schema/beans
http://www.springframework.org/schema/beans/spring-beans.xsd
http://www.springframework.org/schema/context
http://www.springframework.org/schema/context/spring-context.xsd
http://www.springframework.org/schema/aop
http://www.springframework.org/schema/aop/spring-aop-3.2.xsd"
default-lazy-init="false">
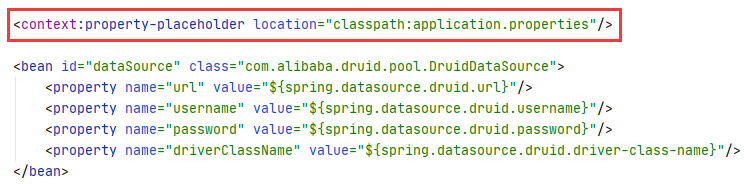
<context:property-placeholder location="classpath:application.properties"/>
<bean id="dataSource" class="com.alibaba.druid.pool.DruidDataSource">
<property name="url" value="${spring.datasource.druid.url}"/>
<property name="username" value="${spring.datasource.druid.username}"/>
<property name="password" value="${spring.datasource.druid.password}"/>
<property name="driverClassName" value="${spring.datasource.druid.driver-class-name}"/>
</bean>
</beans>
测试
@Test
public void test6() {
    ClassPathXmlApplicationContext applicationContext = new ClassPathXmlApplicationContext("spring.xml");
    DruidDataSource bean = applicationContext.getBean(DruidDataSource.class);
    System.out.println(bean.getUrl());
    System.out.println(bean.getUsername());
    System.out.println(bean.getPassword());
    System.out.println(bean.getDriverClassName());
}
输出
可以发现配置并没有用,主要原因就是没有引入application.properties,在 xml 中添加如下代码:
<context:property-placeholder location="classpath:application.properties"/>
输出正常

2.2 源码解析
对于上面的情况,主要就是context:property-placeholder这个标签起作用了,很明显这是一个自定义标签,之前在Spring自定义标签解析中分析过context:component-scan标签的解析,这两者的解析过程是类似的,只是对于的 Paser 不同。
而在标签的解析主要就是在大名鼎鼎的 refresh()方法中的obtainFreshBeanFactory(),源码如下:
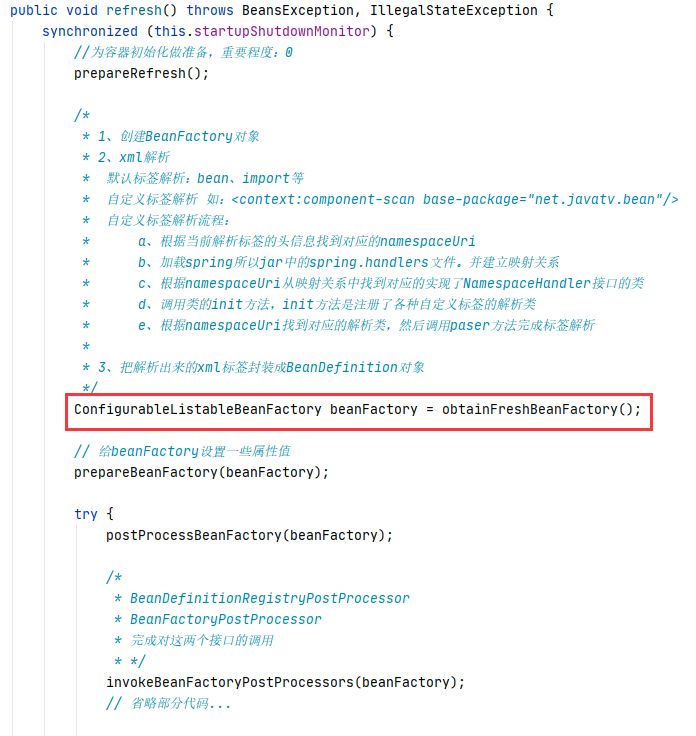
大致过程如下:
- NamespaceHandler 解析 xml 配置文件中的自定义命名空间;
- ContextNamespaceHandler 上下文相关的解析器,这边定义了具体如何解析 property-placeholder 的解析器;
- BeanDefinitionParser 解析 BeanDefinition 的接口,这里的 BeanDefinitionParser 为PropertyPlaceholderBeanDefinitionParser;
- BeanFactoryPostProcessor 加载好 BeanDefinition 后可以对其进行修改;
- PropertySourcesPlaceholderConfigurer 处理 BeanDefinition 中的占位符。
对应的解析器在spring.handles中可以找到:

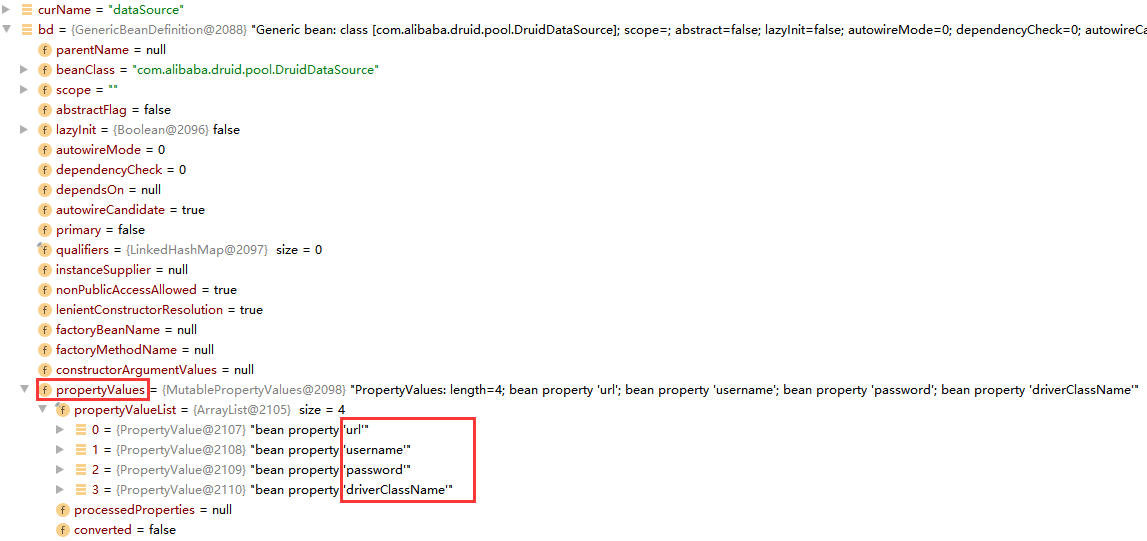
而对于其中第 3 步封装的 BeanDefinition 就把我们配置文件的信息添加到 BeanDefinition 中去,而在 BeanDefinition 中有一个类型为 MutablePropertyValues 的propertyValues属性,它用于封装<property>标签的信息,其实类里面就是有一个 list,list里面是 PropertyValue 对象,PropertyValue 就是一个 name 和 value 属性,用于封装<property>标签的名称和值信息,如下:
点开其中一个属性,可以看到对应的 value 值如下:
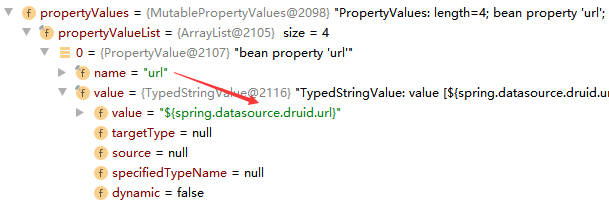
很明显可以看到它并不是我们需要的在application.properties中对应的明文,而实际上最后输出的确实明文,这是怎么做到的呢?
我们知道在标签解析后创建的 BeanDefinition 对象此时在容器中,既然可以拿到 BeanDefinition ,也就意味着可以对它进行修改,也就是上面的第 4 步,在之前的文章 Bean工厂的后置处理器BeanFactoryPostProcessor 也详细描叙过,即可以通过后置处理器 BeanFactoryPostProcessor 来进行对 BeanDefinition 的修改。
而处理占位符${}的就是 PropertyPlaceholderConfigurer 和 PropertySourcesPlaceholderConfigurer,它们都是对 BeanFactoryPostProcessor 的实现。可以将上下文(配置文件)中的属性值放在另一个单独的标准java Properties文件中去。在 XML 文件中用${}替换指定的 properties 文件中的值或者可以自定义前缀和后缀。此时只需要对 properties 文件进行修改,而不用对xml配置文件进行修改。spring 3.1之后更推荐使用PropertySourcesPlaceholderConfigurer,因为其加入了 Environment 对象,使得更加灵活。
PropertySourcesPlaceholderConfigurer 类图:

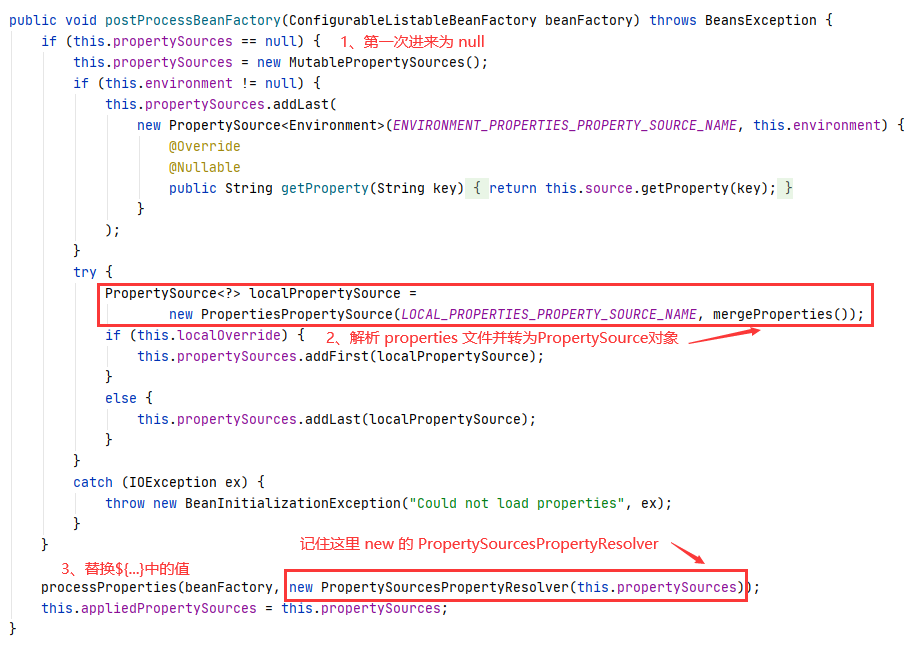
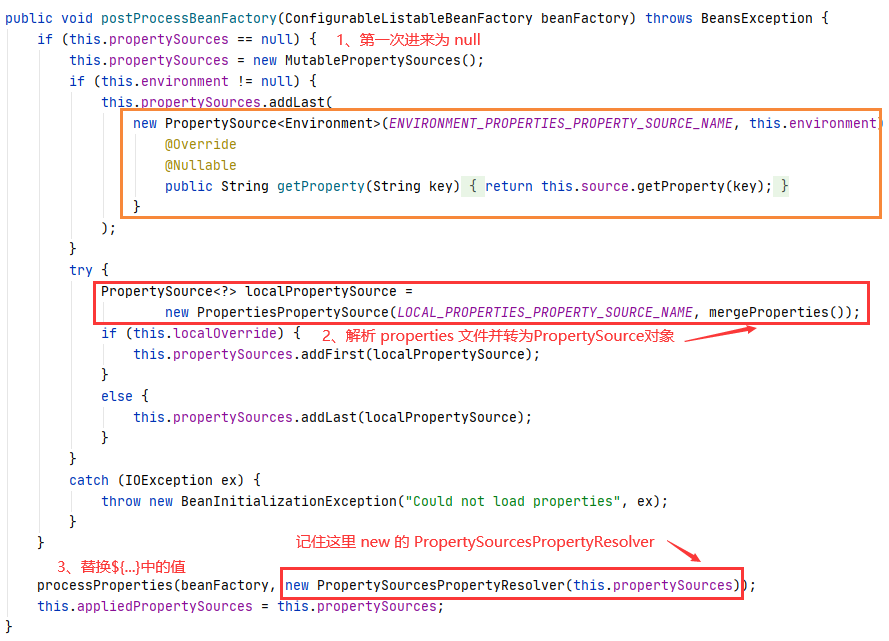
在执行后置处理器的 postProcessBeanFactory 时,首先会去解析 properties 文件
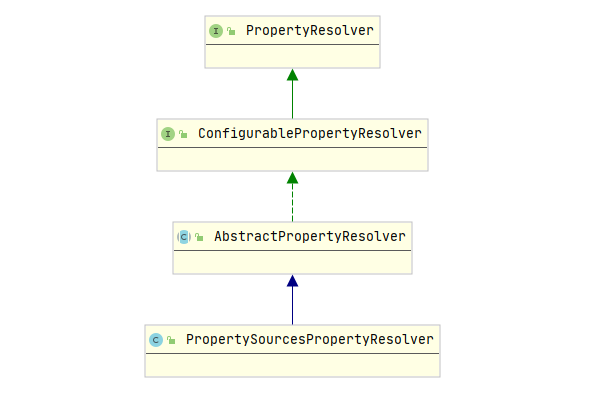
PropertySourcesPropertyResolver 类图如下:
1、解析.properties 文件。
PropertiesLoaderSupport#mergeProperties() 加载和合并所有的 Properties 属性,可动态控制配置文件和 BeanDefinition (默认配置)加载顺序,进入mergeProperties():
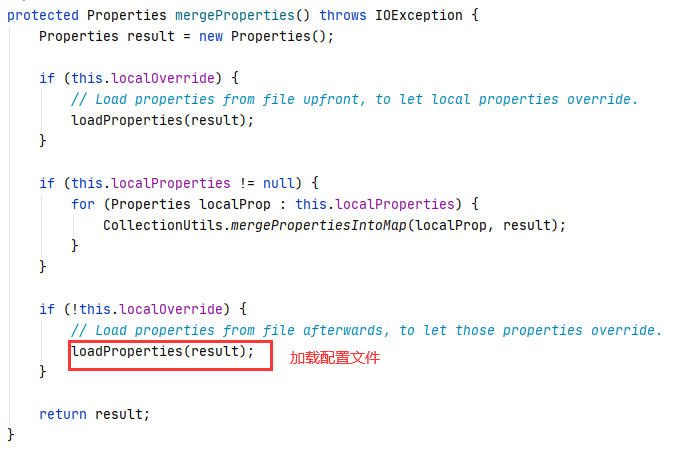
loadProperties()方法解析Properties,如下:
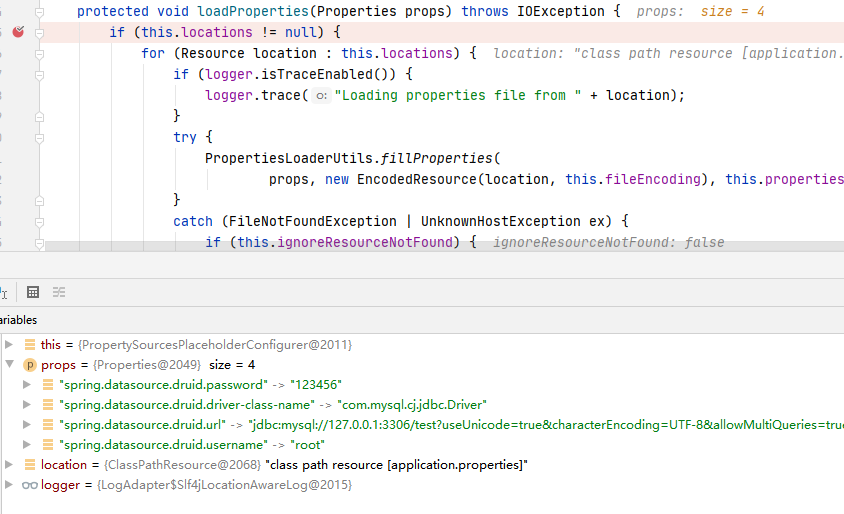
具体的加载逻辑是委托PropertiesLoaderUtils#fillProperties实现。
2、PropertiesLoaderSupport
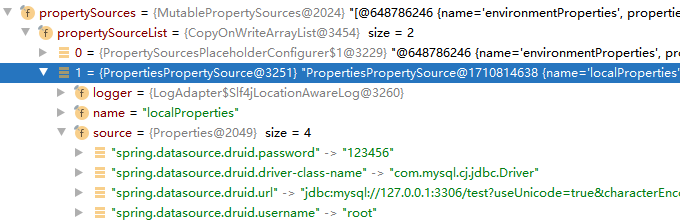
可以看到解析后的 properties 文件转为了 PropertySource 对象,进入它的构造方法,它集成自PropertySource。
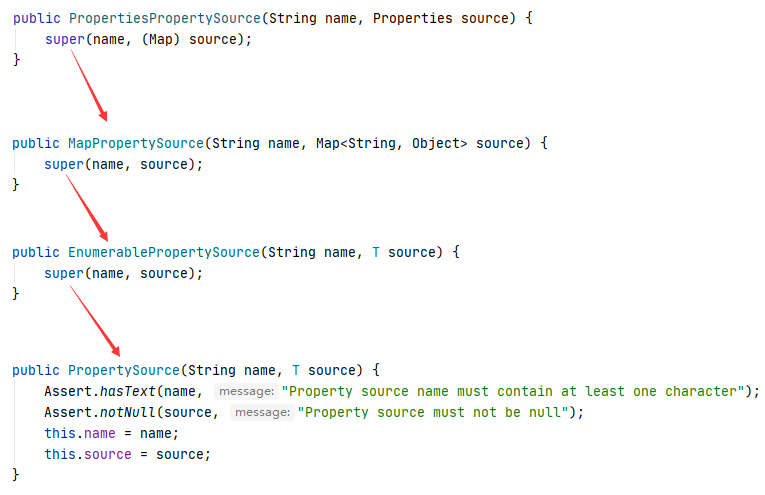
发现把他转为了一个 Map 结构。
3、解析占位符
① 然后进入PropertySourcesPlaceholderConfigurer#processProperties进行解析。
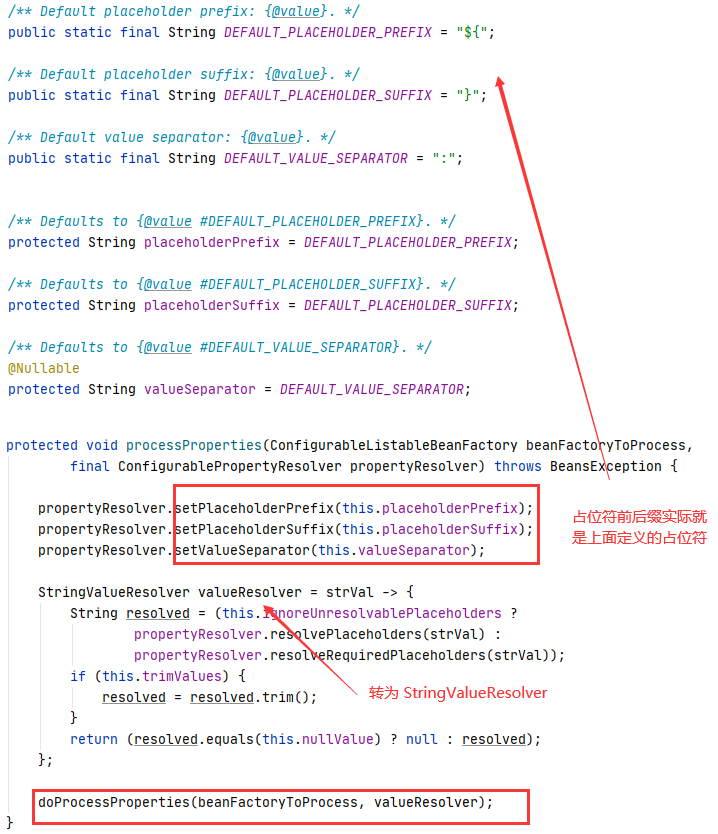
把 ConfigurablePropertyResolver 转为了 StringValueResolver。
② 然后进入doProcessProperties,通过访问者模式,使用 BeanDefinitionVisitor 和 StringValueResolver 更新属性。

然后进行占位符替换
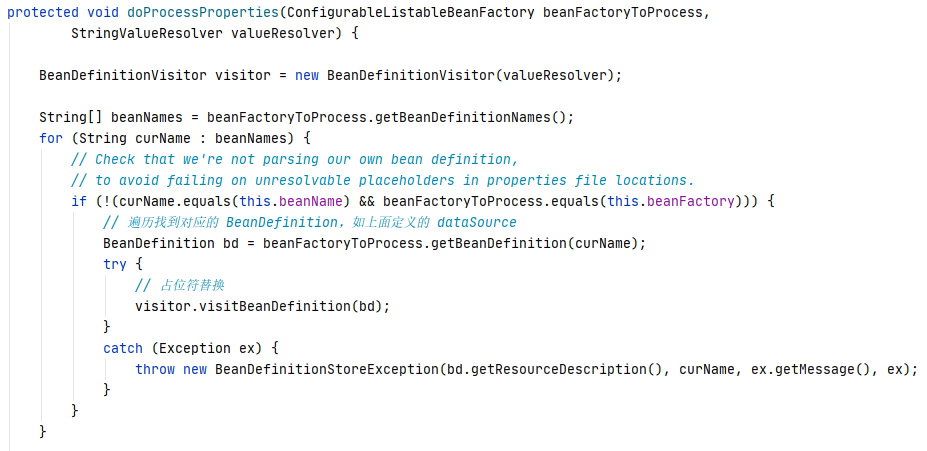
③ 进入visitBeanDefinition:
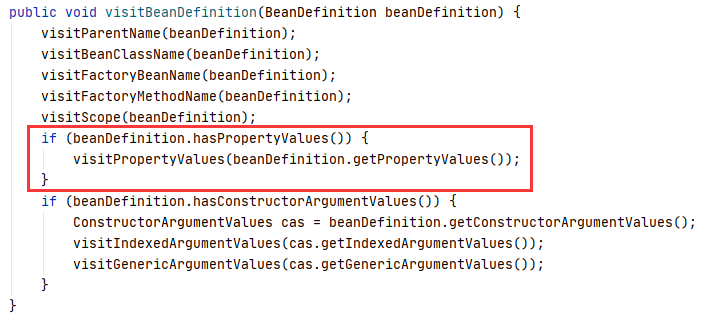
④ 里面有对方法,构造器,等等的解析,按照名字可以进入visitPropertyValues 方法,很明显就是用来解析MutablePropertyValues 中的propertyValues属性,debug 模式如下:
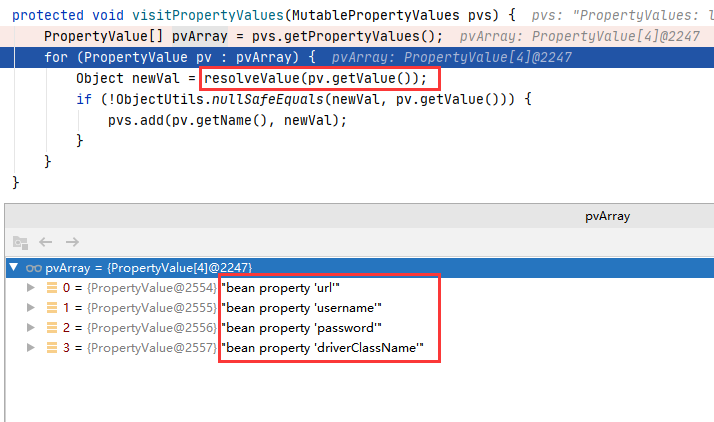
⑤ 进入 resolveValue :

⑥ 进入 resolveStringValue :
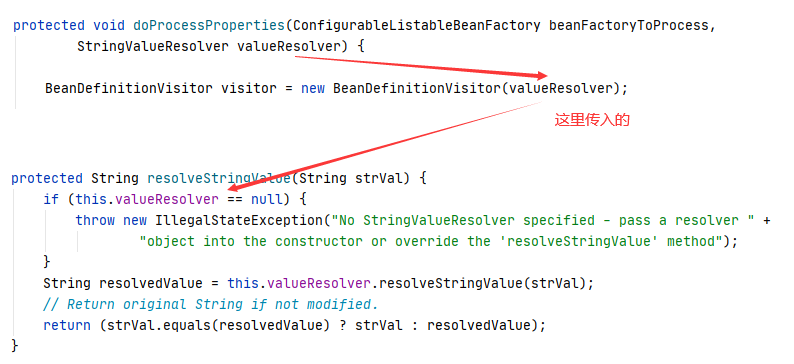
这里的 valueResolver 就是在第 ② 步传入的。
⑦ 然后进入StringValueResolver#resolveStringValue,它的实现类为 PlaceholderResolvingStringValueResolver ,进入该类的实现方法,它是在 PropertyPlaceholderConfigurer 的一个内部类,如下:
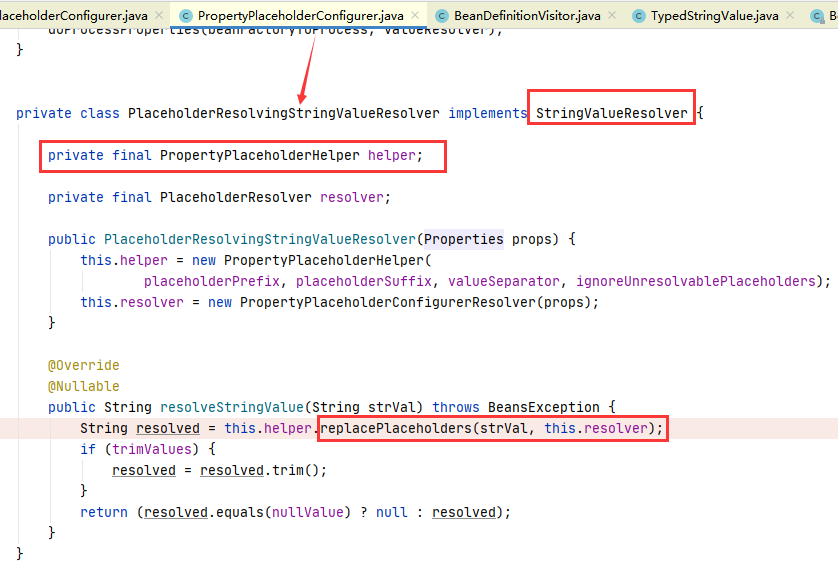
其中 PropertyPlaceholderHelper 一个解析工具类,调用了 replacePlaceholders 方法,但底层实际调用的是parseStringValue 方法。
⑧ 进入 PropertyPlaceholderHelper#parseStringValue 。
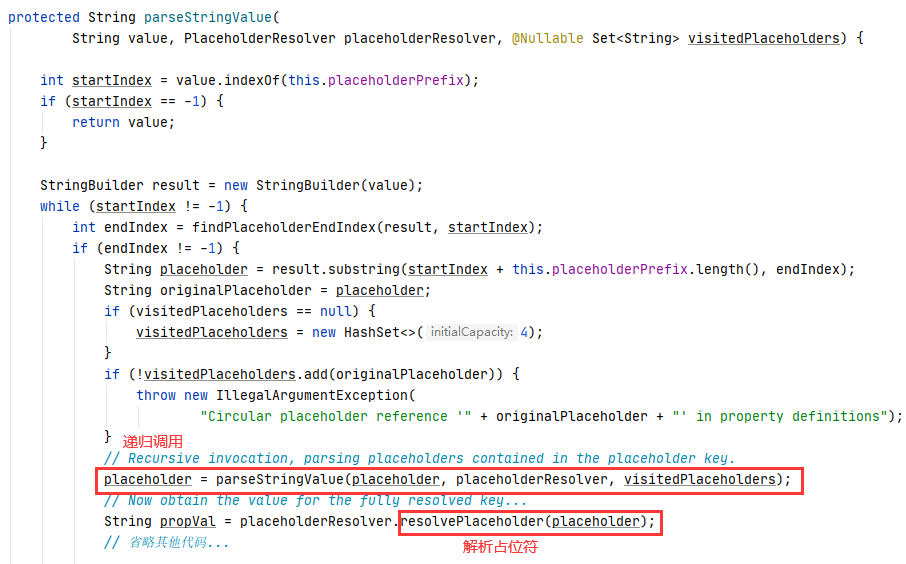
递归调用的目的就是为了得到排除占位符的真正的值,如spring.datasource.druid.url,然后解析。
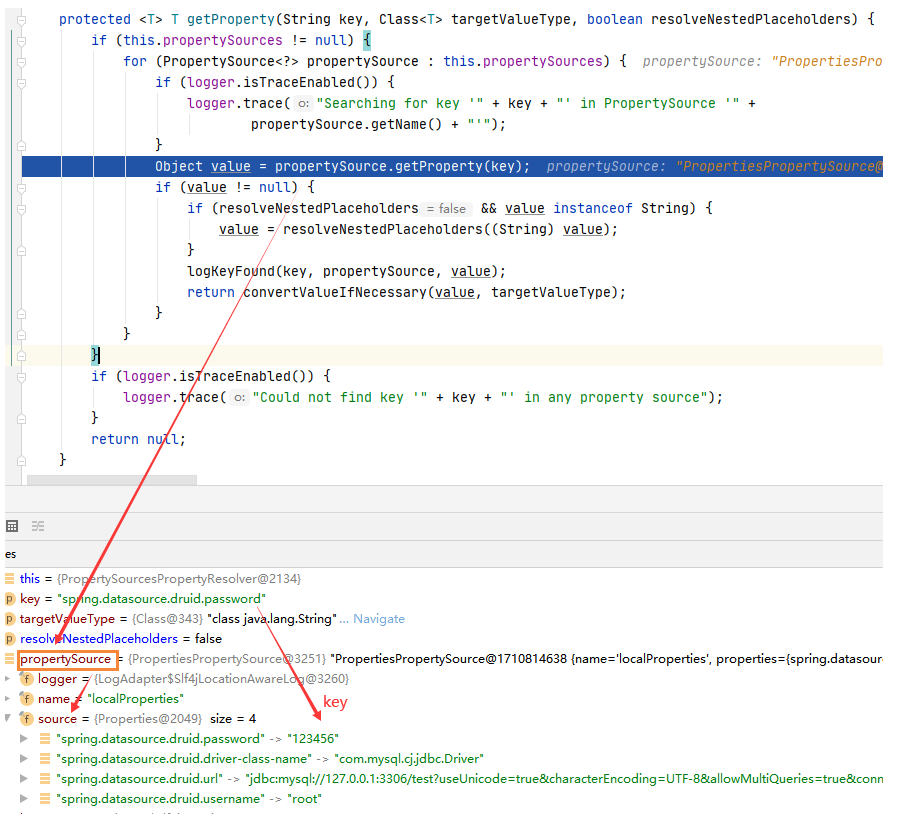
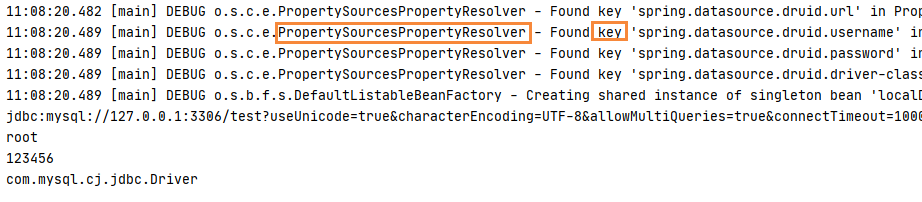
⑨ 进入PropertyPlaceholderConfigurer 的另一个内部类 PropertyPlaceholderConfigurerResolver#resolvePlaceholder方法,然后回调到PropertySourcesPropertyResolver.getProperty,即后置处理器的postProcessBeanFactory 方法中的回调方法,如下面黄色框中的 this.source.getProperty(key)。
而这个 key 就是解析出来的取出占位符后的值,如spring.datasource.druid.url,而这个source就是上面 2 中说的 PropertySources,它实际上就是一个 Map,如下:
所以实际上就相当于Map.get(key)的形式,从而取出了对应的值。
3. @Value
关于 Java Config 解析如下。
先看这样一个栗子。
@Configuration
@PropertySource(value = {"classpath:application.properties"})
public class DataSourceConfig {

    @Value("${spring.datasource.druid.url}")
    private String url;

    @Value("${spring.datasource.druid.username}")
    private String username;

    @Value("${spring.datasource.druid.password}")
    private String password;

    @Value("${spring.datasource.druid.driver-class-name}")
    private String driverClassName;

    @Bean
    public DruidDataSource localDataSource() {
        DruidDataSource dataSource = new DruidDataSource();
        dataSource.setUrl(this.url);
        dataSource.setUsername(this.username);
        dataSource.setPassword(this.password);
        dataSource.setDriverClassName(this.driverClassName);
        return dataSource;
    }
}
配置类同上 application.properties
测试
 @Test
 public void test7() {
     AnnotationConfigApplicationContext applicationContext = new AnnotationConfigApplicationContext(DataSourceConfig.class);
     DruidDataSource bean = applicationContext.getBean(DruidDataSource.class);
     System.out.println(bean.getUrl());
     System.out.println(bean.getUsername());
     System.out.println(bean.getPassword());
     System.out.println(bean.getDriverClassName());
 }
输出:
从日志就能看出还是通过 PropertySourcesPropertyResolver 解析得到的,而对于@Value的解析则是在 Bean 的实例化的属性注入过程中进行注入的,可以参考这篇文章:Bean的实例化。
4. @ConfigurationProperties
通过@Value的方式确实解决了xml配置的方式,但我们知道在实际配置过程中,数据库的连接配置不止这几个参数,还有连接数,超时时间等等,使用 @Value 需要注入的值较多时,代码就会显得冗余。
因此我们可以使用 @ConfigurationProperties,它支持批量注入配置文件中的属性,在Spring源码中大量使用了该注解,比如server.port就是由该注解获取到的,通过与其他注解配合使用,能够实现Bean的按需配置。
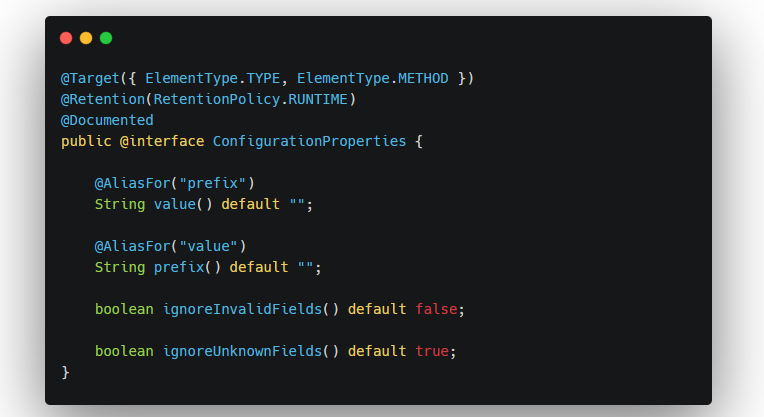
该注解有一个prefix属性,通过指定的前缀,绑定配置文件中的配置,该注解可以放在类上,也可以放在方法上。
4.1 作用于方法
比较常见的就是配置读写分离的场景。
4.1.1 配置文件内容
#数据源
spring.datasource.druid.write.url=jdbc:mysql://localhost:3306/jpa
spring.datasource.druid.write.username=root
spring.datasource.druid.write.password=1
spring.datasource.druid.write.driver-class-name=com.mysql.jdbc.Driver

spring.datasource.druid.read.url=jdbc:mysql://localhost:3306/jpa
spring.datasource.druid.read.username=root
spring.datasource.druid.read.password=1
spring.datasource.druid.read.driver-class-name=com.mysql.jdbc.Driver
4.1.2 java代码
Copy@Configuration
public class DruidDataSourceConfig {
    /**
     * DataSource 配置
     * @return
     */
    @ConfigurationProperties(prefix = "spring.datasource.druid.read")
    @Bean(name = "readDruidDataSource")
    public DataSource readDruidDataSource() {
        return new DruidDataSource();
    }


    /**
     * DataSource 配置
     * @return
     */
    @ConfigurationProperties(prefix = "spring.datasource.druid.write")
    @Bean(name = "writeDruidDataSource")
    @Primary
    public DataSource writeDruidDataSource() {
        return new DruidDataSource();
    }
}
也许有的人看到这里会比较疑惑,prefix并没有指定配置的全限定名,那它是怎么进行配置绑定的呢?
相信大家肯定了解@Value注解,它可以通过全限定名进行配置的绑定,这里的ConfigurationProperties其实就类似于使用多个@Value同时绑定,绑定的对象就是DataSource类型的对象,而且是 隐式绑定 的,意味着在配置文件编写的时候需要与对应类的字段名称 相同,比如上述spring.datasource.druid.write.url=jdbc:mysql://localhost:3306/jpa ,当然了,你也可以随便写个配置,比如 spring.datasource.druid.write.uuu=www.baidu.com,此时你只需要在注解中加上以下参数即可

以上就完成了多个数据源的配置,为读写分离做了铺垫
4.2 作用于Class类
4.2.1 配置文件内容
Copyspring.datasource.url=jdbc:mysql://127.0.0.1:8888/test?useUnicode=false&autoReconnect=true&characterEncoding=utf-8
spring.datasource.username=root
spring.datasource.password=root
spring.datasource.driver-class-name=com.mysql.jdbc.Driver
spring.datasource.type=com.alibaba.druid.pool.DruidDataSource
4.2.2 java代码
Copy@ConfigurationProperties(prefix = "spring.datasource")
@Component
public class DatasourcePro {

    private String url;

    private String username;

    private String password;

    // 配置文件中是driver-class-name, 转驼峰命名便可以绑定成
    private String driverClassName;

    private String type;

    public String getUrl() {
        return url;
    }

    public void setUrl(String url) {
        this.url = url;
    }

    public String getUsername() {
        return username;
    }

    public void setUsername(String username) {
        this.username = username;
    }

    public String getPassword() {
        return password;
    }

    public void setPassword(String password) {
        this.password = password;
    }

    public String getDriverClassName() {
        return driverClassName;
    }

    public void setDriverClassName(String driverClassName) {
        this.driverClassName = driverClassName;
    }

    public String getType() {
        return type;
    }

    public void setType(String type) {
        this.type = type;
    }
}
4.3 用法
@Controller
@RequestMapping(value = "/config")
public class ConfigurationPropertiesController {

    @Autowired
    private DatasourcePro datasourcePro;

    @RequestMapping("/test")
    @ResponseBody
    public Map<String, Object> test(){

        Map<String, Object> map = new HashMap<>();
        map.put("url", datasourcePro.getUrl());
        map.put("userName", datasourcePro.getUsername());
        map.put("password", datasourcePro.getPassword());
        map.put("className", datasourcePro.getDriverClassName());
        map.put("type", datasourcePro.getType());

        return map;
    }
}
4.4 小结
- @ConfigurationProperties 和 @value 有着相同的功能,但是 @ConfigurationProperties的写法更为方便
- @ConfigurationProperties 的 POJO类的命名比较严格,因为它必须和prefix的后缀名要一致, 不然值会绑定不上, 特殊的后缀名是“driver-class-name”这种带横杠的情况,在POJO里面的命名规则是 下划线转驼峰 就可以绑定成功,所以就是 “driverClassName”
注:关于@ConfigurationProperties来自:注解@ConfigurationProperties使用方法
5. 总结
由于项目中使用了@ConfigurationProperties和@Value,又想起了以前基于 XML 的配置方式,因此查看了源码来了解其实现原理(那真是绕得我头晕),尽管 Spring Boot 方便,但 XML 配置的方式也不忘。


 8138
8138

 被折叠的 条评论
为什么被折叠?
被折叠的 条评论
为什么被折叠?
 到【灌水乐园】发言


