


目录
写在之前
本人纯小白,第一次接触openwrt和旁路由相关,这也是本人第一篇博客,写出来更多的是为了记录,当然如果能帮到大家一点就更好了。
整个过程中参考了很多大佬的文章,但是大佬的视角和小白的视角是不一样的,所以这篇博客我会尽可能详细地以一个小白的视角去阐述自己的一些理解,可能会有不对的地方,还望大家不吝赐教。
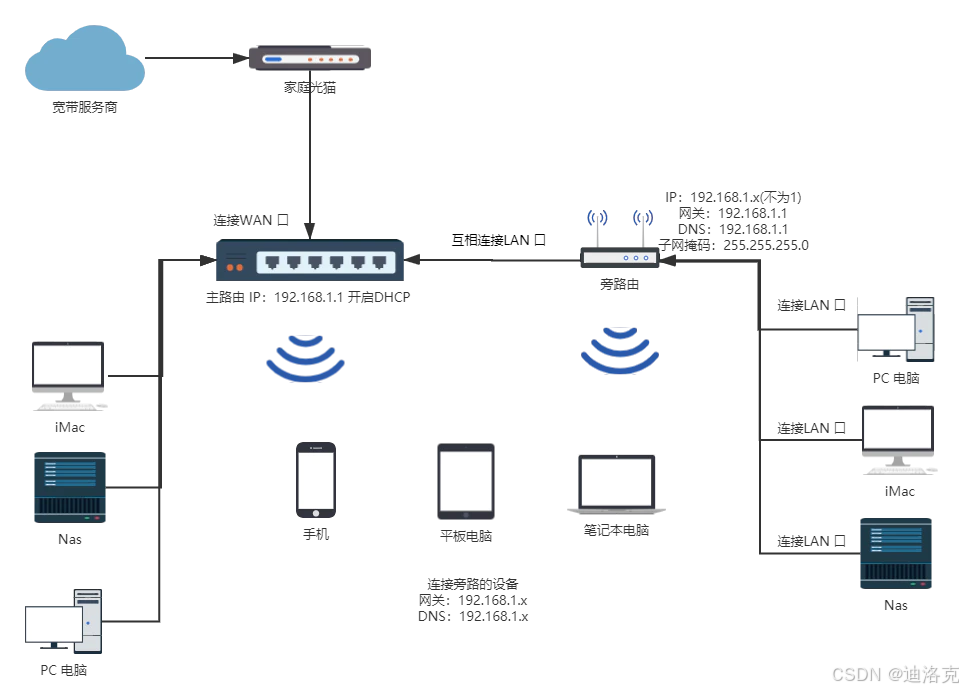
这篇文章的目的是将OrangePi打造为一个旁路由,OrangePi通过网线插到路由器上,然后开启WiFi热点,连接上OrangePi的WiFi的设备可以借助上级路由器的网络上网,同时也能通过openwrt做更多的事情。
环境准备
本次使用的设备是OrangePi 5 Plus和Orangepi5plus_1.0.10_ubuntu_jammy_server_linux6.1.43.img,这应该是目前最新的官方镜像。具体烧录过程参考官方的教程就好,就不再赘述。使用的网卡是RTL8852BE,官方的openwrt镜像不支持这个网卡,所以只能选择docker+openwrt。
假设当前OrangePi已经装好系统,并已经通过网线连接到路由器上,我们已经通过局域网下的电脑通过ssh登录到OrangePi。
注意:以下整个过程中都是以root用户在操作!
安装docker
这个镜像是没有集成docker的,虽然按照官方教程可以运行enable_docker.sh,但也会告诉你没有安装docker,所以首先第一步需要安装好docker。
#配置阿里的docker源
curl -fsSL https://mirrors.aliyun.com/docker-ce/linux/ubuntu/gpg | sudo gpg --dearmor -o /usr/share/keyrings/docker-archive-keyring.gpg
echo "deb [arch=$(dpkg --print-architecture) signed-by=/usr/share/keyrings/docker-archive-keyring.gpg] https://mirrors.aliyun.com/docker-ce/linux/ubuntu $(lsb_release -cs) stable" | sudo tee /etc/apt/sources.list.d/docker.list > /dev/null
#更新本地缓存
apt update
#更新包
apt upgrade
#安装必要依赖
apt install apt-transport-https ca-certificates curl software-properties-common gnupg lsb-release
#安装docker
apt install docker-ce docker-ce-cli containerd.io
输入docker有下列输出就完成了。
root@orangepi5plus:~# docker

Usage:  docker [OPTIONS] COMMAND

A self-sufficient runtime for containers

Common Commands:
  run         Create and run a new container from an image
  exec        Execute a command in a running container
  ps          List containers
  build       Build an image from a Dockerfile
  pull        Download an image from a registry
  push        Upload an image to a registry
  images      List images
  login       Authenticate to a registry
  logout      Log out from a registry
  search      Search Docker Hub for images
  version     Show the Docker version information
  info        Display system-wide information

Management Commands:
  builder     Manage builds
  container   Manage containers
  context     Manage contexts
  image       Manage images
  manifest    Manage Docker image manifests and manifest lists
  network     Manage networks
  plugin      Manage plugins
  system      Manage Docker
  trust       Manage trust on Docker images
  volume      Manage volumes

Swarm Commands:
  swarm       Manage Swarm

Commands:
  attach      Attach local standard input, output, and error streams to a running container
  commit      Create a new image from a container's changes
  cp          Copy files/folders between a container and the local filesystem
  create      Create a new container
  diff        Inspect changes to files or directories on a container's filesystem
  events      Get real time events from the server
  export      Export a container's filesystem as a tar archive
  history     Show the history of an image
  import      Import the contents from a tarball to create a filesystem image
  inspect     Return low-level information on Docker objects
  kill        Kill one or more running containers
  load        Load an image from a tar archive or STDIN
  logs        Fetch the logs of a container
  pause       Pause all processes within one or more containers
  port        List port mappings or a specific mapping for the container
  rename      Rename a container
  restart     Restart one or more containers
  rm          Remove one or more containers
  rmi         Remove one or more images
  save        Save one or more images to a tar archive (streamed to STDOUT by default)
  start       Start one or more stopped containers
  stats       Display a live stream of container(s) resource usage statistics
  stop        Stop one or more running containers
  tag         Create a tag TARGET_IMAGE that refers to SOURCE_IMAGE
  top         Display the running processes of a container
  unpause     Unpause all processes within one or more containers
  update      Update configuration of one or more containers
  wait        Block until one or more containers stop, then print their exit codes

Global Options:
      --config string      Location of client config files (default "/root/.docker")
  -c, --context string     Name of the context to use to connect to the daemon (overrides DOCKER_HOST env var and default context set with "docker
                           context use")
  -D, --debug              Enable debug mode
  -H, --host list          Daemon socket to connect to
  -l, --log-level string   Set the logging level ("debug", "info", "warn", "error", "fatal") (default "info")
      --tls                Use TLS; implied by --tlsverify
      --tlscacert string   Trust certs signed only by this CA (default "/root/.docker/ca.pem")
      --tlscert string     Path to TLS certificate file (default "/root/.docker/cert.pem")
      --tlskey string      Path to TLS key file (default "/root/.docker/key.pem")
      --tlsverify          Use TLS and verify the remote
  -v, --version            Print version information and quit

Run 'docker COMMAND --help' for more information on a command.

For more help on how to use Docker, head to https://docs.docker.com/go/guides/
安装create_ap
create_ap是一个方便我们运行AP的脚本,能够帮助我们配置hostapd和dnsmasq等,OrangePi的镜像中已经集成了create_ap,如果需要安装也很简单
git clone https://github.com/oblique/create_ap.git
cd create_ap
make install
运行create_ap有下列输出就算安装成功了
root@orangepi5plus:~# create_ap
Usage: create_ap [options] <wifi-interface> [<interface-with-internet>] [<access-point-name> [<passphrase>]]

Options:
  -h, --help              Show this help
  --version               Print version number
  -c <channel>            Channel number (default: 1)
  -w <WPA version>        Use 1 for WPA, use 2 for WPA2, use 1+2 for both (default: 1+2)
  -n                      Disable Internet sharing (if you use this, don't pass
                          the <interface-with-internet> argument)
  -m <method>             Method for Internet sharing.
                          Use: 'nat' for NAT (default)
                               'bridge' for bridging
                               'none' for no Internet sharing (equivalent to -n)
  --psk                   Use 64 hex digits pre-shared-key instead of passphrase
  --hidden                Make the Access Point hidden (do not broadcast the SSID)
  --mac-filter            Enable MAC address filtering
  --mac-filter-accept     Location of MAC address filter list (defaults to /etc/hostapd/hostapd.accept)
  --redirect-to-localhost If -n is set, redirect every web request to localhost (useful for public information networks)
  --hostapd-debug <level> With level between 1 and 2, passes arguments -d or -dd to hostapd for debugging.
  --isolate-clients       Disable communication between clients
  --ieee80211n            Enable IEEE 802.11n (HT)
  --ieee80211ac           Enable IEEE 802.11ac (VHT)
  --ht_capab <HT>         HT capabilities (default: [HT40+])
  --vht_capab <VHT>       VHT capabilities
  --country <code>        Set two-letter country code for regularity (example: US)
  --freq-band <GHz>       Set frequency band. Valid inputs: 2.4, 5 (default: 2.4)
  --driver                Choose your WiFi adapter driver (default: nl80211)
  --no-virt               Do not create virtual interface
  --no-haveged            Do not run 'haveged' automatically when needed
  --fix-unmanaged         If NetworkManager shows your interface as unmanaged after you
                          close create_ap, then use this option to switch your interface
                          back to managed
  --mac <MAC>             Set MAC address
  --dhcp-dns <IP1[,IP2]>  Set DNS returned by DHCP
  --daemon                Run create_ap in the background
  --pidfile <pidfile>     Save daemon PID to file
  --logfile <logfile>     Save daemon messages to file
  --stop <id>             Send stop command to an already running create_ap. For an <id>
                          you can put the PID of create_ap or the WiFi interface. You can
                          get them with --list-running
  --list-running          Show the create_ap processes that are already running
  --list-clients <id>     List the clients connected to create_ap instance associated with <id>.
                          For an <id> you can put the PID of create_ap or the WiFi interface.
                          If virtual WiFi interface was created, then use that one.
                          You can get them with --list-running
  --mkconfig <conf_file>  Store configs in conf_file
  --config <conf_file>    Load configs from conf_file

Non-Bridging Options:
  --no-dns                Disable dnsmasq DNS server
  --no-dnsmasq            Disable dnsmasq server completely
  -g <gateway>            IPv4 Gateway for the Access Point (default: 192.168.12.1)
  -d                      DNS server will take into account /etc/hosts
  -e <hosts_file>         DNS server will take into account additional hosts file

Useful informations:
  * If you're not using the --no-virt option, then you can create an AP with the same
    interface you are getting your Internet connection.
  * You can pass your SSID and password through pipe or through arguments (see examples).
  * On bridge method if the <interface-with-internet> is not a bridge interface, then
    a bridge interface is created automatically.

Examples:
  create_ap wlan0 eth0 MyAccessPoint MyPassPhrase
  echo -e 'MyAccessPoint\nMyPassPhrase' | create_ap wlan0 eth0
  create_ap wlan0 eth0 MyAccessPoint
  echo 'MyAccessPoint' | create_ap wlan0 eth0
  create_ap wlan0 wlan0 MyAccessPoint MyPassPhrase
  create_ap -n wlan0 MyAccessPoint MyPassPhrase
  create_ap -m bridge wlan0 eth0 MyAccessPoint MyPassPhrase
  create_ap -m bridge wlan0 br0 MyAccessPoint MyPassPhrase
  create_ap --driver rtl871xdrv wlan0 eth0 MyAccessPoint MyPassPhrase
  create_ap --daemon wlan0 eth0 MyAccessPoint MyPassPhrase
  create_ap --stop wlan0
安装好create_ap后,我们还需要创建一个create_ap.service,这样以后能够开机自动开启AP。
#创建service
vim /etc/systemd/system/create_ap.service

#下列是create_ap.service中的内容
[Unit]
Description=Create AP Service
Wants=network.target
After=network.target

[Service]
Type=simple
ExecStart=
ExecStop=
Restart=on-failure
RestartSec=5

[Install]
WantedBy=multi-user.target
执行命令和退出命令暂时先空着,我们待会来填。
获取网络信息
执行命令ifconfig,查看网卡信息,对于OrangePi 5Plus来说,会有两个有线网口和一个无线网口。有线网卡前缀是en,无线网口前缀是wl。由于一个有线网口已经插入网线连接上了路由器,这时候应该是能看到ip的,这个ip是由路由器的dhcp服务分配给OrangePi的,我们从这个地址可以知道上级路由器的网关。我们需要获取的信息有已经插上网线的端口名称及ip、无线端口名称。对于我的环境而言,有线端口名称为enP4p65s0,无线端口名称为wlP2p33s0,ip为192.168.3.192。
实现过程
修改网络配置
按照我的理解,旁路由中要实现的就是通过openwrt将有线网口和无线网口连接起来。我们这个旁路由选择的模式是旁路由不开启dhcp,全部由主路由去分配ip,这样上级路由器不需要做任何修改。如果旁路由出问题了,也不会影响上级路由正常使用。
我参考的文章中大都选择将旁路由wan口的dhcp打开,关闭上级路由的dhcp,这种方案我没有尝试过,同时这两种方案孰优孰劣我也说不清楚,不过从我个人角度是不愿意去动主路由的。
vim /etc/network/interfaces #运行指令,将下列内容添加到文件中


iface enP4p65s0 inet manual
iface wlP2p33s0 inet manual
auto br-lan
iface br-lan inet static
    address 192.168.2.1
    netmask 255.255.255.0
    dns-nameserver 192.168.2.100
    gateway 192.168.2.100
    bridge_ports wlP2p33s0
我根据自己的理解对上述配置做一个解释:
#将有线网口和无线网口都设置为手动配置,这些网口的配置我们后续都会在openwrt中设置
iface enP4p65s0 inet manual
iface wlP2p33s0 inet manual
#br-lan是一个虚拟的lan口,可以桥接多个真实网络端口,能够让openwrt认为只有一个lan口,不过我们只桥接了无线网口
auto br-lan
iface br-lan inet static
    #设置ip地址,不要和上级路由一个网段就行,我的上级路由网段是192.168.3.x,这里我选择了192.168.2.x作为旁路由lan口的网段
    address 192.168.2.1
    netmask 255.255.255.0
    #这两个ip也可以随便设置为除192.168.2.1以外的192.168.2.x,其实也就是后面我们要设置的openwrt的ip地址
    dns-nameserver 192.168.2.100
    gateway 192.168.2.100
    #桥接网口,我们只设置了无线网口
    bridge_ports wlP2p33s0
拉取openwrt镜像
我们使用的是SuLingGG/OpenWrt-Docker: Build OpenWrt Docker Images For Raspberry Pi 1~4 (Daily Update)
OrangePi 5 Plus是armv8架构,所以选择openwrt:armv8
#二选一就好,我这边官方的死活下不了
#官方镜像源
docker pull openwrt:armv8
#国内镜像源
docker pull registry.cn-shanghai.aliyuncs.com/suling/openwrt:armv8
我们先把镜像下载下来,先不着急运行。为什么在这时候先拉镜像,因为待会可能就连不上网了……
创建AP
前文我们已经创建了create_ap.service,现在可以继续去修改:
#创建service
vim /etc/systemd/system/create_ap.service

#下列是create_ap.service中的内容
[Unit]
Description=Create AP Service
Wants=network.target
After=network.target

[Service]
Type=simple
ExecStart=/usr/local/bin/create_ap --no-virt -m bridge wlP2p33s0 br-lan HelloWorld 12345678 -g 192.168.2.1
ExecStop=/usr/local/bin/create_ap --stop wlP2p33s0
Restart=on-failure
RestartSec=5

[Install]
WantedBy=multi-user.target
大概解释:
create_ap --no-virt -m bridge wlP2p33s0 br-lan HelloWorld 12345678 -g 192.168.2.1

--no-virt: 表示我们的网口不支持创建一个虚拟的AP,只能基于真实的无线网口去创建AP,大概是这个意思?
-m bridge wlP2p33s0 br-lan: 选择桥接模式,将无线网口和新创建的br-lan桥接起来,亲测只能用桥接模式,net模式不行,但是我也不清楚为啥
HelloWorld 12345678: 分别是WiFi的ssid和密码,可以根据自己的意愿随意修改
-g 192.168.2.1: create_ap的默认网关是192.168.12.1,但是我们的lan口配置了192.168.2.1,所以需要设置网关
然后运行,这个时候应该能搜到创建的AP了。
#重新导入service
systemctl daemon-reload
#设置开机自启动
systemctl enable create_ap.service
#开启create_ap服务
systemctl start create_ap.service
一些问题
我看的别的教程这一步就应该重启让网络配置生效了,后续就可以连接AP登录ssh继续操作。但是!先别急,我的环境会遇到一系列问题导致重启后AP创建失败,从而导致只能通过串口连接操作的情况,为了帮大家避坑,建议先做以下操作。
重启后NetworkManager和Hostapd冲突导致wlan网口被软锁
这个问题参考这两篇文章,分别将原因和解决办法说的很清楚。
https://askubuntu.com/questions/673950/i-have-to-issue-rfkill-unblock-wifi-at-every-boot
https://bbs.archlinux.org/viewtopic.php?id=269922
归根结底大概就是networkmanager的wlan状态和hostapd的wlan状态冲突了,networkmanager的wlan状态是关的,然后hostapd打开了,然后networkmanager就把wlan锁定了。其实解决方法也很简单,运行下面命令即可。
nmcli radio wifi ondnsmasq服务和systemd-resolved服务53端口冲突
这个问题好像没啥影响,不过我查了一下都是建议把systemd-resolved服务禁用了,可以运行以下命令
systemctl disable systemd-resolved.service解决完这些问题后,这时候可以reboot重启了,重启以后不能再通过上级路由的局域网登录OrangePi,只能通过连接OrangePi的AP进行ssh连接。
创建docker网络
重启以后重新连接上OrangePi,然后输入以下命令创建docker网络。我的理解是让容器内能够访问到容器外的网口。
#基于br-lan创建给openwrt使用的lan口,这里的网关要设置为与上文一致的192.168.2.1
docker network create -d bridge --subnet 192.168.2.0/24 --gateway=192.168.2.1 -o "com.docker.network.bridge.name=br-lan" maclan

#基于有线网口创建给openwrt使用的wan口,网关是192.168.3.1,同样与上文的上级路由保持一致
docker network create -d macvlan --subnet=192.168.3.0/24 --gateway=192.168.3.1 -o parent=enP4p65s0 macwan
可以通过以下命令进行查看。
root@orangepi5plus:~# docker network ls
NETWORK ID     NAME      DRIVER    SCOPE
7cb1daee73c1   bridge    bridge    local
df49d770d98f   host      host      local
c51a9565ec29   maclan    bridge    local
8034dd54e42c   macwan    macvlan   local
8f95180d5a76   none      null      local
运行openwrt
创建完docker网络后,通过以下命令运行openwrt容器:
docker run --name openwrt -d --network maclan --privileged registry.cn-shanghai.aliyuncs.com/suling/openwrt:armv8 /sbin/init大概解释一下:
docker run --name openwrt -d --network maclan --privileged registry.cn-shanghai.aliyuncs.com/suling/openwrt:armv8 /sbin/init

-name openwrt: 容器名字为openwrt
-d: 后台运行
--network maclan: 使用maclan网络,也就是我们刚刚创建的lan网络
--privileged: 特权模式,可以使用root权限
registry.cn-shanghai.aliyuncs.com/suling/openwrt:armv8: 使用的镜像
/sbin/init: 启动容器之后可以使用systemctl方法
这里我们暂时不设置为自动重启,防止待会调试出问题导致系统无限重启,先调稳定再设置。
然后还需要将创建的macvan网络连接到openwrt上:
docker network connect macwan openwrt修改openwrt网络配置
使用下列命令进入openwrt命令行:
docker exec -it openwrt bash下列命令都在bash中运行。
通过ifconfig确认有eth0和eth1两个网络,分别就是我们刚才接入的maclan和macwan网络。
编辑openwrt网络配置文件:
vim /etc/config/network

#以下是文件内容,将这个配置覆盖默认的lan即可
...
config interface 'lan'
        option type 'bridge'
        option ifname 'eth0'
        option proto 'static'
        option netmask '255.255.255.0'
        option ip6assign '60'
        option ipaddr '192.168.2.100'

config interface 'wan'
        option ifname 'eth1'
        option _orig_ifname 'eth1'
        option _orig_bridge 'false'
        option proto 'static'
        option ipaddr '192.168.3.192'
        option netmask '255.255.255.0'
        option gateway '192.168.3.1'
        option broadcast '192.168.1.255'
        option dns '192.168.3.1'

config interface 'wan6'
        option ifname '@wan'
        option proto 'dhcpv6'
大概解释一下:
config interface 'lan'
        option type 'bridge'
        option ifname 'eth0' #使用maclan
        option proto 'static'
        option netmask '255.255.255.0'
        option ip6assign '60'
        option ipaddr '192.168.2.100' #指定openwrt的地址,可以自行设置192.168.2.x,后续可以通过这个地址访问openwrt网页

#这个wan网口其实是我通过界面操作生成的,我理解应该在这里直接配置好应该也可以
config interface 'wan'
        option ifname 'eth1' #使用macwan
        option _orig_ifname 'eth1'
        option _orig_bridge 'false' #非桥接模式
        option proto 'static'
        option ipaddr '192.168.3.192' #这个我摸索着设置成上级路由分配给有线网口的地址
        option netmask '255.255.255.0'
        option gateway '192.168.3.1' #使用上级路由的网关
        option dns '192.168.3.1' #dns也要写成上级路由的

#这个wan6是从别的文章抄过来的,具体啥作用也不太清楚
config interface 'wan6'
        option ifname '@wan'
        option proto 'dhcpv6'
运行下列命令重启openwrt网络:
/etc/init.d/network restart然后可以运行exit退出openwrt的控制台,这时候如果连接上openwrt的话,应该是可以直接在浏览器通过http://192.168.2.100/访问到openwrt网页的,这个控制网页以后可以慢慢探索。
关于wan口的配置
正如上文所说,wan口的配置我是通过控制台网页去增加的,各位可以参考一下。如果按照上文那样在配置文件中修改好应该是不用再设置的。
第一次登入是不需要密码的,登入后会提示你设置密码。
选择网络-接口-创建新接口,新接口就叫wan
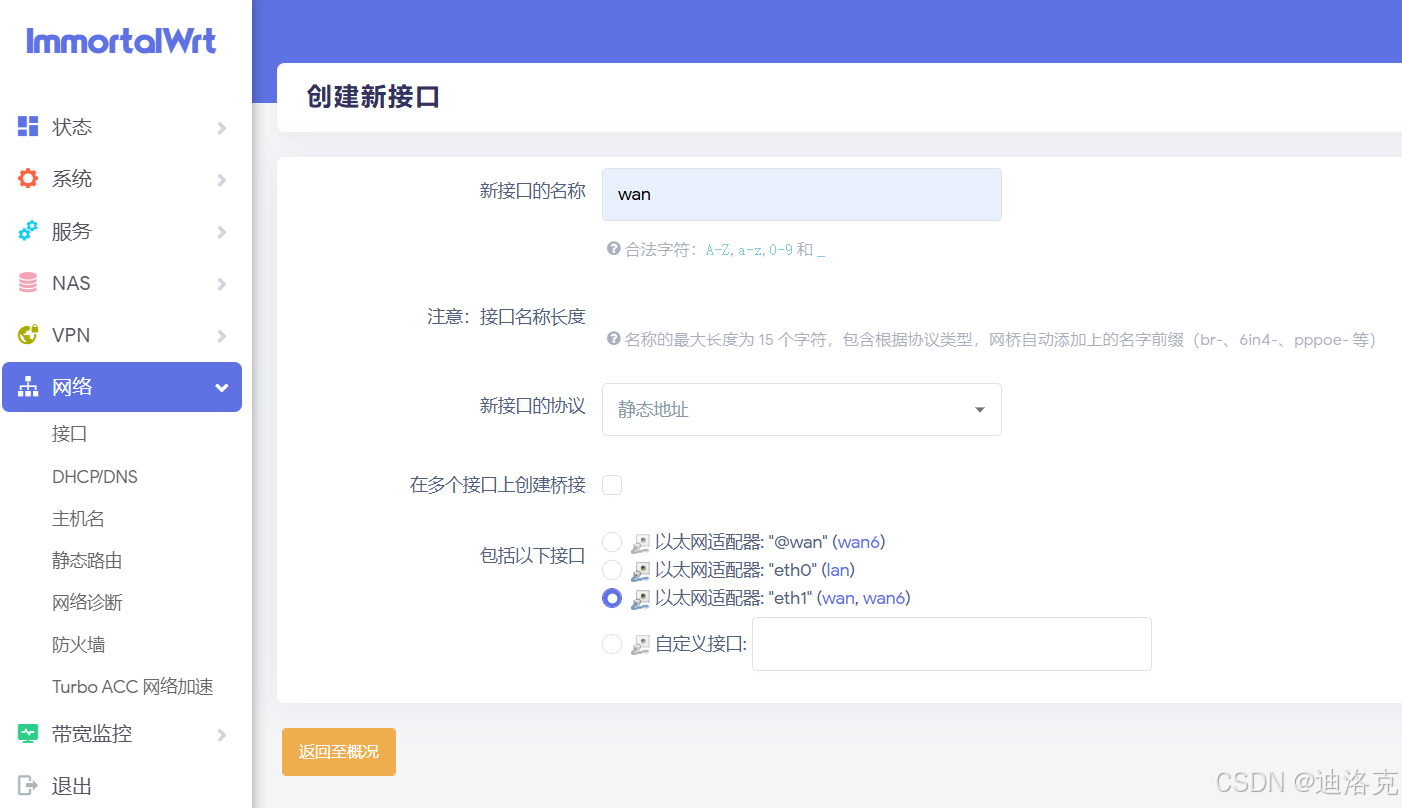
然后接口的配置正如配置文件一样(忽略状态,这是我后来补的图(*^_^*))
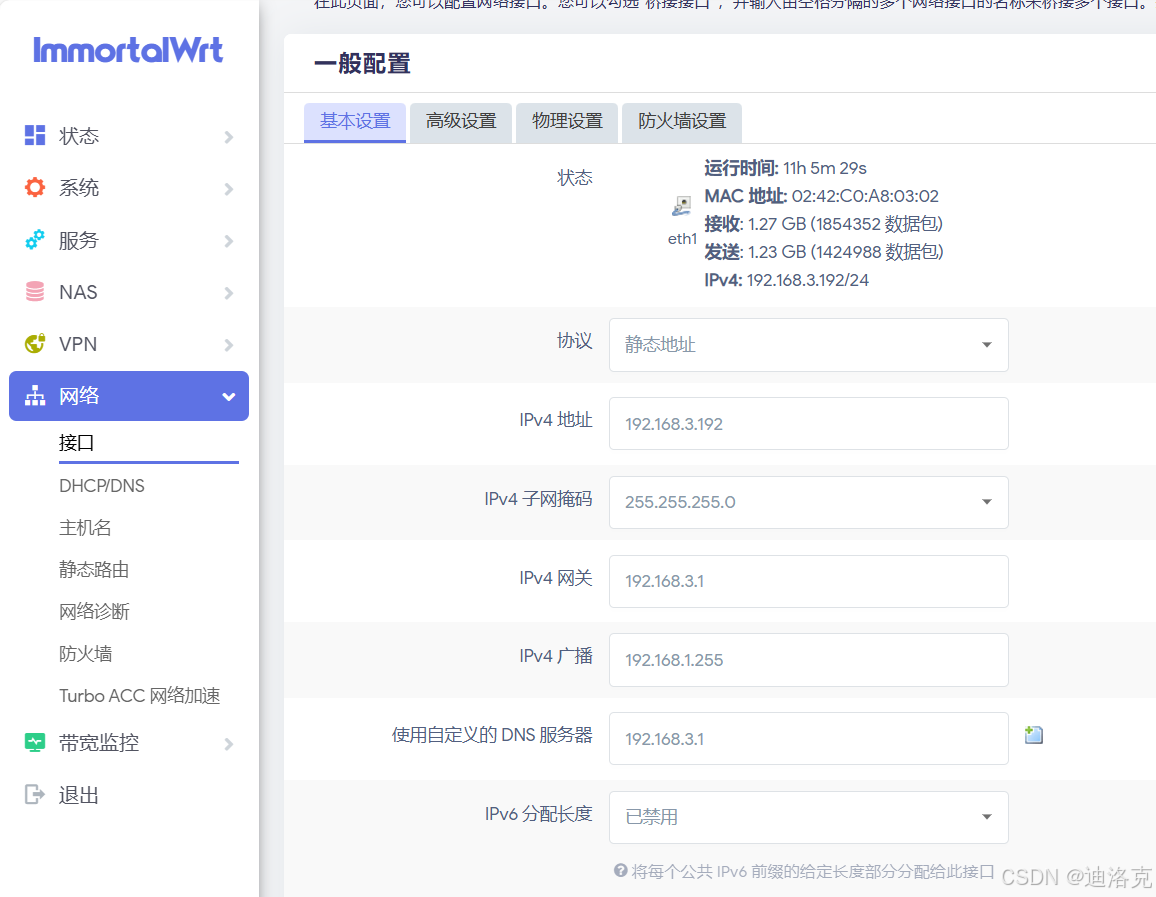
切换到物理设置界面,取消勾选桥接接口,大概就这样设置就好了。

连接AP网络
在设置完上述一切后,可以通过reboot重启OrangePi。
在重启之后需要再次登录ssh手动运行openwrt:
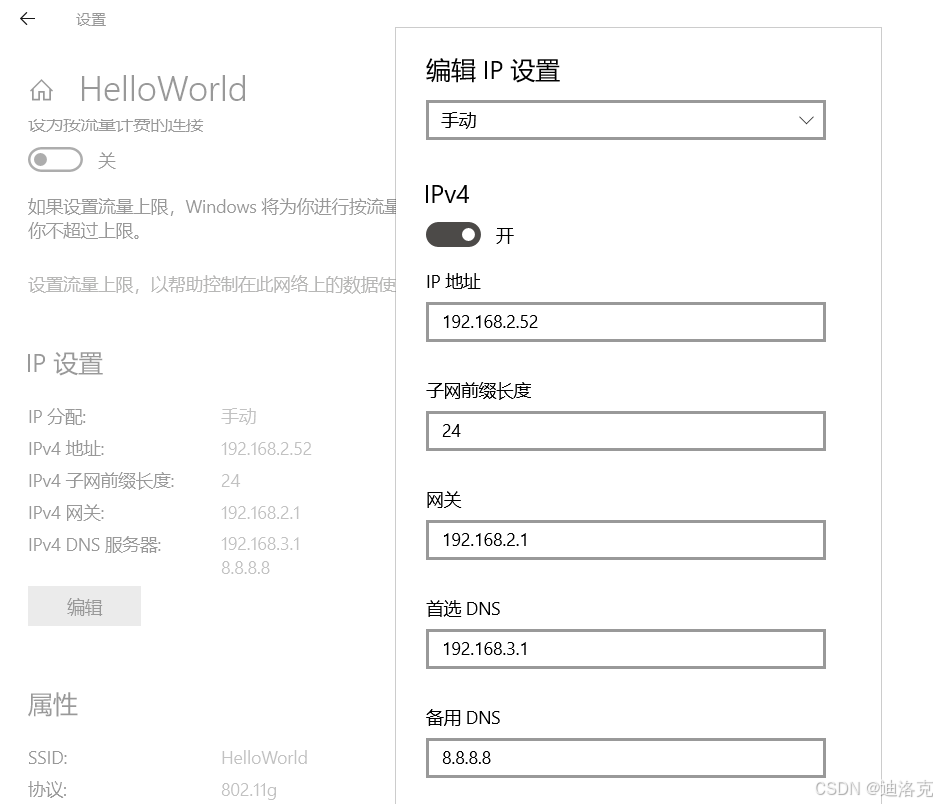
docker start openwrt这时候连接AP应该会有点问题,我们需要手动设置DNS。不出意外的话,手动设置好后应该就可以正常上网了。后续连接AP的设备都需要手动指定一下DNS为上级路由的网关才能正常上网,这一点需要注意。
这个可以用手机电脑都测试一下,我曾遇到过只有一台设备可以正常连接上网的问题。如果一切都没有问题,那么运行下列命令将openwrt设置为始终自动重启:
docker update --restart always openwrt写在最后
关于openwrt的玩法和能够做的事情也还在摸索中,目前也只是用来科学上网,只要连接上AP就可以使用,还是很方便的。另外对于连接上AP需要手动修改DNS才能使用的问题,如果有大佬能够指定一下旁路由主路由都打开dhcp该怎么解决就更好了。
参考链接
https://blog.oaker.io/archives/858db735.html
【原创】Docker内OpenWRT设置成主路由,为WiFi接入的客户提供源自有线网口的网络服务-斐讯无线路由器以及其它斐迅网络设备-恩山无线论坛


 1万+
1万+

 被折叠的 条评论
为什么被折叠?
被折叠的 条评论
为什么被折叠?
 到【灌水乐园】发言


