一、全局组件
html:
<div id="app">
   <mytemplace></mytemplace>
</div>
javascript:
<script>
      const { createApp } = Vue
      const app = createApp({})
      app
        .component('mytemplace', {
          template: '<div><button>返回</button></div>'
        })
        .mount('#app')
</script>
结果展示:

二、局部组件
- 局部组件只能在父组件中使用,其他组件无法使用该局部组件
- 父组件与子组件属性和方法不能共享
html:
<div id="app">
   <mytemplate></mytemplate>
</div>
javascript:
<script>
      const { createApp, ref } = Vue
      const app = createApp({})
      app
        .component('mytemplate', {
          template:
            '<div> <input type="text" v-model="inputText" /><childTemplate @click="buttonClk"></childTemplate><ul><li v-for="item in myDataList">{{ item }}</li></ul></div>',
          data() {
            return {
              myDataList: ['123', '123qwe', 'aaa'],
              inputText: ''
            }
          },
          methods: {
            buttonClk() {
              console.log('自定义组件-父组件点击事件')
            }
          },
          components: {
            childTemplate: {
              template: '<button @click="childButtonClk">点击</button>',
              methods: {
                childButtonClk() {
                  console.log('自定义组件-子组件点击事件')
                }
              }
            }
          }//局部组件
        })
        .mount('#app')
</script>
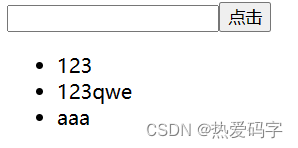
1.结果展示:

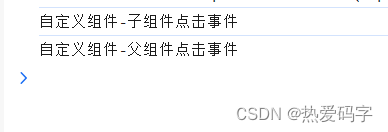
2.点击按钮输出结果:

三、父组件与子组件之间的传参
1、父传子
父传子通过属性向下传递:在父组件中自定义属性名(mypros),并传递相应的参数过去。子组件通过 props 接受传过来的参数
<body>
    <div id="app">
      <mytemplace mypros="传递固定参数"></mytemplace>
      <mytemplace :mypros="parentProps"></mytemplace>
      <mytemplace :mypros="parentProps" :mypros1="parentProps1"></mytemplace>
    </div>
    <script src="./lib/vue.global.js"></script>
    <script>
      const { createApp } = Vue
      const app = createApp({
        data() {
          return {
            parentProps: '传递动态参数属性前加冒号',
            parentProps1: true
          }
        }
      })
      app
        .component('mytemplace', {
          template: '<div><button>{{mypros+"-"+mypros1}}</button></div>',
          //属性校验,指定参数类型
          props: {
            mypros: String,
            mypros1: Boolean
          }
          // props: ['mypros', 'mypros1']
        })
        .mount('#app')
    </script>
</body>
2、子传父
子传父通过事件传递参数:子组件的点击事件通过 this.$emit(父组件中自定义的事件名称, 传递的参数) 传递参数到父组件;父组件通过自定义事件接收参数;父组件与子组件的事件名称要一致
<body>
    <div id="app">
      <mytemplace @myevent="parentClick($event)"></mytemplace>
    </div>
    <script src="./lib/vue.global.js"></script>
    <script>
      const { createApp } = Vue
      const app = createApp({
        methods: {
          parentClick(e) {
            console.log('父组件点击:' + e)
          }
        }
      })
      app
        .component('mytemplace', {
          data() {
            return { childProp: '子组件属性' }
          },
          template: '<div><button @click="childClick()">返回</button></div>',
          methods: {
            childClick() {
              this.$emit('myevent', this.childProp)
            }
          }
        })
        .mount('#app')
    </script>
</body>
四、slot 插槽
当需要在子组件标签中插入一个或多个父组件的标签时,需要在子组件中定义一个 slot 标签
1、具名插槽: 在子组件中通过 name 属性为插槽取名,在 template 标签中通过 v-slot:插槽名(或者:#插槽名) 选择对应的插槽
v-slot: 等效于 #
html :
<div id="app">
  <myslot>
    <template v-slot:slot1>插槽1</template>
    <template v-slot:slot2>插槽2</template>
    <template #slot3>插槽3</template>
  </myslot>
</div>
js :
<script>
const app = Vue.createApp({
  data () {
    return { chooseValue: 'component1' }
  },
  components: {
    myslot: {
      template:
        '<div><button>组件</button><input type="text"/><slot name="slot1"></slot><slot name="slot2"></slot><slot name="slot3"></slot></div>'
    }
  }
}).mount('#app')
</script>
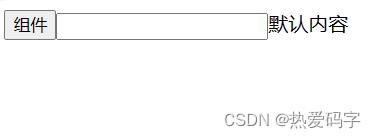
2、默认内容: 当父组件没有内容替换插槽时,在 < slot > 标签中的内容回被视为默认内容显示出来
html :
<defaultslot> </defaultslot>
js :
const app = Vue.createApp({
  data () {
    return { chooseValue: 'component1' }
  },
  components: {
    defaultslot: {
      template:
        '<div><button>组件</button><input type="text"/><slot>默认内容</slot></div>'
    }
  }
}).mount('#app')
结果展示 :

3、动态插槽名: 通过 #[动态插槽名] (或者 v-slot:[动态插槽名]) 动态选择插槽(动态插槽名必须为小写)
<myslot>
 <template #[slotname]>插槽1</template>
</myslot>

<select v-model="slotname">
<option value="slot1">插槽1</option>
<option value="slot2">插槽2</option>
<option value="slot2">插槽3</option>
</select>
const app = Vue.createApp({
  data () {
    return { slotname: 'slot1' }
  },
  components: {
    myslot: {
      template:
        '<div><button>组件</button><input type="text"/><slot name="slot1">插槽11</slot><slot name="slot2">插槽22</slot><slot name="slot3">插槽33</slot></div>'
    }
  }
}).mount('#app')
A、结果展示:初始下拉框默认为插槽1,所以第一个插槽被替换,其他2个插槽使用默认内容

--------------------------------------------------------------------------------------------------------------------------
B、结果展示:选择插槽2后,第二个插槽被替换,其他2个插槽使用默认内容

--------------------------------------------------------------------------------------------------------------------------
4、默认插槽传参
<div id="app">
	<scopeslot v-slot="slotvalue">
		{{ slotvalue.text }} {{ slotvalue.count }}
	</scopeslot>
</div>
将 :text 与 :count 的值传递给 slotvalue
<script>
const app = Vue.createApp({
	components: {
		scopeslot: {
		      data () {
		        return { greetingMessage: 'hello' }
		      },
		      template: '<div><slot :text="greetingMessage" :count="1"></slot></div>'
		}
	}
}).mount('#app')
</script>
结果展示:

5、具名插槽传参:
html :
<scopeslot1>
	 <!-- 默认插槽传参 -->
    <template v-slot="info">{{ info.message }} {{ info.age }}</template>
    <!-- <template #scope1="{message,age}">{{ message }} {{ age }}</template>
    等效于 :-->
    <template v-slot:scope1="{message,age}">{{ message }} {{ age }}</template>
</scopeslot1>
js:
注意插槽上的 name 是一个 Vue 特别保留的 attribute,不会作为 props 传递给插槽
<script>
scopeslot1: {
      template:
        '<div><slot message="无名插槽" age="18"></slot>--<slot name="scope1" message="具名插槽" age="20"></slot></div>'
}
</script>
五、ref 通信
子组件(标签)中定义 ref 属性后,可以通过 this.$refs.ref属性名 获得子组件(标签)对象,从而获取子组件(标签)的控制权
<body>
    <div id="app">
    	<!-- 通过ref获取输入框的内容 -->
      <input type="text" ref="myInputText" />
      <mytemplace ref="myRef"></mytemplace>
      <button @click="parentClick">父组件点击事件</button>
    </div>
    <script src="./lib/vue.global.js"></script>
    <script>
      const { createApp } = Vue
      const app = createApp({
        data() {
          return { parentPro: 'refTest' }
        },
        methods: {
          parentClick() {
            this.$refs.myRef.childClick(this.parentPro)
          }
        }
      })
      app
        .component('mytemplace', {
          data() {
            return { childProp: '子组件属性' }
          },
          template: '<div><button @click="childClick()">返回</button></div>',
          methods: {
            childClick(e) {
              console.log('子组件点击事件', e)
            }
          }
        })
        .mount('#app')
    </script>
</body>


 1262
1262


 被折叠的 条评论
为什么被折叠?


