


——————仅供记录——————
使用阿里巴巴的相关组件 Nacos 。
spring cloud 是基于 spring boot项目使用的。
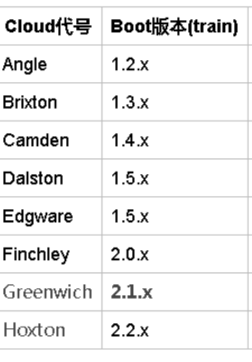
spring cloud 和 spring boot版本对应关系如下
spring cloud 相关基础服务组件如下。
Nacos是阿里巴巴的。

前提:spring boot 项目
Nacos 下载安装。https://nacos.io/zh-cn/docs/quick-start.html
解压后,双击 startup.cmd 启动。访问http://localhost:8848/nacos/index.html(启动日志中会打印出来地址)

因为还没有注册服务所以看不到任何服务

使用。假如 A服务 要调用 B服务 中的方法
一,服务注册-Nacos(相当于在房屋中介进行登记,Nacos就相当于房屋中介)
A服务和B服务都进行注册
1,在需要注册的服务中引入依赖
<!--服务注册-->
<dependency>
       <groupId>org.springframework.cloud</groupId>
       <artifactId>spring-cloud-starter-alibaba-nacos-discovery</artifactId>
</dependency>
2,在需要注册的服务的配置文件application.properties中,配置Nacos的地址
# nacos服务地址
spring.cloud.nacos.discovery.server-addr=127.0.0.1:8848
3,需要注册的启动类上添加@EnableDiscoveryClient 注解。
@SpringBootApplication
@EnableDiscoveryClient  //nacos注册
@ComponentScan(basePackages = {"com.june"})
public class EduApplication {

    public static void main(String[] args) {
        SpringApplication.run(EduApplication.class, args);
    }
}
以上即可注册完服务。这时候在访问的Nacos页面中看到注册成功的服务。服务名显示的是配置文件中的spring.application.name。服务名尽量不要使用下划线(_),可使用 中划线连接(-)
# 服务名
spring.application.name=A
# 服务名
spring.application.name=B
二,服务调用-Feign(上面那个只是让服务注册,而这个才是服务调用)
前提:相互调用的服务已在Nacos中注册
1,调用端(如A服务)引入依赖
<!--服务调用-->
<dependency>
    <groupId>org.springframework.cloud</groupId>
    <artifactId>spring-cloud-starter-openfeign</artifactId>
</dependency>
2, 调用端的启动类添加@EnableFeignClients注解
@SpringBootApplication
@EnableDiscoveryClient  //nacos注册
@EnableFeignClients //服务调用
@ComponentScan(basePackages = {"com.june"})
public class EduApplication {

    public static void main(String[] args) {
        SpringApplication.run(EduApplication.class, args);
    }
}
3,在调用端创建 interface, 添加注解,并在接口中定义方法,方法的定义使用被调用端(如B服务)中的方法。可以直接从B中把调用的方法复制过来。
@FeignClient(name = "B") //调用的服务名称
@Component
public interface VodClient {

    //@PathVariable注解一定要指定参数名称,否则出错
    @DeleteMapping("/removeById/{id}")
    public R removeAlyVideo(@PathVariable("id") String id);
}

// 备注.此时 B服务中已有一个已经实现了的 removeAlyVideo 方法。如下

//	    @DeleteMapping("/removeById/{id}")
//      public R removeAlyVideo(@PathVariable("id") String id){
//		       ...
//	    }
4,调用。此时可在其他类(如 Controller)中注入上面那个VodClient 接口,然后调用 removeAlyVideo 方法。
说明: 通过 VodClient 调用 removeAlyVideo 方法时,会根据 @FeignClient(name = "B")注解 ,去B服务中 调用已经实现了的 removeAlyVideo方法
三,熔断器-hystrix
被调用服务宕机或者规定长时间没有响应后,会移除该服务,不再访问该异常服务
1,调用端添加依赖
<!--hystrix依赖,主要是用  @HystrixCommand -->
<dependency>
     <groupId>org.springframework.cloud</groupId>
     <artifactId>spring-cloud-starter-netflix-hystrix</artifactId>
</dependency>
2, 调用端配置文件中进行配置
#开启熔断机制
feign.hystrix.enabled=true
# 设置hystrix超时时间,默认1000ms
#hystrix.command.default.execution.isolation.thread.timeoutInMilliseconds=6000
3,在调用端创建一个类,实现 在服务调用时候创建的VodClient接口。当出现熔断时就会调用这个实现类中的方法。正常情况下则不会调用
@Component
public class VodFileDegradeFeignClient implements VodClient {
   //出错之后会执行
    @Override
    public R removeAlyVideo(String id) {
        return R.error().message("删除视频出错了");
    }
}
4, 在服务调用时创建的接口的注解上再添加一个 fallback属性,值是接口实现类的class
@FeignClient(name = "B",fallback = VodFileDegradeFeignClient.class) //调用的服务名称
@Component
public interface VodClient {

    //@PathVariable注解一定要指定参数名称,否则出错
    @DeleteMapping("/removeById/{id}")
    public R removeAlyVideo(@PathVariable("id") String id);
}
四,网关-Gateway (相当于 调用端 和 服务端 中间的一面墙,可以起到:比如请求转发,负载均衡,权限控制等作用)

在项目中新创建一个 网关模块。
前提:①、网关需要在Nacos注册中心进行注册。②、需要通过网关跳转的服务也都需要在Nacos进行注册
1,添加依赖
<dependency>
    <groupId>org.springframework.cloud</groupId>
    <artifactId>spring-cloud-starter-gateway</artifactId>
</dependency>
2, 修改 application.properties 配置文件
# 服务端口
server.port=8222
# 服务名
spring.application.name=service-gateway
# nacos服务地址
spring.cloud.nacos.discovery.server-addr=127.0.0.1:8848

#使用服务发现路由。就是让网关可以找到其它服务
spring.cloud.gateway.discovery.locator.enabled=true

#设置路由id。可以自由写,但是建议写服务名称
spring.cloud.gateway.routes[0].id=service-acl
#设置路由的uri。  格式是【lb://在nacos中注册的服务名称】   Load Balance:负载均衡
spring.cloud.gateway.routes[0].uri=lb://service-acl
#设置路由断言(也就是路由匹配)。访问路径是 /*/acl/** 这种格式时,会去 service-acl 这个服务调用方法
spring.cloud.gateway.routes[0].predicates= Path=/*/acl/**

#配置service-edu服务
spring.cloud.gateway.routes[1].id=service-edu
spring.cloud.gateway.routes[1].uri=lb://service-edu
# 在 service-edu服务 中,所有Controller的访问路径都是 @RestController("/eduservice/xxxx") 这种格式。
# 当访问路径是 /eduservice/** 这种格式的时候,就会去 service-edu 这个服务中调用方法
spring.cloud.gateway.routes[1].predicates= Path=/eduservice/**

#配置service-msm服务
spring.cloud.gateway.routes[2].id=service-msm
spring.cloud.gateway.routes[2].uri=lb://service-msm
# 在 service-msm服务 中,所有Controller的访问路径都是 @RestController("/edumsm/xxxx") 这种格式
spring.cloud.gateway.routes[2].predicates= Path=/edumsm/**

# 如果还有更多服务可以按照上面格式添加
						.........
(3)统一处理跨域 。
这个类可以不写,但是为了解决跨域,每个Controller类上都要加@CrossOrigin跨域注解(如果写了这个类,那么在每个Controller类上不能再加@CrossOrigin跨域注解,否则会出错 )
import org.springframework.context.annotation.Bean;
import org.springframework.context.annotation.Configuration;
import org.springframework.web.cors.CorsConfiguration;
import org.springframework.web.cors.reactive.CorsWebFilter;
import org.springframework.web.cors.reactive.UrlBasedCorsConfigurationSource;
import org.springframework.web.util.pattern.PathPatternParser;

@Configuration
public class CorsConfig {
    @Bean
    public CorsWebFilter corsFilter() {
        CorsConfiguration config = new CorsConfiguration();
        config.addAllowedMethod("*"); //允许所有方法跨域
        config.addAllowedOrigin("*"); //允许所有跨域来源跨域
        config.addAllowedHeader("*"); //允许所有请求头跨域
        config.setAllowCredentials(true); //允许带cookie跨域

        UrlBasedCorsConfigurationSource source = new UrlBasedCorsConfigurationSource(new PathPatternParser());
        source.registerCorsConfiguration("/**", config); //任意路径都进行跨域配置

        return new CorsWebFilter(source);
    }
}
这样,前端访问的时候,就可以直接通过网关的 IP 和 端口 来访问了。网关会根据不同路径去不同的服务中调用方法。例如访问 http://localhost:8222/eduservice/index,网关会根据设置的路由匹配去 service-edu 服务调用方法。
~~~~~
补充:报错【Caused by: java.lang.ClassNotFoundException: reactor.core.publisher.Mono】
~~~~~
换成了下面这种后好了。
import org.springframework.context.annotation.Bean;
import org.springframework.context.annotation.Configuration;
import org.springframework.web.cors.CorsConfiguration;
import org.springframework.web.cors.UrlBasedCorsConfigurationSource;
import org.springframework.web.filter.CorsFilter;

@Configuration
public class CorsConfig {

    @Bean
    public CorsFilter corsFilter() {
        CorsConfiguration corsConfiguration = new CorsConfiguration();
        corsConfiguration.addAllowedOrigin("*");
        corsConfiguration.addAllowedHeader("*");
        corsConfiguration.addAllowedMethod("*");

        UrlBasedCorsConfigurationSource source = new UrlBasedCorsConfigurationSource();
        source.registerCorsConfiguration("/**", corsConfiguration);
        return new CorsFilter(source);
    }
}
再写几个 网关 的配置类。 未测试,先记录。
第一个,全局Filter,统一处理用户登录与外部不允许访问的服务
package com.june.gateway.filter;

import com.google.gson.JsonObject;
import org.springframework.cloud.gateway.filter.GatewayFilterChain;
import org.springframework.cloud.gateway.filter.GlobalFilter;
import org.springframework.core.Ordered;
import org.springframework.core.io.buffer.DataBuffer;
import org.springframework.http.server.reactive.ServerHttpRequest;
import org.springframework.http.server.reactive.ServerHttpResponse;
import org.springframework.stereotype.Component;
import org.springframework.util.AntPathMatcher;
import org.springframework.web.server.ServerWebExchange;
import reactor.core.publisher.Mono;

import java.nio.charset.StandardCharsets;
import java.util.List;

/**
 * 全局Filter,统一处理用户登录与外部不允许访问的服务
 */
@Component
public class AuthGlobalFilter implements GlobalFilter, Ordered {

    private AntPathMatcher antPathMatcher = new AntPathMatcher();

    @Override
    public Mono<Void> filter(ServerWebExchange exchange, GatewayFilterChain chain) {
        ServerHttpRequest request = exchange.getRequest();
        String path = request.getURI().getPath();
        //api接口,校验用户必须登录
        if(antPathMatcher.match("/api/**/auth/**", path)) {
            List<String> tokenList = request.getHeaders().get("token");
            if(null == tokenList) {
                ServerHttpResponse response = exchange.getResponse();
                return out(response);
            } else {
//                Boolean isCheck = JwtUtils.checkToken(tokenList.get(0));
//                if(!isCheck) {
                    ServerHttpResponse response = exchange.getResponse();
                    return out(response);
//                }
            }
        }
        //内部服务接口,不允许外部访问
        if(antPathMatcher.match("/**/inner/**", path)) {
            ServerHttpResponse response = exchange.getResponse();
            return out(response);
        }
        return chain.filter(exchange);
    }

    @Override
    public int getOrder() {
        return 0;
    }

    private Mono<Void> out(ServerHttpResponse response) {
        JsonObject message = new JsonObject();
        message.addProperty("success", false);
        message.addProperty("code", 28004);
        message.addProperty("data", "鉴权失败");
        byte[] bits = message.toString().getBytes(StandardCharsets.UTF_8);
        DataBuffer buffer = response.bufferFactory().wrap(bits);
        //response.setStatusCode(HttpStatus.UNAUTHORIZED);
        //指定编码,否则在浏览器中会中文乱码
        response.getHeaders().add("Content-Type", "application/json;charset=UTF-8");
        return response.writeWith(Mono.just(buffer));
    }
}
第二个 ,全局异常处理
自定义异常处理
package com.june.gateway.handler;

import org.springframework.boot.autoconfigure.web.ErrorProperties;
import org.springframework.boot.autoconfigure.web.ResourceProperties;
import org.springframework.boot.autoconfigure.web.reactive.error.DefaultErrorWebExceptionHandler;
import org.springframework.boot.web.reactive.error.ErrorAttributes;
import org.springframework.context.ApplicationContext;
import org.springframework.http.HttpStatus;
import org.springframework.web.reactive.function.server.*;

import java.util.HashMap;
import java.util.Map;

/**
 * 自定义异常处理
 * <p>异常时用JSON代替HTML异常信息<p>
 */
public class JsonExceptionHandler extends DefaultErrorWebExceptionHandler {

    public JsonExceptionHandler(ErrorAttributes errorAttributes, ResourceProperties resourceProperties,
                                ErrorProperties errorProperties, ApplicationContext applicationContext) {
        super(errorAttributes, resourceProperties, errorProperties, applicationContext);
    }

    /**
     * 获取异常属性
     */
    @Override
    protected Map<String, Object> getErrorAttributes(ServerRequest request, boolean includeStackTrace) {
        Map<String, Object> map = new HashMap<>();
        map.put("success", false);
        map.put("code", 20005);
        map.put("message", "网关失败");
        map.put("data", null);
        return map;
    }

    /**
     * 指定响应处理方法为JSON处理的方法
     * @param errorAttributes
     */
    @Override
    protected RouterFunction<ServerResponse> getRoutingFunction(ErrorAttributes errorAttributes) {
        return RouterFunctions.route(RequestPredicates.all(), this::renderErrorResponse);
    }

    /**
     * 根据code获取对应的HttpStatus
     * @param errorAttributes
     */
    @Override
    protected int getHttpStatus(Map<String, Object> errorAttributes) {
        return 200;
    }
}
覆盖默认的异常处理
package com.june.gateway.handler;

import org.springframework.beans.factory.ObjectProvider;
import org.springframework.boot.autoconfigure.web.ResourceProperties;
import org.springframework.boot.autoconfigure.web.ServerProperties;
import org.springframework.boot.context.properties.EnableConfigurationProperties;
import org.springframework.boot.web.reactive.error.ErrorAttributes;
import org.springframework.boot.web.reactive.error.ErrorWebExceptionHandler;
import org.springframework.context.ApplicationContext;
import org.springframework.context.annotation.Bean;
import org.springframework.context.annotation.Configuration;
import org.springframework.core.Ordered;
import org.springframework.core.annotation.Order;
import org.springframework.http.codec.ServerCodecConfigurer;
import org.springframework.web.reactive.result.view.ViewResolver;

import java.util.Collections;
import java.util.List;

/**
 * 覆盖默认的异常处理
 */
@Configuration
@EnableConfigurationProperties({ServerProperties.class, ResourceProperties.class})
public class ErrorHandlerConfig {

    private final ServerProperties serverProperties;
    private final ApplicationContext applicationContext;
    private final ResourceProperties resourceProperties;
    private final List<ViewResolver> viewResolvers;
    private final ServerCodecConfigurer serverCodecConfigurer;

    public ErrorHandlerConfig(ServerProperties serverProperties,
                                     ResourceProperties resourceProperties,
                                     ObjectProvider<List<ViewResolver>> viewResolversProvider,
                                        ServerCodecConfigurer serverCodecConfigurer,
                                     ApplicationContext applicationContext) {
        this.serverProperties = serverProperties;
        this.applicationContext = applicationContext;
        this.resourceProperties = resourceProperties;
        this.viewResolvers = viewResolversProvider.getIfAvailable(Collections::emptyList);
        this.serverCodecConfigurer = serverCodecConfigurer;
    }

    @Bean
    @Order(Ordered.HIGHEST_PRECEDENCE)
    public ErrorWebExceptionHandler errorWebExceptionHandler(ErrorAttributes errorAttributes) {
        JsonExceptionHandler exceptionHandler = new JsonExceptionHandler(
                errorAttributes,
                this.resourceProperties,
                this.serverProperties.getError(),
                this.applicationContext);
        exceptionHandler.setViewResolvers(this.viewResolvers);
        exceptionHandler.setMessageWriters(this.serverCodecConfigurer.getWriters());
        exceptionHandler.setMessageReaders(this.serverCodecConfigurer.getReaders());
        return exceptionHandler;
    }
}
五,配置中心-Nacos ( 项目要通过Nacos的配置中心读取 配置文件 )
通过读取外部的配置文件,这样的话如果配置文件需要修改的话,也方便修改
只需要创建bootstrap.properties文件即可(该文件的作用就是 说明读取配置中心哪个命名空间,哪个分组等等的配置文件)
前提:在 Nacos 注册中心进行注册
知识点:spring boot项目启动后,加载配置文件的顺序:
第一,首先 加载 bootstrap.properties ( bootstrap.yml )
第二,加载 application.properties ( application.yml ) 如果这个配置文件中配置了spring.profiles.active=dev,
则第三步会去加载application-dev.properties ( application-dev.yml )
1, 在Nacos 添加配置文件
启动Nacos,并进入管理控制台。点击配置列表,点击加号添加配置文件

1》Data ID 填写规则如下
// 服务名称-环境设置值.配置文件类型
${prefix} - ${spring.profiles.active} . ${file-extension}
- prefix 服务名称 ( spring.application.name=service-statistics )
- spring.profile.active 的值。 (spring.profile.active=dev )如果没有这个配置就不写
- file-extension 配置文件类型
举个例子:service-statistics.properties
2》Group : 默认

备注:发布这个文件的时候提示有语法错误,可以忽略
2, 调用的服务里面引入依赖
<dependency>
   <groupId>org.springframework.cloud</groupId>
    <artifactId>spring-cloud-starter-alibaba-nacos-config</artifactId>
</dependency>
3, 在项目中创建 bootstrap.properties 配置文件(这里有个坑,最后看spring.cloud.nacos.config.file-extension=yml这个配置)
# 配置中心
spring.cloud.nacos.config.server-addr=127.0.0.1:8848

# 这里没有添加 dev。如果有这个配置的话,第一步添加Data ID 的时候应该是 service-statistics-dev.properties
# spring.profiles.active=dev

# 配置Nacos配置中心的 Data ID。 到时候项目会读取配置中心 Data ID 是 service-statistics 的配置
spring.application.name=service-statistics

## 经过测试,Nacos 如果配置中心写 yml 类型的配置文件时,要加上这个配置,不然读取不到配置文件
# spring.cloud.nacos.config.file-extension=yml
4 , 启动项目,这个项目就会读取 Nacos 中写的配置文件
如果在类中通过 $Value("${user.nickName}") 注解 获取配置文件中的值,则在此类上加@RefreshScope注解,可以实现动态获取并刷新配置。也就是配置文件一修改,则项目中引用的 nickName 也会自动修改,不用重新部署项目
上面这些就是 配置中心 最基本的使用。下面补充一些,实际项目中的用法
1> 命名空间 (public 是默认命名空间)这里以开发环境为命名空间的名称。推荐使用另外一种,以微服务名为命名空间的名称,通过group来区分开发,测试,生产三种环境(例子在最后面)。
一般项目配置文件会有三种环境,dev,test,prod,分别是开发,测试,生产环境。Nacos也可以 配置 三种命名空间方便切换。

1,依次添加dev,test 和 prod 三个命名空间

添加成功的三个命令空间

此时看配置列表中,已经显示了自定义添加的三个命令空间。(public 是默认命名空间)

2,通过 克隆(或者在需要的命名空间中 新建 ),可以在 dev 命名空间中有一个配置文件


3,此时需要在项目的bootstrap.properties配置文件中添加spring.cloud.nacos.config.namespace=fffcbc78-504b-4cae-b9a2-3f50e0c2c4ef 。后面的 值 是需要切换到命名空间的值,如上图鼠标指示所示
#配置中心地址
spring.cloud.nacos.config.server-addr=127.0.0.1:8848

spring.profiles.active=dev

# 该配置影响统一配置中心中的dataId
spring.application.name=service-statistics

# 配置命名空间
spring.cloud.nacos.config.namespace=fffcbc78-504b-4cae-b9a2-3f50e0c2c4ef
这样,项目启动就会去 配置的命名空间里 找相应的配置文件
2> 加载多个配置文件(推荐这种用法。把不同的配置分开写到自己的配置文件中,如数据库配置单独写一个配置文件(datasource.properties),mybatis的配置文件写到mybatis.properties中,其他的写到other.properties中等等)
1,首先再创建一个配置文件,名字可以自由命名。比如 port.properties

2,修改项目配置文件,加载Nacos多个配置文件
添加部分。如果有多个配置文件继续按照规律添加
# 配置添加的那个配置文件的名称
spring.cloud.nacos.config.ext-config[0].data-id=port.properties
#######如果分组了,添加这个配置#######
spring.cloud.nacos.config.ext-config[0].group=dev
# 开启动态刷新配置,否则配置文件修改,工程无法感知
spring.cloud.nacos.config.ext-config[0].refresh=true
完整部分
#配置中心地址
spring.cloud.nacos.config.server-addr=127.0.0.1:8848

spring.profiles.active=dev

# 该配置影响统一配置中心中的dataId
spring.application.name=service-statistics

spring.cloud.nacos.config.namespace=fffcbc78-504b-4cae-b9a2-3f50e0c2c4ef

# 配置添加的那个配置文件的名称
spring.cloud.nacos.config.ext-config[0].data-id=port.propertie
#######如果分组了,添加这个配置#######
spring.cloud.nacos.config.ext-config[0].group=dev
# 开启动态刷新配置,否则配置文件修改,工程无法感知
spring.cloud.nacos.config.ext-config[0].refresh=true


## 如果还有其他配置文件,则按规律继续添加
#spring.cloud.nacos.config.ext-config[1].data-id=port2.properties
spring.cloud.nacos.config.ext-config[1].group=dev
#spring.cloud.nacos.config.ext-config[1].refresh=true
以 微服务名 为命名空间的名称
举个栗子
1》其中一个微服务userService为例。首先创建userService命名空间,在userService命名空间下,创建三种环境dev,test,prod的配置文件

2》配置文件
# 配置中心地址
spring.cloud.nacos.config.server-addr=127.0.0.1:8848

# 服务名
spring.application.name=mall-user

# 命名空间
spring.cloud.nacos.config.namespace=fffcbc78-504b-4cae-b9a2-3f50e0c2c4ef

######## 重点在这儿,配置使用哪个环境的配置文件 ########
spring.cloud.nacos.config.group=dev


 1万+
1万+


 被折叠的 条评论
为什么被折叠?
被折叠的 条评论
为什么被折叠?
 到【灌水乐园】发言


