


文章目录
Java学习阶段二
1. 线程
1.1 创建线程
创建一个线程
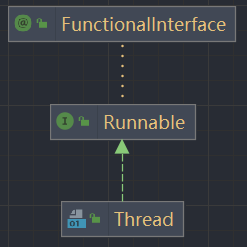
- 法一:继承Thread类
- 法二:实现Runnable 接口
1.1.1 法一 (继承Thread类):
/*
* 在执行下面代码的过程中,可以在终端输入jconsole 连接当前进程,选择线程进行查看
* 可以发现当main线程结束了而Thread-01线程(即Cat创建的线程)还在继续,说明 --> 不是main线程结束了整个程序就结束了 √
*/
package Thread_;
import static java.lang.Thread.sleep;
public class Thread01 {
public static void main(String[] args) throws InterruptedException {
//因为Cat类实现了Runnable接口,所以创建cat对象,即创建了一个线程
Cat cat = new Cat();
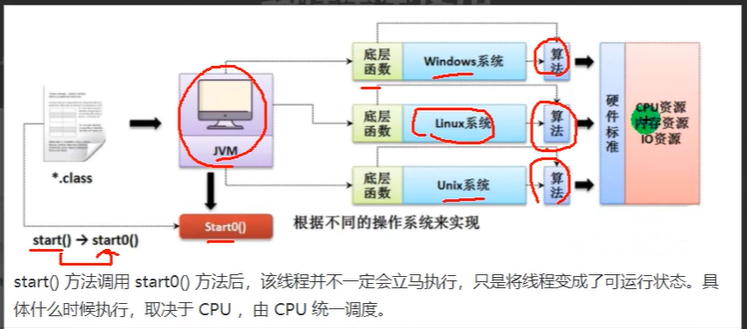
//这里为什么调用start 就会让下面的run方法运行
//为什么不直接调用run --> cat.run();
cat.start();
/*
* 因为run() 就是个普通的方法,如果直接cat.run(),则会直接调用Cat类的run(),而且输出的当前线程名仍然是main,而没有新开一个线程,该程序就变成了一个串行执行的程序
* 可以理解为,run只是调用者的一个方法,而与创建线程,是否放入线程组里无关
* 真正实现多线程的是 start() 中的 start0() 方法,而该方法是native方法,由JVM调用,是c/c++实现
*/
//主线程是main不会受到cat线程的影响,即使它阻塞,主线程也能继续
//主线程和子线程会交替执行
for (int i = 0; i < 30; i++) {
System.out.println("This is main Thread,"+"Thread name="+Thread.currentThread().getName());
sleep(1000);
}
}
}
class Cat extends Thread{
int count = 0;
//这里run方法实际上是实现了Runnable接口
@Override
public void run() {
while (count<60){
count++;
System.out.println("This is No."+count+" cat Thread"+" ,Thread name="+Thread.currentThread().getName());
try {
sleep(1000);
} catch (InterruptedException e) {
e.printStackTrace();
}
}
}
}

1.1.2 法二 (Runnable 接口):
//由于Java是单继承的,在某些情况下该类已经继承了某个父类,无法继承Thread 则法一:继承Thread就不可能了,所以可以实现Runnable接口来实现创建线程
package Thread_;

import static java.lang.Thread.sleep;

public class Thread02 {
    public static void main(String[] args) {
        Dog dog = new Dog();
//        dog.start();   //实现Runnable,而Runnable并没有start方法,故无法实现多线程

        /**
         * 这里使用了设计模式:代理模式
         */
        Thread thread = new Thread(dog);
        thread.start();

        for (int i = 0; i < 20; i++) {
            System.out.println("This is main thread,No."+i+" thread,name="+Thread.currentThread().getName());
            try {
                sleep(1000);
            } catch (InterruptedException e) {
                e.printStackTrace();
            }
        }
    }
}
class Dog implements Runnable{
    int count = 0;
    @Override
    public void run() {
        while (count<20){
            System.out.println("This is dog thread,thread"+ ++count + ",name="+Thread.currentThread().getName());
            try {
                sleep(1000);
            } catch (InterruptedException e) {
                e.printStackTrace();
            }
        }
    }
}
法二中需要 静态代理模式 进行实现
代理模式的模拟,进而更好理解代理模式
package Thread_;

/**
 * 模拟 代理模式的实现
 * 让一个类A代理实现类B没有的功能x,但在实际实现那个功能x时,该功能x内的实现体y,已经被类B实现了
 * 根据动态绑定机制,实际上还是调用类B的实现体y
 */
public class Simulation {
    public static void main(String[] args) {
        SmallThread smallThread = new SmallThread();
        ThreadProxy threadProxy = new ThreadProxy(smallThread);
        threadProxy.start();//output 这内部实现了多线程的相关功能,这里只是模拟,并未实现其中多线程的功能
    }
}

/**
 * 这里 ThreadProxy 实际上模拟了 Thread,Thread是实现了Runnable接口
 * 通过 这种方式简单模拟了---代理模式
 * 通过ThreadProxy代理,去实现SmallThread这个没有start方法的类(该类实现了Runnable,但Runnable没有start()方法,也就没有start0()这个真正实现多线程的方法)
 */
class ThreadProxy implements Thread{
    private Runnable target = null;

    public ThreadProxy(Runnable target) {
        this.target = target;
    }

    @Override
    public void run() {
        if (target != null) {
            target.run();
        }
    }
}


class SmallThread implements Runnable{

    public void start0(){
        System.out.println("这内部实现了多线程的相关功能,这里只是模拟,并未实现其中多线程的功能");
    }

    public void start() {
        start0();
    }

    @Override
    public void run() {
        start();
    }
}
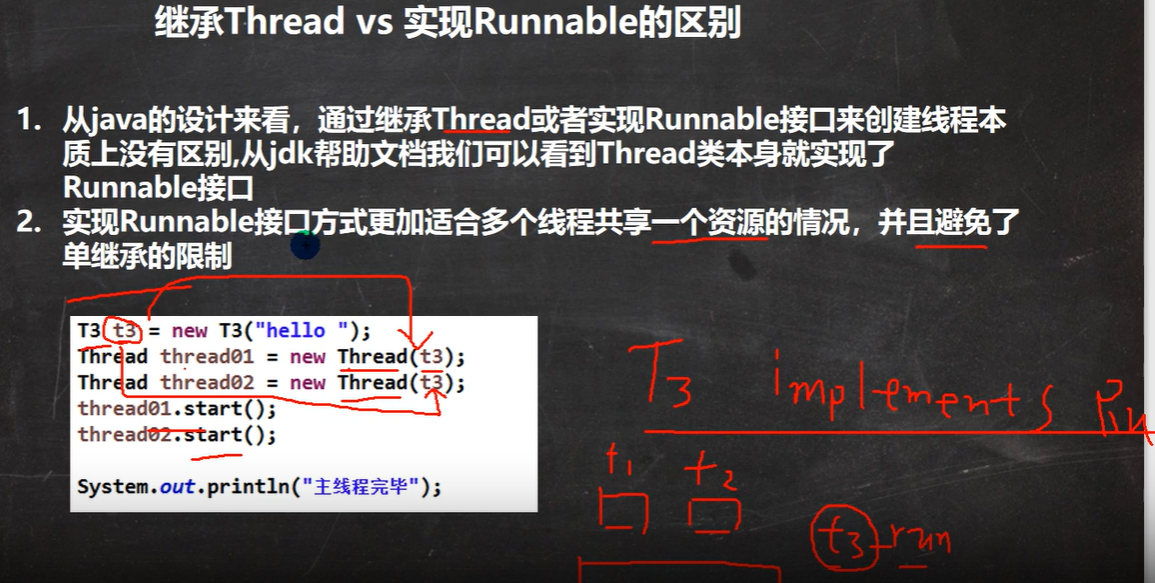
1.1.3 继承Thread 与 实现Runnable接口 对比
售票问题(为解决互斥资源问题)
package Thread_;

import static java.lang.Thread.sleep;

public class SellTicket {
    public static void main(String[] args) {
        Sell st = new Sell();
        Thread thread = new Thread(st);
        Thread thread2 = new Thread(st);
        Thread thread3 = new Thread(st);

        //这里出现互斥资源的问题
        thread.start();
        thread2.start();
        thread3.start();
    }
}
class Sell implements Runnable{
    private static int ticketNum = 20;
    @Override
    public void run() {
        while (ticketNum>0){
            System.out.println(Thread.currentThread().getName() + " 售出一张票,余票:"+ --ticketNum);
            try {
                sleep(100);
            } catch (InterruptedException e) {
                e.printStackTrace();
            }
        }

    }
}
1.1.4 线程终止
- 自动终止:线程执行完毕,自动终止
- 通知终止:线程接到通知,然后终止
/*通知终止*/

package Thread_;

import static java.lang.Thread.sleep;

public class MessageThread {
    public static void main(String[] args) {
        Message message = new Message();
        message.start();

        try {
            sleep(1000*10);     //main线程休眠10秒
            Message.setLoop();      //main 线程发送通知 Thread-0线程即可停止
        } catch (InterruptedException e) {
            e.printStackTrace();
        }
    }
}

class Message extends Thread {
    private static boolean loop = true;
    private int count = 0;

    @Override
    public void run() {
        //这里循环是无限的,除非接到 通知 --即另一个线程对其设置loop为false,才能终止该线程
        while (loop) {
            System.out.println(++count + Thread.currentThread().getName() + " ...");
            try {
                sleep(500);
            } catch (InterruptedException e) {
                e.printStackTrace();
            }
        }
    }

    public static void setLoop() {
        loop = false;
    }
}
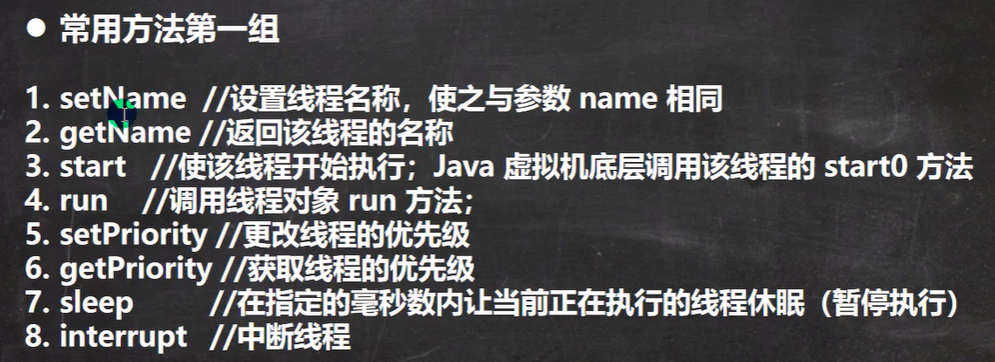
1.1.5 线程常用方法
//优先级: 1  -- MIN PRIORITY
		 5  -- NORMAL PRIORITY
         10 -- MAX PORORITY
package Thread_;

import java.time.LocalDateTime;
import java.time.format.DateTimeFormatter;

public class Methods {
    public static void main(String[] args) {
        Thread workerThread = new Thread(new Worker());
        workerThread.setName("worker");
        workerThread.start();

        try {
            Thread.sleep(5*1000);   //main休眠 5s
            workerThread.setPriority(Thread.MIN_PRIORITY);  //将该线程优先级设为最低
            workerThread.interrupt();     //main 在休眠 5s 后就要中断 workerThread的休眠,而worker的休眠本应该有100s
            System.out.println("worker priority is "+ workerThread.getPriority());
        } catch (InterruptedException e) {
            e.printStackTrace();
        }

    }
}

class Worker implements Runnable {
    private LocalDateTime startTime;
    private LocalDateTime endTime;
    private final DateTimeFormatter dateFormat = DateTimeFormatter.ofPattern("yyyy-MM-dd HH:mm:ss");

    @Override
    public void run() {
        try {
            System.out.println(Thread.currentThread().getName() + " Sleeping...");
            startTime = LocalDateTime.now();
            Thread.sleep(100*1000); //休眠100s
        } catch (InterruptedException e) {
            System.out.println("Get up and begin to work !");
            endTime = LocalDateTime.now();
            System.out.println("slept from "+dateFormat.format(startTime) + " to "+dateFormat.format(endTime));
        }
    }
}

/*执行结果

worker Sleeping...				//这句执行5s后才有后面的
Get up and begin to work !
worker priority is 1
slept from 2022-04-12 14:56:22 to 2022-04-12 14:56:27	//事实也证明worker只休眠了5s

进程已结束,退出代码0
*/
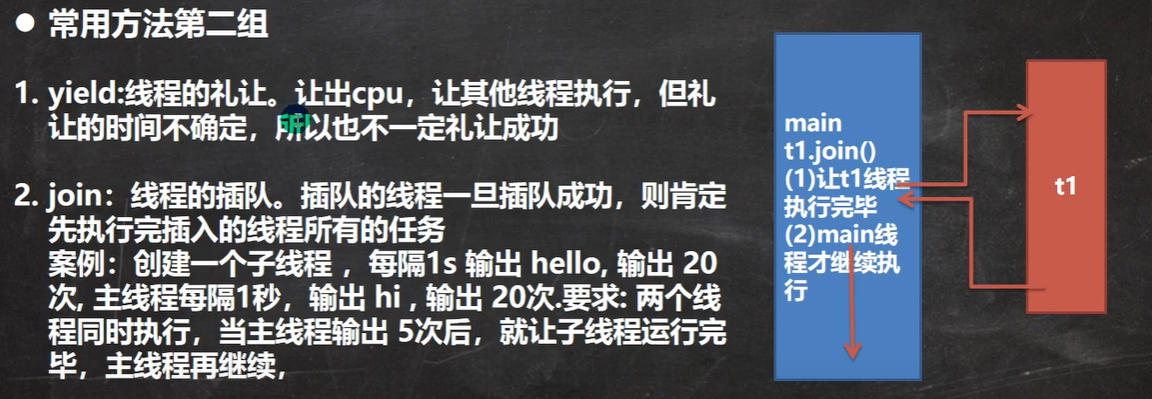
/* join 和 yield */

package Thread_;

import static java.lang.Thread.sleep;

public class JoinThread {
    public static void main(String[] args) {
        B b = new B();
        Thread thread = new Thread(b);
        Thread thread1 = new Thread(new A(thread));
        thread1.start();
        thread.start();
    }
}
class A implements Runnable{

    private final Thread temp;
    private int count = 0;

    public A(Thread temp) {
        this.temp = temp;
    }

    @Override
    public void run() {
        while (count<10){
            try {
                System.out.println("This is "+Thread.currentThread().getName()+" start");
                count++;

                //join : 表示暂时让出cpu,让cpu处理另一个线程,等处理完那个线程,再回到这个位置继续处理后面的代码
                temp.join();

                //yield,礼让  不一定能成功
//                Thread.yield();

                System.out.println("This is "+Thread.currentThread().getName()+" end");
            } catch (InterruptedException e) {
                e.printStackTrace();
            }
        }


    }
}
class B implements Runnable{
    private int count = 0;

    @Override
    public void run() {
        while (count<5)
        {
            System.out.println("This is "+Thread.currentThread().getName() + "------------ start");
            count++;
            System.out.println("This is "+Thread.currentThread().getName() + "------------ end");
        }
    }
}

/* output

This is Thread-0------------ start
This is Thread-1 start				//这里调用了join
This is Thread-0------------ end
This is Thread-0------------ start
This is Thread-0------------ end
This is Thread-0------------ start
This is Thread-0------------ end
This is Thread-0------------ start
This is Thread-0------------ end
This is Thread-0------------ start
This is Thread-0------------ end
This is Thread-1 end				//接着上面的join后继续
This is Thread-1 start
This is Thread-1 end
This is Thread-1 start
This is Thread-1 end
This is Thread-1 start
This is Thread-1 end
This is Thread-1 start
This is Thread-1 end
This is Thread-1 start
This is Thread-1 end
This is Thread-1 start
This is Thread-1 end
This is Thread-1 start
This is Thread-1 end
This is Thread-1 start
This is Thread-1 end
This is Thread-1 start
This is Thread-1 end

进程已结束,退出代码0

*/
1.1.6 用户线程 和 守护线程

//可以设置守护线程来监控想要管理的线程 等等功能
package Thread_;

public class DaemonThread01 {

    /**
     * 这里守护线程myDaemonThread 是“监控”main线程,并且在无限循环中,但如果main线程结束了,守护线程也随即结束
     * @param args
     */
    public static void main(String[] args) {
        MyDaemonThread myDaemonThread = new MyDaemonThread();

        //设置该线程为守护线程
        myDaemonThread.setDaemon(true);
        myDaemonThread.start();

        int count = 0;
        while (count<10){
            System.out.println("This is main thread -->"+Thread.currentThread().getName());
            count++;
        }

    }
}
class MyDaemonThread extends Thread {
    @Override
    public void run() {
        while (true){
            System.out.println("This is main DaemonThread->"+Thread.currentThread().getName());
        }
    }
}
1.1.7 线程的生命周期
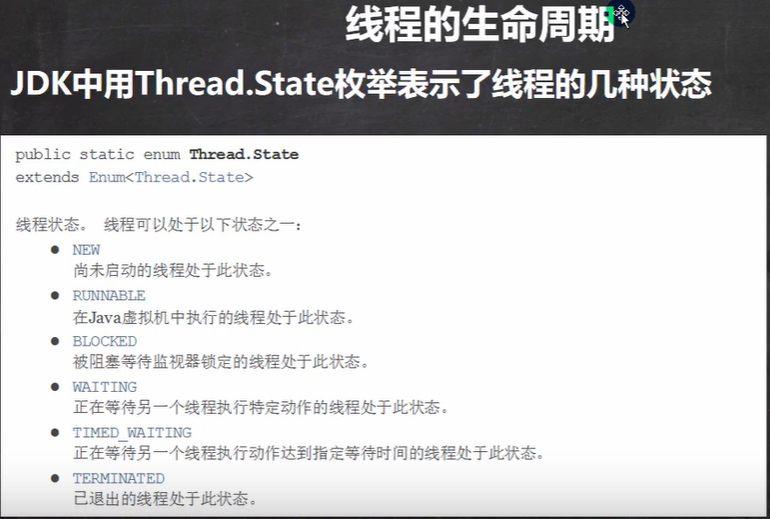
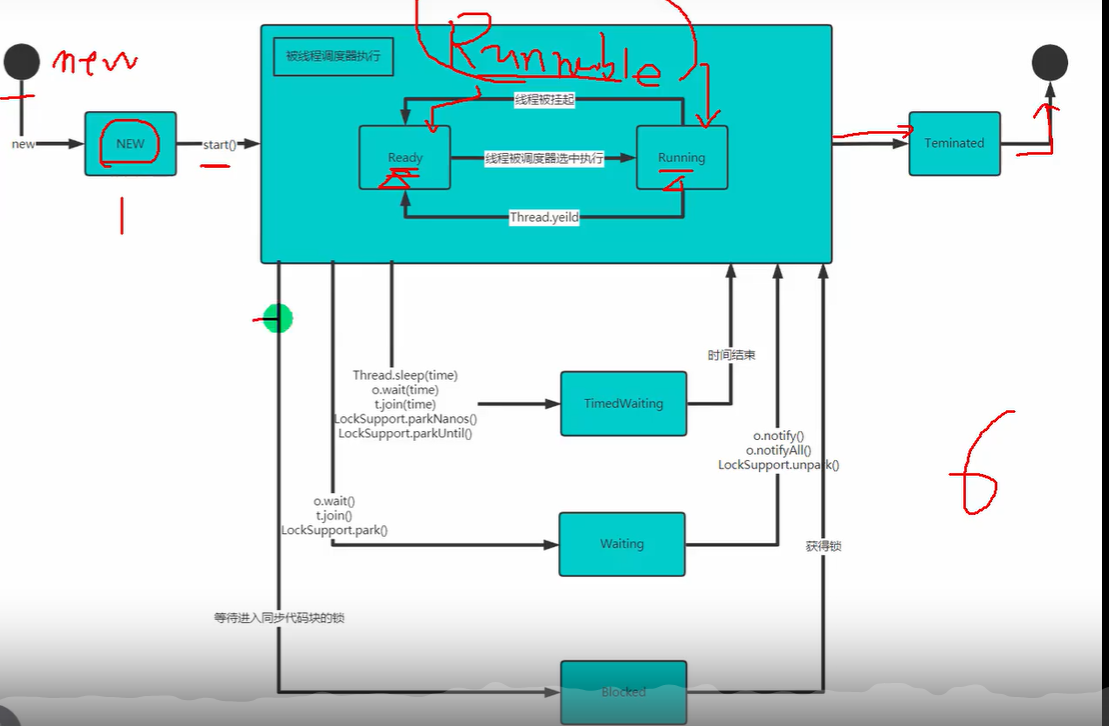
通过 getState() 可以查看部分状态
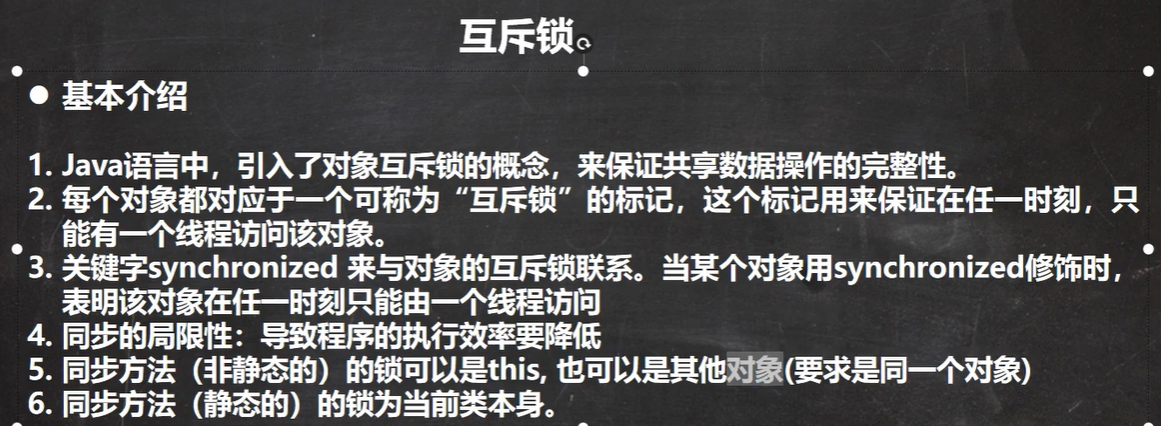
1.2 线程同步
Synchronized
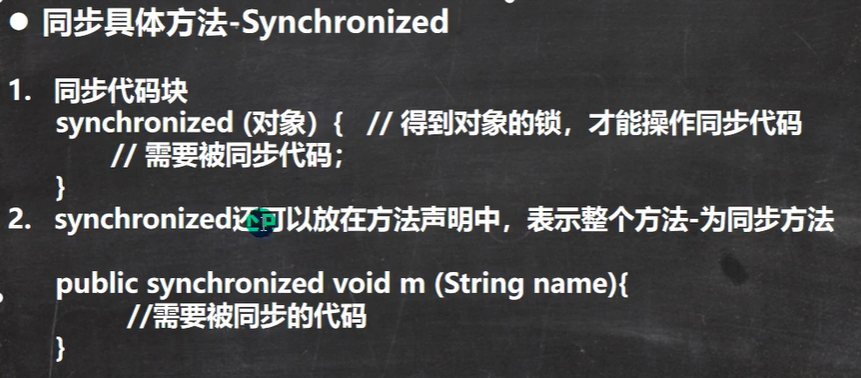
用同步解决卖票问题**(包括同步方法 和 同步代码块)(静态同步方法 和 静态方法中有同步代码块**
package Thread_;

import static java.lang.Thread.sleep;

public class SellTicket {
    public static void main(String[] args) {
        Sell st = new Sell();
        Thread thread = new Thread(st);
        Thread thread2 = new Thread(st);
        Thread thread3 = new Thread(st);

        //这里使用同步解决问题
        //虽然创建了3个线程,但是操作的都是同一个对象,这与下面同步方法 或是 同步代码块有关
        //同步方法 或是 同步代码块 加的锁,都必须是针对同一个对象
        //如这里:三个线程 针对的 都是一个对象 st
        thread.start();
        thread2.start();
        thread3.start();
    }
}
class Sell implements Runnable{
    private static int ticketNum = 200;

    /**
     * 访问修饰符 synchronized 返回类型 方法名(){}
     * 增加synchronized 使得 sellFunc() 变成同步方法
     * 互斥锁 也是加到对象上的
     * 简而言之,这个对象是要被共享的对象
     */
    public synchronized void sellFunc(){
        //如果没有第一个if判断的话,可能会超卖 卖成负数
        if(ticketNum <= 0){
            return;
        }
        System.out.println(Thread.currentThread().getName() + " 售出一张票,余票:"+ --ticketNum);
        try {
            sleep(100);
        } catch (InterruptedException e) {
            e.printStackTrace();
        }
    }

    //-----------------------------------------------------------------------------
    public void sellFunc2(){
        /**
         * synchronized(对象)
         * 同步代码块的锁加到 this对象上
         * 这个this 是要被共享的
         */
        synchronized (this) {
            //如果没有第一个if判断的话,可能会超卖 卖成负数
            if (ticketNum <= 0) {
                return;
            }
            System.out.println(Thread.currentThread().getName() + " 售出一张票,余票:" + --ticketNum);
            try {
                sleep(100);
            } catch (InterruptedException e) {
                e.printStackTrace();
            }
        }
    }

    //-----------------------------------------------------------------------------

    /**
     * 1.静态方法要是有synchronized 代码块,
     * 2.或者是 静态同步方法
     * 所针对的是这个类而不是对象 ( 理解基础:静态方法是在类创建时就会进行创建的 )
     */
    public static void Code(){
        synchronized (Sell.class){
            System.out.println("This is a static func has synchronized codeblocks");
        }
    }
    public synchronized static void Code2(){
        System.out.println("This is a synchronized static func");
    }


    @Override
    public void run() {
        while (ticketNum>0){
//            sellFunc();
            sellFunc2();
        }
    }
}

尽量使用同步代码块
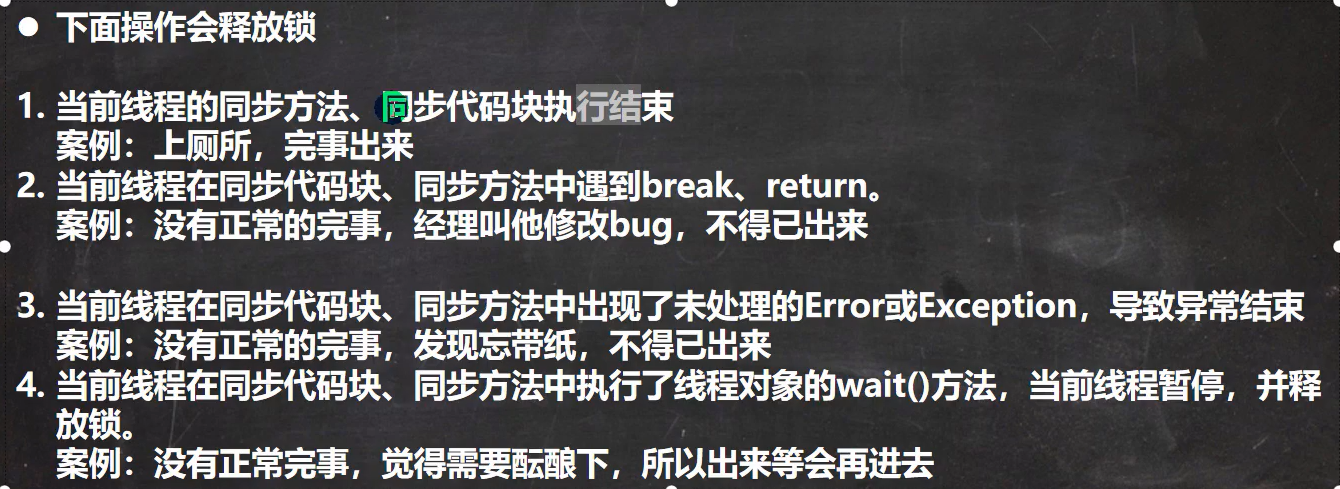
会释放锁的操作:
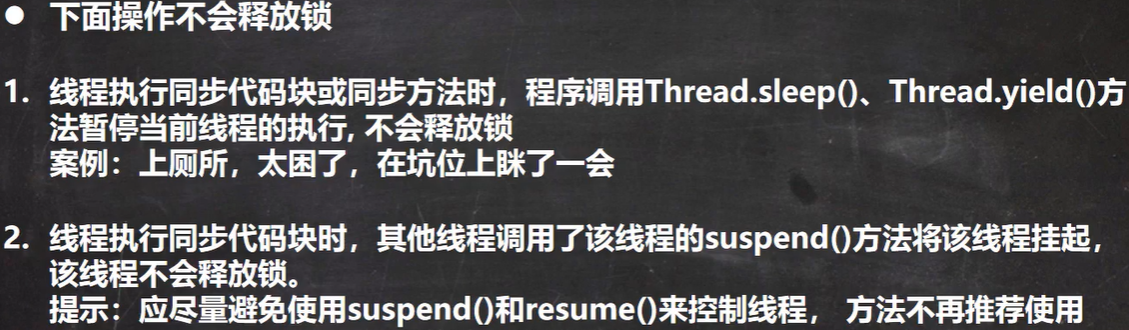
不会释放锁的操作


 274
274


 被折叠的 条评论
为什么被折叠?
被折叠的 条评论
为什么被折叠?
 到【灌水乐园】发言


