


安装zabbix监控系统
下载zabbix源 #rpm采用升级安装
rpm -Uvh https://repo.zabbix.com/zabbix/4.0/rhel/7/x86_64/zabbix-release-4.0-1.el7.noarch.rpm
#监控主机需要安装的程序如下
yum install zabbix-server-mysql zabbix-web-mysql zabbix-agent
#如果别的主机也需要被监控,则需要安装 zabbix-agent即可
yum install -y zabbix-agent
#创建zabbix数据库,同时授权zabbix用户访问权限。
 create database zabbix character set utf8 collate utf8_bin;    #创建库
 grant all privileges on zabbix.* to zabbix@'%' identified by 'password';    #授权
 zcat /usr/share/doc/zabbix-server-mysql*/create.sql.gz | mysql -h$ip -uzabbix -p zabbix  导入数据库
修改server配置文件
 vim  /etc/zabbix/zabbix_server.conf
DBHost=$ip
DBPassword=password
#修改时区
vim  /etc/httpd/conf.d/zabbix.conf
php_value date.timezone Asia/Shanghai
启动zabbix-server
systemctl restart zabbix-server httpd
systemctl enable zabbix-server httpd
修改 agent配置文件并启动
 vim /etc/zabbix/zabbix_agentd.conf
Server=$server_ip
ServerActive=$server_ip
启动zabbix-agent
 systemctl restart zabbix-agent
 systemctl enable zabbix-agent
访问
http://ip/zabbix/zabbix.php

安装配置到此完成
第一步docker中安装启动grafana看板服务
#docker自己研究安装
[root@zf ~]# docker search grafana
NAME                                             DESCRIPTION                                     STARS               OFFICIAL            AUTOMATED
grafana/grafana                                  The official Grafana docker container           1360
kamon/grafana_graphite                           All in one image running StatsD, Graphite an…   156
monitoringartist/grafana-xxl                     Dockerized Grafana 5.x/4.x/3.x with all prei…   83                                      [OK]
tutum/grafana
查看grafana容器
第二步 下载容器
docker pull grafana/grafana
第三步 创建并启动镜像
docker run -d -p 3000:3000 --name grafana grafana/grafana
第四步 查看,并检查
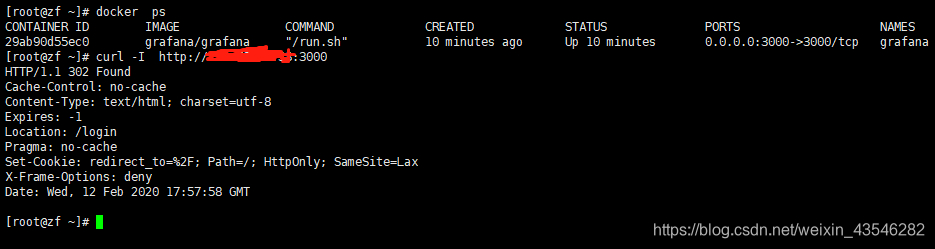
网页302属于正常现象,这里有转发,可以打开浏览器登录

到此 grafana部署完成
#安装zabbix插件
docker exec -it grafana bash
grafana-cli plugins install alexanderzobnin-zabbix-app
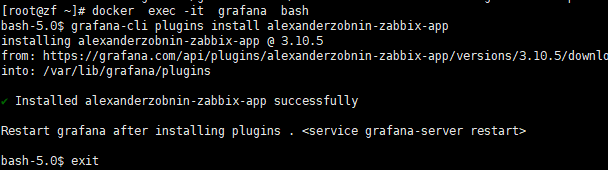
成功!!!
开始安装zabbix
1.下载zabbix源
阿里巴巴开源镜像站(推荐使用)
地址:https://mirrors.aliyun.com/zabbix/
下载最新的zabbix源,并安装
 wget   https://mirrors.aliyun.com/zabbix/zabbix/4.5/rhel/7/x86_64/zabbix-release-4.4-2.el7.noarch.rpm
 rpm -ivh  zabbix-release-4.4-2.el7.noarch.rpm
下载安装zabbix
mkdir /date/zabbix && cd /date/zabbix
yum -y install zabbix-apache-conf #刚才少安装一个组件
wget https://mirrors.aliyun.com/zabbix/zabbix/4.3/rhel/7/x86_64/zabbix-server-mysql-4.4.0-0.1alpha1.el7.x86_64.rpm
wget https://mirrors.aliyun.com/zabbix/zabbix/4.3/rhel/7/x86_64/zabbix-web-4.4.0-0.1alpha1.el7.noarch.rpm
wget https://mirrors.aliyun.com/zabbix/zabbix/4.3/rhel/7/x86_64/zabbix-web-mysql-4.4.0-0.1alpha1.el7.noarch.rpm
wget https://mirrors.aliyun.com/zabbix/zabbix/4.3/rhel/7/x86_64/zabbix-get-4.4.0-0.1alpha1.el7.x86_64.rpm
wget https://mirrors.aliyun.com/zabbix/zabbix/4.3/rhel/7/x86_64/zabbix-agent-4.4.0-0.1alpha1.el7.x86_64.rpm

检查zabbix是否安装成功
安装mysql或者自带的mariadb 数据库,并配置权限
#数据库安装自行查看资料
mysql -uroot -p"密码"
create database zabbix character set utf8 collate utf8_bin;
grant all privileges on zabbix.* to zabbix@localhost identified by “Zhangfan@123”;
zcat /usr/share/doc/zabbix-server-mysql-4.4.0/create.sql.gz | mysql -uzabbix -p zabbix
#输入刚才定义的zabbix数据库密码,美有报错说明导入成功
vim /etc/zabbix/zabbix_server.conf
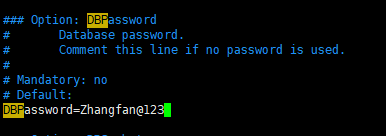
输入刚才定义的zabbix数据库密码
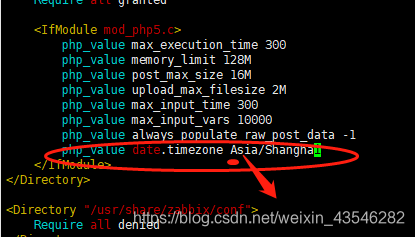
修改时区
vim /etc/httpd/conf.d/zabbix.conf
重启所有服务
systemctl restart httpd zabbix-ser zabbix-agent
systemctl enable httpd zabbix-server zabbix-agent
检查服务启动 情况
systemctl is-active httpd zabbix-server zabbix-agent mysqld
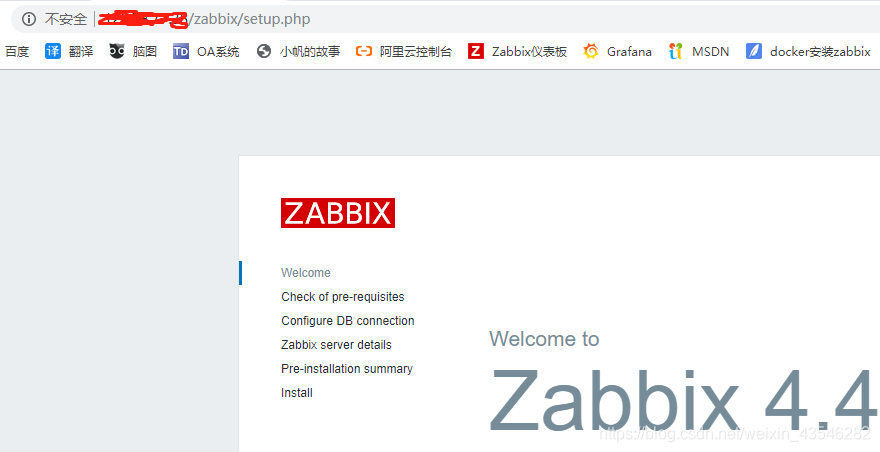
Web页面出现这个说明配置成功
下一步,下一步然后输入 账号密码可以登录
Admin zabbix
解决中文乱码问题
yum -y install wqy-microhei-fonts
cp /usr/share/fonts/wqy-microhei/wqy-microhei.ttc /usr/share//fonts/dejavu/DejaVuSans.ttf


 566
566

 被折叠的 条评论
为什么被折叠?
被折叠的 条评论
为什么被折叠?
 到【灌水乐园】发言


