


服务发现
微服务的框架体系中,服务发现是不能不提的一个模块。我相信了解或者熟悉微服务的童鞋应该都知道它的重要性。这里我只是简单的提一下,毕竟这不是我们的重点。我们看下面的一幅图片:
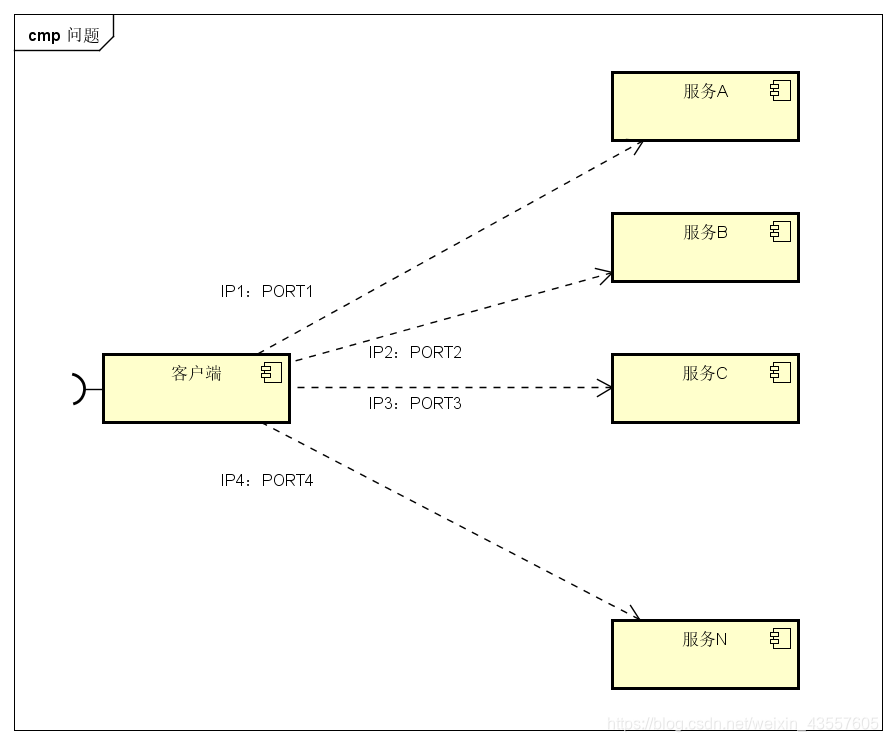
图中,客户端的一个接口,需要调用服务A-N。客户端必须要知道所有服务的网络位置的,以往的做法是配置是配置文件中,或者有些配置在数据库中。这里就带出几个问题:
图中,客户端的一个接口,需要调用服务A-N。客户端必须要知道所有服务的网络位置的,以往的做法是配置是配置文件中,或者有些配置在数据库中。这里就带出几个问题:
- 需要配置N个服务的网络位置,加大配置的复杂性
- 服务的网络位置变化,都需要改变每个调用者的配置
- 集群的情况下,难以做负载(反向代理的方式除外)
总结起来一句话:服务多了,配置很麻烦,问题多多
既然有这些问题,那么服务发现就是解决这些问题的。话说,怎么解决呢?我们再看一张图

与之前一张不同的是,加了个服务发现模块。图比较简单,这边文字描述下。服务A-N把当前自己的网络位置注册到服务发现模块(这里注册的意思就是告诉),服务发现就以K-V的方式记录下,K一般是服务名,V就是IP:PORT。服务发现模块定时的轮询查看这些服务能不能访问的了(这就是健康检查)。客户端在调用服务A-N的时候,就跑去服务发现模块问下它们的网络位置,然后再调用它们的服务。这样的方式是不是就可以解决上面的问题了呢?客户端完全不需要记录这些服务网络位置,客户端和服务端完全解耦!
这个过程大体是这样,当然服务发现模块没这么简单。里面包含的东西还很多。这样表述只是方便理解。
图中的服务发现模块基本上就是微服务架构中服务发现的作用了。
consul集群
服务器规划
| 主机名 | 地址 | 作用 | 模式 |
|---|---|---|---|
| consul1 | 192.168.43.249 | consul节点1 | server |
| consul2 | 192.168.43.74 | consul节点2 | server |
| consul3 | 192.168.43.253 | consul节点3 | server |
| client1 | 192.168.43.147 | client节点1 | client |
目录规划
| 目录 | 作用 |
|---|---|
| /opt/consul/data | 存放持久化数据目录 |
| /opt/consul/config | 存放配置文件目录 |
#节点上均建立上述指定目录(实际环境请自定义)
[root@localhost ~]# mkdir -p /opt/consul/data
[root@localhost ~]# mkdir /opt/consul/config
安装和启动
注意:安装时候用wget命令要加–no-check-certificat,否则会提示无法建立ssl链接
[root@localhost ~]# wget https://releases.hashicorp.com/consul/1.4.0/consul_1.4.0_linux_amd64.zip --no-check-certificat
--2019-01-30 14:44:45--  https://releases.hashicorp.com/consul/1.4.0/consul_1.4.0_linux_amd64.zip
Resolving releases.hashicorp.com (releases.hashicorp.com)... 2a04:4e42:2e::439, 151.101.197.183
Connecting to releases.hashicorp.com (releases.hashicorp.com)|2a04:4e42:2e::439|:443... failed: Connection timed out.
Connecting to releases.hashicorp.com (releases.hashicorp.com)|151.101.197.183|:443... connected.
HTTP request sent, awaiting response... 200 OK
Length: 34591598 (33M) [application/zip]
Saving to: ‘consul_1.4.0_linux_amd64.zip’

100%[===============================================================>] 34,591,598  98.9KB/s   in 3m 45s

2019-01-30 14:50:38 (150 KB/s) - ‘consul_1.4.0_linux_amd64.zip’ saved [34591598/34591598]

[root@localhost ~]# unzip consul_1.4.0_linux_amd64.zip
Archive:  consul_1.4.0_linux_amd64.zip
  inflating: consul
[root@localhost ~]# mv ./consul /usr/bin/
[root@localhost ~]# consul -v
Consul v1.4.0
Protocol 2 spoken by default, understands 2 to 3 (agent will automatically use protocol >2 when speaking to compatible agents)
参数说明
- -bootstrap-expect 数据中心预期的服务器数,只有达到指定数量后,才开始进行选举流程。添加此参数后,consul将等待指定数量的服务器可用,然后引导集群。这允许自动选择初始领导者。这不能与传统-bootstrap标志(一般仅有一台服务器时使用,自选为leader,多用于测试)一起使用。此标志需要在服务端模式下运行。
- -server 以服务端模式运行
- -data-dir 数据存放位置,这个用于持久化保存集群状态
- -node 集群中此节点的名字,这在集群中必须是唯一的,默认为主机名
- -bind 绑定服务器的ip地址
- -config-dir 指定配置文件服务,这个目录下有.json结尾的文件就会加载进来
- -enable-script-checks 检查服务是否处于活动状态,类似开启心跳
- -datacenter 数据中性名称
- -client 客户端可访问ip,包括HTTP和dns服务器。默认是127.0.0.1,仅允许回环链接
- -ui 开启web的UI界面
- -join 加入到已有的集群中
- -dev 启用开发服务器模式。这对于在关闭所有持久性选项的情况下快速启动consul代理非常有用,从而启用可用于快速原型化或针对API开发的内存服务器。在这种模式下,connect被启用,并且默认情况下会在启动时候创建一个新的ca证书。此模式不打算用于生产,因为它不向磁盘写入任何数据。在此模式下,GRPC端口也默认为8502.
server 节点1
[root@localhost ~]# consul agent -bootstrap-expect 2 -server -data-dir /opt/consul/data/ -node=consul1 -bind 192.168.43.249 -client=0.0.0.0 -config-dir /opt/consul/config/ -enable-script-checks=true -datacenter=bdqn01
这个命令是以服务端模式启动一个代理,进群需要有两个扩展机器,设置集群持久化数据存放在/opt/consul/data,节点名称是consul1,绑定本机ip,服务配置文件存放在/opt/consul/config(如果有json文件为加载),开启检查心跳,数据中心名称是bdqn01,可访问的客户端地址是0.0.0.0
server 节点2
[root@localhost ~]# consul agent -server -data-dir /opt/consul/data/ -node=consul2 -bind 192.168.43.74 -client=0.0.0.0 -config-dir /opt/consul/config/ -enable-script-checks=true -datacenter=bdqn01 -join 192.168.43.249
server 节点3
[root@localhost ~]# consul agent -server -data-dir /opt/consul/data/ -node=consul3 -bind 192.168.43.253 -client=0.0.0.0 -config-dir /opt/consul/config/ -enable-script-checks=true -datacenter=bdqn01 -join 192.168.43.249
server集群验证
输入上述命令后,命令行会阻塞,并输入日志,选手集群状态,如下
 2019/01/30 15:19:52 [INFO] consul: cluster leadership acquired
    2019/01/30 15:19:52 [INFO] consul: New leader elected: consul1
    2019/01/30 15:19:52 [INFO] raft: pipelining replication to peer {Voter c9772032-7f8e-d1d5-1b97-a0d0cf54934a 192.168.43.74:8300}
    2019/01/30 15:19:53 [INFO] memberlist: Suspect consul2.bdqn01 has failed, no acks received
使用命令查看集群成员(任一server节点)
[root@localhost ~]# consul members
Node     Address              Status  Type    Build  Protocol  DC      Segment
consul1  192.168.43.249:8301  alive   server  1.4.0  2         bdqn01  <all>
consul2  192.168.43.74:8301   alive   server  1.4.0  2         bdqn01  <all>
consul3  192.168.43.253:8301  alive   server  1.4.0  2         bdqn01  <all>
[root@localhost ~]#
使用命令查看集群信息(任一server节点)
[root@localhost ~]# consul info
agent:
	check_monitors = 0
	check_ttls = 0
	checks = 0
	services = 0
build:
	prerelease =
	revision = 0bddfa23
	version = 1.4.0
consul:
	acl = disabled
	bootstrap = false
	known_datacenters = 1
	leader = false
	leader_addr = 192.168.43.249:8300
	server = true
raft:
	applied_index = 98
	commit_index = 98
	fsm_pending = 0
	last_contact = 14.046772ms
	last_log_index = 98
	last_log_term = 8
	last_snapshot_index = 0
	last_snapshot_term = 0
	latest_configuration = [{Suffrage:Voter ID:c9772032-7f8e-d1d5-1b97-a0d0cf54934a Address:192.168.43.74:8300} {Suffrage:Voter ID:46709fba-6e61-074c-29f3-1d273ea53f44 Address:192.168.43.249:8300} {Suffrage:Voter ID:7144d459-8695-947a-e030-61d332b301fc Address:192.168.43.253:8300}]
	latest_configuration_index = 38
	num_peers = 2
	protocol_version = 3
	protocol_version_max = 3
	protocol_version_min = 0
	snapshot_version_max = 1
	snapshot_version_min = 0
	state = Follower
	term = 8
runtime:
	arch = amd64
	cpu_count = 4
	goroutines = 79
	max_procs = 4
	os = linux
	version = go1.11.1
serf_lan:
	coordinate_resets = 0
	encrypted = false
	event_queue = 0
	event_time = 3
	failed = 0
	health_score = 0
	intent_queue = 0
	left = 0
	member_time = 4
	members = 3
	query_queue = 0
	query_time = 1
serf_wan:
	coordinate_resets = 0
	encrypted = false
	event_queue = 0
	event_time = 1
	failed = 0
	health_score = 0
	intent_queue = 0
	left = 0
	member_time = 4
	members = 3
	query_queue = 0
	query_time = 1
[root@localhost ~]#
使用HTTP api查看集群状态
#集群server成员
[root@localhost ~]# curl 127.0.0.1:8500/v1/status/peers
[“192.168.43.74:8300”,“192.168.43.249:8300”,“192.168.43.253:8300”]
#集群 raft leader
[root@localhost ~]# curl 127.0.0.1:8500/v1/status/leader
“192.168.43.249:8300”
#注册的所有服务
[root@localhost ~]# curl 127.0.0.1:8500/v1/catalog/srevices
#服务信息
[root@localhost ~]# curl 127.0.0.1:8500/v1/catalog/srevices/nginx
#集群节点详细信息
[root@localhost ~]# curl 127.0.0.1:8500/v1/catalog/nodes
[{"ID":"46709fba-6e61-074c-29f3-1d273ea53f44","Node":"consul1","Address":"192.168.43.249","Datacenter":"bdqn01","TaggedAddresses":{"lan":"192.168.43.249","wan":"192.168.43.249"},"Meta":{"consul-network-segment":""},"CreateIndex":5,"ModifyIndex":9},{"ID":"c9772032-7f8e-d1d5-1b97-a0d0cf54934a","Node":"consul2","Address":"192.168.43.74","Datacenter":"bdqn01","TaggedAddresses":{"lan":"192.168.43.74","wan":"192.168.43.74"},"Meta":{"consul-network-segment":""},"CreateIndex":6,"ModifyIndex":8},{"ID":"7144d459-8695-947a-e030-61d332b301fc","Node":"consul3","Address":"192.168.43.253","Datacenter":"bdqn01","TaggedAddresses":{"lan":"192.168.43.253","wan":"192.168.43.253"},"Meta":{"consul-network-segment":""},"CreateIndex":33,"ModifyIndex":34}]
client 节点
[root@localhost ~]# consul agent -ui -data-dir /opt/consul/data -node=client1 -bind=192.168.43.147 -client 0.0.0.0 -config-dir /opt/consul/config -enable-script-checks=true -datacenter=bdqn01 -join 192.168.43.249
这个命令是以客户端模式启动一个代理,设置集群持久化数据存放在/opt/consul/data,节点名称是client1,绑定本机地址,服务配置文件存放在/opt/consul/config,开启检测心跳,数据中心的名称是bdqn01,可访问客户端地址是0.0.0.0并加入节点1 的集群,并且开启web-ui管理界面
访问web-ui 只有client开启了web-ui,只有访问client ip才行 http://192.168.43.147:8500/ui/
[root@localhost ~]# firefox http://192.168.43.147:8500/ui/

命令行中对键值对的操作
创建:put —在consul的kv存储中创建或者更新名为“redis/config/connections”的键值为5
[root@localhost ~]# consul kv put redis/config/connections 5
Success! Data written to: redis/config/connection
获取值:get
[root@localhost ~]# consul kv get redis/config/connections
5
查询详情:-detailed
[root@localhost ~]# consul kv get -detailed redis/config/connections
CreateIndex      262
Flags            0
Key              redis/config/connections
LockIndex        0
ModifyIndex      262
Session          -
Value            5
[root@localhost ~]#
删除key:delete
[root@localhost ~]# consul kv delete redis/config/connections
Success! Deleted key: redis/config/connections
删除一个指定索引的key,指定-cas或者-modify-index
[root@localhost ~]# consul kv get -detailed redis/config/connections | grep ModifyIndex
ModifyIndex      370
[root@localhost ~]# consul kv delete -cas -modify-index=370 redis/config/connections
Success! Deleted key: redis/config/connections
递归删除指定前缀的所有key,使用-recurse
[root@localhost ~]# consul kv delete -recurse redis/
Success! Deleted keys with prefix: redis/
递归删除中,尾随斜杠很重要,因为consul对所提供的前缀执行贪婪的匹配。如果是有foo作为键,则会递归删除以foo food football等字母开头的所有键,而不仅仅是foo。
导出key为config/的树
[root@localhost ~]# consul kv export config/
[]
列出以指定前缀开头的键: -keys
[root@localhost ~]# consul kv get -keys config/
分隔符: -separator=“string”
默认情况下,-keys使用分隔符为/ 这意味着它不会递归超出分隔符。可以通过设置-separator来设置分隔符,如果分隔符为"" 也即分隔符为空,可以完全禁用分隔符。-separator必须和-keys配合使用
列出所有key,省略前缀即可
[root@localhost ~]# consul kv get -keys
从文件中导入
[root@localhost ~]# consul kv import @value.json
其中value为文件名
从stdin导入,使用-作为数据参数
cat values.json | consul kv import -
consul对json格式的文档也有格式要求 使用consul kv export导出的才可以使用import导入
结合springcloud做注册中心
使用consul作为springcloud的注册中心 下边的操作以上边操作为基础,总的来说还是需要四个节点相连接,但是又有不同,具体来说,consul1和consul2和之前的命令一样,253主机的命令为
consul agent -ui -data-dir /opt/consul/data/ -node=client1 -bind 192.168.43.253 -client=0.0.0.0 -config-dir /opt/consul/config/ -enable-script-checks=true -datacenter=bdqn01 -join 192.168.43.249
147的主机的命令为
consul agent -server -ui -data-dir /opt/consul/data -node=consul3 -bind=192.168.43.147 -client 0.0.0.0 -config-dir /opt/consul/config -enable-script-checks=true -datacenter=bdqn01 -join 192.168.43.249
服务器规划
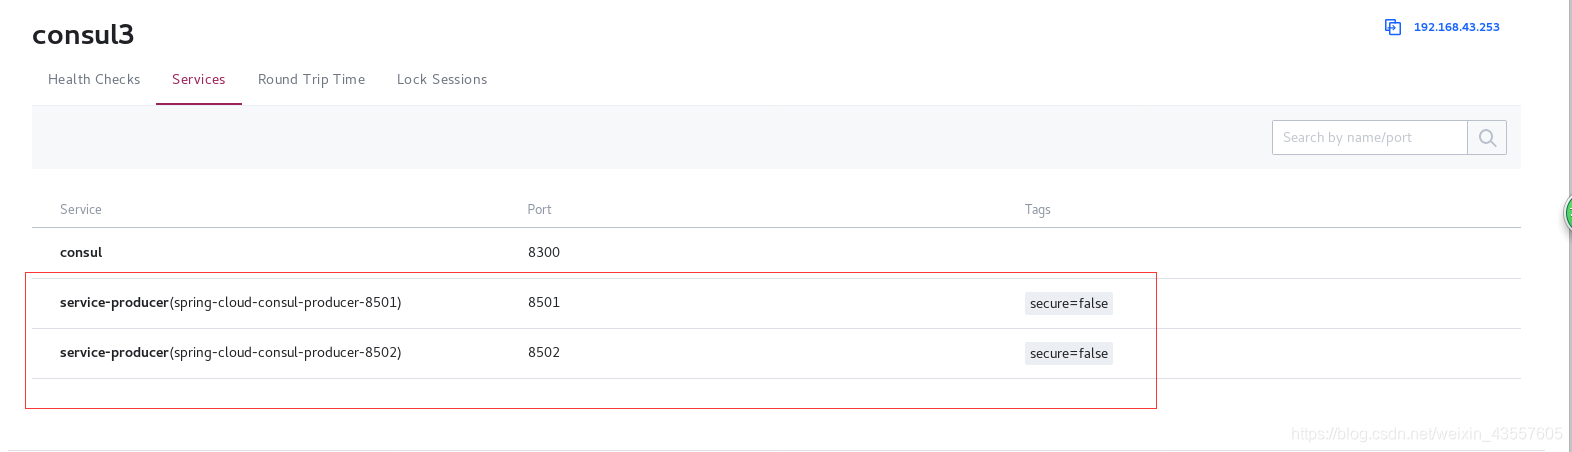
| 地址 | 作用 | 注册到consul应用名 | 端口 |
|---|---|---|---|
| 192.168.43.249 | 提供者节点1 | service-producer | 8501 |
| 192.168.43.74 | 提供者节点2 | service-producer | 8502 |
| 192.168.43.253 | 消费者节点1 | 8503 | |
| 192.168.43.147 | 注册中心 | client | 8500 |
注册演示
演示说明:
- 两个服务提供者注册到consul注册中心
- 消费者通过链接consul注册中心获取到提供者信息,进行通信,并请求验证
- 为方便区分不同提供者,连个服务提供者相应内容显示不同
提供者节点1
代码克隆:
[root@localhost ~]# git clone https://github.com/luojunyong/spring-cloud-examples.git
Cloning into 'spring-cloud-examples'...
remote: Enumerating objects: 700, done.
remote: Total 700 (delta 0), reused 0 (delta 0), pack-reused 700
Receiving objects: 100% (700/700), 67.17 KiB | 96.00 KiB/s, done.
Resolving deltas: 100% (208/208), done.
[root@localhost ~]# ls
anaconda-ks.cfg                Desktop               jdk-8u201-linux-x64.tar.gz  spring-cloud-examples
apache-maven-3.6.0-bin.tar.gz  Documents             Music                       Templates
apache-tomcat-8.5.35.tar.gz    Downloads             Pictures                    Videos
consul_1.4.0_linux_amd64.zip   initial-setup-ks.cfg  Public
[root@localhost ~]# cd spring-cloud-examples/spring-cloud-consul/spring-cloud-consul-producer
修改配置:
[root@localhost spring-cloud-consul-producer]# vim src/main/resources/application.properties
spring.application.name=spring-cloud-consul-producer #应用名
server.port=8501  #监听端口
spring.cloud.consul.host=192.168.43.147   #要连接的consul地址
spring.cloud.consul.port=8500  #要连接的consul端口
#\u6CE8\u518C\u5230consul\u7684\u670D\u52A1\u540D\u79F0
spring.cloud.consul.discovery.serviceName=service-producer  #注册到consul注册中心的服务名
运行:
mvn spring-boot:run
运行之后会阻塞在下边的字样处,这是正常的,如果需要其他操作再开一个终端就好
2019-01-30 20:02:49.361  INFO 45742 --- [           main] c.neo.consul.ConsulProducerApplication   : Started ConsulProducerApplication in 13.214 seconds (JVM running for 22.243)
2019-01-30 20:02:53.425  INFO 45742 --- [nio-8502-exec-2] o.a.c.c.C.[Tomcat].[localhost].[/]       : Initializing Spring FrameworkServlet 'dispatcherServlet'
2019-01-30 20:02:53.426  INFO 45742 --- [nio-8502-exec-2] o.s.web.servlet.DispatcherServlet        : FrameworkServlet 'dispatcherServlet': initialization started
2019-01-30 20:02:53.459  INFO 45742 --- [nio-8502-exec-2] o.s.web.servlet.DispatcherServlet        : FrameworkServlet 'dispatcherServlet': initialization completed in 33 ms
提供者节点2
代码克隆:
[root@localhost ~]# git clone https://github.com/luojunyong/spring-cloud-examples.git
Cloning into 'spring-cloud-examples'...
remote: Enumerating objects: 700, done.
remote: Total 700 (delta 0), reused 0 (delta 0), pack-reused 700
Receiving objects: 100% (700/700), 67.17 KiB | 96.00 KiB/s, done.
Resolving deltas: 100% (208/208), done.
[root@localhost ~]# ls
anaconda-ks.cfg                Desktop               jdk-8u201-linux-x64.tar.gz  spring-cloud-examples
apache-maven-3.6.0-bin.tar.gz  Documents             Music                       Templates
apache-tomcat-8.5.35.tar.gz    Downloads             Pictures                    Videos
consul_1.4.0_linux_amd64.zip   initial-setup-ks.cfg  Public
[root@localhost ~]# cd spring-cloud-examples/spring-cloud-consul/spring-cloud-consul-producer-2
修改配置:
[root@localhost spring-cloud-consul-producer]# vim src/main/resources/application.properties
spring.application.name=spring-cloud-consul-producer #应用名
server.port=8502  #监听端口
spring.cloud.consul.host=192.168.43.147   #要连接的consul地址
spring.cloud.consul.port=8500  #要连接的consul端口
#\u6CE8\u518C\u5230consul\u7684\u670D\u52A1\u540D\u79F0
spring.cloud.consul.discovery.serviceName=service-producer  #注册到consul注册中心的服务名
运行:
mvn spring-boot:run
消费者节点1
克隆代码-修改配置
[root@localhost ~]# git clone https://github.com/luojunyong/spring-cloud-examples.git
Cloning into 'spring-cloud-examples'...
remote: Enumerating objects: 700, done.
remote: Total 700 (delta 0), reused 0 (delta 0), pack-reused 700
Receiving objects: 100% (700/700), 67.17 KiB | 13.00 KiB/s, done.
Resolving deltas: 100% (208/208), done.
[root@localhost ~]# cd spring-cloud-examples/spring-cloud-consul/spring-cloud-consul-consumer/
[root@localhost spring-cloud-consul-consumer]# vim src/main/resources/application.properties
spring.application.name=spring-cloud-consul-consumer
server.port=8503
spring.cloud.consul.host=192.168.43.147
spring.cloud.consul.port=8500
#\u8BBE\u7F6E\u4E0D\u9700\u8981\u6CE8\u518C\u5230consul\u4E2D
spring.cloud.consul.discovery.register=false  #设置不需要注册到consul中
运行:
mvn spring-boot:run
消费节点运行完之后会阻塞在下边的语句
2019-01-30 20:20:33.321  INFO 45589 --- [           main] o.s.c.support.DefaultLifecycleProcessor  : Starting beans in phase 0
2019-01-30 20:20:33.625  INFO 45589 --- [           main] o.s.b.w.embedded.tomcat.TomcatWebServer  : Tomcat started on port(s): 8503 (http) with context path ''
2019-01-30 20:20:33.638  INFO 45589 --- [           main] c.neo.consul.ConsulConsumerApplication   : Started ConsulConsumerApplication in 13.525 seconds (JVM running for 819.005)
查看状态
可以在consul注册中心查看状态
firefox 192.168.43.147:8500/ui/
两个服务提供者均存活,消费者使用有轮询,以下是在消费者上的显示结果
[root@localhost spring-cloud-consul-consumer]# curl 192.168.43.253:8503/call
helle consul
[root@localhost spring-cloud-consul-consumer]# curl 192.168.43.253:8503/call
helle consul two
结合nginx动态联动
服务器规划
| 地址 | 作用 | 注册到consul应用名 | 端口 |
|---|---|---|---|
| 192.168.43.249 | 提供者节点1 | service-producer | 8501 |
| 192.168.43.74 | 提供者节点2 | service-producer | 8502 |
| 192.168.43.253 | consul-client | consu-client | 8500 |
| 192.168.43.147 | 负载均衡联动(nginx+consul-template) | 80 |
目录规划
第四台负责联动的主机建立三个目录
- /opt/consul/config 生成nginx配置文件的ctmpl文件目录
- /usr/local/nginx/conf/vhost 生成nginx配置文件的ctmpl文件目录
- /opt/consul/logs 生成consul-template进程(后台运行)产生的consul-template.log日志
演示说明
- 开启consul注册中心,服务提供者通过consul client注册到注册中心
- 服务提供者注册时候使用真是IP地址注册(在不适合hosts方式的环境)
- nginx和consul-template服务装在一台服务器上
- 当注册中心服务提供者有变更(新增或失败)的时候,nginx能动态加载upstream列表
操作提示
在上边实验的基础上操作:
249主机启动consul命令不变,74主机启动consul命令不变,253主机启动consul命令不变,147主机断开consul,249主机和74主机修改代码文件配置,把注册中心ip改成253。253主机需要克隆代码,并修改配置,然后再运行
249和74主机修改代码文件,修改ip,并添加一行内容在最后
spring.cloud.consul.discovery.preferIpAddress=true
253主机修改配置的操作如下所示:
[root@localhost ~]# cd spring-cloud-examples/spring-cloud-consul/spring-cloud-consul-consumer/
[root@localhost spring-cloud-consul-consumer]# vim src/main/resources/application.properties
spring.application.name=spring-cloud-consul-consumer
server.port=8503
spring.cloud.consul.host=192.168.43.253
spring.cloud.consul.port=8500
#\u8BBE\u7F6E\u4E0D\u9700\u8981\u6CE8\u518C\u5230consul\u4E2D
spring.cloud.consul.discovery.register=false
spring.cloud.consul.discovery.preferIpAddress=true
以上三台主机都修改完毕,可以运行
mvn spring-boot:run
服务配置
最后一台主机自己安装nginx
过程略
配置consul-template服务
[root@localhost ~]# mkdir -p /opt/consul/{config,logs}
[root@localhost ~]# mkdir -p /usr/local/nginx/conf/vhost
[root@localhost ~]# wget https://releases.hashicorp.com/consul-template/0.19.5/consul-template_0.19.5_linux_amd64.tgz --no-check-certificat
[root@localhost ~]# tar -zxf consul-template_0.19.5_linux_amd64.tgz
[root@localhost ~]# mv consul-template /usr/bin/
配置consul-template模板
- range service要和服务提供者注册在consul应用名相同
- 具体nginx配置可根据环境自定义配置
[root@localhost ~]# vim /opt/consul/config/nginx-consul-web1.ctmpl  #这部分内容手写
upstream web1 {
    ip_hash;
{{range service "service-producer"}}
    server {{.Address}}:{{.Port}} max_fails=3 fail_timeout=30s;
   {{end}}
}

server {
    listen 80;
    server_name web1.luojunyong.com;
    location / {
        proxy_connect_timeout 300s;
        proxy_send_timeout    900;
        proxy_read_timeout    900;
        proxy_buffer_size     32k;
        proxy_buffers        4 32k;
        proxy_busy_buffers_size 64k;
        proxy_redirect         off;
        proxy_set_header       Host              $host;
        proxy_set_header       Referer           $http_referer;
        proxy_set_header       X-Real-IP         $remote_addr;
        proxy_set_header       X-Forwarded-For   $proxy_add_x_forwarded_for;
        proxy_pass             http://web1/;
}
}
配置nginx引用方式
以include方式加载由consul-template生成的nginx配置目录
[root@localhost ~]# vim /usr/local/nginx/conf/nginx.conf
http模块和server模块之间添加一行内容:   include /usr/local/nginx/conf/vhost/*.conf;
生成nginx配置文件
测试模板状态
consul-template --consul-addr 192.168.43.253:8500 -template /opt/consul/config/nginx-consul-web1.ctmpl:/usr/local/nginx/conf/vhost/web1.conf:"/usr/local/nginx/sbin/nginx -s reload" -dry
-dry表示仅运行此命令,但不实际执行写入文件的命令,此处是指不根据模板修改文件,不执行nginx -s reload命令。第一个冒号前是模板文件位置,第二个冒号前是输出配置文件到哪里,第二个冒号后是需要运行的命令。
生成nginx配置和运行
通过nohup命令可以将consul-template放到后台执行
[root@localhost ~]# nohup consul-template --consul-addr 192.168.43.253:8500 -template /opt/consul/config/nginx-consul-web1.ctmpl:/usr/local/nginx/conf/vhost/web1.conf:"/usr/local/nginx/sbin/nginx -s reload" --log-level=info >/opt/consul/logs/consul-template.log 2>&1 &
2>&1 的意思就是将标准错误重定向到标准输出。这里标准输出已经重定向到了consul-template.log文件,那么标准错误也会输出到consul-template.log文件
可通过以下方式查看运行情况
[root@localhost ~]# ps -elf | grep consul
4 S root      52027  45465  0  80   0 -  2969 futex_ 22:33 pts/2    00:00:00 consul-template --consul-addr 192.168.43.253:8500 -template /opt/consul/config/nginx-consul-web1.ctmpl:/usr/local/nginx/conf/vhost/web1.conf:/usr/local/nginx/sbin/nginx -s reload --log-level=info
0 S root      52061  45465  0  80   0 - 28165 pipe_w 22:35 pts/2    00:00:00 grep --color=auto consul
或者
[root@localhost ~]# cat /opt/consul/logs/consul-template.log
nohup: ignoring input
2019/01/30 14:33:42.149784 [INFO] consul-template v0.19.5 (57b6c71)
2019/01/30 14:33:42.149831 [INFO] (runner) creating new runner (dry: false, once: false)
2019/01/30 14:33:42.150385 [INFO] (runner) creating watcher
2019/01/30 14:33:42.150672 [INFO] (runner) starting
验证效果
测试模板生成验证(之前的步骤已实现)
[root@localhost ~]# consul-template --consul-addr 192.168.43.253:8500 -template /opt/consul/config/nginx-consul-web1.ctmpl:/usr/local/nginx/conf/vhost/web1.conf:"/usr/local/nginx/sbin/nginx -s reload" -dry
> /usr/local/nginx/conf/vhost/web1.conf
upstream web1 {
    ip_hash;

    server 192.168.43.249:8501 max_fails=3 fail_timeout=30s;

    server 192.168.43.74:8502 max_fails=3 fail_timeout=30s;

}

server {
    listen 80;
    server_name web1.luojunyong.com;
    location / {
	proxy_connect_timeout 300s;
	proxy_send_timeout    900;
	proxy_read_timeout    900;
	proxy_buffer_size     32k;
	proxy_buffers        4 32k;
	proxy_busy_buffers_size 64k;
	proxy_redirect         off;
	proxy_set_header       Host              $host;
	proxy_set_header       Referer           $http_referer;
        proxy_set_header       X-Real-IP         $remote_addr;
	proxy_set_header       X-Forwarded-For   $proxy_add_x_forwarded_for;
	proxy_pass             http://web1/;
}
}
验证nginx配置
[root@localhost ~]# cat /usr/local/nginx/conf/vhost/web1.conf
upstream web1 {
    ip_hash;

    server 192.168.43.249:8501 max_fails=3 fail_timeout=30s;

    server 192.168.43.74:8502 max_fails=3 fail_timeout=30s;

}

server {
    listen 80;
    server_name web1.luojunyong.com;
    location / {
	proxy_connect_timeout 300s;
	proxy_send_timeout    900;
	proxy_read_timeout    900;
	proxy_buffer_size     32k;
	proxy_buffers        4 32k;
	proxy_busy_buffers_size 64k;
	proxy_redirect         off;
	proxy_set_header       Host              $host;
	proxy_set_header       Referer           $http_referer;
        proxy_set_header       X-Real-IP         $remote_addr;
	proxy_set header       X-Forwarded-For   $proxy_add_x_forwarded_for;
	proxy_pass             http://web1/;
}
}
两个服务提供者均运行(consul-template主机上验证)
[root@localhost ~]# nginx
[root@localhost ~]# curl http://192.168.43.147:80/hello
helle consul
[root@localhost ~]# curl http://192.168.43.147:80/hello
helle consul
因为nginx配置有ip_hash,所有请求会一直在一个节点(可关闭一个服务提供者进行验证)
由于上边的访问提示的是第一个节点的 返回信息(第一个consul返回helle consul 第二个返回helle consul two),所以我们关闭第一个节点后再进行验证。关闭方法是去终端ctrl+c,让mvn spring-boot:run的命令停止
[root@localhost ~]# curl http://192.168.43.147:80/hello
helle consul two[root@localhost ~]# curl http://192.168.43.147:80/hello
helle consul two[root@localhost ~]#
动态列表验证
当服务提供者有变更(此处演示停了一个服务提供者)的时候,通过consul-template和nginx日志均可发现服务重载
[root@localhost ~]# tail -100f /opt/consul/logs/consul-template.log
动态监控日志文件,当停掉服务提供者1的时候新增加如下信息:
2019/01/30 15:24:46.556339 [INFO] (runner) rendered "/opt/consul/config/nginx-consul-web1.ctmpl" => "/usr/local/nginx/conf/vhost/web1.conf"
2019/01/30 15:24:46.556453 [INFO] (runner) executing command "/usr/local/nginx/sbin/nginx -s reload" from "/opt/consul/config/nginx-consul-web1.ctmpl" => "/usr/local/nginx/conf/vhost/web1.conf"
2019/01/30 15:24:46.592771 [INFO] (child) spawning: /usr/local/nginx/sbin/nginx -s reload
再次开启服务提供者1的时候增加如下信息:
2019/01/30 15:27:15.113516 [INFO] (runner) rendered "/opt/consul/config/nginx-consul-web1.ctmpl" => "/usr/local/nginx/conf/vhost/web1.conf"
2019/01/30 15:27:15.113948 [INFO] (runner) executing command "/usr/local/nginx/sbin/nginx -s reload" from "/opt/consul/config/nginx-consul-web1.ctmpl" => "/usr/local/nginx/conf/vhost/web1.conf"
2019/01/30 15:27:15.116804 [INFO] (child) spawning: /usr/local/nginx/sbin/nginx -s reload
说明这个是在动态刷新,当发现有不能用的节点,即使执行命令把可用的节点ip和端口生成到web1.conf文件中,人后重载nginx,当发现不能用的节点再次能用的时候也会执行相同的操作

[root@localhost ~]# tailf /usr/local/nginx/logs/error.log
当停掉服务提供者1的时候,新增信息如下:
2019/01/30 23:29:03 [notice] 53369#0: signal process started
当再次开启服务提供者1的时候,新增信息如下:
2019/01/30 23:29:36 [notice] 53373#0: signal process started
说明服务提供者的生与死,都可以被动态监控到
日志和配置文件变更时间一直,并且nginx自动reload,实现了后端服务的动态刷新
多配置文件
在多个配置文件(不同微服子站点)或多服务的时候,可以指定多个template模板文件
consul-template -template "/opt/consul/config/nginx.ctmpl:/var/nginx/nginx.conf:nginx -s reload" -template "/opt/consul/config/redis.ctmpl:/var/redis/redis.conf:service redis restart" -template "/opt/consul/config/haproxy.xtmpl:/var/haproxy/haproxy.conf"
Consul Config Server
- 如果采用consul作为spring-cloud的注册中心的话,其实configserver(版本库钩子+队列+bus总线,架构太重)也没有必要继续使用了,consul自带kv存储,可以取代configserver的功能
- consul作为注册中心的时候,spring cloud会自动使用远程配置覆盖本地配置(本地优先级低于远程配置)。配置加载策略是,首先从远程加载,远程存在则覆盖本地,远程不存在,再从本地配置查找,若果本地也不存在,则抛出异常。
config server的逻辑如下图

Spring Cloud Bus会向外提供一个http接口,即图中的/bus/refresh。我们将这个接口配置到远程的git的webhook上,当git上的文件内容发生变动时,就会自动调用/bus-refresh接口。Bus就会通知config-server,config-server会发布更新消息到消息总线的消息队列中,其他服务订阅到该消息就会信息刷新,从而实现整个微服务进行自动刷新。
下面的操作是把consul作为spring cloud注册中心的操作,它可以实现远程配置覆盖本地配置
服务器规划
| ip地址 | 角色 | 端口 |
|---|---|---|
| 192.168.43.253(节点3) | 注册中心 | 8500 |
| 192.168.43.147(节点4) | spring cloud | 8055 |
实现过程
consul连接
节点1
[root@localhost ~]# consul agent -bootstrap-expect 2 -server -data-dir /opt/consul/data/ -node=consul1 -bind 192.168.43.249 -client=0.0.0.0 -config-dir /opt/consul/config/ -enable-script-checks=true -datacenter=bdqn01
节点2
[root@localhost ~]# consul agent -server -data-dir /opt/consul/data/ -node=consul2 -bind 192.168.43.74 -client=0.0.0.0 -config-dir /opt/consul/config/ -enable-script-checks=true -datacenter=bdqn01 -join 192.168.43.249
节点3
[root@localhost ~]# consul agent -server -ui -data-dir /opt/consul/data/ -node=consul3 -bind 192.168.43.253 -client=0.0.0.0 -config-dir /opt/consul/config/ -enable-script-checks=true -datacenter=bdqn01 -join 192.168.43.249
节点4
[root@localhost consulservice2]# consul agent -server -data-dir /opt/consul/data/ -node=consul4 -bind 192.168.43.147 -client=0.0.0.0 -config-dir /opt/consul/config/ -enable-script-checks=true -datacenter=bdqn01 -join 192.168.43.249

如果不做集群,curl的命令会提示no cluster leader报错
spring cloud端的操作
克隆代码
[root@localhost ~]# git clone https://github.com/luojunyong/spring_cloud_learn.git
Cloning into 'spring_cloud_learn'...
remote: Enumerating objects: 290, done.
remote: Total 290 (delta 0), reused 0 (delta 0), pack-reused 290
Receiving objects: 100% (290/290), 30.55 KiB | 12.00 KiB/s, done.
Resolving deltas: 100% (57/57), done.
[root@localhost ~]# cd spring_cloud_learn/discover_server_with_consul/springcloudlearn/consulservice2/
代码说明:
- 在resources文件夹下创建bootstrap.properties和application.properties两个配置文件
- bootstrap.properties在程序引导其间加载,应用于更早期配置信息读取
- application.properties相当于系统级别的配置,优先加载
- 将配置条目使用consul的kv存储进行存储,bootstrap.properties在程序引导其间进行远程调用测试
- 演示项目在启动的时候将加载到的配置条目在启动过程中打印出来
- 为方便区分,consul存储的值为username=aaa,password=123,本地配置文件中存储的为username=bbb,password=456
配置文件/启动
[root@localhost consulservice2]# vim src/main/resources/bootstrap.properties
spring.application.name=consul-service2 #springboot应用名
server.port=8055  #监听端口

spring.cloud.consul.host=192.168.43.253 #consul注册中心地址
spring.cloud.consul.port=8500  #注册中心端口
spring.cloud.consul.discovery.serviceName=${spring.application.name} #注册到consul注册中心的服务名
spring.cloud.consul.discovery.preferIpAdress=true  #开启真实ip注册

spring.cloud.consul.config.prefix=config  #指定consul配置的文件夹前缀为config
spring.cloud.consul.config.data-key=configuration  #指定consul配置的配置文件为configuration
spring.cloud.consul.config.format=properties  #指定consul配置的配置文件格式properties(maven),gradle为YAML
spring.cloud.consul.config.defaultContext=${spring.application.name}  #指定consul配置的配置文件的父路径

[root@localhost consulservice2]# vim src/main/resources/application.properties
jdbc.username=bbb
jdbc.password=456
consul配置键值
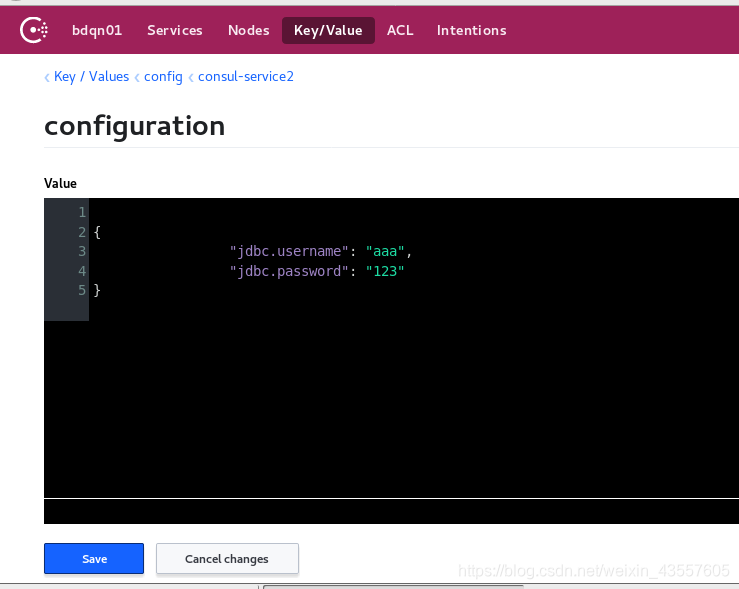
#添加config/consul-service2/configuration 值,必须对应bootstrap.properties指定的目录树结构和key配置文件
[root@localhost consulservice2]# curl -X PUT "http://192.168.43.253:8500/v1/kv/config/consul-service2/configuration" -H 'Content-Type: applicatoin/json' -d'{ "jdbc.username": "aaa", "jdbc.password": "123"}'
true
去注册中心的主机,也就是253主机,访问ui,找到key并调整成如下图所示的样式,点击save
firefox 192.168.43.253:8500/ui/
配置文件和consul的键值配置完成后,进行项目
[root@localhost consulservice2]# mvn spring-boot:run
执行命令后,终端在最后的部分会输出如下信息
01-31 14:17:28.093 [main] INFO  o.s.c.c.s.ConsulServiceRegistry - Registering service with consul: NewService{id='consul-service2-8055', name='consul-service2', tags=[], address='192.168.43.147', port=8055, enableTagOverride=null, check=Check{script='null', interval='10s', ttl='null', http='http://192.168.43.147:8055/actuator/health', tcp='null', timeout='null', deregisterCriticalServiceAfter='null', tlsSkipVerify=null, status='null'}, checks=null}
01-31 14:17:28.145 [main] INFO  com.yyh.ConsulService2App - Started ConsulService2App in 13.47 seconds (JVM running for 1604.546)
username:"aaa",
password:"123"
01-31 14:17:38.075 [http-nio-8055-exec-1] INFO  o.a.c.c.C.[Tomcat].[localhost].[/] - Initializing Spring FrameworkServlet 'dispatcherServlet'
01-31 14:17:38.076 [http-nio-8055-exec-1] INFO  o.s.web.servlet.DispatcherServlet - FrameworkServlet 'dispatcherServlet': initialization started
01-31 14:17:38.112 [http-nio-8055-exec-1] INFO  o.s.web.servlet.DispatcherServlet - FrameworkServlet 'dispatcherServlet': initialization completed in 36 ms
从这里可以看出默认加载的是远程consul服务器上的设定的键值,并且本地配置没有生效
此时去注册用心查看service,如下图,可以看到8055端口的

在spring客户机上远程删除consul上的值,再重新启动项目试试
[root@localhost consulservice2]# curl -X DELETE "http://192.168.43.253:8500/v1/kv/config/consul-service2/configuration"
true[root@localhost consulservice2]#
[root@localhost consulservice2]# mvn spring-boot:run
运行项目后,关键部分输出结果如下:
01-31 14:23:41.301 [main] INFO  o.s.c.c.s.ConsulServiceRegistry - Registering service with consul: NewService{id='consul-service2-8055', name='consul-service2', tags=[], address='192.168.43.147', port=8055, enableTagOverride=null, check=Check{script='null', interval='10s', ttl='null', http='http://192.168.43.147:8055/actuator/health', tcp='null', timeout='null', deregisterCriticalServiceAfter='null', tlsSkipVerify=null, status='null'}, checks=null}
01-31 14:23:41.466 [main] INFO  com.yyh.ConsulService2App - Started ConsulService2App in 16.862 seconds (JVM running for 25.546)
username:bbb
password:456
01-31 14:23:49.410 [http-nio-8055-exec-1] INFO  o.a.c.c.C.[Tomcat].[localhost].[/] - Initializing Spring FrameworkServlet 'dispatcherServlet'
01-31 14:23:49.410 [http-nio-8055-exec-1] INFO  o.s.web.servlet.DispatcherServlet - FrameworkServlet 'dispatcherServlet': initialization started
01-31 14:23:49.439 [http-nio-8055-exec-1] INFO  o.s.web.servlet.DispatcherServlet - FrameworkServlet 'dispatcherServlet': initialization completed in 28 ms
可以看出,在没有加载到consul远程的键值时,使用本地配置


 6421
6421


 被折叠的 条评论
为什么被折叠?
被折叠的 条评论
为什么被折叠?
 到【灌水乐园】发言


