


报错解决:libcudart.so和libprotobuf.so链接库未找到
此博客介绍了博主在编译软件包时遇到的两个报错,主要是libcudart和libprotobuf两个动态链接库未找到的问题,分析了其原因,并给出了解决方法。博主软硬件环境如下(供参考):
- Linux
- NVIDIA GeForce RTX 3080Ti
- CUDA Driver Version 525.105.17
- CUDA 11.1
- gcc (Ubuntu 9.4.0-1ubuntu1~18.04) 9.4.0
libcudart.so链接库未找到
libprotobuf.so是Google Protocol Buffers库的动态链接库文件。它用于在计算机系统中使用Protocol Buffers数据进行序列化和反序列化操作。
报错如下:
/usr/bin/ld: warning: libcudart.so.11.0, needed by XXX, not found.
原因
cuda未安装或cuda版本存在问题,抑或版本过低,抑或版本过高,需要安装CUDA >= 11.0 并且CUDA <= 12.0。
解决方法
前往官网,下载对应版本的cuda并安装,例如我选择安装cuda11.1,依次选择Linux-x86_64-Ubuntu-18.04-runfile(local),如下图所示。
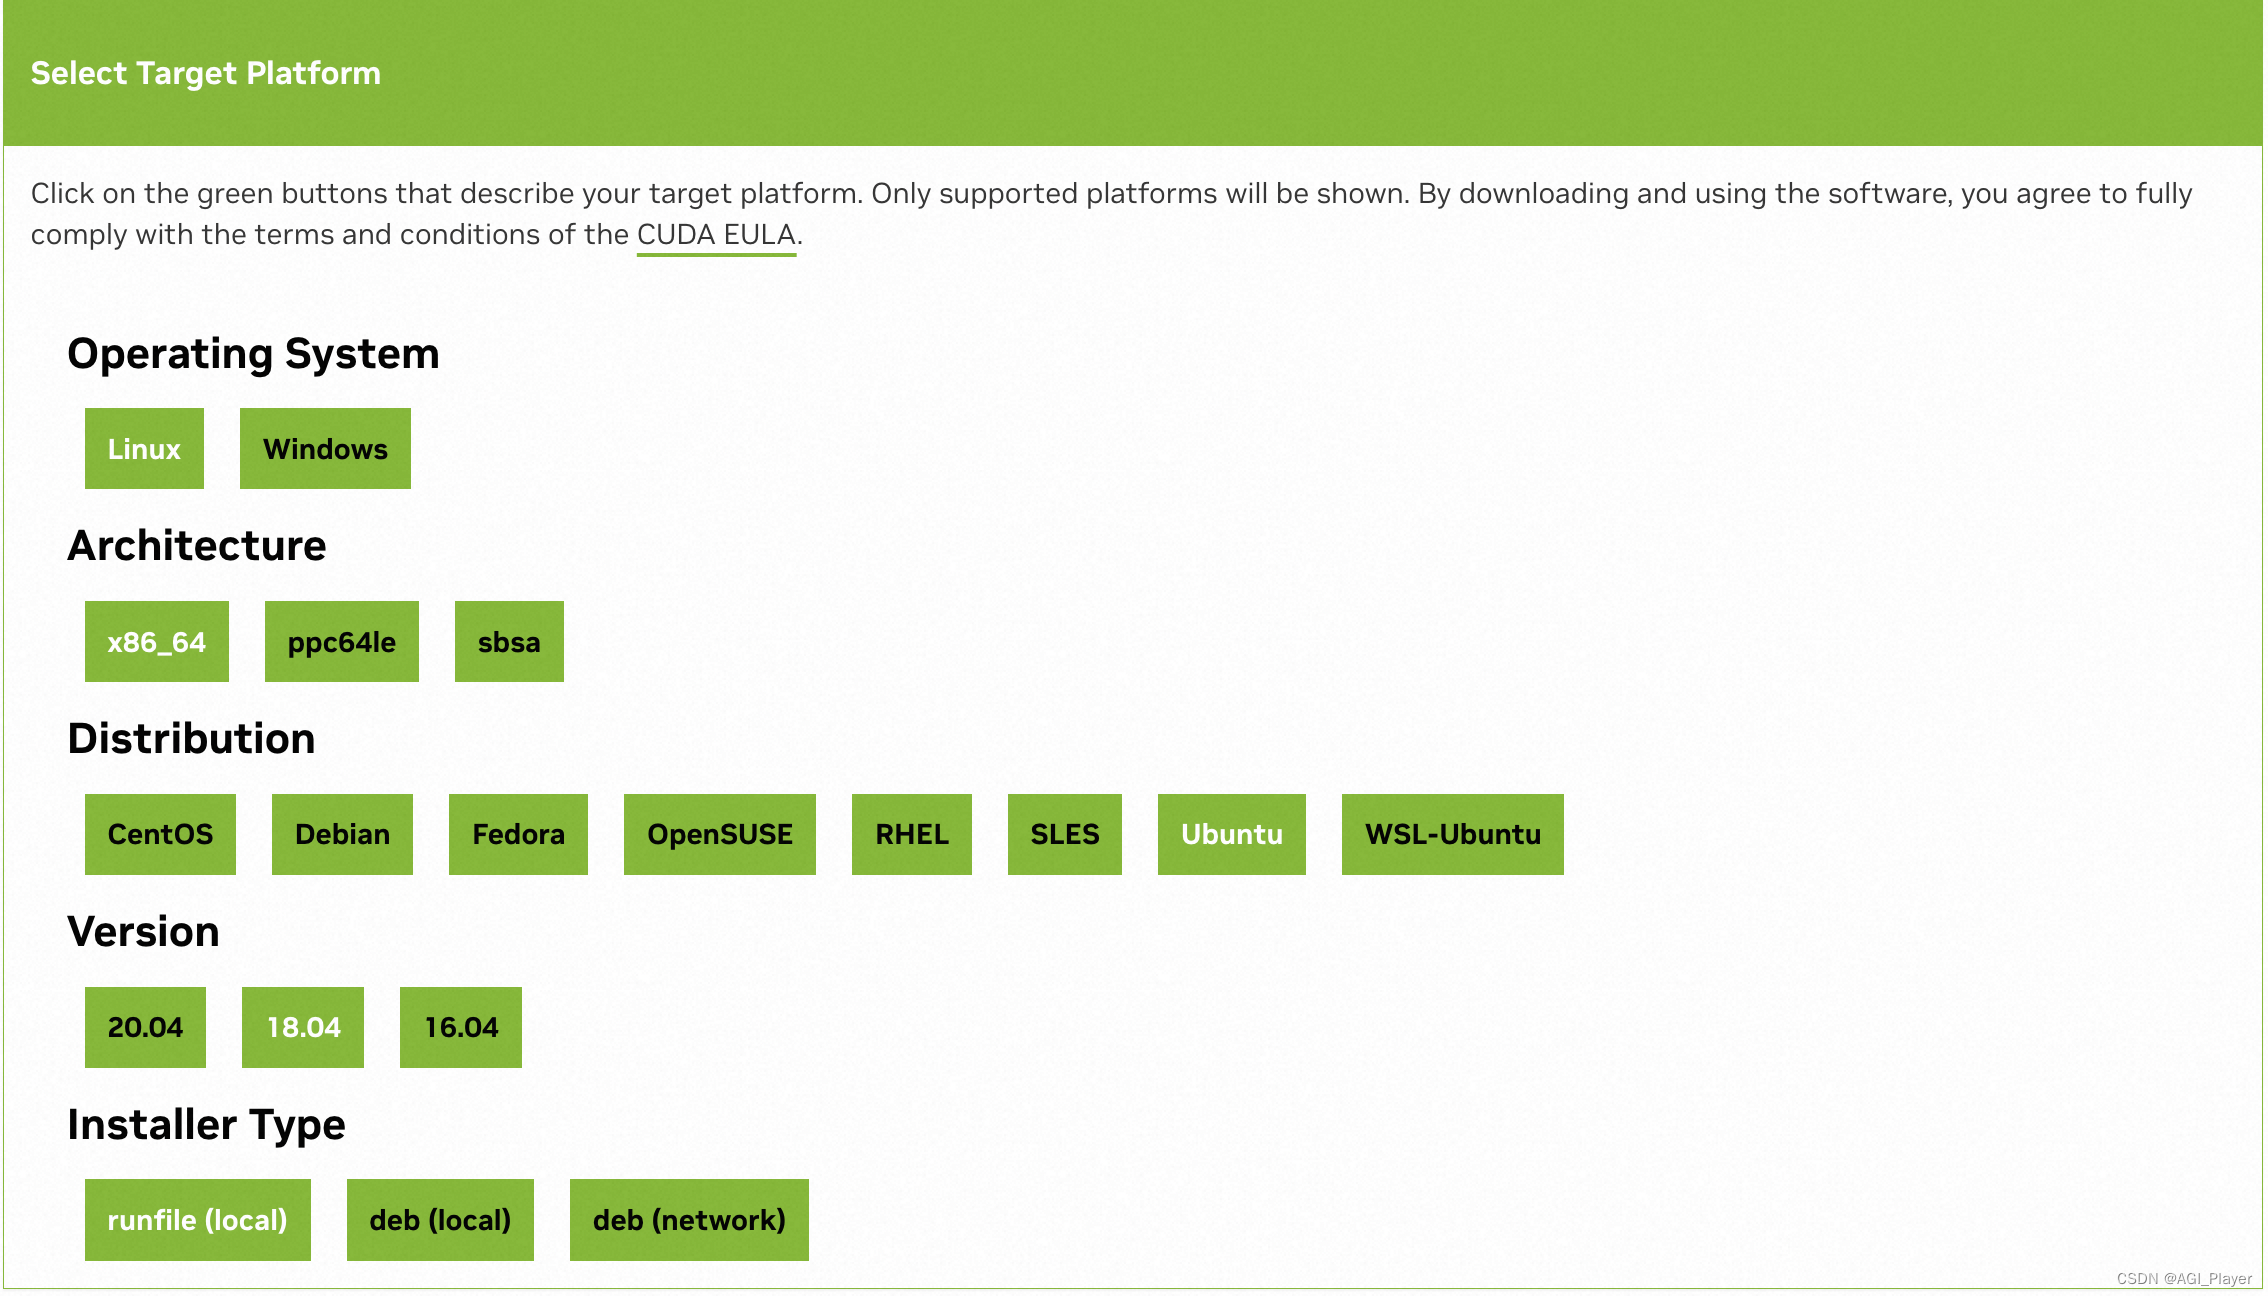
注意,我选择deb(local)安装会报以下错误,因此选择runfile(local)进行安装。
Reading package lists... Done
Building dependency tree
Reading state information... Done
Some packages could not be installed. This may mean that you have
requested an impossible situation or if you are using the unstable
distribution that some required packages have not yet been created
or been moved out of Incoming.
The following information may help to resolve the situation:

The following packages have unmet dependencies:
 cuda : Depends: cuda-12-1 (>= 12.1.1) but it is not going to be installed
W: Target Packages (main/binary-amd64/Packages) is configured multiple times in /etc/apt/sources.list.d/borglab-ubuntu-gtsam-release-4_0-bionic.list:1 and /etc/apt/sources.list.d/borglab-ubuntu-gtsam-release-4_0-bionic.list:3
W: Target Packages (main/binary-i386/Packages) is configured multiple times in /etc/apt/sources.list.d/borglab-ubuntu-gtsam-release-4_0-bionic.list:1 and /etc/apt/sources.list.d/borglab-ubuntu-gtsam-release-4_0-bionic.list:3
W: Target Packages (main/binary-all/Packages) is configured multiple times in /etc/apt/sources.list.d/borglab-ubuntu-gtsam-release-4_0-bionic.list:1 and /etc/apt/sources.list.d/borglab-ubuntu-gtsam-release-4_0-bionic.list:3
W: Target Translations (main/i18n/Translation-en_US) is configured multiple times in /etc/apt/sources.list.d/borglab-ubuntu-gtsam-release-4_0-bionic.list:1 and /etc/apt/sources.list.d/borglab-ubuntu-gtsam-release-4_0-bionic.list:3
W: Target Translations (main/i18n/Translation-en) is configured multiple times in /etc/apt/sources.list.d/borglab-ubuntu-gtsam-release-4_0-bionic.list:1 and /etc/apt/sources.list.d/borglab-ubuntu-gtsam-release-4_0-bionic.list:3
W: Target DEP-11 (main/dep11/Components-amd64.yml) is configured multiple times in /etc/apt/sources.list.d/borglab-ubuntu-gtsam-release-4_0-bionic.list:1 and /etc/apt/sources.list.d/borglab-ubuntu-gtsam-release-4_0-bionic.list:3
W: Target DEP-11 (main/dep11/Components-all.yml) is configured multiple times in /etc/apt/sources.list.d/borglab-ubuntu-gtsam-release-4_0-bionic.list:1 and /etc/apt/sources.list.d/borglab-ubuntu-gtsam-release-4_0-bionic.list:3
W: Target DEP-11-icons-small (main/dep11/icons-48x48.tar) is configured multiple times in /etc/apt/sources.list.d/borglab-ubuntu-gtsam-release-4_0-bionic.list:1 and /etc/apt/sources.list.d/borglab-ubuntu-gtsam-release-4_0-bionic.list:3
W: Target DEP-11-icons (main/dep11/icons-64x64.tar) is configured multiple times in /etc/apt/sources.list.d/borglab-ubuntu-gtsam-release-4_0-bionic.list:1 and /etc/apt/sources.list.d/borglab-ubuntu-gtsam-release-4_0-bionic.list:3
W: Target CNF (main/cnf/Commands-amd64) is configured multiple times in /etc/apt/sources.list.d/borglab-ubuntu-gtsam-release-4_0-bionic.list:1 and /etc/apt/sources.list.d/borglab-ubuntu-gtsam-release-4_0-bionic.list:3
W: Target CNF (main/cnf/Commands-all) is configured multiple times in /etc/apt/sources.list.d/borglab-ubuntu-gtsam-release-4_0-bionic.list:1 and /etc/apt/sources.list.d/borglab-ubuntu-gtsam-release-4_0-bionic.list:3
E: Unable to correct problems, you have held broken packages.
运行如下命令,可以顺利安装:
wget https://developer.download.nvidia.com/compute/cuda/11.1.0/local_installers/cuda_11.1.0_455.23.05_linux.run
sudo sh cuda_11.1.0_455.23.05_linux.run
更多详细的安装过程,例如:运行.run文件后如何勾选选项等,可以参照我的另一篇博客CUDA安装。
libprotobuf.so链接库未找到
libcudart.so是CUDA运行时库的动态链接库文件。CUDA(Compute Unified Device Architecture)是由NVIDIA开发的用于并行计算的平台和编程模型。该库文件提供了在使用CUDA进行GPU编程时所需的运行时支持。
报错如下:
CMake Error at /usr/share/cmake-3.16/Modules/FindPackageHandleStandardArgs.cmake:146 (message):
Could NOT find Protobuf (missing: Protobuf_INCLUDE_DIR)
Call Stack (most recent call first):
/usr/share/cmake-3.16/Modules/FindPackageHandleStandardArgs.cmake:393 (_FPHSA_FAILURE_MESSAGE)
/usr/share/cmake-3.16/Modules/FindProtobuf.cmake:624 (FIND_PACKAGE_HANDLE_STANDARD_ARGS)
CMakeLists.txt:31 (find_package)
或者
/usr/bin/ld: warning: libprotobuf.so.17, needed by XXX, not found.
原因
protobuf未安装或系统默认安装的protobuf版本较低,需要按照高版本的protobuf。
解决方法
如果运行指令sudo apt install libprotobuf-dev无法安装对应版本的protobuf,则可以按照如下方法进行安装 :
- 前往protobuf的github官网下载对应版本(此处安装的是libprotobuf-dev==3.6.1)。
git clone https://github.com/protocolbuffers/protobuf.git
git checkout v3.6.1
- 运行如下命令进行安装:
./autogen.sh
./configure --prefix=/usr/local/protobuf #为了以后便于管理
make -j4 #多核编译加快速度
sudo make install
- 安装完之后,动态库的位置在/usr/local/protobuf/lib/,并创建(或修改)软链接:
sudo ln -s /usr/local/protobuf/lib/libprotoc.so.17.0.0 /usr/lib/libprotoc.so
sudo ln -s /usr/local/protobuf/lib/libprotobuf.so.17.0.0 /usr/lib/libprotobuf.so
sudo ln -s /usr/local/protobuf/lib/libprotobuf-lite.so.17.0.0 /usr/lib/libprotobuf-lite.so
# x86_64
sudo ln -s /usr/local/protobuf/lib/libprotobuf.so.17.0.0 /usr/lib/x86_64-linux-gnu/libprotobuf.so
sudo ln -s /usr/local/protobuf/lib/libprotobuf-lite.so.17.0.0 /usr/lib/x86_64-linux-gnu/libprotobuf-lite.so
这一点要注意:若你的电脑原protobuf库的位置不在/usr/local/protobuf/lib/,需要对应修改一下。


 2298
2298


 被折叠的 条评论
为什么被折叠?
被折叠的 条评论
为什么被折叠?
 到【灌水乐园】发言


