


public static void main(String[] args) throws IOException, ParseException {
//数据
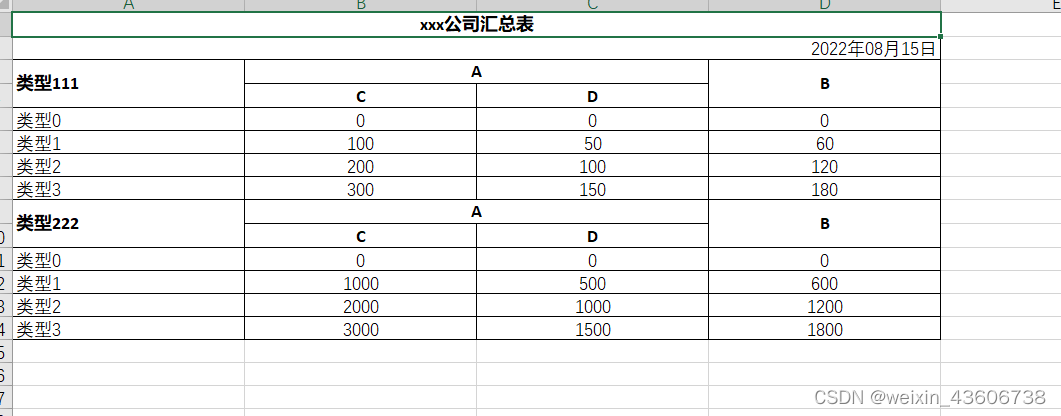
String ownerName = "xxx公司";
String date = "2022年08月15日";
SXSSFWorkbook wb = new SXSSFWorkbook();
//创建一个sheel页
SXSSFSheet sheet = wb.createSheet("汇总表");
//设置列宽
sheet.setDefaultColumnWidth(25);
//创建一行 设置第一行表头
Row row1 = sheet.createRow(0);
sheet.addMergedRegion(new CellRangeAddress(row1.getRowNum(),row1.getRowNum(), row1.getRowNum(), 3));
for(int i=0;i<=3;i++){
Cell titleCell = row1.createCell(i);
if(i == 0){
titleCell.setCellValue(ownerName + "汇总表");
}
titleCell.setCellStyle(createStyle(wb,1));
}
//创建第二行表头
Row row2 = sheet.createRow(1);
sheet.addMergedRegion(new CellRangeAddress(row2.getRowNum(), row2.getRowNum(), 0, 3));
for(int i=0;i<=3;i++){
Cell cell = row2.createCell(i);
if(i == 0){
cell.setCellValue(date);
}
cell.setCellStyle(createStyle(wb,2));
}
//TODO 数据---提取数据
Map<String, List<Map<String, Object>>> map = new HashMap();
List<Map<String, Object>> DMSMapList = new ArrayList();
for (int i = 0; i < 4; i++) {
Map<String, Object> lm = new HashMap();
lm.put("alarmTypeName", "类型" + i );
lm.put("alarmAllNum", i * 100 );
lm.put("verifyNum", i * 50);
lm.put("interveneNum", i * 60);
DMSMapList.add(lm);
}
map.put("A", DMSMapList);
List<Map<String, Object>> ADASMapList = new ArrayList();
for (int i = 0; i < 4; i++) {
Map<String, Object> lm = new HashMap();
lm.put("alarmTypeName", "类型" + i );
lm.put("alarmAllNum", i * 1000 );
lm.put("verifyNum", i * 500);
lm.put("interveneNum", i * 600);
ADASMapList.add(lm);
}
map.put("B", ADASMapList);
ArrayList<String> alarm_p = Lists.newArrayList("A","B");
Map<String,String> alarm_p_name = new HashMap();
alarm_p_name.put("A","类型111");
alarm_p_name.put("B","类型222");
//写入数据
int rowNum = row2.getRowNum();
for(String s : alarm_p){
createTitle(wb,sheet, alarm_p_name.get(s) ,rowNum+1);
rowNum = rowNum + 2;//表头有两行
List<Map<String, Object>> list = map.get(s);
if(!CollectionUtils.isEmpty(list)){
for(Map<String, Object> dataMap : list){
Row row = sheet.createRow(rowNum=rowNum+1);
Cell cellTemp1 = row.createCell(0);
cellTemp1.setCellValue(dataMap.get("alarmTypeName").toString());
cellTemp1.setCellStyle(createStyle(wb,4));
Cell cellTemp2 = row.createCell(1);
cellTemp2.setCellValue(Integer.parseInt(dataMap.get("alarmAllNum").toString()));
cellTemp2.setCellStyle(createStyle(wb,0));
Cell cellTemp3 = row.createCell(2);
cellTemp3.setCellValue(Integer.parseInt(dataMap.get("verifyNum").toString()));
cellTemp3.setCellStyle(createStyle(wb,0));
Cell cellTemp4 = row.createCell(3);
cellTemp4.setCellValue(Integer.parseInt(dataMap.get("interveneNum").toString()));
cellTemp4.setCellStyle(createStyle(wb,0));
}
}
}
// 输出到本地
String excelName = "D:/excel/myExcel.xls";
FileOutputStream out = null;
try {
out = new FileOutputStream(excelName);
wb.write(out);
out.flush();
out.close();
} catch (Exception e) {
e.printStackTrace();
} finally {
if (out != null)
try {
out.close();
} catch (IOException e) {
e.printStackTrace();
}
}
}
/**
* 动态 多行表头
* @param wb
* @param sheet
* @param name
* @param rowNum
*/
public static void createTitle(SXSSFWorkbook wb, SXSSFSheet sheet,String name ,int rowNum){
//创建第三行表头
Row row3 = sheet.createRow(rowNum);
sheet.addMergedRegion(new CellRangeAddress(row3.getRowNum(), row3.getRowNum()+1, 0, 0));
Cell row3cell1 = row3.createCell(0);
row3cell1.setCellValue(name);
row3cell1.setCellStyle(createStyle(wb,3));
sheet.addMergedRegion(new CellRangeAddress(row3.getRowNum(), row3.getRowNum(), 1, 2));
Cell row3cell2 = row3.createCell(1);
row3cell2.setCellValue("A");
row3cell2.setCellStyle(createStyle(wb,1));
sheet.addMergedRegion(new CellRangeAddress(row3.getRowNum(), row3.getRowNum()+1, 3, 3));
Cell row3cell3 = row3.createCell(3);
row3cell3.setCellValue("B");
row3cell3.setCellStyle(createStyle(wb,1));
//创建第四行表头
Row row4 = sheet.createRow(rowNum+1);
Cell row4cell1 = row4.createCell(1);
row4cell1.setCellValue("C");
row4cell1.setCellStyle(createStyle(wb,1));
Cell row4cell2 = row4.createCell(2);
row4cell2.setCellValue("D");
row4cell2.setCellStyle(createStyle(wb,1));
Cell row4cell3 = row4.createCell(3);
row4cell3.setCellStyle(createStyle(wb,1));
}
/**
* 设置样式
* @param wb
* @param num
* @return
*/
public static CellStyle createStyle(SXSSFWorkbook wb,int num){
switch(num){
case 1 :
CellStyle style1 = wb.createCellStyle();
style1.setAlignment(HorizontalAlignment.CENTER);//水平居中
style1.setVerticalAlignment(VerticalAlignment.CENTER);//垂直居中
setBorder(style1);//边框
Font font = wb.createFont();//字体
//font.setFontName("Arial");//字号
font.setBold(true);//加粗
style1.setFont(font);
return style1;
case 2 :
CellStyle style2 = wb.createCellStyle();
style2.setAlignment(HorizontalAlignment.RIGHT);//水平靠右
style2.setVerticalAlignment(VerticalAlignment.CENTER);//垂直居中
setBorder(style2);
return style2;
case 3 :
CellStyle style3 = wb.createCellStyle();
style3.setAlignment(HorizontalAlignment.LEFT);//水平靠左
style3.setVerticalAlignment(VerticalAlignment.CENTER);//垂直居中
setBorder(style3);
Font font3 = wb.createFont();
font3.setBold(true);//加粗
style3.setFont(font3);
return style3;
case 4 :
CellStyle style4 = wb.createCellStyle();
style4.setAlignment(HorizontalAlignment.LEFT);//水平靠左
style4.setVerticalAlignment(VerticalAlignment.CENTER);//垂直居中
setBorder(style4);
return style4;
default :
CellStyle style = wb.createCellStyle();
style.setAlignment(HorizontalAlignment.CENTER);//水平居中
style.setVerticalAlignment(VerticalAlignment.CENTER);//垂直居中
setBorder(style);
return style;
}
}
/**
* 设置边框
* @param style
*/
private static void setBorder(CellStyle style){
style.setBorderBottom(BorderStyle.THIN); //下边框
style.setBorderLeft(BorderStyle.THIN);//左边框
style.setBorderTop(BorderStyle.THIN);//上边框
style.setBorderRight(BorderStyle.THIN);//右边框
}
依赖
   <dependency>
      <groupId>cn.afterturn</groupId>
      <artifactId>easypoi-base</artifactId>
      <version>4.1.0</version>
    </dependency>
    <dependency>
      <groupId>cn.afterturn</groupId>
      <artifactId>easypoi-web</artifactId>
      <version>4.1.0</version>
    </dependency>
    <dependency>
      <groupId>cn.afterturn</groupId>
      <artifactId>easypoi-annotation</artifactId>
      <version>4.1.0</version>
    </dependency>
复杂表格导出,可以使用easypoi的模板导出,我这个有多行动态表头,使用模板导出效果不好
参考官方文档,还有pdf导出,文档导出等等
https://gitee.com/lemur/easypoi
模板导出
直接上demo
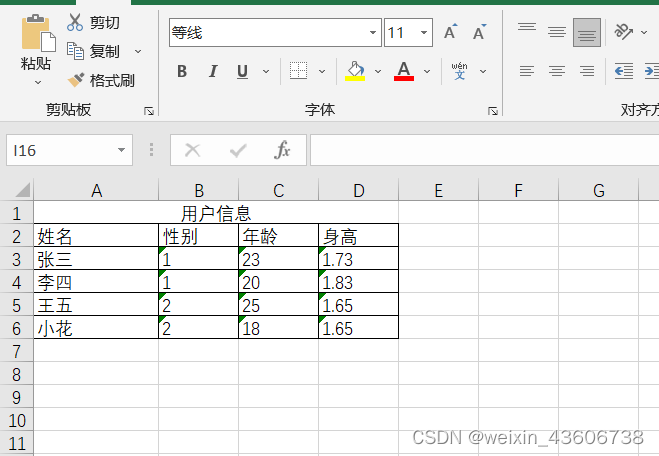
List<User> dataList = new ArrayList<>();
        User user1 = new User("张三", 23, 1, 1.73F);
        User user2 = new User("李四", 20, 1, 1.83F);
        User user3 = new User("王五", 25, 2, 1.65F);
        User user4 = new User("小花", 18, 2, 1.65F);
        dataList.add(user1);
        dataList.add(user2);
        dataList.add(user3);
        dataList.add(user4);

        FileOutputStream out = null;
        InputStream templateInputStream = null;
        try {
            // 模板导出 模板地址
            String templatePath = "/excel/template.xlsx"; //resources目录下
            templateInputStream = this.getClass().getResourceAsStream(templatePath);
            // HSSFWorkbook 扩展名xls XSSFWorkbook 扩展名xlsx
            Workbook templateWorkbook = new XSSFWorkbook(templateInputStream);
            //这里不太友好 TemplateExportParams的构造方法竟然没有输入流参数,全都是指定模板url来构造,但我的模板是直接放在项目里的resource目录下的  以jar报形式启动项目 就找不到文件,所以只能先构造一个Workbook 然后set进去
            TemplateExportParams params = new TemplateExportParams("templateUrl", 1);
            params.setTemplateWb(templateWorkbook);
            //数据
            Map<String, Object> map = new HashMap<>();
            map.put("list", dataList);

            //1.直接浏览器下载
            /*response.setHeader(HttpHeaders.CONTENT_TYPE, MediaType.APPLICATION_OCTET_STREAM_VALUE);
            response.setHeader(HttpHeaders.CONTENT_DISPOSITION, "attachment;filename=" + URLEncoder.encode("模板导出.xls", "utf-8"));
            Workbook workbook = ExcelExportUtil.exportExcel(params, map);
            workbook.write(response.getOutputStream());*/

            //2.输出到指定文件夹
            File file =new File("D:/excel");
            //如果文件夹不存在则创建
            if  (!file .exists()  && !file .isDirectory()) {
                file .mkdir();
            }


            // 输出到本地
            String excelName = "D:/excel/myExcel.xlsx";
            Workbook workbook = ExcelExportUtil.exportExcel(params, map);
            out = new FileOutputStream(excelName);
            workbook.write(out);
            out.flush();

        } catch (Exception e) {
            e.printStackTrace();
        }finally {
            if(out !=null){
                try {
                    out.close();
                } catch (IOException e) {
                    throw new RuntimeException(e);
                }
            }

            if(templateInputStream !=null){
                try {
                    templateInputStream.close();
                } catch (IOException e) {
                    throw new RuntimeException(e);
                }
            }
        }

    }
JAVA
/**
     * 将double格式化为指定小数位的String,不足小数位用0补全
     */
    private String roundByScale(Double v, int scale) {
        if(scale <= 0){
            return new DecimalFormat("0").format(v);
        }
        String formatStr = "0.";
        for(int i=0;i<scale;i++){
            formatStr = formatStr + "0";
        }
        return new DecimalFormat(formatStr).format(v);
    }


 1万+
1万+


 被折叠的 条评论
为什么被折叠?
被折叠的 条评论
为什么被折叠?
 到【灌水乐园】发言


