


简介
优点
时间旅行:
测试时拍摄快照,方便查看任意时刻发生的情况
方便调试:
支持新型测试:可以人为创造错误状态等直接进行测试
快捷方式:快速到达测试区域,利用cookie等跳过登录等重复流程
UI直观展示状态
自动等待
不用等待或睡眠,自动等待命令和断言可执行或超时
支持多种浏览器
缺点
不支持同时测试多个浏览器或选项卡
不是通用的测试工具:只针对浏览器测试
对iframe支持有限
一次测试只能访问一个域
安装使用
安装node.js(官网下载msi安装)
安装cypress
npm init
生成package.json文件(项目不能和cypress同名不然后面会报错)
npm install cypress --save-dev
打开cypress
npx cypress open
目录结构
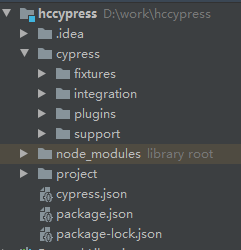
node_modules:依赖组件
cypress/integration:测试示例
plugins:插件
support:支持文件,先于所有测试文件之前执行一次
cypress.json 默认配置文件
代码结构

界面
仪表盘
Run选项卡可以查看每次测试的运行情况。仪表盘功能需要登录,一些功能需要付费

用例界面
成功的测试用例

控制台输出

内容:
命令(已发出)
输出结果(此命令返回的内容)
元素(找到的元素数)
选择器(我们使用的参数)
页面事件

这些都不是我们发出的命令,而是cypress本身会在发生重要事件时记录的。它们是灰色的并且没有数字,通常包含:
网络XHR请求,URL哈希更改,页面加载,表单提交
测试失败的用例

1错误名称:这是错误的类型(例如 AssertionError、CypressError)
2错误消息:这通常会告诉您出了什么问题。它的长度可以变化。有些像示例中一样短,而有些则很长,并且可能会告诉您确切地如何修复错误。
3了解更多:一些错误消息包含“了解更多”链接,可将您带到相关的赛普拉斯文档。
4代码框架文件:这通常是堆栈跟踪的第一行,它显示在下面的代码框架中突出显示的文件、行号和列号。单击此链接将在您首选的文件打开器中打开文件,并在支持它的编辑器中突出显示行和列。
5代码框架:这显示了发生故障的代码片段,并突出显示了相关的行和列。
6查看堆栈跟踪:单击此按钮可切换堆栈跟踪的可见性。堆栈跟踪的长度各不相同。单击蓝色文件路径将在您首选的文件打开器中打开该文件。
7打印到控制台按钮:单击此按钮可将完整错误打印到您的 DevTools 控制台。这通常允许您单击堆栈跟踪中的行并在开发者工具中打开文件。
核心概念
查询
cypress捆绑了jquery
jquery查询
$(’.my-selector’)
cypress查询
cy.get(’.my-selector’)
区别:当无法从选择器中找到匹配元素时,jquery返回空集合,cypress会再次尝试直到找到或超时(默认4秒,可以在配置中修改)
cypress可以智能提示唯一选择器

命令
支持链式命令,cypress会排队等待执行
不能同时(并行)竞赛或运行多个命令。
不能“意外”忘记返回或链接命令:可以将 Cypress 视为“排队”每个命令。最终,它们将在 100% 的情况下按照使用的确切顺序运行,不需要任何return cypress命令。
不能.catch向失败的命令添加错误处理程序:在cypress中,没有从失败命令中恢复的内置错误。一个命令及其断言最终都会通过,或者如果一个命令失败,所有剩余的命令都不会运行,并且测试失败
挂钩执行顺序:
beforeEach(() => {
  // root-level hook
  // runs before every test
})

describe('Hooks', () => {
  before(() => {
    // runs once before all tests in the block
  })

  beforeEach(() => {
    // runs before each test in the block
  })

  afterEach(() => {
    // runs after each test in the block
  })

  after(() => {
    // runs once after all tests in the block
  })
})
所有before()钩子运行(一次)
任何beforeEach()钩子运行
测试运行
任何afterEach()钩子运行
所有after()钩子运行(一次)
元素交互
用于与DOM交互的命令
.click()
cy.get('.btn').click() // Click on button
cy.focused().click() // Click on el with focus
cy.contains('Welcome').click() // Click on first el containing 'Welcome'
.dblclick()
cy.get('button').dblclick() // Double click on button
cy.focused().dblclick() // Double click on el with focus
cy.contains('Welcome').dblclick() // Double click on first el containing 'Welcome'
.rightclick()
cy.get('.menu').rightclick() // Right click on .menu
cy.focused().rightclick() // Right click on el with focus
cy.contains('Today').rightclick() // Right click on first el containing 'Today'
.type()
cy.get('input').type('Hello, World') // Type 'Hello, World' into the 'input'
.clear()
cy.get('[type="text"]').clear() // Clear text input
cy.get('textarea').type('Hi!').clear() // Clear textarea
cy.focused().clear() // Clear focused input/textarea
.check()
cy.get('[type="checkbox"]').check() // Check checkbox element
cy.get('[type="radio"]').first().check() // Check first radio element
.uncheck()
cy.get('[type="checkbox"]').uncheck() // Unchecks checkbox element
.select()
cy.get('select').select('user-1') // Select the 'user-1' option
.trigger()
cy.get('a').trigger('mousedown') // Trigger mousedown event on link
执行的检查操作:
将元素滚动到视图中。
确保元素未被隐藏。
确保该元素未被禁用。
确保元件未分离。
确保元素不是只读的。
确保元素没有动画。
确保元件未被覆盖。
如果仍然被固定位置的元素覆盖,则滚动页面。
在所需坐标处触发事件。
可见性、只读性、覆盖、动画、独立等
坐标:调整改变事件坐标
cy.get('button').click({ position: 'topLeft' })
动画:检查元素之前与当前位置的距离判断是否为动画元素。
覆盖:查看元素的覆盖关系(默认检查中心坐标)
滚动:设置’center’,‘top’,‘bottom’,‘nearest’,和false值,滚动页面上元素的位置
调试:对不可见元素及其原因进行查看时可以使用调试命令
// force the click and all subsequent events
// to fire even if this element isn't considered 'actionable'
cy.get('button').click({ force: true })
强制执行:传递force给命令以强制事件发生
// force the click and all subsequent events
// to fire even if this element isn't considered 'actionable'
cy.get('button').click({ force: true })
断言
默认断言
许多命令都有一个默认的、内置的断言,或者更确切地说,有一些要求可能会导致它失败而无需您添加的显式断言。
cy.visit()期望页面发送text/html带有200状态代码的内容。
cy.request() 期望远程服务器存在并提供响应。
cy.contains() 期望具有内容的元素最终存在于 DOM 中。
cy.get() 期望元素最终存在于 DOM 中。
.find() 还期望元素最终存在于 DOM 中。
.type()期望元素最终处于可键入状态。
.click()期望元素最终处于可操作状态。
.its() 期望最终找到当前主题的属性。
某些命令可能具有特定要求,导致它们立即失败而无需重试:例如cy.request()。其他的,比如基于 DOM 的命令会自动重试并等待它们对应的元素存在,然后才会失败。还有操作命令将在失败之前自动等待其元素达到可操作状态。
写法
隐式主语:使用.should()或.and()。因为发生故障时会反复重新运行断言至通过或超时,故要确保整个函数多次执行不会产生副作用
显式主题:使用expect
cy.get('#header a')
  .should('have.class', 'active')
  .and('have.attr', 'href', '/users')
重试
单个命令后跟多个断言会按顺序重试每个断言。因此,当第一个断言通过时,将使用第一个和第二个断言重试该命令。当第一个和第二个断言通过时,将使用第一个、第二个和第三个断言重试该命令,依此类推。不完全通过会显示哪个通过哪个没通过
有些命令不会重试如click,因为可能会更改内容,但click会等待到元素可操作,先检查
用户可以点击元素吗?
元素是不可见的吗?
该元素是否在另一个元素后面?
元素有disabled属性吗?
处理深度嵌套的 JavaScript 属性时,尽量不要将其拆分为多个调用。相反,使用.分隔符将属性名称组合到一个调用中
// 🛑 not recommended
// only the last "its" will be retried
cy.window()
  .its('app') // runs once
  .its('model') // runs once
  .its('todos') // retried
  .should('have.length', 2)

// ✅ recommended
cy.window()
  .its('app.model.todos') // retried
  .should('have.length', 2)
超时
所有断言共享相同的超时值,修改的超时会影响当前和之后所有断言
cy.get('.mobile-nav', { timeout: 10000 })
  .should('be.visible')
  .and('contain', 'Home')
命令的默认超时:visit和exec是60秒,cy.wait()实际上使用 2 种不同的超时。在等待路由别名时,我们会等待 的匹配请求5000ms,然后另外等待服务器对 的响应30000ms。
测试
应当编写100%确定的测试,不要用自己的UI建立状态,用cookie来建立
测试有四种状态:通过,失败,待定,跳过。
通过的测试成功完成了所有命令,没有失败任何断言。在多次测试重试后通过,命令日志会显示一些失败的尝试,但最终整个测试成功完成。
待定=pending,会标记为挂起在这里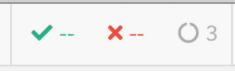
跳过:本来要执行但由于某些运行时问题而被跳过的测试被标记为“跳过”。
变量与别名
变量:
不能分配或使用cypress的返回值
// this won't work the way you think it does
const button = cy.get('button')
const form = cy.get('form')

button.click()
访问要通过then
cy.get('button').then(($btn) => {
  // $btn is the object that the previous
  // command yielded us
})
别名:使用as赋予别名,通过this使用
beforeEach(() => {
  // alias the $btn.text() as 'text'
  cy.get('button').invoke('text').as('text')
})

it('has access to text', function () {
  this.text // is now available
})
指南
常用命令
运行Cypress:需要项目路径下执行以下命令启动,例如:项目路径为/Node_js/codes,在该路径下执行如下命令:
-
命令行启动
npx cypress run -
以测试运行器方式启动
npx cypress open
查看配置信息:在项目路径下执行如下命令,会打印有关Cypress 和当前环境的信息。
npx cypress info
验证 Cypress 是否已正确安装并且是可执行的。
npx cypress verify
查看版本:打印已安装的 Cypress 二进制版本、Cypress 软件包版本、用于构建 Cypress 的 Electron 版本以及捆绑的 Node 版本。
npx cypress version
还可以单独打印组件版本号
cypress version --component package
6.0.0
cypress version --component binary
6.0.0
cypress version --component electron
10.1.5
cypress version --component node
12.14.1
缓存相关:npx cypress cache [command]
- 打印Cypress缓存文件路径
npx cypress cache path - 清除Cypress缓存。运行此命令后,您需要cypress install在再次运行 Cypress 之前运行。
npx cypress cache clear
调试命令:可以启用调试日志(Window)
set DEBUG=cypress:*
npx cypress run
Cypress 是一个相当大且复杂的项目,涉及十几个或更多子模块,默认输出可能会让人不知所措。为此,我们可以给输出到特定模块
//一级子模块
DEBUG=cypress:cli cypress run
//二级子模块
DEBUG=cypress:launcher cypress run
……
模块API
除了上述采用 cypress run 或 cypress open 命令的运行方式,Cypress还允许将它视为一个Node Module 来运行,然后通过Node.js运行Cypress。
当想在运行后直接访问测试结果时,此功能很有用
- 挑选测试用例运行
- 整合所有测试用例,提供一份完整HTML格式的测试报告
- 重新运行单个失败的 spec 文件
- 发送有关测试失败的通知,包括附带的屏幕截图
- 启动其他构建行为或脚本
其中最重要的两个命令:cypress.run()和cypress.open()这两个命令的区别与cypress run 与cypress open 类似
// e2e-run-tests.js
// 导入 cypress 模块
const cypress = require('cypress')
//执行run命令
cypress.run({
  reporter: 'junit',
  browser: 'chrome',
  config: {
    baseUrl: 'http://localhost:8080',
    video: true,
  },
  env: {
    login_url: '/login',
    products_url: '/products',
  },
})
运行该文件
node e2e-run-tests.js
返回结果
{
  "cypressVersion": "3.0.2",
  "endedTestsAt": "2018-07-11T17:53:35.675Z",
  "browserName": "electron",
  "browserPath": "path/to/browser",
  "browserVersion": "59.0.3071.115",
  "config": {...},
  "osName": "darwin",
  "osVersion": "14.5.0",
  "runs": [{
    "error": null,
    "hooks": [{
      "hookName": "before each",
      "title": [ "before each hook" ],
      "body": "function () {\n  expect(true).to.be["true"];\n}"
    }],
    "reporter": "spec",
    "reporterStats": {...},
    "shouldUploadVideo": true,
    "spec": {...},
    "stats": {
      "suites": 1,
      "tests": 1,
      "passes": 0,
      "pending": 0,
      "skipped": 0,
      "failures": 1,
      "startedAt": "2020-08-05T08:38:37.589Z",
      "endedAt": "2018-07-11T17:53:35.675Z",
      "duration": 1171
    },
    "tests": [{
      "title": [ "test" ],
      "state": "failed",
      "body": "function () {\n  expect(true).to.be["false"];\n}",
      "displayError": "AssertionError: expected true to be false\n' +
      '    at Context.eval (...cypress/integration/spec.js:5:21",
      "attempts": [{
        "state": "failed",
        "error": {
          "message": "expected true to be false",
          "name": "AssertionError",
          "stack": "AssertionError: expected true to be false\n' +
      '    at Context.eval (...cypress/integration/spec.js:5:21"
        },
        "screenshots": [{
          "name": null,
          "takenAt": "2020-08-05T08:52:20.432Z",
          "path": "User/janelane/my-app/cypress/screenshots/spec.js/test (failed).png",
          "height": 720,
          "width": 1280
        }],
        "startedAt": "2020-08-05T08:38:37.589Z",
        "duration": 1171,
        "videoTimestamp": 4486
      }]
    }],
    "video": "User/janelane/my-app/cypress/videos/abc123.mp4"
  }],
  "runUrl": "https://dashboard.cypress.io/projects/def456/runs/12",
  "startedTestsAt": "2018-07-11T17:53:35.463Z",
  "totalDuration": 212,
  "totalFailed": 1,
  "totalPassed": 0,
  "totalPending": 0,
  "totalSkipped": 0,
  "totalSuites": 1,
  "totalTests": 1,
}
若Cypress 可以运行,但由于某种原因无法启动测试。 在这种情况下,解析的值是一个具有两个字段的对象:
{
  "failures": 1,    // non-zero number
  "message": "..."  // error message
}
此时,可以在cypress.run()中添加一个catch用来处理这个错误。
// e2e-run-tests.js
const cypress = require('cypress')

cypress.run({...})
.then(result => {
  if (result.failures) {
    console.error('Could not execute tests')
    console.error(result.message)
    process.exit(result.failures)
  }

// 打印测试结果并退出
   // 以失败测试的数量作为退出代码
  process.exit(result.totalFailed)
})
.catch(err => {
  console.error(err.message)
  process.exit(1)
})
cypress.open()使用方式类似,具体可以参考官方文档
要想以命令行形式运行cypress.run(),可以参照以下方式:
// wrapper.js
const cypress = require('cypress')

const runOptions = await cypress.cli.parseRunArguments(process.argv.slice(2))
const results = await cypress.run(runOptions)
// process the "cypress.run()" results
终端命令:
node ./wrapper cypress run --browser chrome --config ...
调试
采用如下方式使用debugger,cy.visit()并cy.get()会立即返回。即,debugger之前的任何命令在其运行之前将被执行。
it('let me debug like a fiend', () => {
  cy.visit('/my/page/path')

  cy.get('.selector-in-question')

  debugger // Doesn't work
})
正确方式,使用.then()在执行期间使用Cypress 命令并debugger在适当的时间添加一个:
it('let me debug when the after the command executes', () => {
  cy.visit('/my/page/path')

  cy.get('.selector-in-question').then(($selectedElement) => {
 //cy.visit 和 cy.get 命令完成后,调试器被触发
    debugger
  })
})
第一次通过时,cy.visit() 和 cy.get() 链(及其 .then() 附加)被排队等待 Cypress 执行。 it 块退出,赛普拉斯开始工作:
- 页面被访问,赛普拉斯等待它加载。
- 查询该元素,如果没有立即找到,Cypress 会自动等待并重试片刻。
- 执行传递给 .then() 的函数,并将找到的元素交给它。
- 在 .then() 函数的上下文中,调试器被调用,停止浏览器并将焦点调用到开发人员工具。
- 如果将调试器放入应用程序代码中,则像往常一样检查应用程序的状态。
使用.debug()
我们可以使用.debug()这个辅助方法重写测试,它会返回上一条命令产生的结果。
it('let me debug like a fiend', () => {
  cy.visit('/my/page/path')

  cy.get('.selector-in-question').debug()
})
.debug()可以用于在测试期间快速检查应用程序的任何(或多个!)部分。可以将它附加到任何 Cypress 命令链,以查看当时系统的状态
逐步执行测试命令
可以使用命令通过命令运行测试.pause()命令。它允许在每个命令之后检查 Web 应用程序、DOM、网络和任何存储,以确保一切都按预期进行
it('adds items', () => {
  cy.pause()
  cy.get('.new-todo')
  // more commands
})
cypress 网络请求
cypress提供对包含HTTP 请求的整个生命周期中请求信息的对象的访问,使其能够对其属性进行断言,存根和模拟请求的响应。
主要功能:
- 断言请求的正文
- 断言请求的 url
- 断言请求的标头
- 存根响应的主体
- 存根响应的状态代码
- 存根响应的标头
- 延迟响应
- 等待响应发生
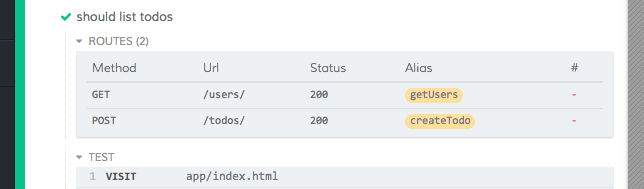
路由
cy.intercept(
  {
    method: 'GET', // Route all GET requests
    url: '/users/*', // that have a URL that matches '/users/*'
  },
  [] // and force the response to be: []
)
定义的路由会显示在
组织
每个新项目中都会有一个fixtures文件夹,存放路由相关的json文件例如
/cypress/fixtures/example.json
在使用路由时可以使用fixture方式进行读取
cy.intercept('GET', '/activities/*', { fixture: 'activities.json' })
等待
cypress可以通过使用cy.wait()强制等待路由
cy.intercept('/activities/*', { fixture: 'activities' }).as('getActivities')
cy.intercept('/messages/*', { fixture: 'messages' }).as('getMessages')

//访问仪表板,它应该发出匹配的请求
//含有以上两条路径
cy.visit('http://localhost:8888/dashboard')

//传递一个Route alias数组,强制Cypress等待
//直到看到每个匹配的请求的响应
cy.wait(['@getActivities', '@getMessages'])

// 在上面的wait命令解析之前,这些命令不会运行
cy.get('h1').should('contain', 'Dashboard')
断言
cypress可以对请求中的数据进行拦截和断言
// 监视POST请求到/users端点
cy.intercept('POST', '/users').as('new-user')
// 然后,通过操作web应用程序的用户界面来触发网络调用
cy.wait('@new-user').should('have.property', 'response.statusCode', 201)

// 我们可以再次获取已完成的拦截对象,以运行更多断言
//断言请求体
cy.get('@new-user') // yields the same interception object
  .its('request.body')
  .should(
    'deep.equal',
    JSON.stringify({
      id: '101',
      firstName: 'Joe',
      lastName: 'Black',
    })
  )

// 我们可以在一个“should”回调中放置多个断言
cy.get('@new-user').should(({ request, response }) => {
  expect(request.url).to.match(/\/users$/)
  expect(request.method).to.equal('POST')
  expect(response.headers, 'response headers').to.include({
    'cache-control': 'no-cache',
    expires: '-1',
    'content-type': 'application/json; charset=utf-8',
    location: '<domain>/users/101',
  })
})
测试重试
默认情况下,测试失败时不会重试。需要 在配置中启用测试重试才能使用此功能。开启测试重试后,测试会在失败时重试配置中的次数,在配置文件cypress.json中声明配置:
{
  "retries": 1
}
cypress run和cypress open命令下可以在cypress.json中设置不同的配置
{
  "retries": {
    // cypress run 默认为0
    "runMode": 2,
    // cypress open 默认为0
    "openMode": 2
  }
}
启动浏览器
Cypress 在运行中会启动一个浏览器,这个浏览器是可设置的。
-方式一:以Cypress测试运行器方式启动,可以在右上角直接更改浏览器

-
方式二:以命令行形式启动Cypress
Chrome浏览器:
//启动 Chrome
cypress run --browser chromium
//启动 Chromium
cypress run --browser chromium
//Chrome 测试版
cypress run --browser chrome:beta
//Chrome 金丝雀
cypress run --browser chrome:canary
//Microsoft Edge(基于 Chromium)
cypress run --browser edge
火狐浏览器:
cypress run --browser firefox
自定义可用浏览器
修改在运行测试之前找到的浏览器列表。
我们可以在插件文件中(cypress/plugins/index.js),配置对象中传递的浏览器列表,并返回希望在 cypress 打开期间可供选择的浏览器列表。
// cypress/plugins/index.js
module.exports = (on, config) => {
  // inside config.browsers array each object has information like
  // {
  //   name: 'chrome',
  //   channel: 'canary',
  //   family: 'chromium',
  //   displayName: 'Canary',
  //   version: '80.0.3966.0',
  //   path:
  //    '/Applications/Canary.app/Contents/MacOS/Canary',
  //   majorVersion: 80
  // }
  return {
    browsers: config.browsers.filter((b) => b.family === 'chromium'),
  }
}
测试策略
fixtures:放自定义json文件
integration:编写测试用例
plugins:插件
support:自定义指令
可执行项目:Cypress Real World App (RWA)
用于演示 Cypress 测试实践、配置和策略。
通常,通过第三方提供商进行身份验证在您的应用中登录用户需要访问托管在不同域上的登录页面 。由于每个 Cypress 测试仅限于访问同源域,因此我们可以通过与第三方身份验证 API 以编程方式交互以登录用户来颠覆访问和测试第三方登录页面。
一、访问Auth0认证程序
在Cypress中设置Auth应用程序凭据
要在我们的测试中访问测试用户凭据,我们需要将 Cypress 配置为使用在 cypress/plugins/index.js 文件内的 .env 中设置的 Auth0 环境变量。
// cypress/plugins/index.js
// initial imports ...

dotenv.config()

export default (on, config) => {
  // ...
  config.env.auth0_username = process.env.AUTH0_USERNAME
  config.env.auth0_password = process.env.AUTH0_PASSWORD
  config.env.auth0_domain = process.env.REACT_APP_AUTH0_DOMAIN
  config.env.auth0_audience = process.env.REACT_APP_AUTH0_AUDIENCE
  config.env.auth0_scope = process.env.REACT_APP_AUTH0_SCOPE
  config.env.auth0_client_id = process.env.REACT_APP_AUTH0_CLIENTID
  config.env.auth0_client_secret = process.env.AUTH0_CLIENT_SECRETD

  // plugins code ...

  return config
}
Auth0认证的自定义命令
以下是一个以编程方式登录Auth0的自定以命令,使用/oauth/token 端点并在 localStorage 中设置一个项目,并在 localStorage 中使用经过身份验证的用户详细信息设置一个项目,我们将在我们的应用程序代码中使用这些信息来验证我们是否在测试中进行了身份验证。
该loginByAuth0Api命令执行的步骤包括:
- 使用使用/oauth/token 端点执行程序化登录。
- 最后auth0Cypress使用access token,id_token和用户配置文件设置 localStorage 项。
在工程下cypress/support/commands.js文件添加如下配置:
// cypress/support/commands.js
Cypress.Commands.add(
  'loginByAuth0Api',
  (username: string, password: string) => {
    cy.log(`Logging in as ${username}`)
    const client_id = Cypress.env('auth0_client_id')
    const client_secret = Cypress.env('auth0_client_secret')
    const audience = Cypress.env('auth0_audience')
    const scope = Cypress.env('auth0_scope')

    cy.request({
      method: 'POST',
      url: `https://${Cypress.env('auth0_domain')}/oauth/token`,
      body: {
        grant_type: 'password',
        username,
        password,
        audience,
        scope,
        client_id,
        client_secret,
      },
    }).then(({ body }) => {
      const claims = jwt.decode(body.id_token)
      const {
        nickname,
        name,
        picture,
        updated_at,
        email,
        email_verified,
        sub,
        exp,
      } = claims

      const item = {
        body: {
          ...body,
          decodedToken: {
            claims,
            user: {
              nickname,
              name,
              picture,
              updated_at,
              email,
              email_verified,
              sub,
            },
            audience,
            client_id,
          },
        },
        expiresAt: exp,
      }

      window.localStorage.setItem('auth0Cypress', JSON.stringify(item))

      cy.visit('/')
    })
  }
)
在Auth0开发人员控制台中设置好第三方应用程序,同时配置好相应的环境变量以及相关指令。通过Cypress就可以自动为我们完成身份认证的测试。以下是测试代码:
describe('Auth0', function () {
  beforeEach(function () {
    cy.task('db:seed')
    cy.loginByAuth0Api(
      Cypress.env('auth_username'),
      Cypress.env('auth_password')
    )
  })

  it('shows onboarding', function () {
    cy.contains('Get Started').should('be.visible')
  })
})
调整Auth0应用程序
以下部分提供了有关构建或调整应用以使用Google身份验证的指南。
调整后端
验证来自前端的 API 请求,需要安装express-jwt和jwks-rsa并且需要配置Auth0 的JWT 验证。
// backend/helpers.ts
import jwt from 'express-jwt'
import jwksRsa from 'jwks-rsa'

dotenv.config()

const auth0JwtConfig = {
  secret: jwksRsa.expressJwtSecret({
    cache: true,
    rateLimit: true,
    jwksRequestsPerMinute: 5,
    jwksUri: `https://${process.env.REACT_APP_AUTH0_DOMAIN}/.well-known/jwks.json`,
  }),

  // Validate the audience and the issuer.
  audience: process.env.REACT_APP_AUTH0_AUDIENCE,
  issuer: `https://${process.env.REACT_APP_AUTH0_DOMAIN}/`,
  algorithms: ['RS256'],
}
定义一个 Express 中间件函数,用于我们的路由来验证前端 API 请求发送的Auth0 JWT 作为Bearer令牌。
// backend/helpers.ts

// ...

export const checkJwt = jwt(auth0JwtConfig).unless({ path: ['/testData/*'] })
定义完这个助手后,就可以全局应用于所有路由
// backend/app.ts
// initial imports ...
import { checkJwt } from './helpers'

// ...

if (process.env.REACT_APP_AUTH0) {
  app.use(checkJwt)
}

// routes ...
前端适配
需要更新前端 React 应用程序使其允许使用Auth0进行身份验证。如上所述,使用了用于 React 单页应用程序 (SPA)的auth0-react SDK。
首先,我们创建一个AppAuth0.tsx容器来呈现我们的应用程序,因为它通过Auth0 进行身份验证。该组件与组件相同App.tsx,但使用useAuth0React Hook,消除了对 Sign Up 和 Sign In 路由的需要,并使用withAuthenticationRequired高阶函数 (HOC)包装了组件。
useEffect添加了一个钩子以获取经过身份验证的用户的访问令牌,并AUTH0使用user和token对象发送事件以使用现有的身份验证层 ( authMachine.ts)。
// src/containers/AppAuth0.tsx

// initial imports ...

import { withAuthenticationRequired, useAuth0 } from '@auth0/auth0-react'

// ...

const AppAuth0 = () => {
  const { isAuthenticated, user, getAccessTokenSilently } = useAuth0()

  // ...

  useEffect(() => {
    ;(async function waitForToken() {
      const token = await getAccessTokenSilently()
      authService.send('AUTH0', { user, token })
    })()
  }, [user, getAccessTokenSilently])

  // ...

  const isLoggedIn =
    isAuthenticated &&
    (authState.matches('authorized') ||
      authState.matches('refreshing') ||
      authState.matches('updating'))

  return <div className={classes.root}>// ...</div>
}

export default withAuthenticationRequired(AppAuth0)
之后更新我们的入口点 ( index.tsx) 以使用来自auth0-react SDK SDK 的提供自定义onRedirectCallback. 我们为.env上面设置的 Auth0 环境变量传递 props ,并将我们的组件渲染为应用程序。
// src/index.tsx

// initial imports ...

import AppAuth0 from "./containers/AppAuth0";

// ..

const onRedirectCallback = (appState: any) => {
  history.replace((appState && appState.returnTo) || window.location.pathname);
};

if (process.env.REACT_APP_AUTH0) {
  ReactDOM.render(
    <Auth0Provider
      domain={process.env.REACT_APP_AUTH0_DOMAIN!}
      clientId={process.env.REACT_APP_AUTH0_CLIENTID!}
      redirectUri={window.location.origin}
      audience={process.env.REACT_APP_AUTH0_AUDIENCE}
      scope={process.env.REACT_APP_AUTH0_SCOPE}
      onRedirectCallback={onRedirectCallback}
    >
      <Router history={history}>
        <ThemeProvider theme={theme}>
          <AppAuth0 />
        </ThemeProvider>
      </Router>
    </Auth0Provider>,
    document.getElementById("root")
  );
} else {
  // render passport-local App.tsx
}
需要更新我们的AppAuth0.tsx 组件才能有条件地使用auth0CypresslocalStorage 项。
在下面的代码中,我们有条件地应用useEffect基于 Cypress 测试的块(使用window.Cypress)。
此外,withAuthenticationRequired如果我们不在 Cypress 中进行测试,我们将更新要包装的导出。这允许我们的应用程序在开发/生产中使用Auth0重定向登录流,但在 Cypress 中进行测试时则不能使用。
// src/containers/AppAuth0.tsx

// initial imports ...

import { withAuthenticationRequired, useAuth0 } from "@auth0/auth0-react";

// ...

const AppAuth0 = () => {
  const { isAuthenticated, user, getAccessTokenSilently } = useAuth0();

  // ...

  useEffect(() => {
      (async function waitForToken() {
        const token = await getAccessTokenSilently();
        authService.send("AUTH0", { user, token });
      })();
    }, [user, getAccessTokenSilently]);

  // If under test in Cypress, get credentials from "auth0Cypress" localstorage item and send event to our state management to log the user into the SPA
  if (window.Cypress) {
    useEffect(() => {
      const auth0 = JSON.parse(localStorage.getItem("auth0Cypress")!);
      authService.send("AUTH0", {
        user: auth0.body.decodedToken.user,
        token: auth0.body.access_token,
      });
    }, []);
  } else {
    useEffect(() => {
      (async function waitForToken() {
        const token = await getAccessTokenSilently();
        authService.send("AUTH0", { user, token });
      })();
    }, [isAuthenticated, user, getAccessTokenSilently]);
  }

  // ...

  const isLoggedIn =
    isAuthenticated &&
    (authState.matches("authorized") ||
      authState.matches("refreshing") ||
      authState.matches("updating"));

  return (
    <div className={classes.root}>
      // ...
    </div>
  );
};

// Conditional export wrapped with `withAuthenticationRequired` if we are not under test in Cypress.
let appAuth0 = window.Cypress ? AppAuth0 : withAuthenticationRequired(AppAuth0);
export default appAuth0
Auth速率限制登录
Auth0中设置了如下规定:“如果用户每分钟尝试以同一用户的身份从同一位置登录 20 次,无论是否拥有正确的凭据,速率限制都会生效。 发生这种情况时,用户每分钟可以尝试 10 次。”
如果遇到此速率限制,可以将编程方法添加到loginByAuth0命令中,以在测试运行之前清除被阻止的 IP。
具体操作:我们可以使用API 令牌将此令牌作为环境变量添加AUTH0_MGMT_API_TOKEN到应用程序中 .env。
// .env
// ... additional keys
AUTH0_MGMT_API_TOKEN = 'YOUR-MANAGEMENT-API-TOKEN'
这个令牌,可以添加与Auth0 Anomaly 的交互,将被阻止的 IP 地址端点移除到我们的loginByAuth0Api命令中。这将向Auth0 管理 API异常端点发送删除请求,以取消阻止可能在测试运行期间被阻止的 IP。
Cypress.Commands.add('loginByAuth0Api', (username, password) => {
  // Useful when rate limited by Auth0
  cy.exec('curl -4 icanhazip.com')
    .its('stdout')
    .then((ip) => {
      cy.request({
        method: 'DELETE',
        url: `https://${Cypress.env(
          'auth0_domain'
        )}/api/v2/anomaly/blocks/ips/${ip}`,
        auth: {
          bearer: Cypress.env('auth0_mgmt_api_token'),
        },
      })
    })

  // ... remaining loginByAuth0Api command
})
二、亚马逊 Cognito 身份验证
Amazon Cognito是Amazon Web Services (AWS)之外的身份验证提供商。
它“让您可以快速轻松地向您的 Web 和移动应用程序添加用户注册、登录和访问控制”,并且“可扩展到数百万用户并支持使用社交身份提供商登录,例如 Facebook、谷歌、和亚马逊,以及通过 SAML 2.0 的企业身份提供商。”
使用Amazon Cognito进行程序化身份验证
对于文档Amazon Cognito建议使用AWS中扩增框架验证库从AWS中扩增框架与部署的互动Amazon Cognito实例。
AWS Amplify Framework 中以编程方式将现有用户登录到应用程序所需的有限代码说明:
// 将“aws-amplify”库添加到您的应用程序中
// 使用您的 Amazon Cognito 凭证配置身份验证类别
Amplify.configure({
  Auth: {
    identityPoolId: 'XX-XXXX-X:XXXXXXXX-XXXX', // Amazon Cognito 身份池 ID
    region: 'XX-XXXX-X', // Amazon Cognito 区域
  },
})

//使用用户凭据调用 Auth.signIn
Auth.signIn(username, password)
  .then((user) => console.log(user))
  .catch((err) => console.log(err))
Amazon Cognito设置
需要创建一个Amazon Web Services (AWS)帐户。
在演示程序中Cypress Real World 应用程序中提供了 Amazon Cognito 集成。
克隆 Cypress Real World 应用程序并安装 AWS Amazon Amplify CLI,如下所示:
npm install -g @aws-amplify/cli
Cypress Real World 应用程序通过 AWS Amplify 框架身份验证库配置了一个可选的 Amazon Cognito 实例。
AWS Amazon Amplify CLI 用于预置配置环境和云资源所需的 Amazon Web Services (AWS) 基础设施。
首先,运行 amplify init 命令来初始化 Cypress Real World App。 这里需要使用 AWS 凭证预置项目。
amplify init
之后,运行amplify push命令以在云中创建Amazon Cognito资源:
amplify push
在Cypress中设置Amazon Cognito 应用程序凭证
首先,我们需要配置 Cypress 以使用在 cypress/plugins/index.js 文件内的 .env 中设置的 AWS Cognito 环境变量。 此外,我们正在使用 AWS Amplify CLI 构建过程中提供的 aws-exports.js。
// cypress/plugins/index.js
// initial imports ...

const awsConfig = require(path.join(__dirname, '../../aws-exports-es5.js'))

dotenv.config()

export default (on, config) => {
  // ...
  config.env.cognito_username = process.env.AWS_COGNITO_USERNAME
  config.env.cognito_password = process.env.AWS_COGNITO_PASSWORD
  config.env.awsConfig = awsConfig.default

  // plugins code ...

  return config
}
自定义Amazon Cognito 身份验证命令
将编写一个命令来执行到 Amazon Cognito 的编程登录,并使用经过身份验证的用户详细信息在 localStorage 中设置项目,我们将在我们的应用程序代码中使用这些信息来验证我们是否在测试中通过了身份验证。
在这个 loginByCognitoApi 命令中,我们调用 Auth.signIn,然后使用该响应设置 localStorage 内部的项目,以便 UI 知道我们的用户已登录到应用程序。
// cypress/support/auth-provider-commands/cognito.ts

import Amplify, { Auth } from 'aws-amplify'

Amplify.configure(Cypress.env('awsConfig'))

// Amazon Cognito
Cypress.Commands.add('loginByCognitoApi', (username, password) => {
  const log = Cypress.log({
    displayName: 'COGNITO LOGIN',
    message: [`🔐 Authenticating | ${username}`],
    // @ts-ignore
    autoEnd: false,
  })

  log.snapshot('before')

  const signIn = Auth.signIn({ username, password })

  cy.wrap(signIn, { log: false }).then((cognitoResponse) => {
    const keyPrefixWithUsername = `${cognitoResponse.keyPrefix}.${cognitoResponse.username}`

    window.localStorage.setItem(
      `${keyPrefixWithUsername}.idToken`,
      cognitoResponse.signInUserSession.idToken.jwtToken
    )

    window.localStorage.setItem(
      `${keyPrefixWithUsername}.accessToken`,
      cognitoResponse.signInUserSession.accessToken.jwtToken
    )

    window.localStorage.setItem(
      `${keyPrefixWithUsername}.refreshToken`,
      cognitoResponse.signInUserSession.refreshToken.token
    )

    window.localStorage.setItem(
      `${keyPrefixWithUsername}.clockDrift`,
      cognitoResponse.signInUserSession.clockDrift
    )

    window.localStorage.setItem(
      `${cognitoResponse.keyPrefix}.LastAuthUser`,
      cognitoResponse.username
    )

    window.localStorage.setItem('amplify-authenticator-authState', 'signedIn')
    log.snapshot('after')
    log.end()
  })

  cy.visit('/')
})
最后,可以在测试中使用 loginByCognitoApi 命令。通过 Amazon Cognito 以用户身份登录、完成入职流程和注销的测试。
describe('Cognito', function () {
  beforeEach(function () {
    // Seed database with test data
    cy.task('db:seed')

    // Programmatically login via Amazon Cognito API
    cy.loginByCognitoApi(
      Cypress.env('cognito_username'),
      Cypress.env('cognito_password')
    )
  })

  it('shows onboarding', function () {
    cy.contains('Get Started').should('be.visible')
  })
})
调整Amazon Cognito 应用程序进行测试
以下部分提供了有关构建或调整应用以使用Amazon Cognito身份验证的指南。
调整后端
为了验证来自前端的 API 请求,我们安装了express-jwt和jwks-rsa并配置了来自Amazon Cognito 的JWT 验证。
// backend/helpers.ts
// ... initial imports
import jwt from 'express-jwt'
import jwksRsa from 'jwks-rsa'

// ...

const awsCognitoJwtConfig = {
  secret: jwksRsa.expressJwtSecret({
    jwksUri: `https://cognito-idp.${awsConfig.aws_cognito_region}.amazonaws.com/${awsConfig.aws_user_pools_id}/.well-known/jwks.json`,
  }),

  issuer: `https://cognito-idp.${awsConfig.aws_cognito_region}.amazonaws.com/${awsConfig.aws_user_pools_id}`,
  algorithms: ['RS256'],
}
与Auth类似可以定义一个助手,用于我们的路由来验证前端 API 请求。
export const checkCognitoJwt = jwt(awsCognitoJwtConfig).unless({
  path: ['/testData/*'],
})
定义完这个助手后,就可以全局应用于所有路由:
// backend/app.ts
// initial imports ...
import { checkCognitoJwt } from './helpers'

// ...

if (process.env.REACT_APP_AWS_COGNITO) {
  app.use(checkCognitoJwt)
}

// routes ...
前端适配
需要更新我们的前端 React 应用程序,以允许使用AWS Amplify Framework 身份验证库通过Amazon Cognito进行身份验证。
首先,我们基于 App.tsx 组件创建一个 AppCognito.tsx 容器。
添加了一个 useEffect 钩子以获取经过身份验证的用户的访问令牌,并使用用户和令牌对象发送 COGNITO 事件以使用现有的身份验证层 (authMachine.ts)。 我们使用 AmplifyAuthenticator 组件提供来自 Amazon Cognito 的登录表单。
// src/containers/AppOkta.tsx
// initial imports ...
import Amplify from "aws-amplify";
import { AmplifyAuthenticator, AmplifySignUp, AmplifySignIn } from "@aws-amplify/ui-react";
import { AuthState, onAuthUIStateChange } from "@aws-amplify/ui-components";

import awsConfig from "../aws-exports";

Amplify.configure(awsConfig);

// ...

const AppCognito: React.FC = () => {

  // ...

  useEffect(() => {
    return onAuthUIStateChange((nextAuthState, authData) => {
      if (nextAuthState === AuthState.SignedIn) {
        authService.send("COGNITO", { user: authData });
      }
    });
  }, []);

  // ...

  return isLoggedIn ? (
    // ...
  ) : (
    <Container component="main" maxWidth="xs">
      <CssBaseline />
      <AmplifyAuthenticator usernameAlias="email">
        <AmplifySignUp slot="sign-up" usernameAlias="email" />
        <AmplifySignIn slot="sign-in" usernameAlias="email" />
      </AmplifyAuthenticator>
    </Container>
  );
};

export default AppCognito;
更新入口点 ( index.tsx) 以使用我们的AppCognito.tsx组件。
// src/index.tsx
// ... initial imports
import AppCognito from './containers/AppCognito'

// ...

if (process.env.REACT_APP_AWS_COGNITO) {
  ReactDOM.render(
    <Router history={history}>
      <ThemeProvider theme={theme}>
        <AppCognito />
      </ThemeProvider>
    </Router>,
    document.getElementById('root')
  )
}
三、Okta身份验证
如果尚未设置,您将需要在 Okta 开发人员控制台中创建一个 Okta 应用程序。创建 Okta 应用程序后,Okta 开发人员控制台将提供一个客户端 ID,该ID将与您的Okta 域一起用于配置 Okta SDK。
yarn dev:okta在启动Cypress Real World App时使用该命令。
在Cypress中设置Okta应用程序凭据
要在测试中访问测试用户凭据,需要将 Cypress 配置为使用 cypress/plugins/index.js 文件内的 .env 中设置的 Okta 环境变量。
// cypress/plugins/index.js
// initial imports ...

dotenv.config()

export default (on, config) => {
  // ...
  config.env.auth_username = process.env.AUTH_USERNAME
  config.env.auth_password = process.env.AUTH_PASSWORD
  config.env.okta_domain = process.env.REACT_APP_OKTA_DOMAIN
  config.env.okta_client_id = process.env.REACT_APP_OKTA_CLIENTID

  // plugins code ...

  return config
}
自定义Okta身份验证命令
编写一个名为loginByOktaApi以编程方式登录Okta的命令,并使用经过身份验证的用户详细信息在 localStorage 中设置一个项目,我们将在我们的应用程序代码中使用它来验证我们在测试中是否通过身份验证。
该loginByOktaApi命令将执行以下步骤:
- 使用Okta 身份验证 API执行程序化登录。
- 使用Okta Auth SDK中的OktaAuth客户端实例获取会话令牌。id_token
- 最后,oktaCypresslocalStorage 项使用access
token用户配置文件进行设置。
// cypress/support/commands.js
import { OktaAuth } from '@okta/okta-auth-js'

// Okta
Cypress.Commands.add('loginByOktaApi', (username, password) => {
  cy.request({
    method: 'POST',
    url: `https://${Cypress.env('okta_domain')}/api/v1/authn`,
    body: {
      username,
      password,
    },
  }).then(({ body }) => {
    const user = body._embedded.user
    const config = {
      issuer: `https://${Cypress.env('okta_domain')}/oauth2/default`,
      clientId: Cypress.env('okta_client_id'),
      redirectUri: 'http://localhost:3000/implicit/callback',
      scope: ['openid', 'email', 'profile'],
    }

    const authClient = new OktaAuth(config)

    return authClient.token
      .getWithoutPrompt({ sessionToken: body.sessionToken })
      .then(({ tokens }) => {
        const userItem = {
          token: tokens.accessToken.value,
          user: {
            sub: user.id,
            email: user.profile.login,
            given_name: user.profile.firstName,
            family_name: user.profile.lastName,
            preferred_username: user.profile.login,
          },
        }

        window.localStorage.setItem('oktaCypress', JSON.stringify(userItem))

        log.snapshot('after')
        log.end()
      })
  })
})
配置完成后,通过Okta以用户身份登录、完成入职流程和注销的测试。
describe('Okta', function () {
  beforeEach(function () {
    cy.task('db:seed')
    cy.loginByOktaApi(
      Cypress.env('auth_username'),
      Cypress.env('auth_password')
    )
  })

  it('shows onboarding', function () {
    cy.contains('Get Started').should('be.visible')
  })
})
调整Okta应用程序
以下部分提供有关构建或调整应用程序以使用 Okta 身份验证的指南。
yarn dev:okta在启动Cypress Real World App时使用该命令。
调整后端
为了验证来自前端的 API 请求,需要为 Node.js安装Okta JWT Verifier并使用创建 Okta 应用程序后提供的 Okta 域和客户端 ID 对其进行配置。
// backend/helpers.ts
import OktaJwtVerifier from '@okta/jwt-verifier'

dotenv.config()

// Okta Validate the JWT Signature
const oktaJwtVerifier = new OktaJwtVerifier({
  issuer: `https://${process.env.REACT_APP_OKTA_DOMAIN}/oauth2/default`,
  clientId: process.env.REACT_APP_OKTA_CLIENTID,
  assertClaims: {
    aud: 'api://default',
    cid: process.env.REACT_APP_OKTA_CLIENTID,
  },
})
定义一个 Express 中间件函数,用于我们的路由来验证前端 API 请求发送的Okta JWT 作为Bearer令牌。
// backend/helpers.ts

// ...

export const verifyOktaToken = (req, res, next) => {
  const bearerHeader = req.headers['authorization']

  if (bearerHeader) {
    const bearer = bearerHeader.split(' ')
    const bearerToken = bearer[1]

    oktaJwtVerifier
      .verifyAccessToken(bearerToken, 'api://default')
      .then((jwt) => {
        // the token is valid
        req.user = {
          // @ts-ignore
          sub: jwt.sub,
        }

        return next()
      })
      .catch((err) => {
        // a validation failed, inspect the error
        console.log('error', err)
      })
  } else {
    res.status(401).send({
      error: 'Unauthorized',
    })
  }
}
使用上述定义的助手,就可以全局使用它来应用于所有路由:
// backend/app.ts
// initial imports ...
import { verifyOktaToken } from './helpers'

// ...

if (process.env.REACT_APP_OKTA) {
  app.use(verifyOktaToken)
}

// routes ...
前端适配
需要更新我们的前端 React 应用程序,以允许使用 Okta React SDK 对 Okta 进行身份验证。
首先,我们基于 App.tsx 组件创建一个 AppOkta.tsx 容器。
AppOkta.tsx 使用 useOktaAuth React Hook,用 SecureRoute 和 LoginCallback 替换 Sign Up 和 Sign In 路由,并用 withOktaAuth 高阶组件 (HOC) 包装组件。
添加了一个 useEffect 钩子以获取经过身份验证的用户的访问令牌,并使用用户和令牌对象发送 OKTA 事件以使用现有的身份验证层 (authMachine.ts)。 我们为隐式/回调定义了一个路由来呈现 LoginCallback 组件,并为根路径定义一个 SecureRoute。
// src/containers/AppOkta.tsx
// initial imports ...
import {
  LoginCallback,
  SecureRoute,
  useOktaAuth,
  withOktaAuth,
} from '@okta/okta-react'

// ...

const AppOkta: React.FC = () => {
  const { authState, oktaAuth } = useOktaAuth()

  // ...

  useEffect(() => {
    if (authState.isAuthenticated) {
      oktaAuth.getUser().then((user) => {
        authService.send('OKTA', { user, token: oktaAuthState.accessToken })
      })
    }
  }, [authState, oktaAuth])

  // ...

  return (
    <div className={classes.root}>
      // ...
      {authState.matches('unauthorized') && (
        <>
          <Route path="/implicit/callback" component={LoginCallback} />
          <SecureRoute exact path="/" />
        </>
      )}
      // ...
    </div>
  )
}

export default withOktaAuth(AppOkta)
更新 AppOkta.tsx 组件后才能有条件地使用 oktaCypress localStorage 项。
使用 Cypress 进行测试(使用 window.Cypress)有条件地应用 useEffect 块。
此外,仅当我们不在 Cypress 中进行测试时,我们才会更新导出以使用 withOktaAuth 高阶组件进行包装。 这允许我们的应用程序在开发/生产中使用 Okta 重定向登录流,但在 Cypress 中进行测试时则不能使用。
// src/containers/AppOkta.tsx
// initial imports ...
import { LoginCallback, SecureRoute, useOktaAuth, withOktaAuth } from "@okta/okta-react";

// ...

const AppOkta: React.FC = () => {
  const { authState, oktaAuth } = useOktaAuth();

  // ...

  // If under test in Cypress, get credentials from "oktaCypress" localstorage item and send event to our state management to log the user into the SPA
  if (window.Cypress) {
    useEffect(() => {
      const okta = JSON.parse(localStorage.getItem("oktaCypress")!);
      authService.send("OKTA", {
        user: okta.user,
        token: okta.token,
      });
    }, []);
  } else {
    useEffect(() => {
      if (authState.isAuthenticated) {
        oktaAuth.getUser().then((user) => {
          authService.send("OKTA", { user, token: oktaAuthState.accessToken });
        });
      }
    }, [authState, oktaAuth]);
  }

  // ...

  return (
    <div className={classes.root}>

      // ...

      {authState.matches("unauthorized") && (
        <>
          <Route path="/implicit/callback" component={LoginCallback} />
          <SecureRoute exact path="/" />
        </>
      )}

      // ...
    </div>
  );
};

// Conditional export wrapped with `withOktaAuth` if we are not under test in Cypress
let appOkta = window.Cypress ? AppOkta : withOktaAuth(AppOkta);
export default appOkta;
四、谷歌认证
在Cypress中设置Google应用凭据
要在我们的测试中访问测试用户凭据,我们需要将 Cypress 配置为使用 cypress/plugins/index.js 文件内的 .env 中设置的 Google 环境变量。
// .env
REACT_APP_GOOGLE_CLIENTID = 'your-client-id'
REACT_APP_GOOGLE_CLIENT_SECRET = 'your-client-secret'
GOOGLE_REFRESH_TOKEN = 'your-refresh-token'
// cypress/plugins/index.js
// initial imports ...

dotenv.config()

export default (on, config) => {
  // ...
  config.env.googleRefreshToken = process.env.GOOGLE_REFRESH_TOKEN
  config.env.googleClientId = process.env.REACT_APP_GOOGLE_CLIENTID
  config.env.googleClientSecret = process.env.REACT_APP_GOOGLE_CLIENT_SECRET

  // plugins code ...

  return config
}
自定义身份验证命令
编写一个名为 loginByGoogleApi 的命令来执行到 Google 的编程登录,并使用经过身份验证的用户详细信息在 localStorage 中设置一个项目,我们将在我们的应用程序代码中使用它来验证我们在测试中是否通过身份验证。
loginByGoogleApi 命令将执行以下步骤:
-
使用来自 Google OAuth 2.0 Playground 的刷新令牌执行程序化登录,将刷新令牌交换为 access_token。
-
使用返回的 access_token 获取 Google 用户个人资料。
-
最后,googleCypress localStorage
项设置为访问令牌和用户配置文件。
// cypress/support/commands.js
Cypress.Commands.add('loginByGoogleApi', () => {
  cy.log('Logging in to Google')
  cy.request({
    method: 'POST',
    url: 'https://www.googleapis.com/oauth2/v4/token',
    body: {
      grant_type: 'refresh_token',
      client_id: Cypress.env('googleClientId'),
      client_secret: Cypress.env('googleClientSecret'),
      refresh_token: Cypress.env('googleRefreshToken'),
    },
  }).then(({ body }) => {
    const { access_token, id_token } = body

    cy.request({
      method: 'GET',
      url: 'https://www.googleapis.com/oauth2/v3/userinfo',
      headers: { Authorization: `Bearer ${access_token}` },
    }).then(({ body }) => {
      cy.log(body)
      const userItem = {
        token: id_token,
        user: {
          googleId: body.sub,
          email: body.email,
          givenName: body.given_name,
          familyName: body.family_name,
          imageUrl: body.picture,
        },
      }

      window.localStorage.setItem('googleCypress', JSON.stringify(userItem))
      cy.visit('/')
    })
  })
})
完成配置之后,通过Google以用户身份登录、完成入职流程和注销的测试。
describe('Google', function () {
  beforeEach(function () {
    cy.task('db:seed')
    cy.loginByGoogleApi()
  })

  it('shows onboarding', function () {
    cy.contains('Get Started').should('be.visible')
  })
})
调整Google应用程序
前面介绍了 Cypress 测试中推荐的 Google 身份验证实践。但是要使用这种方式需要适当构建或适应使用 Google 的应用程序。以下将有关构建或调整应用以使用 Google 身份验证进行说明。
yarn dev:google在启动Cypress Real World App时使用该命令。
后端适配
验证来自前端的 API 请求,需要安装了express-jwt和jwks-rsa并为来自Google 的JWT 配置验证。
// backend/helpers.ts
import jwt from 'express-jwt'
import jwksRsa from 'jwks-rsa'

dotenv.config()
const googleJwtConfig = {
  secret: jwksRsa.expressJwtSecret({
    cache: true,
    rateLimit: true,
    jwksRequestsPerMinute: 5,
    jwksUri: 'https://www.googleapis.com/oauth2/v3/certs',
  }),
  // Validate the audience and the issuer.
  audience: process.env.REACT_APP_GOOGLE_CLIENTID,
  issuer: 'accounts.google.com',
  algorithms: ['RS256'],
}
定义一个 Express 中间件函数,用于我们的路由来验证前端 API 请求发送的Google JWT 作为Bearer令牌。
// backend/helpers.ts
// ...
export const checkJwt = jwt(googleJwtConfig).unless({ path: ['/testData/*'] })
定义了这个助手,我们就可以全局使用来应用于所有路由:
// backend/app.ts
// initial imports ...
import { checkJwt } from './helpers'

// ...
if (process.env.REACT_APP_GOOGLE) {
  app.use(checkJwt)
}
// routes ...
前端适配
需要更新我们的前端 React 应用程序以允许使用Google进行身份验证。如上所述,前端使用react-google-login 组件来执行登录。
首先,我们创建一个AppGoogle.tsx容器来呈现我们的应用程序,因为它通过Google 进行了身份验证。该组件与组件相同App.tsx,但添加了一个GoogleLogin组件来代替原始的 Sign Up 和 Sign In 组件。
useGoogleLogin添加了一个钩子以发送GOOGLE带有user和token对象的事件以与现有的身份验证层 ( authMachine.ts) 一起使用。
// src/containers/AppGoogle.tsx
// initial imports ...
import { GoogleLogin, useGoogleLogin } from "react-google-login"
// ...
const AppGoogle= () => {
  // ...
  useGoogleLogin({
      clientId: process.env.REACT_APP_GOOGLE_CLIENTID!,
      onSuccess: (res) => {
      authService.send("GOOGLE", { user: res.profileObj, token: res.tokenId });
    },
    cookiePolicy: "single_host_origin",
    isSignedIn: true,
  });
  // ...
  const isLoggedIn =
    isAuthenticated &&
    (authState.matches("authorized") ||
      authState.matches("refreshing") ||
      authState.matches("updating"));
  return (
    <div className={classes.root}>
      // ...
      {authState.matches("unauthorized") && (
        <Container component="main" maxWidth="xs">
          <CssBaseline />
          <div className={classes.paper}>
            <GoogleLogin
              clientId={process.env.REACT_APP_GOOGLE_CLIENTID!}
              buttonText="Login"
              cookiePolicy={"single_host_origin"}
            />
          </div>
        </Container>
      )}
    </div>
  );
};
export default AppGoogle;
如果我们在 REACT_APP_GOOGLE 环境变量设置为 true 的情况下启动应用程序,我们更新我们的入口点 (index.tsx) 以有条件地加载 AppGoogle 组件。
// src/index.tsx
import React from 'react'
import ReactDOM from 'react-dom'
import { Router } from 'react-router-dom'
import { history } from './utils/historyUtils'
import App from './containers/App'
import AppGoogle from './containers/AppGoogle'
import { createMuiTheme, ThemeProvider } from '@material-ui/core'
const theme = createMuiTheme({
  palette: {
    secondary: {
      main: '#fff',
    },
  },
})
ReactDOM.render(
  <Router history={history}>
    <ThemeProvider theme={theme}>
      {process.env.REACT_APP_GOOGLE ? <AppGoogle /> : <App />}
    </ThemeProvider>
  </Router>,
  document.getElementById('root')
)
五、GraphQL一种用于 API 的查询语言
GraphQL 既是一种用于 API 的查询语言也是一个满足你数据查询的运行时。 GraphQL 对你的 API 中的数据提供了一套易于理解的完整描述,使得客户端能够准确地获得它需要的数据,而且没有任何冗余,也让 API 更容易地随着时间推移而演进,还能用于构建强大的开发者工具。
别名多个查询或突变
在 中beforeEach,我们将使用cy.intercept()来捕获对 GraphQL 端点(例如/graphql)的所有请求,使用条件来匹配查询或变异,并为 using 设置别名req.alias。
首先,我们将创建一组实用函数来帮助匹配和别名我们的查询和突变。
// utils/graphql-test-utils.js

// Utility to match GraphQL mutation based on the operation name
export const hasOperationName = (req, operationName) => {
  const { body } = req
  return (
    body.hasOwnProperty('operationName') && body.operationName === operationName
  )
}

// Alias query if operationName matches
export const aliasQuery = (req, operationName) => {
  if (hasOperationName(req, operationName)) {
    req.alias = `gql${operationName}Query`
  }
}

// Alias mutation if operationName matches
export const aliasMutation = (req, operationName) => {
  if (hasOperationName(req, operationName)) {
    req.alias = `gql${operationName}Mutation`
  }
}
导入程序并在beforeEach使用它们
// app.spec.js
import { aliasQuery, aliasMutation } from '../utils/graphql-test-utils'

context('Tests', () => {
  beforeEach(() => {
    cy.intercept('POST', 'http://localhost:3000/graphql', (req) => {
      // Queries
      aliasQuery(req, 'GetLaunchList')
      aliasQuery(req, 'LaunchDetails')
      aliasQuery(req, 'GetMyTrips')

      // Mutations
      aliasMutation(req, 'Login')
      aliasMutation(req, 'BookTrips')
    })
  })
  // ...
})
对查询或变异结果的期望
可以使用cy.wait()对拦截的 GraphQL 查询或突变的响应做出预期。
// app.spec.js
import { aliasQuery } from '../utils/graphql-test-utils'

context('Tests', () => {
  beforeEach(() => {
    cy.intercept('POST', 'http://localhost:3000/graphql', (req) => {
      // Queries
      aliasQuery(req, 'Login')

      // ...
    })
  })

  it('should verify login data', () => {
    cy.wait('@gqlLoginQuery')
      .its('response.body.data.login')
      .should('have.property', 'id')
      .and('have.property', 'token')
  })
})
修改查询或变异响应
将测试结果的响应修改为测试单页结果的 UI
// app.spec.js
import { hasOperationName, aliasQuery } from '../utils/graphql-test-utils'

context('Tests', () => {
  beforeEach(() => {
    cy.intercept('POST', 'http://localhost:3000/graphql', (req) => {
      // Queries
      aliasQuery(req, 'GetLaunchList')

      // ...
    })
  })

  it('should not display the load more button on the launches page', () => {
    cy.intercept('POST', 'http://localhost:3000/graphql', (req) => {
      const { body } = req
      if (hasOperationName(req, 'GetLaunchList')) {
        // Declare the alias from the initial intercept in the beforeEach
        req.alias = 'gqlGetLaunchListQuery'

        // Set req.fixture or use req.reply to modify portions of the response
        req.reply((res) => {
          // Modify the response body directly
          res.body.data.launches.hasMore = false
          res.body.data.launches.launches = res.body.data.launches.launches.slice(
            5
          )
        })
      }
    })

    // Must visit after cy.intercept
    cy.visit('/')

    cy.wait('@gqlGetLaunchListQuery')
      .its('response.body.data.launches')
      .should((launches) => {
        expect(launches.hasMore).to.be.false
        expect(launches.length).to.be.lte(20)
      })

    cy.get('#launch-list').its('length').should('be.gte', 1).and('be.lt', 20)
    cy.contains('button', 'Load More').should('not.exist')
  })
})
cypress-cucumber-preprocessor插件
cypress-cucumber-preprocessor是Cypress对于cucumber功能进行增强的插件
安装
- 安装插件库:npm install --save-dev cypress-cucumber-preprocessor
- 修改插件配置文件 cypress/plugins/index.js
const cucumber = require('cypress-cucumber-preprocessor').default

module.exports = (on, config) => {
  on('file:preprocessor', cucumber())
}
- 在项目配置文件cypress.json中设置feature文件目录
{
	"testFiles": "**/*.{feature,features}",
	"screenshotOnRunFailure": false,
	"video": false
}
- 在package.json设置spec文件模式,如果为true,请使用Cypress Cucumber Preprocessor Style模式来放置步骤定义文件。如果为false,我们将使用“oldschool”(所有内容都是全局的)Cucumber样式。
"cypress-cucumber-preprocessor": {
  "nonGlobalStepDefinitions": true
}
配置说明:
| 选项 | 默认值 | 描述 |
|---|---|---|
| commonPath | 当nononglobalstepdefinitions为true时,使用,cypress/integration/common,当nonGlobalStepDefinitions为false时,使用cypress/support/step_definitions,当nonGlobalStepBaseDir被定义时使用${nonGlobalStepBaseDir}/common | 定义包含测试的所有通用步骤定义的文件夹的路径。当定义了nonGlobalStepBaseDir时,这个路径就是从这个基本位置定义的。如$ {nonGlobalStepBaseDir} / $ {commonPath}。 |
| nonGlobalStepDefinitions | false | 如果为true,请使用Cypress Cucumber Preprocessor Style模式来放置步骤定义文件。如果为false,我们将使用“oldschool”(所有内容都是全局的)Cucumber样式。 |
| nonGlobalStepBaseDir | undefined | 如果defined和nononglobalstepdefinitions也为true,则步骤定义将从这里提供的目录开始搜索具有特性名称的文件夹 |
| stepDefinitions | 当nononglobalstepdefinitions为true时,使用cypress/integration,当nonGlobalStepDefinitions为false时,使用cypress/support/step_definitions | 包含步骤定义的文件夹的路径 |
- 运行文件 cypress run --spec **/*.features
搭建测试工程
- 事件定义:在integration文件夹下新建.feature文件,如baidu.feature。
#language: zh-CN
功能: 百度主页

  看到百度搜索页面

  场景: 打开百度搜索
    假如 打开百度首页
    当 我看到"百度一下,你就知道"的标题
- 脚本定义:默认的项目结构中,每个.feature要有一个对应名字的同级文件夹,用来存放对应的.js文件,如cypress/integration/baidu.feature,脚本文件应为cypress/integration/Baidu/baidu.js。我们也可以将其脚本步骤分离放在cypress/integration/common中。示例:baidu.js
import { Before, After ,Then , Given } from "cypress-cucumber-preprocessor/steps";

const url = 'https://baidu.com'

Given('打开百度首页', () => {
  cy.visit(url)
})

Then(`我看到{string}的标题`, (title) => {
  cy.title().should('include', title)
})
当需要自定义脚本位置时,可在package.json添加配置
  "cypress-cucumber-preprocessor": {
    "step_definitions": "cypress/support/step_definitions/"
  }
编写脚本
- 创建脚本文件引入相关方法,例如Given, When, Then
const {
  Before,
  After,
  When,
  Given,
  Then
} = require("cypress-cucumber-preprocessor/steps");
- 与对应的.feature文件一一对应的步骤实现
Given("事件步骤内容", () => {
  // ...test code here
})
- 参数接受
	//1,普通参数
	那么 我看到"百度一下,你就知道"的标题  //.feature内容

	Then(`我看到{string}的标题`, (title) => { //.js脚本内容,string为参数类型
	  cy.title().should('include', title)
	})


	//2,数据列表形式
	 当 我使用的数据为: //.feature内容
      | number | another number |
      | 1      | 2              |
      | 3      | 4              |

	When("I add all following numbers:", (dataTable) => { //.js脚本内容,string为参
	  sum = dataTable.rawTable
	    .slice(1)
	    .reduce(
	      (rowA, rowB) =>
	        rowA.reduce((a, b) => parseInt(a, 10) + parseInt(b, 10)) +
	        rowB.reduce((a, b) => parseInt(a, 10) + parseInt(b, 10))
	    );
	});
	//3.示例列表形式
	当   修改项目地址为<项目地址>  //.feature内容
	例子:
	|项目地址|
	|北京市|
	|陕西省西安市|

	When(/^修改项目地址为(.*)$/, (address) => {//.js脚本内容,string为参
		.....dosamething
	});
- 前置和后置函数Before,After。
const {
  Before,
  After,
} = require("cypress-cucumber-preprocessor/steps");

// 这将在每个场景之前被调用
Before(() => {
  beforeCounter += 1;
  beforeWithTagCounter = 0;
});

// 这只会在用@foo标记的场景之前被调用
Before({ tags: "@foo" }, () => {
  beforeWithTagCounter += 1;
});
- 事件背景:定义的事件背景会在此事件每个场景开始前调用,如我们可以创建一个重置计数器的给定步骤。
事件: 背景示例		//.feature内容
   背景:
    重置步数计时器
   场景:
   	........

let counter = 0;	//.js脚本内容
Given("重置步数计时器", () => {
  counter = 0;
});
-
@focus标签:在场景上添加@focus标签,执行脚本时会只执行带有@focus标签的场景。通过标签启动模式,启动脚本
npx cypress-tags run
-
自定义标签:添加自定义标签,同时通过命令的形式来选择只想那些场
npx cypress-tags run -e TAGS=‘not @foo and (@bar or @zap)’
Feature: Smart Tagging

  As a cucumber cypress plugin which handles Tags
  I want to allow people to select tests to run if focused
  So they can work more efficiently and have a shorter feedback loop

  Scenario: This scenario should not run if @focus is on another scenario
    Then this unfocused scenario should not run

  @focus
  Scenario: This scenario is focused and should run
    Then this focused scenario should run

  @this-tag-affects-nothing
  Scenario: This scenario should also not run
    Then this unfocused scenario should not run

  @focus
  Scenario: This scenario is also focused and also should run
    Then this focused scenario should run
也可以在cypress.json中添加配置来实现:
{
    "env": {
        "TAGS": "not @ignore"
    },
    //rest of configuration options
    "baseUrl": "yourBaseUrl",
    "ignoreTestFiles": "*.js",
    //etc
}


 2618
2618


 被折叠的 条评论
为什么被折叠?
被折叠的 条评论
为什么被折叠?
 到【灌水乐园】发言


