


前言
本文章旨在记录一下学习chainlink CCIP跨链时,编写与调试智能合约所遇到的问题。顺便简单介绍一下chainlink CCIP的原理和NFT(这一对数字藏品感兴趣的朋友)。
序言
由于目前区块链的网络已经出现了多元化,每个区块链blockchain网络都会有自己的共识机制,从而提升在不同链上进行交易确认的速度。由于每个区块链网络的独立,导致这个网络无法与真实世界进行沟通,获取真实世界的汇率、天气等信息都变得十分困难。更何况不同的区块链网络之间的数字资产、交易数据更是很难互操作了。
CCIP介绍
因此chainlink提供了一个叫做CCIP(跨链互操作性协议),该协议利用互操作性实现了用户在不同的区块链网络之间的限制;同时,由于每个区块链网络之间的共识机制不同,这将导致从A区块链网络到B区块链网络的互操作性耗时较长,并且因为共识机制的不同,各区块链网络的最终交易确认即最终性也有很大的区别。控制的不好,就会出现A区块链网络的α资产没来得及锁定(可能是交易过程中出现了链的分叉、回滚),B区块链就创建出了α资产,那这个时候就出现了很严重的问题。因此跨链过程中,最终性是至关重要的。
CCIP作为各个区块链网络的桥梁,在进行资产转移时,也要对两个区块链网络的代理(这个代理是区块链网络过CCIP这座桥梁的入口和出口)进行反复确认,有了确认就会存在欺骗,因此有个去中心化预言机网络DON来轮流对这两个口的资产情况进行共识确认,保证资产的安全性。
CCIP的跨链分为3个步骤:
图片来源于chainlink官方

- commit
commit是用户在源联上发起一个资产跨链的请求,这个时候commit会把资产发送到一个路由合约router进行数据打包,这个数据打包的内容包含了目标链的chainSelector和receiver。然后发送到OnRamp(匝道合约,即入口)合约里面,之后会发射一个事件。并将包放入到目标链的OffRamp(匝道合约,即出口)里面(通过目标链的chainSelector)。 - bless(风险管理网络 RMN)
bless监控收到了OnRamp发射的事件,开始进行对源链的OnRamp的数据包和目的链OffRamp的数据包进行密码学验证、默克尔树证明,确保数据包没有在commit过程中被篡改或攻击。验证通过后就进行execute - execute
execute开始进行资产的转移。在commit阶段,数据包里面包含了receiver,这个时候会路由到receiver合约里面对资产进行铸造。
至此,CCIP的跨链算是完成了。关于资产的转移也存在多种模式,有Mint and Burn。Lock and Release.因为一些区块链网络对资产的权限非常严格,普通用户很难在该区块链网络上对该资产进行铸造Mint和烧毁Burn,这种情况就只能对资产进行锁定Lock和释放Release,目的链也是如此。
NFT介绍
NFT是区块链网络的一种资产,它是基于比特币、以太币之上的。比特币这些是区块链网络的“法定货币”,NFT可以说是一种流通于区块链网络的衍生数字资产,在一定程度上具有现实世界的映射。比如说现实世界的苹果,如何在区块链网络上证明这个苹果是属于你的?首先这个苹果的拥有者owner是你,更重要的这需要让区块链网络中的其他参与者认可。并且由于苹果的完整性,不可能存在说我有一半的苹果,你有一半的苹果,NFT在这方面具有单个整体的不可拆分特性。
登录opensea,我们查看下NFT在这里面的具体表现形式,比如说这张NFT
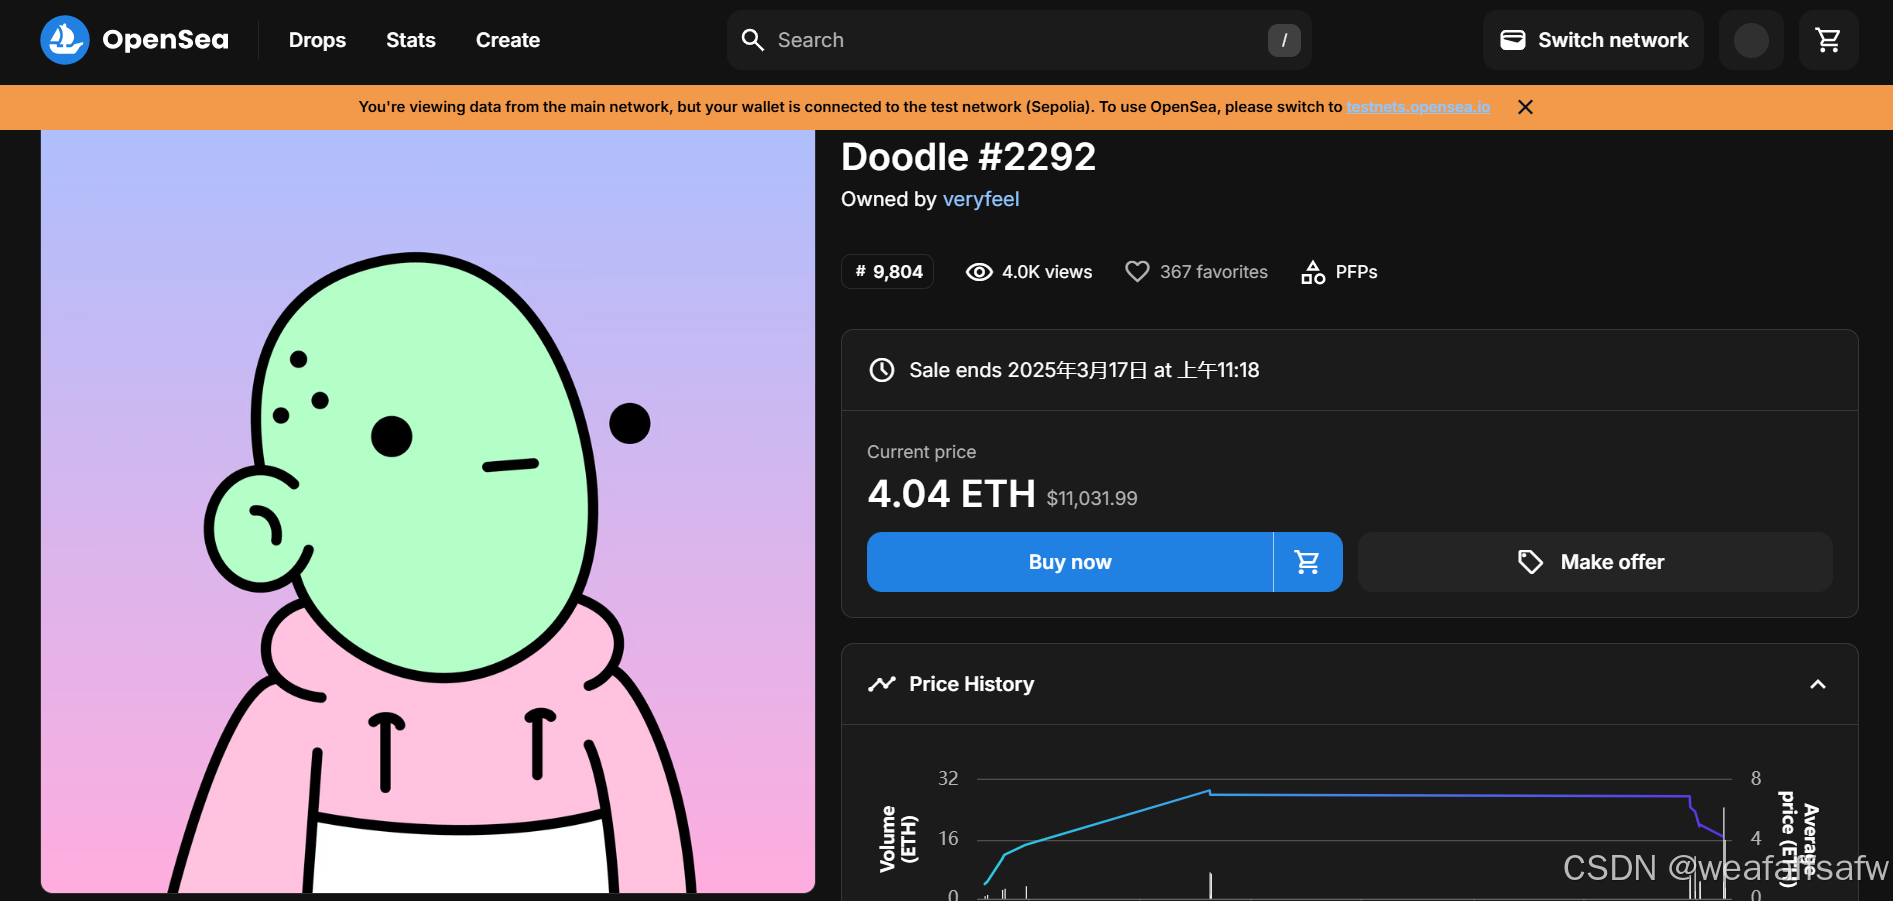
这个NFT的图片是用于展示的,下面有对于这个NFT的详情描述,如下:

这些对这个NFT的特征进行描述。这些描述是体现于NFT的元数据metadata里面,metadata的格式可搜索"opensea metadata"可以看到
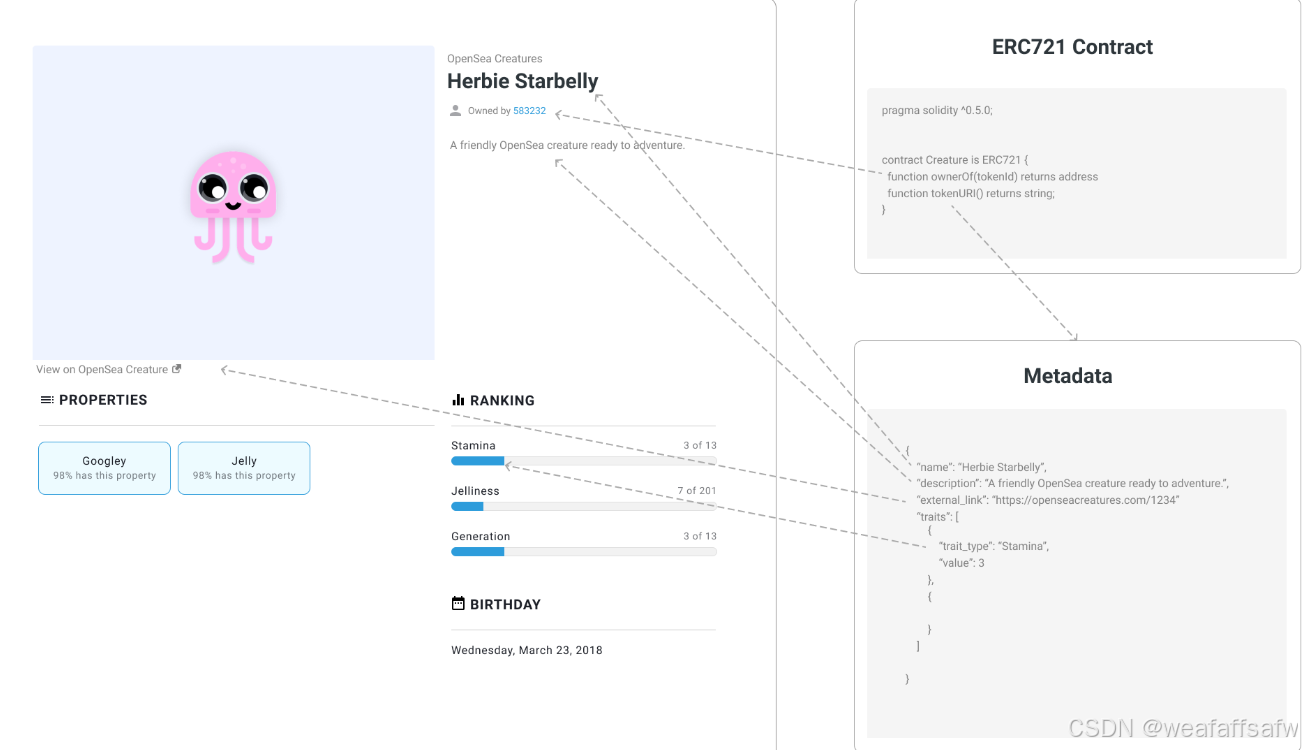
很清晰的可以看到metadata是一个json描述体,里面包含了NFT的名字、描述、图片(展示到手机上)、特性等等。在区块链的世界中NFT包含了(metadata、图片),那么这些数据需要存储,并能够让opensea进行访问,因此这就有了IPFS去中心化的数据管理网络
IPFS
IPFS是一个去中心化的数据管理网络,存储在其上的数据不会因为中心化的数据库损坏导致NFT消失,同时还可以很好的管理。但由于IPFS是收费的,这里介绍下FileBase,filebase公司提供了一些服务,为我们的学习NFT跨链带来了很大的帮助。登录filebase之后,可以看到一个
buckets
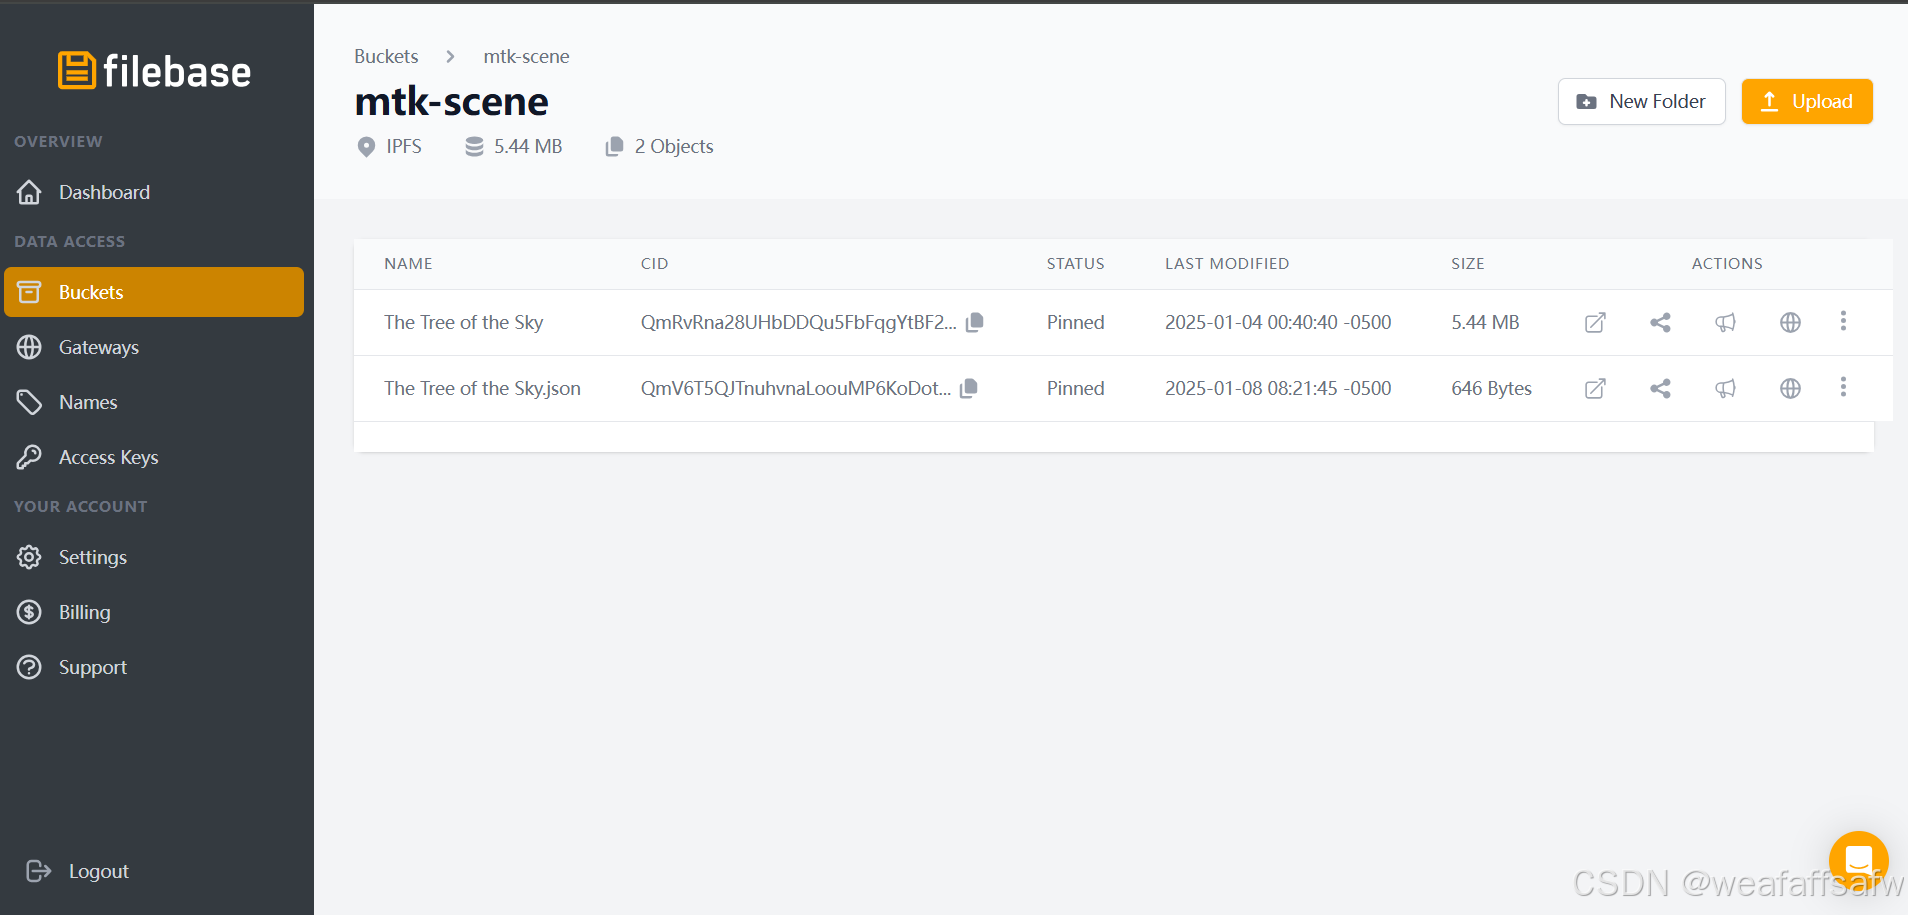
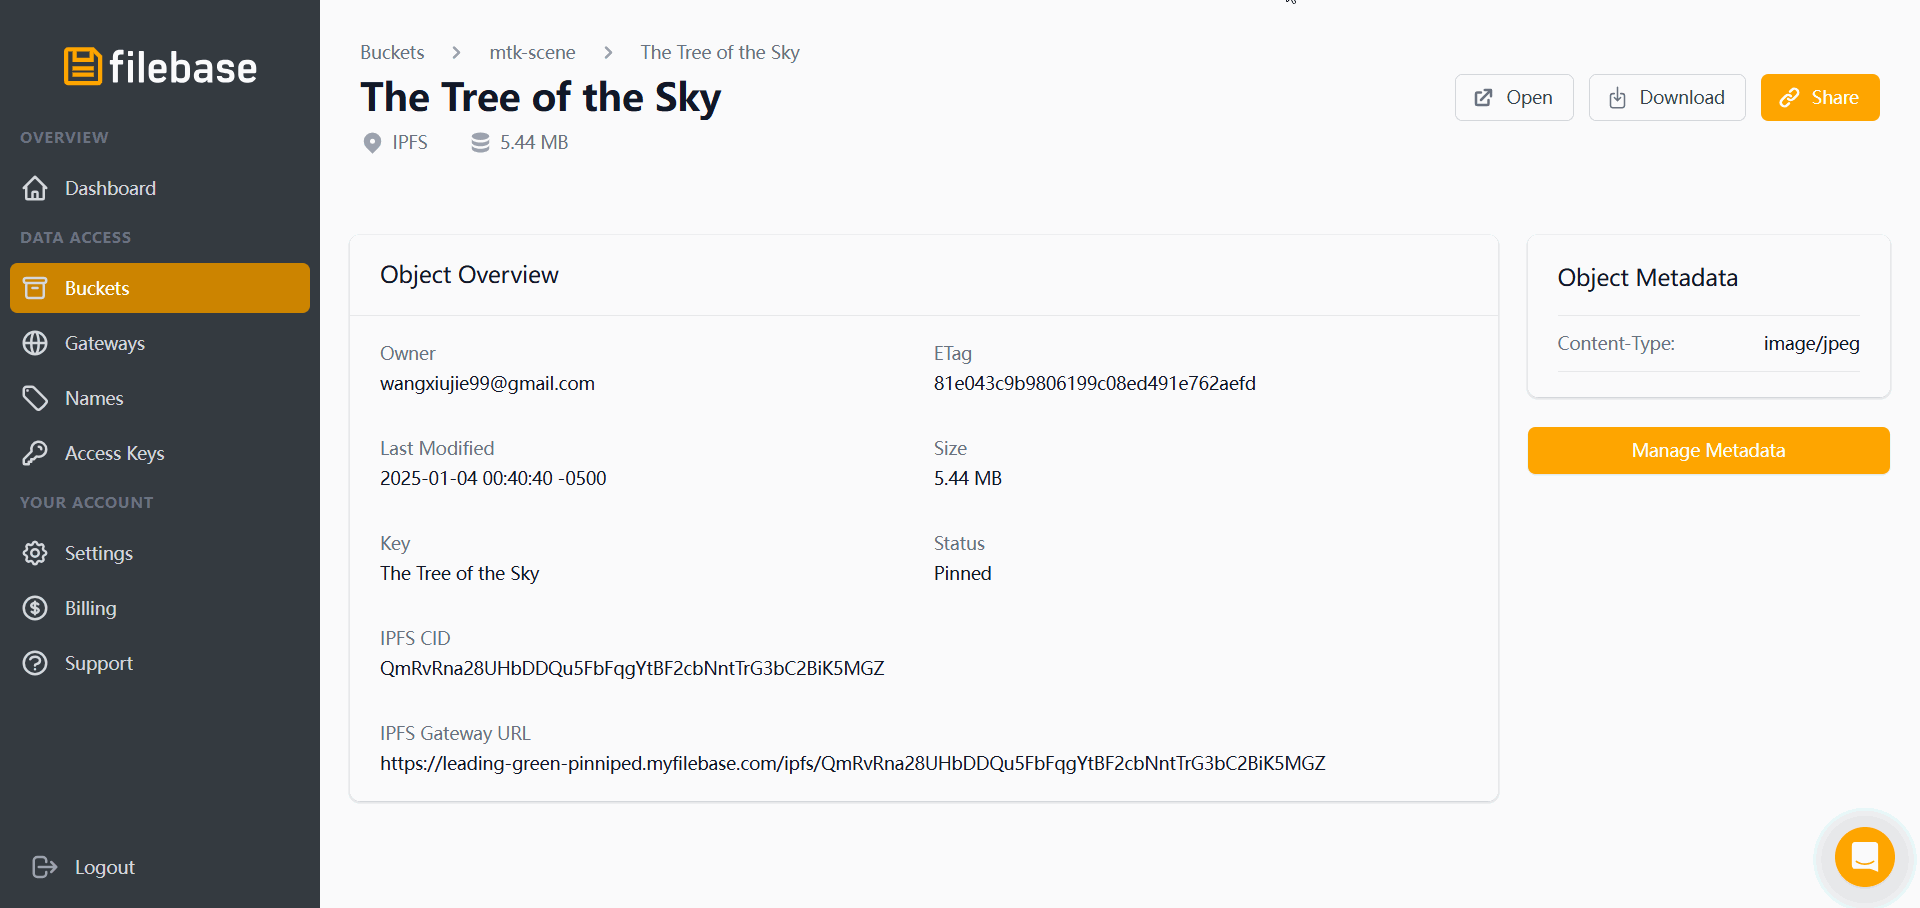
在这里面可以上传你的NFT(图片、metadata),我在这里上传了一个名叫“天空之树”的NFT。
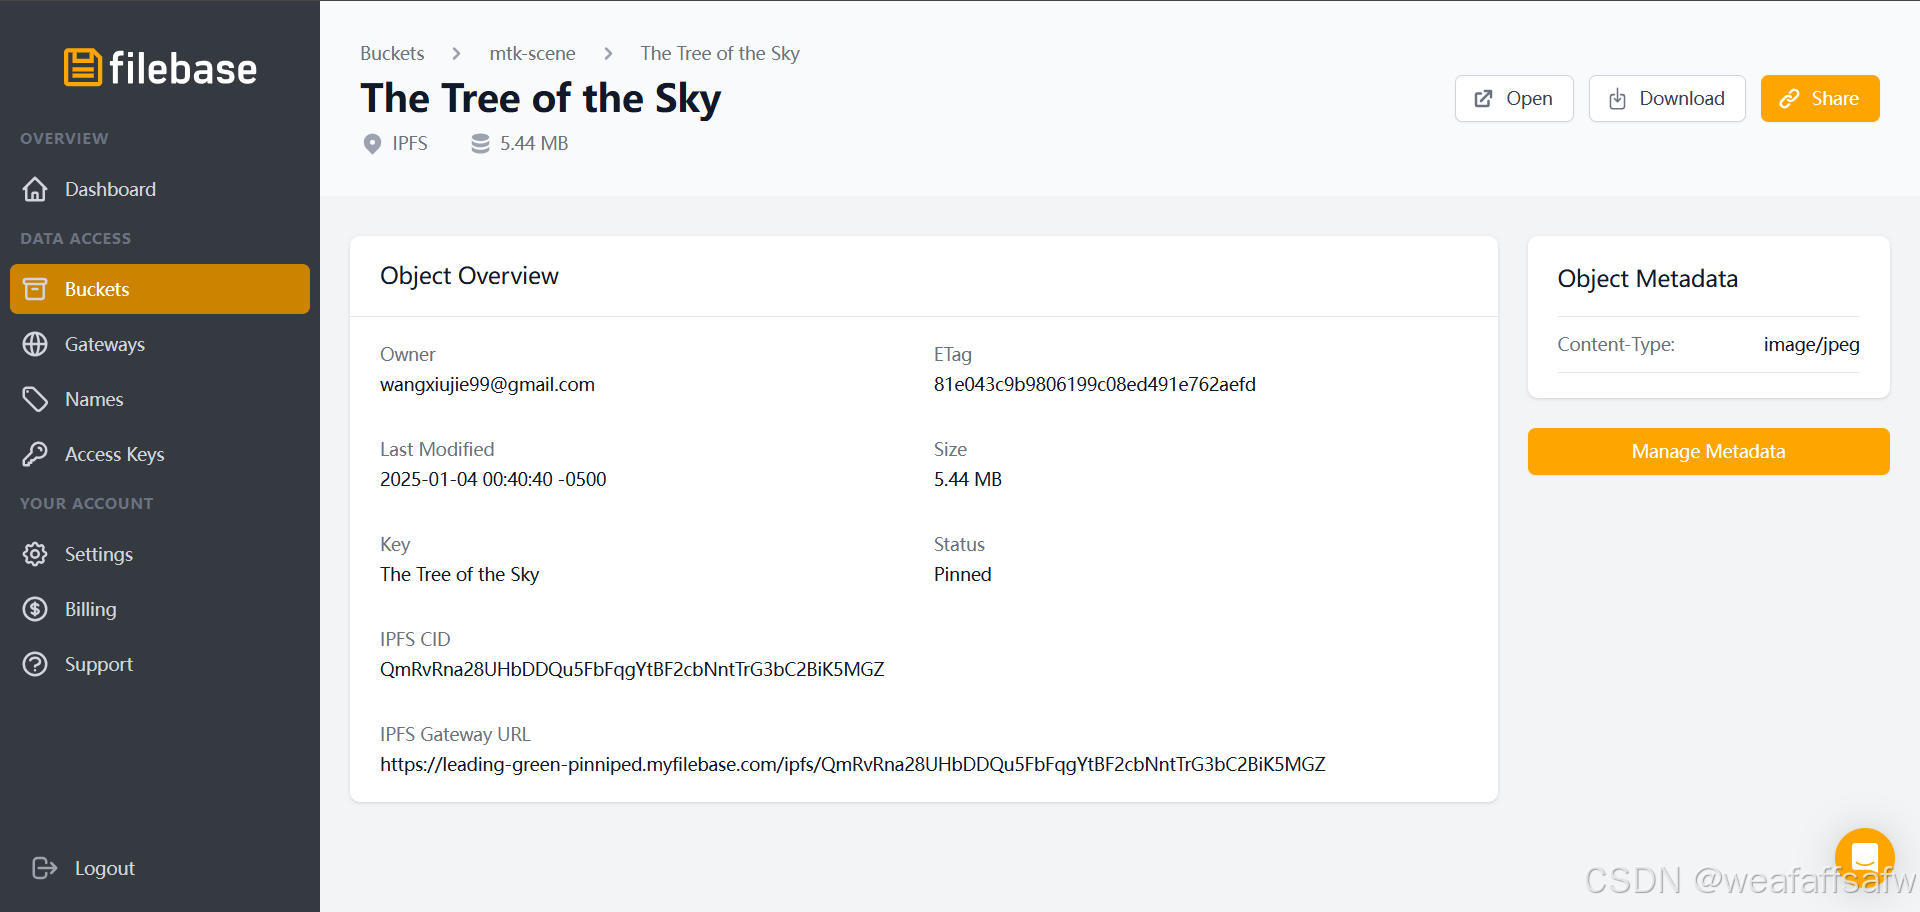
我们可以看到上张图片的下面有个IPFS网关URL,这个就是将图片传递到IPFS去中心化的数据管理网络上,点击该链接我们就可以看到上传的图片了
同时,也上传了我的metadata,如下:
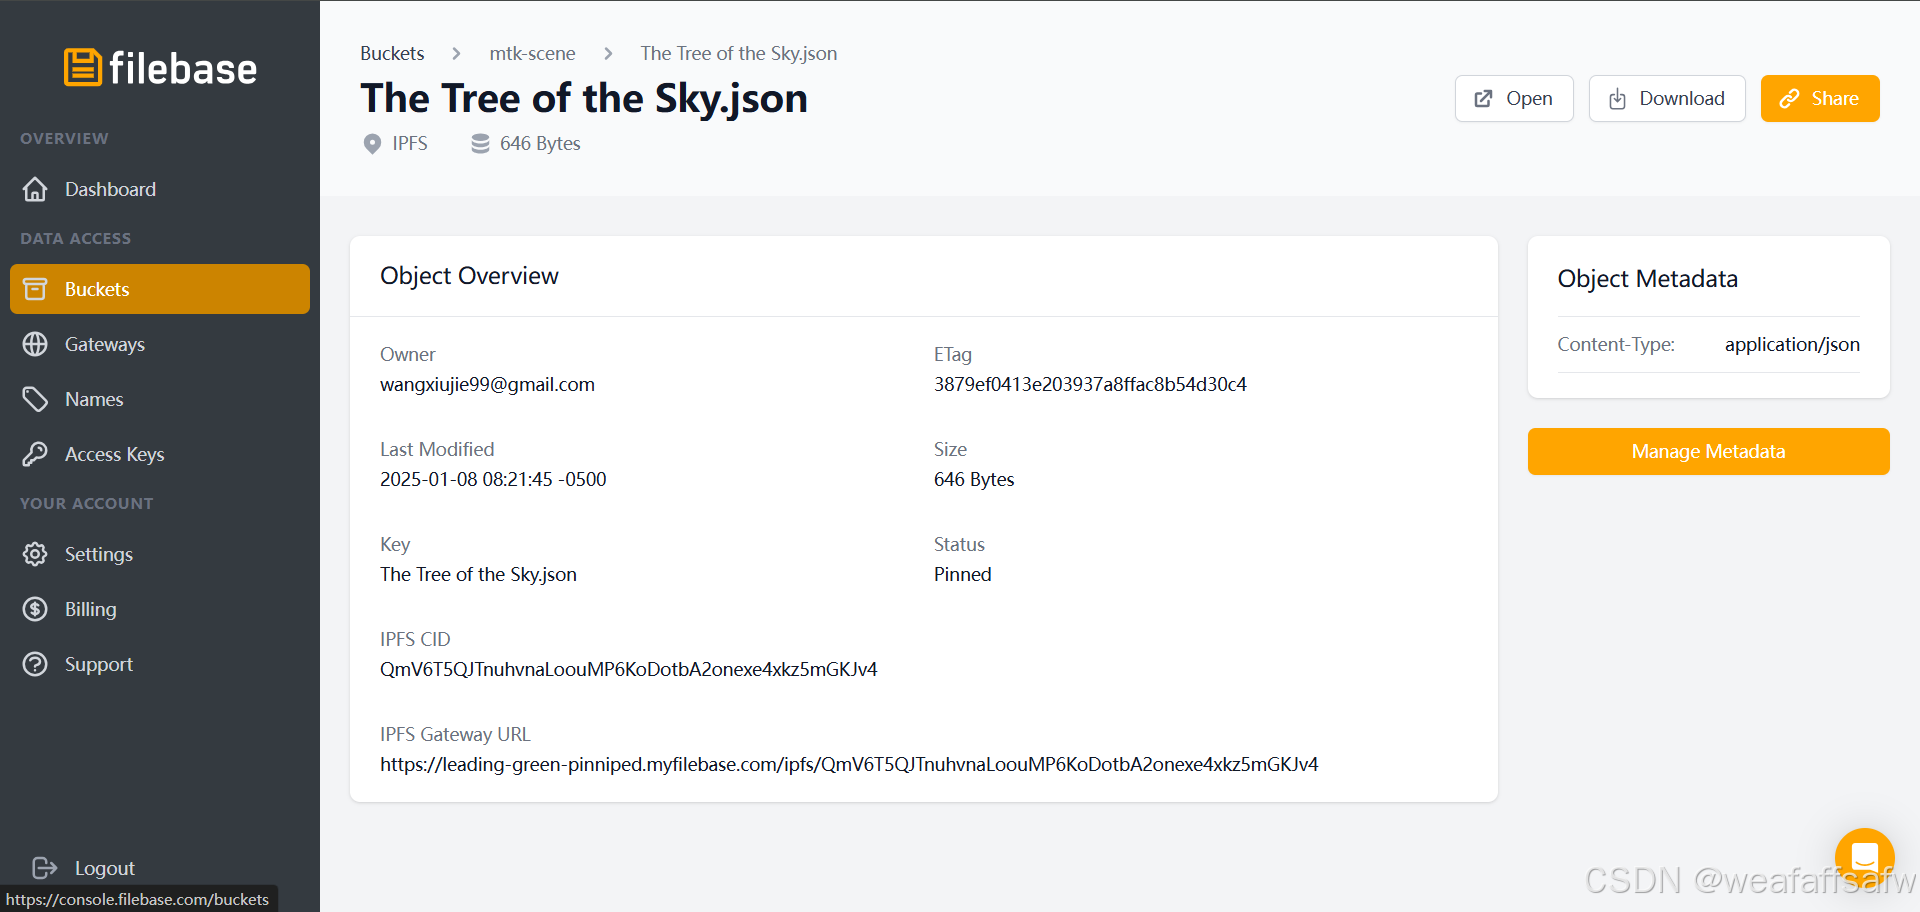
至于metadata的格式,上面已经简单介绍。那之后呢我们就需要通过智能合约将该NFT进行铸造mint,从而进行NFT的“天空之树”的创建。
实战
那在区块链世界中,我们需要通过智能合约才能进入区块链的大门,接下就对学习chainlink CCIP跨链时所遇到的问题进行梳理和总结。
准备好NFT的metadata之后,我们就可以开始进行代码上的学习了,首先NFT是基于ERC721的智能合约提供的接口,只有满足了ERC721才可以算的上是NFT,我们可以到openzeppelin进行ERC721的生成
name是这个token在这个区块链网络blockchain里面的名字,symbol是token的符号
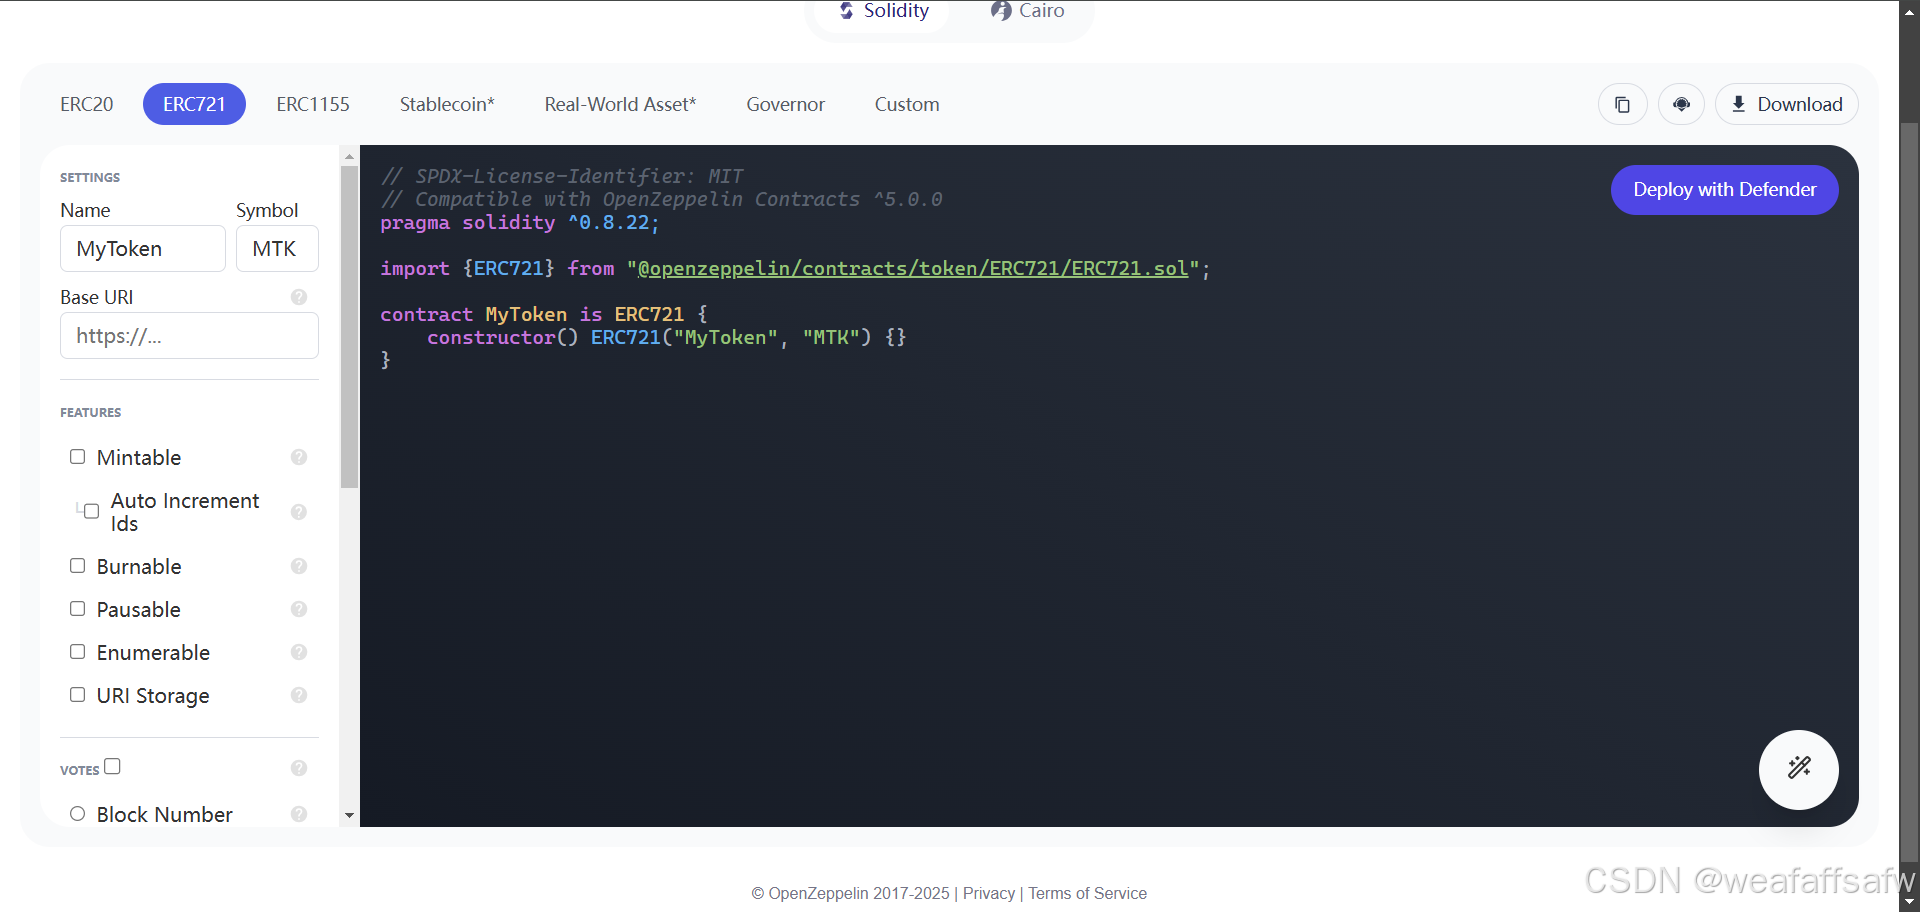
我们在下面勾选可铸造的Mintable,以及下面的Auto Increment Ids它允许我们铸造NFT时,tokenId会自增。可烧毁的Burnable,可查看的Enumerable,URI storage。之后复制代码开始我们的编写。我们现在主要要实现的是receiver合约和sender合约,用于将跨链的NFT进行发送,并且包含发送的目标链chainSelector和receiver合约地址。
生成之后,我们需要修改一下MyToken合约的safeMint()里面调用_setTokenURI()
在这里我选择的是这两个测试网进行的测试
Ethereum Sepolia & Polygon Amoy
这里我们采取的跨链模式是Lock And Mint,Unlock And Burn,采用的是源联的NFT被Lock之后,目的链将会铸造Mint一个Wrapped Token即包装NFT。实际上Mint And Burn,Burn And Mint也是可以使用的。取决于我们对于这两条链的合约的控制,如果我们只介于做中间的跨链操作,那可能Mint和Burn的权限也很难拥有。
那基于此,我们需要知道这两条链的chainSelector,可以在chainlink提供的CCIP的不同的区块链网络部署地址里面去查,点我可以查看,选择testnet
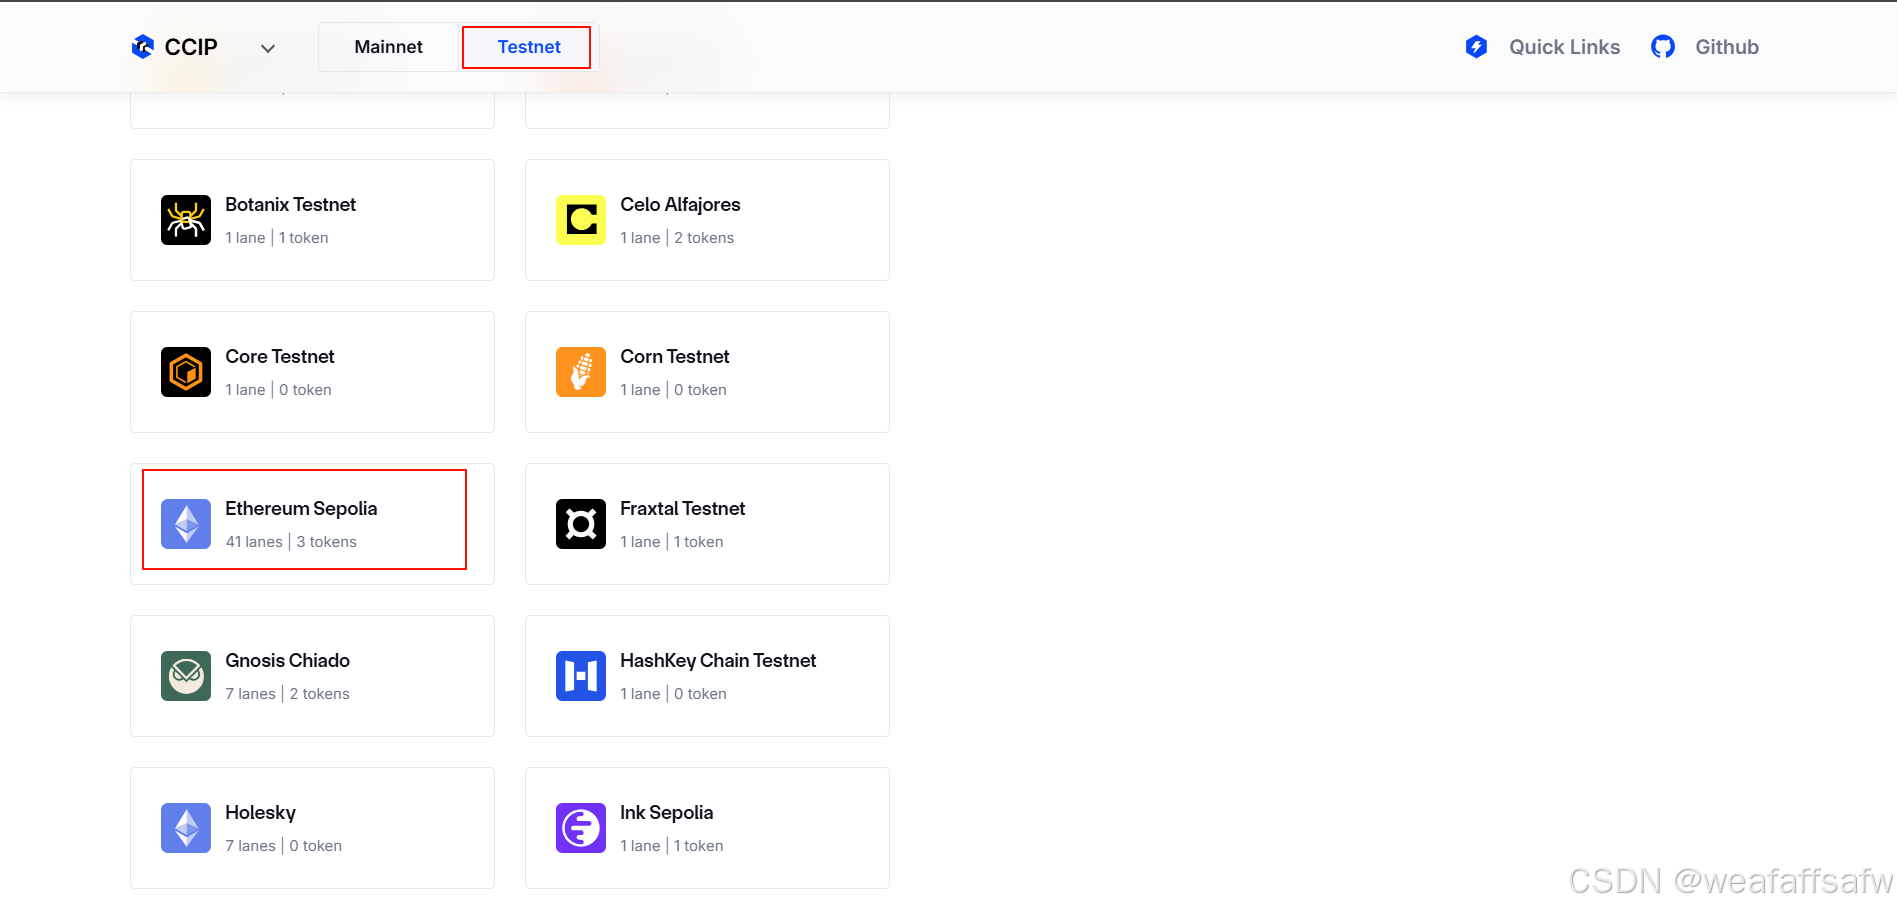
点击Ethereum Sepolia,如图:

里面有在Ethereum Sepolia上部署的router合约的地址,以及Ethereum Sepolia的chainSelector,RMN(风险管理DON),LINK合约地址等。
我们需要Ethereum Sepolia和Polygon Amoy两个测试网给它配置下。其中ChainSelector的配置是需要相互交换的,即Ethereum Sepolia里面的chainSelector是Polygon Amoy的。反之亦然。
整体的配置如下,developmentChains是用于本地区块链网络测试使用的。由于上边说明了,真正的测试网之间的跨链,CCIP的时间是很长的,因此引入了开发环境下的本地区块链网络
const developmentChains=["hardhat","local"]

const crossChainInfo={
    11155111:{
        ccipRouterAddr:"0x0BF3dE8c5D3e8A2B34D2BEeB17ABfCeBaf363A59",//源链的router
        ccipLinkTokenAddr:"0x779877A7B0D9E8603169DdbD7836e478b4624789",//源链的token address
        companionChainSelector:BigInt(`16281711391670634445`)//目标链的chainSelector
    },
    80002:{
        ccipRouterAddr:"0x9C32fCB86BF0f4a1A8921a9Fe46de3198bb884B2",
        ccipLinkTokenAddr:"0x0Fd9e8d3aF1aaee056EB9e802c3A762a667b1904",
        companionChainSelector:BigInt(`16015286601757825753`)
    }
}

module.exports={
    developmentChains,
    crossChainInfo
}
导出配置之后,还需要介绍下LINK是做啥的,LINK是chainlink提供的一种通证,用于使用CCIP得以限制,需要像比特币一样,发起交易就要有代价,以保证交易的正确且不存在恶意交易行为。
那接下来就是目标链的receiver和源联的sender两个合约的实现了。主要实现的就是源联的sender进行源链的NFT锁定,目的链receiver进行WrappedNFT铸造Mint;反之,目的链receiver进行烧毁Burn,目的链进行NFT的解锁。
源链的sender合约,在这里叫做NFTPoolLockAndRelease 合约的锁定NFT并发送的函数实现。原版代码可以在chainlink CCIP文档中找到,复制过来的代码有对目标链和源链进行限制的mapping,避免未经授权的链进行跨链操作。这里的代码对其进行了注释。
// SPDX-License-Identifier: MIT
pragma solidity ^0.8.24;

import {IRouterClient} from "@chainlink/contracts-ccip/src/v0.8/ccip/interfaces/IRouterClient.sol";
import {OwnerIsCreator} from "@chainlink/contracts-ccip/src/v0.8/shared/access/OwnerIsCreator.sol";
import {Client} from "@chainlink/contracts-ccip/src/v0.8/ccip/libraries/Client.sol";
import {CCIPReceiver} from "@chainlink/contracts-ccip/src/v0.8/ccip/applications/CCIPReceiver.sol";
import {IERC20} from "@chainlink/contracts-ccip/src/v0.8/vendor/openzeppelin-solidity/v4.8.3/contracts/token/ERC20/IERC20.sol";
import {SafeERC20} from "@chainlink/contracts-ccip/src/v0.8/vendor/openzeppelin-solidity/v4.8.3/contracts/token/ERC20/utils/SafeERC20.sol";

import {MyToken} from "./MyToken.sol";

/**
 * THIS IS AN EXAMPLE CONTRACT THAT USES HARDCODED VALUES FOR CLARITY.
 * THIS IS AN EXAMPLE CONTRACT THAT USES UN-AUDITED CODE.
 * DO NOT USE THIS CODE IN PRODUCTION.
 */

/// @title - A simple messenger contract for sending/receiving string data across chains.
contract NFTPoolLockAndRelease is CCIPReceiver, OwnerIsCreator {
    using SafeERC20 for IERC20;

    // Custom errors to provide more descriptive revert messages.
    error NotEnoughBalance(uint256 currentBalance, uint256 calculatedFees); // Used to make sure contract has enough balance.
    error NothingToWithdraw(); // Used when trying to withdraw Ether but there's nothing to withdraw.
    error FailedToWithdrawEth(address owner, address target, uint256 value); // Used when the withdrawal of Ether fails.

    error InvalidReceiverAddress(); // Used when the receiver address is 0.

    // Event emitted when a message is sent to another chain.
    event MessageSent(
        bytes32 indexed messageId, // The unique ID of the CCIP message.
        uint64 indexed destinationChainSelector, // The chain selector of the destination chain.
        address receiver, // The address of the receiver on the destination chain.
        bytes text, // The text being sent.
        address feeToken, // the token address used to pay CCIP fees.
        uint256 fees // The fees paid for sending the CCIP message.
    );

    // Event emitted when a message is received from another chain.
    event TokenUnlocked(
        uint256 tokenId,
        address newOwner
    );

    bytes32 private s_lastReceivedMessageId; // Store the last received messageId.
    string private s_lastReceivedText; // Store the last received text.

    MyToken public nft;

    IERC20 private s_linkToken;

    struct DecodeStructure {
        address receiver;
        uint256 tokenId;
    }

    /// @notice Constructor initializes the contract with the router address.
    /// @param _router The address of the router contract.
    /// @param _link The address of the link contract.
    constructor(
        address _router,
        address _link,
        address nftAddr
    ) CCIPReceiver(_router) {
        s_linkToken = IERC20(_link);
        nft = MyToken(nftAddr);
    }

    /// @dev Modifier that checks the receiver address is not 0.
    /// @param _receiver The receiver address.
    modifier validateReceiver(address _receiver) {
        if (_receiver == address(0)) revert InvalidReceiverAddress();
        _;
    }

    function sendLockNFT(
        uint256 tokenId,
        address newOwner,
        uint64 destinationChainSelector,
        address receiver
    ) public returns (bytes32) {
        nft.transferFrom(msg.sender, address(this), tokenId);
        bytes memory payload = abi.encode(newOwner, tokenId);
        bytes32 messageId = sendMessagePayLINK(
            destinationChainSelector,
            receiver,
            payload
        );
        return messageId;
    }

    /// @notice Sends data to receiver on the destination chain.
    /// @notice Pay for fees in LINK.
    /// @dev Assumes your contract has sufficient LINK.
    /// @param _destinationChainSelector The identifier (aka selector) for the destination blockchain.
    /// @param _receiver The address of the recipient on the destination blockchain.
    /// @param _data The text to be sent.
    /// @return messageId The ID of the CCIP message that was sent.
    function sendMessagePayLINK(
        uint64 _destinationChainSelector,
        address _receiver,
        bytes memory _data
    ) internal returns (bytes32 messageId) {
        // Create an EVM2AnyMessage struct in memory with necessary information for sending a cross-chain message
        Client.EVM2AnyMessage memory evm2AnyMessage = _buildCCIPMessage(
            _receiver,
            _data,
            address(s_linkToken)
        );

        // Initialize a router client instance to interact with cross-chain router
        IRouterClient router = IRouterClient(this.getRouter());

        // Get the fee required to send the CCIP message
        uint256 fees = router.getFee(_destinationChainSelector, evm2AnyMessage);

        if (fees > s_linkToken.balanceOf(address(this)))
            revert NotEnoughBalance(s_linkToken.balanceOf(address(this)), fees);

        // approve the Router to transfer LINK tokens on contract's behalf. It will spend the fees in LINK
        s_linkToken.approve(address(router), fees);

        // Send the CCIP message through the router and store the returned CCIP message ID
        messageId = router.ccipSend(_destinationChainSelector, evm2AnyMessage);

        // Emit an event with message details
        emit MessageSent(
            messageId,
            _destinationChainSelector,
            _receiver,
            _data,
            address(s_linkToken),
            fees
        );

        // Return the CCIP message ID
        return messageId;
    }

    /// handle a received message
    function _ccipReceive(
        Client.Any2EVMMessage memory any2EvmMessage
    ) internal override {
        DecodeStructure memory d = abi.decode(
            any2EvmMessage.data,
            (DecodeStructure)
        );
        uint256 tokenId = d.tokenId;
        address newOwner = d.receiver;

        nft.transferFrom(address(this), newOwner, tokenId);
        emit TokenUnlocked(tokenId,newOwner);
    }

    /// @notice Construct a CCIP message.
    /// @dev This function will create an EVM2AnyMessage struct with all the necessary information for sending a text.
    /// @param _receiver The address of the receiver.
    /// @param _data The string data to be sent.
    /// @param _feeTokenAddress The address of the token used for fees. Set address(0) for native gas.
    /// @return Client.EVM2AnyMessage Returns an EVM2AnyMessage struct which contains information for sending a CCIP message.
    function _buildCCIPMessage(
        address _receiver,
        bytes memory _data,
        address _feeTokenAddress
    ) private pure returns (Client.EVM2AnyMessage memory) {
        // Create an EVM2AnyMessage struct in memory with necessary information for sending a cross-chain message
        return
            Client.EVM2AnyMessage({
                receiver: abi.encode(_receiver), // ABI-encoded receiver address
                data: _data, // ABI-encoded string
                tokenAmounts: new Client.EVMTokenAmount[](0), // Empty array as no tokens are transferred
                extraArgs: Client._argsToBytes(
                    // Additional arguments, setting gas limit and allowing out-of-order execution.
                    // Best Practice: For simplicity, the values are hardcoded. It is advisable to use a more dynamic approach
                    // where you set the extra arguments off-chain. This allows adaptation depending on the lanes, messages,
                    // and ensures compatibility with future CCIP upgrades. Read more about it here: https://docs.chain.link/ccip/best-practices#using-extraargs
                    Client.EVMExtraArgsV1({
                        gasLimit: 200_000 // Gas limit for the callback on the destination chain
                        //allowOutOfOrderExecution: true // Allows the message to be executed out of order relative to other messages from the same sender
                    })
                ),
                // Set the feeToken to a feeTokenAddress, indicating specific asset will be used for fees
                feeToken: _feeTokenAddress
            });
    }

    /// @notice Fetches the details of the last received message.
    /// @return messageId The ID of the last received message.
    /// @return text The last received text.
    function getLastReceivedMessageDetails()
        external
        view
        returns (bytes32 messageId, string memory text)
    {
        return (s_lastReceivedMessageId, s_lastReceivedText);
    }

    /// @notice Fallback function to allow the contract to receive Ether.
    /// @dev This function has no function body, making it a default function for receiving Ether.
    /// It is automatically called when Ether is sent to the contract without any data.
    receive() external payable {}

    /// @notice Allows the contract owner to withdraw the entire balance of Ether from the contract.
    /// @dev This function reverts if there are no funds to withdraw or if the transfer fails.
    /// It should only be callable by the owner of the contract.
    /// @param _beneficiary The address to which the Ether should be sent.
    function withdraw(address _beneficiary) public onlyOwner {
        // Retrieve the balance of this contract
        uint256 amount = address(this).balance;

        // Revert if there is nothing to withdraw
        if (amount == 0) revert NothingToWithdraw();

        // Attempt to send the funds, capturing the success status and discarding any return data
        (bool sent, ) = _beneficiary.call{value: amount}("");

        // Revert if the send failed, with information about the attempted transfer
        if (!sent) revert FailedToWithdrawEth(msg.sender, _beneficiary, amount);
    }

    /// @notice Allows the owner of the contract to withdraw all tokens of a specific ERC20 token.
    /// @dev This function reverts with a 'NothingToWithdraw' error if there are no tokens to withdraw.
    /// @param _beneficiary The address to which the tokens will be sent.
    /// @param _token The contract address of the ERC20 token to be withdrawn.
    function withdrawToken(
        address _beneficiary,
        address _token
    ) public onlyOwner {
        // Retrieve the balance of this contract
        uint256 amount = IERC20(_token).balanceOf(address(this));

        // Revert if there is nothing to withdraw
        if (amount == 0) revert NothingToWithdraw();

        IERC20(_token).safeTransfer(_beneficiary, amount);
    }
}
主要介绍下sendLockNFT函数,该函数里面可以看到,首先先将NFT从交易用户转移到合约账户里面进行锁定,这个NFT跨链也要知道是哪个NFT,以及跨链是转给用户自己还是其它人。因此需要对NFT的tokenId和newOwner进行数据打包,之后调用sendMessagePayLINK()进行发送即可。我们查看sendMessagePayLINK()内部的实现。
function sendMessagePayLINK(
        uint64 _destinationChainSelector,
        address _receiver,
        bytes memory _data
    ) internal returns (bytes32 messageId) {
        // Create an EVM2AnyMessage struct in memory with necessary information for sending a cross-chain message
        Client.EVM2AnyMessage memory evm2AnyMessage = _buildCCIPMessage(
            _receiver,
            _data,
            address(s_linkToken)
        );

        // Initialize a router client instance to interact with cross-chain router
        IRouterClient router = IRouterClient(this.getRouter());

        // Get the fee required to send the CCIP message
        uint256 fees = router.getFee(_destinationChainSelector, evm2AnyMessage);

        if (fees > s_linkToken.balanceOf(address(this)))
            revert NotEnoughBalance(s_linkToken.balanceOf(address(this)), fees);

        // approve the Router to transfer LINK tokens on contract's behalf. It will spend the fees in LINK
        s_linkToken.approve(address(router), fees);

        // Send the CCIP message through the router and store the returned CCIP message ID
        messageId = router.ccipSend(_destinationChainSelector, evm2AnyMessage);

        // Emit an event with message details
        emit MessageSent(
            messageId,
            _destinationChainSelector,
            _receiver,
            _data,
            address(s_linkToken),
            fees
        );

        // Return the CCIP message ID
        return messageId;
    }
先进行了CCIP消息体的创建,之后获取router合约对象,并对其进行了gas费的计算,这里是以chainlink提供的LINK进行支付(可以选择Native原生以太币进行支付),随后进行授权进行ccip send,触发MessageSent事件。
那么到NFTPoolBurnAndMint合约里面的receiver就是接收到源链的跨链请求之后,经过上述CCIP跨链的前2个步骤之后(commit->bless)进行execute。所以这里可以直接对NFTPoolLockAndRelease合约进行复制,修改_ccipReceive()函数,如下:
struct DecodeStructure{
        address receiver;
        uint256 tokenId;
    }


/// handle a received message
    function _ccipReceive(
        Client.Any2EVMMessage memory any2EvmMessage
    )
        internal
        override
    {

        //decode recevie message body,and wrapped nft by source chain tokenid
        //step1:decode receive message body
        DecodeStructure memory d=abi.decode(any2EvmMessage.data,(DecodeStructure));
        //step2:use decode get data to mint wrapped nft.
        uint256 tokenId=d.tokenId;
        address newOwner=d.receiver;
        wnft.mintTokenWithSpecificTokenId(newOwner,tokenId);
        emit TokenMinted(tokenId,newOwner);

    }
创建了一个消息结构体,用于进行解码,之后调用wnft合约为newOnwer用户进行包装NFT资产的铸造Mint。这个过程就是lock and mint。
反之,从目的链sender到源链receiver的跨链,就需要burn and unlock。在目的链的sender里面就需要对WrappedNFT进行burn操作,如下:
function sendBurnNFT(uint256 tokenId,address newOwner,uint64 destinationChainSelector,address receiver) public returns(bytes32){
       wnft.transferFrom(msg.sender, address(this), tokenId);
       wnft.burn(tokenId);
       bytes memory payload=abi.encode(newOwner,tokenId);
       bytes32 messageId= sendMessagePayLINK(destinationChainSelector,receiver,payload);
       return messageId;
    }
将WrappedNFT转移到NFTPoolBurnAndMint合约进行Burn,之后发送到源链。源链的NFTPoolLockAndRelease的_ccipReceive()进行NFT的转出如下:
/// handle a received message
    function _ccipReceive(
        Client.Any2EVMMessage memory any2EvmMessage
    ) internal override {
        DecodeStructure memory d = abi.decode(
            any2EvmMessage.data,
            (DecodeStructure)
        );
        uint256 tokenId = d.tokenId;
        address newOwner = d.receiver;

        nft.transferFrom(address(this), newOwner, tokenId);
        emit TokenUnlocked(tokenId,newOwner);
    }
总结一下,这里的智能合约实现主要是做了sender和receiver合约的实现,至于NFT和WrappedNFT我们可以快速采用openzeppelin进行生成即可。在进行源链->目的链的跨链时,源链的sender是做了lock操作(也就是把这个nft从交易账户转移到了合约账户里面),目的链的receiver进行mint操作,为指定用户铸造一个包装的WNFT;反之,源链的sender是做burn操作,目的链的receiver将NFT从合约账户转出到给定账户。
调试
调试我们采用的是Hardhat框架进行测试,在进行测试的时候,我们需要将router地址、link地址、chainSelector做成配置,以便于修改。同时,由于水龙头的币基本上领不到,如果不是chainlink的UP主及时响应我们的用水需求,我想这篇文章很难写的出来,在这里还是要感谢一下。所以尽量在把所有的配置读取出来之后,放到ether scan进行搜索(如果是Polygon,就去Poloy scan进行搜索),看看是否可以搜索到,如果可以搜索到就证明读取的是正确的,同时receiver和sender合约里面有个getRouter()也需要打印出来(不能怕废水),进行验证。
我们接下来使用Hardhat的task来进行以下的操作:
- 源链的NFT铸造
- 源链的NFT查看
- 源链到目的链的NFT转移(lock and mint)
- 目的链的WNFT查看
- 目的链到源链的NFT转移(unlock and burn)
- 源链的NFT查看
源链的NFT铸造
const {task}=require(`hardhat/config`)
task(`create-source-nft`).setAction(async(args,hre)=>{
   const firstAccount=(await getNamedAccounts()).firstAccount
   const MyToken=await ethers.getContract("MyToken",firstAccount)
   const mintedTx=await MyToken.safeMint(firstAccount)
   await mintedTx.wait(5)
   console.log(`mint nft successfully on source chain.the hash is ${mintedTx.hash}`)
})
我们通过执行npx hardhat create-source-nft --network sepolia进行源链上的NFT铸造。
源链的NFT查看
// const { getNamedAccounts, ethers } = require("hardhat");
const { task } = require("hardhat/config");

task("query-source-chain").setAction(async(args,hre)=>{
    const firstAccount=(await getNamedAccounts()).firstAccount
    const MyToken=await ethers.getContract("MyToken",firstAccount)
    const totalSupply=await MyToken.totalSupply()
    for(let tokenid=0;tokenid<totalSupply;tokenid++){
        const owner=await MyToken.ownerOf(tokenid)
        console.log(`tokenId=${tokenid},owner=${owner}`);

    }

})
通过执行npx hardhat query-source-chain --network sepolia进行源链上的NFT查看。如图:

可以看到tokenId目前是属于我的MetaMask的账户的。
源链到目的链的NFT转移(lock and mint)
为了灵活配置参数,通过addOptionalParam()进行可选参数的配置,支持用户自定义receiver和chainSelector。
之后通过获取crossChainInfo的配置,获取出linkToken的合约地址,router合约地址等等,chainSelector的配置(上面有)是通过链id配置的伙伴链companionChainId来获取目标链的chainSelector。
const { task } = require("hardhat/config");
const { crossChainInfo } = require("../helper.hardhat.config");


task("send-and-lock")
    .addOptionalParam("receiver", "接收方的receiver地址,可空")
    .addOptionalParam("chainselector", "接收方的链编码,可空")
    .addParam("tokenid", "要跨链转账的nft,所在源链的nft编码,必填")
    .setAction(async (args, hre) => {
        const firstAccount = (await getNamedAccounts()).firstAccount
        const MyToken = await ethers.getContract("MyToken", firstAccount)
        console.log(`cross chain start,current chain id is ${network.config.chainId}`)
        let receiver
        let chainSelector
        if (args.chainselector) {
            chainSelector = args.chainselector
        }
        else {
            console.log("chainSelector not set in command.")
            chainSelector = crossChainInfo[network.config.chainId].companionChainSelector
        }
        console.log(`chain selector=${chainSelector}`)
        if (args.receiver) {
            receiver = args.receiver
        }
        else {
            console.log("receiver not set in command.")
            const NFTPoolBurnAndMint = await hre.companionNetworks["destChain"].deployments.get("NFTPoolBurnAndMint")
            receiver = NFTPoolBurnAndMint.address
        }
        console.log(`receiver address =${receiver}`)

        const PoolLockAndRelease = await ethers.getContract("NFTPoolLockAndRelease", firstAccount)
        //1.firstAccount用户批准poolLockAndRelease合约进行转账
        console.info(`approve to PoolLockAndRelease permission.`)
        const approveTx=await MyToken.approve(PoolLockAndRelease.target,args.tokenid)
        await approveTx.wait(5)
        console.info(`approve successfully.`)

        //2.需要向poolLockAndRelease合约转账1个Link
        const linkTokenContractAddress = crossChainInfo[network.config.chainId].ccipLinkTokenAddr
        console.log(`LinkToken contract address=${linkTokenContractAddress}`)

        const LinkToken = await ethers.getContractAt("LinkToken", linkTokenContractAddress)
        const transferTx = await LinkToken.transfer(PoolLockAndRelease.target, ethers.parseEther("10"))
        await transferTx.wait(5)
        const poolLockAndReleaseBalance = await LinkToken.balanceOf(PoolLockAndRelease.target)
        console.log(`contract address is ${PoolLockAndRelease.target},PoolLockAndRelease linktoken balance is ${poolLockAndReleaseBalance}`)


        //approver=0x7Ce29D9C932469700b0fB947B2365D05C8c97CA0,tokenid=0
        //PoolLockAndRelease contract address=0x7Ce29D9C932469700b0fB947B2365D05C8c97CA0


        //3.将源nft放入到poolLockAndRelease合约中进行锁定,且产生发送消息id到目标链
        const chainSelectorInteger = BigInt(chainSelector);
        const tokenId=BigInt(args.tokenid)
        try {
            // console.log(PoolLockAndRelease.interface.fragments)
            console.log(`token id is ${tokenId} in args.the type name is ${typeof(tokenId)}`)
            const router=await PoolLockAndRelease.getRouter()
            console.log(`router address=${router}`)

            const poolLockAndReleaseTx = await PoolLockAndRelease.sendLockNFT
                (
                    tokenId,
                    firstAccount,
                    chainSelectorInteger,
                    receiver
                )
            console.log(`cross lock and release tx hash is: ${poolLockAndReleaseTx.hash}`)
        }
        catch (error) {

            console.error("callStatic error:", error);
        }

        // const balance = await MyToken.balanceOf(PoolLockAndRelease.target)
        // console.log(`balance of pool is ${balance}`)
        // //3.为poolLockAndRelease合约指定接收方poolMintAndBurn的地址,以及amoy的链码
        // await PoolLockAndRelease.sendLockNFT(args.tokenid,firstAccount,chainSelector,receiver)
    })

module.exports = {}
在获取目的链的receiver合约时,Hardhat提供了一种叫做Hardhat run enviroment的hre,通过hre找到hardhat内置配置companionNetworks来获取目标链的deployments,获取到receiver合约地址。
执行npx hardhat send-and-lock --network sepolia --tokenid 0命令后,结果如下:

我们把cross lock and release tx hash is: 0x619dd0147d92f866cab934da09d3438416cc6c44e97ca1993f0f0df3e4695b76hash地址复制到chainlink explorer搜索该hash的跨链状态。
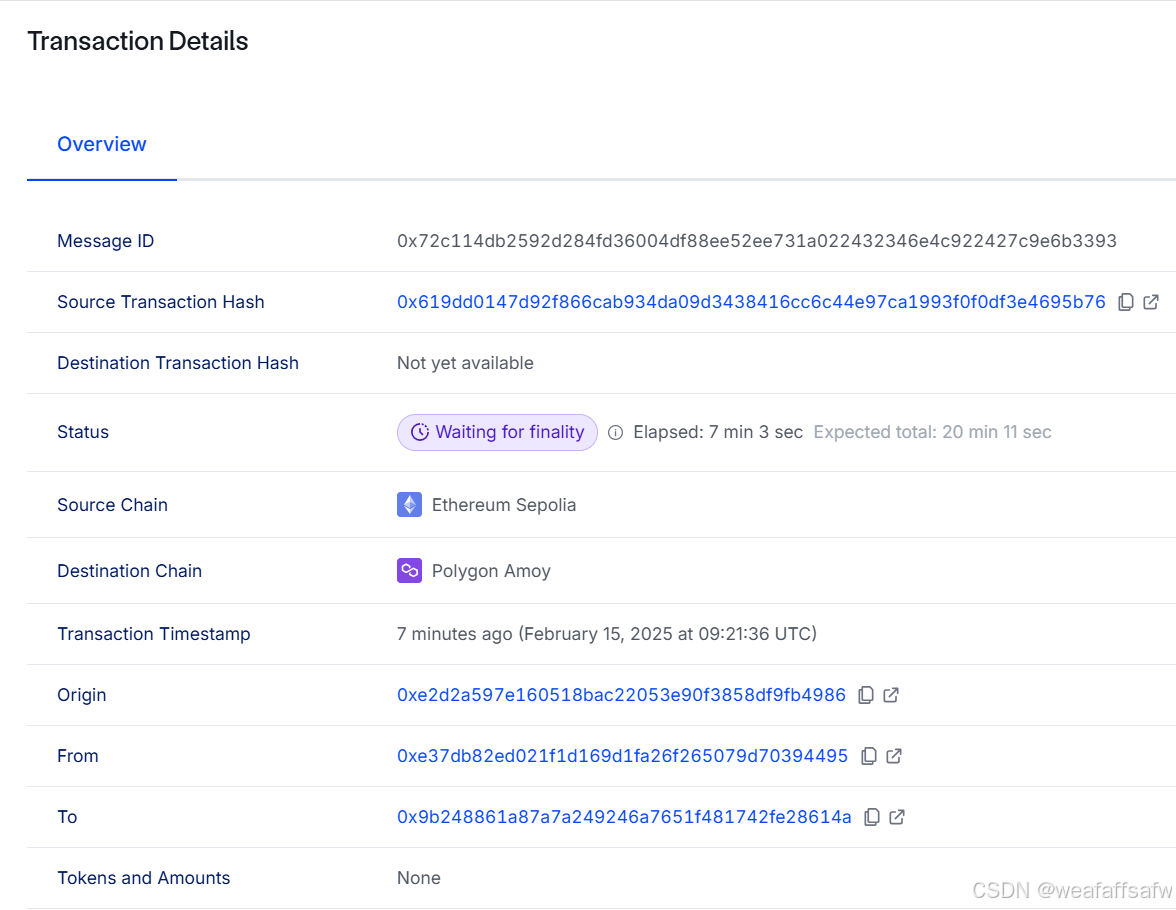
可以看到目标链的交易哈希目前还是空的状态,状态为等待最终确认
等待20分钟……
因此在本地区块链网络上测试时,可以采用CCIPSimulator来模拟这种场景,有效的提高了本地单元测试的时间。
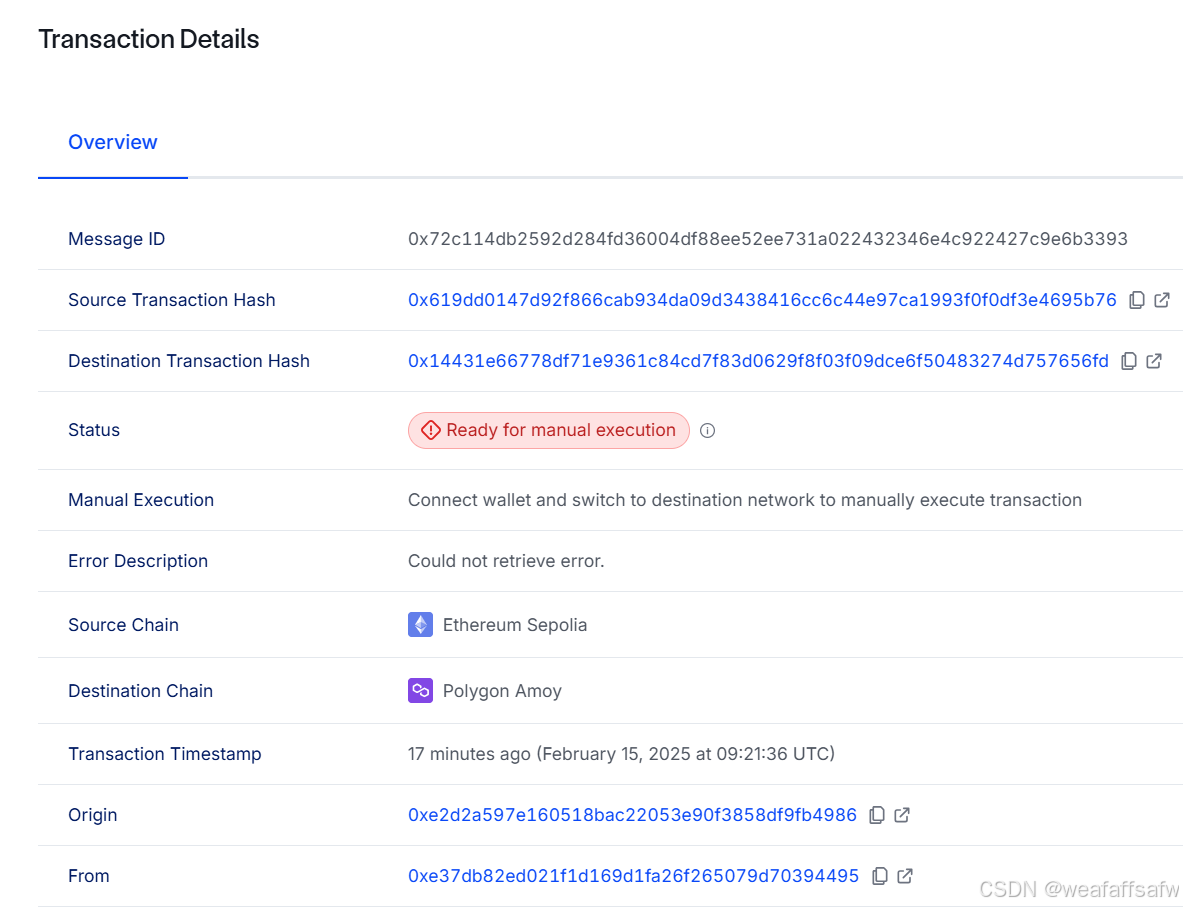
此时状态:准备手动执行,事与愿违交易可能因为当前区块链网络拥堵,gas费提高导致执行失败。在tenderly的explorer里面搜索该hash,之后就看到如下这张图片:
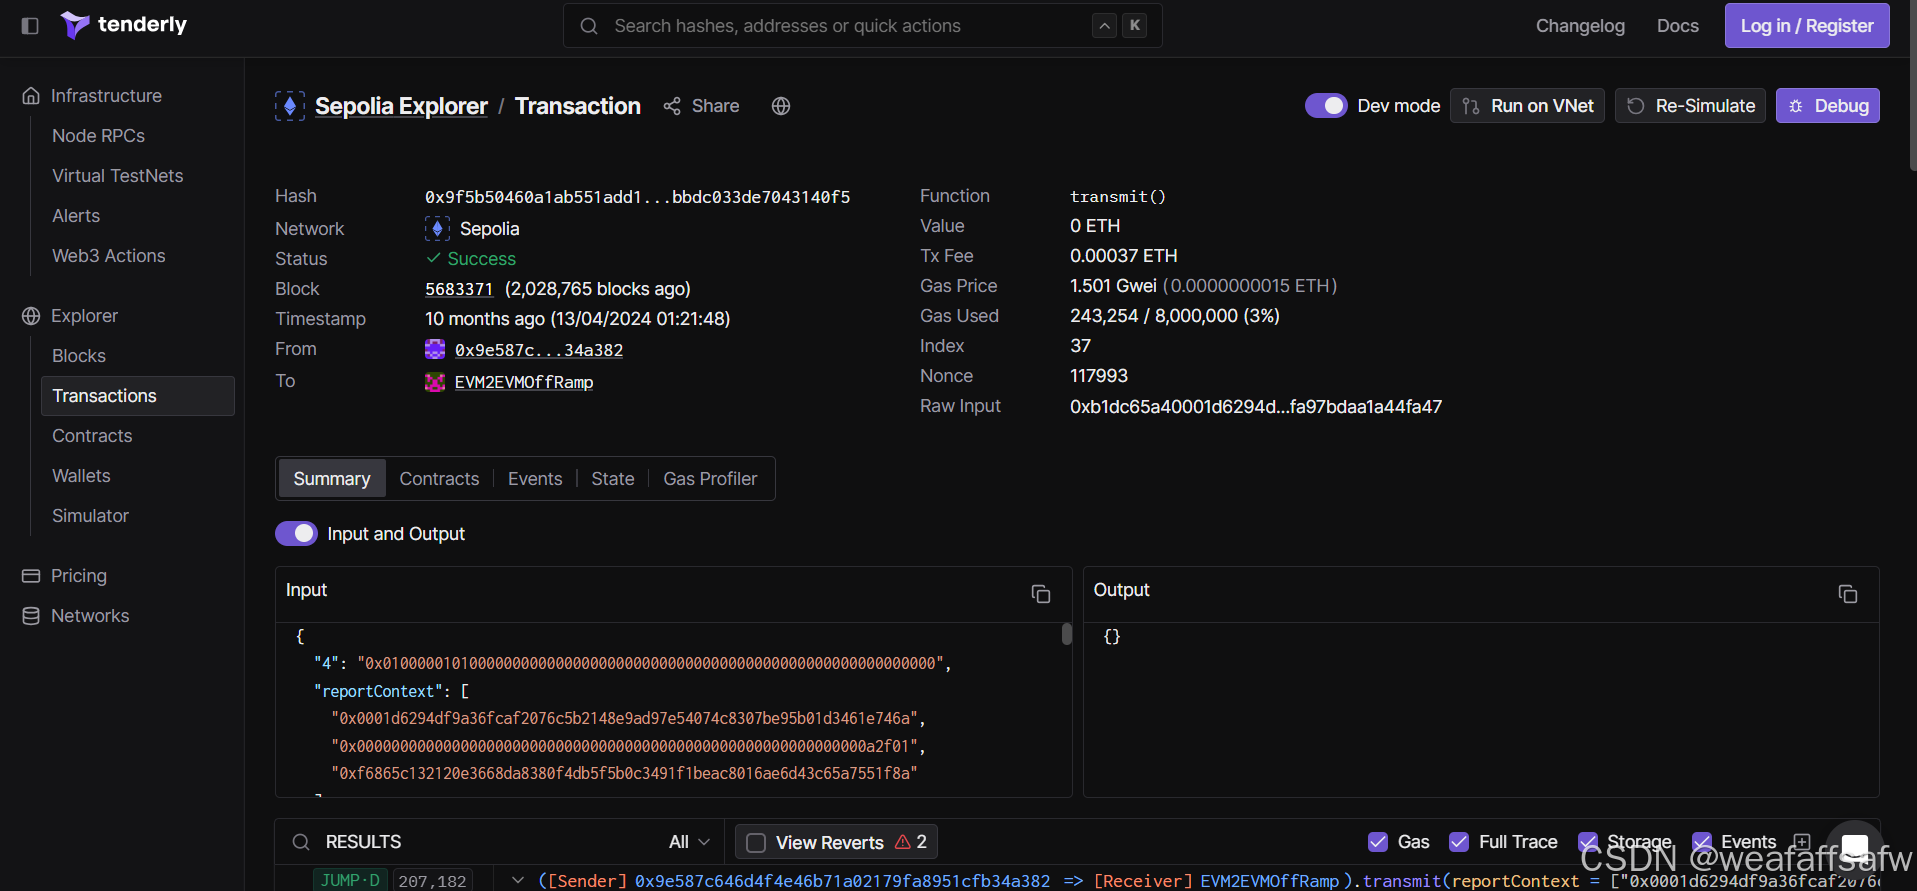
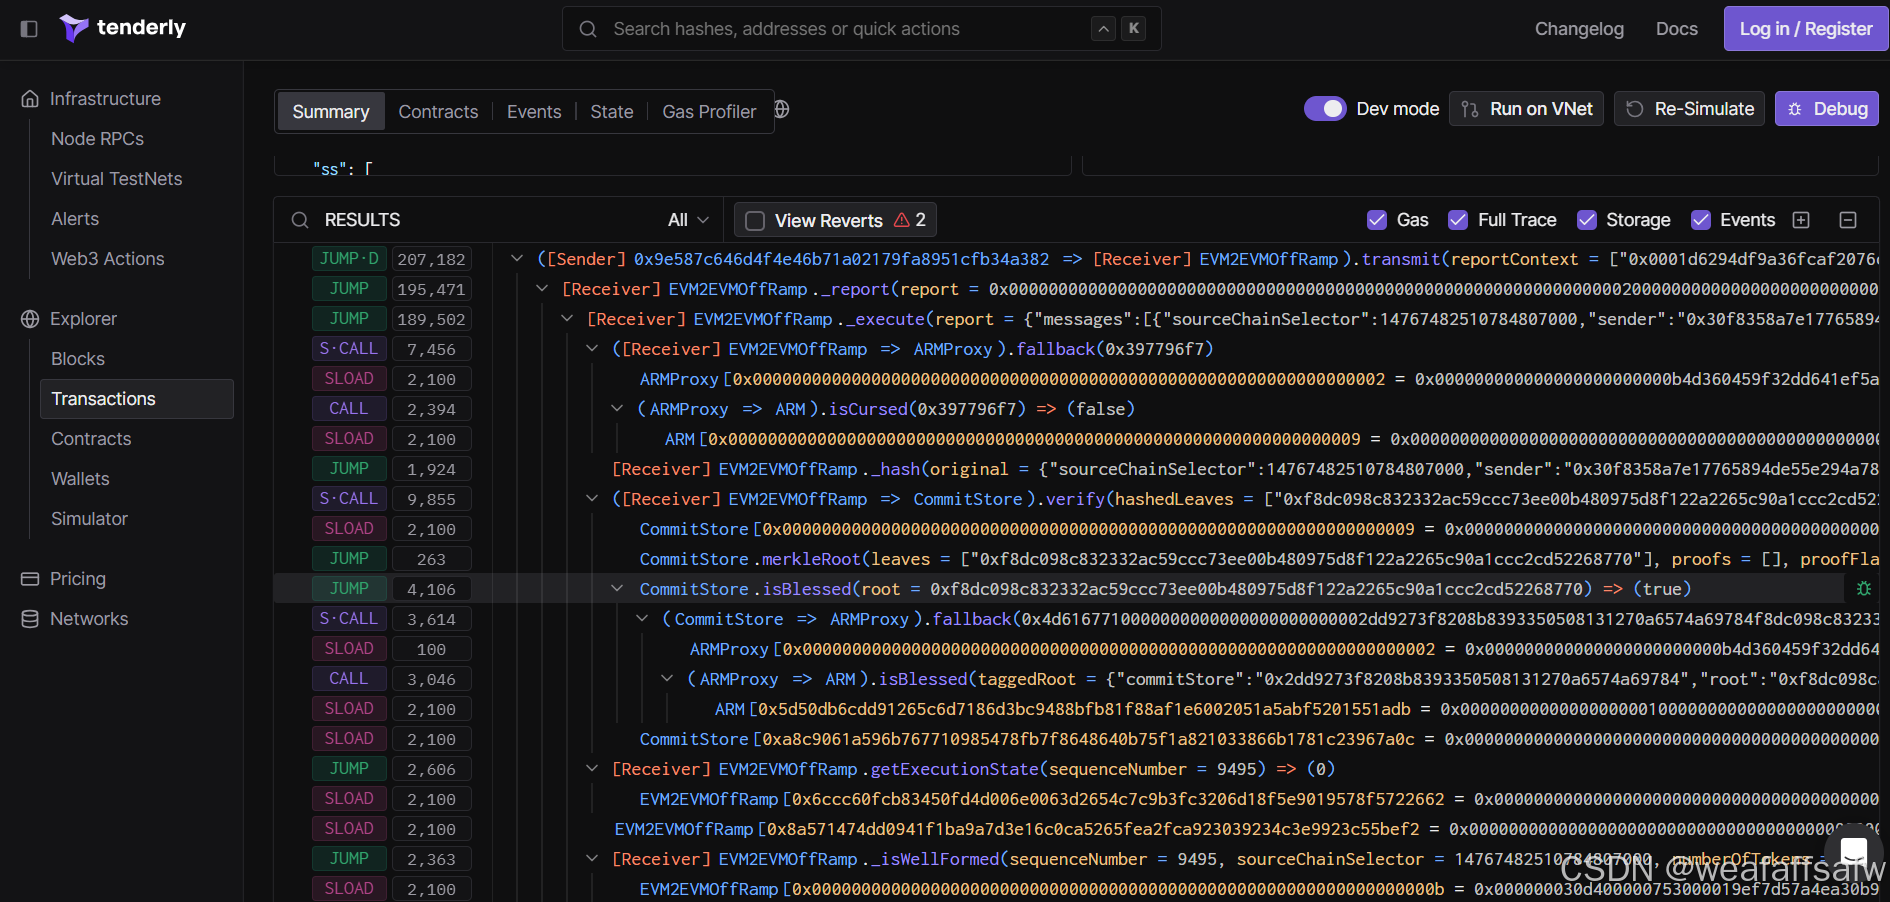
干瞪眼,这应该是交易栈的详情吧。通过deepseek的分析再结合chainlink官方文档的解释,很有可能就是gas费用不足。在chainlink ccip浏览器里面连接下钱包。
手动设置下gas limit
通过本地hardhat网络测试,也测试不通过。
未解决的问题:为何在WrappedNFT合约中,使用ERC721进行_setTokenURI()时,在sender合约和receiver合约中,将对应NFT的tokenURI(即metadata)取出,并进行打包发送会报上述错误,本地hardhat测试出现错误如下:
npx hardhat test --network hardhat


execute times:1
  source chain -> destnation chain
ipfs://QmV6T5QJTnuhvnaLoouMP6KoDotbA2onexe4xkz5mGKJv4
    ✔ 源链为拥有者创建一个nft,查看该nft的属于者是否为拥有者。期望:是拥有者
PoolBurnAndMint.target:0xDc64a140Aa3E981100a9becA4E685f962f0cF6C9
    1) 将拥有者所拥有的nft,转移ccip里面,查看该nft是否被锁定。期望结果:nft目前的拥有者为poolLockAndRelease合约。期望结果:nft的拥有者为PoolLockAndRelease地址
    2) 测试wrapped nft合约,tokenId=0的nft是否属于firstAccount所拥有。期望结果:是

  destnation chain->source chain.
    3) 将wrapped nft合约中tokenId=0的wnft烧掉,发送到poolBurnAndMint合约中,查看wrapped ntf合约中的数量是否少了1。期望结果:wrapped nft count比之前少了一个
    ✔ 测试source nft合约,查看目前的拥有者是否为firstAccount。期望:是


  2 passing (3s)
  3 failing

  1) source chain -> destnation chain
       将拥有者所拥有的nft,转移ccip里面,查看该nft是否被锁定。期望结果:nft目前的拥有者为poolLockAndRelease合约。期望结果:nft的拥有者为PoolLockAndRelease地址:
     Error: VM Exception while processing transaction: reverted with custom error 'ReceiverError("0x")'
    at MockCCIPRouter.ccipSend (@chainlink/contracts-ccip/src/v0.8/ccip/test/mocks/MockRouter.sol:117)
    at NFTPoolLockAndRelease.sendMessagePayLINK (contracts/NFTPoolLockAndRelease.sol:128)
    at NFTPoolLockAndRelease.sendLockNFT (contracts/NFTPoolLockAndRelease.sol:88)
    at EdrProviderWrapper.request (node_modules/hardhat/src/internal/hardhat-network/provider/provider.ts:444:41)
    at HardhatEthersSigner.sendTransaction (node_modules/@nomicfoundation/hardhat-ethers/src/signers.ts:125:18)
    at send (node_modules/ethers/src.ts/contract/contract.ts:313:20)
    at Proxy.sendLockNFT (node_modules/ethers/src.ts/contract/contract.ts:352:16)
    at Context.<anonymous> (test/cross-chain-nft.test.js:53:9)


  2) source chain -> destnation chain
       测试wrapped nft合约,tokenId=0的nft是否属于firstAccount所拥有。期望结果:是:
     Error: VM Exception while processing transaction: reverted with custom error 'ERC721NonexistentToken(0)'
    at WrappedMyToken._requireOwned (@openzeppelin/contracts/token/ERC721/ERC721.sol:452)
    at WrappedMyToken.ownerOf (@openzeppelin/contracts/token/ERC721/ERC721.sol:68)
    at EdrProviderWrapper.request (node_modules/hardhat/src/internal/hardhat-network/provider/provider.ts:444:41)
    at staticCallResult (node_modules/ethers/src.ts/contract/contract.ts:337:22)
    at staticCall (node_modules/ethers/src.ts/contract/contract.ts:303:24)
    at Proxy.ownerOf (node_modules/ethers/src.ts/contract/contract.ts:351:41)
    at Context.<anonymous> (test/cross-chain-nft.test.js:59:21)


  3) destnation chain->source chain.
       将wrapped nft合约中tokenId=0的wnft烧掉,发送到poolBurnAndMint合约中,查看wrapped ntf合约中的数量是否少了1。期望结果:wrapped nft count比之前少了一个:
     Error: VM Exception while processing transaction: reverted with custom error 'ERC721NonexistentToken(0)'
    at WrappedMyToken._requireOwned (@openzeppelin/contracts/token/ERC721/ERC721.sol:452)
    at WrappedMyToken._approve (@openzeppelin/contracts/token/ERC721/ERC721.sol:412)
    at WrappedMyToken._approve (@openzeppelin/contracts/token/ERC721/ERC721.sol:402)
    at WrappedMyToken.approve (@openzeppelin/contracts/token/ERC721/ERC721.sol:108)
    at EdrProviderWrapper.request (node_modules/hardhat/src/internal/hardhat-network/provider/provider.ts:444:41)
    at HardhatEthersSigner.sendTransaction (node_modules/@nomicfoundation/hardhat-ethers/src/signers.ts:125:18)
    at send (node_modules/ethers/src.ts/contract/contract.ts:313:20)
    at Proxy.approve (node_modules/ethers/src.ts/contract/contract.ts:352:16)
    at Context.<anonymous> (test/cross-chain-nft.test.js:67:9)
检查了接收合约的地址,也不是0x0,为何在Mock合约中出现了这样的问题?一旦把tokenURI去掉,此问题就解决了。也检查了buildCCIPMessage()里面的数据体没问题。
如果不进行上述的_setTokenURI()。在跨链转移后,该WrappedNFT就不会显示图片了。
把打包的tokenURI和WrappedNFT合约中的_setTokenURI()去掉之后。再次进行跨链,hash如下:
cross lock and release tx hash is: 0xecfd6277780bc489c859fd4d7462d3a3d577c3f34043f1729ddc65e57f0b8e60
等了将近15分钟左右,状态已经成功
目的链的WNFT查看
// const { getNamedAccounts, ethers } = require("hardhat");
const { task } = require("hardhat/config");

task("query-dest-chain")
.addParam("tokenid")
.setAction(async(args,hre)=>{
    const firstAccount=(await getNamedAccounts()).firstAccount
    const WrappedMyToken=await ethers.getContract("WrappedMyToken",firstAccount)
    const owner=await WrappedMyToken.ownerOf(args.tokenid)
    console.log("Owner of tokenid",args.tokenid,"is",owner)

})
转移了nft之后,我们就要验证下源链此nft的拥有者是否为合约地址。执行命令npx hardhat query-source-chain --network sepolia查看。
先将部署sender合约的打印日志放在这
npx hardhat deploy --tags sourcechain --network sepolia
Nothing to compile
deploy MyToken contract.
reusing "MyToken" at 0xC61281699448bb632328C4602aAd5c60aCacaac1
MyToken deployed sucessfully.
deploy NFTPoolLockAndRelease contract.
Product enviroment need main network router and link.
!!!ccipRouter=0x0BF3dE8c5D3e8A2B34D2BEeB17ABfCeBaf363A59,ccipLinkToken=0x779877A7B>0D9E8603169DdbD7836e478b4624789
deploying "NFTPoolLockAndRelease" (tx: >0xa71f13bf59e444ff5e060890cfa369e0213f2b7375c6be75d13447e99e052c85)...: deployed at >0x8D0Cee0e9Ce70DB6570DFF3b19BDF5647FFB3bD9 with 2268152 gas
NFTPoolLockAndRelease deployed sucessfully,this contract address is >0x8D0Cee0e9Ce70DB6570DFF3b19BDF5647FFB3bD9
npx hardhat query-source-chain --network sepolia
tokenId=0,owner=0xe37dB82ed021f1D169d1Fa26f265079D70394495
tokenId=1,owner=0xe37dB82ed021f1D169d1Fa26f265079D70394495
tokenId=2,owner=0x8D0Cee0e9Ce70DB6570DFF3b19BDF5647FFB3bD9
前两2个token,就是实验上述的疑问,未解决导致的。这里转移的是tokenid=2的nft,可以看到此时的拥有者的地址为sender合约地址(见引用)。
我们通过验证下目标链的wnft,也可以看出wnft是否被成功铸造。
执行hardhat task命令npx hardhat query-dest-chain --network amoy --tokenid 2
可以看到如下:
Owner of tokenid 2 is 0xe2d2a597e160518BAc22053E90f3858df9Fb4986
此时tokenid为2,已在ploygon amoy测试网的WrappedNFT合约铸造出来。
目的链到源链的NFT转移(unlock and burn)
const {task}=require(`hardhat/config`)
const { crossChainInfo } = require("../helper.hardhat.config")
const { parseEther } = require("ethers")

task(`burn-and-release`)
.addOptionalParam("chainselector","目标链的链id 【可选】")
.addOptionalParam("receiver","目标链的pool合约地址 【可选】")
.addParam("tokenid","转移目标的nft编码 【必填】")
.setAction(async(args,hre)=>{
    let chainSelector
    let receiver
    let tokenId=BigInt(args.tokenid)

    let NFTPoolLockAndReleaseDeployments


    const {firstAccount}=await getNamedAccounts()
    const NFTPoolBurnAndMint=await ethers.getContract("NFTPoolBurnAndMint",firstAccount)
    const WrappedMyToken=await ethers.getContract("WrappedMyToken",firstAccount)
    if(args.chainselector){
        chainSelector=args.chainselector
    }
    else{
        console.log(`chain selector not set in command.`)
        chainSelector=crossChainInfo[network.config.chainId].companionChainSelector
    }

    if(args.receiver){
        receiver=args.receiver
    }
    else{
        NFTPoolLockAndReleaseDeployments=await hre.companionNetworks["destChain"].deployments.get("NFTPoolLockAndRelease")
        receiver=NFTPoolLockAndReleaseDeployments.address
    }

    console.log(`>>>chain selector=${chainSelector},receiver=${receiver}`)
    console.log(`NFTPoolBurnAndMint address is ${NFTPoolBurnAndMint.target}`)
    const routerAddress=await NFTPoolBurnAndMint.getRouter()
    console.log(`router address is ${routerAddress} in NFTPoolBurnAndMint`)
    //variable section
    let linkTokenAddress=crossChainInfo[network.config.chainId].ccipLinkTokenAddr
    const LinkToken=await ethers.getContractAt("LinkToken",linkTokenAddress)
    //1. transfer link to NFTPoolBurnAndMint.
    const transferTx=await LinkToken.transfer(NFTPoolBurnAndMint.target,ethers.parseEther("10"))
    await transferTx.wait(6)
    const balance=await LinkToken.balanceOf(NFTPoolBurnAndMint.target)
    console.log(`NFTPoolBurnAndMint balance is ${balance}`)

    //2.approval NFTPoolBurnAndMint to burn
    const approvalTx=await WrappedMyToken.approve(NFTPoolBurnAndMint.target,args.tokenid)
    await approvalTx.wait(6)

    //3.burn and release of pool

    const burnReleaseTx=await NFTPoolBurnAndMint.sendBurnNFT(tokenId,firstAccount,chainSelector,receiver)
    console.log(`burn and release hash is ${burnReleaseTx.hash}`)


})
接下来执行命令npx hardhat burn-and-release --network amoy --tokenid 2将此wnft烧掉,并从刚刚tokenid=2所拥有的合约账户转移到交易账户中。
执行结果如下:
burn and release hash is 0xda35125be789c6378b5079478dbe34b5bccb73a9d509a117bf76166696fc4d01
用此hash到chainlink浏览器搜索下,查看下当前跨链交易的状态。

可以看到此时的交易状态也是等待最终确定,且预计等待时间为11分钟,很明显比sepolia测试网快的多。这些就是不同的区块链网络的共识机制的不同,导致等待最终性finality也不同。
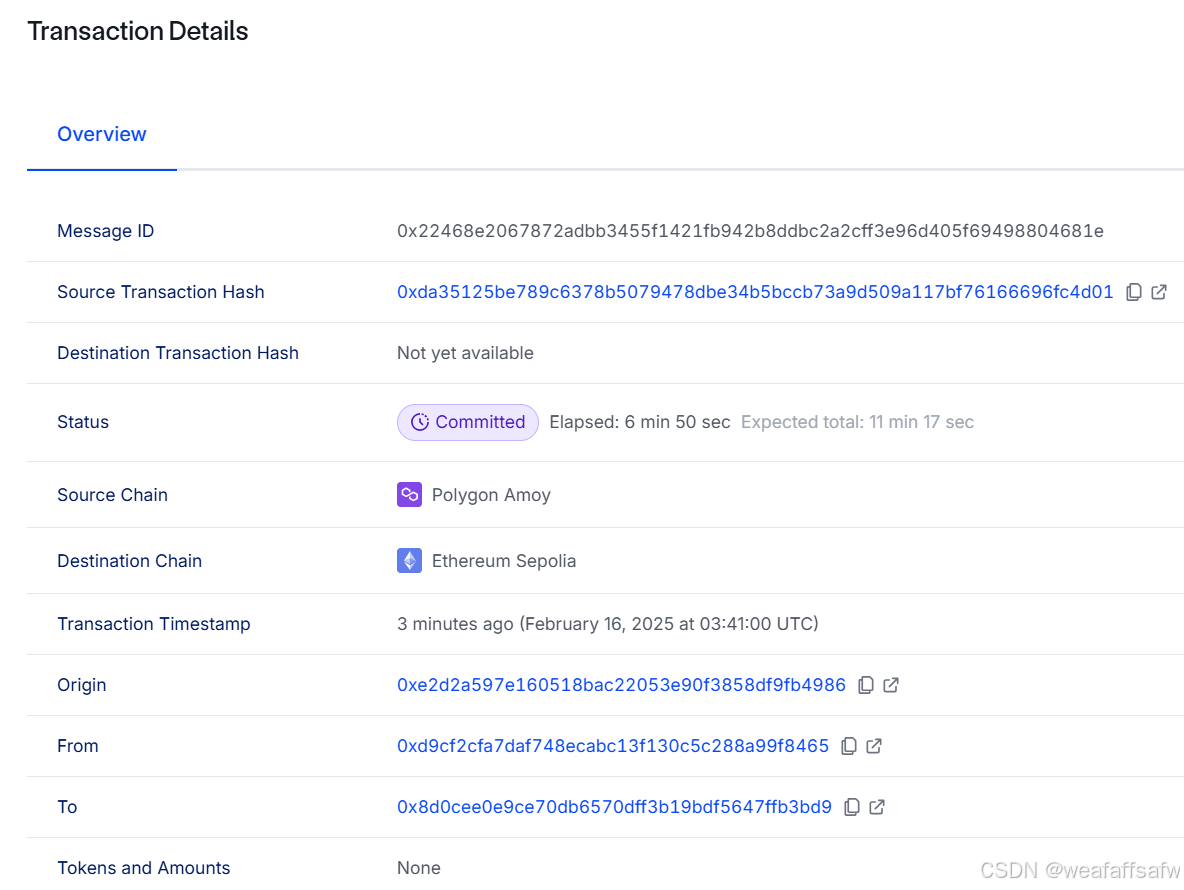
可以看到现在的状态为committed状态
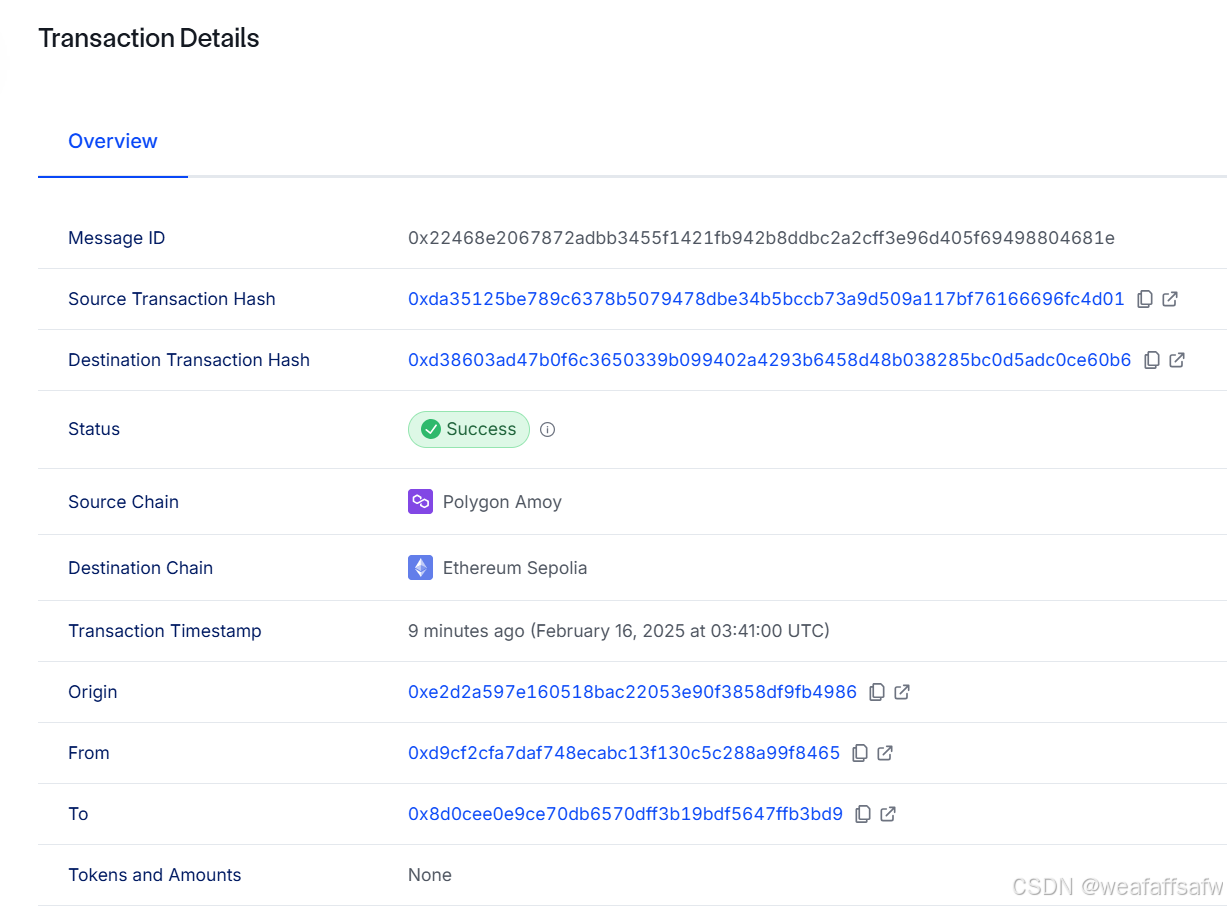
此时跨链状态已经成功。
源链的NFT查看
在通过npx hardhat query-source-chain --network sepolia命令查看下,tokenid=2的nft的拥有者
tokenId=0,owner=0xe37dB82ed021f1D169d1Fa26f265079D70394495
tokenId=1,owner=0xe37dB82ed021f1D169d1Fa26f265079D70394495
tokenId=2,owner=0xe2d2a597e160518BAc22053E90f3858df9Fb4986
可以看到此时成功到tokenid=2的nft的拥有者变为了交易用户地址。保险起见,我们在看下WrappedNFT里面的tokenid=2的wnft是否被烧掉。
 npx hardhat query-dest-chain --network amoy --tokenid 2
An unexpected error occurred:
ProviderError: execution reverted
    at HttpProvider.request (/home/w/hardhat/CrossChainLink-NFT/node_modules/hardhat/src/internal/core/providers/http.ts:107:21)
    at processTicksAndRejections (node:internal/process/task_queues:95:5)
    at staticCallResult (/home/w/hardhat/CrossChainLink-NFT/node_modules/ethers/src.ts/contract/contract.ts:337:22)
    at staticCall (/home/w/hardhat/CrossChainLink-NFT/node_modules/ethers/src.ts/contract/contract.ts:303:24)
    at Proxy.ownerOf (/home/w/hardhat/CrossChainLink-NFT/node_modules/ethers/src.ts/contract/contract.ts:351:41)
    at SimpleTaskDefinition.action (/home/w/hardhat/CrossChainLink-NFT/tasks/query_dest_nft.js:10:17)
    at Environment._runTaskDefinition (/home/w/hardhat/CrossChainLink-NFT/node_modules/hardhat/src/internal/core/runtime-environment.ts:351:14)
    at Environment.run (/home/w/hardhat/CrossChainLink-NFT/node_modules/hardhat/src/internal/core/runtime-environment.ts:184:14)
    at main (/home/w/hardhat/CrossChainLink-NFT/node_modules/hardhat/src/internal/cli/cli.ts:324:7)
至此,关于chainlink ccip跨链nft的练习已经完成,
心得&总结
心得
在测试过程中,尽量多采取一些打印的方式,打印出所有存在错误点的合约地址、chainSelector等等。因为这些错误需要很小心才能看出来。
总结
在本次学习chainlink ccip跨链nft的学习旅途中,认识了ccip跨链的3个步骤(commit,bless,execute)以及NFT的组成部分和基于去中心化的IPFS的Filebase。使用hardhat编写task任务更便于对nft跨链进行操作,以及采取日志调试的方式等等。
遗留问题
跨链后,由于tokenURI没有传递,导致跨链后图片不显示。将tokenURI进行打包,通过ccip message发送报错。此问题没解决。
致谢
感谢B站chainlink的官方视频讲解,以及up主不断给学习者提供测试币的帮助。谢谢chainlink让我对web3有一个更深刻的认识。
作者能力有限,如有不足之处请各位多多指教。同是web3爱好者可以与之多多交流。


 1841
1841

 被折叠的 条评论
为什么被折叠?
被折叠的 条评论
为什么被折叠?
 到【灌水乐园】发言


