


文章目录
1 elasticsearch简介
- 什么是elasticsearch?
- 一个开源的
分布式搜索引擎,可以用来实现搜索、日志统计、分析、系统监控等功能 - 什么是elastic stack(ELK)?
- 是以elasticsearch为核心的技术栈,包括beats、Logstash、Kibana、elasticsearch
- 什么是Lucene?
- 是Apache的开源搜索引擎类库,提供了搜索引擎的核心API,核心技术是
倒排索引
1.1 正向索引和倒排索引
什么是文档和词条?
- 文档:每一条数据就是一个文档
- 词条:对文档中的内容分词,得到的词语就是词条
什么是正向索引? - 基于
文档id创建索引。查询词条时必须先找到文档,而后判断是否包含词条
什么是倒排索引? - 对文档内容分词,对
词条创建索引,并记录词条所在文档的id信息。查询时先根据词条查询到文档id,而后根据文档id获取到文档。
1.2 文档
elasticsearch是面向文档储存的,文档数据会被序列化为json格式后储存在elasticsearch中。
1.3 索引和映射
- 索引:相同类型的
文档的集合 - 映射:索引中文档的
字段约束信息,类似表的结构约束
1.4 elasticsearch与mysql概念对比

- Mysql:擅长事务类型操作,可以确保数据的安全和一致性
- Elasticsearch:擅长海量数据的搜索、分析、计算
之间是互补关系!
2 部署单点es和kibana
2.1 创建网络
因为还需要部署kibana容器,因此需要让es和kibana容器互联。先创建一个网路
dockerhub地址:https://hub.docker.com/_/elasticsearch
docker network create es-net
2.2 拉取镜像
docker pull elasticsearch:7.12.1
docker pull kibana:7.12.1
这里如果拉取失败,可以尝试重启docker- kibana提供了很方便的工具,方便编写es中的DSL语句,来操作es
也可以直接加载镜像
elasticsearch.tar:https://download.csdn.net/download/weixin_43684214/86881986
kibana.tar:
docker load -i elasticsearch.tar
docker load -i kibana.tar
2.3 运行
2.3.1 单个容器运行
- es运行
docker run -d
--name elasticsearch  # 容器名
-e "ES_JAVA_OPTS=-Xms512m -Xmx512m"  #内存配置
-e "discovery.type=single-node"  # 单机启动
-v es-data:/usr/share/elasticsearch/data # 数据存储目录
-v es-plugins:/usr/share/elasticsearch/plugins # 插件目录
--privileged
--net es-net #  加入创建的网络
-p 9200:9200 # 用户访问的端口
-p 9300:9300 # 容器互联访问的端口
elasticsearch:7.12.1
- kibana运行
docker run -d
--name kibana
-e ELASTICSEARCH_HOSTS=http://elasticsearch:9200 #同一个网络可以使用容器名代替IP
--network=es-net #加入创建的网络
-p 5601:5601
kibana:7.12.1  # tag要和es一致
2.3.2 docker-compose一件运行
version : '3'
#networks:
#  es:
services:
  elasticsearch:
    container_name: elasticsearch
    image: elasticsearch:7.12.1
    ports:
      - 9200:9200
      - 9300:9300
    volumes:
      - ./es-data:/usr/share/elasticsearch/data
      - ./es-plugins:/usr/share/elasticsearch/plugins
    environment:
      ES_JAVA_OPTS: -Xms512m -Xmx512m
      discovery.type: single-node
    privileged: true
#    networks:
#      - "es"
  kinana:
    container_name: kinana
    image: kibana:7.12.1
    ports:
      - 5601:5601
#    networks:
#      - "es"
    environment:
      ELASTICSEARCH_HOSTS: http://elasticsearch:9200
#    volumes:
#    - ./kibana.yml:/usr/share/kibana/config/kibana.yml
2.4 访问
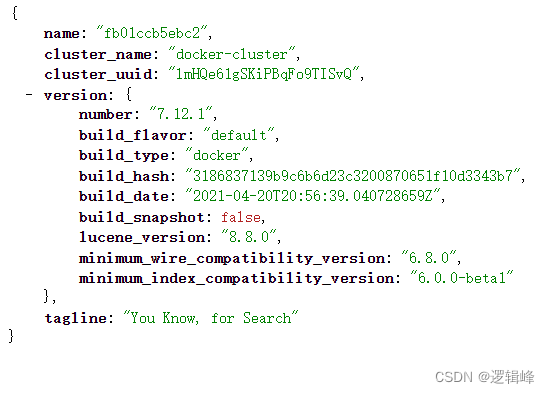
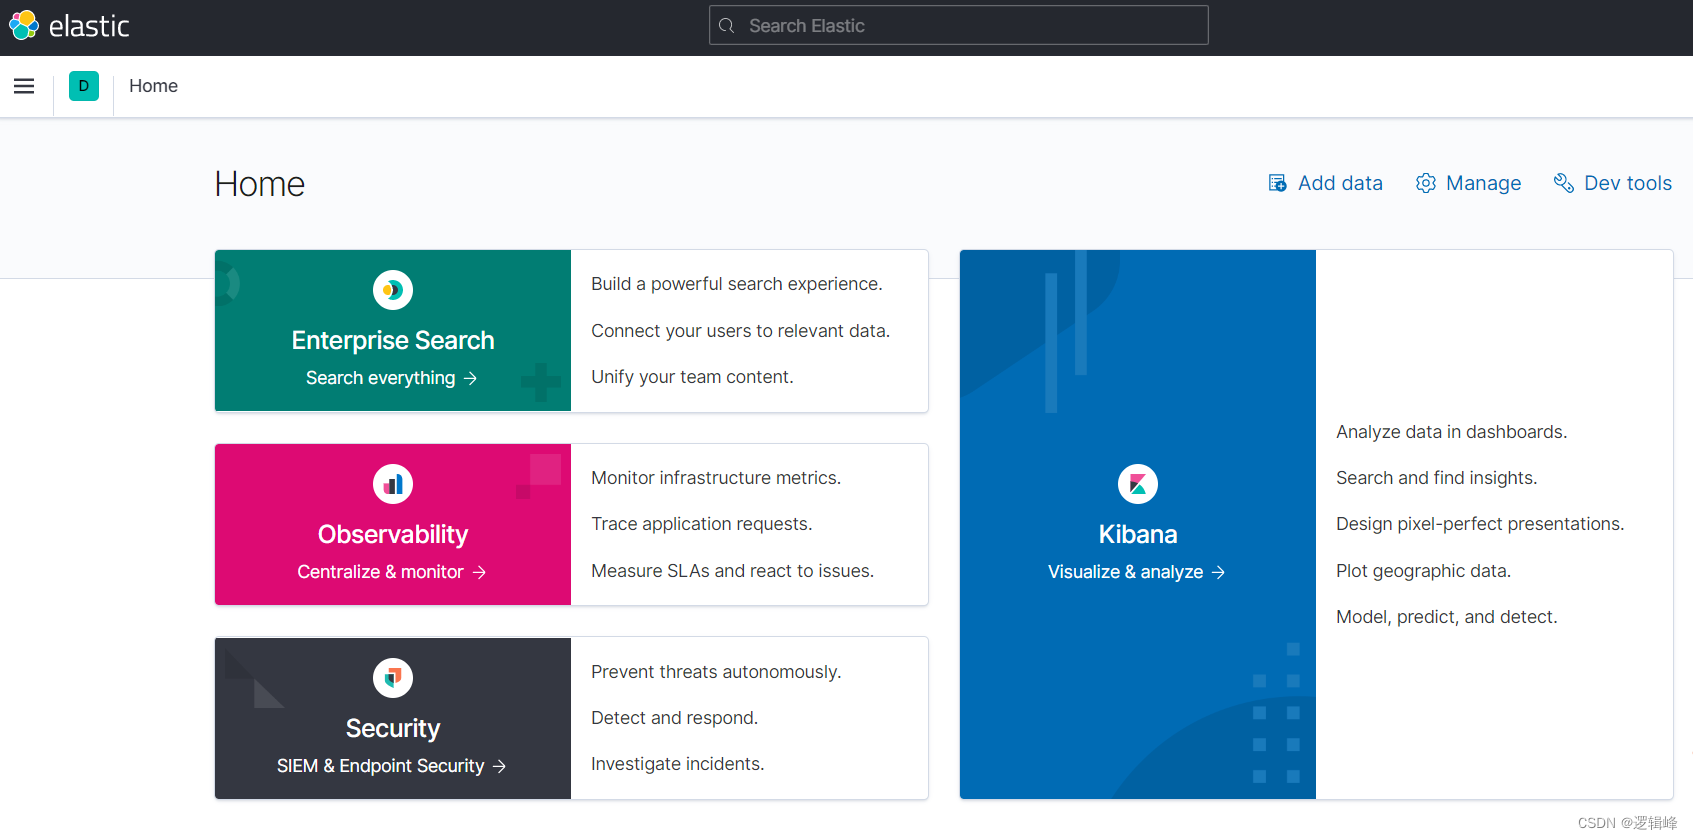
- http://localhost:9200/
- http://localhost:5601/app/home#/
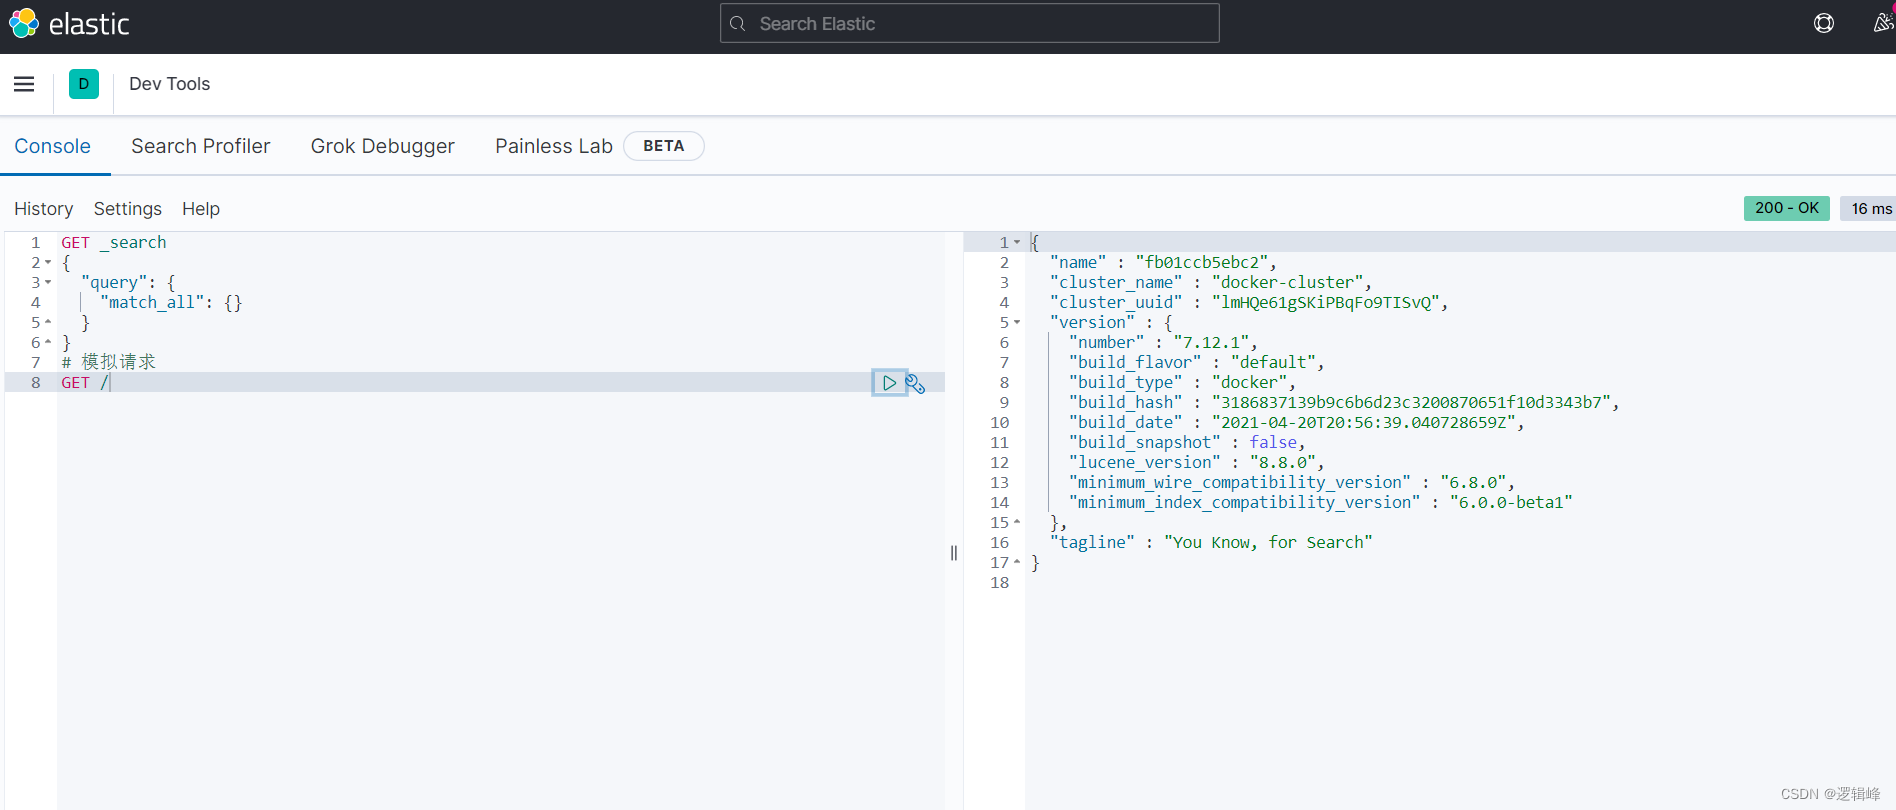
2.5 模拟访问
3 分词器
3.1安装ik插件
# 进入容器内部
docker exec -it elasticsearch /bin/bash

# 在线下载并安装
./bin/elasticsearch-plugin install https://github.com/medcl/elasticsearch-analysis-ik/releases/download/v7.12.1/elasticsearch-analysis-ik-7.12.1.zip

# 退出
exit

#重启容器
docker restart elasticsearch
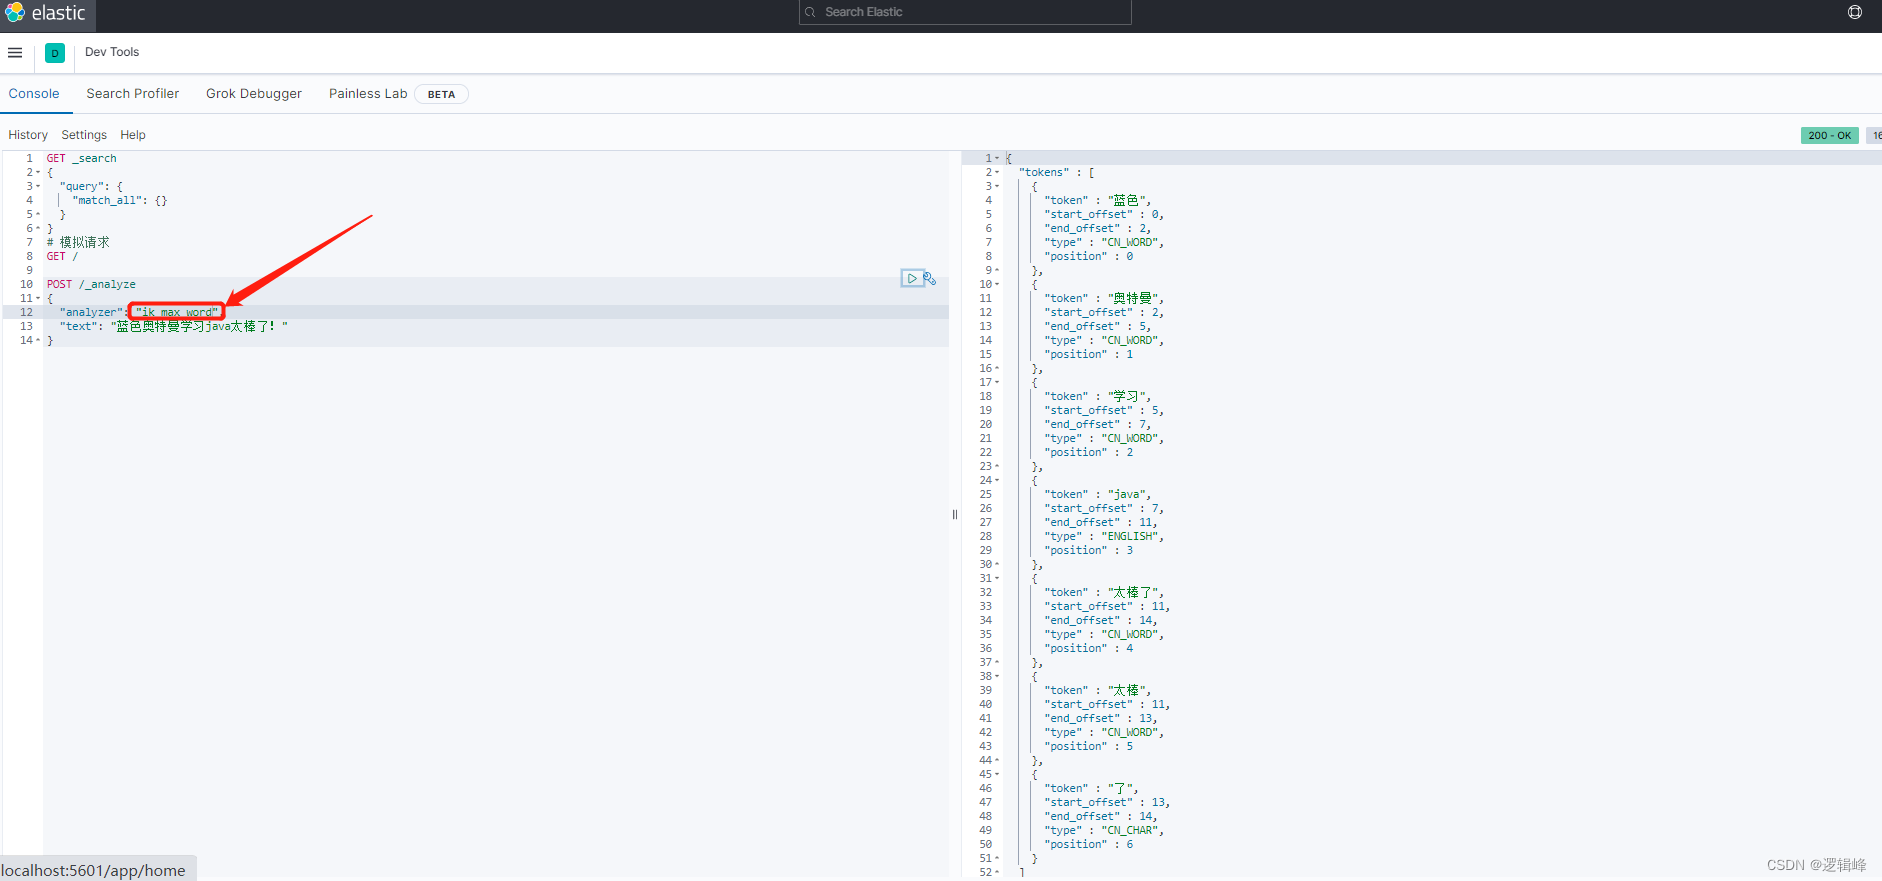
3.2 测试
IK分词器包含两种模式:
ik_smart: 最少切分
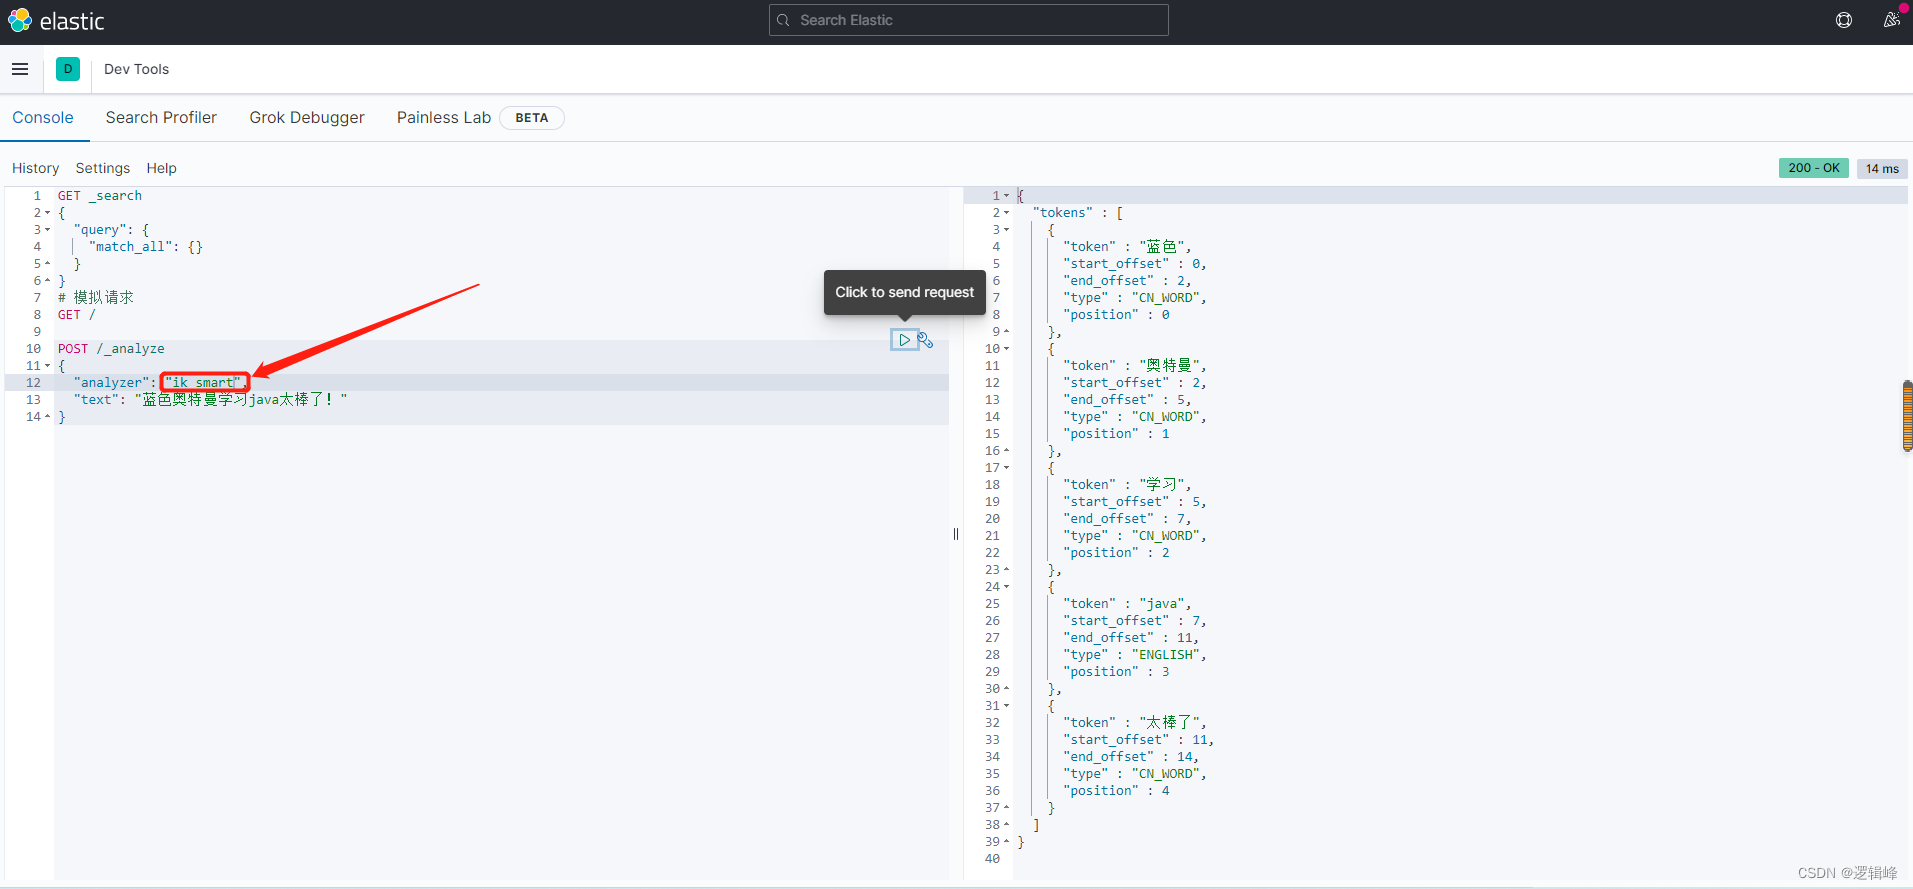
ik_max_word:最细切分
3.3 ik分词器的拓展和停用
- 在挂载的es插件目录招到IKAnalyzer.cfg.xml配置文件,如下:
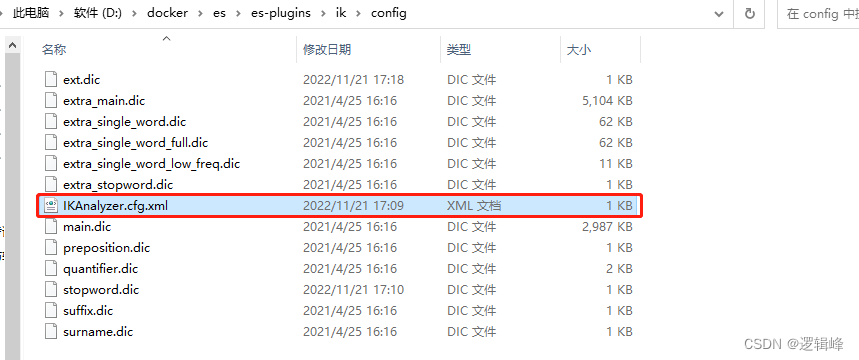
- 配置内容如下
<?xml version="1.0" encoding="UTF-8"?>
<!DOCTYPE properties SYSTEM "http://java.sun.com/dtd/properties.dtd">
<properties>
<comment>IK Analyzer 扩展配置</comment>
<!--用户可以在这里配置自己的扩展字典 -->
<entry key="ext_dict">ext.dic</entry>
<!--用户可以在这里配置自己的扩展停止词字典-->
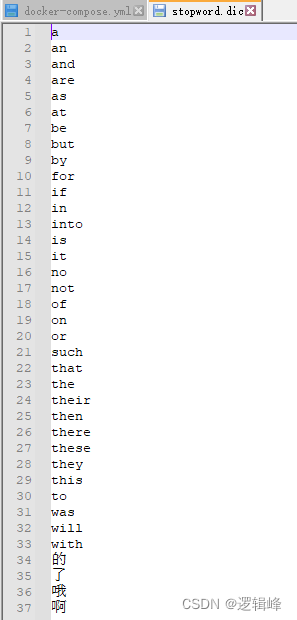
<entry key="ext_stopwords">stopword.dic</entry>
<!--用户可以在这里配置远程扩展字典 -->
<!-- <entry key="remote_ext_dict">words_location</entry> -->
<!--用户可以在这里配置远程扩展停止词字典-->
<!-- <entry key="remote_ext_stopwords">words_location</entry> -->
</properties>
- ext.dic(新定义的词汇)

- stopword.dic(排除的词汇)
4 索引库操作
4.1 mapping映射属性
mapping是对索引库中文档的约束,常见的mapping属性包括:
type:字段数据类型,常见的简单类型有:
----字符串:text(可分词的文本)、keyword(是一个整体,不能拆分,精确值,例如:品牌、国家、IP地址)
----数值:long、integer、short、byte、double、float
----布尔:boolean
----日期:date
----对象:object
—经度:geo_point
注意:es中没有数组,都可以有多个值。index:是否创建索引,默认为true(创建倒排索引,参与搜索)、false(不创建倒排索引,不参与搜索)。analyzer:使用哪种分词器properties:该字段的子字段
4.2 索引库的创建
类似mysql的表
# 新建
PUT /mytable
{
  "mappings": {
    "properties": {
      "info": {
        "type": "text",
        "analyzer": "ik_smart"
      },
      "email": {
        "type": "keyword",
        "index": false
      },
      "name": {
        "type": "object",
        "properties": {
          "firstName": {
            "type": "keyword"
          },
          "lastName": {
            "type": "keyword"
          }
        }
      }
    }
  }
}
4.3 索引库的CRUD
- 查看索引库语法:
GET /索引库名
- 删除索引库的语法:
DELETE /索引库名
- 修改索引库
索引库和mapping一旦创建无法修改,但是可以添加新的字段,语法如下:
PUT /索引库名/_mapping
{
	"properties": {
		"新字段名": {
			"type": "integer"
		}
	}
}
举例如下:
# 查询
GET /mytable

# 修改
PUT /mytable/_mapping
{
  "properties":{
    "age": {
      "type": "integer"
    }

  }
}

# 删除
DELETE /mytable
5 文档操作
5.1 新增文档
POST /索引库名/_doc/文档id
{
  "info": "奥特曼来自M78星云",
  "email": "302976975@qq.com",
  "name": {
    "firstName": "迪",
    "lastName": "迦"
  }
}
举个例子:
# 插入文档
POST /mytable/_doc/1
{
  "info": "奥特曼来自M78星云",
  "email": "302976975@qq.com",
  "name": {
    "firstName": "迪",
    "lastName": "迦"
  }
}
5.2 查询文档
GET /索引库名/_doc/文档id
举个例子:
GET /mytable/_doc/1
5.3 删除文档
DELETE /索引库名/_doc/文档id
举个例子:
DELETE /mytable/_doc/1
5.4 修改文档
- 方法一:全量修改,会删除旧文档,添加新文档,如果id不存在则新增
PUT /索引库名/_doc/文档id
{
  "info": "奥特曼来自M78星云",
  "email": "302976975@qq.com",
  "name": {
    "firstName": "迪",
    "lastName": "迦"
  }
}
举个例子:
# 全量修改文档
PUT /mytable/_doc/1
{
  "info": "奥特曼来自M78星云",
  "email": "302976975@qq.com",
  "name": {
    "firstName": "赛",
    "lastName": "罗"
  }
}
- 方法二:增量修改,修改指定字段值
POST /索引库名/_update/文档id
{
  "doc": {
    "info": "赛罗奥特曼来自M78星云"
  }
}
举个例子:
# 增量修改
POST /mytable/_update/1
{
  "doc": {
    "info": "赛罗奥特曼来自M78星云"
  }
}
6 JavaRestClient实现索引库操作
6.1 创建索引库DSL语句
- 新建患者索引库
- 字段拷贝可以使用copy_to属性将当前字段拷贝到指定字段。
PUT /patient
{
  "mappings": {
    "properties": {
      "patientId": {
        "type": "keyword",
        "copy_to": "all"
      },
      "barCode": {
        "type": "keyword",
        "copy_to": "all"
      },
      "barCodeImage": {
        "type": "keyword",
        "index": false
      },
      "patientName": {
        "type": "text",
        "analyzer": "ik_max_word",
        "copy_to": "all"
      },
      "patientAge": {
        "type": "integer",
        "copy_to": "all"
      },
      "patientSex": {
        "type": "keyword",
        "copy_to": "all"
      },
      "hospitalNum": {
        "type": "keyword",
        "copy_to": "all"
      },
      "opcNum": {
        "type": "keyword",
        "copy_to": "all"
      },
      "abo": {
        "type": "keyword"
      },
      "rh": {
        "type": "keyword"
      },
      "irregular": {
        "type": "keyword"
      },
      "reportPath": {
        "type": "keyword",
        "index": false
      },
      "reportStatus": {
        "type": "keyword"
      },
      "createTime": {
        "type": "date",
        "copy_to": "all"
      },
      "updateTime": {
        "type": "date",
        "index": false
      },
      "deleteTime": {
        "type": "date"
      },
      "remark": {
        "type": "text",
        "analyzer": "ik_max_word",
        "copy_to": "all"
      },
      "all": {
        "type": "text",
        "analyzer": "ik_max_word"
      }
    }
  }
}
6.2 引入RestClient依赖
注意:版本要一致!!!
		<dependency>
            <groupId>org.elasticsearch.client</groupId>
            <artifactId>elasticsearch-rest-high-level-client</artifactId>
            <version>7.12.1</version>
        </dependency>
6.3 初始化RestHighLevelClient
import org.apache.http.HttpHost;
import org.elasticsearch.client.RestClient;
import org.elasticsearch.client.RestHighLevelClient;
import org.junit.jupiter.api.AfterEach;
import org.junit.jupiter.api.BeforeEach;
import org.junit.jupiter.api.Test;

import java.io.IOException;
public class EsTest {

    private RestHighLevelClient client;

    @Test
    public void test(){
        System.out.println(client);
    }

    @BeforeEach
    public void testBefor(){
                this.client = new RestHighLevelClient(
                RestClient.builder(
                        //可以是多个
                        HttpHost.create("http://127.0.0.1:9200")
                )
        );
    }

    @AfterEach
    public void testAfter() throws IOException {
        this.client.close();
    }
}
6.4 通过RestClient创建索引库
	@Test
    public void createPatientIndex() throws IOException {
        // 1 创建Request对象,命名索引库名称
        CreateIndexRequest request = new CreateIndexRequest("patient");
        // 2 请求参数,内容是DSL语句的json字符串,类型json
        request.source(MAPPING_TEMPLATE, XContentType.JSON);
        // 3 发起请求
        client.indices().create(request, RequestOptions.DEFAULT);
    }
6.5 RestClient删除索引库
	@Test
    public void deletePatientIndex() throws IOException {
        // 1 创建Request对象,命名索引库名称
        DeleteIndexRequest request = new DeleteIndexRequest("patient");
        // 2 发起请求
        client.indices().delete(request, RequestOptions.DEFAULT);
    }
6.6 RestClient判断索引库是否存在
	@Test
    public void existsPatientIndex() throws IOException {
        // 1 创建Request对象,命名索引库名称
        GetIndexRequest request = new GetIndexRequest("patient");
        // 2 发起请求
        boolean exists = client.indices().exists(request, RequestOptions.DEFAULT);
        System.out.println(exists);
    }
7 RestClient操作文档
7.1 新增文档
	@Test
    public void addDoc() throws IOException {
        FangzhouUser fangzhouUser = fangzhouUserMapper.selectFangzhouUserByPatientId(1l);

        // 1 准备Request对象
        IndexRequest indexRequest = new IndexRequest("patient").id(fangzhouUser.getPatientId().toString());
        // 2 准备json文档
        indexRequest.source(JSON.toJSONString(fangzhouUser),XContentType.JSON);
        // 3 发起请求
        client.index(indexRequest,RequestOptions.DEFAULT);
    }
7.2 查询文档
	@Test
    public void testSelectDoc() throws IOException {
        // 1.准备Request
        GetRequest request = new GetRequest("patient", "1");
        // 2.发送请求,得到相应
        GetResponse response = client.get(request, RequestOptions.DEFAULT);
        // 3.解析相应结果
        String jsonstr = response.getSourceAsString();
        FangzhouUser fangzhouUser = JSON.parseObject(jsonstr, FangzhouUser.class);
        System.out.println(fangzhouUser);
    }
7.3 修改文档
- 全局修改,先删除后新增
- 局部修改
@Test
    public void testUpdateDoc() throws IOException {
        UpdateRequest request = new UpdateRequest("patient", "1");
        request.doc(
                "patientName","胡云峰",
                "patientSex","女"
        );
        client.update(request,RequestOptions.DEFAULT);
    }
7.4 删除文档
@Test
    public void testDeleteDoc() throws IOException {
        DeleteRequest request = new DeleteRequest("patient", "1");
        client.delete(request,RequestOptions.DEFAULT);
    }
7.5 批量导入文档
@Test
    public void testBulkDoc() throws IOException {
        List<FangzhouUser> userList = fangzhouUserMapper.selectFangzhouUserList(new FangzhouUser());
        BulkRequest bulkRequest = new BulkRequest();
        for (FangzhouUser user : userList) {
            bulkRequest.add(new IndexRequest("patient").id(user.getPatientId().toString()).source(JSON.toJSONString(user),XContentType.JSON));
        }
        client.bulk(bulkRequest,RequestOptions.DEFAULT);
    }


 538
538


 被折叠的 条评论
为什么被折叠?
被折叠的 条评论
为什么被折叠?
 到【灌水乐园】发言


