


创作不易 只因热爱!!
热衷分享,一起成长!
“你的鼓励就是我努力付出的动力”
—调试有点废,文章有点长,希望大家用心看完,肯定能学废,感谢.
1. Ubuntu下python3.12安装
1.1 导入 Python 的稳定版 PPA,不用编译
sudo add-apt-repository ppa:deadsnakes/ppa
sudo apt update
1.2 安装python3.12
sudo apt install python3.12 python3.12-venv python3.12-dev python3.12-distutils


# sudo apt install python3.12-full # 或可使用这个全安装
1.3 配置选择python3的使用,随时切换使用版本
ls /usr/bin/python*
root@lucky-ubuntu2204:~/pythonpro# ls /usr/bin/python*
/usr/bin/python3  /usr/bin/python3-config  /usr/bin/python3.12  /usr/bin/python3.10
###如上结果显示有py3.10, py3.12.

sudo update-alternatives --list python3
sudo update-alternatives --install /usr/bin/python3 python3 /usr/bin/python3.12 1
sudo update-alternatives --install /usr/bin/python3 python3 /usr/bin/python3.10 2
sudo update-alternatives --config python3 #切换使用的版本,根据提示选择
python3 -V # 查看选择后的使用版本
切换python版本运行过程结果如下
root@lucky-ubuntu2204:~/pythonpro# sudo update-alternatives --list python3
update-alternatives: error: no alternatives for python3
root@lucky-ubuntu2204:~/pythonpro# sudo update-alternatives --install /usr/bin/python3 python3 /usr/bin/python3.12 1
update-alternatives: using /usr/bin/python3.12 to provide /usr/bin/python3 (python3) in auto mode
root@lucky-ubuntu2204:~/pythonpro# sudo update-alternatives --install /usr/bin/python3 python3 /usr/bin/python3.10 2
update-alternatives: using /usr/bin/python3.10 to provide /usr/bin/python3 (python3) in auto mode
root@lucky-ubuntu2204:~/pythonpro# sudo update-alternatives --config python3
There are 2 choices for the alternative python3 (providing /usr/bin/python3).

  Selection    Path                 Priority   Status
------------------------------------------------------------
* 0            /usr/bin/python3.10    2         auto mode
  1            /usr/bin/python3.12   1         manual mode
  2            /usr/bin/python3.10    2         manual mode

Press <enter> to keep the current choice[*], or type selection number: 1
update-alternatives: using /usr/bin/python3.12 to provide /usr/bin/python3 (python3) in manual mode
root@lucky-ubuntu2204:~/pythonpro# python3 -V
Python 3.12.4
1.4 pip3.12的安装
# sudo apt install python3-pip # 不推荐使用这个安装,会导致后续pip关联原有py3.10版本的程序

wget https://bootstrap.pypa.io/get-pip.py
python3 get-pip.py
同样查看本地的pip版本
ls /usr/bin/pip*

# 安装后本地没有,于是创建软链接
which pip # 找到pip安装后位置
ln -s /usr/local/bin/pip /usr/bin/pip
# 设置pip的国内访问镜像
pip config set global.index-url https://pypi.tuna.tsinghua.edu.cn/simple
Tips :过程可能有错误提示如下
ModuleNotFoundError: No module named 'apt_pkg'
No module named ‘apt_pkg’ 解决方法:
cd /usr/lib/python3/dist-packages
sudo cp apt_pkg.cpython-310-x86_64-linux-gnu.so apt_pkg.so
2. 安装调试使用,分布式推理exo
2.1.创建venv环境,激活环境安装exo
python3 -m venv .venva
source .venv/bin/activate
git clone https://github.com/exo-explore/exo.git
# git clone https://gitdl.cn/https://github.com/exo-explore/exo.git
# git地址前加https://gitdl.cn/,这样的方法访问是加速git访问

cd exo
python3 -m pip install -e .
Tips: 如果报错tinygrad无法安装,可以先git安装tinygrad.
# python3 -m pip install tinygrad # 报错,github访问慢

cd .. #先返回上层目录
git clone https://gitdl.cn/https://github.com/tinygrad/tinygrad.git
cd tinygrad
python3 -m pip install -e .
cd ../exo #安装完返回exo目录
sudo vi setup.py # 编辑安装, 注释掉 tinygrad, 保存退出再安装
python3 -m pip install -e .
cd .. #返回上层目录
2.2.下载Meta-Llama-3-8B
# source .venv/bin/activate  # 重新激活环境,如已退出venv环境

export HF_ENDPOINT=https://hf-mirror.com
export HF_HUB_ENABLE_HF_TRANSFER=1
huggingface-cli download --local-dir-use-symlinks False --resume-download bofenghuang/Meta-Llama-3-8B --local-dir /root/.cache/tinygrad/downloads/llama3-8b-sfr
确认离线文件目录:
/root/.cache/tinygrad/downloads/
确认有llama3-8b-sfr文件夹:
/root/.cache/tinygrad/downloads/llama3-8b-sfr/
并且此llama3-8b-sfr内有以下文件:
model.safetensors.index.json,
llama3-8b-sfr/tokenizer.model,
llama3-8b-sfr/model-00001-of-00004.safetensors,
llama3-8b-sfr/model-00002-of-00004.safetensors,
llama3-8b-sfr/model-00003-of-00004.safetensors,
llama3-8b-sfr/model-00004-of-00004.safetensors
2.3.运行 exo 及调试
sudo apt install clang -y # 安装使用CPU推理
# source .venv/bin/activate  # 重新激活环境,如已退出venv环境
DEBUG=9 python3 exo/main.py
运行后如下图:

2.3.1 或使用huggingface.co的镜像站hf-mirror.com运行
HF_ENDPOINT=https://hf-mirror.com DEBUG=9 python3 exo/main.py
2.3.2 或使用离线模式运行
HF_HUB_OFFLINE=1 DEBUG=9 python3 exo/main.py
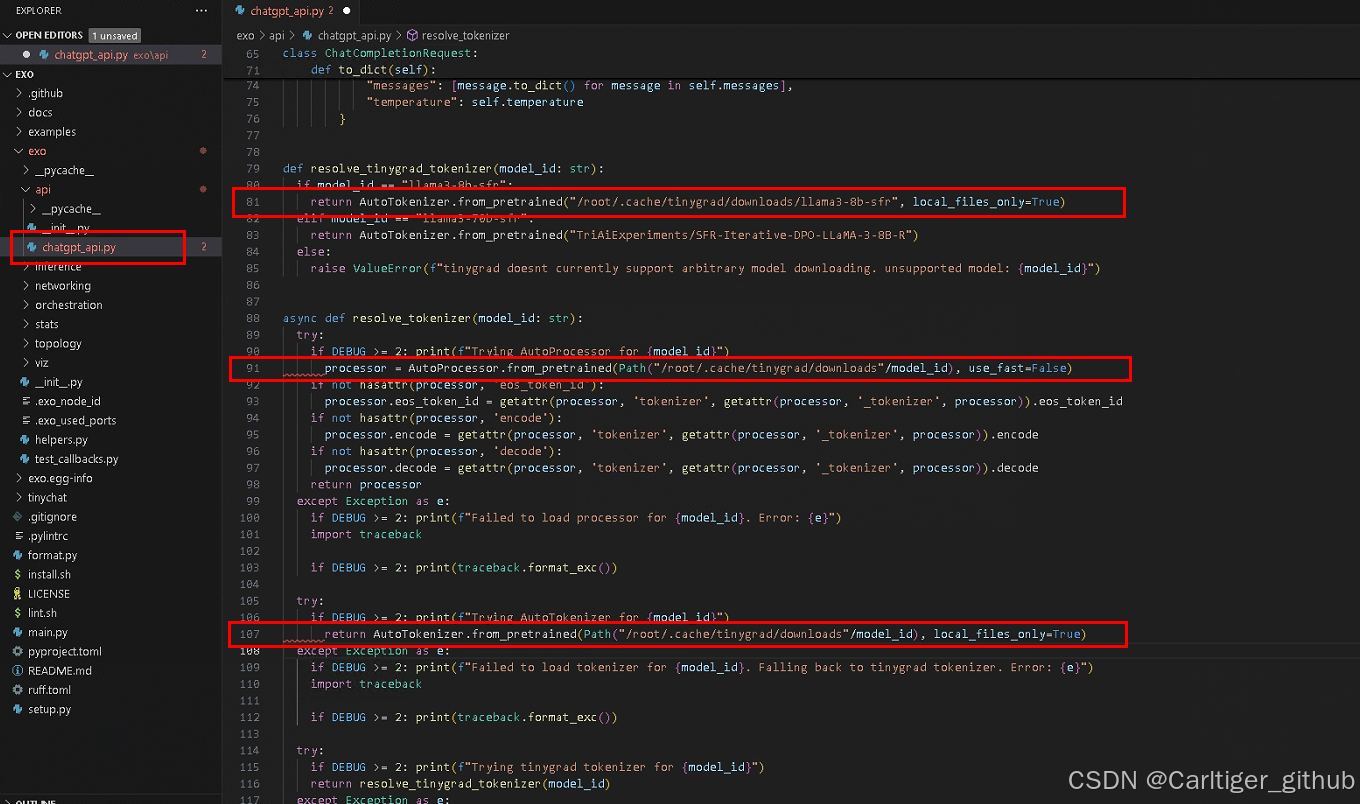
Tips: 本地运行, 修改路径下文件 exo/api/chatgpt.py
.from_pretrained("/root/.cache/tinygrad/downloads/llama3-8b-sfr", local_files_only=True)
2.3.3 本地运行修改内容, 如图:
2.3.1 运行报错subprocess.CalledProcessError: clang
clang returned non-zero exit status 1.错误内容如下:
subprocess.CalledProcessError: Command '['clang', '-include', 'tgmath.h', '-shared', '-march=native', '-O2', '-Wall',
'-Werror', '-x', 'c', '-fPIC', '-', '-o', '/tmp/tmp920xv7jw']' returned non-zero exit status 1.
按Ctrl + C 手动终止运行
调试修改文件tinygrad/tinygrad/runtime/ops_clang.py运行后
vi tinygrad/tinygrad/runtime/ops_clang.py
######### 修改
# try:
#   subprocess.check_output(['clang', '-include', 'tgmath.h', ...
# except subprocess.CalledProcessError as e:
#   print(src)
#   print(e)
#########
HF_HUB_OFFLINE=1 DEBUG=9 python3 exo/main.py
调试ops_clang.py运行结果如下:
print(src)==>
void E_4194304_4(__fp16* restrict data0, const __bf16* restrict data1) {
for (int ridx0 = 0; ridx0 < 4194304; ridx0++) {
int alu0 = (ridx0*4);
int alu1 = (alu0+1);
int alu2 = (alu0+2);
int alu3 = (alu0+3);
__bf16 val0 = data1[alu1];
__bf16 val1 = data1[alu2];
__bf16 val2 = data1[alu3];
__bf16 val3 = data1[alu0];
data0[alu1] = (__fp16)(val0);
data0[alu2] = (__fp16)(val1);
data0[alu3] = (__fp16)(val2);
data0[alu0] = (__fp16)(val3);
}
}
print(e) ==>
__bf16 is not supported on this target
按Ctrl + C 手动终止运行
定位到问题在这里
subprocess.check_output(['clang', '-include', 'tgmath.h', '-shared', '-march=native', '-O2', '-Wall', '-Werror', '-x', 'c', '-fPIC', '-o', '/tmp/tmp7weyfuio'], input=src.encode('utf-8'))
把以上src的内容存入 /tmp/tmp1234, 直接运行clang如下
root@lucky-ubuntu2204:~/pythonpro/exo/exo/inference# clang -include tgmath.h -shared -march=native -O2 -Wall -Werror -x c -fPIC -o /tmp/tmp4321 /tmp/tmp1234
/tmp/tmp1234:1:48: error: __bf16 is not supported on this target
void E_4194304_4(__fp16* restrict data0, const __bf16* restrict data1) {
                                             ^/tmp/tmp1234:7:5: error: __bf16 is not supported on this target __bf16 val0 = data1[alu1];    ^/tmp/tmp1234:8:5:
                                                error: __bf16 is not supported on this target    __bf16 val1 = data1[alu2];    ^/tmp/tmp1234:9:5:
                                                error: __bf16 is not supported on this target    __bf16 val2 = data1[alu3];    ^/tmp/tmp1234:10:5:
                                                error: __bf16 is not supported on this target    __bf16 val3 = data1[alu0];    ^/tmp/tmp1234:11:27:
                                                error: cannot type-cast from __bf16    data0[alu1] = (__fp16)(val0);                          ^~~~~~/tmp/tmp1234:12:27:
                                                error: cannot type-cast from __bf16    data0[alu2] = (__fp16)(val1);                          ^~~~~~/tmp/tmp1234:13:27:
                                                error: cannot type-cast from __bf16    data0[alu3] = (__fp16)(val2);                          ^~~~~~/tmp/tmp1234:14:27:
                                                error: cannot type-cast from __bf16    data0[alu0] = (__fp16)(val3);
^~~~~~9 errors generated.
### 找了一下原因,__bf16 is not supported on this target意思是###
### CPU太老了,需要支持AVX512才可以运行.CPU是i3-8100无法使用.###
### 于是更换安装显卡CUDA ###
2.3.2 ubuntu安装显卡CUDA驱动
也可以上官网https://developer.nvidia.com/cuda-toolkit-archive查找安装CUDA驱动.

sudo apt install nvidia-cuda-toolkit
nvcc --version # 安装完成,查看CUDA
root@lucky-ubuntu2204:~/pythonpro/exo# nvcc --version
nvcc: NVIDIA (R) Cuda compiler driver
Copyright (c) 2005-2021 NVIDIA Corporation
Built on Thu_Nov_18_09:45:30_PST_2021
Cuda compilation tools, release 11.5, V11.5.119
Build cuda_11.5.r11.5/compiler.30672275_0
更换加速器可以在调试前写入
  HF_HUB_OFFLINE=1 CUDA=1 DEBUG=9   python3 exo/main.py
  HF_HUB_OFFLINE=1 GPU=1 DEBUG=9   python3 exo/main.py
tinygrad支持的加速如下
GPU (OpenCL) # sudo apt install opencl-headers ocl-icd-opencl-dev -y
CLANG (C Code) # sudo apt install clang -y #CPU,x86需支持AVX512
LLVM
METAL
CUDA # 安装CUDA驱动
AMD # amd_comgr
NV


!!!总之, 过旧的设备及CPU无法支持分布式 LLM 推理,如果拥有各种高端设备, 比如有以上加速器的各设备(iPad,Mac,较新的至强CPU电脑,有较显卡电脑,等等), 建立运行自己的 AI 集群才有可能.!!!
但行好事,莫问前程!
end
**你好呀,我是一个医信行业工程师,喜欢学习,喜欢搞机,喜欢各种捣,也会持续分享,如果喜欢我,那就关注我吧!**
往期精彩:
[AI]在家中使用日常设备运行您自己的 AI 集群.适用于移动、桌面和服务器的分布式 LLM 推理。
作者|医信工程师随笔|Carltiger_github
图片|自制|侵删
关注我,我们共同成长
“你的鼓励就是我分享的动力”


 2133
2133

 被折叠的 条评论
为什么被折叠?
被折叠的 条评论
为什么被折叠?
 到【灌水乐园】发言


