


拒绝废话,直接整活儿,使用步骤:
1 部署seata服务
2 服务引入seata
3 方法添加事务注解使用
注:若依版本:3.6.3,nacos版本:2.3.1,seata版本:1.7.0,数据库:8.0;
前提:若依+nacos已经配置好
下载seata:Releases · apache/incubator-seata · GitHub
一、部署seata服务
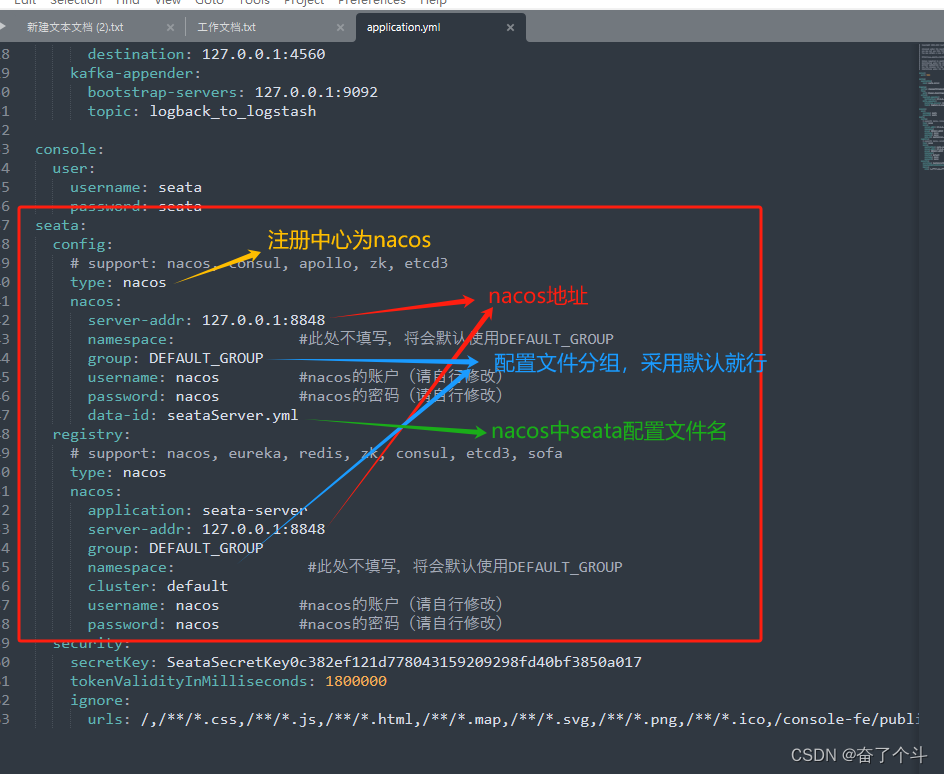
1.1 修改seata配置文件,位置在seata/config/application.yml,如下图:
①修改seata配置类型为:nacos
②修改nacos地址
③分组采用默认就行,不用修改
④修改seata在nacos中的配置文件名
#  Copyright 1999-2019 Seata.io Group.
#
#  Licensed under the Apache License, Version 2.0 (the "License");
#  you may not use this file except in compliance with the License.
#  You may obtain a copy of the License at
#
#  http://www.apache.org/licenses/LICENSE-2.0
#
#  Unless required by applicable law or agreed to in writing, software
#  distributed under the License is distributed on an "AS IS" BASIS,
#  WITHOUT WARRANTIES OR CONDITIONS OF ANY KIND, either express or implied.
#  See the License for the specific language governing permissions and
#  limitations under the License.

server:
  port: 7091

spring:
  application:
    name: seata-server

logging:
  config: classpath:logback-spring.xml
  file:
    path: ${user.home}/logs/seata
  extend:
    logstash-appender:
      destination: 127.0.0.1:4560
    kafka-appender:
      bootstrap-servers: 127.0.0.1:9092
      topic: logback_to_logstash

console:
  user:
    username: seata
    password: seata
seata:
  config:
    # support: nacos, consul, apollo, zk, etcd3
    type: nacos
    nacos:
      server-addr: 127.0.0.1:8848
      namespace:              #此处不填写,将会默认使用DEFAULT_GROUP
      group: DEFAULT_GROUP
      username: nacos         #nacos的账户(请自行修改)
      password: nacos         #nacos的密码(请自行修改)
      data-id: seataServer.yml
  registry:
    # support: nacos, eureka, redis, zk, consul, etcd3, sofa
    type: nacos
    nacos:
      application: seata-server
      server-addr: 127.0.0.1:8848
      group: DEFAULT_GROUP
      namespace:               #此处不填写,将会默认使用DEFAULT_GROUP
      cluster: default
      username: nacos         #nacos的账户(请自行修改)
      password: nacos         #nacos的密码(请自行修改)
  security:
    secretKey: SeataSecretKey0c382ef121d778043159209298fd40bf3850a017
    tokenValidityInMilliseconds: 1800000
    ignore:
      urls: /,/**/*.css,/**/*.js,/**/*.html,/**/*.map,/**/*.svg,/**/*.png,/**/*.ico,/console-fe/public/**,/api/v1/auth/login
1.2 nacos中添加seata配置文件,文件名和1.1中seata配置文件中的名字对应上;

1.2.1 seata配置上需要分布式事务的服务
格式如下:服务名就是你服务的yml文件中定义的服务名
service:
vgroupMapping:
服务名-group: default
1.2.2修改数据库地址
如果你的数据库版本是5.*.*的,driverClassName: com.mysql.jdbc.Driver
如果你的数据库版本是8.*.*的,driverClassName: com.mysql.cj.jdbc.Driver
然后修改数据库地址为你自己的数据库地址

service:
vgroupMapping:
yst-user-group: default
yst-product-group: default
ruoyi-auth-group: default
yst-facade-customer-group: default
yst-trade-group: default
ruoyi-system-group: default
yst-facade-operation-group: default
yst-pay-group: default
store:
mode: db
session:
mode: db
lock:
mode: db
db:
datasource: druid
dbType: mysql
driverClassName: com.mysql.cj.jdbc.Driver
url: jdbc:mysql://rm-2ze37qy531sh3coeypo.mysql.rds.aliyuncs.com/seata?useUnicode=true&characterEncoding=utf8&zeroDateTimeBehavior=convertToNull&useSSL=true&serverTimezone=GMT%2B8
user: root
password: TS8JMJ2JFzLGMjSh
globalTable: global_table
lockTable: lock_table
branchTable: branch_table
maxConn: 30
maxWait: 5000
minConn: 5
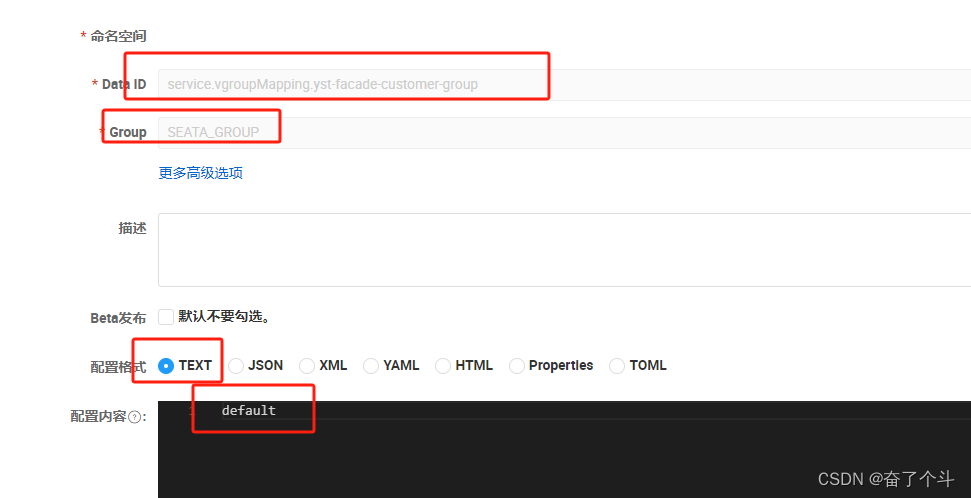
queryLimit: 1001.3 添加服务seata辅助配置文件
![]()
每个需要用到分布式事务的服务都要添加这样一个配置文件,配置文件名为:service.vgroupMapping.服务名-group,分组放到SEATA_GROUP中,配置文件内容为:default,类型为TEXT,如下图:
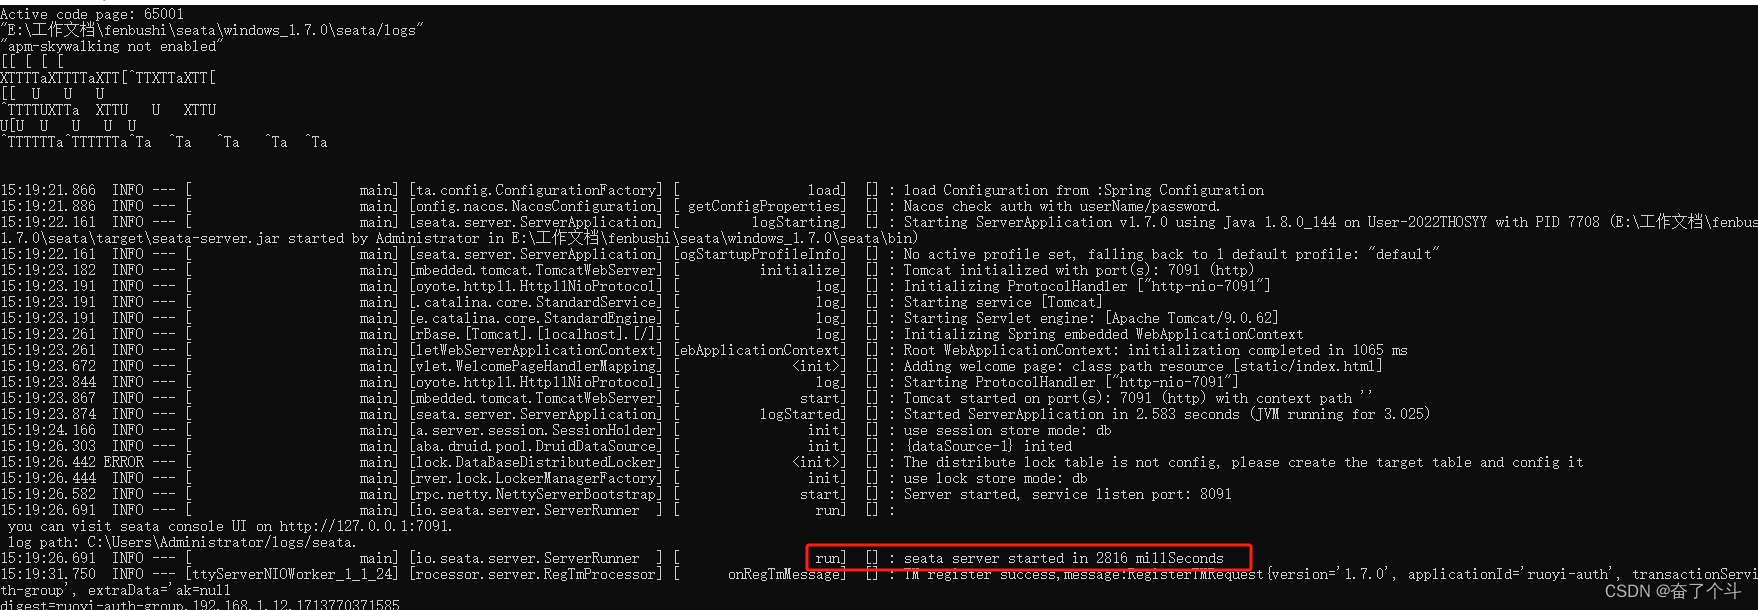
然后到seata的bin目录下启动seata服务就好了,seata默认注册到nacos中的端口是8091,启动后到nacos确认下(微服务注册到seata时需要指定seata的ip和端口)
windows环境,直接点击\seata\bin\seata-server.bat
linux环境,sh seata-server.sh -h 127.0.0.1 -p 8091
启动成功如下:
二、服务引入seata
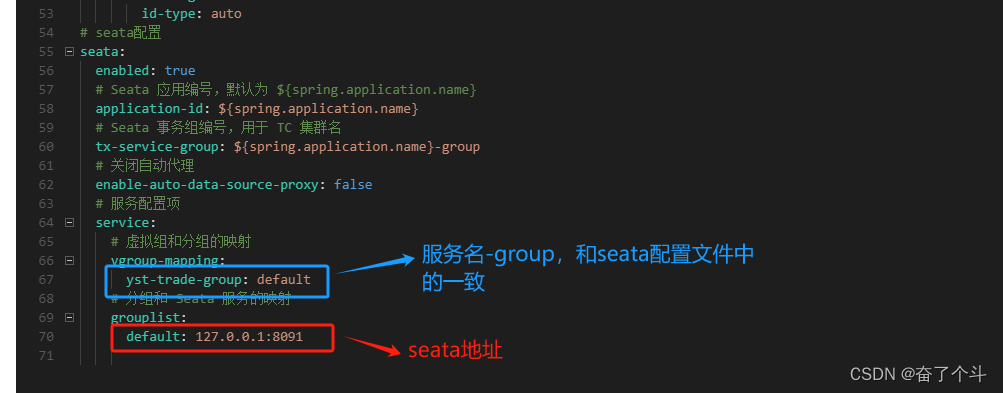
2.1 修改各个需要分布式事务的服务配置文件
开启seata代理
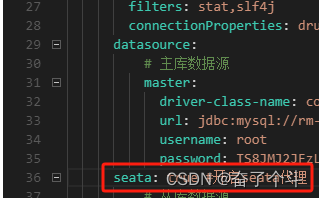
添加配置对应seata服务,修改虚拟组和分组的映射,修改seata服务映射
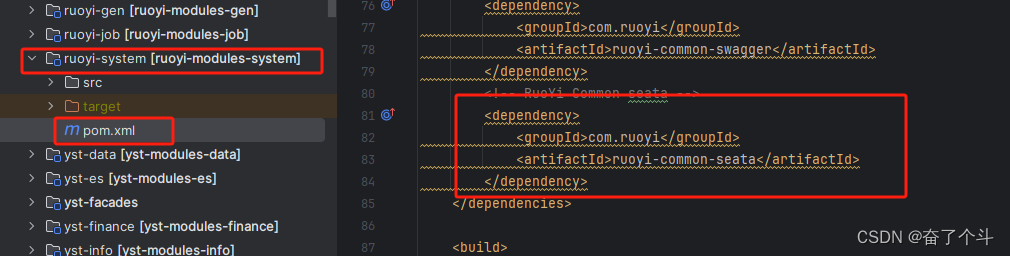
2.2 服务添加依赖
在若依的seata服务添加seata依赖
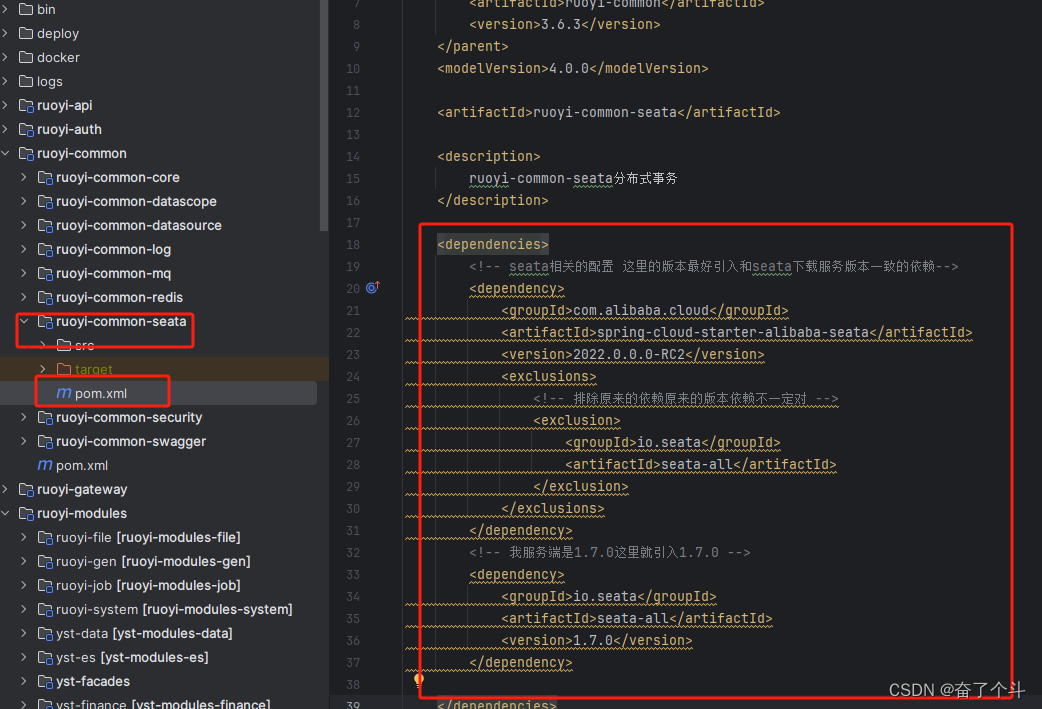
<dependencies>
    <!-- seata相关的配置 这里的版本最好引入和seata下载服务版本一致的依赖-->
    <dependency>
        <groupId>com.alibaba.cloud</groupId>
        <artifactId>spring-cloud-starter-alibaba-seata</artifactId>
        <version>2022.0.0.0-RC2</version>
        <exclusions>
            <!-- 排除原来的依赖原来的版本依赖不一定对 -->
            <exclusion>
                <groupId>io.seata</groupId>
                <artifactId>seata-all</artifactId>
            </exclusion>
        </exclusions>
    </dependency>
    <!-- 我服务端是1.7.0这里就引入1.7.0 -->
    <dependency>
        <groupId>io.seata</groupId>
        <artifactId>seata-all</artifactId>
        <version>1.7.0</version>
    </dependency>
</dependencies>
然后各个微服务添加seata服务依赖即可
三、方法添加事务注解使用
服务调用方添加注解即可
/*
 * 调用方
 */
@Transactional
@GlobalTransactional
public void confirmReceive(OrderUpdateVo orderUpdateVo) {
    //业务-略
    remoteOrderService.updateOrderStatus(orderUpdateVo);
}


/*
 * 被调用方
 */
@Transactional
public R<?> updateOrderStatus(OrderUpdateVo orderUpdateVo){
    this.save(orderUpdateVo);
    return R.ok();
}
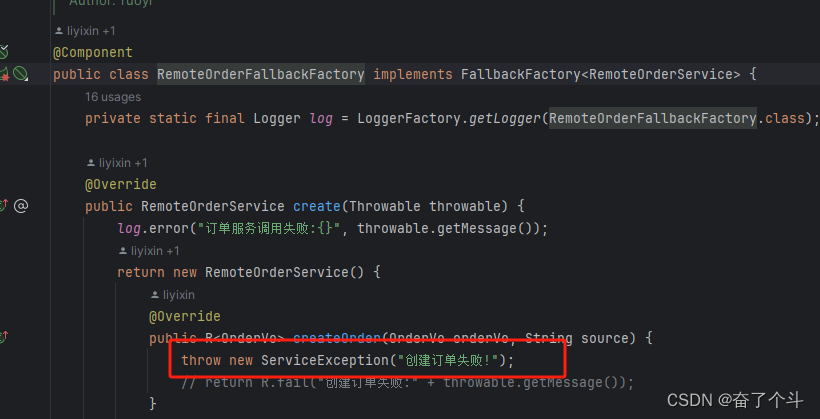
如果用到了服务降级处理,需要抛出异常


 490
490

 被折叠的 条评论
为什么被折叠?
被折叠的 条评论
为什么被折叠?
 到【灌水乐园】发言


