


一 简述
Activity 启动分为两种:
1、Activity中通过startActivity()方法启动一个Activity(可分为不同进程间和相同进程内部的启动)
2、从桌面通过点击应用图标启动一个App然后显示Activity
由于进程间 Activity 启动流程包括了相同进程内部 Activity 启动的流程。因此本文只分析不同进程间,比如点击 Launcher 桌面图标启动 Activity 的整个过程。
流程图: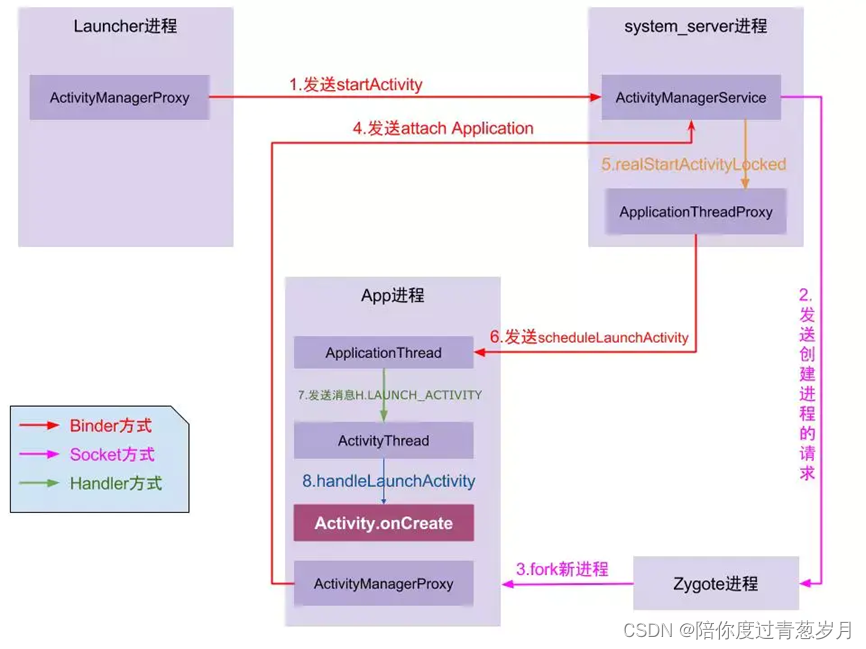
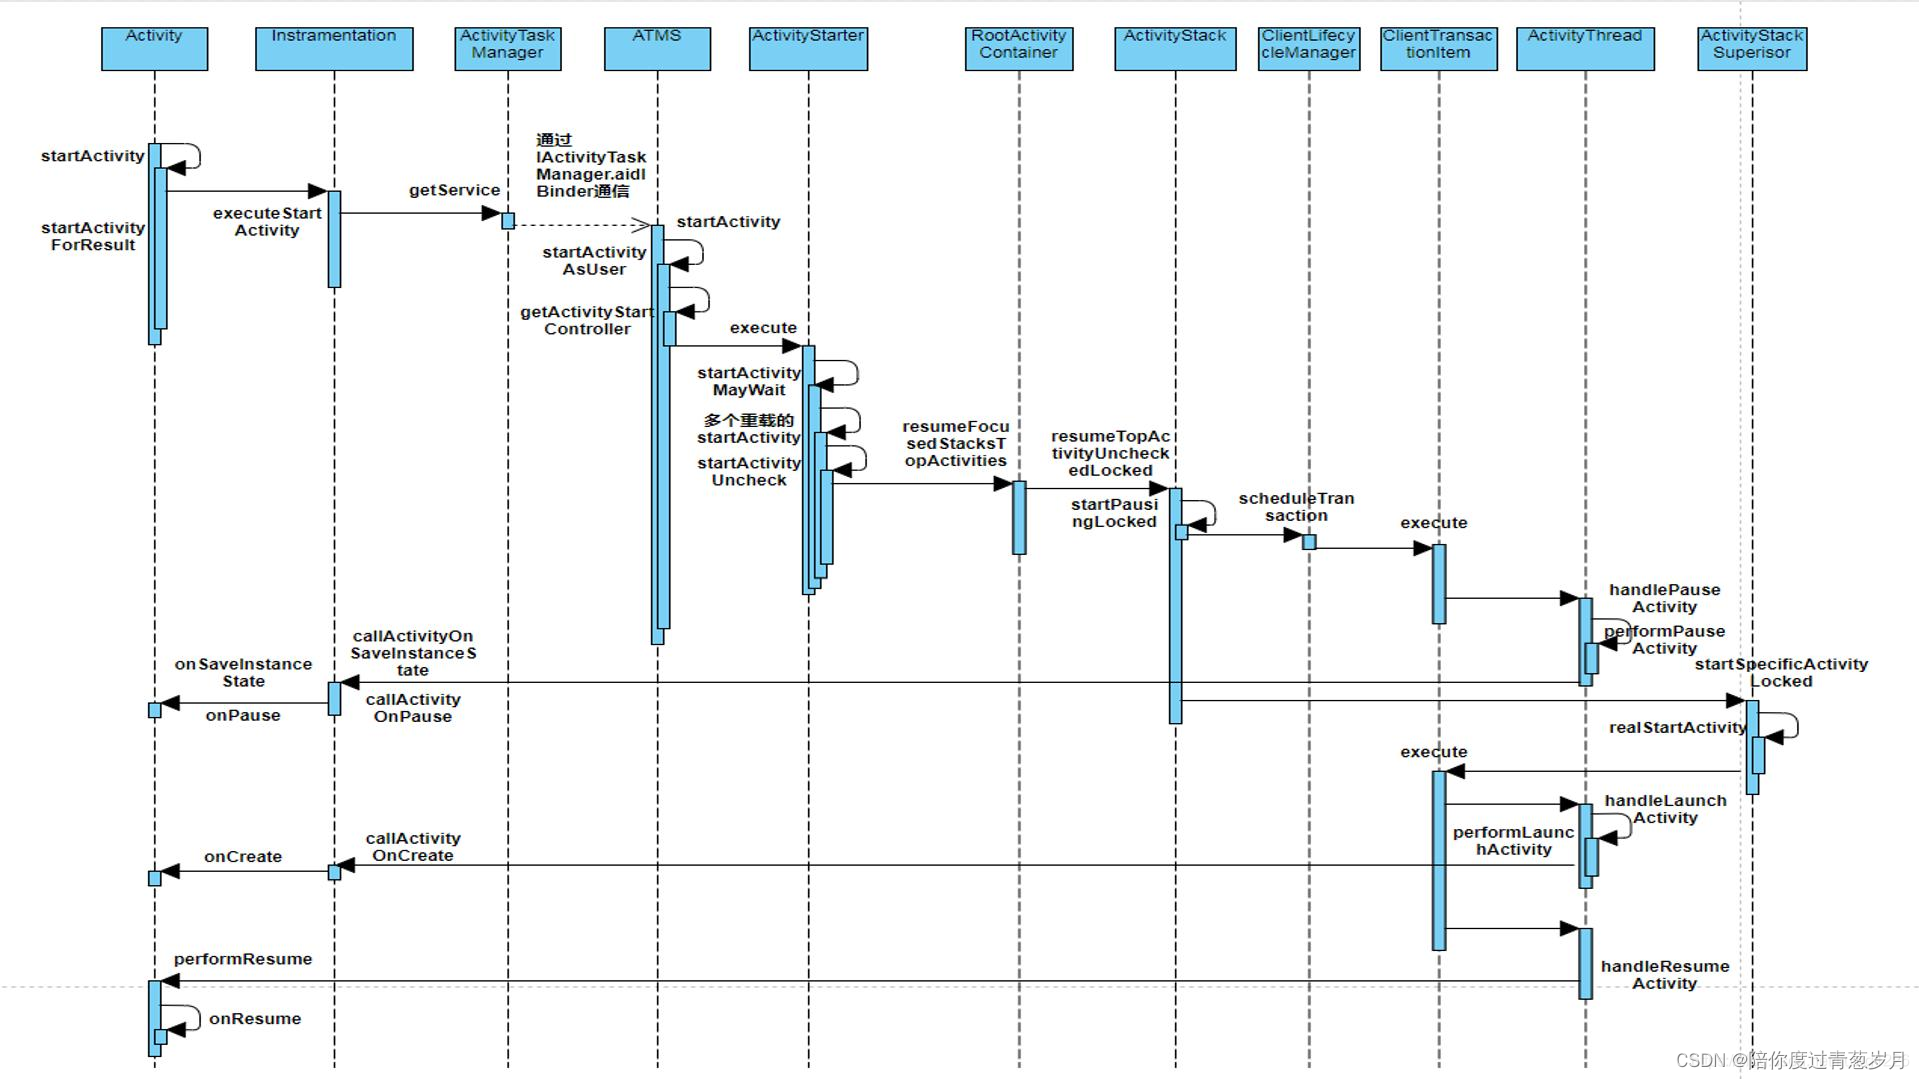
时序图:
二 Launcher向AMS发送启动Activity
我们知道,我们可以在自己的应用中的 Activity 中通过 startActivity 就可以发送一个 Intent 然后启动一个新的应用,这里边调用的就是 Activity.startActivity,我们来看这个函数,需要注意的是这些个操作都是在发起端进程中执行的。这个发起端可以是 Launcher,也可以是任何调用 startActivity 的应用。
2.1 Activity.startActivity
frameworks/base/core/java/android/app/Activity.java
public void startActivity(Intent intent) {
        this.startActivity(intent, null);
}

public void startActivity(Intent intent, @Nullable Bundle options) {
        if (options != null) {
            startActivityForResult(intent, -1, options);
        } else {
            startActivityForResult(intent, -1);
        }
}
2.2 Activity.startActivityForResult
public void startActivityForResult(@RequiresPermission Intent intent,
        int requestCode) { // 从当前应用进程跨进程跳转到了 AMS
        startActivityForResult(intent, requestCode, null);
}

public void startActivityForResult(@RequiresPermission Intent intent,
     int requestCode, @Nullable Bundle options) {
        if (mParent == null) {
            options = transferSpringboardActivityOptions(options);
            // 调用 Instrumentation 的 execStartActivity 方法,继续执行
            Instrumentation.ActivityResult ar =
                mInstrumentation.execStartActivity(
                    this, mMainThread.getApplicationThread(), mToken, this,
                    intent, requestCode, options);
            if (ar != null) {
                mMainThread.sendActivityResult(
                    mToken, mEmbeddedID, requestCode, ar.getResultCode(),
                    ar.getResultData());
            }
            if (requestCode >= 0) {
                mStartedActivity = true;
            }
            ......
        } else {
            ......
        }
    }
2.3 Instrumentation.execStartActivity
frameworks/base/core/java/android/app/Instrumentation.java
public ActivityResult execStartActivity(
    Context who, IBinder contextThread, ......) {
    IApplicationThread whoThread = (IApplicationThread) contextThread;
        ......
        try {
            ......
            // 跨进程调用 ActivityTaskManagerService.startActivity
            int result = ActivityTaskManager.getService()
                .startActivity(whoThread, who.getBasePackageName(), intent,
                    intent.resolveTypeIfNeeded(who.getContentResolver()),
                    token, target != null ? target.mEmbeddedID : null,
                    requestCode, 0, null, options);
            // 检查 result, 判断 Activity 是否启动成功.
            checkStartActivityResult(result, intent);
        } catch (RemoteException e) {
            throw new RuntimeException("Failure from system", e);
        }
        return null;
    }
- who:启动 Activity 的上下文
- contextThread:ActivityThread 中的 ApplicationThread 对象 mAppThread
- token:令牌,标识着 Activity,系统唯一标识
- target:在哪个 Activity 中启动,会接收启动完成的结果
- intent:启动意图
- requestCode:请求码,用于将结果和请求对应上
- options:可选参数
mMainThread.getApplicationThread() 会返回一个 ApplicationThread 类型的变量。 ApplicationThread 代表的是发起请求的客户端进程,后面 AMS 就是通过它来和客户端进程进行跨进程通信的。
第二个需要重点关注的就是 mToken,mToken 我们在之前也介绍过了,它是连接 ActivityRecord,Activity,ActivityClientRecord 的桥梁,AMS 通过它就可以获取客户端进程中的 Activity 的详细信息。
最后通过 Binder 调用 ActivityTaskManagerService 的 startActivity 函数,之前讲过 ATMS 是用来分担 AMS 的一些功能的。从这个地方开始就从当前应用进程跨进程跳转到了 AMS,接下来我们来看 AMS 是怎么处理响应的。
2.4 ActivityTaskManagerService.startActivity
frameworks/base/services/core/java/com/android/server/wm/ActivityTaskManagerService.java
public final int startActivity(IApplicationThread caller,
    String callingPackage, Intent intent, String resolvedType,
    IBinder resultTo, String resultWho, int requestCode, int startFlags,
    ProfilerInfo profilerInfo, Bundle bOptions) {
        // 指定启动 Activity 的 userId
        return startActivityAsUser(caller, callingPackage, intent,
            resolvedType, resultTo, resultWho, requestCode, startFlags,
            profilerInfo, bOptions, UserHandle.getCallingUserId());
}

public int startActivityAsUser(IApplicationThread caller, String callingPackage,
            Intent intent, String resolvedType, IBinder resultTo,
            String resultWho, int requestCode, int startFlags,
            ProfilerInfo profilerInfo, Bundle bOptions, int userId) {
        // 继续调用 startActivityAsUser
        return startActivityAsUser(caller, callingPackage, intent,
            resolvedType, resultTo, resultWho, requestCode, startFlags,
            profilerInfo, bOptions, userId, true /*validateIncomingUser*/);
}

int startActivityAsUser(IApplicationThread caller, String callingPackage,
            Intent intent, String resolvedType, IBinder resultTo,
            String resultWho, int requestCode, int startFlags,
            ProfilerInfo profilerInfo, Bundle bOptions, int userId,
            boolean validateIncomingUser) {
        // 确保调用进程不是 isolated
        enforceNotIsolatedCaller("startActivityAsUser");
        // 检查 userId 的有效性, 并返回有效的 userId
        userId = getActivityStartController().checkTargetUser(userId,
            validateIncomingUser, Binder.getCallingPid(),
            Binder.getCallingUid(), "startActivityAsUser");
        // ActivityStartController#obtainStarter(),拿到 ActivityStarter
        // ActivityStarter#execute(),启动 Activity
        return getActivityStartController().obtainStarter(intent,
           "startActivityAsUser")
                .setCaller(caller)
                .setCallingPackage(callingPackage)
                .setResolvedType(resolvedType)
                .setResultTo(resultTo)
                .setResultWho(resultWho)
                .setRequestCode(requestCode)
                .setStartFlags(startFlags)
                .setProfilerInfo(profilerInfo)
                .setActivityOptions(bOptions)
                .setMayWait(userId)
                .execute();
}
在 ATMS 的 startActivityAsUser 方法中会获取并初始化 ActivityStater 对象,然后调用它的 execute 方法,用来启动 Activity。注意倒数第二个 setMayWait() 方法,会将 mRequest.mayWait 属性设为 true。
ActivityStarter.java
ActivityStarter setMayWait(int userId) {
        mRequest.mayWait = true;
        mRequest.userId = userId;
        return this;
    }
2.5 ActivityStarter.execute
frameworks/base/services/core/java/com/android/server/wm/ActivityStarter.java
int execute() {
        try {
            if (mRequest.mayWait) {// 需要等待请求返回结果
                return startActivityMayWait(mRequest.caller, mRequest.callingUid,
                       mRequest.callingPackage, mRequest.realCallingPid,
                       ......);
            } else {
                return startActivity(mRequest.caller, mRequest.intent,
                     mRequest.ephemeralIntent,  mRequest.resolvedType,
                     ......);
            }
        } finally {
            onExecutionComplete();// 执行完成
        }
    }
由上面的分析可知,这里的 mRequest.mayWait 为 true,是在上一步创建 ActivityStarter 实例时,通过调用 setMayWait 设置的。
2.6 ActivityStarter.startActivityMayWait
private int startActivityMayWait(IApplicationThread caller, int callingUid,
            ......) {
        ......
        // PakageManagerService 解析 intent(要启动的 APP 的 intent),
        // 获取 Activity 更多的信息
        ResolveInfo rInfo = mSupervisor.resolveIntent(intent, resolvedType,
            userId, 0 /* matchFlags */,
            computeResolveFilterUid(
            callingUid, realCallingUid, mRequest.filterCallingUid));
        ......
        // Collect information about the target of the Intent.
        ActivityInfo aInfo = mSupervisor.resolveActivity(
                intent, rInfo, startFlags, profilerInfo);
        synchronized (mService.mGlobalLock) {
            ......
            final ActivityRecord[] outRecord = new ActivityRecord[1];
            // 调用 startActivity
            int res = startActivity(caller, intent, ephemeralIntent,
                ......);
            ......
            return res;
        }
}
2.7 ActivityStarter.startActivity
private int startActivity(IApplicationThread caller, Intent intent,
            ......) {
        ......
        // 继续调用 startActivity
        mLastStartActivityResult = startActivity(caller, intent,
            ......);
        ......
        return getExternalResult(mLastStartActivityResult);
}


private int startActivity(IApplicationThread caller, Intent intent,
        ......) {
        ......
    int err = ActivityManager.START_SUCCESS;
    // 下面这段代码是确定源 Activity 和目的 Activity
    // 通常 sourceRecord 和 resultRecord 是同一个
    ActivityRecord sourceRecord = null; // 源 Activity, 启动 Activity 的那个 Activity
    // 需要接收 result 的目的 Activity, 将启动结果返回给它
    ActivityRecord resultRecord = null;
    // 根据启动 Activity 的 token, 判断 Activity Stack 中是否有对应的源 Activity
    // 如果 requestCode>=0 且源 Activity 非空且非 finish, 则目的 Activity 即为源 Activity
    if (resultTo != null) {
        sourceRecord = mRootActivityContainer.isInAnyStack(resultTo);
        if (sourceRecord != null) {
            if (requestCode >= 0 && !sourceRecord.finishing) {
                resultRecord = sourceRecord;
            }
        }
    }
    // launchFlags 就是 Activity 的启动参数
    final int launchFlags = intent.getFlags();
    if ((launchFlags & Intent.FLAG_ACTIVITY_FORWARD_RESULT) != 0 &&
        sourceRecord != null) {
      // 如果启动参数包含 FLAG_ACTIVITY_FORWARD_RESULT,则需要对 resultRecord 进行调整
    }

    // 以下代码都是进行一些常规检查,如果不符合条件,则给定一个错误码,标记启动失败
    if (err == ActivityManager.START_SUCCESS && intent.getComponent() == null) {
        err = ActivityManager.START_INTENT_NOT_RESOLVED;
    }

    if (err == ActivityManager.START_SUCCESS && aInfo == null) {
         err = ActivityManager.START_CLASS_NOT_FOUND;
    }
    ......
    final ActivityStack resultStack = resultRecord == null
                ? null : resultRecord.getActivityStack();

// 如果错误码被标记上,表示上面的常规检查没有通过,需要结束 Activity 的启动过程
    if (err != START_SUCCESS) {
        if (resultRecord != null) {
        // 此处,如果 resultRecord 不为 null,则需要告诉调用者启动失败了
             resultStack.sendActivityResultLocked(
                  -1, resultRecord, resultWho, requestCode, RESULT_CANCELED, null);
        }
        SafeActivityOptions.abort(options);
        return err;
    }

    // 常规检查通过,又要开始进行一系列的权限检查。上面是通过错误码 err 来标记
    // 权限检查是通过 abort 这个变量来标记的
    boolean abort = !mSupervisor.checkStartAnyActivityPermission(intent, ......);
    abort |= !mService.mIntentFirewall.checkStartActivity(intent, callingUid,
           callingPid, resolvedType, aInfo.applicationInfo);
    ......
    // 拦截器处理
    if (mInterceptor.intercept(intent, rInfo, aInfo, resolvedType, inTask,
            callingPid, callingUid, checkedOptions)) {
        ......
    }
    ......
    if (abort) {
         if (resultRecord != null) {
             resultStack.sendActivityResultLocked(-1, resultRecord, ......);
         }
         ActivityOptions.abort(checkedOptions);
         // 如果权限检查失败,会中断 Activity 的启动过程,返回 START_ABORTED
         return START_ABORTED;
     }
    ......
    mService.onStartActivitySetDidAppSwitch();
    mController.doPendingActivityLaunches(false);
	// 最关键点:创建 ActivityRecord
    ActivityRecord r = new ActivityRecord(mService, callerApp,
	        ......);
    // 继续 startActivity
    final int res = startActivity(r, sourceRecord, voiceSession,
		    ......);
    return res;
}


private int startActivity(final ActivityRecord r, ActivityRecord sourceRecord,
                ......) {
        int result = START_CANCELED;
        final ActivityStack startedActivityStack;
        try {
            mService.mWindowManager.deferSurfaceLayout();
            result = startActivityUnchecked(r, sourceRecord, voiceSession,
                    ......);
        } finally {
            ......
        }
        postStartActivityProcessing(r, result, startedActivityStack);
        return result;
}
这个函数非常重要,关键节点在于创建了一个 ActivityRecord:
- 在创建之前要进行参数设置 (sourceRecord 和 resultRecord 等)、常规检查 (譬如调用者的包名是否存在)、权限检查
- 在创建 ActivityRecord 之后,也有一些处理,包括 AppSwitch,优先启动之前被阻塞的 Activity,然后,进入了 Activity 过程的下一阶段:startActivityUncheckedLocked(),从函数命名可以看出,该做的检查已经做完了,剩下的函数调用就不需要进行额外的检查了 (Unchecked)。
2.8 ActivityStarter.startActivityUnchecked
private int startActivityUnchecked(final ActivityRecord r,
            ......) {
   ......
   // 计算 mLaunchFlags
   computeLaunchingTaskFlags();
   // 设置刚才在上面计算出来的 mLaunchFlags
   mIntent.setFlags(mLaunchFlags);
   // 根据 mLaunchFlags 来查找是否有可重用的 activity
   ActivityRecord reusedActivity = getReusableIntentActivity();
   if (reusedActivity != null) {
     // 如果找到了可重用的 activity,需要清理掉原来的信息,并把当前启动的
     // activity 的信息拷贝进去,做清理和拷贝工作
     ......
     if((mLaunchFlags & FLAG_ACTIVITY_CLEAR_TOP) != 0 ||
           isLaunchModeOneOf(LAUNCH_SINGLE_INSTANCE, LAUNCH_SINGLE_TASK)){
       // 没必要新建实例,回调 onNewIntent 并将 top 移至前台
       deliverNewIntent(top);
     }
     ......
   }
   ......
    // Should this be considered a new task?
    // 将要启动的 Activity(即 mStartActivity)添加到 task 里, 同时将该
    // task 移到 task 列表的最前面,这个 task 可能是新建的 task
    // 也可能是启动 Activity 的当前 Activity 所在的 task
    int result = START_SUCCESS;
    if (mStartActivity.resultTo == null && mInTask == null && !mAddingToTask
            && (mLaunchFlags & FLAG_ACTIVITY_NEW_TASK) != 0) {
        newTask = true;// 复用 task 或创建新的 task
        // TaskRecord,ActivityStack 就是在这个函数建立联系的
        result = setTaskFromReuseOrCreateNewTask(taskToAffiliate);
    } else if (mSourceRecord != null) {// 不是新建 task 的,重用原 activity 的 task
        result = setTaskFromSourceRecord();// 从 mSourceRecord 中获取 task
    } else if (mInTask != null) {
        result = setTaskFromInTask();// 从 mInTask 中获取 task
    } else {
        // 从 mHistoryTasks 栈顶获取 task 或创建新的 task
        result = setTaskToCurrentTopOrCreateNewTask();
    }
    ......
    // 启动 Activity 的准备工作
    mTargetStack.startActivityLocked(mStartActivity, topFocused,
            ......);
    if (mDoResume) {// resume 操作, 此处为 true
        // 获取当前正在运行的位于栈顶的 Activity
        final ActivityRecord topTaskActivity =
                mStartActivity.getTaskRecord().topRunningActivityLocked();
        if (!mTargetStack.isFocusable()
               || (topTaskActivity != null && topTaskActivity.mTaskOverlay
               && mStartActivity != topTaskActivity)) {
          // 设置启动的 Activity(即 mStartActivity)可见, 并通知 WindowManager 更新
            mTargetStack.ensureActivitiesVisibleLocked(mStartActivity,
               0, !PRESERVE_WINDOWS);
         mTargetStack.getDisplay().mDisplayContent.executeAppTransition();
        } else {
    // 若 mTargetStack 栈当前没有显示在最上层并获取焦点, 则先将 mTargetStack 移到栈顶
         if (mTargetStack.isFocusable()
         && !mRootActivityContainer.isTopDisplayFocusedStack(mTargetStack)) {
                mTargetStack.moveToFront("startActivityUnchecked");
         }
            // 关键点 resume mStartActivity
            mRootActivityContainer.resumeFocusedStacksTopActivities(
                    mTargetStack, mStartActivity, mOptions);
        }
    } else if (mStartActivity != null) {
        // 将启动的 Activity 所在的 task 添加到最近任务列表 mRecentTasks 里
        mSupervisor.mRecentTasks.add(mStartActivity.getTaskRecord());
    }
    ......
    return START_SUCCESS;
}
startActivityUnchecked 是分配 Task 的重点函数,就是根据 activty 的启动模式找到合适的 task 来放置 activity,如果找不到,就会新建一个。具体过程如下:
- 首先,根据 launchMode 和 Intent 中的 FLAG_ACTIVITY_NEW_TASK 等 flag 综合计算 activity 的启动模式,结果保存在 mLaunchFlags 中。计算的过程不仅要考虑目标 activity 的 launchMode,也要考虑原来 activity 的 launchMode 和 Intent 中所带着的 flag。例如原来 activity 的 launchMode 是LAUNCH_SINGLE_INSTANCE,那么新 activity 只能新建 task
- 调用 getReusableIntentActivity() 查找是否有可以重用的 activity,这个只对 LAUNCH_SINGLE_INSTANCE 和 LAUNCH_SINGLE_TASK 或者 FLAG_ACTIVITY_NEW_ TASK 不为 0 有用的 actvity,对于 standard 的 activity,该方法永远返回 null。查找的依据包括 ActivityType、ComponentName 和 taskAffinity 等
- 如果成功找到了可以重用的 activity,要进行清理工作,把原来 activity 的信息替换成现在 activity 的信息。例如同一个 activity,两次启动的 caller 可能不同,要进行更新。同时,还要进行根据 launchMode 来进行 task 内的清理。例如 LAUNCH_SINGLE_TASK 的 activity,如果此类所在的 task 上面有其它 Activity,那么其它的 Activity 会被销毁。
- 找到了可以重用的 activity,那么就相当于把原来的 activty 替换成现在的 activty,也就不用新建 task 了。但是如果没有找到重用的 activity,那么调用 setTaskFromReuseOrCreateNewTask() 尝试寻找可以重用的 task,注意此时前提是 mStartActivity.resultTo == null && mLaunchFlags & FLAG_ACTIVITY_NEW_TASK,即,如果我们调用startActivityForResult 启动 activity,那么是不能新建 task 的,二者是不兼容的。没有找到重用的 task,此时会新建一个 TaskRecord,置于前台,然后把 activity 也置于 task 中 activity 队列的最后(即前台)。如果是重用原 activity 的 task,那么执行 setTaskFromSourceRecord,首先也是把该 task 移到前台,然后把 activity 置于该 task 的 activity 队列的最后
- 经过前面四步,actvity 及其对应的 task 位置已经安排妥当,现在可以准备让这个 activity 开始工作了!那么这开工的第一步就是 mTargetStack.startActivityLocked,这里面的工作主要是通知 WMS 准备 activty 的过渡动画和 startingWindow
2.8.1 ActivityStarter.setTaskFromReuseOrCreateNewTask
private int setTaskFromReuseOrCreateNewTask(TaskRecord taskToAffiliate) {
        if (mRestrictedBgActivity && (mReuseTask == null ||
                !mReuseTask.containsAppUid(mCallingUid))
                && handleBackgroundActivityAbort(mStartActivity)) {
            return START_ABORTED;
        }
        // 获取目标 ActivityStack
        mTargetStack = computeStackFocus(mStartActivity, true,
            mLaunchFlags, mOptions);

        // Do no move the target stack to front yet, as we might bail if
        // isLockTaskModeViolation fails below.

    if (mReuseTask == null) {
        final boolean toTop = !mLaunchTaskBehind && !mAvoidMoveToFront;
     // 创建目标 TaskRecord
        final TaskRecord task = mTargetStack.createTaskRecord(
            mSupervisor.getNextTaskIdForUserLocked(mStartActivity.mUserId),
            mNewTaskInfo != null ? mNewTaskInfo : mStartActivity.info,
            mNewTaskIntent != null ? mNewTaskIntent : mIntent, mVoiceSession,
            mVoiceInteractor, toTop, mStartActivity, mSourceRecord, mOptions);
        // 把要启动的 ActivityRecord 添加到目标 TaskRecord 中
        addOrReparentStartingActivity(task,
            "setTaskFromReuseOrCreateNewTask - mReuseTask");
        updateBounds(mStartActivity.getTaskRecord(), mLaunchParams.mBounds);

    } else {
       addOrReparentStartingActivity(mReuseTask,
            "setTaskFromReuseOrCreateNewTask");
    }

        if (taskToAffiliate != null) {
            mStartActivity.setTaskToAffiliateWith(taskToAffiliate);
        }

        if (mService.getLockTaskController().isLockTaskModeViolation(
                mStartActivity.getTaskRecord())) {
            return START_RETURN_LOCK_TASK_MODE_VIOLATION;
        }

        if (mDoResume) {
            mTargetStack.moveToFront("reuseOrNewTask");
        }
        return START_SUCCESS;
}


private void addOrReparentStartingActivity(TaskRecord parent, String reason) {
        if (mStartActivity.getTaskRecord() == null ||
            mStartActivity.getTaskRecord() == parent) {
            parent.addActivityToTop(mStartActivity);
        } else {
            mStartActivity.reparent(parent, parent.mActivities.size(), reason);
        }
}
为 activity 分配了任务栈之后,接下来调用 resumeFocusedStackTopActivityLocked。
2.9 RootActivityContainer.resumeFocusedStacksTopActivities()
boolean resumeFocusedStacksTopActivities(ActivityStack targetStack,
        ActivityRecord target, ActivityOptions targetOptions) {
        if (!mStackSupervisor.readyToResume()) {
            return false;
        }

        boolean result = false;
        if (targetStack != null && (targetStack.isTopStackOnDisplay()
                || getTopDisplayFocusedStack() == targetStack)) {
            result = targetStack.resumeTopActivityUncheckedLocked(
                target, targetOptions);
        }
        ......
        return result;
    }
2.10 ActivityStack.resumeTopActivityUncheckedLocked()
ActivityStack.java
boolean resumeTopActivityUncheckedLocked(ActivityRecord prev,
     ActivityOptions options) {
        if (mInResumeTopActivity) {
            // Don't even start recursing.
            return false;
        }

        boolean result = false;
        try {
            // Protect against recursion.
            mInResumeTopActivity = true;
            result = resumeTopActivityInnerLocked(prev, options);
            final ActivityRecord next = topRunningActivityLocked(true);
            if (next == null || !next.canTurnScreenOn()) {
                checkReadyForSleep();
            }
        } finally {
            mInResumeTopActivity = false;
        }

        return result;
    }
2.11 ActivityStack.resumeTopActivityInnerLocked()
private boolean resumeTopActivityInnerLocked(ActivityRecord prev,
    ActivityOptions options) {
        if (!mService.isBooting() && !mService.isBooted()) {
            // Not ready yet!
            return false;
        }
        // next 是要 resume 的 activity
        ActivityRecord next = topRunningActivityLocked(true);
        ......
        // 关键函数
        boolean pausing = getDisplay().pauseBackStacks(userLeaving, next, false);
        ......
        // Launching this app's activity, make sure the app is no longer
        // considered stopped.
        try {
            AppGlobals.getPackageManager().setPackageStoppedState(
                    next.packageName, false, next.mUserId);
        } catch (RemoteException e1) {
        } catch (IllegalArgumentException e) {
            Slog.w(TAG, "Failed trying to unstop package "
                    + next.packageName + ": " + e);
        }
        ......
        return true;
}
这个方法会执行 getDisplay().pauseBackStacks() 这步,用于暂停当前的 Activity。getDisplay() 会返回 ActivityDisplay 对象。
ActivityDisplay.java
boolean pauseBackStacks(boolean userLeaving, ActivityRecord resuming,
    boolean dontWait) {
        boolean someActivityPaused = false;
        for (int stackNdx = mStacks.size() - 1; stackNdx >= 0; --stackNdx) {
            final ActivityStack stack = mStacks.get(stackNdx);
            final ActivityRecord resumedActivity = stack.getResumedActivity();
            if (resumedActivity != null
                    && (stack.getVisibility(resuming) != STACK_VISIBILITY_VISIBLE
                        || !stack.isFocusable())) {
                someActivityPaused |=
                stack.startPausingLocked(userLeaving, false, resuming,
                        dontWait);
            }
        }
        return someActivityPaused;
    }
如果有符合条件的 Activity,则调用 stack.startPausingLocked 进入 pause 阶段。
三 AMS启动Activity并通知Launcher进入Paused状态
在启动一个 Activity 的时候,如果发现当前还有处于 resume 状态的 Activity,会先走 puase 流程,暂停当前的 Activity。接上个阶段的分析我们知道,最终调用到了 ActivityDisplay 的 pauseBackStacks 方法。
ActivityDisplay.java
boolean pauseBackStacks(boolean userLeaving, ActivityRecord resuming,
    boolean dontWait) {
        boolean someActivityPaused = false;
        for (int stackNdx = mStacks.size() - 1; stackNdx >= 0; --stackNdx) {
            final ActivityStack stack = mStacks.get(stackNdx);
            final ActivityRecord resumedActivity = stack.getResumedActivity();
            if (resumedActivity != null
                    && (stack.getVisibility(resuming) != STACK_VISIBILITY_VISIBLE
                        || !stack.isFocusable())) {
                someActivityPaused |=
                stack.startPausingLocked(userLeaving, false, resuming,
                        dontWait);
            }
        }
        return someActivityPaused;
    }
可以看到 pauseBackStacks 会执行以下操作:
- pause 其他所有处于非 focus 状态的任务栈的 resumedActivity
- pause 当前任务栈 resumedActivity
3.1 ActivityStack.startPausingLocked
final boolean startPausingLocked(boolean userLeaving, boolean uiSleeping,
            ActivityRecord resuming, boolean pauseImmediately) {
        // 如果还有正在 pause 的 activity 那么等待执行结束
        if (mPausingActivity != null) {
            if (!shouldSleepActivities()) {
                completePauseLocked(false, resuming);
            }
        }
        ActivityRecord prev = mResumedActivity;
        ......
        if (DEBUG_STATES) Slog.v(TAG_STATES, "Moving to PAUSING: " + prev);
        else if (DEBUG_PAUSE) Slog.v(TAG_PAUSE, "Start pausing: " + prev);
        mPausingActivity = prev;
        mLastPausedActivity = prev;
        mLastNoHistoryActivity = (prev.intent.getFlags() &
            Intent.FLAG_ACTIVITY_NO_HISTORY) != 0
                || (prev.info.flags & ActivityInfo.FLAG_NO_HISTORY) != 0 ?
                 prev : null;
        prev.setState(PAUSING, "startPausingLocked");
        prev.getTaskRecord().touchActiveTime();
        clearLaunchTime(prev);

        mService.updateCpuStats();

    if (prev.attachedToProcess()) {
        if (DEBUG_PAUSE) Slog.v(TAG_PAUSE, "Enqueueing pending pause: " + prev);
        try {
        // 关键调用 执行 PauseActivityItem
            mService.getLifecycleManager().scheduleTransaction(prev.app.getThread(),
              prev.appToken, PauseActivityItem.obtain(prev.finishing, userLeaving,
              prev.configChangeFlags, pauseImmediately));
        } catch (Exception e) {
            // Ignore exception, if process died other code will cleanup.
            Slog.w(TAG, "Exception thrown during pause", e);
            mPausingActivity = null;
            mLastPausedActivity = null;
            mLastNoHistoryActivity = null;
        }
    } else {
        mPausingActivity = null;
        mLastPausedActivity = null;
        mLastNoHistoryActivity = null;
    }
    ......
}
上面代码很简单,就是变更一下 mPausingActivity 的状态,然后通过 LifecycleManager 来通知 APP 进行 pause 操作,至此完成了所有 resumedActivity 的 pause 工作。关于 ClientLifecycleManager 机制,请参考 深入理解 ClientLifecycleManager 机制。我们直接来看 PauseActivityItem 的 execute()方法。
3.2 PauseActivityItem.execute
@Override
    public void execute(ClientTransactionHandler client, IBinder token,
            PendingTransactionActions pendingActions) {
        Trace.traceBegin(TRACE_TAG_ACTIVITY_MANAGER, "activityPause");
        client.handlePauseActivity(token, mFinished,
        mUserLeaving, mConfigChanges, pendingActions,
                "PAUSE_ACTIVITY_ITEM");
        Trace.traceEnd(TRACE_TAG_ACTIVITY_MANAGER);
    }
调用了 client 的 handlePauseActivity() 方法。我们知道 ActivityThread 继承了 ClientTransactionHandler ,并且也重写了这个方法,所以这里其实执行的是 ActivityThread 的 handlePauseActivity() 方法。
3.3 ActivityThread.handlePauseActivity
ActivityThread.java
public void handlePauseActivity(IBinder token, boolean finished, boolean userLeaving,
        int configChanges, PendingTransactionActions pendingActions, String reason) {
    ActivityClientRecord r = mActivities.get(token);
    if (r != null) {
        if (userLeaving) {
            performUserLeavingActivity(r);
        }

        r.activity.mConfigChangeFlags |= configChanges;
        performPauseActivity(r, finished, reason, pendingActions);
       ......
    }
}
3.4 ActivityThread.performPauseActivity
private Bundle performPauseActivity(ActivityClientRecord r, boolean finished,
    String reason, PendingTransactionActions pendingActions) {
        if (r.paused) {
            if (r.activity.mFinished) {
        // If we are finishing, we won't call onResume() in certain cases.
       // So here we likewise don't want to call onPause() if the activity
       // isn't resumed.
                return null;
            }
            RuntimeException e = new RuntimeException(
                    "Performing pause of activity that is not resumed: "
                    + r.intent.getComponent().toShortString());
            Slog.e(TAG, e.getMessage(), e);
        }
        if (finished) {
            r.activity.mFinished = true;
        }

        // Pre-Honeycomb apps always save their state before pausing
        final boolean shouldSaveState = !r.activity.mFinished &&
            r.isPreHoneycomb();
        if (shouldSaveState) {
            callActivityOnSaveInstanceState(r);
        }
        // 关键调用
        performPauseActivityIfNeeded(r, reason);
        ......
        return shouldSaveState ? r.state : null;
    }
3.5 ActivityThread.performPauseActivityIfNeeded
ActivityThread.java
private void performPauseActivityIfNeeded(ActivityClientRecord r, String reason) {
    ......
    try {
        r.activity.mCalled = false;
        mInstrumentation.callActivityOnPause(r.activity);
        ......
    } catch (SuperNotCalledException e) {
        throw e;
    } catch (Exception e) {
        ......
    }
    r.setState(ON_PAUSE);
}
3.6 Instrumentation.callActivityOnPause
Instrumentation.java
public void callActivityOnPause(Activity activity) {
    activity.performPause();
}
3.7 Activity.performPause
Activity.java
final void performPause() {
	......
	onPause();// 回调 onPause 函数
	......
	dispatchActivityPostPaused();
}
最后在这里调用了我们当前 Activity 的 onPause 方法。也就是执行了 Activity 生命周期的 onPause 方法。
3.8 PauseActivityItem.postExecute
回到前面 TransactionExecutor 的 executeLifecycleState() 方法。在 PauseActivityItem 的 execute() 方法中执行了前一个 Activity 的 onPause() 方法,紧跟着会调用 PauseActivityItem 的 postExecute() 方法。ClientLifecycleManager 机制请参考 深入理解 ClientLifecycleManager 机制。
PauseActivityItem.java
public void postExecute(ClientTransactionHandler client, IBinder token,
        PendingTransactionActions pendingActions) {
    ......
    try {
        // TODO(lifecycler): Use interface callback instead of AMS.
        ActivityTaskManager.getService().activityPaused(token);
    } catch (RemoteException ex) {
        throw ex.rethrowFromSystemServer();
    }
}
调用 ActivityTaskManager.getService() 的 activityPaused 方法。也就是通过 Binder 机制跨进程调用系统进程中对应的 ActivityTaskManagerService 的 activityPaused 方法。
3.9 ActivityTaskManagerService.activityPaused
ActivityTaskManagerService.java
public final void activityPaused(IBinder token) {
    final long origId = Binder.clearCallingIdentity();
    synchronized (mGlobalLock) {
        ActivityStack stack = ActivityRecord.getStackLocked(token);
        if (stack != null) {
            stack.activityPausedLocked(token, false);
        }
    }
    Binder.restoreCallingIdentity(origId);
}
调用了 Activity 所在的 ActivityStack 的 activityPausedLocked 方法。
3.10 ActivityStack.activityPausedLocked
frameworks/base/services/core/java/com/android/server/wm/ActivityStack.java
final void activityPausedLocked(IBinder token, boolean timeout) {
	......
	if (r != null) {
		mHandler.removeMessages(PAUSE_TIMEOUT_MSG, r);
		if (mPausingActivity == r) {
			......
			try {
				completePauseLocked(true, null);
			} finally {
				mService.mWindowManager.continueSurfaceLayout();
			}
			return;
		} else {
			......
		}
	}
	mRootActivityContainer.ensureActivitiesVisible(null, 0, !PRESERVE_WINDOWS);
}
调用 completePauseLocked() 方法。
3.11 ActivityStack.completePauseLocked
frameworks/base/services/core/java/com/android/server/wm/ActivityStack.java
private void completePauseLocked(boolean resumeNext, ActivityRecord resuming) {
	ActivityRecord prev = mPausingActivity;
	......
	if (resumeNext) {
		final ActivityStack topStack =
		   mRootActivityContainer.getTopDisplayFocusedStack();
		if (!topStack.shouldSleepOrShutDownActivities()) {
			mRootActivityContainer.resumeFocusedStacksTopActivities(
			   topStack, prev, null);
		} else {
			......
		}
	}
	......
}
调用 RootActivityContainer 类的 resumeFocusedStacksTopActivities() 方法。发现这个方法在前面是看过的。
3.12 RootActivityContainer.resumeFocusedStacksTopActivities
RootActivityContainer.java
boolean resumeFocusedStacksTopActivities(ActivityStack targetStack,
    ActivityRecord target, ActivityOptions targetOptions) {
	if (!mStackSupervisor.readyToResume()) {
		return false;
	}

	boolean result = false;
	if (targetStack != null && (targetStack.isTopStackOnDisplay()
			|| getTopDisplayFocusedStack() == targetStack)) {
		result = targetStack.resumeTopActivityUncheckedLocked(
		    target, targetOptions);
	}
	......
	return result;
}
调用 ActivityStack 的 resumeTopActivityUncheckedLocked() 方法。
3.13 ActivityStack.resumeTopActivityUncheckedLocked
frameworks/base/services/core/java/com/android/server/wm/ActivityStack.java
boolean resumeTopActivityUncheckedLocked(ActivityRecord prev,
        ActivityOptions options) {
    if (mInResumeTopActivity) {
        return false;
    }
    boolean result = false;
    try {
        // Protect against recursion.
        mInResumeTopActivity = true;
        result = resumeTopActivityInnerLocked(prev, options);
        final ActivityRecord next = topRunningActivityLocked(true);
        if (next == null || !next.canTurnScreenOn()) {
            checkReadyForSleep();
        }
    } finally {
        mInResumeTopActivity = false;
    }
    return result;
}
调用 resumeTopActivityInnerLocked() 方法。前面就是在这个方法中开始了 Activity 的 pause 流程,但是现在会开始新 Activity 的创建流程。
3.14 ActivityStack.resumeTopActivityInnerLocked
private boolean resumeTopActivityInnerLocked(ActivityRecord prev,
        ActivityOptions options) {
    ......
    // 从任务历史列表 mTaskHistory 里, 获取最上面运行的 Activity
    ActivityRecord next = topRunningActivityLocked(true);
    final boolean hasRunningActivity = next != null;
    if (!hasRunningActivity) {
        // 如果没有运行的 Activity, 则从其他 task 堆栈中查找 Activity 并 resume
        return resumeNextFocusableActivityWhenStackIsEmpty(prev, options);
    }
    // 如果 topRunningActivity 已经是 resume 状态, 则 do nothing
    if (mResumedActivity == next && next.isState(RESUMED) &&
            display.allResumedActivitiesComplete()) {
        executeAppTransition(options);
        return false;
    }
    ......
    // 如果没有获取到 topRunningActivity,则先暂停所有 Stack 中的 Activity.
    // 前面就是在这个方法中判断需要先 pause 当前 Activity 的
    boolean pausing = getDisplay().pauseBackStacks(userLeaving, next, false);
    // 暂停当前恢复态的 Activity(mResumedActivity),注意 prev/next 为要启动的
    // 目的 Activity, 而 mResumedActivity 为当前 Activity, 两者不是同一个
    if (mResumedActivity != null) {
        pausing |= startPausingLocked(userLeaving, false, next, false);
    }
    if (pausing && !resumeWhilePausing) {
        // 如果 Activity 正在 Pausing 状态,且不允许 pausing 过程中执行 resume, 则先不执行
        // resume 只是将即将启动的 Activity 所在的进程添加到 mLruProcesses 最前面, 避免被杀
        if (next.attachedToProcess()) {
            next.app.updateProcessInfo(false, true, false);
        }
        if (lastResumed != null) {
            lastResumed.setWillCloseOrEnterPip(true);
        }
        return true;
    } else if (mResumedActivity == next && next.isState(RESUMED) &&
                display.allResumedActivitiesComplete()) {
        // 如果要启动的 Activity 已经 Resume 了则不需要做什么
        // 调一下 executeAppTransition 执行一下 pending transitions 即可.
        executeAppTransition(options);
        return true;
    }
    ......
    // 如果下一个 Activity 已经可见了, 上一个 Activity 当前正处于 finishing 状态
    // 则直接让上一个 Activity 不可见,当上一个 Activity 不是 finishing 状态
    //(比如当下一个 Activity 不是全屏状态时的场景), 上一个 Activity 还应该是可见的
    if (prev != null && prev != next && next.nowVisible) {
        if (prev.finishing) {
            prev.setVisibility(false);
        }
    }
    ......
    if (next.attachedToProcess()) {// 不会走次分支,因为进程还没有启动起来
        // Activity 所在进程已启动, 和 realStartActivityLocked 做的事情类似.
        // 上一个 Activity 是否半透明
        final boolean lastActivityTranslucent = lastFocusedStack != null
                && (lastFocusedStack.inMultiWindowMode()
                || (lastFocusedStack.mLastPausedActivity != null
                && !lastFocusedStack.mLastPausedActivity.fullscreen));
        // 如果将要启动的Activity不可见, 则让该Activity可见
        if (!next.visible || next.stopped || lastActivityTranslucent) {
            next.setVisibility(true);
        }
        ......
        // 设置Activity状态为RESUMED
        next.setState(RESUMED, "resumeTopActivityInnerLocked");
        // 更新进程信息
        next.app.updateProcessInfo(false, true, true);
        ......
        final ClientTransaction transaction =
                ClientTransaction.obtain(next.app.getThread(), next.appToken);
        // 分发所有pending结果
        ArrayList<ResultInfo> a = next.results;
        if (a != null) {
            final int N = a.size();
            if (!next.finishing && N > 0) {
                transaction.addCallback(ActivityResultItem.obtain(a));
            }
        }
        // 分发new intent
        if (next.newIntents != null) {
            transaction.addCallback(NewIntentItem.obtain(next.newIntents, true));
        }
        // Well the app will no longer be stopped.
        // Clear app token stopped state in window manager if needed.
        next.notifyAppResumed(next.stopped);
        next.sleeping = false;
        mService.getAppWarningsLocked().onResumeActivity(next);
next.app.setPendingUiCleanAndForceProcessStateUpTo(mService.mTopProcessState);
        next.clearOptionsLocked();
        // 触发onResume
       transaction.setLifecycleStateRequest(
		       ResumeActivityItem.obtain(next.app.getReportedProcState(),
		       getDisplay().mDisplayContent.isNextTransitionForward()));
        mService.getLifecycleManager().scheduleTransaction(transaction);
        // From this point on, if something goes wrong there is no way
        // to recover the activity.
        next.completeResumeLocked();
    } else {// 进程没启动
        // Whoops, need to restart this activity!
        if (!next.hasBeenLaunched) {
            next.hasBeenLaunched = true;
        } else {
            if (SHOW_APP_STARTING_PREVIEW) {
                next.showStartingWindow(null, false, false);
            }
        }
        // 创建 App 进程并启动 Activity.
        mStackSupervisor.startSpecificActivityLocked(next, true, true);
    }
    return true;
}
3.15 ActivityStackSupervisor.startSpecificActivityLocked
ActivityStackSupervisor.java
void startSpecificActivityLocked(ActivityRecord r, boolean andResume,
        boolean checkConfig) {
    final WindowProcessController wpc =
       mService.getProcessController(r.processName, r.info.applicationInfo.uid);

    boolean knownToBeDead = false;
    // 如果已经有进程,则调用 realStartActivityLocked,此处不会走,因为进程没启动
    if (wpc != null && wpc.hasThread()) {
        try {
            realStartActivityLocked(r, wpc, andResume, checkConfig);
            return;
        } catch (RemoteException e) {
            Slog.w(TAG, "Exception when starting activity "
                    + r.intent.getComponent().flattenToShortString(), e);
       }
        knownToBeDead = true;
    }
	......
	try {
    	......
		// Post message to start process to avoid possible deadlock of
		// calling into AMS with the ATMS lock held.
		// 关键调用,发送消息,启动进程
		final Message msg = PooledLambda.obtainMessage(
				ActivityManagerInternal::startProcess, mService.mAmInternal, r.processName,
				r.info.applicationInfo, knownToBeDead, "activity", r.intent.getComponent());
		mService.mH.sendMessage(msg);
	} finally {
		Trace.traceEnd(TRACE_TAG_ACTIVITY_MANAGER);
	}
}
会在 try 中调用 ActivityManagerService 的 startProcess() 方法,从方法名可以看出,是启动一个新进程。
四 Zygote 进程接收请求并创建 APP 进程
4.1 进程线程介绍
进程:每个 App 在启动前必须先创建一个进程,该进程是由 zygote fork 出来的,进程具有独立的资源空间,用于承载 App 上运行的各种 Activity,Service 等组件。进程对于上层应用来说是完全透明的,这也是谷歌有意为之,让 App 程序都运行在 Android Runtime 上。大多数情况一个 App 就运行在一个进程中,除非在 AndroidManifest.xml 中配置 Android:process 属性,或通过 native 代码 fork 进程。关于多进程内容请参考 Android多进程 android:process 属性。
线程:线程对应用开发者来说非常熟悉,比如每次 new Thread().start() 都会创建一个新的线程,该线程并没有自己独立的地址空间,而是与其所在进程之间资源共享。从 Linux 角度来说进程与线程都是一个 task_struct 结构体,除了是否共享资源外,并没有其他本质的区别。
在接下来的介绍中,会涉及到 system_server 进程和 zygote 进程,下面重复简要介绍下这两个进程:
- system_server 进程:是用于管理整个 Java framework 层,包含 AMS,PMS 等各种系统服务
- zygote 进程:是 Android 系统的首个 Java 进程,zygote 是所有 Java 进程的父进程,包括 system_server 进程以及所有的 App 进程都是 zygote 的子进程,注意这里说的是子进程,而非子线程
4.2 进程创建图
对于大多数的应用开发者来说创建线程比较熟悉,而对于创建进程并没有太多的概念。对于系统工程师或者高级开发者,还是很有必要了解 Android 系统是如何一步步地创建出一个进程的。先来看一张进程创建过程的简要图: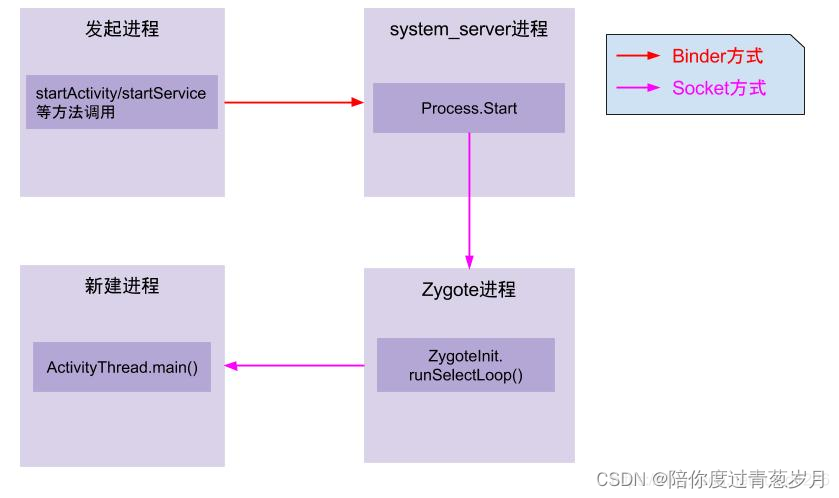
- App 发起进程:当从桌面启动应用,则发起进程便是 Launcher 所在进程;当从某 App 内启动远程进程,则发送进程便是该 App 所在进程。发起进程先通过 binder 发送消息给 system_server 进程
- system_server 进程:调用 Process.start() 方法,通过 socket 向 zygote 进程发送创建新进程的请求
- zygote 进程:在执行 ZygoteInit.main() 后便进入 runSelectLoop() 循环体内,当有客户端连接时便会执行 ZygoteConnection.runOnce() 方法,再经过层层调用后 fork 出新的应用进程
- 新进程:执行 handleChildProc 方法,最后调用 ActivityThread.main() 方法
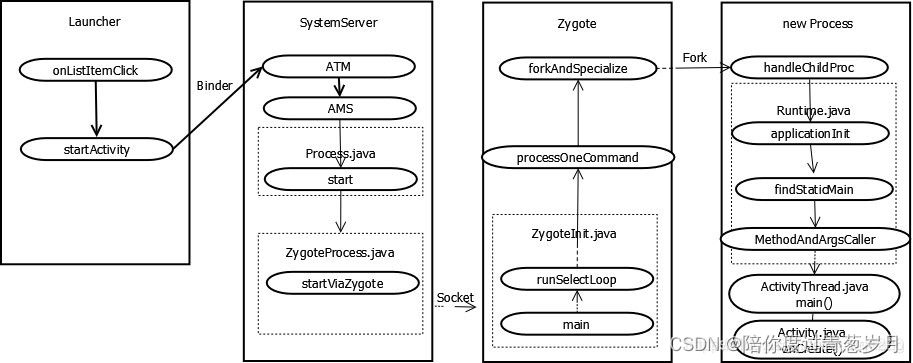
调用栈:
4.2 ActivityManagerService.startProcess
ActivityManagerService.java
public void startProcess(String processName, ApplicationInfo info,
        boolean knownToBeDead, String hostingType, ComponentName hostingName) {
    try {
        ......
        synchronized (ActivityManagerService.this) {
            startProcessLocked(processName, info, knownToBeDead, 0 /* intentFlags */,
                    new HostingRecord(hostingType, hostingName),
                    false /* allowWhileBooting */, false /* isolated */,
                    true /* keepIfLarge */);
        }
    } finally {
        Trace.traceEnd(Trace.TRACE_TAG_ACTIVITY_MANAGER);
    }
}
4.3 ProcessList.startProcessLocked
ProcessList.java
final ProcessRecord startProcessLocked(String processName,
        ApplicationInfo info, boolean knownToBeDead, int intentFlags,
        HostingRecord hostingRecord, boolean allowWhileBooting,
        boolean isolated, boolean keepIfLarge) {
    return mProcessList.startProcessLocked(processName, info, knownToBeDead, intentFlags,
            hostingRecord, allowWhileBooting, isolated, 0 /* isolatedUid */, keepIfLarge,
            null /* ABI override */, null /* entryPoint */, null /* entryPointArgs */,
            null /* crashHandler */);
}
4.4 ProcessList.startProcess
ProcessList.java
private Process.ProcessStartResult startProcess(HostingRecord hostingRecord,
    String entryPoint,	ProcessRecord app,......) {
	try {
		......
		final Process.ProcessStartResult startResult;
		if (hostingRecord.usesWebviewZygote()) {
			......
		} else if (hostingRecord.usesAppZygote()) {
			......
		} else {
		// 调用 Process.start
			startResult = Process.start(entryPoint,
					app.processName, uid, uid, gids, runtimeFlags, mountExternal,
					app.info.targetSdkVersion, seInfo, requiredAbi, instructionSet,
					app.info.dataDir, invokeWith, app.info.packageName,
					new String[] {PROC_START_SEQ_IDENT + app.startSeq});
		}
		checkSlow(startTime, "startProcess: returned from zygote!");
		return startResult;
	} finally {
		Trace.traceEnd(Trace.TRACE_TAG_ACTIVITY_MANAGER);
	}
}
可以看到是通过调用 Process 的 start 方法来启动新进程的。至此进入新进程的创建阶段。
4.5 Process.start
rameworks/base/core/java/android/os/Process.java
public static final ZygoteProcess ZYGOTE_PROCESS = new ZygoteProcess();

public static ProcessStartResult start(@NonNull final String processClass,
                                           @Nullable final String niceName,
                                           int uid, int gid, @Nullable int[] gids,
                                           int runtimeFlags,
                                           int mountExternal,
                                           int targetSdkVersion,
                                           @Nullable String seInfo,
                                           @NonNull String abi,
                                           @Nullable String instructionSet,
                                           @Nullable String appDataDir,
                                           @Nullable String invokeWith,
                                           @Nullable String packageName,
                                           @Nullable String[] zygoteArgs) {
        return ZYGOTE_PROCESS.start(processClass, niceName, uid, gid, gids,
                    runtimeFlags, mountExternal, targetSdkVersion, seInfo,
                    abi, instructionSet, appDataDir, invokeWith, packageName,
                    /*useUsapPool=*/ true, zygoteArgs);
    }
rameworks/base/core/java/android/os/ZygoteProcess.java
public final Process.ProcessStartResult start(@NonNull final String processClass,
                                                  final String niceName,
                                                  int uid, int gid, @Nullable int[] gids,
                                                  ........
                                                  boolean useUsapPool,
                                                  @Nullable String[] zygoteArgs) {
        // TODO (chriswailes): Is there a better place to check this value?
        if (fetchUsapPoolEnabledPropWithMinInterval()) {
            informZygotesOfUsapPoolStatus();
        }
        try {
            return startViaZygote(processClass, niceName, uid, gid, gids,
                    runtimeFlags, mountExternal, targetSdkVersion, seInfo,
                    abi, instructionSet, appDataDir, invokeWith, false,
                    packageName, useUsapPool, zygoteArgs);
        } catch (ZygoteStartFailedEx ex) {
            Log.e(LOG_TAG,
                    "Starting VM process through Zygote failed");
            throw new RuntimeException(
                    "Starting VM process through Zygote failed", ex);
        }
    }
4.6 ZygoteProcess.startViaZygote
private Process.ProcessStartResult startViaZygote(@NonNull final String processClass,
                                                      @Nullable final String niceName,
                                                      final int uid, final int gid,
                                                      @Nullable final int[] gids,
                                                      ........
                                                      @Nullable String[] extraArgs)
                                                      throws ZygoteStartFailedEx {
        ArrayList<String> argsForZygote = new ArrayList<>();
        // --runtime-args, --setuid=, --setgid=,
        // and --setgroups= must go first
        argsForZygote.add("--runtime-args");
        argsForZygote.add("--setuid=" + uid);
        argsForZygote.add("--setgid=" + gid);
        argsForZygote.add("--runtime-flags=" + runtimeFlags);
        if (mountExternal == Zygote.MOUNT_EXTERNAL_DEFAULT) {
            argsForZygote.add("--mount-external-default");
        } else if (mountExternal == Zygote.MOUNT_EXTERNAL_READ) {
            argsForZygote.add("--mount-external-read");
        } else if (mountExternal == Zygote.MOUNT_EXTERNAL_WRITE) {
            argsForZygote.add("--mount-external-write");
        } else if (mountExternal == Zygote.MOUNT_EXTERNAL_FULL) {
            argsForZygote.add("--mount-external-full");
        } else if (mountExternal == Zygote.MOUNT_EXTERNAL_INSTALLER) {
            argsForZygote.add("--mount-external-installer");
        } else if (mountExternal == Zygote.MOUNT_EXTERNAL_LEGACY) {
            argsForZygote.add("--mount-external-legacy");
        }
        argsForZygote.add("--target-sdk-version=" + targetSdkVersion);
        ........
        if (niceName != null) {
            argsForZygote.add("--nice-name=" + niceName);
        }
        ........
        if (startChildZygote) {
            argsForZygote.add("--start-child-zygote");
        }
        if (packageName != null) {
            argsForZygote.add("--package-name=" + packageName);
        }
        //关键点:processClass = “android.app.ActivityThread”,把这个参数添加到argsForZygote中
        argsForZygote.add(processClass);
        if (extraArgs != null) {
            Collections.addAll(argsForZygote, extraArgs);
        }
        synchronized(mLock) {
            return zygoteSendArgsAndGetResult(openZygoteSocketIfNeeded(abi),
                                              useUsapPool,
                                              argsForZygote);
        }
    }
该过程主要工作是生成 argsForZygote 数组,该数组保存了进程的 uid、gid、groups、target-sdk、nice-name 等一系列参数,然后调用 zygoteSendArgsAndGetResult 方法,其中的第一个参数是调用 openZygoteSocketIfNeeded 方法得到 ZygoteState。
4.7 ZygoteProcess.zygoteSendArgsAndGetResult
private ZygoteState openZygoteSocketIfNeeded(String abi) throws ZygoteStartFailedEx {
        try {
            attemptConnectionToPrimaryZygote();
            if (primaryZygoteState.matches(abi)) {
                return primaryZygoteState;
            }
            if (mZygoteSecondarySocketAddress != null) {
                // The primary zygote didn't match. Try the secondary.
                attemptConnectionToSecondaryZygote();
                if (secondaryZygoteState.matches(abi)) {
                    return secondaryZygoteState;
                }
            }
        } catch (IOException ioe) {
            throw new ZygoteStartFailedEx("Error connecting to zygote", ioe);
        }
        throw new ZygoteStartFailedEx("Unsupported zygote ABI: " + abi);
    }
根据当前的 abi 来选择与 zygote 还是 zygote64 来进行通信
4.8 ZygoteInit.main
zygote 进程是由 init 进程创建的,zygote 进程启动之后,会调用 ZygoteInit.main() 方法,经过创建 socket 管道,预加载资源后,便执行 runSelectLoop() 方法,进入无限循环状态
public static void main(String argv[]) {
    ........
    Runnable caller;
    ........
    if (startSystemServer) {
        //Zygote Fork出的第一个进程 SystmeServer
        Runnable r = forkSystemServer(abiList, zygoteSocketName, zygoteServer);
        if (r != null) {
            r.run();
            return;
        }
    }
    ........
    //循环等待接收AMS在socket上发出的消息
    //最终通过调用processOneCommand()来进行进程的创建和初始化处理
    caller = zygoteServer.runSelectLoop(abiList);
    ........
    if (caller != null) {
    //fork 出子进程的话,会执行到这里,然后在子进程中
    //执行这个Runnable,其实就是通过反射调用ActivityThread的main函数
    //如果是zygote进程的话不会执行到这里,会一直在runSelectLoop里面循环阻塞
        caller.run();
    }
}
zygote 先 fork 出 SystemServer 进程,接着进入循环阻塞等待状态,接收 Socket 发来的消息,收到消息后会 fork 出其他应用进程,比如 Launcher。
4.9 ZygoteServer.runSelectLoop
frameworks\base\core\java\com\android\internal\os\ZygoteServer.java
 Runnable runSelectLoop(String abiList) {
        ArrayList<FileDescriptor> socketFDs = new ArrayList<FileDescriptor>();
        ArrayList<ZygoteConnection> peers = new ArrayList<ZygoteConnection>();
        // 首先将 server socket 加入到 socketFDs
        socketFDs.add(mZygoteSocket.getFileDescriptor());
        peers.add(null); //对应的 ZygoteConnection 为 null

        while (true) {//无限循环用来等待AMS请求zygote创建新的应用进程
            fetchUsapPoolPolicyPropsWithMinInterval();
            int[] usapPipeFDs = null;
            // 每次循环,都重新创建需要监听的 pollFds
            StructPollfd[] pollFDs = null;
            if (mUsapPoolEnabled) {
                usapPipeFDs = Zygote.getUsapPipeFDs();
           pollFDs = new StructPollfd[socketFDs.size() + 1 + usapPipeFDs.length];
            } else {
                pollFDs = new StructPollfd[socketFDs.size()];
            }
            int pollIndex = 0;
            for (FileDescriptor socketFD : socketFDs) {
                 //关注事件到来
                pollFDs[pollIndex] = new StructPollfd();
                pollFDs[pollIndex].fd = socketFD;
                pollFDs[pollIndex].events = (short) POLLIN;
                ++pollIndex;
            }
            final int usapPoolEventFDIndex = pollIndex;
            ........
            try {
                //阻塞状态,当 pollFdd 有事件到来则往下执行,否则阻塞在这里
                Os.poll(pollFDs, -1);
            } catch (ErrnoException ex) {
                throw new RuntimeException("poll failed", ex);
            }
            boolean usapPoolFDRead = false;
            // 倒序处理,即优先处理已建立链接的信息,后处理新建链接的请求
            while (--pollIndex >= 0) {
                if ((pollFDs[pollIndex].revents & POLLIN) == 0) {
                    continue;                }
                // server socket 最先加入 fds, 因此这里是 server socket 收到数据
                if (pollIndex == 0) {
                    // 收到新的建立通信请求,调用 server socket 端的 accpet 函数建立连接
                    // zygote 进程与 system server 进程建立了连接
                    ZygoteConnection newPeer = acceptCommandPeer(abiList);
                    // 加入到 peers 和 fds, 即下一次也开始监听
                    peers.add(newPeer);
                    socketFDs.add(newPeer.getFileDescriptor());
                } else if (pollIndex < usapPoolEventFDIndex) {
                    // 说明接收到 AMS 发送过来创建应用程序的请求,调用
                    // processOneCommand 来创建新的应用程序进程
                    try {
                        // 有 socket 连接,创建 ZygoteConnection 对象,并添加到 fds。
                        ZygoteConnection connection = peers.get(pollIndex);
                        // 处理连接(用于 fork 新的进程)
                        final Runnable command = connection.processOneCommand(this);
                        if (mIsForkChild) {
                            if (command == null) {
                                throw new IllegalStateException("command == null");
                            }
                            return command;// 子进程中,返回 Runnable,终止无限循环
                        } else {// 父进程中,fork 新的进程后,删除之前建立的连接,继续无限循环
                            // We're in the server - we should never have any
                            //commands to run.
                            if (command != null) {
                                throw new IllegalStateException("command != null");
                            }
                            if (connection.isClosedByPeer()) {
                                connection.closeSocket();
                                peers.remove(pollIndex); // 从 peers 中删除已经处理过的连接
                                //处理完则从 socketFDs 中移除该文件描述符
                                socketFDs.remove(pollIndex);
                            }
                        }
                    } catch (Exception e) {
                        ......
                    } finally {
                        mIsForkChild = false;
                    }
                } else {
                    //处理USAP pool的事件
                    ........
                }
            }
            // Check to see if the USAP pool needs to be refilled.
            ........
        }
}
第一次 while(true) 时,socketFDs 只有一个元素即 ServerSocket,因此会走到 if (pollIndex == 0) 分支,结束时 socketFDs 有 2 个元素:ServerSocket 和 newPeer 对应的 Socket。peers 也有 2 个元素:null 和 newPeer。
第二次 while(true) 时,socketFDs 有 2 个元素,当走到 if (pollIndex < usapPoolEventFDIndex) 分支时,此时 pollIndex=1,peers 取出的元素为 newPeer,然后就会执行到 connection.processOneCommand()。
4.10 ZygoteConnection.processOneCommand
Runnable processOneCommand(ZygoteServer zygoteServer) {
    int pid = -1;
    ........
    // Fork 子进程,得到一个新的 pid
    // fork 子进程,采用 copy on write 方式,这里执行一次,会返回两次
    /// pid=0 表示 zygote fork 子进程成功
    // pid > 0 表示子进程的真正的 PID
    pid = Zygote.forkAndSpecialize(parsedArgs.mUid, parsedArgs.mGid, parsedArgs.mGids,
            parsedArgs.mRuntimeFlags, rlimits, parsedArgs.mMountExternal, parsedArgs.mSeInfo,
            parsedArgs.mNiceName, fdsToClose, fdsToIgnore, parsedArgs.mStartChildZygote,
            parsedArgs.mInstructionSet, parsedArgs.mAppDataDir, parsedArgs.mTargetSdkVersion);
    ........
    if (pid == 0) {// in child, fork 成功,第一次返回的 pid = 0
        ........
        return handleChildProc(parsedArgs, descriptors, childPipeFd,
                parsedArgs.mStartChildZygote);
    } else {//in parent
        ........
        childPipeFd = null;
        handleParentProc(pid, descriptors, serverPipeFd);
        return null;
    }
}
通过 forkAndSpecialize() 来 fork 出子进程,并执行 handleChildProc,进入子进程的处理.
4.11 ZygoteConnection.handleChildProc
private Runnable handleChildProc(ZygoteArguments parsedArgs, FileDescriptor[] descriptors,
        FileDescriptor pipeFd, boolean isZygote) {
    ........
    if (parsedArgs.mInvokeWith != null) {
        ........
        throw new IllegalStateException("WrapperInit.execApplication unexpectedly returned");
    } else {
        if (!isZygote) {
            // 新创建的 App 进程将会调用到这里,执行目标类 (ActivityThread) 的 main()方法
            return ZygoteInit.zygoteInit(parsedArgs.mTargetSdkVersion,
                    parsedArgs.mRemainingArgs, null /* classLoader */);
        } else {
            return ZygoteInit.childZygoteInit(parsedArgs.mTargetSdkVersion,
                    parsedArgs.mRemainingArgs, null /* classLoader */);
        }
    }
}
进入子进程中的操作,调用 ZygoteInit.zygoteInit,最终获得需要执行的 ActivityThread 的 main()。
4.12 ZygoteInit.zygoteInit
public static final Runnable zygoteInit(int targetSdkVersion, String[] argv,
            ClassLoader classLoader) {
        ........
        Trace.traceBegin(Trace.TRACE_TAG_ACTIVITY_MANAGER, "ZygoteInit");
        RuntimeInit.redirectLogStreams();// 日志重定向
        RuntimeInit.commonInit();// 通用的初始化工作
        ZygoteInit.nativeZygoteInit();// zygote初始化,完成 Binder 驱动的初始化和 Binder 线程的创建
        //应用的初始化
        return RuntimeInit.applicationInit(targetSdkVersion, argv, classLoader);
}
zygoteInit 进行一些环境的初始化、启动 Binder 线程等操作
4.13 ZygoteInit.nativeZygoteInit
AndroidRuntime.cpp
static void com_android_internal_os_ZygoteInit_nativeZygoteInit(JNIEnv* env, jobject clazz)
{
    gCurRuntime->onZygoteInit();
}
这个 gCurRuntime 就是 AndroidRuntime,它的实现类就是在 app_main.cpp 文件中的 AppRuntime,接下来我们来看这个方法的实现
app_main.cpp
virtual void onZygoteInit()
    {
        sp<ProcessState> proc = ProcessState::self();
        ALOGV("App process: starting thread pool.\n");
        proc->startThreadPool();
    }
看到了吧?初始化了 ProcessState,我们之前学习 Binder 的时候,已经知道在这个过程中,完成了 Binder 的初始化,同时创建了 Binder 的线程池,使新创建的进程具备了 Binder 通信的条件,这个非常重要。
4.14 RuntimeInit.applicationInit
protected static Runnable applicationInit(int targetSdkVersion, String[] argv,
            ClassLoader classLoader) {
        // true 代表应用程序退出时不调用 AppRuntime.onExit(),否则会在退出前调用
        nativeSetExitWithoutCleanup(true);
        // 设置虚拟机的内存利用率参数值为 0.75
        VMRuntime.getRuntime().setTargetHeapUtilization(0.75f);
        VMRuntime.getRuntime().setTargetSdkVersion(targetSdkVersion);
        final Arguments args = new Arguments(argv);
        // The end of of the RuntimeInit event (see #zygoteInit).
        Trace.traceEnd(Trace.TRACE_TAG_ACTIVITY_MANAGER);
        // 调用 startClass 的 static 方法 main()
        return findStaticMain(args.startClass, args.startArgs, classLoader);
    }
此处 findStaticMain 的参数 args.startClass 为 “android.app.ActivityThread”。
4.15 RuntimeInit.findStaticMain
protected static Runnable findStaticMain(String className, String[] argv,
            ClassLoader classLoader) {
        Class<?> cl;
        try {
            cl = Class.forName(className, true, classLoader);
        } catch (ClassNotFoundException ex) {
            throw new RuntimeException(
                    "Missing class when invoking static main " + className,
                    ex);
        }
        Method m;
        try {
            m = cl.getMethod("main", new Class[] { String[].class });
        } catch (NoSuchMethodException ex) {
            throw new RuntimeException(
                    "Missing static main on " + className, ex);
        } catch (SecurityException ex) {
            throw new RuntimeException(
                    "Problem getting static main on " + className, ex);
        }
        int modifiers = m.getModifiers();
        if (! (Modifier.isStatic(modifiers) && Modifier.isPublic(modifiers))) {
            throw new RuntimeException(
                    "Main method is not public and static on " + className);
        }
        return new MethodAndArgsCaller(m, argv);
    }
该方法最终返回一个 MethodAndArgsCaller,这是一个 Runnable,在这个 Runnable 中会通过反射调用 ActivityThread 的 main() 方法。这个 Runnable 会一路返回到 ZygoteInit 类的 main() 方法中,最终会在子进程中通过 caller.run 来执行这个 Runnable,从而完成 ActivityThread main 方法的执行。
五 应用进程入口ActivityThread.main
5.1 ActivityThread.main
public static void main(String[] args) {
    // 安装选择性的系统调用拦截
    AndroidOs.install();
	........
	// 启动主线程消息 Looper 机制
    Looper.prepareMainLooper();
	........
	// 之前 SystemServer 调用 attach 传入的是 true,这里应用进程传入 false 就行
    ActivityThread thread = new ActivityThread();
    thread.attach(false, startSeq);
	........
	// 一直循环,如果退出,说明程序关闭
    Looper.loop();
    throw new RuntimeException("Main thread loop unexpectedly exited");
}
5.2 ActivityThread.attach
private void attach(boolean system, long startSeq) {
    sCurrentActivityThread = this;
    mSystemThread = system;
    if (!system) {// 应用进程非系统进程
		........
        RuntimeInit.setApplicationObject(mAppThread.asBinder());
        // 获取 AMS 的本地代理类
        final IActivityManager mgr = ActivityManager.getService();
        try {
            // 通过 Binder 调用 AMS 的 attachApplication 方法
            mgr.attachApplication(mAppThread, startSeq);
        } catch (RemoteException ex) {
            throw ex.rethrowFromSystemServer();
        }
        // Watch for getting close to heap limit. GC 监听
         BinderInternal.addGcWatcher(new Runnable() {
              @Override public void run() {
                  if (!mSomeActivitiesChanged) {// 是否有 Activity 生命周期发生变化
                      return;
                  }
                  Runtime runtime = Runtime.getRuntime();
                  long dalvikMax = runtime.maxMemory();
                  long dalvikUsed = runtime.totalMemory() - runtime.freeMemory();
                  // 当虚拟机使用的内存超出最大内存的 3/4 时, 释放一些 Activity
          if (dalvikUsed > ((3*dalvikMax)/4)) {
               if (DEBUG_MEMORY_TRIM) Slog.d(TAG, "Dalvik max=" + (dalvikMax/1024)
                            + " total=" + (runtime.totalMemory()/1024)
                            + " used=" + (dalvikUsed/1024));
                    mSomeActivitiesChanged = false;
                   try {
              ActivityTaskManager.getService().releaseSomeActivities(mAppThread);
                       } catch (RemoteException e) {
                          throw e.rethrowFromSystemServer();
                      }
                  }
              }
          });
    } else {
        // 通过 system_server 启动 ActivityThread 对象
        ........
    }
    // 为 ViewRootImpl 设置全局配置变化回调,
    // 当系统资源配置(如:系统字体)发生变化时,通知系统配置发生变化
    ViewRootImpl.ConfigChangedCallback configChangedCallback
            = (Configuration globalConfig) -> {
        synchronized (mResourcesManager) {
			........
        }
    };
    ViewRootImpl.addConfigCallback(configChangedCallback);
}
5.3 ActivityManagerService.attachApplication
public final void attachApplication(IApplicationThread thread, long startSeq) {
    synchronized (this) {
		// 通过 Binder 获取传入的 pid 信息
        int callingPid = Binder.getCallingPid();
        final int callingUid = Binder.getCallingUid();
        final long origId = Binder.clearCallingIdentity();
        attachApplicationLocked(thread, callingPid, callingUid, startSeq);
        Binder.restoreCallingIdentity(origId);
    }
}


private final boolean attachApplicationLocked(IApplicationThread thread,
        int pid, int callingUid, long startSeq) {
    ProcessRecord app;
    // 从 mPidsSelfLocked 列表根据 pid 查找进程
    if (pid != MY_PID && pid >= 0) {
        synchronized (mPidsSelfLocked) {
            app = mPidsSelfLocked.get(pid);
        }
        ........
    } else {
        app = null;
    }
    // 若上述查找 app 为空,则从 mPendingStarts 列表根据 startSeq 查找进程
    if (app == null && startSeq > 0) {
        final ProcessRecord pending = mProcessList.mPendingStarts.get(startSeq);
        if (pending != null && pending.startUid == callingUid && pending.startSeq == startSeq
                && mProcessList.handleProcessStartedLocked(pending, pid,
                pending.isUsingWrapper(), startSeq, true)) {
            app = pending;
        }
    }
	........
    // 如果当前的 Application 记录仍然依附到之前的进程中,则清理掉
    if (app.thread != null) {
        handleAppDiedLocked(app, true, true);
    }

    // mProcessesReady 这个变量在 AMS 的 systemReady 中被赋值为 true,
    //  所以这里的 normalMode 也为 true
    boolean normalMode = mProcessesReady || isAllowedWhileBooting(app.info);
	........
	if (app.isolatedEntryPoint != null) { // isolated进程
        // This is an isolated process which should just call an entry point instead of
        // being bound to an application.
        thread.runIsolatedEntryPoint(app.isolatedEntryPoint, app.isolatedEntryPointArgs);
    } else if (instr2 != null) {
	    // 绑定 App 进程
        thread.bindApplication(processName, appInfo, providers,
                instr2.mClass,
                profilerInfo, instr2.mArguments,
                instr2.mWatcher,
                instr2.mUiAutomationConnection, testMode,
                mBinderTransactionTrackingEnabled, enableTrackAllocation,
                isRestrictedBackupMode || !normalMode, app.isPersistent(),
                new Configuration(app.getWindowProcessController().getConfiguration()),
                app.compat, getCommonServicesLocked(app.isolated),
                mCoreSettingsObserver.getCoreSettingsLocked(),
                buildSerial, autofillOptions, contentCaptureOptions);
    } else {
        thread.bindApplication(processName, appInfo, providers, null, profilerInfo,
                null, null, null, testMode,
                mBinderTransactionTrackingEnabled, enableTrackAllocation,
                isRestrictedBackupMode || !normalMode, app.isPersistent(),
                new Configuration(app.getWindowProcessController().getConfiguration()),
                app.compat, getCommonServicesLocked(app.isolated),
                mCoreSettingsObserver.getCoreSettingsLocked(),
                buildSerial, autofillOptions, contentCaptureOptions);
    }
    ........
    // 绑定应用程序后, 设置 app active, 并更新 lru 进程信息
    app.makeActive(thread, mProcessStats);// 给 ProcessRecord 的 thread 赋值,表示绑定成功
    mProcessList.updateLruProcessLocked(app, false, null);
    app.lastRequestedGc = app.lastLowMemory = SystemClock.uptimeMillis();

    // Remove this record from the list of starting applications.
    mPersistentStartingProcesses.remove(app);
    mProcessesOnHold.remove(app);

    boolean didSomething = false;
    // 上面说到,这里为 true,进入 StackSupervisor 的 attachApplication 方法
    // 去真正启动 Activity
    if (normalMode) {
		//调用ATM的attachApplication()
        didSomething = mAtmInternal.attachApplication(app.getWindowProcessController());
		........
    }
    // Find any services that should be running in this process...
    // 启动进程中的服务. (启动服务过程本文暂不讲解)
    didSomething |= mServices.attachApplicationLocked(app, processName);
    // Check if a next-broadcast receiver is in this process...
    // 发送 pending 中的广播. (发送广播过程本文暂不讲解)
    if (isPendingBroadcastProcessLocked(pid)) {
        didSomething |= sendPendingBroadcastsLocked(app);
    }
    if (!didSomething) {
	    // 进程启动,更新 Adj
        updateOomAdjLocked(OomAdjuster.OOM_ADJ_REASON_PROCESS_BEGIN);
    }
	........
    return true;
}
清除一些无用的记录,最终调用 ActivityStackSupervisor.java 的 realStartActivityLocked(),进行 Activity 的启动。
5.3.1 ActivityThread.bindApplication
private class ApplicationThread extends IApplicationThread.Stub {
	public final void bindApplication(String processName, ApplicationInfo appInfo,
	        List<ProviderInfo> providers, ComponentName instrumentationName,
	        ProfilerInfo profilerInfo, Bundle instrumentationArgs,
	        IInstrumentationWatcher instrumentationWatcher,
	        IUiAutomationConnection instrumentationUiConnection, int debugMode,
	        boolean enableBinderTracking, boolean trackAllocation,
	        boolean isRestrictedBackupMode, boolean persistent, Configuration config,
	        CompatibilityInfo compatInfo, Map services, Bundle coreSettings,
	        String buildSerial, AutofillOptions autofillOptions,
	        ContentCaptureOptions contentCaptureOptions) {
	    ...
	    // 封装 App 进程绑定数据 AppBindData
	    AppBindData data = new AppBindData();
	    data.processName = processName;
	    data.appInfo = appInfo;
	    data.providers = providers;
	    data.instrumentationName = instrumentationName;
	    data.instrumentationArgs = instrumentationArgs;
	    data.instrumentationWatcher = instrumentationWatcher;
	    data.instrumentationUiAutomationConnection = instrumentationUiConnection;
	    data.debugMode = debugMode;
	    data.enableBinderTracking = enableBinderTracking;
	    data.trackAllocation = trackAllocation;
	    data.restrictedBackupMode = isRestrictedBackupMode;
	    data.persistent = persistent;
	    data.config = config;
	    data.compatInfo = compatInfo;
	    data.initProfilerInfo = profilerInfo;
	    data.buildSerial = buildSerial;
	    data.autofillOptions = autofillOptions;
	    data.contentCaptureOptions = contentCaptureOptions;
	    // 向 H 发送 BIND_APPLICATION 广播
	    sendMessage(H.BIND_APPLICATION, data);
	}
}
5.3.2 H.handleBindApplication
class H extends Handler {
    public static final int BIND_APPLICATION        = 110;

    public void handleMessage(Message msg) {
        switch (msg.what) {
            case BIND_APPLICATION: // 处理App进程绑定
                AppBindData data = (AppBindData)msg.obj;
                handleBindApplication(data);
                break;
        }
    }
}

private void handleBindApplication(AppBindData data) {
    // 从 AppBindData 中取出 InstrumentationInfo 信息
    final InstrumentationInfo ii;
    if (data.instrumentationName != null) {
        ii = new ApplicationPackageManager(null,
		        getPackageManager()).getInstrumentationInfo(data.instrumentationName, 0);
        mInstrumentationPackageName = ii.packageName;
        mInstrumentationAppDir = ii.sourceDir;
        mInstrumentationSplitAppDirs = ii.splitSourceDirs;
        mInstrumentationLibDir = getInstrumentationLibrary(data.appInfo, ii);
        mInstrumentedAppDir = data.info.getAppDir();
        mInstrumentedSplitAppDirs = data.info.getSplitAppDirs();
        mInstrumentedLibDir = data.info.getLibDir();
    }
    // 创建 Context
    final ContextImpl appContext = ContextImpl.createAppContext(this, data.info);
	// InstrumentationInfo 对象非空
    if (ii != null) { // 从 InstrumentationInfo 中取出各参数, 基于此创建和初始化 Instrumentation
        ApplicationInfo instrApp = getPackageManager()
		        .getApplicationInfo(ii.packageName, 0, UserHandle.myUserId());
        if (instrApp == null) {
            instrApp = new ApplicationInfo();
        }
        // 将 InstrumentationInfo 里的参数拷贝到 ApplicationInfo 对象
        ii.copyTo(instrApp);
        instrApp.initForUser(UserHandle.myUserId());
        final LoadedApk pi = getPackageInfo(instrApp, data.compatInfo,
		        appContext.getClassLoader(), false, true, false);
        final ContextImpl instrContext = ContextImpl.createAppContext(this,
		        pi, appContext.getOpPackageName());
        final ClassLoader cl = instrContext.getClassLoader();
        mInstrumentation = (Instrumentation) cl
		        .loadClass(data.instrumentationName.getClassName()).newInstance();
        final ComponentName component = new ComponentName(ii.packageName, ii.name);
        mInstrumentation.init(this, instrContext, appContext, component,
		        data.instrumentationWatcher, data.instrumentationUiAutomationConnection);
    } else { // 初始化Instrumentation
        mInstrumentation = new Instrumentation();
        mInstrumentation.basicInit(this);
    }
    // 创建 Application 对象
    Application app = data.info.makeApplication(data.restrictedBackupMode, null);
    mInitialApplication = app;
    // 调用 Application.onCreate() 方法
    mInstrumentation.onCreate(data.instrumentationArgs);
    mInstrumentation.callApplicationOnCreate(app);
    ........
}
5.3.3 LoadedApk.makeApplication
public Application makeApplication(boolean forceDefaultAppClass,
		Instrumentation instrumentation) {
    if (mApplication != null) {
        return mApplication;
    }
    String appClass = mApplicationInfo.className;
    // 设置默认 Application-   "android.app.Application"
    if (forceDefaultAppClass || appClass == null) {
        appClass = "android.app.Application";
    }
    java.lang.ClassLoader cl = getClassLoader();
    if (!mPackageName.equals("android")) {
        initializeJavaContextClassLoader();
    }
    // 创建 AppContext
    ContextImpl appContext = ContextImpl.createAppContext(mActivityThread, this);
    // newApplication
    Application app = mActivityThread.mInstrumentation
		    .newApplication(cl, appClass, appContext);
    // 将 Application 设置到 AppContext
    appContext.setOuterContext(app);
    // 将 Application 添加到应用程序列表
    mActivityThread.mAllApplications.add(app);
    mApplication = app;
    if (instrumentation != null) { // 此处 instrumentation=null
        instrumentation.callApplicationOnCreate(app);
    }
    // Rewrite the R 'constants' for all library apks.
    SparseArray<String> packageIdentifiers = getAssets().getAssignedPackageIdentifiers();
    final int N = packageIdentifiers.size();
    for (int i = 0; i < N; i++) {
        final int id = packageIdentifiers.keyAt(i);
        if (id == 0x01 || id == 0x7f) {
            continue;
        }
        rewriteRValues(getClassLoader(), packageIdentifiers.valueAt(i), id);
    }
    return app;
}
5.3.4 Instrumentation
frameworks/base/core/java/android/app/Instrumentation.java
public void onCreate(Bundle arguments) {
}

public void callApplicationOnCreate(Application app) {
    app.onCreate();
}
5.4 ActivityTaskManagerService.attachApplication
// 启动 Activity
public boolean attachApplication(WindowProcessController wpc) throws RemoteException {
    synchronized (mGlobalLockWithoutBoost) {
        return mRootActivityContainer.attachApplication(wpc);
    }
}
5.5 RootActivityContainer.attachApplication
boolean attachApplication(WindowProcessController app) throws RemoteException {
    final String processName = app.mName;
    boolean didSomething = false;
    for (int displayNdx = mActivityDisplays.size() - 1; displayNdx >= 0; --displayNdx) {
        final ActivityDisplay display = mActivityDisplays.get(displayNdx);
        final ActivityStack stack = display.getFocusedStack();
        if (stack != null) {
            stack.getAllRunningVisibleActivitiesLocked(mTmpActivityList);
            final ActivityRecord top = stack.topRunningActivityLocked();
            final int size = mTmpActivityList.size();
            for (int i = 0; i < size; i++) {
                final ActivityRecord activity = mTmpActivityList.get(i);
                if (activity.app == null && app.mUid == activity.info.applicationInfo.uid
		                && processName.equals(activity.processName)) {
		            // 启动Activity
                    if (mStackSupervisor.realStartActivityLocked(activity, app,
		                    top == activity /* andResume */, true /* checkConfig */)) {
                        didSomething = true;
                    }
                }
            }
        }
    }
    if (!didSomething) {
        ensureActivitiesVisible(null, 0, false /* preserve_windows */);
    }
    return didSomething;
}
因为篇幅的原因,接下来的 onCreate,onStart,onResume 函数阶段,我们放在下一篇文章 中分析。


 1965
1965

 被折叠的 条评论
为什么被折叠?
被折叠的 条评论
为什么被折叠?
 到【灌水乐园】发言


