


tensorflow2.0使用VGG16预训练模型实现猫狗数据集2分类
准备:
- tensorflow2.0.0或以上,最好是GPU版本
- python3.7或以上环境,推荐使用Anaconda发行版,本站有相关教程
- 数据集,这里放出网盘链接:猫狗数据集,提取码:ijtz
- VGG16预训练模型:VGG16,提取码:ouac,在下面代码中,直接调用keras内置的,需要从国外网站下载,速度慢, 这里给出网盘文件,下载后放到C盘**.用户/yourPCname/.keras **文件夹下
- 看到的小伙伴们有什么问题可以在下方评论,一起交流学习
直接上代码:
'''
2021-3-4, edit by wyf
python3.7, tensorflow2.0.0
'''
import tensorflow as tf
import matplotlib.pyplot as plt
import numpy as np
import glob
import os
import datetime
train_image_path = glob.glob('C:/Users/wyf1998/PycharmProjects/tf20/datasets/dc_2000/train/*/*.jpg')#猫狗数据集存放路径
test_image_path = glob.glob('C:/Users/wyf1998/PycharmProjects/tf20/datasets/dc_2000/test/*/*.jpg')

train_image_label = [int(p.split('\\')[1] == 'cat') for p in train_image_path]#从文件夹名称获取label名称,并编码,cat为1,dog为0
test_image_label = [int(p.split('\\')[1] == 'cat') for p in test_image_path]


def load_preprocess_image(path, label):
    '''
    :param path: 数据集输入路径
    :param label: 编码后的标签
    :return:
    '''
    image = tf.io.read_file(path)
    image = tf.image.decode_jpeg(image, channels=3)
    image = tf.image.resize(image, (256, 256))
    image = tf.cast(image, tf.float32)
    image = image/255
    return image, label


train_image_ds = tf.data.Dataset.from_tensor_slices((train_image_path, train_image_label))
test_image_ds = tf.data.Dataset.from_tensor_slices((test_image_path, test_image_label))
AUTOTUNE = tf.data.experimental.AUTOTUNE#自动并行,加快加载速度
train_count = len(train_image_path)
test_count = len(test_image_path)
BATCH_SIZE = 28
train_image_ds = train_image_ds.map(load_preprocess_image, num_parallel_calls=AUTOTUNE)
train_image_ds = train_image_ds.shuffle(train_count).batch(BATCH_SIZE)
test_image_ds = test_image_ds.map(load_preprocess_image, num_parallel_calls=AUTOTUNE)
test_image_ds = test_image_ds.batch(BATCH_SIZE)

conv_base = tf.keras.applications.VGG16(weights='imagenet', include_top=False)#加载VGG16预训练模型
'''
下面三行为VGG模型微调,经测试可提高正确率,如不需要微调,则可将conv_base.trainable设置为FALSE,后面三行注释
'''
conv_base.trainable = True
fine_tune_at = -3
for layer in conv_base.layers[:fine_tune_at]:
    layer.trainable = False
model = tf.keras.Sequential()
model.add(conv_base)
model.add(tf.keras.layers.GlobalAveragePooling2D())
model.add(tf.keras.layers.Dense(512, activation='relu'))
model.add(tf.keras.layers.Dense(1, activation='sigmoid'))
model.summary()
img_, label_ = next(iter(train_image_ds))
pred_ = model.predict(img_)#此tensorflow版本在训练前,必须要先使用model.predict方法,否则后面训练会报错,原因未知
print(pred_.shape)


loss_func = tf.keras.losses.BinaryCrossentropy(from_logits=False)
optimizer = tf.keras.optimizers.Adam()
train_loss = tf.keras.metrics.Mean('train_loss')
train_acc = tf.keras.metrics.BinaryAccuracy('train_acc')

test_loss = tf.keras.metrics.Mean('test_loss')
test_acc = tf.keras.metrics.BinaryAccuracy('test_acc')


def train_step(model, images, labels):
    with tf.GradientTape() as t:
        predict = model(images)
        loss_step = loss_func(labels, predict)
    grads = t.gradient(loss_step, model.trainable_variables)
    optimizer.apply_gradients(zip(grads, model.trainable_variables))
    train_loss(loss_step)
    train_acc(labels, predict)


def test_step(model, images, labels):
    pred = model(images)
    loss_step = loss_func(labels, pred)
    test_loss(loss_step)
    test_acc(labels, pred)


current_time = datetime.datetime.now().strftime("%Y-%m-%d--%H-%M-%S")#tensorboard可视化,需要在根目录创建logs文件夹(手动)
train_log_dir = 'logs/gradient_tape' + current_time + '/train'
test_log_dir = 'logs/gradient_tape' + current_time + '/test'
train_writer = tf.summary.create_file_writer(train_log_dir)
test_writer = tf.summary.create_file_writer(test_log_dir)


def train(epoch_nums):
    for epoch in range(1, epoch_nums):
        for (batch, (images, labels)) in enumerate(train_image_ds):
            train_step(model, images, labels)
            print('epoch{}/{}, train_loss={:.3f}, train_acc={:.3f}'.format(epoch,
                                                                           batch,
                                                                           train_loss.result(),
                                                                           train_acc.result()))
        with train_writer.as_default():
            tf.summary.scalar('train_loss', data=train_loss.result(), step=epoch)
            tf.summary.scalar('train_acc', data=train_acc.result(), step=epoch)

        for (batch, (images, labels)) in enumerate(test_image_ds):
            test_step(model, images, labels)
            print('\repoch{}-val------, test_loss={:.3f}, test_acc={:.3f}'.format(epoch,
                                                                                  test_loss.result(),
                                                                                  test_acc.result()))
        with test_writer.as_default():
            tf.summary.scalar('test_loss', data=test_loss.result(), step=epoch)
            tf.summary.scalar('test_acc', data=test_acc.result(), step=epoch)

        print('Epoch {}, loss= {}, acc= {}, test_loss= {}, test_acc= {}'.format(epoch,
                                                                                train_loss.result(),
                                                                                train_acc.result(),
                                                                                test_loss.result(),
                                                                                test_acc.result()))
        train_loss.reset_states()
        train_acc.reset_states()
        test_loss.reset_states()
        test_acc.reset_states()


if __name__ == '__main__':
    train(epoch_nums=20)
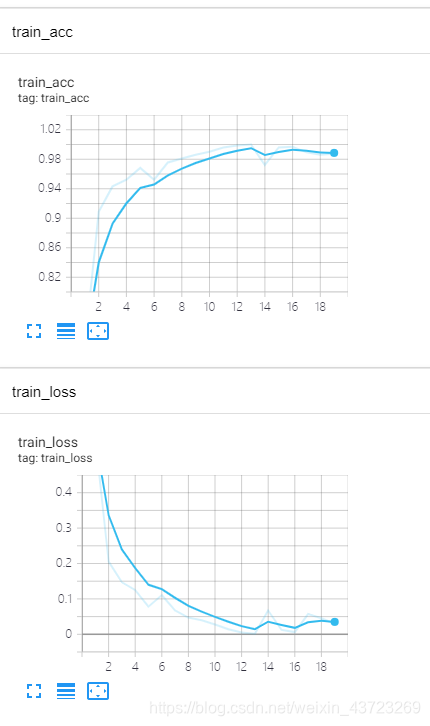
tensorboard使用方法:训练完成之后,进入对应文件的目录(logs文件夹的主目录),在终端输入:tensorboard --logdir=logs,按enter键会得到一个网站,复制到浏览器打开即可


 6万+
6万+


 被折叠的 条评论
为什么被折叠?
被折叠的 条评论
为什么被折叠?
 到【灌水乐园】发言


