#===================================【 Server 】======================================
#!/bin/bash
# install by Centos
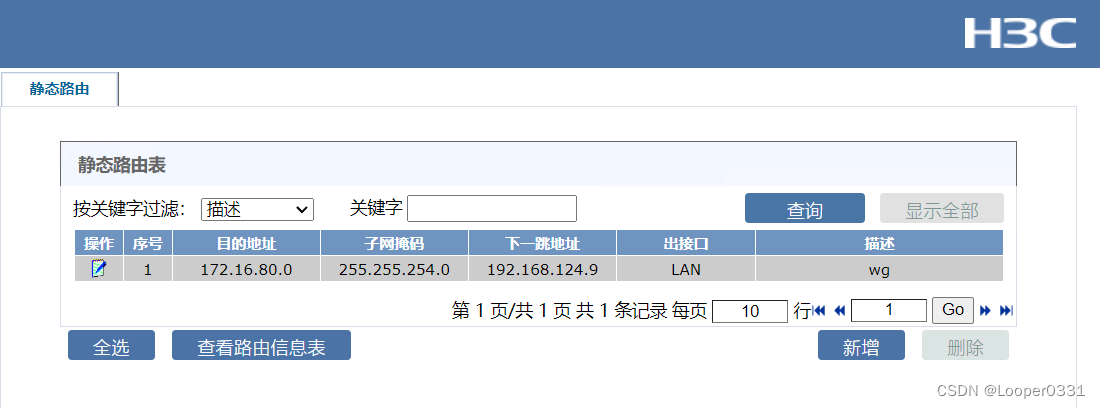
# 建议双方都在网关路由器中设置相应的静态路由,如果是家用路由器没有路由功能,可以参考以下方法给单机添加路由:
# Windows添加永久静态路由 : route add -p 192.168.124.0 mask 255.255.255.0 172.16.80.99 // route add -p 172.16.80.0 mask 255.255.254.0 192.168.124.9
# Linux添加静态路由 : echo "any net 192.168.124.0/24 gw 172.16.80.99" >> /etc/sysconfig/static-routes && service network restart // echo "any net 172.16.80.0/23 gw 192.168.124.9" >> /etc/sysconfig/static-routes && service network restart
export PATH=$PATH:/usr/sbin
yum install epel-release elrepo-release
yum install yum-plugin-elrepo
yum install kmod-wireguard wireguard-tools
systemctl stop firewalld.service
systemctl disable firewalld.service
#关闭防火墙
echo -e "net.ipv4.ip_forward = 1\nnet.ipv6.conf.all.disable_ipv6 = 1" >> /etc/sysctl.conf # 开启系统ipv4流量转发功能,并且禁用ipv6
sysctl -p # 刷新配置生效
cd /etc/wireguard/
wg genkey | tee privatekey-server | wg pubkey > publickey-server
wg genkey | tee privatekey-client1| wg pubkey > publickey-client1
read -p "=====请输入实际网卡名称(非虚拟网卡,例如:eth0、em1等)===== : " NIC
read -p "=====请输入需要连接对方的哪些网段,多个网段用逗号隔开(例如:10.0.5.0/24,192.168.3.0/24,192.168.4.0/24) ===== : " Client_Net
cat > wg0.conf << EOF
[Interface]
PrivateKey = $(cat server_privatekey) # 填写本机的privatekey 内容
Address = 10.0.8.1/24 # 本机虚拟局域网IP
PostUp = iptables -A FORWARD -i wg0 -j ACCEPT; iptables -A FORWARD -o wg0 -j ACCEPT; iptables -t nat -A POSTROUTING -o $NIC -j MASQUERADE # 添加 iptables 规则,允许本机的 NAT 转换
# PostDown = iptables -D FORWARD -i wg0 -j ACCEPT; iptables -D FORWARD -o wg0 -j ACCEPT; iptables -t nat -D POSTROUTING -o $NIC -j MASQUERADE # 删除 iptables 规则,禁止本机的 NAT 转换
ListenPort = 50814 # 注意该端口是UDP端口
DNS = 8.8.8.8
MTU = 1420
[Peer]
PublicKey = $(cat client_publickey) # 填写对端的publickey 内容
AllowedIPs = 10.0.8.2/24,$Client_Net # 需要访问客户端的哪些网段
EOF
cat > restart.sh << EOF
#!/bin/bash
wg-quick down wg0
wg-quick up wg0
EOF
chmod 600 wg0.conf
firewall-cmd --zone=public --add-port=50814/tcp --permanent && firewall-cmd --reload
bash restart.sh
#=====================================【 Client 】=================================
#!/bin/bash
export PATH=$PATH:/usr/sbin
yum install epel-release elrepo-release
yum install yum-plugin-elrepo
yum install kmod-wireguard wireguard-tools
systemctl stop firewalld.service
systemctl disable firewalld.service
#关闭防火墙
echo "net.ipv4.ip_forward = 1" >> /etc/sysctl.conf # 开启系统ipv4流量转发功能
sysctl -p # 刷新配置生效
read -p "=====请输入实际网卡名称(非虚拟网卡,例如:eth0、em1等)===== : " NIC
read -p "=====请输入需要连接对方的哪些网段,多个网段用逗号隔开(例如:10.0.5.0/24,192.168.3.0/24,192.168.4.0/24) ===== : " Server_Net
read -p "=====请输入服务端IP,将密钥文件拷贝至本机===== : " Server_Net
cd /etc/wireguard/
scp -r root@$Server_IP:/etc/wireguard/\{server_privatekey,client_publickey\} ./
cat > client1.conf << EOF
[Interface]
PrivateKey = $(cat client_privatekey) # 填写本机的privatekey 内容
Address = 10.0.8.2/24 # 本机虚拟局域网IP
PostUp = iptables -A FORWARD -i wg0 -j ACCEPT; iptables -A FORWARD -o wg0 -j ACCEPT; iptables -t nat -A POSTROUTING -o $NIC -j MASQUERADE # 添加 iptables 规则,允许本机的 NAT 转换
# PostDown = iptables -D FORWARD -i wg0 -j ACCEPT; iptables -D FORWARD -o wg0 -j ACCEPT; iptables -t nat -D POSTROUTING -o $NIC -j MASQUERADE # 删除 iptables 规则,禁止本机的 NAT 转换
DNS = 8.8.8.8
MTU = 1420
[Peer]
PublicKey = $(cat server_publickey) # 填写对端的publickey 内容
Endpoint = 211.136.128.6:50814 # 服务端公网ip/域名+端口号
AllowedIPs = 10.0.8.1/24,$Server_Net # 需要访问服务端的哪些网段
PersistentKeepalive = 25 # 定期发送数据包,保活
EOF
cat > restart.sh << EOF
#!/bin/bash
wg-quick down client1
wg-quick up client1
EOF
chmod 600 client1.conf
firewall-cmd --zone=public --add-port=50814/tcp --permanent && firewall-cmd --reload
bash restart.sh

【openvpn 对接 wireguard】:


 4817
4817


 被折叠的 条评论
为什么被折叠?
被折叠的 条评论
为什么被折叠?
 到【灌水乐园】发言


