


1.Spring Boot是什么?
介绍:Spring Boot是Spring团队在2014年推出的全新框架
目的:简化Spring项目的开发过程,可以让开发者使用少量的代码快速创建Spring应用程序
2.Spring Boot的特点,功能
1:可以独立创建Spring应用程序
2:内置了Tomcat,Jetty和Undertow等Web容器(不需要部署war包)
3:提供了Starter依赖来简化Spring配置
4:尽可能自动配置Spring和第三方框架
5:提供了生产级别的功能:监控,健康体检和外部化配置
6:没有代码的生成,不需要XML配置
三种创建Spring Boot程序的方式
1:Spring网站创建(了解)
2:Spring Initializr(了解)


 3:手动创建
JDK 8+
IDEA
3.修改Web容器端口号,content-path,多环境配置
1:在src/main/resources下创建application.properties/application.yml
//修改端口号
server.port=9090
//contextPath
server.servlet.context-path
2:多环境配置 新建application-dev.properties,application-test.properties
application-dev.properties
server.port=8000application-test.properties
server.port=9000application.properties
spring.profiles.active=dev4.Spring Boot更换Servlet容器(即把Tomcat替换成Jetty)
1:在spring-boot-starter-web依赖中排除Tomcat(spring-boot-starter-tomcat)
<!-- spring-boot-starter-web -->
<!-- 自动配置了Spring MVC -->
<dependency>
<groupId>org.springframework.boot</groupId>
<artifactId>spring-boot-starter-web</artifactId>
<exclusions>
<!--排除Tomcat-->
    <exclusion>
        <groupId>org.springframework.boot</groupId>
        <artifactId>spring-boot-starter-tomcat</artifactId>
    </exclusion>
</exclusions>
</dependency>
2:引入Jetty的自动配置Start(spring-boot-starter-jetty)
<dependency>
    <groupId>org.springframework.boot</groupId>
    <artifactId>spring-boot-starter-jetty</artifactId>
</dependency>
5.Spring整合Mybatis
1:MyBatis核心的API
SqlSessionFactory
创建这个对象需要:数据源,typeAliasesPackage,mapperLocations,plugins
2:整合Spring: mybatis-spring库
SqlSessionFactoryBean代替SqlSessionFactory
需要哪些jar?
mysql,druid,spring-jdbc,spring-tx,mybatis,mybatis-spring
需要配置哪些Bean?
数据源DruidDataSource
SqlSessionFactoryBean
MapperScannerConfigurer==>@MapperScan
3:整合Spring Boot
自动配置数据源:spring-boot-starter-jdbc
自动配置SqlSessionFactory: mybatis-spring-boot-starter(mabatis自己提供的Starter)
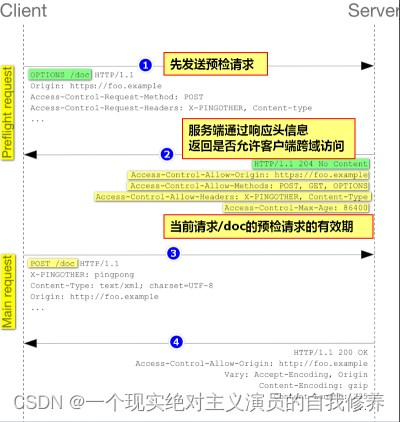
6.解决跨域
1:跨域是什么原因导致的?
浏览器的同源策略导致的
2:同源的定义
如果两个URL的协议(P),端口(P),和主机(L)都相同的话,则这两个URL是同源的
3:CROS跨域资源共享
4:编写过滤器
/**
* 跨域过滤器
*/
public class CrossDomainFilter implements Filter {
@Override
public void doFilter(ServletRequest request, ServletResponse response, FilterChain
chain)
throws IOException, ServletException {
HttpServletResponse resp = (HttpServletResponse) response;
/* 允许哪些源、允许哪些方法、允许哪些请求头 */
resp.setHeader("Access-Control-Allow-Origin", "*");
resp.setHeader("Access-Control-Allow-Methods", "OPTIONS, GET, POST, PUT,
DELETE");
resp.setHeader("Access-Control-Allow-Headers", "*");
// 返回结果可以被缓存的最长时间(如果为-1表示每次都要发送OPTIONS请求)
resp.setHeader("Access-Control-Max-Age", "3600");
// 是否允许另一个域携带Cookie, 如果设置为true, Access-Control-Allow-Origin值应该是具体的
域
// resp.setHeader("Access-Control-Allow-Credentials", "true");
// 允许另一个域拿到服务端自定义的响应头
// resp.setHeader("Access-Control-Expose-Headers", "uuid");
chain.doFilter(request, resp);
}
}
5:配置过滤器
@Configuration
public class CrossConfig {
/**
* 注册过滤器
*/
@Bean
public FilterRegistrationBean<CrossDomainFilter> crossDomainFilter() {
FilterRegistrationBean<CrossDomainFilter> registration
= new FilterRegistrationBean<>();
// 设置要配置的过滤器 <filter-class>
registration.setFilter(new CrossDomainFilter());
// 设置过滤器要拦截的地址
registration.addUrlPatterns("/*");
// 设置执行顺序 值越小, 执行越靠前
registration.setOrder(-100);
return registration;
}
7.REST风格的请求
1:使用URI表示资源
2:使用响应头的Content-Type和请求头的Accept表示资源的表现层(表现形式:html,json,xml,text,jpg)
3:使用Http请求方式表示动作
Get用来获取资源
Post用来新建资源
Put用来更新资源
Delete用来删除资源


 390
390


 被折叠的 条评论
为什么被折叠?
被折叠的 条评论
为什么被折叠?
 到【灌水乐园】发言


