


以下步骤为个人实验环境
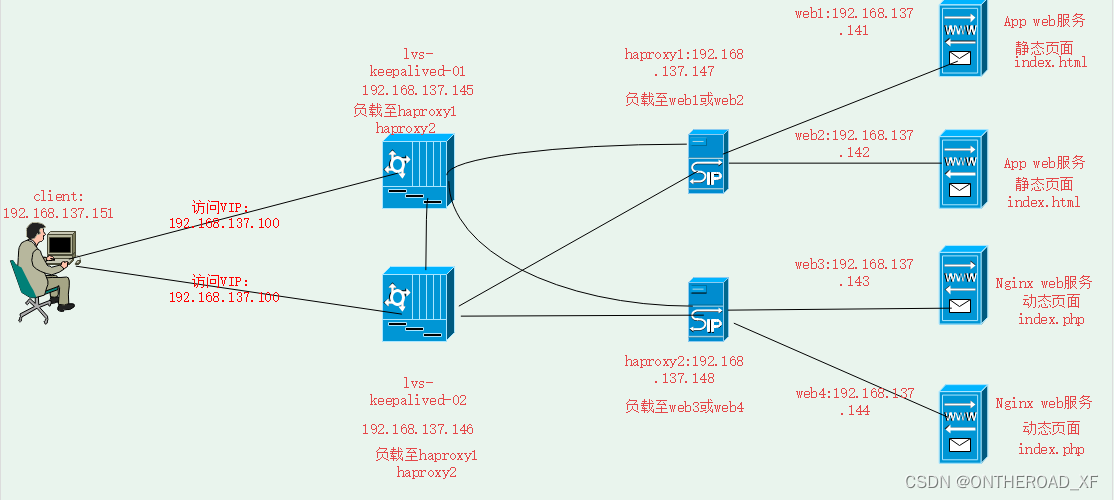
简单原理:客户端访问对外入口lvs+keepalived(四层),lvs将请求负载至后端两台haproxy(七层),haproxy再将请求负载至后端服务器。
如下拓扑图:
一、准备工作
1、9台虚拟机
| 主机 | IP | 作用 |
|---|---|---|
| 192.168.137.100 | 虚拟IP | |
| lvs-keepalived-01 | 192.168.137.145 | LVS将请求负载至haproxy中的一台 |
| lvs-keepalived-02 | 192.168.137.146 | LVS-KEEPALIVED的备份 |
| haproxy | 192.168.137.147 | haproxy-01 将请求负载至后端web |
| haproxy | 192.168.137.148 | haproxy-02 将请求负载至后端web |
| web1 | 192.168.137.141 | web1静态服务器 |
| web2 | 192.168.137.142 | web2静态服务器 |
| web3 | 192.168.137.143 | web3动态服务器 |
| web4 | 192.168.137.144 | web4动态服务器 |
| client | 192.168.137.151 | 客户端虚拟机用于测试 |
配置域名/etc/hosts
二、安装软件及配置
1、在两台lvs-keepalived上安装 ipvsadm和keepalived
yum install -y ipvsadm keepalived
2、在两台haproxy虚拟机上安装haproxy
yum install -y haproxy
3、web3、web4安装Nginx PHP
yum install -y epel-release
yum install -y nginx php-fpm
4、配置网页
web1、web2在/var/www/html/下各自创建index.html,测试内容自定。
web3、web4在/usr/share/nginx/html/下各自创建index.php,添加如下内容
<?
phpinfo()
php?>
配置nginx,添加php模块
# For more information on configuration, see:
#   * Official English Documentation: http://nginx.org/en/docs/
#   * Official Russian Documentation: http://nginx.org/ru/docs/

user nginx;
worker_processes auto;
error_log /var/log/nginx/error.log;
pid /run/nginx.pid;

# Load dynamic modules. See /usr/share/doc/nginx/README.dynamic.
include /usr/share/nginx/modules/*.conf;

events {
    worker_connections 1024;
}

http {
    log_format  main  '$remote_addr - $remote_user [$time_local] "$request" '
                      '$status $body_bytes_sent "$http_referer" '
                      '"$http_user_agent" "$http_x_forwarded_for"';

    access_log  /var/log/nginx/access.log  main;

    sendfile            on;
    tcp_nopush          on;
    tcp_nodelay         on;
    keepalive_timeout   65;
    types_hash_max_size 4096;

    include             /etc/nginx/mime.types;
    default_type        application/octet-stream;

    # Load modular configuration files from the /etc/nginx/conf.d directory.
    # See http://nginx.org/en/docs/ngx_core_module.html#include
    # for more information.
    include /etc/nginx/conf.d/*.conf;

    server {
        listen       80;
        listen       [::]:80;
        server_name  _;
        root         /usr/share/nginx/html;

        # Load configuration files for the default server block.
        include /etc/nginx/default.d/*.conf;

	location / {
		index index.php index.html;
	}

        error_page 404 /404.html;
        location = /404.html {
        }

        error_page 500 502 503 504 /50x.html;
        location = /50x.html {
        }

	location ~ \.php$ {
                root /usr/share/nginx/html;
                fastcgi_pass 127.0.0.1:9000;
                fastcgi_index index.php;
                fastcgi_param SCRIPT_FILENAME $document_root$fastcgi_script_name;
                include fastcgi_params;
        }
    }

# Settings for a TLS enabled server.
#
#    server {
#        listen       443 ssl http2;
#        listen       [::]:443 ssl http2;
#        server_name  _;
#        root         /usr/share/nginx/html;
#
#        ssl_certificate "/etc/pki/nginx/server.crt";
#        ssl_certificate_key "/etc/pki/nginx/private/server.key";
#        ssl_session_cache shared:SSL:1m;
#        ssl_session_timeout  10m;
#        ssl_ciphers HIGH:!aNULL:!MD5;
#        ssl_prefer_server_ciphers on;
#
#        # Load configuration files for the default server block.
#        include /etc/nginx/default.d/*.conf;
#
#        error_page 404 /404.html;
#            location = /40x.html {
#        }
#
#        error_page 500 502 503 504 /50x.html;
#            location = /50x.html {
#        }
#    }

}
5、配置keepalived
vim /etc/keepalived/keepalived.conf
# Global Configuration
global_defs {
lvs_id director1  # 指定lvs的id
}
# VRRP Configuration
vrrp_instance LVS {
state MASTER    # 指定当前节点为master节点
interface ens33    # 这里是网卡的名称,通过ifconfig或者ip addr可以查看
virtual_router_id 51    # 这里指定的是虚拟路由id,master节点和backup节点需要指定一样的
priority 150    # 指定了当前节点的优先级,数值越大优先级越高,master节点要高于backup节点
advert_int 1    # 指定发送VRRP通告的间隔,单位是秒
authentication {
auth_type PASS    # 鉴权,默认通过
auth_pass 1111    # 鉴权访问密码
}

virtual_ipaddress {
192.168.137.100    # 指定了虚拟ip
}

}

# Virtual Server Configuration - for www server
# 后台真实主机的配置
virtual_server 192.168.137.100 80 {
delay_loop 1    # 健康检查的时间间隔
lb_algo rr    # 负载均衡策略,这里是轮询
lb_kind DR    # 调度器类型,这里是DR
persistence_time 1    # 指定了持续将请求打到同一台真实主机的时间长度
protocol TCP    # 指定了访问后台真实主机的协议类型

  # Real Server 1 configuration
  # 指定了真实主机1的ip和端口 , 也就是haproxy-01的IP和端口
real_server 192.168.137.145 80 {
weight 1    # 指定了当前主机的权重
TCP_CHECK {
connection_timeout 10    # 指定了进行心跳检查的超时时间
}
}

  # Real Server 2 Configuration
  # 指定了真实主机2的ip和端口 , 也就是haproxy-02的IP和端口
real_server 192.168.137.146 80 {
weight 1    # 指定了当前主机的权重
TCP_CHECK {
connection_timeout 10    # 指定了进行心跳检查的超时时间
}
}
}
在lvs-keepalived-02也就是backup 机器上面配置keepalived:
只和master 有以下三处不同:
lvs_id director1 改成 lvs_id director2
state MASTER 改成 state BACKUP
priority 150 改成 priority 100
6、配置haproxy
两台虚拟机配置相同,将访问本机80端口的请求负载至后端web服务器,实现动静分离。
vim /etc/haproxy/haproxy.cfg
global
log 127.0.0.1 local3 info
maxconn 4096
user nobody
group nobody
daemon
nbproc 1
pidfile /run/haproxy.pid

defaults
log global
mode http
maxconn 2048
retries 3
option redispatch
timeout connect 5000
timeout client 50000
timeout server 50000
option abortonclose

stats uri /admin?stats
stats realm Private lands
stats auth admin:password
stats hide-version

frontend http-in
	bind 0.0.0.0:80
	mode http
	log global
	option httplog
	option httpclose
#定义请求html的规则
acl html url_reg -i \.html$
#定义请求php的规则
acl php url_reg -i \.php$
#当请求的资源为html时走htnl-server
use_backend html-server if html
#当请求的资源为php时走htnl-php
use_backend php-server if php
#默认使用
default_backend html-server

#静态服务器
backend html-server
	mode http
	balance roundrobin
	option httpchk GET /index.html
	cookie SERVERID insert indirect nocache
	server html-A web1:80 weight 1 cookie 3 check inter 2000 rise 2 fall 5
	server html-B web2:80 weight 1 cookie 3 check inter 2000 rise 2 fall 5

#动态服务器
backend php-server
	mode http
        balance roundrobin
        option httpchk GET /index.php
        cookie SERVERID insert indirect nocache
        server html-A web3:80 weight 1 cookie 3 check inter 2000 rise 2 fall 5
        server html-B web4:80 weight 1 cookie 3 check inter 2000 rise 2 fall 5
在两台haproxy虚拟机本地回环接口上配置虚拟IP,使用脚本配置
cd /etc/init.d/
vim lvsrs
SNS_VIP=192.168.137.100
/etc/rc.d/init.d/functions
case "$1" in
start)
	ifconfig lo:0 $SNS_VIP netmask 255.255.255.255 broadcast $SNS_VIP
	/sbin/route add -host $SNS_VIP dev lo:0
	echo "1" >/proc/sys/net/ipv4/conf/lo/arp_ignore
	echo "2" >/proc/sys/net/ipv4/conf/lo/arp_announce
	echo "1" >/proc/sys/net/ipv4/conf/all/arp_ignore
        echo "2" >/proc/sys/net/ipv4/conf/all/arp_announce
	sysctl -p >/dev/null 2>&1
	echo "RealServer Start OK"
	;;
stop)
	ifconfig lo:0 down
	route del $SNS_VIP >/dev/null 2>&1
	echo "0" >/proc/sys/net/ipv4/conf/lo/arp_ignore
        echo "0" >/proc/sys/net/ipv4/conf/lo/arp_announce
        echo "0" >/proc/sys/net/ipv4/conf/all/arp_ignore
        echo "0" >/proc/sys/net/ipv4/conf/all/arp_announce
	echo "RealServer Stoped"
	;;
*)
	echo "Usage: $0 {start|stop}"
	exit 1
esac
exit 0
更改脚本权限并执行
chmod 755 lvsrs
./lvsrs start
通过ip a,和route查看是否添加虚拟ip和路由成功
7、cient安装elinks
yum install -y elinks
8、测试
检查防火墙和selinux并关闭,启动keepalived、nginx、haproxy
使用elinks访问vip
elinks --dump http://192.168.137.100/
elinks --dump http://192.168.137.100/index.php
通过验证,我们的集群搭建完成,后续可以结合ansible,zabbix、elk等技术。
参考:https://blog.csdn.net/qq_28187347/article/details/106748056


 329
329


 被折叠的 条评论
为什么被折叠?
被折叠的 条评论
为什么被折叠?
 到【灌水乐园】发言


