


3.1.搭建编码环境:
- IDEA工具:2022.1.4
- JDK:Java17(Spring6要求JDK最低版本是Java17)
- Maven:3.8.6
- Spring:6.0.0-M2
- JUnit:4.13.2
3.2.下载Spring源码分析:
a.Spring6的官网:
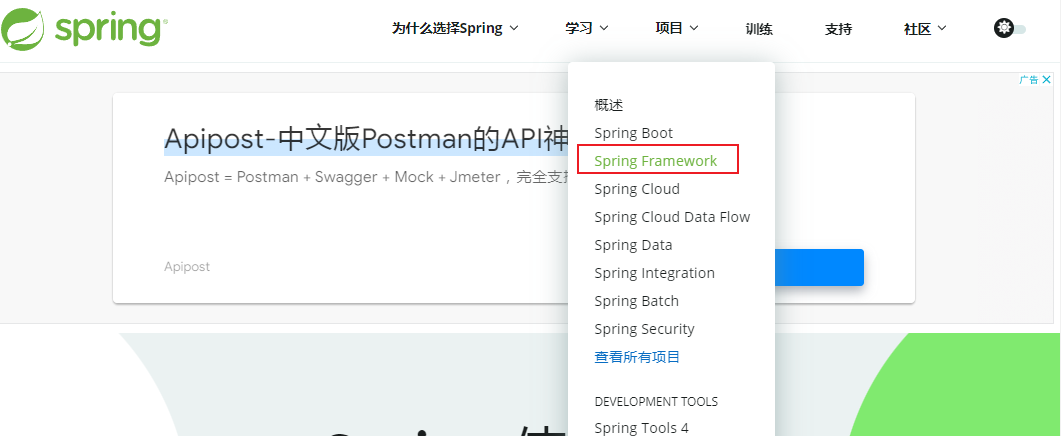
b.Spring6的下载:
-
1.进入github
-
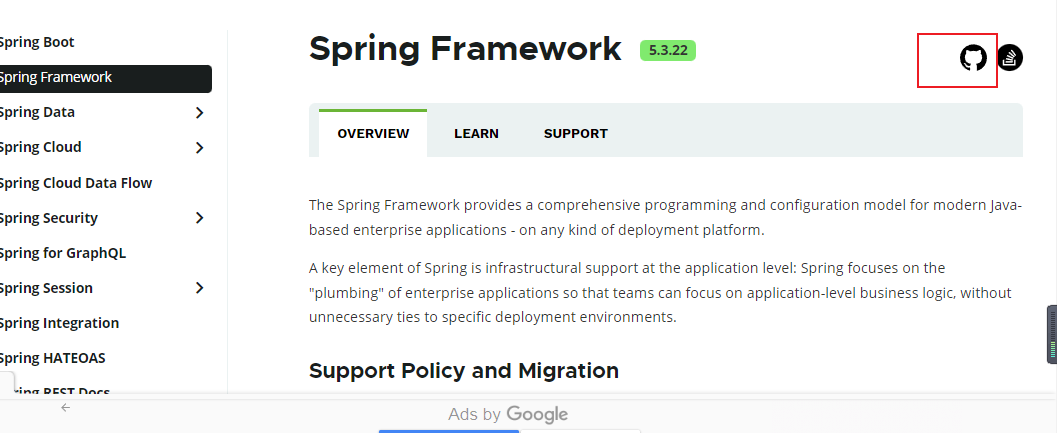
2.找到下图位置,点击超链接:
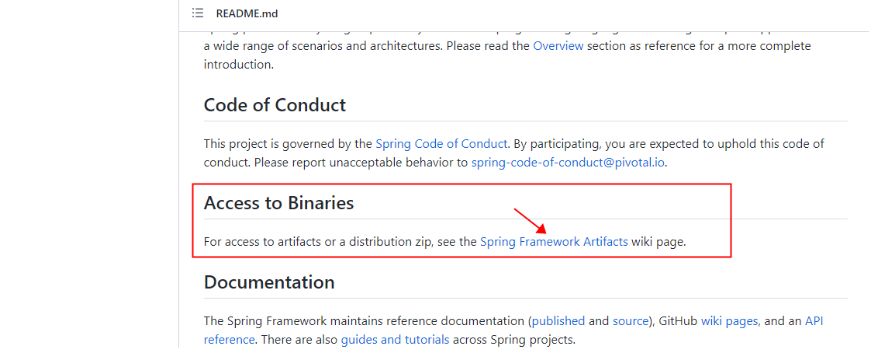
- 3.找到下图位置,点击超链接:
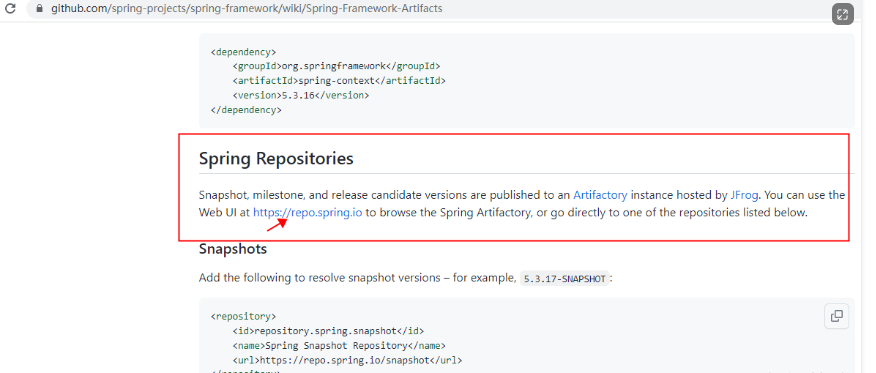
- 4.按照下图步骤操作
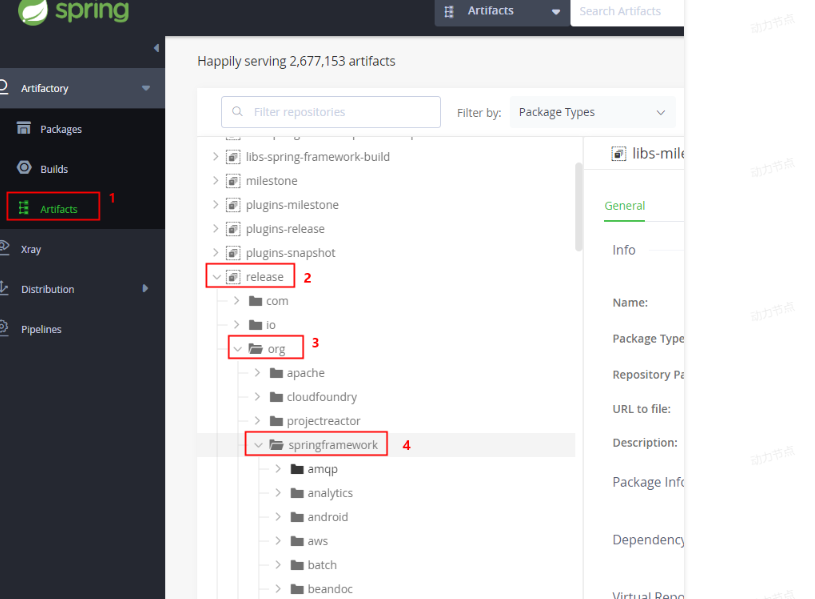
- 5.继续在springframework目录下找下图的spring,点开之后你会看到很多不同的版本
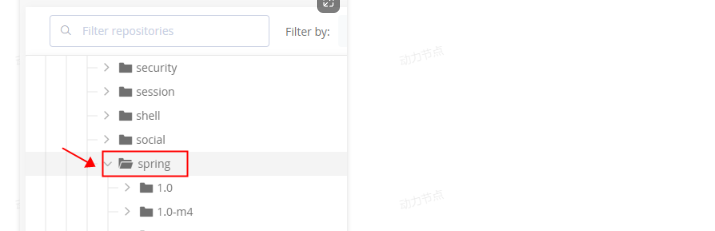
- 6.选择对应的版本:

- 7.点击上图的ur:

- 8.点击spring-5.3.9-dist.zip下载spring框架。将下载的zip包解压:

docs:spring框架的API帮助文档libs:spring框架的jar文件(用spring框架就是用这些jar包)schema:spring框架的XML配置文件相关的约束文件,如xml文件中有什么标签,标签中有什么属性,都在这个文件夹下限制说明了
c.Spring的jar文件:
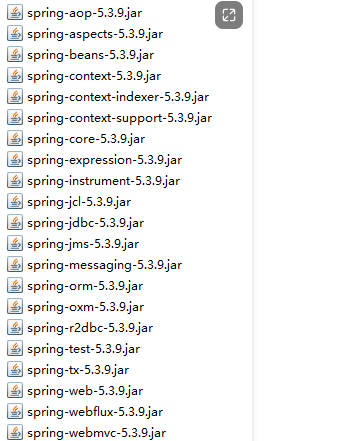
- 1.下载后打开libs目录会发现有很多jar包,
每3个是一组:spring-core-5.3.9.jar:字节码(这个是支撑程序运行的jar包)spring-core-5.3.9-javadoc.jar:代码中的注释spring-core-5.3.9-sources.jar:源码

- 2.spring框架中的jar包介绍:
| JAR文件 | 描述 |
|---|---|
| spring-aop-5.3.9.jar | 这个jar 文件包含在应用中使用Spring 的AOP 特性时所需的类 |
| spring-aspects-5.3.9.jar | 提供对AspectJ的支持,以便可以方便的将面向切面的功能集成进IDE中 |
| spring-beans-5.3.9.jar | 这个jar 文件是所有应用都要用到的,它包含访问配置文件、创建和管理bean 以及进行Inversion ofControl / Dependency Injection(IoC/DI)操作相关的所有类。如果应用只需基本的IoC/DI 支持,引入spring-core.jar 及spring-beans.jar 文件就可以了。 |
| spring-context-5.3.9.jar | 虽然类路径扫描非常快,但是Spring内部存在大量的类,添加此依赖,可以通过在编译时创建候选对象的静态列表来提高大型应用程序的启动性能。 |
| spring-context-indexer-5.3.9.jar | 虽然类路径扫描非常快,但是Spring内部存在大量的类,添加此依赖,可以通过在编译时创建候选对象的静态列表来提高大型应用程序的启动性能。 |
| spring-context-support-5.3.9.jar | 用来提供Spring上下文的一些扩展模块,例如实现邮件服务、视图解析、缓存、定时任务调度等 |
| spring-core-5.3.9.jar | Spring 框架基本的核心工具类。Spring 其它组件要都要使用到这个包里的类,是其它组件的基本核心,当然你也可以在自己的应用系统中使用这些工具类。 |
| spring-expression-5.3.9.jar | Spring表达式语言。 |
| spring-instrument-5.3.9.jar | Spring3.0对服务器的代理接口。 |
| spring-jcl-5.3.9.jar | Spring的日志模块。JCL,全称为"Jakarta Commons Logging",也可称为"Apache Commons Logging"。 |
| spring-jdbc-5.3.9.jar | Spring对JDBC的支持。 |
| spring-jms-5.3.9.jar | 这个jar包提供了对JMS 1.0.2/1.1的支持类。JMS是Java消息服务。属于JavaEE规范之一。 |
| spring-messaging-5.3.9.jar | 为集成messaging api和消息协议提供支持 |
| spring-orm-5.3.9.jar | Spring集成ORM框架的支持,比如集成hibernate,mybatis等。 |
| spring-oxm-5.3.9.jar | 为主流O/X Mapping组件提供了统一层抽象和封装,OXM是Object Xml Mapping。对象和XML之间的相互转换。 |
| spring-r2dbc-5.3.9.jar | Reactive Relational Database Connectivity (关系型数据库的响应式连接) 的缩写。这个jar文件是Spring对r2dbc的支持。 |
| spring-test-5.3.9.jar | 对Junit等测试框架的简单封装。 |
| spring-tx-5.3.9.jar | 为JDBC、Hibernate、JDO、JPA、Beans等提供的一致的声明式和编程式事务管理支持。 |
| spring-web-5.3.9.jar | Spring集成MVC框架的支持,比如集成Struts等。 |
| spring-webflux-5.3.9.jar | WebFlux是 Spring5 添加的新模块,用于 web 的开发,功能和 SpringMVC 类似的,Webflux 使用当前一种比较流程响应式编程出现的框架。 |
| spring-webmvc-5.3.9.jar | SpringMVC框架的类库 |
| spring-websocket-5.3.9.jar | Spring集成WebSocket框架时使用 |
d.pom文件引入依赖说明:
- 1.
注意:如果只是想用Spring的IoC功能,仅需要引入:spring-context即可。将这个jar包添加到classpath当中 - 2.
如果采用maven只需要引入context的依赖即可
<!--Spring6的正式版发布之前,这个仓库地址是需要的-->
<repositories>
  <repository>
    <id>repository.spring.milestone</id>
    <name>Spring Milestone Repository</name>
    <url>https://repo.spring.io/milestone</url>
  </repository>
</repositories>

<dependencies>
  <!--spring context依赖:使用的是6.0.0-M2里程碑版-->
  <dependency>
    <groupId>org.springframework</groupId>
    <artifactId>spring-context</artifactId>
    <version>6.0.0-M2</version>
  </dependency>
</dependencies>
3.3.Spring的入门程序:
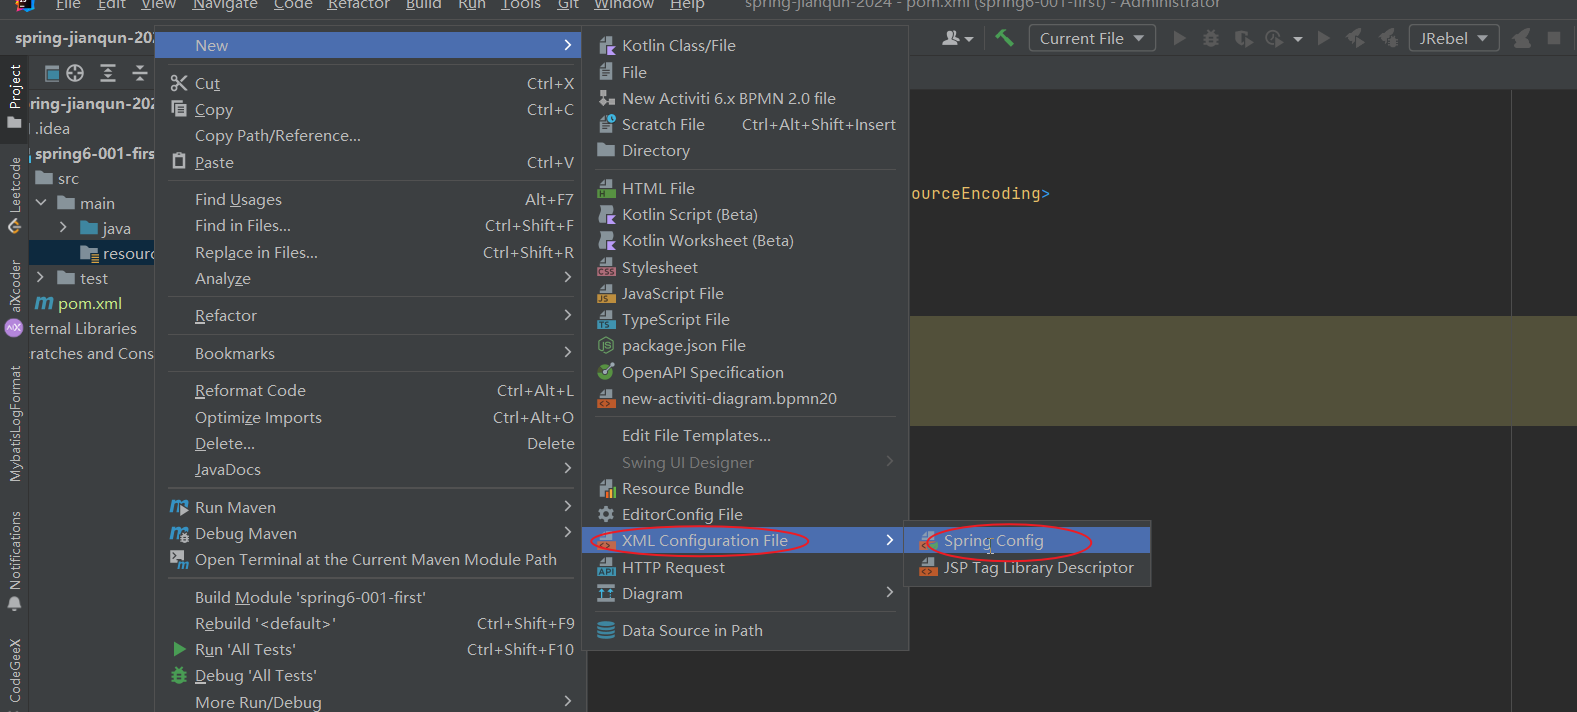
a.项目准备:
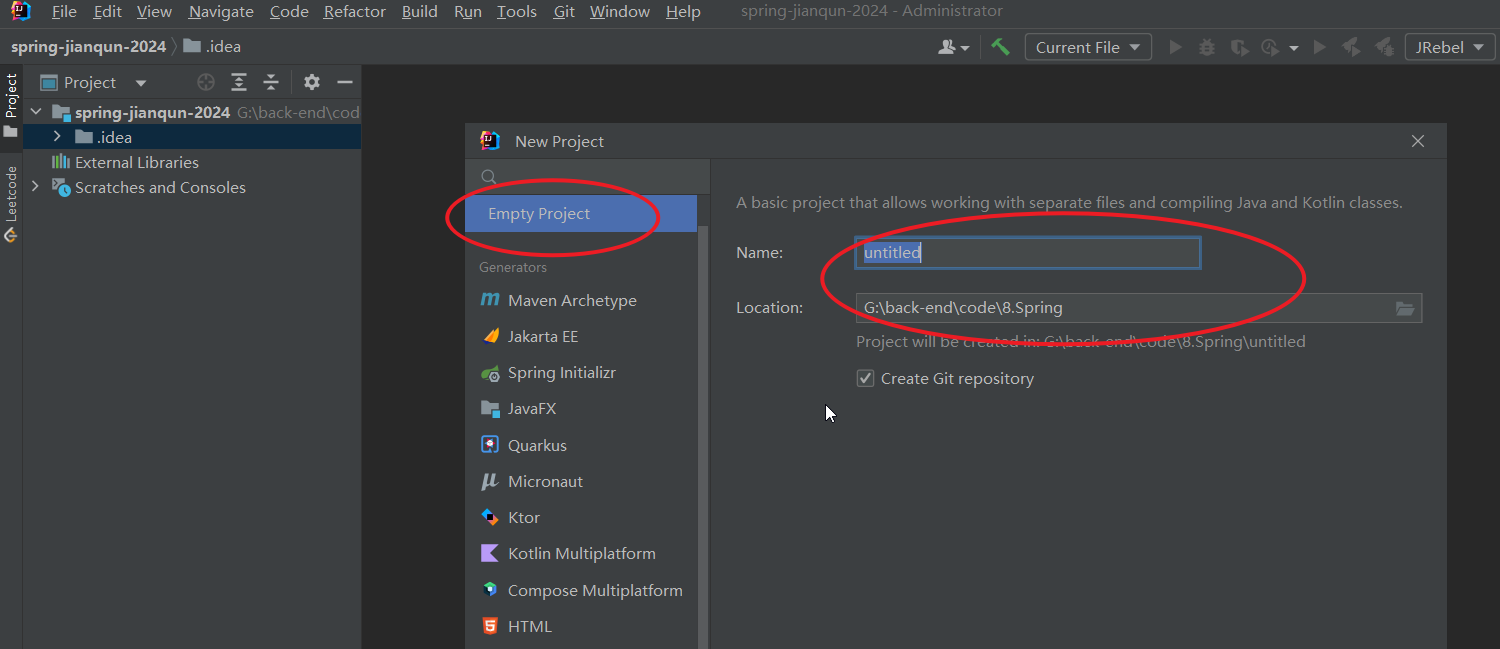
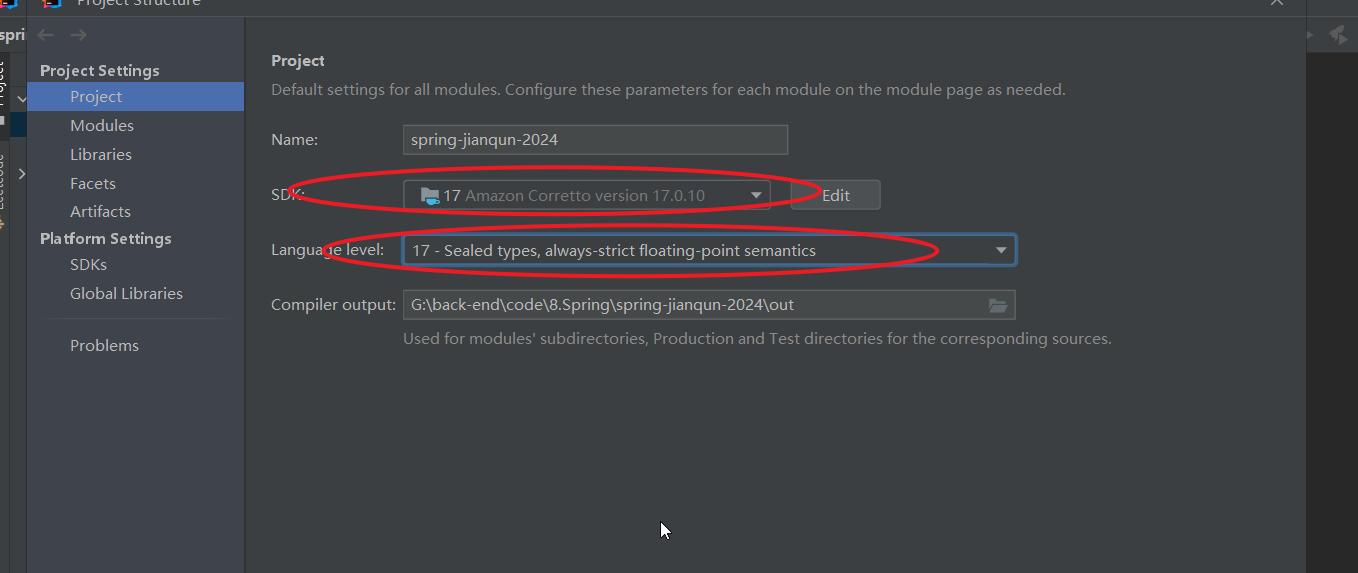
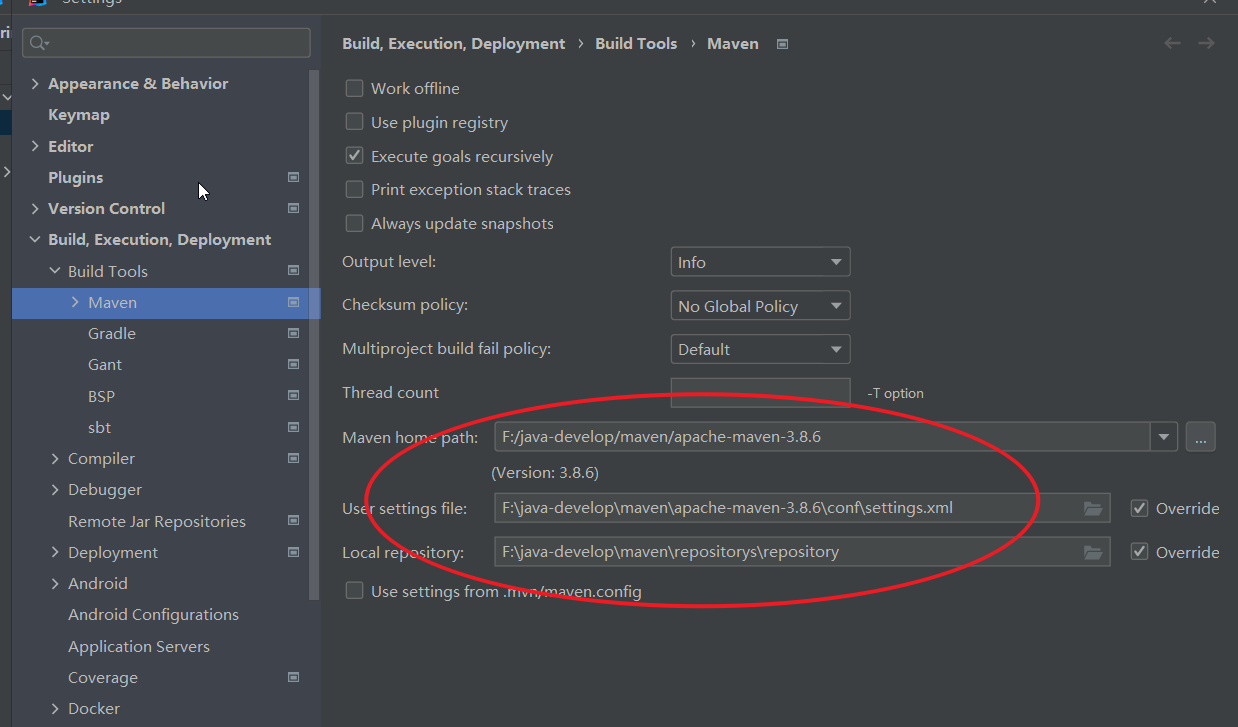
-
1.打开IDEA创建Empty Project:spring6
-
2.设置JDK版本17,编译器版本17
-
3.设置IDEA的Maven:关联自己的maven:
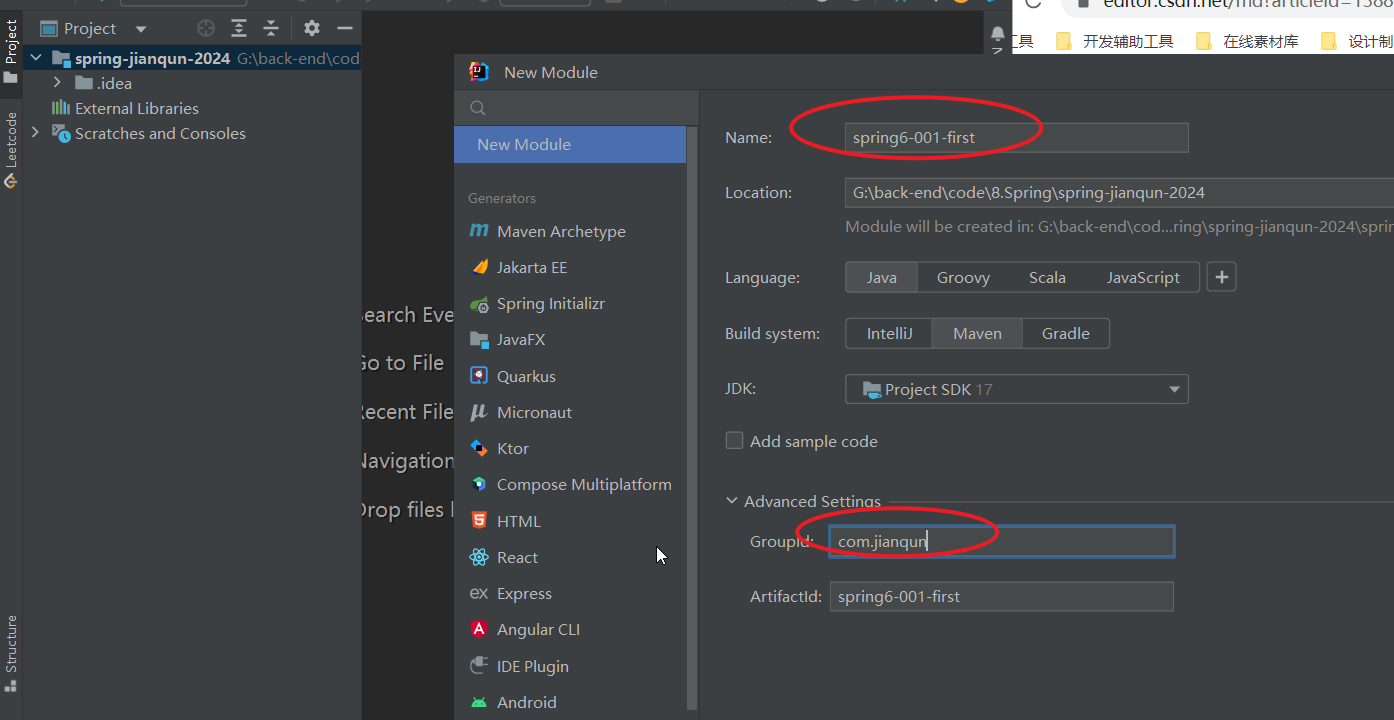
b.创建第一个模块:
- 1.在空的工程spring6中创建第一个模块:
spring6-001-first:
c.引入依赖:
- 1.依赖如下:
<?xml version="1.0" encoding="UTF-8"?>
<project xmlns="http://maven.apache.org/POM/4.0.0"
         xmlns:xsi="http://www.w3.org/2001/XMLSchema-instance"
         xsi:schemaLocation="http://maven.apache.org/POM/4.0.0 http://maven.apache.org/xsd/maven-4.0.0.xsd">
    <modelVersion>4.0.0</modelVersion>

    <groupId>com.powernode</groupId>
    <artifactId>spring6-001-first</artifactId>
    <version>1.0-SNAPSHOT</version>
    <packaging>jar</packaging>

    <repositories>
        <repository>
            <id>repository.spring.milestone</id>
            <name>Spring Milestone Repository</name>
            <url>https://repo.spring.io/milestone</url>
        </repository>
    </repositories>

    <dependencies>
        <!--spring context依赖-->
        <dependency>
            <groupId>org.springframework</groupId>
            <artifactId>spring-context</artifactId>
            <version>6.0.0-M2</version>
        </dependency>
    </dependencies>

    <properties>
        <maven.compiler.source>17</maven.compiler.source>
        <maven.compiler.target>17</maven.compiler.target>
    </properties>

</project>
- 2.注意:打包方式jar。
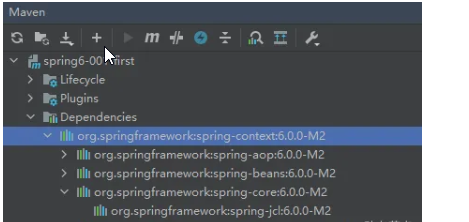
- 3.当加入spring context的依赖之后,会关联引入其他依赖
spring aop:面向切面编程spring beans:IoC核心spring core:spring的核心工具包spring jcl:spring的日志包spring expression:spring表达式
- 4.在pom.xml文件中添加junit依赖:
<!--junit-->
    <dependency>
            <groupId>junit</groupId>
            <artifactId>junit</artifactId>
            <version>4.13.2</version>
            <scope>test</scope>
        </dependency>
d.定义bean User:
package com.powernode.spring6.bean;

/**
 * bean,封装用户信息。
 * @author
 * @version 1.0
 * @since 1.0
 */
public class User {
}
e.编写spring的配置文件:
- 1.配置文件:bean001.xml,该文件放在类的根路径下,文件名随意
- 2.配置文件中进行
bean的配置,这样Spring就帮我们管理这个对象了:
<?xml version="1.0" encoding="UTF-8"?>
<beans xmlns="http://www.springframework.org/schema/beans"
       xmlns:xsi="http://www.w3.org/2001/XMLSchema-instance"
       xsi:schemaLocation="http://www.springframework.org/schema/beans http://www.springframework.org/schema/beans/spring-beans.xsd">

    <bean id="userBean" class="com.jianqun.bean.User"/>

</beans>
- 3.
bean的id和class属性:id属性:代表对象的唯一标识。可以看做一个人的身份证号。class属性:用来指定要创建的java对象的类名,这个类名必须是全限定类名(带包名)。
f.编写测试程序:
- 1.创建测试类:
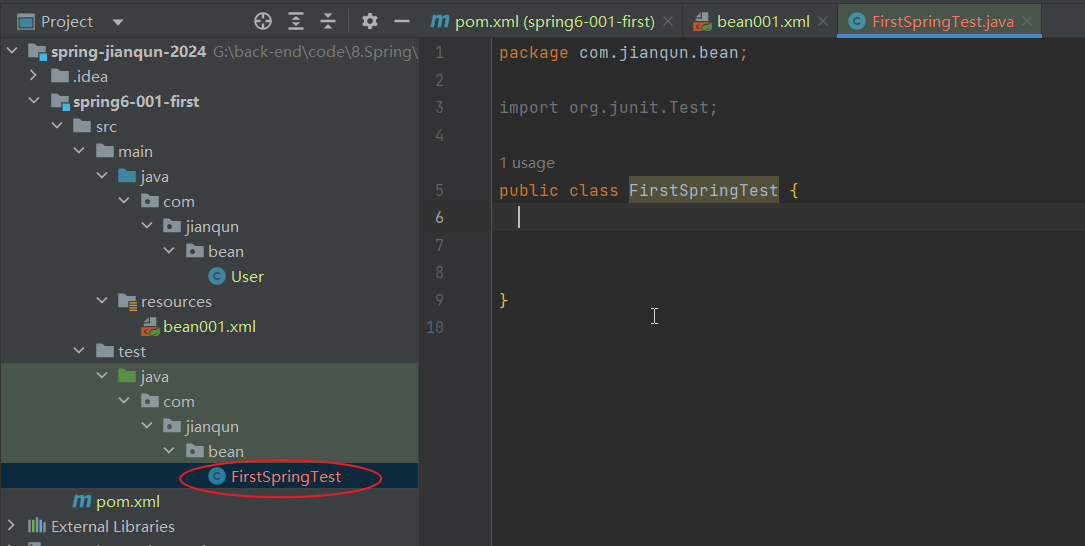
- 2.测试类程序编写:
ApplicationContext翻译为应用上下文,其实就是Spring容器- ApplicationContext 是一个接口
- ApplicationContext 接口下有很多实现类,其中有一个就是叫做
ClassPathXmlApplicationContext ClassPathXmlApplicationContext:专门从类路径中加载spring配置文件的一个Spring上下文对象
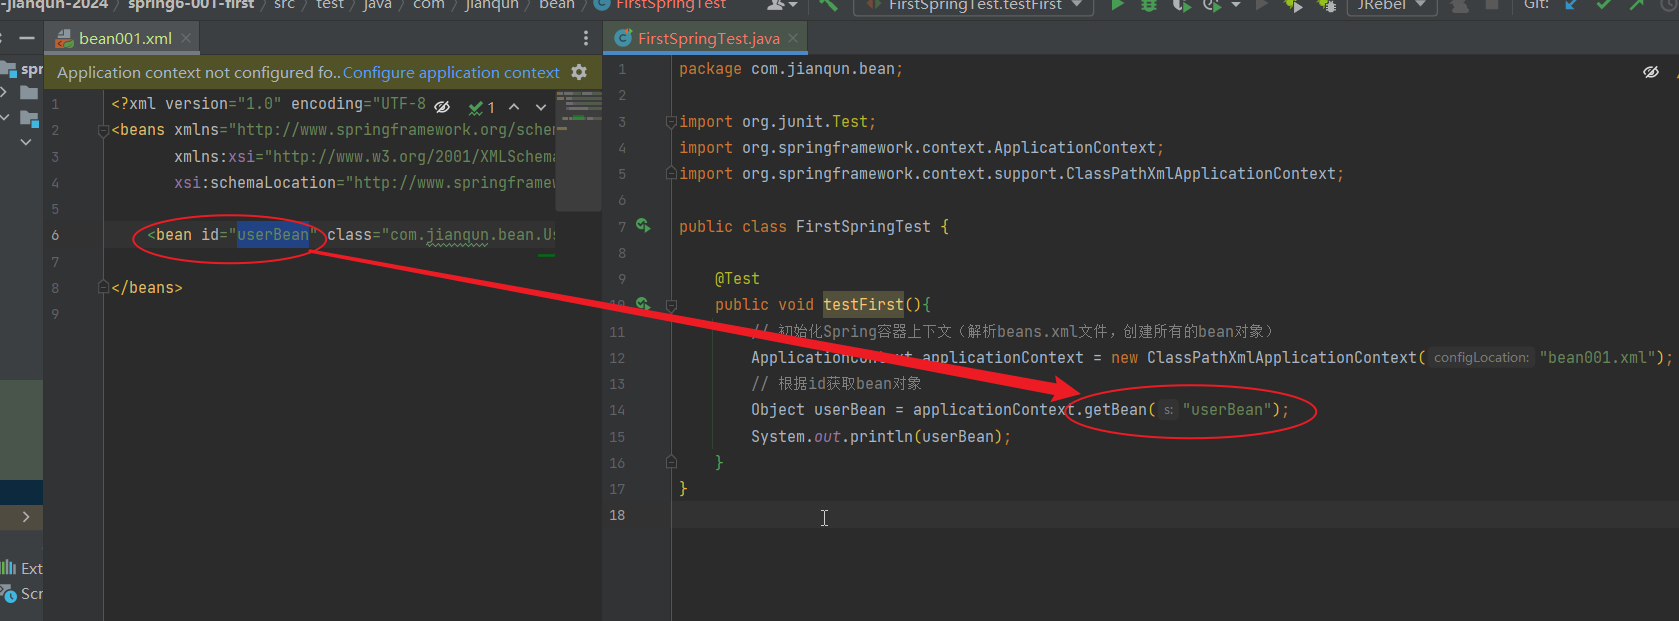
- 3.这行代码
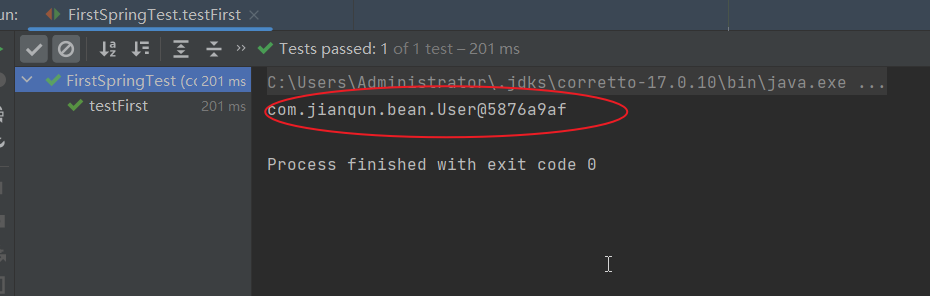
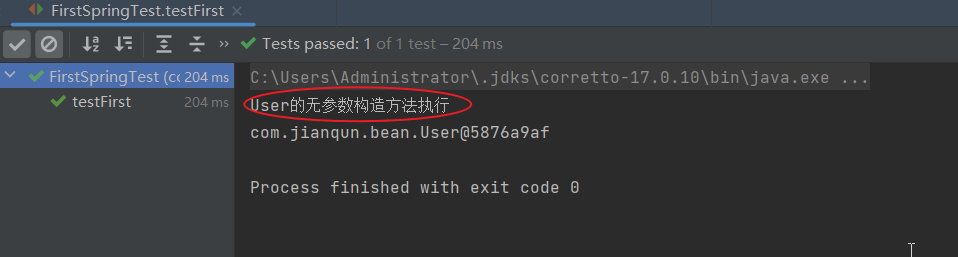
ApplicationContext applicationContext = new ClassPathXmlApplicationContext("beans.xml");执行了之后,就代表启动了spring容器,然后解析beans.xml文件,并实例化所有bean对象,放到spring容器中 - 4.运行测试程序结果:
3.4.第一个Spring程序详细剖析:
a.在spring的配置文件Bean中的id是不能重名
b.Spring是如何创建对象的呢?原理是什么?
- 底层是是通过反射机制调用
无参数构造方法来创建对象的 - spring是通过调用类的无参数构造方法来创建对象的,所以要想让spring给你创建对象,
必须保证无参数构造方法是存在的。当创建了有参构造,必须再手动创建下无参构造。
package com.powernode.spring6.bean;

/**
 * bean,封装用户信息。
 * @author
 * @version 1.0
 * @since 1.0
 */
public class User {
    public User() {
        System.out.println("User的无参数构造方法执行");
    }
}
// dom4j解析beans.xml文件,从中获取class的全限定类名
// 通过反射机制调用无参数构造方法创建对象
Class clazz = Class.forName("com.powernode.spring6.bean.User");
Object obj = clazz.newInstance();
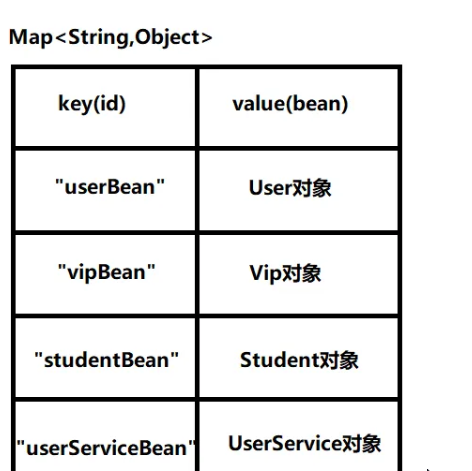
c.把创建好的对象存储到一个什么样的数据结构中
d.spring配置文件的名字必须叫做beans.xml吗?
- 通过以下的java代码可以看出,这个
spring配置文件名字是我们负责提供的,显然spring配置文件的名字是随意的
ApplicationContext applicationContext = new ClassPathXmlApplicationContext("beans.xml");
e.像这样的beans.xml文件可以有多个吗?
- 1.再创建一个spring配置文件,起名:spring.xml
<?xml version="1.0" encoding="UTF-8"?>
<beans xmlns="http://www.springframework.org/schema/beans"
       xmlns:xsi="http://www.w3.org/2001/XMLSchema-instance"
       xsi:schemaLocation="http://www.springframework.org/schema/beans http://www.springframework.org/schema/beans/spring-beans.xsd">
    <bean id="vipBean" class="com.powernode.spring6.bean.Vip"/>
</beans>
package com.powernode.spring6.test;

import org.junit.Test;
import org.springframework.context.ApplicationContext;
import org.springframework.context.support.ClassPathXmlApplicationContext;

public class Spring6Test {

    @Test
    public void testFirst(){
        // 初始化Spring容器上下文(解析beans.xml文件,创建所有的bean对象)
        ApplicationContext applicationContext = new ClassPathXmlApplicationContext("beans.xml","spring.xml");

        // 根据id获取bean对象
        Object userBean = applicationContext.getBean("userBean");
        Object vipBean = applicationContext.getBean("vipBean");

        System.out.println(userBean);
        System.out.println(vipBean);
    }
}
- 2.运行测试:
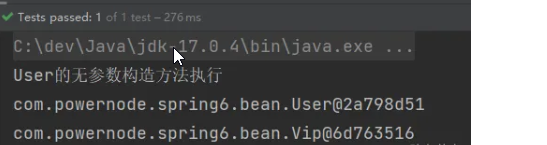
- 3.通过测试得知,spring的配置文件可以有多个,在
ClassPathXmlApplicationContext构造方法的参数上传递文件路径即可。这是为什么呢?通过源码可以看到:

f.在配置文件中配置的类必须是自定义的吗,可以使用JDK中的类吗,例如:java.util.Date?
- 1.编写代码:
<?xml version="1.0" encoding="UTF-8"?>
<beans xmlns="http://www.springframework.org/schema/beans"
       xmlns:xsi="http://www.w3.org/2001/XMLSchema-instance"
       xsi:schemaLocation="http://www.springframework.org/schema/beans http://www.springframework.org/schema/beans/spring-beans.xsd">

    <bean id="userBean" class="com.powernode.spring6.bean.User"/>
    <!--<bean id="userBean" class="com.powernode.spring6.bean.Vip"/>-->

    <bean id="dateBean" class="java.util.Date"/>
</beans>
package com.powernode.spring6.test;

import org.junit.Test;
import org.springframework.context.ApplicationContext;
import org.springframework.context.support.ClassPathXmlApplicationContext;

public class Spring6Test {

    @Test
    public void testFirst(){
        // 初始化Spring容器上下文(解析beans.xml文件,创建所有的bean对象)
        ApplicationContext applicationContext = new ClassPathXmlApplicationContext("beans.xml","spring.xml");

        // 根据id获取bean对象
        Object userBean = applicationContext.getBean("userBean");
        Object vipBean = applicationContext.getBean("vipBean");
        Object dateBean = applicationContext.getBean("dateBean");

        System.out.println(userBean);
        System.out.println(vipBean);
        System.out.println(dateBean);
    }
}
- 2.测试结果:
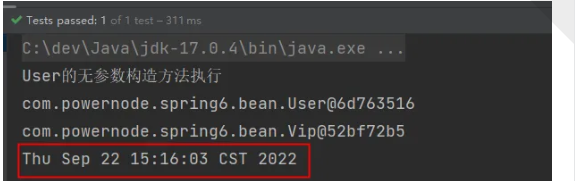
- 3.通过测试得知,在spring配置文件中配置的bean
可以任意类,只要这个类不是抽象的,并且提供了无参数构造方法。
g.getBean()方法返回的类型是Object,如果访问子类的特有属性和方法时,还需要向下转型,有其它办法可以解决这个问题吗?
User user = applicationContext.getBean("userBean", User.class);
h.ClassPathXmlApplicationContext是从类路径中加载配置文件,如果没有在类路径当中,又应该如何加载配置文件呢?

<?xml version="1.0" encoding="UTF-8"?>
<beans xmlns="http://www.springframework.org/schema/beans"
       xmlns:xsi="http://www.w3.org/2001/XMLSchema-instance"
       xsi:schemaLocation="http://www.springframework.org/schema/beans http://www.springframework.org/schema/beans/spring-beans.xsd">
    <bean id="vipBean2" class="com.powernode.spring6.bean.Vip"/>
</beans>
- 1.没有在类路径中的话,需要使用
FileSystemXmlApplicationContext类进行加载配置文件。 - 2.这种方式较少用。一般都是将配置文件放到类路径当中,这样可移植性更强。
ApplicationContext applicationContext2 = new FileSystemXmlApplicationContext("d:/spring6.xml");
Vip vip = applicationContext2.getBean("vipBean2", Vip.class);
System.out.println(vip);
i.ApplicationContext的超级父接口BeanFactory:
- 1.
BeanFactory是Spring容器的顶层接口。ApplicationContext是BeanFactory的子接口 - 2.Spring底层的IOC是由:
XML解析 + 工厂模式 + 反射机制来实现的
BeanFactory beanFactory = new ClassPathXmlApplicationContext("spring.xml");
Object vipBean = beanFactory.getBean("vipBean");
System.out.println(vipBean);
3.5.Spring6启用Log4j2日志框架:
在DSpring5之后,Spring框架集成的日志框架是Log4j2,下面进行启用这个日志框架
a.引入Log4j2的依赖:
- 1.添加依赖:
<dependency>
            <groupId>org.apache.logging.log4j</groupId>
            <artifactId>log4j-core</artifactId>
            <version>2.13.3</version>
        </dependency>

        <dependency>
            <groupId>org.apache.logging.log4j</groupId>
            <artifactId>log4j-slf4j-impl</artifactId>
            <version>2.13.3</version>
        </dependency>
-
2.在类的根路径下提供log4j2.xml配置文件,文件名固定为log4j2.xml,必须放在类的根路径下
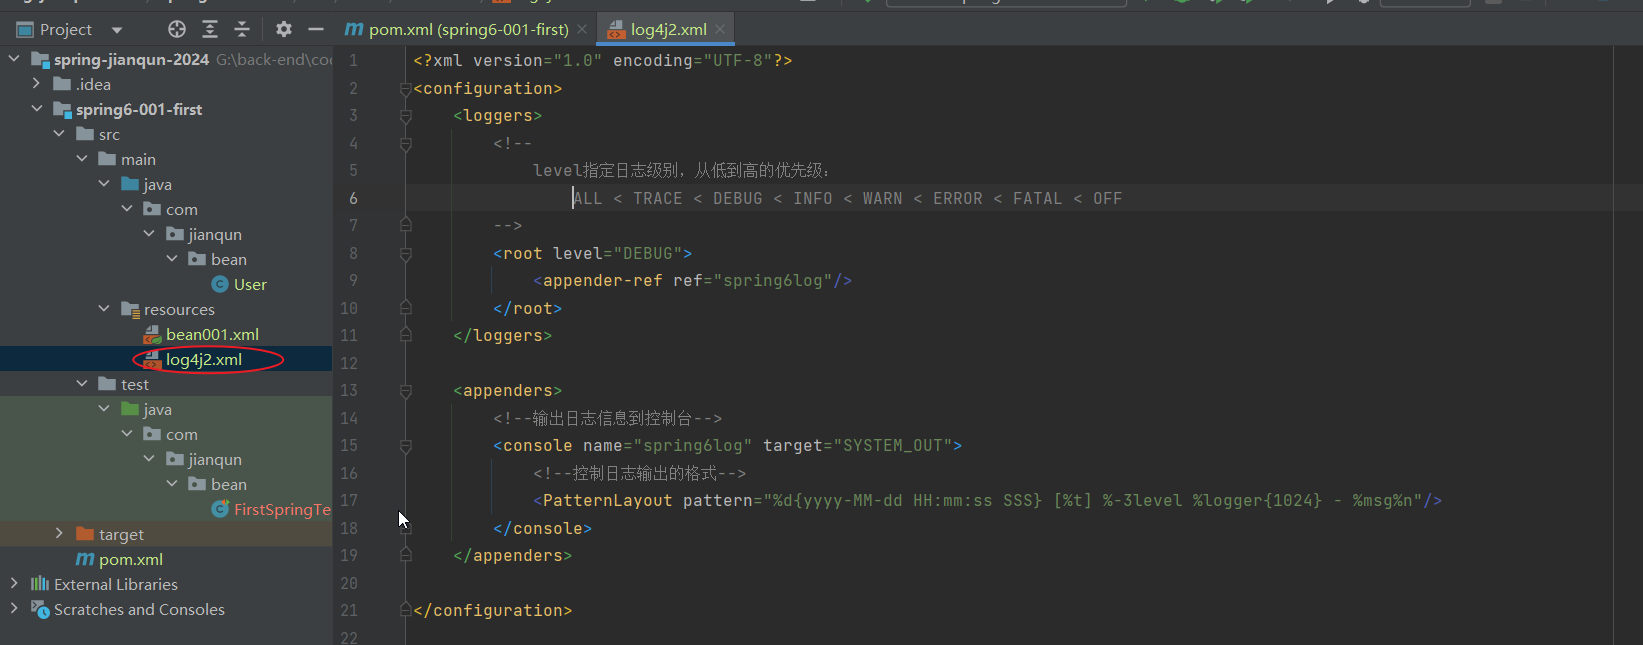
<?xml version="1.0" encoding="UTF-8"?> <configuration> <loggers> <!-- level指定日志级别,从低到高的优先级: ALL < TRACE < DEBUG < INFO < WARN < ERROR < FATAL < OFF --> <root level="DEBUG"> <appender-ref ref="spring6log"/> </root> </loggers> <appenders> <!--输出日志信息到控制台--> <console name="spring6log" target="SYSTEM_OUT"> <!--控制日志输出的格式--> <PatternLayout pattern="%d{yyyy-MM-dd HH:mm:ss SSS} [%t] %-3level %logger{1024} - %msg%n"/> </console> </appenders> </configuration> -
3.使用日志框架:在自己开发的时候,记录一些日志信息:
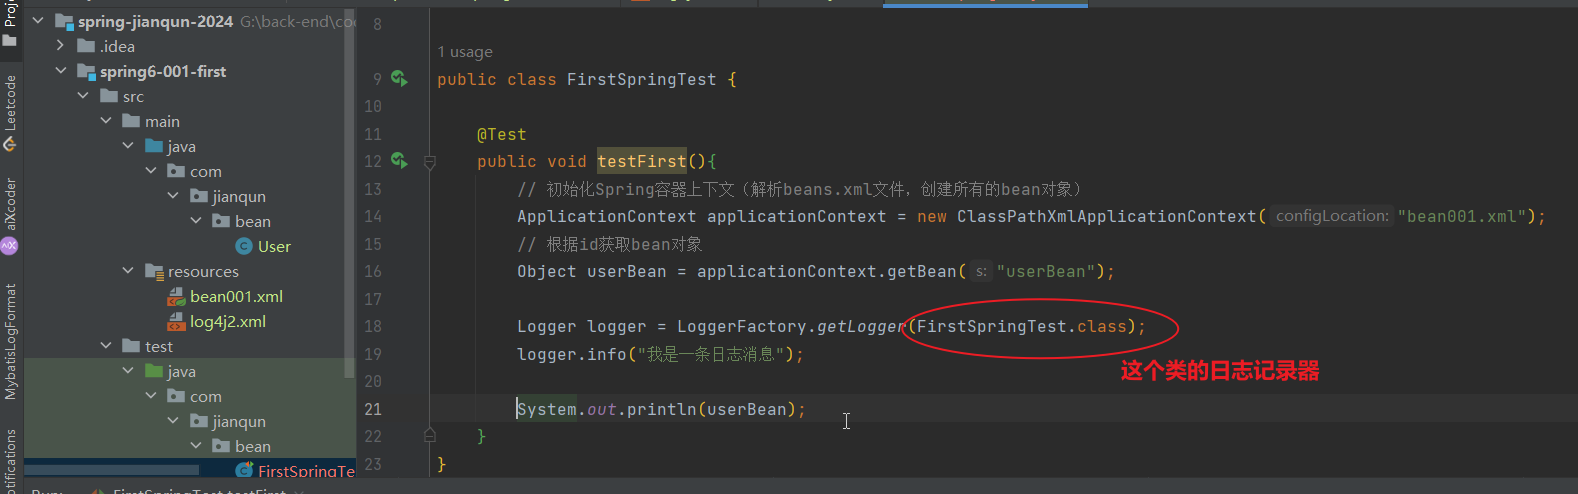
这行代码中,
Logger logger = LoggerFactory.getLogger(FirstSpringTest.class);,也就是说只要是FirstSpringTest类中的的代码执行的记录日志的话,就会输出相关的日志信息
3.6.Spring配置文件:
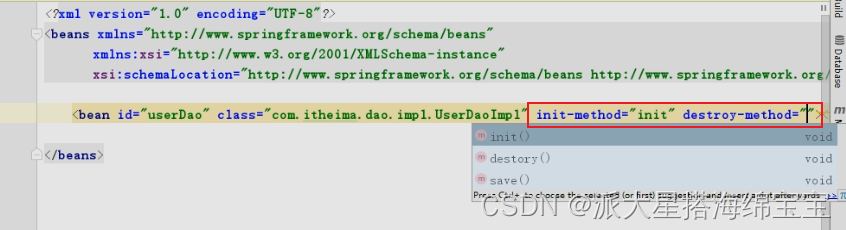
c.配置文件中 Bean生命周期配置:
- 1.
init-method:在指定类中的初始化方法名称 - 2.
destroy-method:在指定类中销毁方法名称
d.配置文件中包扫描方式的变更方式1:
- 1.扫描根包(不推荐):
- 根据以上的架构的开发,默认是使用的直接从根包扫描,这样就会导致一些不需要扫描的包进行了扫描,这种扫描
会降低容器启动的速度,导致多做无用功,<context:component-scan base-package="com.bjpowernode"></context:component-scan>
- 2.设置单个包扫描(推荐使用)
<context:component-scan base-package="com.bjpowernode.controller"></context:component-scan>
<context:component-scan base-package="com.bjpowernode.service.impl"></context:component-scan>
<context:component-scan base-package="com.bjpowernode.dao"></context:component-scan>
- 3简化设置:多个包扫描,多个包之间以逗号或空格或分号分隔
<context:component-scan base-package="com.bjpowernode.controller com.bjpowernode.service ,com.bjpowernode.dao"></context:component-scan>
e.配置文件中包扫描方式的变更方式2:
- 1.如下配置可以实现配置一些类可以扫描,一些不可以扫描
- 1.
use-default-filters="false"表示不再使用默认的filter,使用自己配置filter规则,下面这个意思是:到com.jianqun这个包下面只扫描有Component这个注解的
<?xml version="1.0" encoding="UTF-8"?>
<beans xmlns="http://www.springframework.org/schema/beans"
       xmlns:xsi="http://www.w3.org/2001/XMLSchema-instance"
       xmlns:context="http://www.springframework.org/schema/context"
       xsi:schemaLocation="http://www.springframework.org/schema/beans http://www.springframework.org/schema/beans/spring-beans.xsd
                           http://www.springframework.org/schema/context http://www.springframework.org/schema/context/spring-context.xsd ">

    <context:component-scan base-package="com.jianqun"></context:component-scan>
    <!--
        use-default-filters="false"表示不再使用默认的filter,使用自己配置filter规则
        下面这个意思是:到com.jianqun这个包下面只扫描有Component这个注解的
    -->
    <context:component-scan base-package="com.jianqun" use-default-filters="false">
        <context:include-filter type="annotation" expression="org.springframework.stereotype.Component"/>
    </context:component-scan>
</beans>


 被折叠的 条评论
为什么被折叠?
被折叠的 条评论
为什么被折叠?
 到【灌水乐园】发言


