


1、thread源码浅剖析
基于Ubuntu18.04版本64位操作系统下进行分析thread源码分析,与Window或者其他版本可能有出入。
1.1、thread线程id的源头
typedef pthread_t __gthread_t;
typedef __gthread_t			native_handle_type;

    /// thread::id
class id
{
  native_handle_type	_M_thread;
    explicit
      id(native_handle_type __id) : _M_thread(__id) { }
    .....
}

return thread::id(__gthread_self());

__gthread_self (void)
{
  return __gthrw_(pthread_self) ();
    pthread_self  这个东西并不陌生,Linux系统编程里学过,获取当前线程id号。
}
-
从上往下看,首先看typedef pthread_t __gthread_t;这里可以看到C++的thread本质也是基于Linux系统下的pthread进行多线程的,不过一直在typedef换名字。
-
id类中就一个重要的东西,那就是native_handle_type _M_thread; 这个东西的本质就是pthread_t 表示线程id号。源码中有如下一行代码
可以清楚的知道这就是线程id。
-
另外还有其他很多的东西一些重载和杂七杂八的东西,这里略过,总之:thread多线程是通过pthread库的实现的。
1.2、thread的构造函数分析
private:
    id	_M_id;				// 上面的内部类
  public:
    thread() noexcept = default;
    thread(thread&) = delete;
    thread(const thread&) = delete;
    thread(const thread&&) = delete;

    thread(thread&& __t) noexcept
    { swap(__t); }


    template<typename _Callable, typename... _Args>
    explicit  thread(_Callable&& __f, _Args&&... __args) {
		#ifdef GTHR_ACTIVE_PROXY
		// Create a reference to pthread_create, not just the gthr weak symbol.
        auto __depend = reinterpret_cast<void(*)()>(&pthread_create);
		#else
            auto __depend = nullptr;
        #endif
        _M_start_thread(_S_make_state( __make_invoker(std::forward<_Callable>(__f), std::forward<_Args>(__args)...)),  __depend);
      }
-
这里提供了很多构造函数,最简单的构造是空构造、拷贝构造、以及引用和万能引用的拷贝构造但是这些都不常用,最常用的三下面的有参构造。
-
有参构造中提供_Callable回调函数和万能引用可变长的参数列表。
-
第一点:多线程的创建调用的是pthread_create方法,传入的Callable函数最后会给到pthread_create中的参3,参数会给到pthread_create中的参4。
int pthread_create(pthread_t *tid, const pthread_attr_t *attr, void *(*start_routine)(void *), void *arg); 返回值: 成功0, 失败-1 参数: 1). pthread_t *tid: 传出参数,获取线程的id 2). pthread_attr_t *attr: 可以设置线程的优先级等... 3). void *(*start_routine)(void*):线程的回调函数(线程需要执行的逻辑内容) 4). void *arg: 参数3回调函数的参数,没有的话可以传NULL -
第二点: std::forward方法的作用就是实现完美转发,将参数按照原始模板的类型转发给其他对象,即保持所有对象的类型,决定将参数以左值引用还是右值引用的方式进行转发。
-
第三点:__make_invoker函数的调用
template<typename... _Tp> using __decayed_tuple = tuple<typename std::decay<_Tp>::type...>; template<typename _Callable, typename... _Args> static _Invoker<__decayed_tuple<_Callable, _Args...>> __make_invoker(_Callable&& __callable, _Args&&... __args) { return { __decayed_tuple<_Callable, _Args...>{ std::forward<_Callable>(__callable), std::forward<_Args>(__args)... } }; }- 这里主要就是这些代码,也不必逐行区分析区看待,这里的大致操作就是将回调函数和传入的参数一起进行decay衰退
- decay衰退的解释: 假设T 是某种类型,当T是引用类型,
decay<T>::type返回T引用的元素类型;当T是非引用类型,decay<T>::type返回T的类型。 - 所有的东西decay衰退完毕后组成一个tuple元组
-
第四点:_S_make_state函数进行智能指针的创建,最后就是
_M_start_thread函数的执行。using _State_ptr = unique_ptr<_State>; void _M_start_thread(_State_ptr, void (*)()); template<typename _Callable> static _State_ptr _S_make_state(_Callable&& __f) { using _Impl = _State_impl<_Callable>; return _State_ptr{new _Impl{std::forward<_Callable>(__f)}}; }
-
-
整个过程中需要知道线程是通过pthread_create创建出来的和decay衰退,但是Ubuntu和Windows下的测试并不太一样。
-
其实核心要明白decay衰退,这里会接触所有的引用、const、volatile。
-
Ubuntu下同一份代码的会发现拷贝函数比Windows下多一次,也不知道具体发生在哪一步,可能还得进一步的分析。
2、detach与拷贝的问题
2.1、临时对象作为线程参数
#include <iostream>
#include <thread>

void myprintf(const int &i, char *buf)
{
    std::cout << i << std::endl;
    std::cout << buf << std::endl;
}

int main() {
    int i = 5;
    int& ref_i = i;
    char *mybuf = "this is a test!";
    std::thread mythread(myprintf, ref_i, mybuf);
    mythread.detach();

    std::cout << "Hello, World!" << std::endl;
    return 0;
}
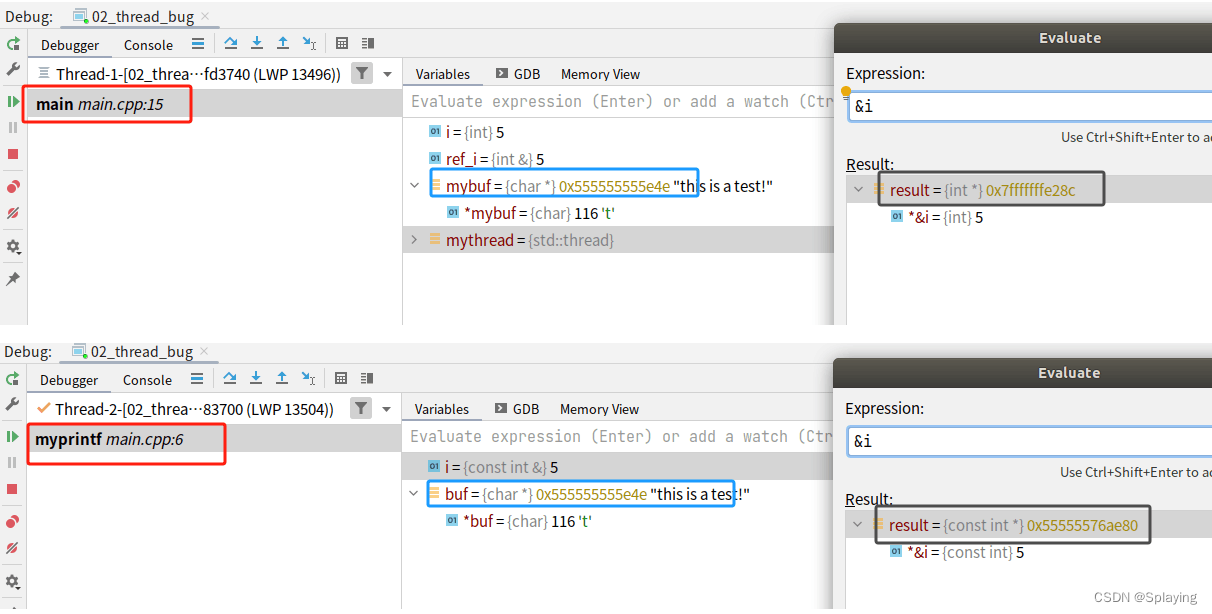
- 可以发现一般的引用类型会被decay退化成普通类型进行重新拷贝构造,因此基本数据类型传入不传入引用都不会造成问题,但还是推荐传值不传引用!
- 而指针类型并没有退化,还是用原来的地址都指向着main栈帧中的同一块地址,因此当使用detach脱离时有可能造成非法访问一块不存在的空间。
2.2、指针类型解决思路
将char *类型的字符串隐式转化成一个string类型的字符串,其中这里肯定会会调用string的构造函数对字符串进行重新构造,因此地址不会相同。
#include <iostream>
#include <thread>
#include <string>

void myprintf1(const int &i, const std::string &buf)
{
    std::cout << i << std::endl;
    std::cout << buf << std::endl;
}
int main() {
    int i = 5;
    int& ref_i = i;
    char *mybuf = "this is a test!";
    std::thread mythread(myprintf1, ref_i, mybuf);
    mythread.detach();
    std::cout << "Hello, World!" << std::endl;
    return 0;
}

2.3、隐式转化由谁实现
上述2.2的代码看起来没有问题,实则隐式转化是存在问题的,当char * --> string需要花费很长时间时。可能主线程执行完毕需要释放这一块的空间,而拷贝还没有完成,因此这个转换交给谁来是有一个严格的说法的。
 // 交给子线程构造转换
 std::thread mythread(myprintf1, ref_i, mybuf);

 // 交给主线程构造转换出一个string
  std::thread mythread(myprintf1, ref_i, string(mybuf));
为了方便测试打印效果,我们采用join等待的方式展示出来,实际上这些问题都是detach方法带来的问题,与join没有半毛钱关系。
2.3.1、隐式构造(子线程构造)
class A{
public:
    int m_i;
    A(int a): m_i(a) {
        std::cout << "[A::A(int a)构造函数执行]" << ", this address = " << this << ", thread_id = " << std::this_thread::get_id()<<std::endl;
    }
    A(const A &a): m_i(a.m_i){
        std::cout << "[A::A(const A &a)拷贝构造函数执行]" << ", this address = " << this << ", thread_id = " << std::this_thread::get_id()<<std::endl;
    }
    ~A(){
        std::cout << "[A::~A()析构函数执行]" << ", this address = " << this << ", thread_id = " << std::this_thread::get_id()<<std::endl;
    }
};
void myprintf2(const A &a)
{
    std::cout << "子线程&a = " << &a << ", thread_id = " << std::this_thread::get_id() << std::endl;
}
int main() {
    std::cout << "主线程 thread_id = " << std::this_thread::get_id() << std::endl;
    int a = 10;
    std::thread mythread(myprintf2, a);
    mythread.join();
    return 0;
}
-
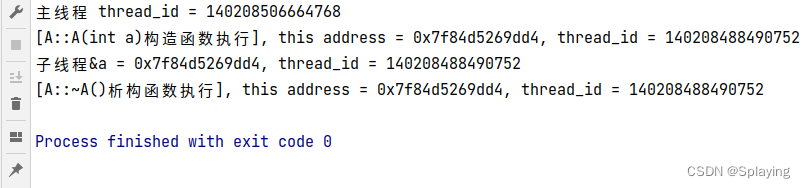
可以看到首先主线程一768结尾,子线程是752结尾。
-
这种隐式构造我们有理由怀疑:当主线程768执行完毕,释放完空间时,子线程752才开始拷贝这个对象,恰巧这个对象的空间地址已经被释放,那么子线程可能越界访问一块不存在的地址空间,从而导致错误。
-
总结:子线程在自己从外面拷贝东西到自己的空间,而需要拷贝的东西可能被提前释放。
2.3.2、临时变量(主线程拷贝)
class A{
public:
    int m_i;
    A(int a): m_i(a) {
        std::cout << "[A::A(int a)构造函数执行]" << ", this address = " << this << ", thread_id = " << std::this_thread::get_id()<<std::endl;
    }
    A(const A &a): m_i(a.m_i){
        std::cout << "[A::A(const A &a)拷贝构造函数执行]" << ", this address = " << this << ", thread_id = " << std::this_thread::get_id()<<std::endl;
    }
    ~A(){
        std::cout << "[A::~A()析构函数执行]" << ", this address = " << this << ", thread_id = " << std::this_thread::get_id()<<std::endl;
    }
};
void myprintf2(const A &a)
{
    std::cout << "子线程&a = " << &a << ", thread_id = " << std::this_thread::get_id() << std::endl;
}
int main() {
    std::cout << "主线程 thread_id = " << std::this_thread::get_id() << std::endl;
    int a = 10;
    std::thread mythread(myprintf2, A(a));
    mythread.join();
    return 0;
}
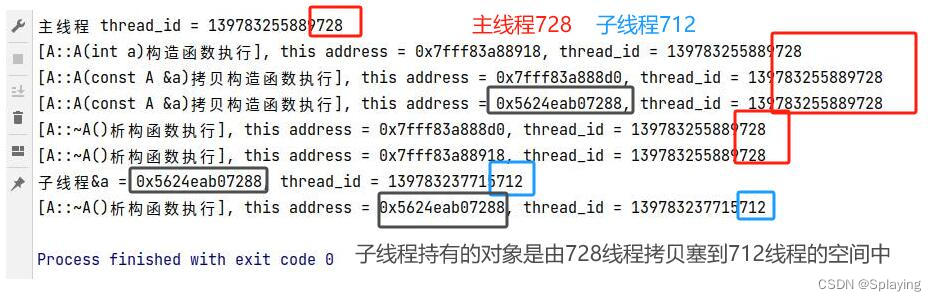
- 可以看到主线程728,子线程712
- 重点关注子线程持有的对象(地址07288的对象),它是由728线程拷贝好了塞到712线程的私人空间中的,这样就能保证主线程728在向下执行之前一定会把子线程712需要的东西已经交付完毕!
- 对比上面子线程自己拷贝存在很大的区别,一个是自己伸手去拿,一个是别人塞给你!
- 但是这里拷贝构造两次一直没弄清楚,同一份代码Window下是只有一次拷贝构造的,Ubuntu下为什么是两次不清楚,可能还需要剖析源码!
3、join与引用
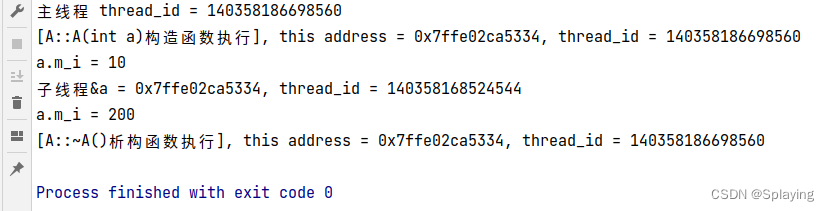
然而并不是所有的方法都需要detach让子线程脱离主线程,有一些情况是需要主子线程协同运行,对于这种情况我们可以使用std::ref()传入,并且使用Join方法即可,而如果使用detach方法那么情况可能就不一样了。
class A{
public:
    int m_i;
    A(int a): m_i(a) {
        std::cout << "[A::A(int a)构造函数执行]" << ", this address = " << this << ", thread_id = " << std::this_thread::get_id()<<std::endl;
    }
    A(const A &a): m_i(a.m_i){
        std::cout << "[A::A(const A &a)拷贝构造函数执行]" << ", this address = " << this << ", thread_id = " << std::this_thread::get_id()<<std::endl;
    }
    ~A(){
        std::cout << "[A::~A()析构函数执行]" << ", this address = " << this << ", thread_id = " << std::this_thread::get_id()<<std::endl;
    }
};
void myprintf3(A &a)
{
    a.m_i = 200;
    std::cout << "子线程&a = " << &a << ", thread_id = " << std::this_thread::get_id() << std::endl;
}
int main() {
    std::cout << "主线程 thread_id = " << std::this_thread::get_id() << std::endl;
    A a(10);
    std::cout << "a.m_i = " << a.m_i << std::endl;
    std::thread mythread(myprintf3, std::ref(a));
    mythread.join();
    std::cout << "a.m_i = " << a.m_i << std::endl;
    return 0;
}
4、成员函数作为线程的回调函数
class A{
public:
    int m_i;
    A(int a): m_i(a) {
        std::cout << "[A::A(int a)构造函数执行]" << ", this address = " << this << ", thread_id = " << std::this_thread::get_id()<<std::endl;
    }
    A(const A &a): m_i(a.m_i){
        std::cout << "[A::A(const A &a)拷贝构造函数执行]" << ", this address = " << this << ", thread_id = " << std::this_thread::get_id()<<std::endl;
    }
    ~A(){
        std::cout << "[A::~A()析构函数执行]" << ", this address = " << this << ", thread_id = " << std::this_thread::get_id() <<std::endl;
    }

    void thread_work(int num){
        std::cout << "[A::thread_work数执行]" << ", this address = " << this << ", thread_id = " << std::this_thread::get_id() <<std::endl;
    }
};
void test4()
{
    std::cout << "主线程 thread_id = " << std::this_thread::get_id() << std::endl;
    A a(10);
    std::cout << "a.m_i = " << a.m_i << std::endl;
    std::thread mythread(myprintf3, std::ref(a));
    mythread.join();
    std::cout << "a.m_i = " << a.m_i << std::endl;
}
int main() {
    A a(10);
    std::thread mythread(&A::thread_work, a, 15);				// 15对应int num
    mythread.join();
    return 0;
}

5、总结
- 当使用detach方法脱离主线程时需要注意拷贝的问题,绝对不能使用隐式转换。
- std::ref函数传入引用、std::decay类型衰退、自定义成员函数当线程的回调函数
- 源码的简单剖析,有机会再深入研究


 2640
2640


 被折叠的 条评论
为什么被折叠?
被折叠的 条评论
为什么被折叠?
 到【灌水乐园】发言


