前言,基于上个简单的ssm项目整合shiro配置
此片写的不太详细,不过基本能理解看懂,详解见之前的boot整合shiro,地址:详解shiro
shiro 所需包,ehcache引入pom.xml
<!-- apache shiro 核心 -->
    <dependency>
      <groupId>org.apache.shiro</groupId>
      <artifactId>shiro-core</artifactId>
      <version>1.3.2</version>
    </dependency>
    <!-- shiro的web整合 -->
    <dependency>
      <groupId>org.apache.shiro</groupId>
      <artifactId>shiro-web</artifactId>
      <version>1.3.2</version>
    </dependency>
    <!-- shiro的aop代理 -->
    <dependency>
      <groupId>org.apache.shiro</groupId>
      <artifactId>shiro-aspectj</artifactId>
      <version>1.3.2</version>
    </dependency>
    <!-- shiro spring整合 -->
    <dependency>
      <groupId>org.apache.shiro</groupId>
      <artifactId>shiro-spring</artifactId>
      <version>1.3.2</version>
    </dependency>

    <!-- ehcache的缓存框架 -->
    <dependency>
      <groupId>net.sf.ehcache</groupId>
      <artifactId>ehcache-core</artifactId>
      <version>2.6.10</version>
    </dependency>
    <!-- shiro整合ehcache -->
    <dependency>
      <groupId>org.apache.shiro</groupId>
      <artifactId>shiro-ehcache</artifactId>
      <version>1.3.2</version>
    </dependency>
在webapp-WEB-INFO下web.xml中配置shiro过滤器,注意一定配置在mvc之前
<!-- 配置Shiro的代理过滤器 -->
  <filter>
    <filter-name>shiroFilter</filter-name>
    <!-- 该过滤器不是一个真正的过滤器实现,是一个代理的过滤器, 自动到Spring容器中获取以 filter-name的名字为名字的bean作为过滤器
        的对象 -->
    <filter-class>org.springframework.web.filter.DelegatingFilterProxy</filter-class>
    <init-param>
      <!-- 设置过滤器的生命周期(销毁)是否是由web容器控制 -->
      <param-name>targetFilterLifecycle</param-name>
      <param-value>true</param-value>
    </init-param>
  </filter>
  <filter-mapping>
    <filter-name>shiroFilter</filter-name>
    <url-pattern>/*</url-pattern>
  </filter-mapping>
编写 application-shiro.xml 在applicationContext.xml(即spring主配置文件) 引入读取

<?xml version="1.0" encoding="UTF-8"?>
<beans xmlns="http://www.springframework.org/schema/beans"
       xmlns:xsi="http://www.w3.org/2001/XMLSchema-instance"
       xsi:schemaLocation="
		http://www.springframework.org/schema/beans http://www.springframework.org/schema/beans/spring-beans.xsd">

    <!-- 配置Shiro核心Filter,bean的id必须和过滤器的名字一样  -->
    <bean id="shiroFilter" class="org.apache.shiro.spring.web.ShiroFilterFactoryBean">
        <!-- 安全管理器 -->
        <property name="securityManager" ref="securityManager"/>
        <!-- 未认证,跳转到哪个页面 ,如果认证失败,跳转的默认页面 -->
        <property name="loginUrl" value="/login/login"/>
        <!-- 登录页面页面,如果认证成功,则默认跳转的页面 -->
        <property name="successUrl" value="/hello"/>
        <!-- 如果没有授权,则默认跳转到该页面 -->
        <property name="unauthorizedUrl" value="/login/hello"/>
        <!-- shiro URL控制过滤器规则:配置的小过滤器链(过滤器栈):执行从上倒下有顺序  -->
        <property name="filterChainDefinitions">
            <value>
                /login/** = anon
                /static/**=anon
                /customersss/list = perms[customer:add]
                /pages/base/area.html* = roles[base]
                /** = authc
            </value>
        </property>
    </bean>

    <!-- 安全管理器  -->
    <bean id="securityManager" class="org.apache.shiro.web.mgt.DefaultWebSecurityManager">
        <property name="realm" ref="bosRealm"></property>
    </bean>

    <bean id="bosRealm" class="com.example.realm.MyRealm"/>

</beans>

anon 无需认证的路径
authc 需要认证的路径
perms[“所需的权限字符串”] 所需的权限
roles[“所需要拥有的角色”] 要拥有的角色
注意:路径的拦截是自上而下的,如果满足一个,就不会再走下面的设置
编写自定义myRealm继承shiro的 AuthorizingRealm类
package com.example.realm;

import com.example.entity.User;
import com.example.service.UserService;
import org.apache.shiro.SecurityUtils;
import org.apache.shiro.authc.AuthenticationException;
import org.apache.shiro.authc.AuthenticationInfo;
import org.apache.shiro.authc.AuthenticationToken;
import org.apache.shiro.authc.LockedAccountException;
import org.apache.shiro.authc.SimpleAuthenticationInfo;
import org.apache.shiro.authc.UnknownAccountException;
import org.apache.shiro.authc.UsernamePasswordToken;
import org.apache.shiro.authz.AuthorizationInfo;
import org.apache.shiro.authz.SimpleAuthorizationInfo;
import org.apache.shiro.realm.AuthorizingRealm;
import org.apache.shiro.subject.PrincipalCollection;
import org.springframework.beans.factory.annotation.Autowired;

/**
 * @author zhaozeren
 * @version 1.0
 * @date 2019/3/18
 */
public class MyRealm extends AuthorizingRealm {

    @Autowired
    private UserService userService;

    @Override
    protected AuthorizationInfo doGetAuthorizationInfo(PrincipalCollection principals) {
        //授权
        //获取当前登录的用户
        User user = (User) SecurityUtils.getSubject().getPrincipal();
        //授权类
        SimpleAuthorizationInfo authorizationInfo = new SimpleAuthorizationInfo();

        if ("admin".equals(user.getName())) {
            //获取所有权限集合,循环添加
            authorizationInfo.addStringPermission("customer:add");
            //获取所有角色集合,循环添加
            authorizationInfo.addRole("经理");
        } else {
            //根据用户去查找用户所有的权限,循环添加
           // authorizationInfo.addStringPermission("customer:add");
            //根据用户去查找用户所用有的角色,循环添加
            //authorizationInfo.addRole("创始人");
        }
        return authorizationInfo;
    }

    @Override
    protected AuthenticationInfo doGetAuthenticationInfo(AuthenticationToken token) throws AuthenticationException {
       //用户的认证
        UsernamePasswordToken usernamePasswordToken = (UsernamePasswordToken) token;
        //用户所输入的同户名
        String username = usernamePasswordToken.getUsername();
        //根据用户名去数据库查找
        User user = userService.getUserByName(username);
        if (user == null) {// 没找到帐号
            throw new UnknownAccountException();
        }

        if (user.getStatus() == 0) {// 帐号未启用(或账号被锁定)
            throw new LockedAccountException();
        }


        SimpleAuthenticationInfo simpleAuthenticationInfo = new SimpleAuthenticationInfo(user, user.getPassword(), super.getName());
        return simpleAuthenticationInfo;
    }
}
编写loginController
package com.example.controller;

import com.example.service.UserService;
import org.apache.shiro.SecurityUtils;
import org.apache.shiro.authc.DisabledAccountException;
import org.apache.shiro.authc.IncorrectCredentialsException;
import org.apache.shiro.authc.LockedAccountException;
import org.apache.shiro.authc.UnknownAccountException;
import org.apache.shiro.authc.UsernamePasswordToken;
import org.apache.shiro.subject.Subject;
import org.springframework.beans.factory.annotation.Autowired;
import org.springframework.stereotype.Controller;
import org.springframework.web.bind.annotation.RequestMapping;
import org.springframework.web.bind.annotation.ResponseBody;


/**
 * @author zhaozeren
 * @version 1.0
 * @date 2019/3/18
 */
@Controller
@RequestMapping("login")
public class LoginController {

    @Autowired
    private UserService userService;

    /**
     * 登录页面
     *
     * @return
     */
    @RequestMapping("login")
    public String login() {
        return "login";
    }

    /**
     * 登录验证
     *
     * @return
     */
    @RequestMapping("loginUser")
    @ResponseBody
    public String loginUser(String userName, String passWord) {
       //获取shiro大管家
        Subject subject = SecurityUtils.getSubject();
        //获取token,将前台传入的用户名和密码放入UsernamePasswordToken
        UsernamePasswordToken usernamePasswordToken = new UsernamePasswordToken(userName, passWord);
        try {
            subject.login(usernamePasswordToken);
            return "success";
        } catch (UnknownAccountException e){
            return "没找到帐号";
        } catch (IncorrectCredentialsException e){
            return "密码错误";
        } catch (LockedAccountException e){
            return "账号被锁定";
        }catch (DisabledAccountException e){
            return "禁用的账号";
        } catch (Exception e){
            return "登录失败";
        }
    }

    @RequestMapping("logout")
    public String logout() {
        Subject subject = SecurityUtils.getSubject();
        subject.logout();
        return "login";
    }

    @RequestMapping("unauthorized")
    public String unauthorized() {
        return "unauthorized";
    }
}
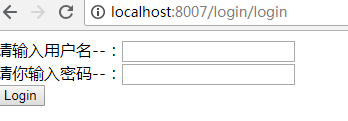
测试 访问 http://localhost:8007/user/getUser
结果被拦截到 登录页面

分析:

授权 思路同上
加入ehcache缓存,理由:我们不能每次操作都去数据库中查询一次,看拥有什么权限或角色。解决:加入缓存
编写:
applicationContext-cache.xml 记得引入spring主配置文件
<?xml version="1.0" encoding="UTF-8"?>
<beans xmlns="http://www.springframework.org/schema/beans"
       xmlns:xsi="http://www.w3.org/2001/XMLSchema-instance"
       xmlns:context="http://www.springframework.org/schema/context"
       xmlns:cache="http://www.springframework.org/schema/cache"
       xsi:schemaLocation="
http://www.springframework.org/schema/beans
http://www.springframework.org/schema/beans/spring-beans.xsd
http://www.springframework.org/schema/context
http://www.springframework.org/schema/context/spring-context.xsd
http://www.springframework.org/schema/cache
http://www.springframework.org/schema/cache/spring-cache.xsd">
    <!-- 配置ehcache的对象EhCacheManager -->
    <bean id="ehCacheManager" class="org.springframework.cache.ehcache.EhCacheManagerFactoryBean">
        <!-- 注入ehcache核心配置文件的位置 Default is "ehcache.xml" in the root of the class
            path, or if not found, "ehcache-failsafe.xml" in the EhCache jar (default
            EhCache initialization). 可以不配置,默认找类路径下的ehcache.xml -->
        <property name="configLocation" value="classpath:ehcache.xml"/>
    </bean>
    <!-- Spring整合Ehache -->
    <!-- Spring的平台缓存管理器 -->
    <bean id="springCacheManager" class="org.springframework.cache.ehcache.EhCacheCacheManager">
        <!-- 注入ehcache的对象 -->
        <property name="cacheManager" ref="ehCacheManager"></property>
    </bean>
    <!-- spring的缓存注解驱动 -->
    <cache:annotation-driven cache-manager="springCacheManager"/>
</beans>
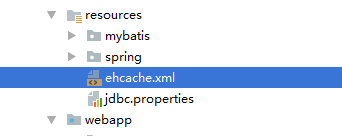
编写ehcache.xml在classpath下

<ehcache xmlns:xsi="http://www.w3.org/2001/XMLSchema-instance" xsi:noNamespaceSchemaLocation="http://ehcache.org/ehcache.xsd">
    <diskStore path="java.io.tmpdir"/>
    <!-- 默认的缓存空间 -->
    <!--
    缓存策略:
    maxElementsInMemory:内存中最大存放的元素的个数
    eternal:缓存的数据是否永生不灭-不会销毁,
    timeToIdleSeconds:发呆(没有读取、使用)多久清除,单位秒
    timeToLiveSeconds:存活多久就清除,单位秒
    maxElementsOnDisk:缓存到硬盘上最大的元素个数
    strategy="localTempSwap":当内存元素个数满了,会溢出到硬盘上缓存。
    diskExpiryThreadIntervalSeconds:过期轮询时间,单位秒
    memoryStoreEvictionPolicy:内存存储和清除策略,默认三个策略,分别为LRU(最近最少使用)、LFU(最常用的)、FIFO(先进先出)。
     -->
    <defaultCache
            maxElementsInMemory="10000"
            eternal="false"
            timeToIdleSeconds="120"
            timeToLiveSeconds="120"
            maxElementsOnDisk="10000000"
            diskExpiryThreadIntervalSeconds="120"
            memoryStoreEvictionPolicy="LRU">
        <persistence strategy="localTempSwap"/>
    </defaultCache>
</ehcache>
在application-shiro.xml 中添加ehcache配置
<!-- 安全管理器  -->
    <bean id="securityManager" class="org.apache.shiro.web.mgt.DefaultWebSecurityManager">
        <property name="realm" ref="bosRealm"></property>
        <!-- 开启Shiro缓存功能,需要在shiro安全管理器中注入shiro的 平台缓存管理器 -->
        <property name="cacheManager" ref="shiroCacheManager"/>
    </bean>

    <bean id="bosRealm" class="com.example.realm.MyRealm"/>

    <!-- shiro整合echcache的缓存配置 -->
    <!-- 配置Shiro的平台缓存管理 -->
    <bean id="shiroCacheManager" class="org.apache.shiro.cache.ehcache.EhCacheManager">
        <!-- 注入ehcache的对象 -->
        <property name="cacheManager" ref="ehCacheManager"/>
    </bean>
我们再次访问,只登陆一次对账号所拥有的权限角色进行查询,其余都走缓存
开启shiro的注解开发:
理由:每次都在xml中配置比较麻烦
解决:
在 springMvc-servlet.xml 添加shiro注解支持
<!-- 开启aop,对类代理 -->
    <aop:config proxy-target-class="true"></aop:config>
    <!-- 开启shiro注解支持 -->
    <bean class="org.apache.shiro.spring.security.interceptor.AuthorizationAttributeSourceAdvisor">
        <property name="securityManager" ref="securityManager"/>
    </bean>
在controller类中的方法上使用:@RequiresPermissions(“所需的权限”)
@RequiresRoles(“所需要的角色”)


 797
797


 被折叠的 条评论
为什么被折叠?


