


sass相关七七八八
dart-sass
sass有三个版本Dart Sass、libsass(废用)和Ruby Sass(废用)
为什么使用Dart Sass
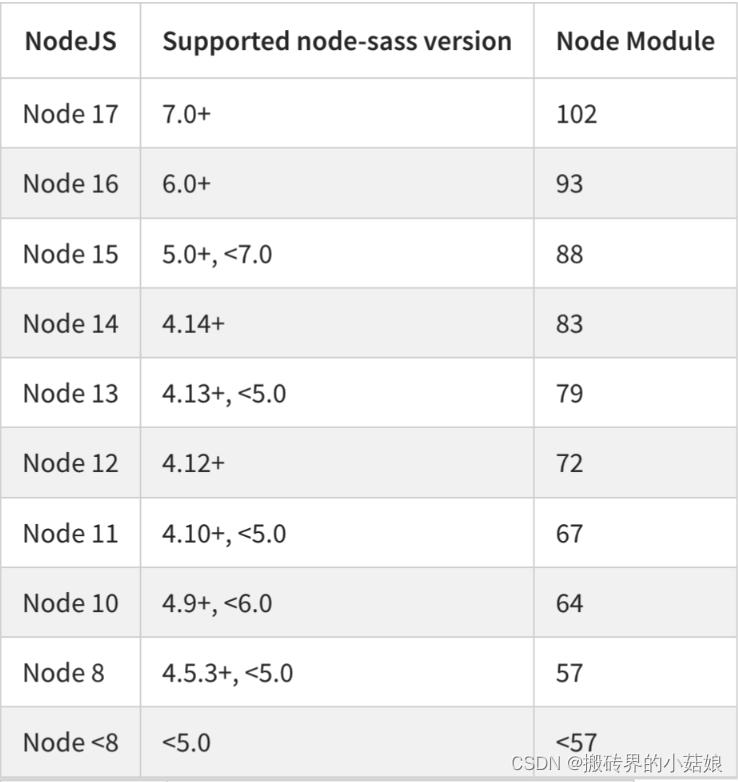
目前Dart Sass已作为Sass最新版本,当执行npm install sass -D默认使用的是Dart Sass包,vue-cli,Vite默认也是使用最新版本Dart Sass,而且不需要安装node-sass(node-sass与sass-loader会有版本问题冲突)
注:element-plus组件库也使用dart sass模块的sass:map 和 @use 重构了所有scss变量,解决了由@import造成的重复输出问题。
安装使用
如果在安装之前项目安装了node-sass,先卸载
npm uninstall node-sass
安装dart-sass
npm install sass sass-loader -D

// 注:这样安装的是最新版本的sass,会出现 TypeError: this.getOptions is not a function (版本过高)这个错误。sass-loader版本11以后需要webpack 5版本才能兼容,解决方法i是sass-loader降级用10版本
npm install sass-loader@^10 -D

// 写法一 使用::v-deep
::v-deep .ant-card-head-title {}
// 写法二 使用>>>操作符
>>> .ant-card-head-title {}
// 写法三 使用/deep/
/deep/ .ant-card-head-title {}
// 写法四 使用:deep(<inner-selector>)
:deep(.ant-card-head-title) {}

//写法一和四,支持sass预处理器,>>>操作符存在浏览器兼容性问题谨慎使用

// 如果项目之前用到的/deep/需要替换为::v-deep;
// 但后续发现控制台提示:::v-deep usage as a combinator has been deprecated. Use :deep(<inner-selector>) instead。 需要写成 ::v-deep(.classname) {}
sass
SCSS变量
sass 变量命名规则
- 以美元符号$开头,后面跟变量名;且必须先定义,后使用
- 变量名不能以数字开头,可包含字母、数字、下划线、横线(连接符)
- 通过连接符-与下划线_定义的同名变量为同一变量
- 写法同css,即变量名和值之间用冒号: 分隔
$color: #FFF;
p {
	color: $color;
}


// 上面代码片段编译为
p {
	color: #FFF;
}
scss变量有两种作用域:全局变量域和局部变量域
- 全局变量:声明在最外层的变量,可在任何地方使用;在局部变量中添加!global声明
- 局部变量:嵌套规则内定义的变量只能在嵌套规则内使用
$color: red;
.container {
	$height: 500px;
	$font-size: 16px !global;  // 全局变量,外部可以使用
	font-size: $font-size;
	color: $color;
	height: $height;
}
.footer {
	// $font-size使用!global声明成全局变量
	font-size: $font-size;
	height: $height;  // $height是在.container下的局部变量,无法在.footer下编译
}

// 上述代码编译成css
.container {
	font-size: 16px;
	color: red;
	height: 500px;
}
.footer {
	font-size: 16px;
}
css变量
css变量 声明一个自定义属性,属性名需要以两个减号(–)开始,定义变量 --变量名:变量值
例如:–main-color: black,由var()函数来获取值,例如color: var(–main-color)
// :root是在HTML文档的任何地方都可以访问它
:root {
	--main-color: #F00;
}
p {
	color: var(--main-color);
}
注:自定义属性名是大小写敏感的,--my-color 和 --My-color 会被认为是定义两个不同的定义属性
通过 JavaScript 获取或修改CSS变量和操作普通CSS属性是一样
// 获取一个 Dom 节点上的 CSS 变量
element.style.getPropertyValue("--my-var");

// 获取任意 Dom 节点上的 CSS 变量
getComputedStyle(element).getPropertyValue("--my-var");

// 修改一个 Dom 节点上的 CSS 变量
element.style.setProperty("--my-var", jsVar + 4);
SCSS数据类型
- 数字:1rem、2vh、13、10px;
- 字符串:分有引号字符串与无引号字符串,“foo”、“bar”、“baz”;
- 颜色: blue,#04a3f9,rgba(255,0,0,0.5)
- 布尔型:true和false
- 空值:null是其类型的唯一值。表示缺少值,通常由函数返回以表示缺少结果;
- 数组:用空格或逗号作分隔符, 1.5em 1em 0; 2em, Helvetica, Arial, sans-serif;
- maps:相当于JavaScript的object对象,格式括号包裹值对,逗号隔开(key1: value1,key2: value2)
// 数字
$layer-index: 10;
$border-width: 3px;

// 字符串
$font-weight: bold;

// 数组
$font-base-family: "Open Sans", Helvetica, Sans-Serif;
$block-base-padding: 6px 10px 6px 10px;

// 颜色
$top-bg-color: rgba(255, 147, 29, 0.6);

// 布尔值
$blank-mode: true;

// null
$var: null;

// maps值
$fonts: (
 serif: "Helvetica Neue",
 monospace: "Consolas",
);
.container {
	// 内部变量
	font-family: $font-base-family;
	font-size: $font-size;
	padding: $block-base-padding;
	@if $blank-mode {
		background-color: #000;
	} @else {
		background-color: #fff;
	}
	content: type-of($var);
	content: length($var);
	color: $top-bg-color;
}

// 如果列表中包含控制,则生成的css中讲忽略该空值
.wrap {
	font: 18px $font-weight map-get($fonts, "sans");
}
!default
可以在变量的结尾添加 !default 来给变量设置默认值,有点类似JavaScript的逻辑运算符let content=value || “default value”。注意,变量是null时将视为未被 !default 赋值
// 如果$content之前没使用 !default ,没办法赋值覆盖
$content: "First content";
$content: "Second content" !default;
#main {
	content: $content;
}

// 编译成css
#main {
	content: "First content";
}
插值语句
通过 #{} 插值语句可以在选择器、属性名、注释中使用变量,使用 #{} 插值语句将变量包裹起来即可,和 js中的 模板字符串 很像
$font-size: 12px;
$line-height: 30px;
$class-name: danger;
$attr: color;
$author: "福大命大";
p {
	font: #{$font-size}/#{$line-height} Arial Helvetica, sans-serif;
}
/*
* 这是文件的说明部分
*/
a.#{$class-name} {
	border-#{attr}: #f00;
}


// 编译为css
p {
	font: 12px/30px Arial Helvetica, sans-serif;
}
a.danger {
	border-color: #f00;
}
条件语句 @if
@if 语法和 js 类似,基本格式是 @if…、@else if…、@else
$theme: 3;
.container {
	@if $theme >= 5 {
		background-color: red;
	}
	@else {
		background-color: blue;
	}
}

// 编译为css
.container {
	background-color: blue;
}
@for循环
for 在条件范围内重复操作,这个指令包含两种格式:
// v a r 可以是任何变量,比如 var可以是任何变量,比如 var可以是任何变量,比如i,start 和 end 必须是整数值。
- @for $var from start through end
- @for $var from start to end
两者区别在于 throught 与 to 的含义
- 使用 through 时,条件范围包含 start 与 end 的值;[start, end]
- 使用to时条件范围只包含start的值不包含end的值;[start, end)
@for $i from 1 to 3 {
	#loading span:nth-child(#{$i}) {
		width: 20 * ($i - 1) + px;
	}
}

// 编译为css
#loading span: nth-child(1) {
	width: 0px;
}
#loading span: nth-child(2) {
	width: 20px;
}

// 如果把to改为through
#loading span: nth-child(1) {
	width: 0px;
}
#loading span: nth-child(2) {
	width: 20px;
}
#loading span: nth-child(3) {
	width: 40px;
}
@each循环
@each指令的格式是 @each $var in $list, $var可以是任何变量名,比如 $length或者 $name,而 $list 是一连串的值,也就是值列表
$color-list: red green blue turquoise darkmagenta;
@each $color in $color-list {
	$index: index($color-list, $color);
	.p#{$index - 1} {
		background-color: $color;
	}
}

// 编译为css
.p0 {
	background-color: red;
}
.p1 {
	background-color: green;
}
.p2 {
	background-color: blue;
}
.p3 {
	background-color: turquoise;
}
.p4 {
	background-color: darkmagenta;
}
@while循环
@while 指令循环输出直到表达式返回结果为false。这样可以实现比 @for 更复杂的循环。比如,可以借此生成栅格化布局
$column: 12;
@while $column > 0 {
	.col-sm-#{${column}} {
		width: $column / 12 * 100%;
	}
	$column: $column - 1;
}

// 编译为css
.col-sm-12 {
    width: 100%;
}

.col-sm-11 {
    width: 91.6666666667%;
}

.col-sm-10 {
    width: 83.3333333333%;
}

.col-sm-9 {
    width: 75%;
}

.col-sm-8 {
    width: 66.6666666667%;
}

.col-sm-7 {
    width: 58.3333333333%;
}

.col-sm-6 {
    width: 50%;
}

.col-sm-5 {
    width: 41.6666666667%;
}

.col-sm-4 {
    width: 33.3333333333%;
}

.col-sm-3 {
    width: 25%;
}

.col-sm-2 {
    width: 16.6666666667%;
}

.col-sm-1 {
    width: 8.3333333333%;
}
@import
scss拓展了@import的功能,允许其导入 scss 或 sass 文件。被导入的文件将合并编译到同一个css文件中,被导入的文件所包含的变量或者混合指令(mixin)都可以在导入的文件中使用。
common.scss
$color: red;
index.scss
@import "common.scss";
.container {
	border-color: $color;
}

// 编译为css
.container {
	border-color: red;
}
以下情况下,@import仅作为普通的css语句,不会导入scss文件;
- 文件扩展名是.css;
- 文件名以http:// 开头;
- 文件名是url();
- @import包含媒体查询。
@import "common.css";
@import url(common);
@import "http://xxx.com/xxx";
@import 'landscape' screen and (orientation: landscape);
scss允许同事导入多个文件,例如同时导入a.scss与b.scss两个文件,不用再单独写个import引入
@import "a", "b";
@Partials
如果需要导入scss或sass文件,但又不希望将其编译为css,只需要在文件名前添加下划线,这样会告诉scss不要编译这些文件。
注
- 导入语句中不需要添加下划线
- 不可以同时存在添加下划线与末添加下划线的同名文件,添加下划线的文件将会被忽略
_common.scss
$color: red;
index.scss
@import "common.scss";
.container {
	border-color: $color;
}

// 编译为
.container {
	border-color: red;
}
_common.scss 文件不会编译成 _common.css文件,Partials主要是用来定义公共样式的,专门用于被其他的 scss 文件 import 进行使用的
@mixin
混合指令(Mixin)用于定义可重复使用的样式。混合指令可以包含所有css规则,绝大部分scss规则,甚至可以通过参数功能引入变量,输出多样化的样式;
@mixin 和 @include 配合使用
// 定义一个区块基本的样式
@mixin block {
	width: 96%;
	margin-left: 2%;
	border-radius: 8px;
	border: 1px #f6f6f6 solid;
}
// 使用混入
.container {
	.block {
		@include block;
	}
}

// 编译为css
.container .block {
	width: 96%;
	margin-left: 2%;
	border-radius: 8px;
	border: 1px #f6f6f6 solid;
}
@mixin可以定义多个参数和默认值
// 定义块元素内边距,参数指定默认
@mixin block-padding($top: 0, $right: 0, $bottom: 0, $left: 0) {
	padding-top: $top;
	padding-right: $right;
	padding-bottom: $bottom;
	padding-left: $left;
}

// 可指定参数赋值
.container {
	// 不带参数
	@include block-padding;
	// 按顺序指定参数值
	@include block-padding(10px, 20px);
	// 给指定参数指定值
	@include block-padding($left: 10px, $top: 20px)
}

// 编译为css
.container {
	// 不带参数
	padding-top: 0;
	padding-right: 0;
	padding-bottom: 0;
	padding-left: 0;

	// 按顺序指定参数值
	padding-top: 10px;
	padding-right: 20px;
	padding-bottom: 0;
	padding-left: 0;

	// 给指定参数指定值
	padding-top: 20px;
	padding-right: 0;
	padding-bottom: 0;
	padding-left: 10px;
}
可变参数
可变参数:使用…处理参数不固定的情况,类似于js中的函数的剩余参数
@mixin linear-gradient($direction, $gradients...) {
	background-color: nth($gradients, 1);
	background-image: linear-gradient($direction, $gradients);
}
.table-data {
	@include linear-gradient(to right, #F00, orange, yellow);
}

// 编译为css
.table-data {
	background-color: #F00;
	background-image: linear-gradient(to right, #F00, orange, yellow);
}
总结:
- mixin是可以重复使用的一组css声明,有助于减少重复代码,只需声明一次,就可在文件中引用;
- 使用参数时建议加上默认值;
- @import 导入局部模块化样式(类似功能、同一组件);
- @mixin 定义的是可重复使用的样式
@function 函数
@function 用于封装复杂的操作,可以很容易地以一种可读的方式抽象出通用公式和行为,函数提供返回值,常用来做计算方面的工作
@function 参数默认值
// change-color和hue是内置方法
// hue 返回$color的颜色为0-36度之间的一个数字
// change-color 用于设置颜色的属性
@function invert($color, $amount: 100%) {
	$inverse: change-color($color, $hue: hue($color) + 180);
	@return mix($inverse, $color, $amount);
}
$primary-color: #036;
.header {
	background-color: invert($primary-color, 80%);
}

// 编译css
.header {
 	background-color: #523314;
}
可变参数js function的rest参数
@function sum($numbers...) {
	$sum: 0;
	@each $number in $numbers {
		$sum: $sum + $number;
	}
	@return $sum;
}
$widths: 50px, 30px, 100px;
.micro {
	width: sum($widths...);
}

// 编译为css
.micro {
	width: 180px;
}
@return 只允许在@function内使用,和js一样,遇到return就会返回
总结
- @function 和 @mixin 参数的使用方式没啥区别;
- @funtion 用来计算,@mixin 用来封装样式,@import 用来抽离他们为一个模块
@extend继承
以elementUI的el-button 组件为例,可以使用@extend继承已经存在的样式,使用逗号选择器。
// # id选择器一样的
.button {
 	border: 1px solid transparent;
    padding: 6px 12px;
    font-size: 14px;
}
.btn-default {
	@extend .button;
	color: #333;
	background-color: #fff;
	border-color: #ccc;
}
.btn-danger {
	@extend .button;
	color: #fff;
	background-color: red;
	border-color: #d43f3a;
}

// 编译成css
.button, .btn-default, .btn-danger {
 	border: 1px solid transparent;
    padding: 6px 12px;
    font-size: 14px;
}
.btn-default {
	color: #fff;
	background-color: red;
	border-color: #d43f3a;
}
.btn-danger {
	color: #fff;
	background-color: red;
	border-color: #d43f3a;
}
占位符选择器
占位符选择器%, 与常用的id与class选择器写法相似,只是#或.替换成了%,占位符选择器必须通过@extand指令调用
// 效果和上面的选择器一样,但他有个优点,占位符选择器%所属的样式未使用时,不会被编译到css文件中
.button %base {
    border: 1px solid transparent;
    padding: 6px 12px;
    font-size: 14px;
}
.btn-default {
	@extend %base;
	color: #333;
	background-color: #fff;
	border-color: #ccc;
}
.btn-danger {
	@extend %base;
	color: #fff;
	background-color: red;
	border-color: #d43f3a;
}

// 编译效果
.button, .btn-default, .btn-danger {
    border: 1px solid transparent;
    padding: 6px 12px;
    font-size: 14px;
}
.btn-default {
	color: #333;
	background-color: #fff;
	border-color: #ccc;
}
.btn-danger {
	color: #fff;
	background-color: red;
	border-color: #d43f3a;
}
@use
存在兼容性问题,支持dart sass 1.23.0以上 官方文档
css真正意义上的模块化,可以从其它scss样式表中加载mixin、function和变量,并将来自多个样式表的css组合在一起。scss还提供了很多内置模块,我们可以通过@use使用,官方也推荐使用@use替换@import,后续会废弃@import
@import缺点
- 多处导入,存在样式重复加载
- 没有命名空间,为了避免撞名,不敢使用简写的classname,因此起名总是需要注意。
- 没有私有函数的概念,样式完全暴露在使用import的地方,这对ui库不够友好
@use使用默认带有命名空间,也可以重复命名空间
// src/_corners.scss
$radius: 3px;
@mixin rounded {
	border-radius: $radius;
}
// index.scss
@use "src/corners";  // 默认命名空间corners
// @use "src/corners" as c;  // 重命名空间
.button {
	@include corners.rounded;
	padding: 5px + corners.$radius;
	// padding: 5px + c.$radius;  // 重命名c引用
}
// as * 让模块处于全局命名空间,不需要带上命名空间就可以直接使用
$radius: 3px;
@mixin rounded {
	border-radius: $radius;
}
// 使用
@use "src/corners" as *;
.button {
	@include rounded;
	padding: 5px + $radius;
}
私有模块
// 变量使用-开头,@use不会引入这个变量
$-radius: 3px;
@mixin rounded {
	border-radius: $-radius;
}
// index.scss
@use "src/corners";
.button {
	@include corners.rounded;
	// Error: Private members can't be accessed from outside their modules
	padding: 10px + corners.$-radius;
}
@forward
@forward可以看作是转发,在当前模块引入另一个模块的所有变量、mixins 和函数,直接向外暴露API,不会在当前模块增加代码,不同于 @use, @forward 不能给变量添加命名空间
例如在bootstrap.css引入functions、variables、mixins文件,不能直接在bootstrap.scss文件中使用这些引入的模块。而是需要在另一个文件中引入@use bootstrap模块,再去使用这些方法
// bootstrap.scss
@forward"functions";
@forward"variables";
@forward"mixins";
@forward通过控制show和hide显示或隐藏模块中的某些变量
// a.scss
@mixin rounded {
	border-radius: 100px;
}
footer {
	height: 1px;
}
// b.scss
$radius: 3px;
// c.scss
@forward "a" rounded;
@forward "b" hide $radius;
// index.scss
@import "c.scss";
.button {
	@include rounded;
	// Error: Undefined variable. padding: $radius;
	// $radius在c.scss中隐藏了所以不能使用
	padding: $radius;
}
@at-root
@at-root 用来跳出嵌套,在多级嵌套时比较常用,包含without 和 with
// 没有跳出
.parent-1 {
	color: #f00;
	.child {
		width: 100px;
	}
}

// 单个选择器跳出
.parent-2 {
	color: #f00;
	@at-root .child {
		width: 200px;
	}
}

// 多个选择器跳出
.parent-3 {
	background: #f00;
	@at-root {
		.child1 {
			width: 300px;
		}
		.child2 {
			width: 400px;
		}
	}
}

// 编译为
.parent-1 {
	color: #f00;
}
.parent-1 .child {
	width: 100px;
}
.parent-2 {
	color: #f00;
}
.child {
	width: 200px;
}
.parent-3 {
	background: #f00;
}
.child1 {
	width: 300px;
}
.child2 {
	width: 400px;
}
@without 和 with
默认@at-root只会跳出选择器嵌套,而不能跳出@media或@support,如果要跳出这两种,则需使用@at-root (without: media) 或 @at-root (without: support), @at-root的关键词有四个
- all 表示所有;
- rule 表示常规 css 选择器;
- media 表示 media;
- support 表示 support(@support主要是用于检测浏览器是否支持css的某个属性)
默认的@at-root 是 @at-root (without: rule)
// 跳出父级元素嵌套
@media print {
	.parent1 {
		color: #f00;
		@at-root .child1 {
			width: 200px;
		}
	}
}

// 跳出media嵌套,父级有效
@media print {
	.parent2 {
		color: #f00;
		@at-root (without: media) {
			.child2 {
				width: 200px;
			}
		}
	}
}

// 跳出media 和父级
@media print {
	.parent3 {
		color: #f00;
		@at-root (without: all) {
			.child3 {
				width: 200px;
			}
		}
	}
}

//编译成
// 跳出父级元素嵌套
@media print {
	.parent1 {
		color: #f00;
	}
	.child1 {
		width: 200px;
	}
}
// 跳出media嵌套,父级有效
@media print {
	.parent2 {
		color: #f00;
	}
}
.parent2 .child2 {
	width: 200px;
}
// 跳出media 和父级
@media print {
	.parent3 {
		color: #f00;
	}
}
.child3 {
	width: 200px;
}
@at-root与&配合使用
.child {
	@at-root .parent & {
		color: #f00;
	}
}

// 编译为
.parent .child {
	color: #f00;
}
scss内置扩展
scss内置扩展分为color, list, map, math, meta, selector, string 等,扩展也就是scss内置的一些funtion,相当于JS内置方法
内置函数可以使用 @use 模块化引入,也可以直接使用他提供的全局函数名调用,以下两种方式是一样的
@use 'sass:list';
p {
	color: nth($list: red blue green, $n: 2);  // blue
	color: list.nth($list: red blue green, $n: 2);  // blue
}
string字符串函数
scss有许多处理字符串的函数
- quote($string) 向字符串添加引号
quote(hello) // "hello"
- unquote($string) 移除字符串的引号
unquote("hello") // hello
- str-index($string, $substring) 返回substring 子字符串第一次在string 中出现的位置。如果没有匹配到子字符串,则返回null。区分大小写
str-index(abcd, a)  // 1
str-index(abcd, ab)  // 1
str-index(abcd, x)  // null
- str-length($string) 获取字符串长度
str-length("hello") // 5
- str-slice($string, $start-at, $end-at: -1) 从string中截取子字符串,通过start-at 和 end-at 设置始末位置,未指定结束索引值则默认截取到字符串末尾。和js感觉有点相似
str-slice("abcd", 2, 3)  //bc
str-slice("abcd", 2)  // bcd
str-slice("abcd", -3, -2)  // bc
其他
- to-lower-case(string) 将字符串转成小写
- to-upper-case(string) 将字符串转成大写
- unique-id() 返回一个无引号的随机字符串作为id
例如
p {
	&:after {
		content: quote(这是里面的内容);
	}
	background-color: unquote($string: "#F00");
	z-index: str-length("scss学习");
}

// 编译结果
p {
	background-color: #F00;
	z-index: 6;
}
p:after {
	content: "这是里面的内容";
}
Math数学函数
Math数值函数处理数值计算
- abs(number) 返回一个数值的绝对值
abs(13)  // 13
abs(-13)  // 13
- comparable(num1, num2) 返回一个布尔值,判断num1 与num2 是否可以进行比较,注意是否可以比较,不是比较的结果
comparable(15px, 10px)  // true
comparable(20mm, 1cm)  // true
comparable(35px, 2em)  // false
- ceil(number) 向上取整
ceil(13.14) // 14
- floor(number) 向下取整
floor(15.84) // 15
- max(number…) 返回最大值
max(5, 7, 9, 0, -3, -7) // 9
- min(number…) 返回最小值
min(7, 2, 0, -2, -7) // -7
- percentage(number) 将数字转化为百分比的表达形式
percentage(1.3) // 130
- random() 返回0-1区间内的小数
random() // 0.2783
- random(number) 如果传入number 参数,返回1至number之间的整数,包括1 和 limit
round(15) // 6
- round(number) 返回最接近该数的一个整数,四舍五入
round(15.20)  // 15
round(15.80)  // 16
- div($number1, $number2) number返回 $number2 除以 $number1 结果
@debug math.div(1, 2);  // 0.5
@debug math.div(100px, 5px);  // 20
@debug math.div(100px, 5);  // 20px
@debug math.div(100px, 5s)  // 20px/s
@debug math.percentage(0.2);  // 20%
例如
p {
	z-index: abs(-15);  // 15
	z-index: ceil(5.8);  // 6
	z-index: max(5, 1, 6, 8, 3);  // 8
	opacity: random()  // 随机0-1
}

// 编译为
p {
    z-index: 15;
    z-index: 6;
    z-index: max(5, 1, 6, 8, 3);
    opacity: 0.72;
}
List列表函数
List 特点
- List 函数可以访问列表中的值,向列表添加元素,合并列表等等
- List 列表是不可变的,因此在处理列表时,返回的是一个新的列表,而不是在原有的列表上进行修改。
- 列表的起始索引值为1,记住不是0
List方法
- append(list, value, [separator]) 将单个值value添加到列表尾部。separator是分隔符,默认会自动侦测,或者指定为逗号或空格,分别用comma、space表示
append((a b c), d)  // a b c d
append((a b c), (d), comma)  // a, b, c, d
- index(list, value) 返回元素value在列表中的索引位置
index(a b c, b)  // 2
index(a b c, f)  // null
- is-bracketed(list) 判断列表中是否有中括号
is-bracketed([a b c])  // true
is-bracketed(a b c)  // false
- list-separator(list) 返回一列表的分隔符类型。可以是空格或逗号
list-separator(a b c)  // "space"
list-separator(a, b, c)  // "comma"
- join(list1, list2, [separator, bracketed]) 合并两列表,将列表list2 添加到列表list1的末尾。separator是分隔符,默认会自动侦测,或者指定为逗号或空格。bracketed默认会自动侦测是否有中括号,可以设置为true或false
join(a b c, d e f)  // a b c d e f
join((a b c), (d e f), comma)  // a, b, c, d, e, f
join(a b c, d e f, $bracketed: true)  // [a b c d e f]
- length($list) 返回列表长度
length(a b c) // 3
- set-nth(list, n, value) 设置列表第n项的值为value
set-nth(a b c, 2, x) // a x c
- nth($list, $n) 获取第n项的值
nth(a b c, 3) // c
- zip(lists) 将多个列表按照以相同索引值为一组,重新组成一个新的多维度列表
zip(1px 2px 3px, solid dashed botted, red green blue)
// 1px solid red, 2px dashed green, 3px botted blue
例如
p {
	z-index: length(12px);  // 1
	z-index: length(12px 5px 8px);  // 3
	z-index: index(a b c d, c);  // 3
	padding: append(10px 20px, 30px);  // 10px 20px 30px
	color: nth($list: red blue green, $n: 2);  // blue
	@debug list.zip(10px 50px 100px, short mid long);  // 10px short, 50px mid, 100px long
}

// 编译为
p {
	z-index: 1;
	z-index: 3;
	z-index: 3;
	padding: 10px 20px 30px;
	color: blue;
}
Map(映射)函数
Sass Map 是不可变的,因此在处理Map对象时, 返回的是一个新的Map对象,而不是在原有的Map对象上进行修改。
Map(映射)对象是以一对或多对的key/value来表示
- map-get(map, key) 返回Map中key所对应的value(值)。如果没有对应的key,则返回null值
$font-sizes: ("small": 12px, "normal": 18px, "large": 24px)
map-get($font-sizes, "small")  // 12px
- map-has-key(map, key) 判断map是否有对应的key, 存在返回true,否则返回false
$font-sizes: ("small": 12px, "normal": 18px, "large": 24px)
map-has-key($font-sizes, "big")  // false
- map-keys(map) 返回map中所有的key组成的队列
$font-sizes: ("small": 12px, "normal": 18px, "large": 24px)
map-keys($font-sizes)  // "small", "normal", "large"
- map-values(map) 返回map中所有的value并生成一个队列
$font-sizes: ("small": 12px, "normal": 18px, "large": 24px)
map-values($font-sizes)  // 12px, 18px, 24px
- map-merge(map1, map2) 合并两个map形成一个新的map类型,即将map2添加到map1的尾部
$font-sizes: ("small": 12px, "normal": 18px, "large": 24px)
$font-sizes2: ("x-large": 30px, "xx-large": 26px)

map-merge($font-sizes, $font-sizes2)
// "small": 12px, "normal": 18px, "large": 24px, "x-large": 30px, "xx-large": 26px
- map.deep-merge($map1, $map2) 将两个嵌套map深度合并
$helvetica-light: (
	"weights": (
		"lightest": 100,
		"light": 300
	)
);
$helvetica-heavy: (
	"weights": (
		"medium": 500,
		"bold": 700
	)
)

@debug map.deep-merge($helvetica-light, $helvetica-heavy)
// 解析内容为
(
	"weights": (
		"lightest": 100,
		"light": 300,
		"medium": 500,
		"bold": 700
	)
)

@debug map.merge($helvetica-light, $helvetica-heavy)
// 解析内容为
(
	"weights": (
		"medium": 500,
		"bold": 700
	)
)
- map-remove(map, keys…) 移除map中的keys, 多个key使用逗号隔开
$font-sizes: ("small": 12px, "normal": 18px, "large": 24px)
map-remove($font-sizes, "small")  // ("normal": 18px, "large": 24px)
map-remove($font-sizes, "small", "large")  // ("normal": 18px)
- map.deep-remove($map, $key, $keys…) 多层嵌套删除,删除层级根据参数个数
$fonts: (
	"Helvetica": (
		"weights": (
			"regular": 400,
			"medium": 500,
			"bold": 700
		)
	)
);

@debug map.deep-remove($fonts, "Helvetica", "weights", "regular");
// 解析后为
(
	"Helvetica": (
		"weights": (
			"medium": 500,
			"bold": 700
		)
	)
)
- map.set($map, $keys…, $value)添加key和value 值, 第一个是map, 最后一个是value,中间是key, 嵌套传入多个key…
$fonts: (
	"Helvetica": (
		"weights": (
			"regular": 400,
			"medium": 500,
			"bold": 700
		)
	)
);
@debug map.set($fonts, "Helvetica", "weights", "regular", 300);
(
	"Helvetica": (
		"weights": (
			"regular": 300,
			"medium": 500,
			"bold": 700
		)
	)
)
例如
@use 'sass:map';

// 创建Map,类似于对象
$map: (
	key: value,
	nextkey: nextvalue
);

// 使用
.element:before {
	content: map-get($map, key);
}

// 编译为
.element:before {
	content: value
}
map在@each应用
// 定义一个sass map名称为$icons
$icons: (
	checkmark: a,
	plus: b,
	minus: c
);
// 遍历map的所有key,创建各自的类
@each $name, $value in $icons {
	.icon--#{$name} {
		content: $value;
	}
}

// 编译为
// 遍历map的所有key,创建各自的类
.icon--checkmark {
	content: "a";
}
.icon--plus {
	content: "b";
}
.icon--minus {
	content: "c"
}
@each遍历嵌套map多个值
- 给map一个key赋予多个value(相当于数组),多个value之间通过逗号,来分割
- 定义一系列buttons,每一个key的第一个value是background-color, 第二个value是font-color。
- 遍历 b u t t o n s 赋值给 buttons赋值给 buttons赋值给colors对象。通过nth($colors, 1) (第一个参数是对象的名称,第二个参数是值得位置)拿到第一个key。如果需要拿第二个value,那将第二个参数改为2。
$buttons: (
	error: (#d82d2d, #666),
	success: (#52bf4a, #fff),
	warning: (#c23435, #fff)
);
.m-button {
	display: inling-block;
	padding: .5em;
	background: #ccc;
	color: #666;

	@each $name, $colors in $buttons {
		$bgcolor: nth($colors, 1);
		$fontcolor: nth($colors, 2);

		&--#{&name} {
			background-color: $bgcolor;
			color: $fontcolor;
		}
	}
}

// 编译为
.m-button {
	display: inling-block;
	padding: .5em;
	background: #ccc;
	color: #666;
}
.m-button--error {
	background-color: #d82d2d;
	color: #666;
}
.m-button--success {
	background-color: #52bf4a;
	color: #fff;
}
.m-button--success {
	background-color: #c23435;
	color: #fff;
}
selector 选择器函数
selector 相关函数可对选择 css 进行一些相应的操作
- is-superselector(super, sub) 比较两个选择器匹配的范围, 即判断 super 选择器是否包含了 sub 选择器所匹配的范围,是的话返回 true , 否则返回 false
is-superselector("div", "div.myInput")  // true
is-superselector("div.myInput", "div")  // false
is-superselector("div", "div")  // true
- selector-append(selectors) 将第二个(也可以有多个)添加到第一个选择器的后面
selector-append("div", ".myInput")  // div.myInput
selector-append(".warning", "_a")  // .warning_a
- selector-nest(selectors) 回一个新的选择器,该选择器通过提供的列表选择器生成一个嵌套的列表
selector-nest("ul", "li")  // ul li
selector-nest(".warning", "alert", "div")  // .warning div, alert div
- selector-parse(selector) 将字符串的选择符 selector 转换为选择器队列。
selector-parse("h1 .myInput .warning") // ("h1" ".myInput" ".warning")
- selector-replace(selector, original, replacement) 给定一个选择器,用replacement 替换 original 后返回一个新的选择器队列
selector-replace("p.warning", "p", "div") // div.warning
- selector-unify(selector1, selector2) 将两组选择器合成一个复合选择器。如果两个选择器无法合成,则返回null值
selector-unify("myInput", ".disabled")  // myInput.disabled
selector-unify("p", "h1")  // null
- simple-selectors(selectors) 将合成选择器拆为单个选择器
simple-selectors("div.myInput")  // div, .myInput
simple-selectors("div.myInput: before") // div, .myInput, :before
例如
@use "sass:selector";
@debug selector.is-superselector("a", "a");  // true
// 可以直接使用@forward下的前缀
@debug selector-append("a", ".disabled");  // a.disabled
@debug selector-extend("a.disabled", "a", ".link");  // a.disabled, .link.disabled
.header {
	content: selector-append(".a", ".b", ".c") + '';
	content: selector-unify("a", ".disabled") + '';
}
meta
meta 提供了一个 mixin 和一些原子级别的 function
- meta.calc-args 获取方法的参数
- meta.calc-name 获取方法名
meta.load-css
meta.load-css($url, w i d t h : ( ) ) 把 width: ()) 把 width:())把url中css样式全部包含进来。注意,$url引入的函数,变量和mixin 在 metha.load-css() 后的 scss 中并不能用,只会返回编译后的 css 代码。第二个参数可以修改使用了 !default 的变量。
// src/corners
$border-contrast: false !default;
code {
	background-color: #6b717f;
	color: #d2e1dd;
	@if $border-contrast {
		border-color: #dadbdf;
	}
}
// index.scss
@use "sass:meta";
body.dark {
	@include meta.load-css("src/corners", $width: ("border-contrast": true));
}

// 编译为
body.dartk code {
	background-color: #6b717f;
	color: #d2e1dd;
	border-color: #dadbdf;
}
相关function
@use "sass:meta";
@debug meta.calc-args(calc(100px + 10%));  // unquote("100px + 10%")
@debug meta.calc-args(clamp(50px, var(--width), 1000px));  // 50px,unquote("var(--width)"), 1000px
@debug meta.calc-name(calc(100px + 10%));  // "calc"
@debug meta.calc-name(clamp(50px, var(--width), 1000px));  // "clamp"
color颜色函数
scss包含很多操作颜色的函数。
- rgb(red, green, blue) 创建一个Red-Green-Blue(RGB) 色。其中R是 red 表示红色,green绿色, blue蓝色
rgb(0, 255, 255);
- rgba(red, green, blue, alpha) 根据红绿蓝和透明度值 创建一个颜色
rgba(0, 255, 255, 0.3);
- hsl(hue, saturation, lightness) 通过色相(hue)、饱和度(saturation)和亮度(lightness)的值创建一个颜色
hsl(120, 100%, 50%);  // 绿色
hsl(120, 100%, 75%);  // 浅绿色
hsl(120, 100%, 25%);  // dark green
hsl(120, 60%, 70%);  // 柔和的绿色
- hsla(hue, saturation, lightness, alpha) 通过色相(hue)、饱和度(saturation)、亮度(lightness) 和透明(alpha)的值创建一个颜色
hsla(120, 100%, 50%, 0.3);  // 绿色带有透明度
hsla(120, 100%, 75%, 0.3);  // 浅绿色带有透明度
- grayscale(color) 将一个颜色变成灰色,相当于 desaturate(color, 100%)
grayscale(#7fffd4); // #c6c6c6
- complement(color) 返回一个补充色, 相当于 adjust-hue($color, 180deg)
complement(#7fffd4); // #ff7faa
- invert(color, weight) 返回一个反相色,红绿蓝值倒过来,而透明度不变
invert(white); // black
- red(color) 从一个颜色中获取其中红色值(0-255),可用于取出某个hex颜色中的红色值
red(#7fffd4);  // 127
red(red);  // 255
- green(color) 从一个颜色中获取其中绿色值(0-255)
green(#7fffd4);  // 255
green(blue);  // 0
- blue(color) 从一个颜色中获取其中蓝色值(0-255)
blue(#7fffd4);  // 212
blue(blue);  // 255
- hue(color) 返回颜色在HSL 色值中的角度值(0deg-255deg)
hue(#7fffd4); // 160deg
- saturation(color) 获取一个颜色的饱和度值(0%-100%)
saturation(#7fffd4); // 100%
- lightness(color) 获取一个颜色的亮度值(0%-100%)
lightness(#7fffd4); // 74.9%
- alpha(color) 返回颜色的alpha ,返回值为0或1
alpha(#7fffd4); // 1
- opacity(color) 获取颜色透明度值(0-1)
opacity(rgba(127, 255, 212, 0.5); // 0.5
- mix(color1, color2, weight) 把两种颜色混合起来。
weight 参数必须是 0%到100%。默认weight为50%,表明颜色各取 50% color1 和 color2 的色值相加。如果weight为25% color1 和 75% color2 的色值相加 - adjust-hue(color, degrees) 通过改变一个颜色的色相值(-360deg-360deg), 创建一个新的颜色
adjust-hue(#7fffd4, 80deg); // #8080ff
- lighten(color, amount) 通过改变颜色的亮度值(0%-100%),让颜色变亮,创建一个新的颜色
- darken(color, amount) 通过改变颜色的亮度值(0%-100%),让颜色变暗,创建一个新的颜色
- saturate(color, amount) 提高传入颜色的色彩饱和度。等同于adjust-color(color, saturation: amount)
- desaturate(color, amount) 调低一个颜色的饱和度后产生一个新的色值。同样,饱和度的取值区间在0%-100%。等同于adjust-color(color, saturation: -amount)
- opacity(color, amount) 降低颜色的透明度,取值在0-1之间。等价于adjust-color(color, alpha: amount)
- fade-in(color, amount) 降低颜色的透明度,取值在0-1之间。等价于adjust-color(color, alpha: amount)
- transparentize(color, amount) 提升颜色的透明度,取值在0-1之间。等价于adjust-color(color, saturation: -amount)
- fade-out(color, amount) 提升颜色的透明度,取值在0-1之间。等价于adjust-color(color, saturation: -amount)
例如
.p1 {
	// 让颜色变亮
	color: scale-color(#5c7a29, $lightness: +30%);
}
.p2 {
	color: scale-color(#5c7a29, $lightness: -15%);
}
.p3 {
	// 降低颜色透明度
	color: scale-color(#5c7a29, $alpha: -40%);
}

// 编译为
.p1 {
	color: #95c249;
}
.p2 {
	color: #4e6823;
}
.ps {
	color: rgba(92, 122, 41, 0.6);
}
调试相关
@debug
@debug打印表达式的值,方便调试
$font-sizes: 10px + 20px;
$style: (
	color: #bdc3c7;
);
.container {
	@debug $style;
	@debug $font-sizes;
}

// 编译为
Debug: (color: #bdc3c7)
Debug: 30px
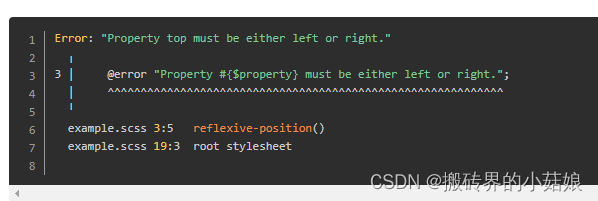
@error
@error 显示错误信息
@mixin reflexive-position($property, $value) {
	@if $property != left and $property != right {
		@error "Property #{$property} must be either left or right.";
	}
	$left-value: if($property == right, initial, $value);
	$right-value: if($property == right, $value, initial);

	left: $left-value;
	right: $right-value;
	[dir=rt] & {
		left: $right-value;
		right: $left-value;
	}
}
.sidebar {
	@include reflexive-position(top, 12px);
	// Error: Property top must be either left or right.
}
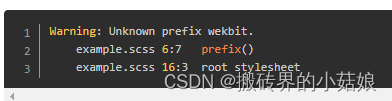
@warn
@warn 显示警告性建议,会显示堆栈信息。
$known-prefixes: webkit, moz, ms, o;
@mixin prefix($property, $value, $prefixes) {
	@each $prefix in $prefixes {
		@if not index($known-prefixes, $prefix) {
			@warn "Unknown prefix #{$prefix}.";
		}
		-#{$prefix}-#{$property}: $value;
	}
	#{$property}: $value;
}
.tilt {
	// Oops, we typo'd "webkit" as "wekbit"!
	@include prefix(transform, rotate(15deg), wekbit ms);
}
实现sass主题色修改
通过设置html的data-theme属性来设置主题,利用css选择器判断识别,设置不同的sass变量
方法一
// 找到项目的index.html文件,绑定data-theme属性
<html lang="en" data-theme="theme">
themecolor.scss
// 背景颜色
$background-color-theme: linear-gradient(135deg, #78ccf6 0%, #2998e8 100%);
$background-color-theme0: #2874ef;
$background-color-theme1: #ffab8f;

//其他按钮主题色
$other-btn-theme:#78CCF6;
$other-btn-theme0:#7fbaf5;
$other-btn-theme1:#FEEEDA;
mixins.scss
@import './themecolor.scss';
@mixin bg_color($color) {
    background-color: $color;
    [data-theme='theme'] & {
        background: $background-color-theme;
    }
    [data-theme='theme0'] & {
        background-color: $background-color-theme0;
    }
    [data-theme='theme1'] & {
        background-color: $background-color-theme1;
    }
}

@mixin other-btn-color($color) {
    background-color: $color;
    [data-theme = 'theme'] & {
        background-color: $other-btn-theme;
    }
    [data-theme = 'theme0'] & {
        background-color: $other-btn-theme0;
    }
    [data-theme = 'theme1'] & {
        background-color: $other-btn-theme1;
    }
}
在页面中
// data的值为theme、theme0、theme1
function changeTheme(data: string) {
    window.document.documentElement.setAttribute('data-theme', data)
}
<style lang="scss" scoped>
	@import '../scss/mixins';
	.home-content {
    	@include bg_color(#0d6efd);
	}
	.header-nav {
		……
    	@include bg_color(#0D6EFD);
    	&-btn {
    		……
        	@include other-btn-color(#78CCF6);
    	}
	}
</style>
方法二(进阶版)
<html lang="en" data-theme="theme">
themecolor.scss
$themes: (
    theme: (
        bgColor1: #2998e8,
        btnColor: #78CCF6
    ),
    theme0: (
        bgColor1: #2874ef,
        btnColor: #7fbaf5
    ),
    theme1: (
        bgColor1: #ffab8f,
        btnColor: #FEEEDA
    )
)
mixins.scss
// @each遍历themes,theme-name对应theme、theme0、theme1; theme-map对应theme、theme0、theme1的值
@mixin themeify {
    @each $theme-name, $theme-map in $themes {
        $theme-map: $theme-map !global;  // $theme-map为全局变量
        [data-theme = '#{$theme-name}'] & {  // & 嵌套里的父容器标识   @content是混合器插槽,像vue的slot
            @content
        }
    }
};
// map-get(map, key)返回map中key对应的value值,没有对应得
@function themed($key) {  // 例如 themed(btnColor)返回#78CCF6或#7fbaf5或#FEEEDA
    @return map-get($theme-map, $key)
};
@mixin bg_color($color) {
    @include themeify {
        background-color: themed($color);
    }
}
@mixin other-btn-color($color) {
    @include themeify {
        background-color: themed($color);
    }
}
页面中
// data的值为theme、theme0、theme1
function changeTheme(data: string) {
    window.document.documentElement.setAttribute('data-theme', data)
}
<style lang="scss" scoped>
@import '../scss/mixins';
.home-content {
    @include bg_color('bgColor1');
}
.header-nav {
	……
    @include bg_color('bgColor1');
    &-btn {
    	……
        @include other-btn-color('btnColor');

    }
}
</style>
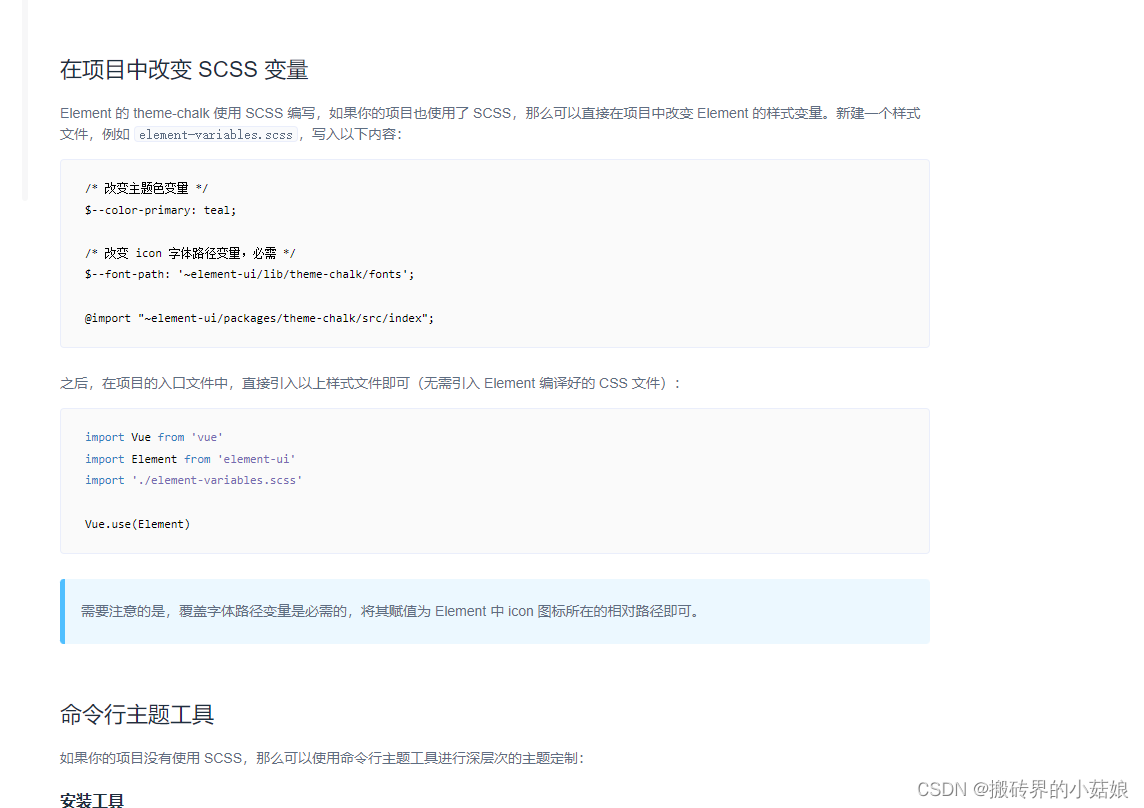
element-ui动态修改主题色
(注)动态修改主题色还没找到更好的方法,以下方法鸡肋的是,有几个主题就要创建相对一个修改element的主题色scss文件
https://element.eleme.cn/#/zh-CN/component/custom-theme
// 在index.js中
import Element from "element-ui";
// theme变量值为theme、theme0、theme1
let theme = document.documentElement.getAttribute('data-theme');
import(`./app/assets/style/element/element-variables-${theme}.scss`);
Vue.use(Element);

// 例如element-variables-theme.scss
$--color-primary: #F76400; /* 改变主题色变量 */
$--font-path: '~element-ui/lib/theme-chalk/fonts';/* 改变 icon 字体路径变量,必需 */

@import "~element-ui/packages/theme-chalk/src/index";
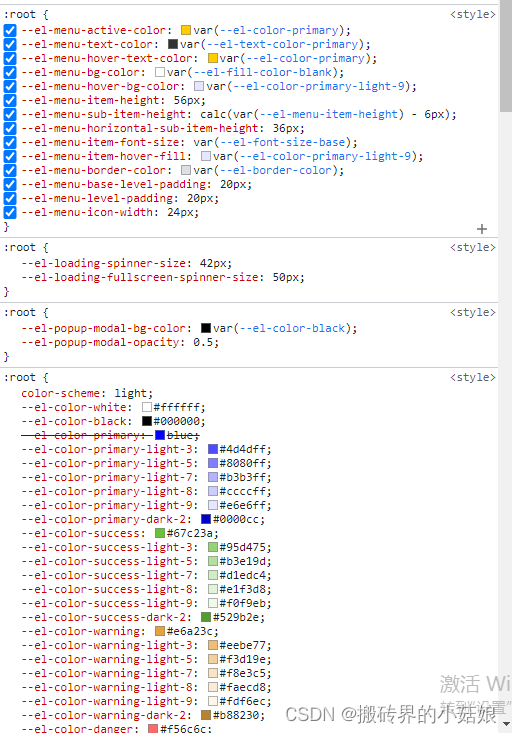
element-plus动态切换主题色
element-plus
在element-plus中可以看到他将一些样式挂在到了root下
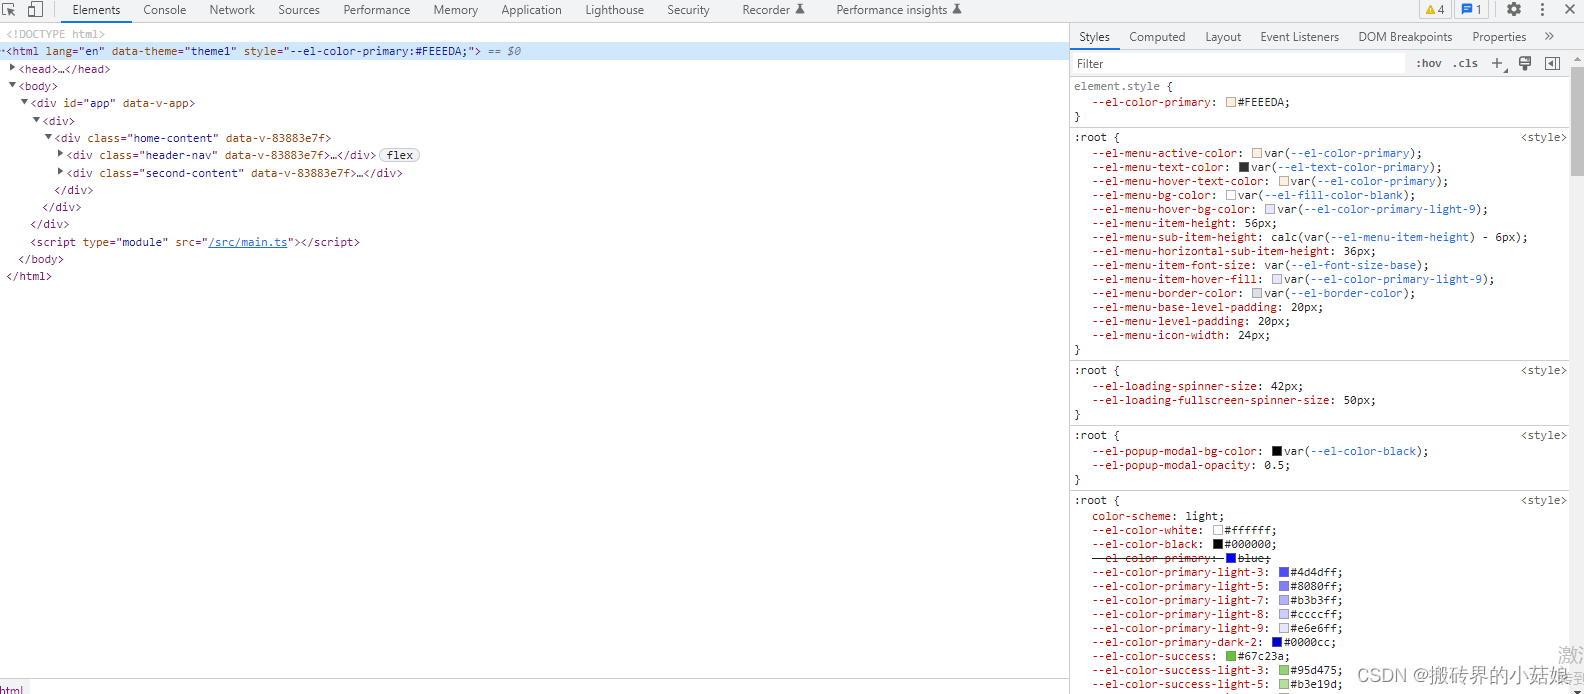
import themecolor from '../scss/variables.module.scss'
// data的值为theme、theme0、theme1
function changeTheme(data: string) {
    window.document.documentElement.setAttribute('data-theme', data)
    var root: any = document.querySelector(":root")
    var color = getComputedStyle(root).getPropertyValue('--el-color-primary')
    console.log("color=", color)
    root.style.setProperty('--el-color-primary', themecolor[`${data}btnColor`])
}


// variables.module.scss中
$themes1: red;
$themes: (
    theme: (
        bgColor1: #2998e8,
        btnColor: #78CCF6
    ),
    theme0: (
        bgColor1: #2874ef,
        btnColor: #7fbaf5
    ),
    theme1: (
        bgColor1: #ffab8f,
        btnColor: #FEEEDA
    )
);
:export {
    themes1: $themes1;
    themebtnColor: map-get(map-get($map: $themes, $key: theme), btnColor);
    theme0btnColor: map-get(map-get($map: $themes, $key: theme0), btnColor);
    theme1btnColor: map-get(map-get($map: $themes, $key: theme1), btnColor);
}
插播:读取:root的值
// 读取
 var root: any = document.querySelector(":root")
 var color = getComputedStyle(root).getPropertyValue('--el-color-primary')
 console.log("color========", color)

// 修改
root.style.setProperty('--el-color-primary', '#ffcc00')
插播:js中引入scss文件中变量
注意:这边需要区分vite+vue3.0
需要注意的是,在 vite 创建的项目中,如果你想在 js 里引用 scss 文件,需要在后缀前加上 .module 。(其余的不需要加后缀)
例如创建一个variables.module.scss文件(其余的命名为variables.scss就可)
// variables.module.scss 文件
$themes1: red;
$themes: (
    theme: (
        bgColor1: #2998e8,
        btnColor: #78CCF6
    ),
    theme0: (
        bgColor1: #2874ef,
        btnColor: #7fbaf5
    ),
    theme1: (
        bgColor1: #ffab8f,
        btnColor: #FEEEDA
    )
);
:export {
    themes1: $themes1
}


// 在页面中
import themecolor from '../scss/variables.module.scss'
console.log("themecolor",themecolor)


 497
497


 被折叠的 条评论
为什么被折叠?
被折叠的 条评论
为什么被折叠?
 到【灌水乐园】发言


