


YARN高可用架构涉及常用功能整理
探讨yarn的系统架构以及以及整体常用的命令和系统分析,本文主要探讨高可用版本的yarn集群,并基于日常工作中的沉淀进行思考和整理。
严格来说,yarn并不是一个大数据平台或者组件,只是一个调度框架或者平台,yarn本身只提供调度和运行任务的能力,本身并不存储数据。只是跟hdfs平台很相近,因此归档为大数据平台。能够跟yarn平台对标的调度平台很多,如k8s、海豚系统等
1. yarn的高可用系统架构和相关组件
yarn平台的组件比较简单,由于没有提供数据存储能力,只是提供调度平台能力,因此相对于hdfs,yarn在架构上,以及组件能力上,没有那么复杂,在架构上通过RM HA的方式进行高可用容错能力。
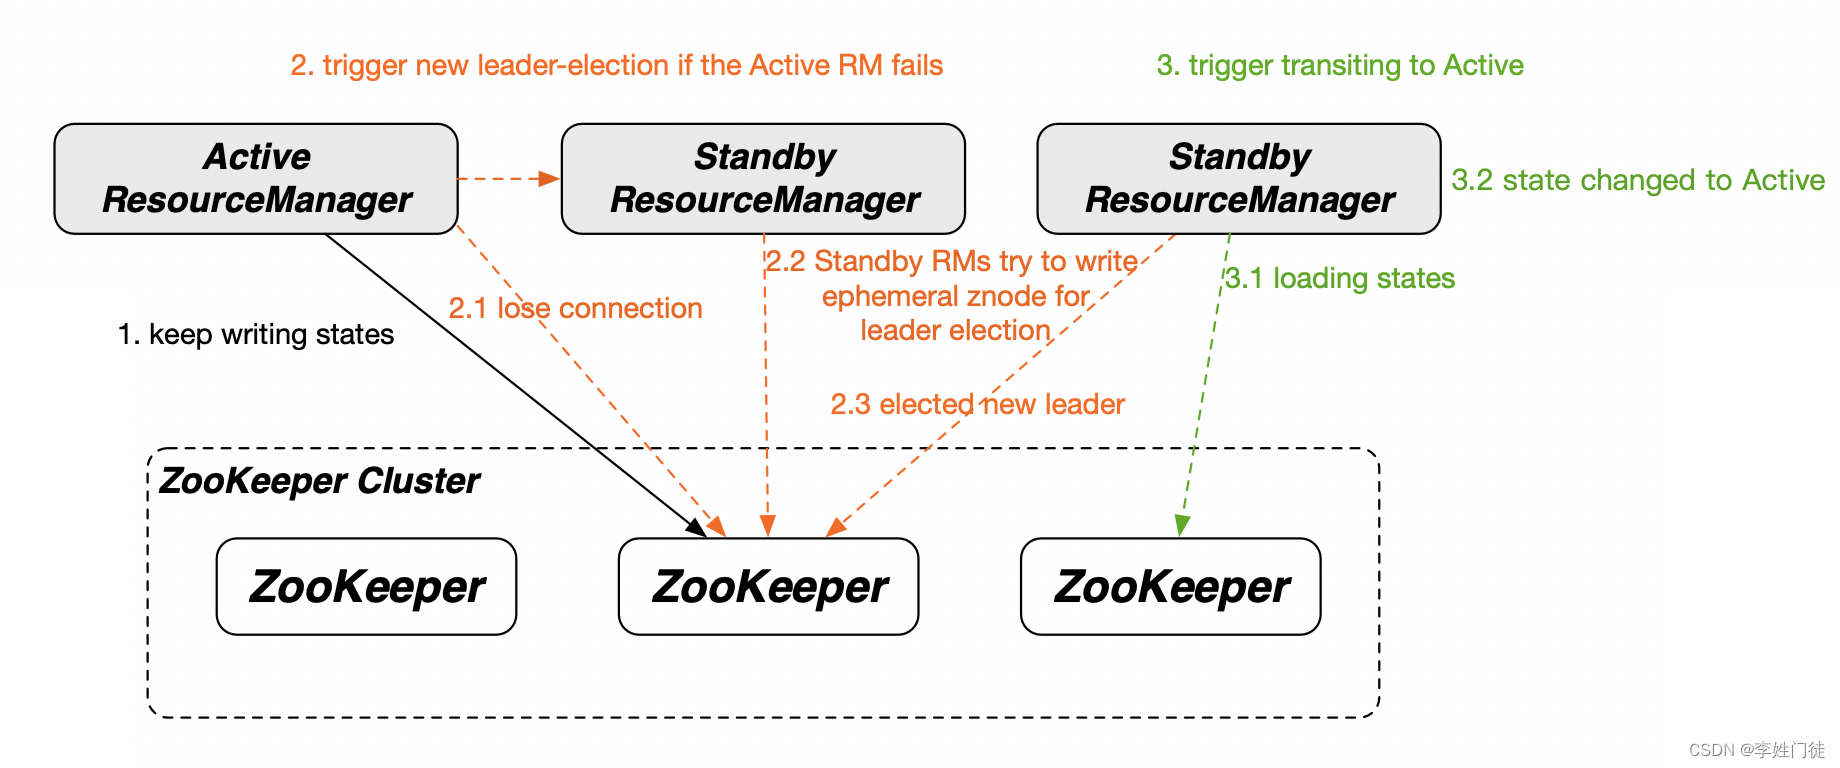
RM HA工作原理是在不同节点上启动多个RM进程,通过Leader选举决定有且只有1个Active RM,并由Active RM记录应用的基本信息与状态,写入Zookeeper存储中。如果Active RM进程或其所在节点存在问题,Standby RM能够基于Zookeeper的分布式锁机制选举出1个Active RM,新的Active RM将从Zookeeper存储中恢复出全部应用的信息与状态,继续提供资源管理与调度服务,从而避免单点故障。
相关核心的组件和角色作用如下
| 组件 | 部署模式 | 组件作用 | 备注 |
|---|---|---|---|
| RM | 多机器部署 | 提供资源调度能力,具备资源调度的全局视角 | 响应任务的提交、请求等服务,多RM节点形成主备 |
| NM | 单机部署 | 具体任务的运行节点 | 具体调度平台的工作节点,相关job会拆分到不同的NM节点上运行,执行相关的任务 |
| zk | 多节点部署 | zk提供yarn的nn选主锁和消息通知,zkfc接受相关zk进行主从切换 | 通过Zab 协议来保证分布式事务的最终一致性 |
2. yarn的核心参数
2.1 常规配置
yarn-core.yaml
<?xml version="1.0"?>
<configuration>
  <!-- Site specific YARN configuration properties -->
  <property>
    <name>yarn.nodemanager.aux-services</name>
    <value>mapreduce_shuffle</value>
  </property>
  <!--启用resourcemanager ha-->
  <property>
    <name>yarn.resourcemanager.ha.enabled</name>
    <value>true</value>
  </property>
  <!--声明yarn集群陪配置的地址-->
  <property>
    <name>yarn.resourcemanager.cluster-id</name>
    <value>support-yarn</value>
  </property>
  <!--声明两台resourcemanager的地址-->
  <property>
    <name>yarn.resourcemanager.ha.rm-ids</name>
    <value>resourcemanager1,resourcemanager2</value>
  </property>
  <property>
    <name>yarn.resourcemanager.hostname.resourcemanager1</name>
    <value>xx.xx.xx.xx</value>
  </property>
  <property>
    <name>yarn.resourcemanager.hostname.resourcemanager2</name>
    <value>xx.xx.xx.xx</value>
  </property>
    <property>
    <name>yarn.resourcemanager.scheduler.address.resourcemanager1</name>
    <value>xx.xx.xx.xx:8030</value>
  </property>
  <property>
    <name>yarn.resourcemanager.scheduler.address.resourcemanager2</name>
    <value>xx.xx.xx.xx:8030</value>
  </property>
  <property>
    <name>yarn.resourcemanager.address.resourcemanager1</name>
    <value>xx.xx.xx.xx:8032</value>
  </property>
  <property>
    <name>yarn.resourcemanager.address.resourcemanager2</name>
    <value>xx.xx.xx.xx:8032</value>
  </property>
  <property>
        <name>yarn.resourcemanager.webapp.address.resourcemanager1</name>
        <value>Master:8088</value>
    </property>
    <property>
        <name>yarn.resourcemanager.webapp.address.resourcemanager2</name>
        <value>Master2:8088</value>
    </property>
  <property>
    <name>yarn.resourcemanager.webapp.https.address.resourcemanager1</name>
    <value>hdfs-xx-xx-xx-xx:8090</value>
  </property>
  <property>
    <name>yarn.resourcemanager.webapp.https.address.resourcemanager2</name>
    <value>hdfs-xx-xx-xx-xx:8090</value>
  </property>
    <property>
    <name>yarn.resourcemanager.admin.address.resourcemanager1</name>
    <value>xx.xx.xx.xx:5003</value>
  </property>
  <property>
    <name>yarn.resourcemanager.admin.address.resourcemanager2</name>
    <value>xx.xx.xx.xx:5003</value>
  </property>
  <!--指定zookeeper集群的地址-->
  <property>
    <name>yarn.resourcemanager.zk-address</name>
    <value>xx.xx.xx.xx:2181,xx.xx.xx.xx:2181,xx.xx.xx.xx:2181</value>
  </property>
  <property>
    <name>yarn.resourcemanager.zk-auth</name>
    <value>digest:zk_user:zk_passwd</value>
  </property>
  <property>
    <name>yarn.resourcemanager.zk-acl</name>
    <value>digest:zk_user:Yg6OG5Tas/LEH5bd73noFMYG3xo=:rwcda</value>
  </property>
  <!--启用自动恢复-->
  <property>
    <name>yarn.resourcemanager.recovery.enabled</name>
    <value>true</value>
  </property>
  <!--指定resourcemanager的状态信息存储在zookeeper集群-->
  <property>
    <name>yarn.resourcemanager.store.class</name>
    <value>org.apache.hadoop.yarn.server.resourcemanager.recovery.ZKRMStateStore</value>
  </property>
  <property>
    <name>yarn.resourcemanager.scheduler.class</name>
    <value>org.apache.hadoop.yarn.server.resourcemanager.scheduler.capacity.CapacityScheduler</value>
  </property>
  <!-- <property>
    <name>yarn.scheduler.fair.allocation.file</name>
    <value>/usr/local/services/hadoop-2.9.2/etc/hadoop/capacity-scheduler.xml</value>
  </property>  -->
  <property>
    <name>yarn.nodemanager.local-dirs</name>
    <value>file:///data2/hadoop/yarn/local</value>
  </property>
  <property>
    <name>yarn.nodemanager.log-dirs</name>
    <value>file:///data2/hadoop/yarn/logs</value>
  </property>
  <property>
    <name>yarn.log-aggregation-enable</name>
    <value>true</value>
  </property>
  <property>
    <name>yarn.log-aggregation.retain-check-interval-seconds</name>
    <value>604800</value>
  </property>
  <property>
    <name>yarn.log-aggregation.retain-seconds</name>
    <value>640800</value>
  </property>
  <property>
    <description>Where to aggregate logs</description>
    <name>yarn.nodemanager.remote-app-log-dir</name>
    <value>/var/log/hadoop-yarn/apps</value>
  </property>
  <property>
    <name>yarn.nodemanager.log-aggregation.roll-monitoring-interval-seconds</name>
    <value>3600</value>
  </property>
  <property>
    <name>yarn.nodemanager.resource.memory-mb</name>
    <value>102400</value>
  </property>
  <property>
    <name>yarn.nodemanager.resource.cpu-vcores</name>
    <value>90</value>
  </property>
    <property>
    <name>yarn.log.server.url</name>
    <value>https://xx.xx.xx.xx:19890/jobhistory/logs</value>
  </property>
    <property>
      <name>yarn.app.mapreduce.am.staging-dir</name>
      <value>/tmp/logs/hadoop-yarn/staging</value>
  </property>
  <property>
    <name>yarn.nm.liveness-monitor.expiry-interval-ms</name>
    <value>100000</value>
  </property>
  <property>
    <name>yarn.resourcemanager.nodes.exclude-path</name>
    <value>/usr/local/services/hadoop-3.2.1/etc/hadoop/excludes_nodemanagers</value>
  </property>
    <!--指定keytab-->
    <property>
    <name>yarn.resourcemanager.keytab</name>
    <value>/usr/local/services/hadoop-3.2.1/etc/hadoop/yarn.keytab</value>
  </property>
  <property>
    <name>yarn.resourcemanager.principal</name>
    <value>yarn/_HOST@XXX.COM</value>
  </property>
  <property>
    <name>yarn.nodemanager.keytab</name>
    <value>/usr/local/services/hadoop-3.2.1/etc/hadoop/yarn.keytab</value>
  </property>
  <property>
    <name>yarn.nodemanager.principal</name>
    <value>yarn/_HOST@XXX.COM</value>
  </property>
  <property>
    <name>yarn.nodemanager.container-executor.class</name>
    <value>org.apache.hadoop.yarn.server.nodemanager.LinuxContainerExecutor</value>
  </property>
  <property>
    <name>yarn.nodemanager.linux-container-executor.group</name>
    <value>yarn</value>
  </property>
  <property>
    <name>mapreduce.application.classpath</name>
    <value>/usr/local/services/hadoop-3.2.1/share/hadoop/mapreduce/*,/usr/local/services/hadoop-3.2.1/share/hadoop/mapreduce/lib/*</value>
  </property>
  <!--指定resourcemanager的通过集群的目录,进行选主和HA-->
  <property>
    <name>yarn.resourcemanager.ha.automatic-failover.zk-base-path</name>
    <value>/yarn-leader-election-one</value>
  </property>
    <property>
    <name>yarn.http.policy</name>
    <value>HTTPS_ONLY</value>
  </property>
  <property>
    <name>yarn.application.classpath</name>
    <value>
      /usr/local/services/hadoop-3.2.1/etc/hadoop,
      /usr/local/services/hadoop-3.2.1/share/hadoop/common/lib/*,
      /usr/local/services/hadoop-3.2.1/share/hadoop/common/*,
      /usr/local/services/hadoop-3.2.1/share/hadoop/hdfs,
      /usr/local/services/hadoop-3.2.1/share/hadoop/hdfs/lib/*,
      /usr/local/services/hadoop-3.2.1/share/hadoop/hdfs/*,
      /usr/local/services/hadoop-3.2.1/share/hadoop/mapreduce/lib/*,
      /usr/local/services/hadoop-3.2.1/share/hadoop/mapreduce/*,
      /usr/local/services/hadoop-3.2.1/share/hadoop/yarn,
      /usr/local/services/hadoop-3.2.1/share/hadoop/yarn/lib/*,
      /usr/local/services/hadoop-3.2.1/share/hadoop/yarn/*,
      /usr/local/services/hadoop-3.2.1/contrib/capacity-scheduler/*.jar
    </value>
  </property>
</configuration>
2.2 队列配置
对于一个调度平台而言,队列的配置和类型至关重要。对于一个调度而言,都有一个目标,希望在满足任务调度需求的前提下,尽可能的提升整体平台的资源利用率! 。
有很多条件都会导致平台的资源利用率不高,比如
- 部分任务长期占用资源,但是本身资源利用率不高
- 平台本身的节点存在资源碎片,任务无法正常利用
- 实时、离线任务在不同时段运行,但是很多元素,导致不能混合部署等
在Yarn中有三种调度器可以选择:FIFO Scheduler,Capacity Scheduler,Fair Scheduler。
相关配置
<property>
    <name>yarn.resourcemanager.scheduler.class</name>
<value>org.apache.hadoop.yarn.server.resourcemanager.scheduler.capacity.CapacityScheduler</value>
</property>
1.FIFO Scheduler:
FIFO Scheduler把应用按提交的顺序排成一个队列,这是一个先进先出队列,在进行资源分配的时候,先给队列中最头上的应用进行分配资源,待最头上的应用需求满足后再给下一个分配,以此类推。
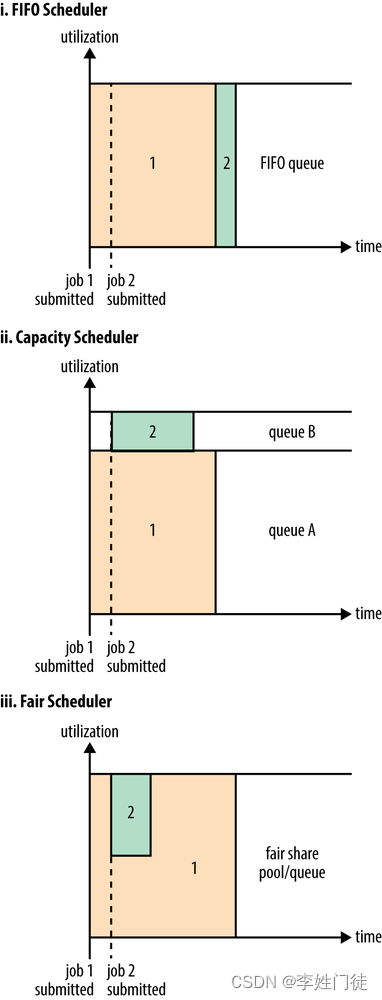
FIFO Scheduler是最简单也是最容易理解的调度器,也不需要任何配置,但它并不适用于共享集群。大的应用可能会占用所有集群资源,这就导致其它应用被阻塞。在共享集群中,更适合采用Capacity Scheduler或Fair Scheduler,这两个调度器都允许大任务和小任务在提交的同时获得一定的系统资源。下面 “Yarn调度器对比图” 展示了这几个调度器的区别,从图中可以看出,在FIFO 调度器中,小任务会被大任务阻塞。
2.Capacity Scheduler:
对于Capacity调度器,有一个专门的队列用来运行小任务,但是为小任务专门设置一个队列会预先占用一定的集群资源,这就导致大任务的执行时间会落后于使用FIFO调度器时的时间。
3.Fair Scheduler:
在 Fair 调度器中,我们不需要预先占用一定的系统资源,Fair 调度器会为所有运行的 job 动态的调整系统资源。如下图所示,当第一个大 job 提交时,只有这一个 job 在运行,此时它获得了所有集群资源;当第二个小任务提交后,Fair 调度器会分配一半资源给这个小任务,让这两个任务公平的共享集群资源。
需要注意的是,在下图Fair调度器中,从第二个任务提交到获得资源会有一定的延迟,因为它需要等待第一个任务释放占用的 Container。小任务执行完成之后也会释放自己占用的资源,大任务又获得了全部的系统资源。最终的效果就是 Fair 调度器即得到了高的资源利用率又能保证小任务及时完成。
3. yarn常用命令
yarn

下面为显示的内容:

Usage: yarn [OPTIONS] SUBCOMMAND [SUBCOMMAND OPTIONS]
 or    yarn [OPTIONS] CLASSNAME [CLASSNAME OPTIONS]
  where CLASSNAME is a user-provided Java class

  OPTIONS is none or any of:

--buildpaths                       attempt to add class files from build tree
--config dir                       Hadoop config directory
--daemon (start|status|stop)       operate on a daemon
--debug                            turn on shell script debug mode
--help                             usage information
--hostnames list[,of,host,names]   hosts to use in worker mode
--hosts filename                   list of hosts to use in worker mode
--loglevel level                   set the log4j level for this command
--workers                          turn on worker mode

  SUBCOMMAND is one of:


    Admin Commands:

daemonlog            get/set the log level for each daemon
node                 prints node report(s)
rmadmin              admin tools
scmadmin             SharedCacheManager admin tools

    Client Commands:

app|application      prints application(s) report/kill application/manage long running application
applicationattempt   prints applicationattempt(s) report
classpath            prints the class path needed to get the hadoop jar and the required libraries
cluster              prints cluster information
container            prints container(s) report
envvars              display computed Hadoop environment variables
jar <jar>            run a jar file
logs                 dump container logs
nodeattributes       node attributes cli client
queue                prints queue information
schedulerconf        Updates scheduler configuration
timelinereader       run the timeline reader server
top                  view cluster information
version              print the version

    Daemon Commands:

nodemanager          run a nodemanager on each worker
proxyserver          run the web app proxy server
registrydns          run the registry DNS server
resourcemanager      run the ResourceManager
router               run the Router daemon
sharedcachemanager   run the SharedCacheManager daemon
timelineserver       run the timeline server

SUBCOMMAND may print help when invoked w/o parameters or with -h.
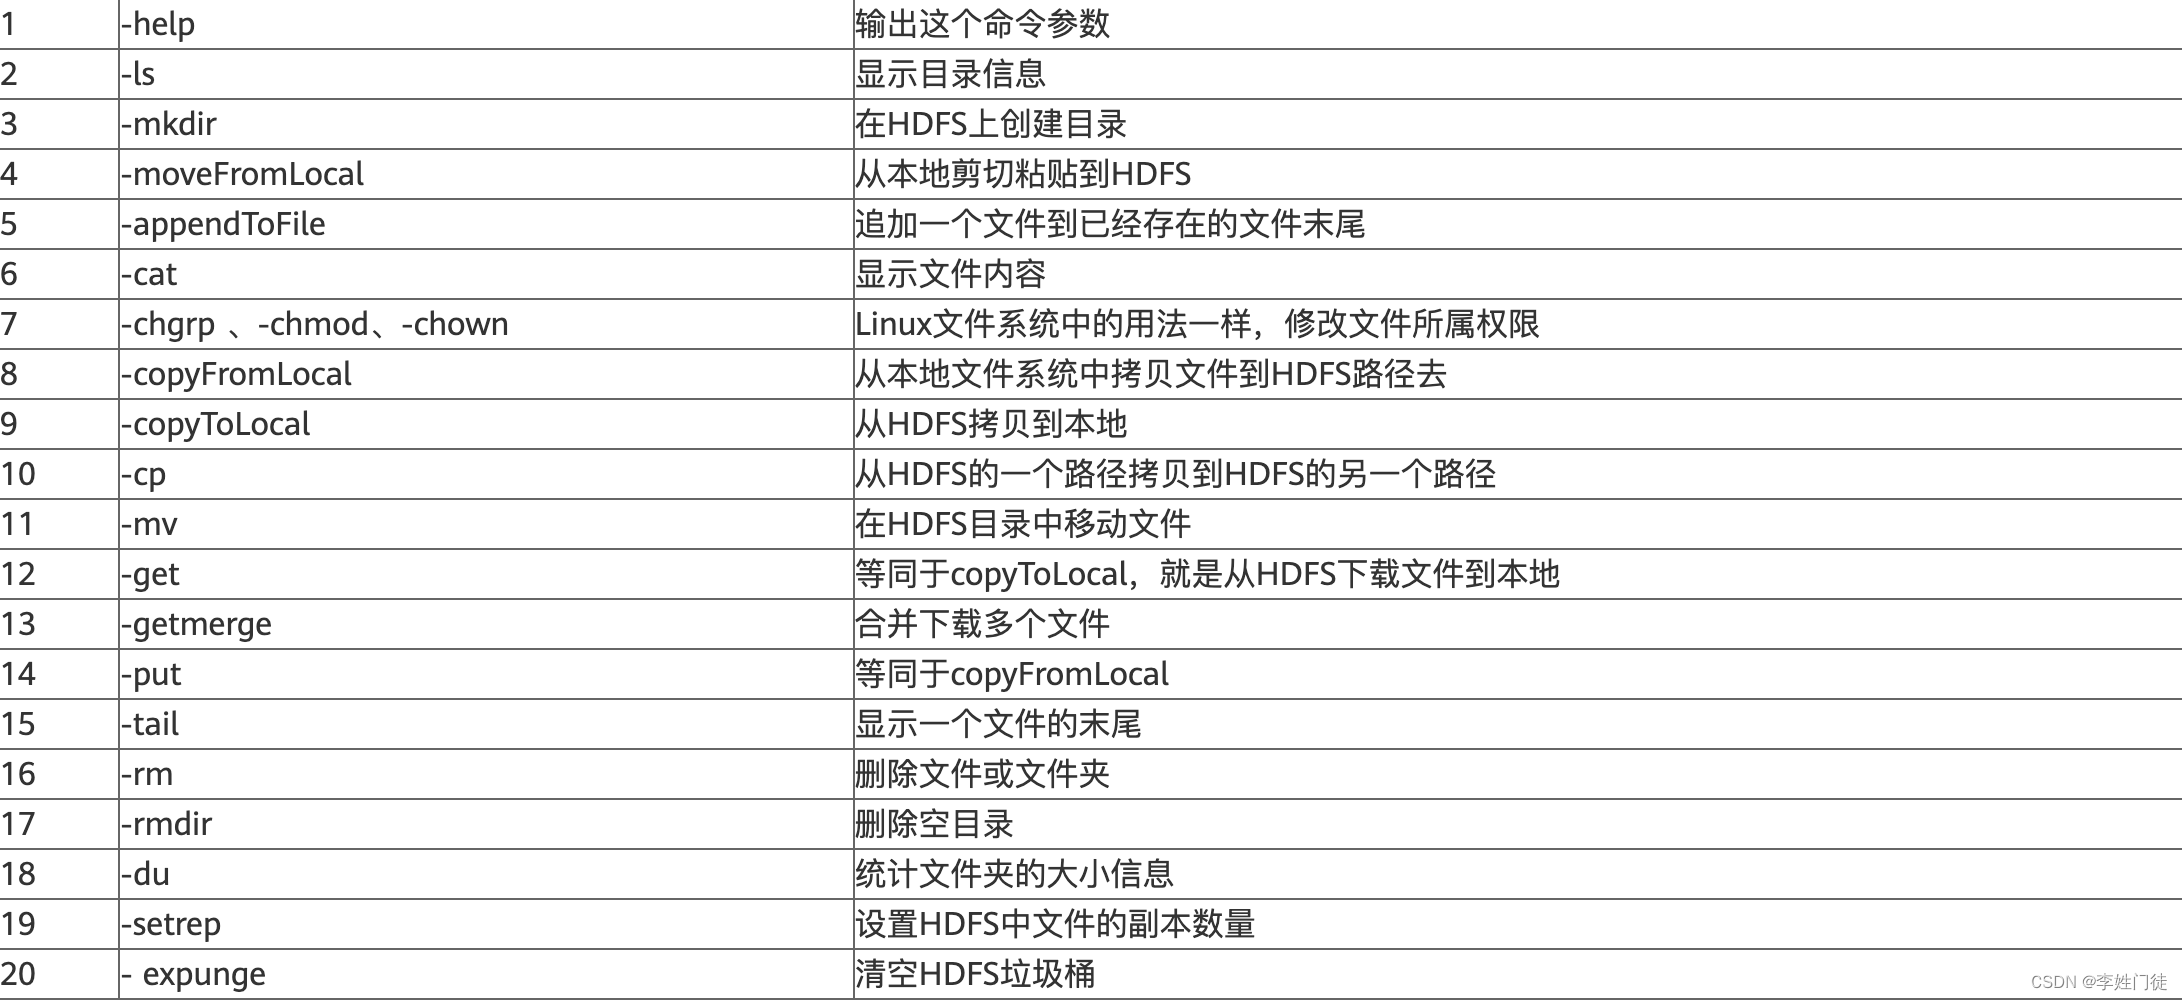
3.1 常用基础命令
整理日常操作yarn常用的命令,便于针对yarn的文件操作
# 查看yarn的ap运行情况
yarn application -list

# 按照状态过滤app
yarn application -list -appStates [ALL、NEW、NEW_SAVING、SUBMITTED、ACCEPTED、RUNNING、FINISHED、FAILED、KILLED]

# kill某个任务
yarn application -kill <ApplicationId>

# 查看app的日志
yarn logs -applicationId <ApplicationId>

# 查看app的container的日志
yarn logs -applicationId <ApplicationId> -containerId <ContainerId>

# 查看容器状态
yarn container -list <ApplicationAttemptId>

# 打印容器的状态
yarn container -status <ContainerId>

# 查看节点状态
yarn node -list -all

# 更新队列配置
yarn rmadmin -refreshQueues

# 查看所有队列信息
无

# 查看队列状态
yarn queue -status <QueueName>

3.2 常用运维命令
用于日常运维命令,便于进行服务运维,提升系统稳定性。
#获取所有 RM 的状态
yarn rmadmin -getAllServiceState

#获取指定 RM 状态
yarn rmadmin -getServiceState rm2

#将指定 RM 切换为 Standby 状态
yarn rmadmin -transitionToStandby rm2

#将指定 RM 切换为 Active 状态
yarn rmadmin -transitionToActive --forceactive rm2
4. app任务开发
4.1 任务提交流程
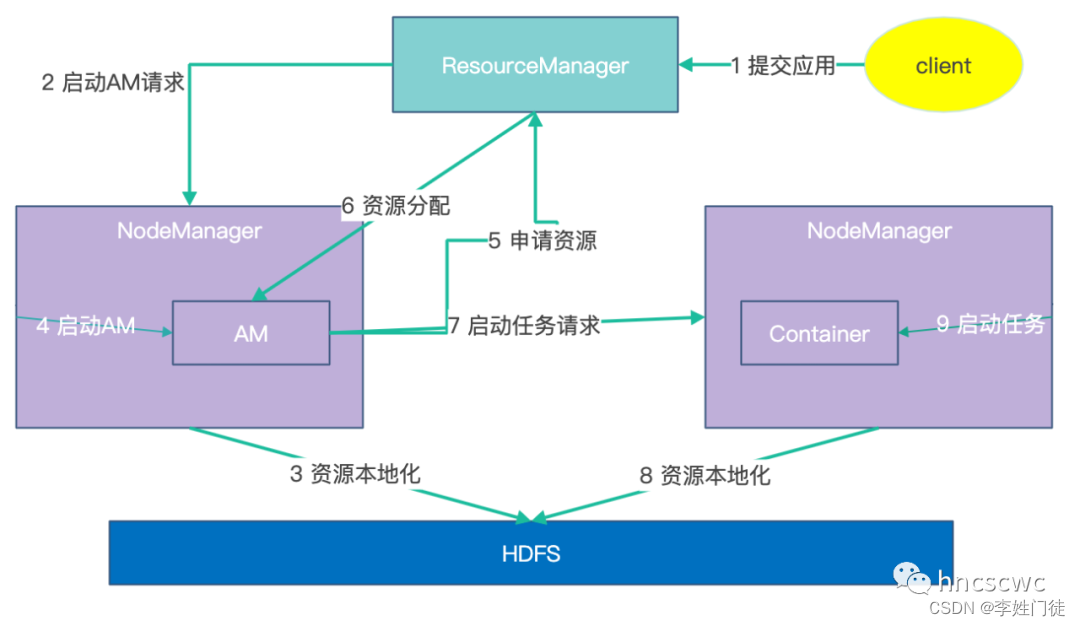
阶段1
- 客户端向RM提交应用,本质上是向RM请求启动AM
- RM选择合适的NM,并向NM发送请求,要求启动AM
- NM收到启动AM的请求后,根据所携带的参数,下载AM所依赖的资源到本地
- 完成依赖资源的本地化后,NM启动AM进程,AM启动后,客户端的工作结束
阶段2
- AM启动后向RM进行注册,并向RM申请启动任务container所需的资源
- RM根据NM的资源汇报情况,向AM回复资源(container)的分配情况,即给请求的任务container分配具体的NM。
- AM根据任务container分配的NM,向对应的NM发送请求,要求启动任务container
- NM收到启动任务container的请求后,同样根据请求参数,先完成依赖资源的本地化,然后启动任务container进程。
yarn的app任务开发过程需要分2个阶段
1, 按照规范,开发实际业务的client,并打包成jar,上传到hdfs集群
2,开发客户端,用于将任务提交到yarn平台,并加载上传到hdfs集群的任务jar,并启动任务jar,从而运行对应的任务。
4.2 开发业务
开发调度任务有相关的开发规范
package com.yarn;

import org.apache.hadoop.conf.Configuration;
import org.apache.hadoop.net.NetUtils;
import org.apache.hadoop.yarn.api.records.*;
import org.apache.hadoop.yarn.client.api.async.AMRMClientAsync;


public class MyAppMaster {

    public static void main(String[] args) {
        MyAppMaster appMaster = new MyAppMaster();
        appMaster.run();
    }

    public void run() {
        try {
            // 开启am-client
            AMRMClientAsync amRmClient = AMRMClientAsync.createAMRMClientAsync(1000, null);
            amRmClient.init(new Configuration());
            amRmClient.start();
            String hostName = NetUtils.getHostname();
            // 向am注册,am会负责向RM申请相关NM资源,运行业务任务
            amRmClient.registerApplicationMaster(hostName, -1, null);
            // 运行程序
            doRun();
            // 解除注册
            amRmClient.unregisterApplicationMaster(FinalApplicationStatus.SUCCEEDED, "SUCCESS", null);
        } catch (Exception e) {
            e.printStackTrace();
        }
    }

    public void doRun() throws InterruptedException {
        while (true) {
            System.out.println("Hello World!");
            Thread.sleep(1000);
        }
    }
}
相关的maven依赖
<?xml version="1.0" encoding="UTF-8"?>
<project xmlns="http://maven.apache.org/POM/4.0.0"
         xmlns:xsi="http://www.w3.org/2001/XMLSchema-instance"
         xsi:schemaLocation="http://maven.apache.org/POM/4.0.0 http://maven.apache.org/xsd/maven-4.0.0.xsd">
    <modelVersion>4.0.0</modelVersion>

    <groupId>org.example</groupId>
    <artifactId>yarn-demo</artifactId>
    <version>1.0-SNAPSHOT</version>

    <properties>
        <maven.compiler.source>8</maven.compiler.source>
        <maven.compiler.target>8</maven.compiler.target>
    </properties>

    <dependencies>
        <dependency>
            <groupId>org.apache.hadoop</groupId>
            <artifactId>hadoop-yarn-client</artifactId>
            <version>3.2.1</version>
        </dependency>
        <dependency>
            <groupId>org.apache.hadoop</groupId>
            <artifactId>hadoop-common</artifactId>
            <version>3.2.1</version>
        </dependency>
        <dependency>
            <groupId>org.apache.hadoop</groupId>
            <artifactId>hadoop-hdfs-client</artifactId>
            <version>3.2.1</version>
        </dependency>
    </dependencies>

    <build>
        <plugins>
            <plugin>
                <artifactId>maven-assembly-plugin</artifactId>
                <configuration>
                    <archive>
                        <manifest>
                            <addClasspath>true</addClasspath>
                            <!--下面必须指定好主类 如com.my.Main -->
                            <mainClass>com.yarn.MyAppMaster</mainClass>
                        </manifest>
                    </archive>
                    <descriptorRefs>
                        <descriptorRef>jar-with-dependencies</descriptorRef>
                    </descriptorRefs>
                </configuration>
                <executions>
                    <execution>
                        <id>make-my-jar-with-dependencies</id>
                        <phase>package</phase>
                        <goals>
                            <goal>single</goal>
                        </goals>
                    </execution>
                </executions>
            </plugin>
            <plugin>
                <groupId>org.apache.maven.plugins</groupId>
                <artifactId>maven-compiler-plugin</artifactId>
                <configuration>
                    <source>1.8</source><!-- 源代码使用的开发版本 -->
                    <target>1.8</target><!-- 需要生成的目标class文件的编译版本 -->
                </configuration>
            </plugin>
        </plugins>
    </build>

</project>
完成任务打包,生成yarn-demo-1.0-SNAPSHOT-jar-with-dependencies.jar。
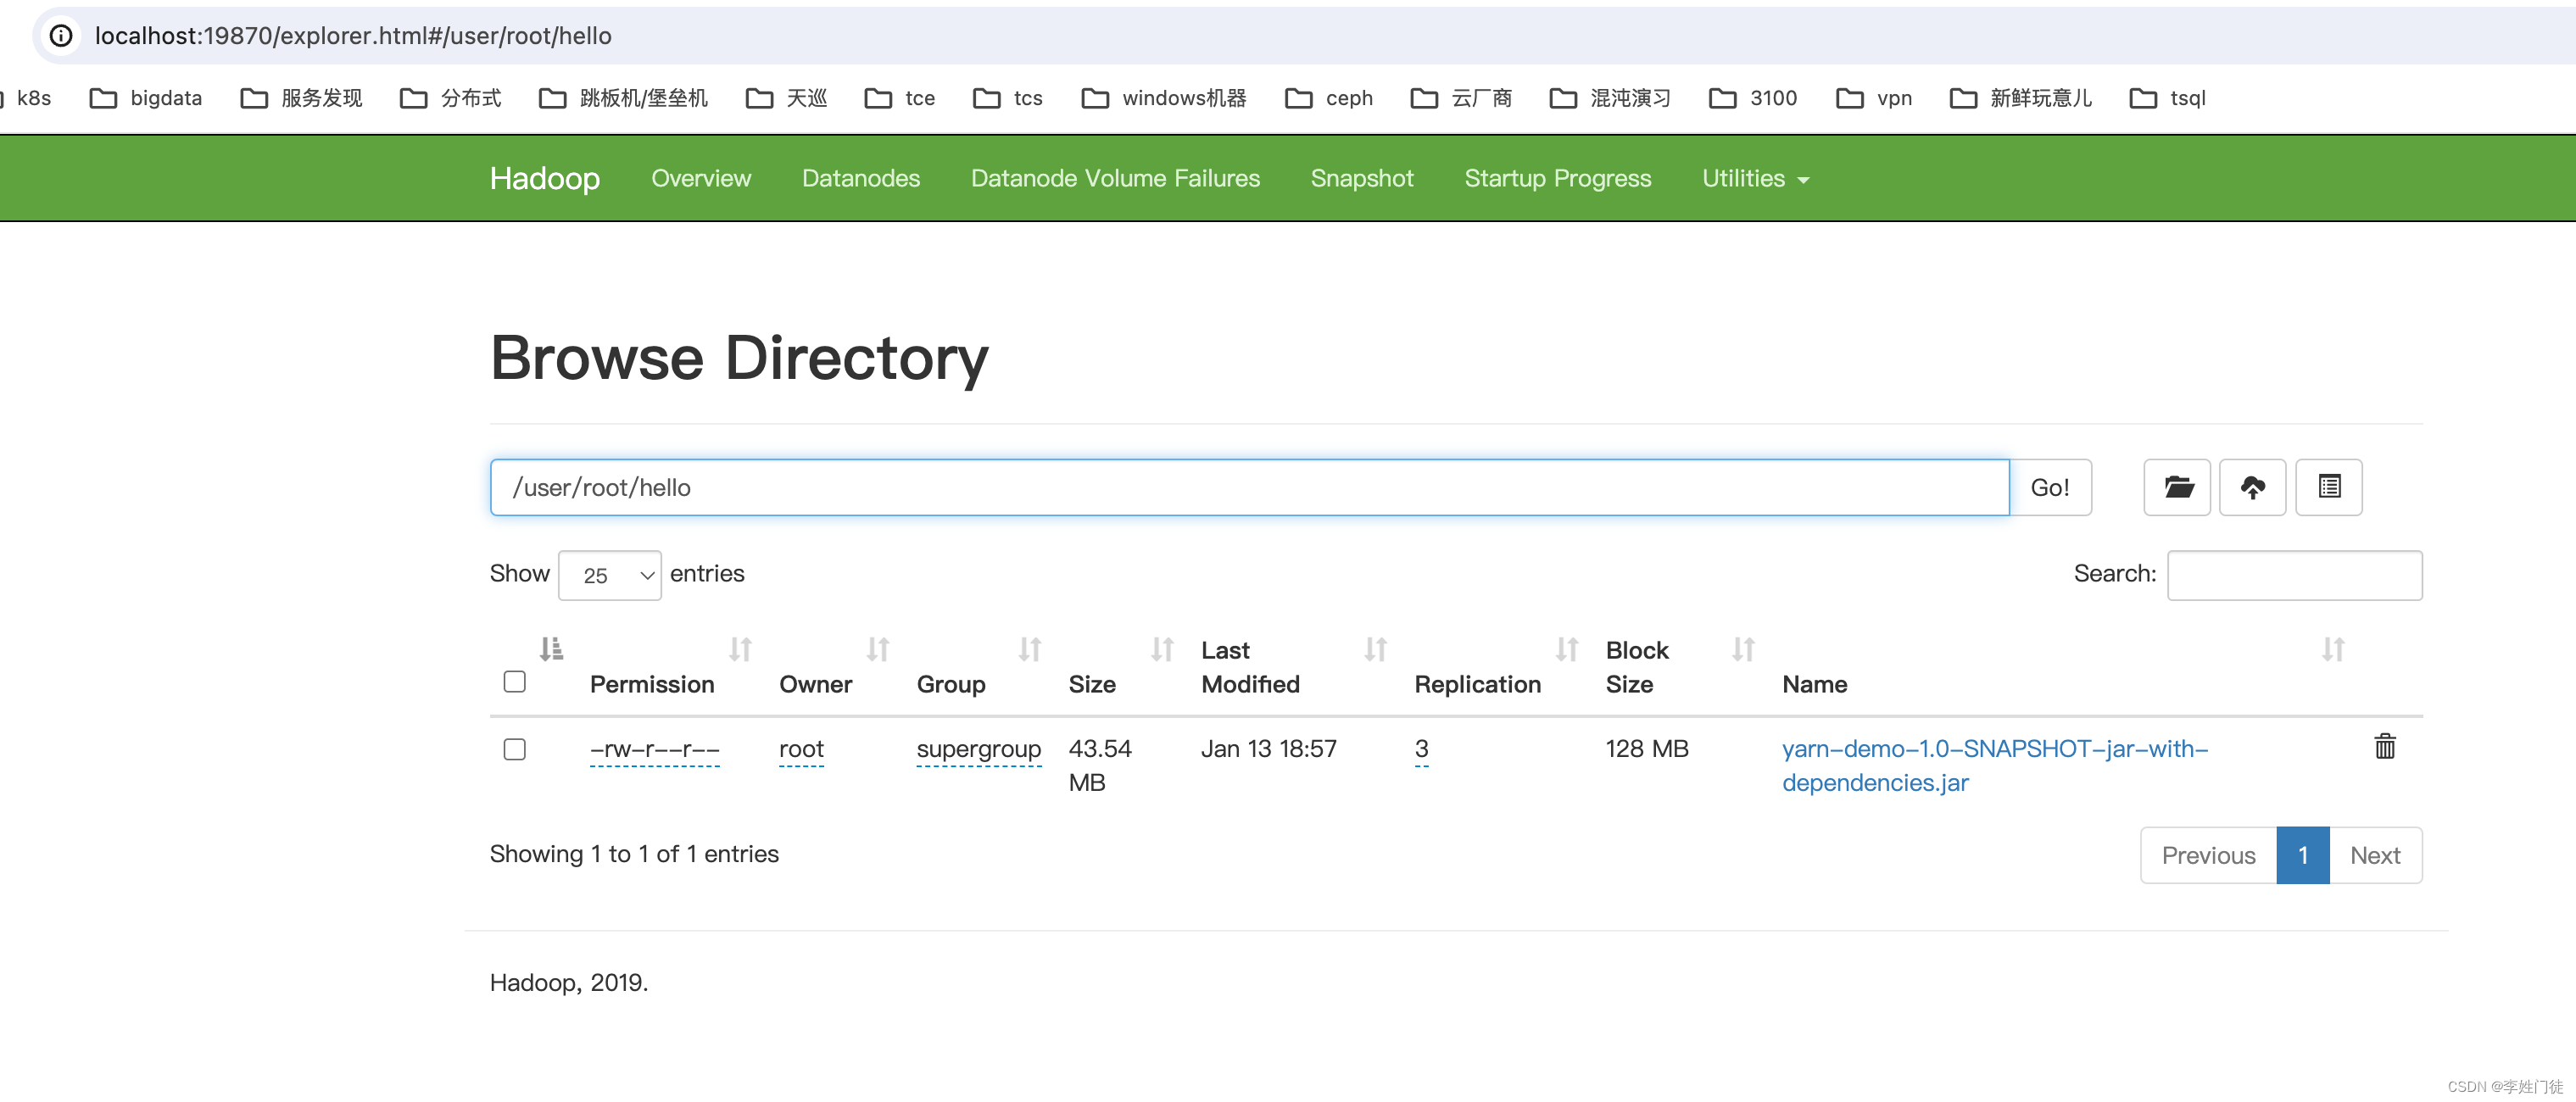
4.3 开发client触发器
还需要通过client触发器,向yarn触发相关的任务,加载业务jar,并执行任务。本文将业务jar上传到hdfs中的代码也一并集成了,避免人力不断地上传业务jar到hdfs(也可以人工上传)
package com.yarn;
import org.apache.hadoop.fs.PartHandle;
import org.slf4j.Logger;
import org.slf4j.LoggerFactory;
import org.apache.hadoop.conf.Configuration;
import org.apache.hadoop.fs.FileStatus;
import org.apache.hadoop.fs.FileSystem;
import org.apache.hadoop.fs.Path;
import org.apache.hadoop.yarn.api.ApplicationConstants;
import org.apache.hadoop.yarn.api.records.*;
import org.apache.hadoop.yarn.client.api.YarnClient;
import org.apache.hadoop.yarn.client.api.YarnClientApplication;
import org.apache.hadoop.yarn.conf.YarnConfiguration;
import org.apache.hadoop.yarn.exceptions.YarnException;
import java.io.IOException;
import java.net.URI;
import java.net.URISyntaxException;
import java.util.ArrayList;
import java.util.HashMap;
import java.util.List;
import java.util.Map;
public class MyYarnClient {
private static Logger log = LoggerFactory.getLogger(MyYarnClient.class);
public static void main(String[] args) {
MyYarnClient client = new MyYarnClient();
try {
client.run();
} catch (Exception e) {
e.printStackTrace();
}
}
/**
* 客户端运行
*
* @throws IOException
* @throws YarnException
* @throws URISyntaxException
* @throws InterruptedException
*/
public void run() throws IOException, YarnException, URISyntaxException, InterruptedException {
/**=====1.配置=====**/
Configuration conf = new Configuration();
// 设置rm所在的ip地址
conf.set("yarn.resourcemanager.hostname", "Master");
/**=====2.申请app=====**/
// 创建YarnClient和ResourceManager进行交互
YarnClient yarnClient = YarnClient.createYarnClient();
// 初始配置
yarnClient.init(conf);
// 开启(建立连接)
yarnClient.start();
// 向RM发送请求创建应用
YarnClientApplication application = yarnClient.createApplication();
// 准备应用提交上下文(RM要求你提交的信息格式)
ApplicationSubmissionContext applicationSubmissionContext = application.getApplicationSubmissionContext();
// 获取分配的应用id
ApplicationId appId = applicationSubmissionContext.getApplicationId();
System.out.println("appId:" + appId);
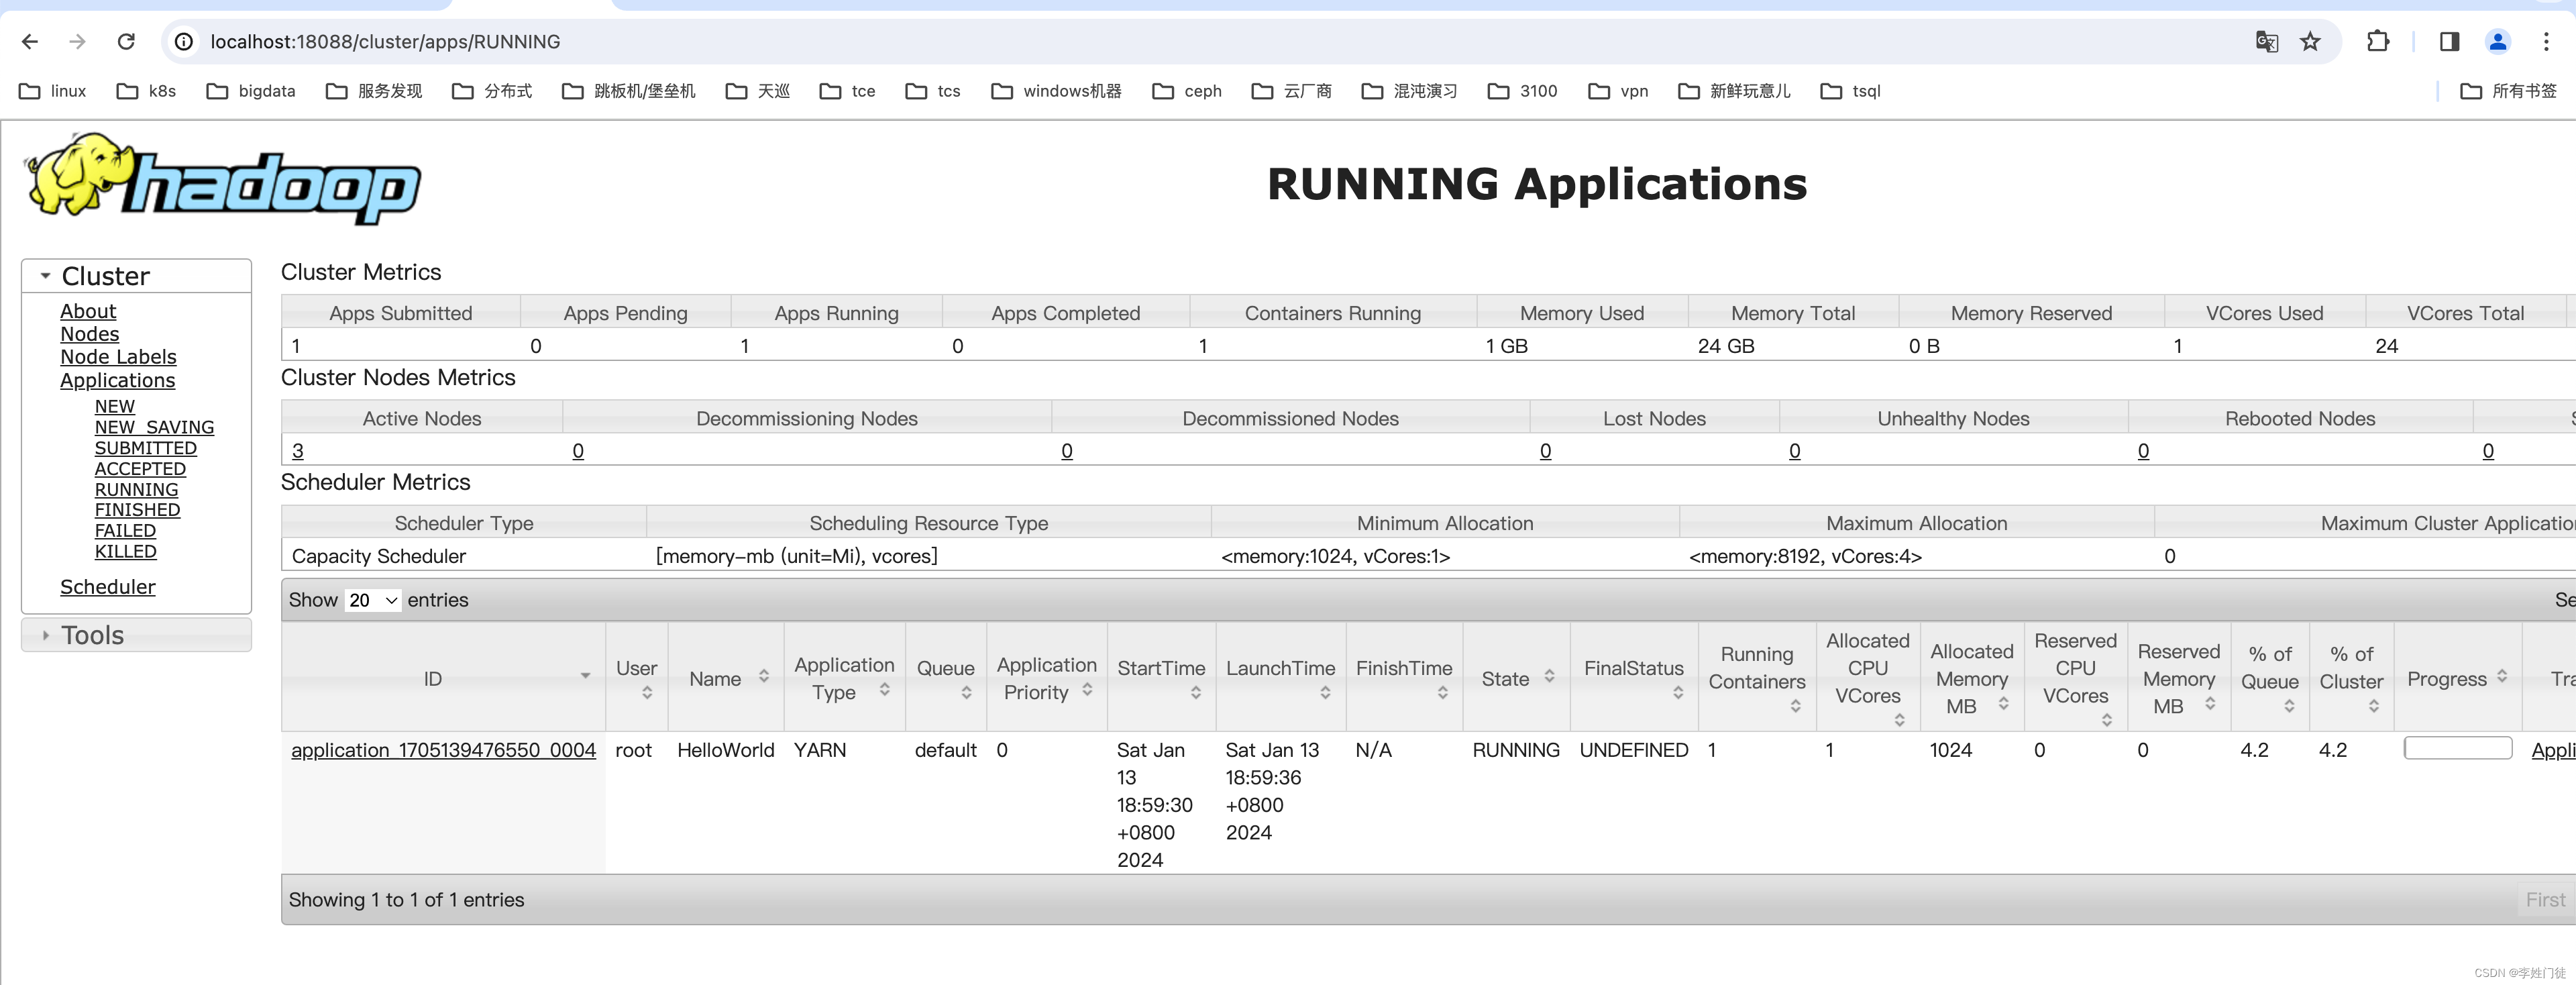
/**=====3.设置应用名称=====**/
// 设置应用名称
applicationSubmissionContext.setApplicationName("HelloWorld");
/**=====4.准备程序(jar包)=====**/
String jarPath = "yarn-demo-1.0-SNAPSHOT-jar-with-dependencies.jar";
String jarName = "yarn-demo-1.0-SNAPSHOT-jar-with-dependencies.jar";
Map<String, LocalResource> localResources = new HashMap<String, LocalResource>() {{
put(jarName, addLocalToHdfs(jarPath, jarName));
}};
/**=====5.准备程序环境=====**/
Map<String, String> env = new HashMap<>();
// 任务的运行依赖jar包的准备
StringBuilder classPathEnv = new StringBuilder(ApplicationConstants.Environment.CLASSPATH.$$()).append(ApplicationConstants.CLASS_PATH_SEPARATOR).append("./*");
// yarn依赖包
for (String c : conf.getStrings(YarnConfiguration.YARN_APPLICATION_CLASSPATH, YarnConfiguration.DEFAULT_YARN_CROSS_PLATFORM_APPLICATION_CLASSPATH)) {
classPathEnv.append(ApplicationConstants.CLASS_PATH_SEPARATOR);
classPathEnv.append(c.trim());
}
env.put("CLASSPATH", classPathEnv.toString());
/**=====6.准备启动命令=====**/
List<String> commands = new ArrayList<String>() {{
add(ApplicationConstants.Environment.JAVA_HOME.$$() + "/bin/java -Xmx300m com.yarn.MyAppMaster");
}};
/**=====7.构造am container运行资源+环境+脚本=====**/
ContainerLaunchContext amContainer = ContainerLaunchContext.newInstance(localResources, env, commands, null, null, null);
// 准备am Container的运行环境
applicationSubmissionContext.setAMContainerSpec(amContainer);
/**=====8.设置am程序所需资源=====**/
int memory = 1024;
int vCores = 2;
applicationSubmissionContext.setResource(Resource.newInstance(memory, vCores));
/**=====9.提交并开始作业=====**/
yarnClient.submitApplication(applicationSubmissionContext);
/**=====10.查询作业是否完成=====**/
for (; ; ) {
Thread.sleep(500);
ApplicationReport applicationReport = yarnClient.getApplicationReport(appId);
YarnApplicationState state = applicationReport.getYarnApplicationState();
FinalApplicationStatus status = applicationReport.getFinalApplicationStatus();
if (state.equals(YarnApplicationState.FINISHED)) {
if (status.equals(FinalApplicationStatus.SUCCEEDED)) {
System.out.println("程序运行成功!");
break;
} else {
System.out.println("程序运行失败!");
break;
}
} else if (state.equals(YarnApplicationState.FAILED) || state.equals(YarnApplicationState.KILLED)) {
System.out.println("程序运行失败!");
break;
}
System.out.println("计算中...!");
}
}
/**
* 上传本地jar包到hdfs
*
* @param jarPath
* @param jarName
* @throws IOException
*/
private LocalResource addLocalToHdfs(String jarPath, String jarName) throws IOException, URISyntaxException, InterruptedException {
//获取文件系统
Configuration configuration = new Configuration();
configuration.set("fs.hdfs.impl", org.apache.hadoop.hdfs.DistributedFileSystem.class.getName());
configuration.set("fs.file.impl", org.apache.hadoop.fs.LocalFileSystem.class.getName());
//NameNode的ip和端口
FileSystem fs = FileSystem.get(new URI("hdfs://Master:9000"), configuration, "root");
// 目标路径
Path srcPath = new Path(jarPath);
String dst = "hello/" + jarName;
Path dstPath = new Path(fs.getHomeDirectory(), dst);
System.out.println(srcPath);
System.out.println(dstPath);
// 上传
try {
fs.copyFromLocalFile(srcPath, dstPath);
} catch (Exception e) {
e.printStackTrace();
}
FileStatus scFileStatus = fs.getFileStatus(dstPath);
System.out.println(scFileStatus);
// 关闭
fs.close();
LocalResource scRsrc = LocalResource.newInstance(URL.fromURI(dstPath.toUri()), LocalResourceType.FILE, LocalResourceVisibility.APPLICATION, scFileStatus.getLen(), scFileStatus.getModificationTime());
System.out.println(scRsrc);
return scRsrc;
}
}
相关的maven依赖
<?xml version="1.0" encoding="UTF-8"?>
<project xmlns="http://maven.apache.org/POM/4.0.0"
         xmlns:xsi="http://www.w3.org/2001/XMLSchema-instance"
         xsi:schemaLocation="http://maven.apache.org/POM/4.0.0 http://maven.apache.org/xsd/maven-4.0.0.xsd">
    <modelVersion>4.0.0</modelVersion>

    <groupId>org.example</groupId>
    <artifactId>yarn-client</artifactId>
    <version>1.0-SNAPSHOT</version>

    <properties>
        <maven.compiler.source>8</maven.compiler.source>
        <maven.compiler.target>8</maven.compiler.target>
    </properties>

    <dependencies>
        <dependency>
            <groupId>org.apache.hadoop</groupId>
            <artifactId>hadoop-yarn-client</artifactId>
            <version>3.2.1</version>
        </dependency>
        <dependency>
            <groupId>org.apache.hadoop</groupId>
            <artifactId>hadoop-common</artifactId>
            <version>3.2.1</version>
        </dependency>
        <dependency>
            <groupId>org.apache.hadoop</groupId>
            <artifactId>hadoop-hdfs-client</artifactId>
            <version>3.2.1</version>
        </dependency>
        <dependency>
            <groupId>org.slf4j</groupId>
            <artifactId>slf4j-api</artifactId>
            <version>1.7.32</version>
        </dependency>
        <dependency>
            <groupId>ch.qos.logback</groupId>
            <artifactId>logback-classic</artifactId>
            <version>1.2.12</version>
            <scope>runtime</scope>
            <exclusions>
                <exclusion>
                    <groupId>org.slf4j</groupId>
                    <artifactId>slf4j-api</artifactId>
                </exclusion>
            </exclusions>
        </dependency>
    </dependencies>

    <build>
        <plugins>
            <plugin>
                <artifactId>maven-assembly-plugin</artifactId>
                <configuration>
                    <archive>
                        <manifest>
                            <addClasspath>true</addClasspath>
                            <!--下面必须指定好主类 如com.my.Main -->
                            <mainClass>com.yarn.MyYarnClient</mainClass>
                        </manifest>
                    </archive>
                    <descriptorRefs>
                        <descriptorRef>jar-with-dependencies</descriptorRef>
                    </descriptorRefs>
                </configuration>
                <executions>
                    <execution>
                        <id>make-my-jar-with-dependencies</id>
                        <phase>package</phase>
                        <goals>
                            <goal>single</goal>
                        </goals>
                    </execution>
                </executions>
            </plugin>
            <plugin>
                <groupId>org.apache.maven.plugins</groupId>
                <artifactId>maven-compiler-plugin</artifactId>
                <configuration>
                    <source>1.8</source><!-- 源代码使用的开发版本 -->
                    <target>1.8</target><!-- 需要生成的目标class文件的编译版本 -->
                </configuration>
            </plugin>
        </plugins>
    </build>

</project>
打包成yarn-client-1.0-SNAPSHOT-jar-with-dependencies.jar
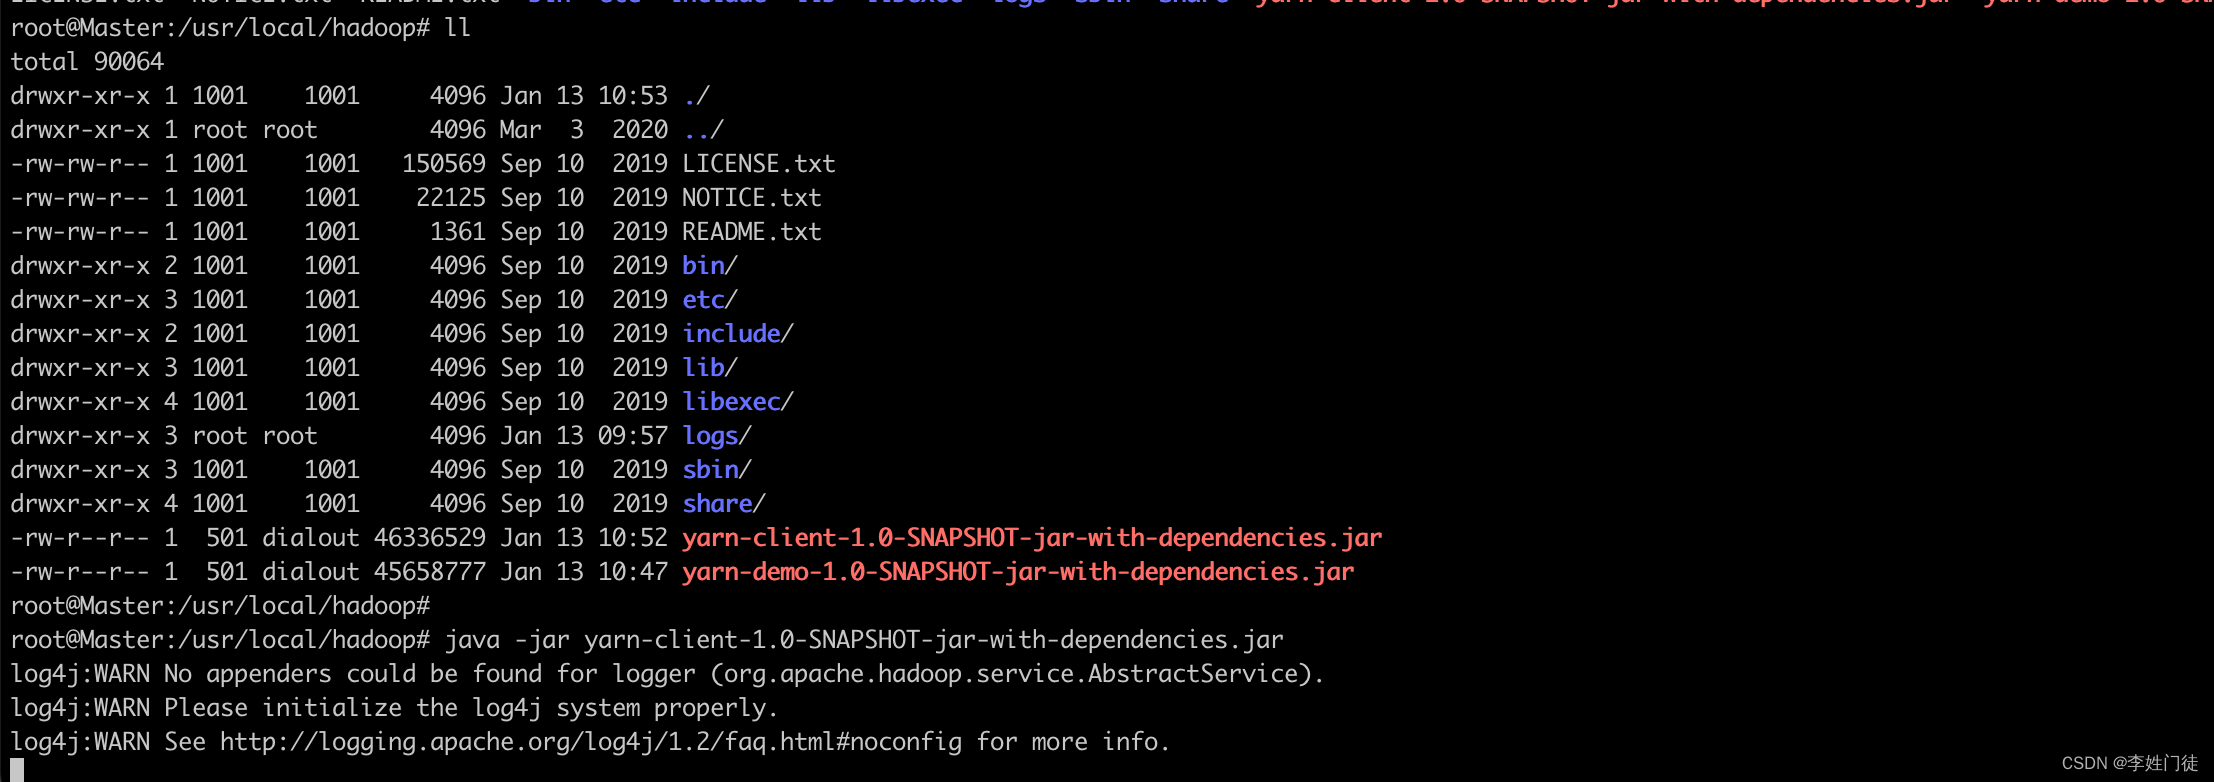
4.4 提交任务
将 yarn-client-1.0-SNAPSHOT-jar-with-dependencies.jar 和 yarn-demo-1.0-SNAPSHOT-jar-with-dependencies.jar 放在hdfs机器上。
执行提交命令
java -jar yarn-client-1.0-SNAPSHOT-jar-with-dependencies.jar
5. 疑问和思考
5.1 yarn中的AM的作用,为什么要设计AM?
AM在yarn的应用程序设计中,起到中枢的作用。 目的是跟RM合作,实现"资源管理"和"任务管理"拆分。
RM负责yarn集群的资源管理,本身并不是"任务"的管理,负责的工作包括
- 接受NM的资源汇报信息,以获取全局的资源、队列资源、任务资源等上帝视角
- 响应客户端的请求,选择合适的NM拉起AM的container
- 响应AM的资源请求,并返回AM启动相关资源的NM列表后,AM自行跟对应的NM通信并拉起需要的container,RM并参与。
AM负责某一个app的任务管理,包括
- 跟RM通信获取启动container所依赖的资源以及相关NM列表,并跟对应的NM通信拉起container
- 负责接受container的心跳,并监控container的状态
- 根据container的心跳情况(比如container失联)决定是否需要再RM通信重新申请NM补齐container等相关工作
5.2 跟k8是对比,yarn队列有何优劣?
相同点
- 都是资源调度平台
- 资源隔离都是通过cgroup实现
- yarn调度上的功能k8s均可以实现(可以自定义调度插件)
不同点
- k8s本身并不强调队列概念,而是通过ns的概念进行任务群,但是默认情况下所有的任务共享1个调度队里,yarn在设计上强调和区分了队列概念
- k8s的pod内可以自定义资源类型,集群功能实现副本保持。而yarn是有AM实现(AM需要实现各种逻辑,开发者任务较重),在设计上跟集群拆开,集群不能并不直接参与任务相关的事务
- k8s平台在设计上并不定位为只是一个调度平台,还有更丰富的功能。


 841
841


 被折叠的 条评论
为什么被折叠?
被折叠的 条评论
为什么被折叠?
 到【灌水乐园】发言


