


直接在项目文件夹内配置,不需要到处复制的方法。
关于 MinGW 的 配置跳过,可以参考https://blog.csdn.net/zwx19921215/article/details/83306119
配置 OpenGL 步骤:
- 首先下载freeglut https://www.transmissionzero.co.uk/software/freeglut-devel/ 选择for MinGW版本的

- 打开压缩包,里面有bin,include,lib三个文件夹

- 创建项目,将 include 和 lib 文件夹复制到项目文件夹内(我此时将其命名为 OpenGL),将 /bin/freeglut.dll 复制到 /cmake-build-debug/bin 内
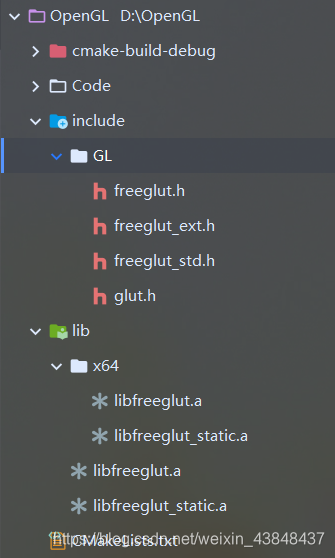

- 配置 CMakeLists.txt,将第一行以下改为
project(OpenGL) #填你的项目名

include_directories(include)
link_directories(lib/x64)

set(CMAKE_C_STANDARD 14) #我选的是 C++14 版本
set(CMAKE_RUNTIME_OUTPUT_DIRECTORY bin)

#测试
add_executable(main main.cpp) #前为编译完成后的exe文件名,随便写就行了, 后面是 cpp 源文件的相对路径
target_link_libraries(main libopengl32.a libfreeglut.a glu32.dll) #链接对应的库文件
测试代码:
#include <GL/glut.h>

GLsizei winWidth = 600, winHeight = 500;

GLubyte label[36] = {'J', 'a', 'n', 'F', 'e', 'b', 'M', 'a', 'r',
                     'A', 'p', 'r', 'M', 'a', 'y', 'J', 'u', 'n',
                     'J', 'u', 'l', 'A', 'u', 'g', 'S', 'e', 'p',
                     'O', 'c', 't', 'N', 'o', 'v', 'D', 'e', 'c'};

GLint  dataValue[12] = {420, 342, 324, 310, 262, 185, 190, 196, 217, 240, 312, 438};

void initWindow(int argc, char* argv[]) {
    glutInit(&argc, argv);
    glutInitWindowSize(winWidth, winHeight);
    glutInitWindowPosition(100, 100);
    glutCreateWindow("P105");
}

void initBackground() {
    glClearColor(1, 1, 1, 0);
    glMatrixMode(GL_PROJECTION);
    //glOrtho(0, winWidth, 0, winHeight, -1, 1);
    gluOrtho2D(0, winWidth, 0, winHeight);
}

void lineGraph() {
    GLint xRaster = 25, yRaster = 150;

    glClear(GL_COLOR_BUFFER_BIT);
    glColor3d(0, 0, 1);

    glBegin(GL_LINE_STRIP);
    for (GLint k = 0; k < 12; k ++) {
        glVertex2i(xRaster + k * 50, dataValue[k]);
    }
    glEnd();

    glColor3d(1, 0, 0);
    for (GLint k = 0; k < 12; k ++) {
        glRasterPos2i(xRaster + k * 50, dataValue[k] - 4);
        glutBitmapCharacter(GLUT_BITMAP_9_BY_15, '*');
    }

    glColor3d(0, 0, 0);
    xRaster = 20;
    for (GLint month = 0; month < 12; month ++) {
        glRasterPos2i(xRaster, yRaster);
        for (GLint k = 3 * month; k < 3 * month + 3; k ++) {
            glutBitmapCharacter(GLUT_BITMAP_HELVETICA_12, label[k]);
        }
        xRaster += 50;
    }
    glFlush();
}

void barChart() {
    GLint xRaster = 20, yRaster = 150;

    glClear(GL_COLOR_BUFFER_BIT);

    glColor3f(1, 0, 0);
    for (GLint k = 0; k < 12; k ++) {
        glRecti(20 + k * 50, 165, 40 + k * 50, dataValue[k]);
    }

    glColor3d(0, 0, 0);
    for (GLint month = 0; month < 12; month ++) {
        glRasterPos2i(xRaster, yRaster);
        for (GLint k = 3 * month; k < 3 * month + 3; k ++) {
            glutBitmapCharacter(GLUT_BITMAP_HELVETICA_12, label[k]);
        }
        xRaster += 50;
    }
    glFlush();
}

void winReshapeFcn(GLint newWidth, GLint newHeight) {
    glMatrixMode(GL_PROJECTION);
    glLoadIdentity();
    glOrtho(0, (GLdouble)newWidth, 0, (GLdouble)newHeight, -1, 1);
    glClear(GL_COLOR_BUFFER_BIT);
}

int main(int argc, char* argv[]) {
    initWindow(argc, argv);
    initBackground();
    //glutDisplayFunc(lineGraph);
    glutDisplayFunc(barChart);
    glutReshapeFunc(winReshapeFcn);
    glutMainLoop();
    return 0;
}
生成以下结果:


 1837
1837


 被折叠的 条评论
为什么被折叠?
被折叠的 条评论
为什么被折叠?
 到【灌水乐园】发言


