


记录一下C++知识点
- 一、自定义排序
- 二、多线程std::condition_variable
- 三、模板特化
- 四、仿函数
- 五 、STL适配器
- 六、函数指针
- 七、四种类型转换static_cast、dynamic_cast、const_cast、reinterpret_cast
- 八、指针的引用*&
- 九、std::atomic
- 十、std::bind
- 十一、std::unordered_map
- 十二、std::function
- 十三、unordered_set
- 十四、std::ref和std::cref
- 十五、c++ emplace_back
- 十六、memset
- 十七、std::bind
- 十八、C++多线程
- 十九、sort对pair排序
- 二十、c++ lower_bound和upper_bound
- 二十一、lambda表达式
一、自定义排序
sort (first, last):对容器或普通数组中 [first, last) 范围内的元素进行排序,默认进行升序排序。
1.1 自定义比较函数
bool  cmp(int a,int b)
{
	return b<a;
}

sort(a,a+n,cmp);
1.2 声明比较类
struct cmp
{
    bool operator()(const Student &s1, const Student &s2)
    {
        if (s1.age == s2.age)
            return s1.name < s2.name;
        else
            return s1.age < s2.age;
    }
};
sort(a,a+n,cmp());
1.3 类内比较函数
public:
    int eraseOverlapIntervals(vector<vector<int>> &intervals)
    {
        std::sort(intervals.begin(), intervals.end(), cmp);
        return 0;
    }
private:
    static bool cmp(const vector<int> &a, const vector<int> &b)
    {
        return false;
    }
如果写成:
public:
    int eraseOverlapIntervals(vector<vector<int>> &intervals)
    {
        std::sort(intervals.begin(), intervals.end(), cmp);
        return 0;
    }
private:
    bool cmp(const vector<int> &a, const vector<int> &b)
    {
        return false;
    }
会报错
类内比较函数一定要加static:sort的第三个参数,也就是我们自定义的cmp,只允许接收两个参数,而当在类内定义cmp函数时,如果像上述那样定义,在编译时,编译器会向函数添加隐式参数this,而变成了三个参数,所以编译会报错。
1.3.1 sort源码
提供自定义的比较函数(谓词)
  template<typename _RandomAccessIterator, typename _Compare>
    inline void
    sort(_RandomAccessIterator __first, _RandomAccessIterator __last,
	 _Compare __comp)
    {
      // concept requirements
      __glibcxx_function_requires(_Mutable_RandomAccessIteratorConcept<
	    _RandomAccessIterator>)
      __glibcxx_function_requires(_BinaryPredicateConcept<_Compare,
	    typename iterator_traits<_RandomAccessIterator>::value_type,
	    typename iterator_traits<_RandomAccessIterator>::value_type>)
      __glibcxx_requires_valid_range(__first, __last);
      __glibcxx_requires_irreflexive_pred(__first, __last, __comp);

      std::__sort(__first, __last, __gnu_cxx::__ops::__iter_comp_iter(__comp));
    }
默认排序:
  template<typename _RandomAccessIterator>
    inline void
    sort(_RandomAccessIterator __first, _RandomAccessIterator __last)
    {
      // concept requirements
      __glibcxx_function_requires(_Mutable_RandomAccessIteratorConcept<
	    _RandomAccessIterator>)
      __glibcxx_function_requires(_LessThanComparableConcept<
	    typename iterator_traits<_RandomAccessIterator>::value_type>)
      __glibcxx_requires_valid_range(__first, __last);
      __glibcxx_requires_irreflexive(__first, __last);

      std::__sort(__first, __last, __gnu_cxx::__ops::__iter_less_iter());
    }
__comp定义:__comp函数只接受两个参数,所以对于类内定义的cmp,如果不加static,因为会引入额外的this参数,导致报错。
  template<typename _RandomAccessIterator, typename _Compare>
    _RandomAccessIterator
    __unguarded_partition(_RandomAccessIterator __first,
			  _RandomAccessIterator __last,
			  _RandomAccessIterator __pivot, _Compare __comp)
    {
      while (true)
	{
	  while (__comp(__first, __pivot))
	    ++__first;
	  --__last;
	  while (__comp(__pivot, __last))
	    --__last;
	  if (!(__first < __last))
	    return __first;
	  std::iter_swap(__first, __last);
	  ++__first;
	}
    }
二、多线程std::condition_variable
https://www.cnblogs.com/haippy/p/3252041.html
三、模板特化
模板特化
编写单一模板使之对任何可能的模板实参都是适合的,这并不是总能办到。通用模板可能对于某些类型不适合导致编译失败,所以
就是为已有的模板参数进行一些使其特殊化的指定,使得以前不受任何约束的模板参数,或受到特定的修饰(例如const或者摇身一变成为了指针之类的东东,甚至是经过别的模板类包装之后的模板类型)或完全被指定了下来。
3.1 模板特化的分类
3.1.1 针对对象的不同分为函数模板的特化和类模板的特化
- 函数模板特化
特化一个函数模板时,必须为原模板中的每个模板参数提供实参 - 类模板特化
当类模板内需要对某些类型进行特别处理时,使用类模板的特化。与函数模板不同的是类模板的特化不必为所有模板参数提供实参
3.1.2 针对指定模板参数的不同,分为全特化和偏特化(部分特例化)
-
全特化
就是模板中模板参数全被指定为确定的类型。全特化也就是定义了一个全新的类型,全特化的类中的函数可以与模板类不一样。 -
偏特化
就是模板中的模板参数没有被全部确定,需要编译器在编译时进行确定。
模板函数只能支持全特化,不支持偏特化
模板类能够支持全特化和偏特化
全特化的标志:template <>
偏特化的标志:template
见C++ Primer Page_628
// 原始的、最通用的版本
template<class T> struct remove_reference{
	typedef T type;
};
//部分特例化版本,将用于左值引用和右值引用
template<class T> struct remove_reference<T&> //左值引用
{
	typedef T type;
};

template<class T> struct remove_reference<T&&>//右值引用
{
	typedef T type;
};
//
3.2 函数模板的特化
目前模板函数只有全特化
3.2.1 函数模板特化技巧
1泛化程序
template <class T>
int compare(const T left, const T right)
{
    std::cout <<"in template<class T>..." <<std::endl;
    return (left - right);
}
但不支持char*(string)类型
进行特化函数:
template < >
int compare<const char*>(const char* left, const char* right)
{
    std::cout <<"in special template< >..." <<std::endl;

    return strcmp(left, right);
}
或者
template < >
int compare(const char* left, const char* right)
{
    std::cout <<"in special template< >..." <<std::endl;

    return strcmp(left, right);
}
示例函数:
#include <iostream>
#include <cstring>

///  模版特化

template <class T>
int compare(const T left, const T right)
{
    std::cout <<"in template<class T>..." <<std::endl;
    return (left - right);
}


//  这个是一个特化的函数模版
template < >
int compare<const char*>(const char* left, const char* right)
{
    std::cout <<"in special template< >..." <<std::endl;

    return strcmp(left, right);
}
//  特化的函数模版, 两个特化的模版本质相同, 因此编译器会报错
// error: redefinition of 'int compare(T, T) [with T = const char*]'|
//template < >
//int compare(const char* left, const char* right)
//{
//    std::cout <<"in special template< >..." <<std::endl;
//
//    return strcmp(left, right);
//}


//  这个其实本质是函数重载
int compare(char* left, char* right)
{
    std::cout <<"in overload function..." <<std::endl;

    return strcmp(left, right);
}

int main( )
{
    compare(1, 4);

    const char *left = "gatieme";
    const char *right = "jeancheng";
    compare(left, right);

    return 0;
}
函数模版的特化,当函数调用发现有特化后的匹配函数时,会优先调用特化的函数,而不再通过函数模版来进行实例化。
示例二判断两个数据是否相等
#include <iostream>
#include <cstring>

using namespace std;
//函数模板
template<class T>
bool IsEqual(T t1,T t2){
    return t1==t2;
}

template<> //函数模板特化
bool IsEqual(char *t1,char *t2){
    return strcmp(t1,t2)==0;
}

int main(int argc, char* argv[])
{
    char str1[]="abc";
    char str2[]="abc";
    cout<<"函数模板和函数模板特化"<<endl;
    cout<<IsEqual(1,1)<<endl;
    cout<<IsEqual(str1,str2)<<endl;
    system("pause");
    return 0;
}
3.3 类模板的特化
类模板内对某些类进行特殊处理时,使用类模板的特化
常见的几种类型
一是特化为绝对类型;
二是特化为引用,指针类型;
三是特化为另外一个类模板。
3.3.1 特化为绝对类型
#include <iostream>
#include <cstring>
#include <cmath>
// general version
template <class T>
class Compare
{
public:
    static bool IsEqual(const T &lh, const T &rh)
    {
        std::cout << "in the general class..." << std::endl;
        return lh == rh;
    }
};

// specialize for float
template <>
class Compare<float>
{
public:
    static bool IsEqual(const float &lh, const float &rh)
    {
        std::cout << "in the float special class..." << std::endl;

        return std::abs(lh - rh) < 10e-3;
    }
};

// specialize for double
template <>
class Compare<double>
{
public:
    static bool IsEqual(const double &lh, const double &rh)
    {
        std::cout << "in the double special class..." << std::endl;

        return std::abs(lh - rh) < 10e-6;
    }
};

int main(int argc, char **argv)
{
    Compare<int> comp1;
    std::cout << comp1.IsEqual(3, 4) << std::endl;
    std::cout << comp1.IsEqual(3, 3) << std::endl;

    Compare<float> comp2;
    std::cout << comp2.IsEqual(3.14, 4.14) << std::endl;
    std::cout << comp2.IsEqual(3, 3) << std::endl;

    Compare<double> comp3;
    std::cout << comp3.IsEqual(3.14159, 4.14159) << std::endl;
    std::cout << comp3.IsEqual(3.14159, 3.14159) << std::endl;
    return 0;
}
面对float和double类型的特化
偏特化
template<class T1, class T2>
class A
{
}

template<class T1>
class A<T1, int>
{
}
3.3.2 特化为引用、指针
template <class _Iterator>
struct iterator_traits {
  typedef typename _Iterator::iterator_category iterator_category;
  typedef typename _Iterator::value_type        value_type;
  typedef typename _Iterator::difference_type   difference_type;
  typedef typename _Iterator::pointer           pointer;
  typedef typename _Iterator::reference         reference;
};

// specialize for _Tp*
template <class _Tp>
struct iterator_traits<_Tp*> {
  typedef random_access_iterator_tag iterator_category;
  typedef _Tp                         value_type;
  typedef ptrdiff_t                   difference_type;
  typedef _Tp*                        pointer;
  typedef _Tp&                        reference;
};

// specialize for const _Tp*
template <class _Tp>
struct iterator_traits<const _Tp*> {
  typedef random_access_iterator_tag iterator_category;
  typedef _Tp                         value_type;
  typedef ptrdiff_t                   difference_type;
  typedef const _Tp*                  pointer;
  typedef const _Tp&                  reference;
};
除了T*, 也可以将T特化为 const T*, T&, const T&等,以下还是以T*为例:
#include <iostream>
#include <cstring>
#include <cmath>
// general version
template <class T>
class Compare
{
public:
    static bool IsEqual(const T &lh, const T &rh)
    {
        std::cout << "in the general class..." << std::endl;
        return lh == rh;
    }
};
// specialize for T*
template<class T>
class Compare<T*>
{
public:
    static bool IsEqual(const T* lh, const T* rh)
    {
        return Compare<T>::IsEqual(*lh, *rh);
    }
};
这种特化其实就不是一种绝对的特化, 它只是对类型做了某些限定,但仍然保留了其一定的模板性,这种特化给我们提供了极大的方便, 如这里, 我们就不需要对int*, float*, double*等等类型分别做特化了。
这其实是第二种方式的扩展,其实也是对类型做了某种限定,而不是绝对化为某个具体类型,如下:
// specialize for vector<T>
template<class T>
class Compare<vector<T> >
{
public:
    static bool IsEqual(const vector<T>& lh, const vector<T>& rh)
    {
        if(lh.size() != rh.size()) return false;
        else
        {
            for(int i = 0; i < lh.size(); ++i)
            {
                if(lh[i] != rh[i]) return false;
            }
        }
        return true;
    }
};
这就把IsEqual的参数限定为一种vector类型, 但具体是vector还是vector, 我们可以不关心, 因为对于这两种类型,我们的处理方式是一样的,我们可以把这种方式称为“半特化”。当然, 我们可以将其“半特化”为任何我们自定义的模板类类型:
// specialize for any template class type
template <class T1>
struct SpecializedType
{
    T1 x1;
    T1 x2;
};
template <class T>
class Compare<SpecializedType<T> >
{
public:
    static bool IsEqual(const SpecializedType<T>& lh, const SpecializedType<T>& rh)
    {
        return Compare<T>::IsEqual(lh.x1 + lh.x2, rh.x1 + rh.x2);
    }
};
这就是三种类型的模板特化, 我们可以这么使用这个Compare类:
int main()
{
       // int
    int i1 = 10;
    int i2 = 10;
    bool r1 = Compare<int>::IsEqual(i1, i2);

    // float
    float f1 = 10;
    float f2 = 10;
    bool r2 = Compare<float>::IsEqual(f1, f2);

    // double
    double d1 = 10;
    double d2 = 10;
    bool r3 = Compare<double>::IsEqual(d1, d2);

    // pointer
    int* p1 = &i1;
    int* p2 = &i2;
    bool r4 = Compare<int*>::IsEqual(p1, p2);

    // vector<T>
    vector<int> v1;
    v1.push_back(1);
    v1.push_back(2);

    vector<int> v2;
    v2.push_back(1);
    v2.push_back(2);
    bool r5 = Compare<vector<int> >::IsEqual(v1, v2);

    // custom template class
    SpecializedType<float> s1 = {10.1f,10.2f};
    SpecializedType<float> s2 = {10.3f,10.0f};
    bool r6 = Compare<SpecializedType<float> >::IsEqual(s1, s2);
    return 0;
}
https://blog.csdn.net/gatieme/article/details/50953564
四、仿函数
4.1 为什么使用仿函数
例子:假设现在有一个数组,数组中存有任意数量的数字,我们希望能够统计出这个数组中大于 10 的数字的数量,一个可能的代码:
#include <iostream>
using namespace std;

int RecallFunc(int *start, int *end, bool (*pf)(int))
{
    int count = 0;
    for (int *i = start; i != end + 1; i++)
    {
        count = pf(*i) ? count + 1 : count;
    }
    return count;
}

bool IsGreaterThanTen(int num)
{
    return num > 10 ? true : false;
}

int main(int argc, char **argv)
{
    int a[5] = {10, 100, 11, 5, 19};
    int result = RecallFunc(a, a + 4, IsGreaterThanTen);
    cout << result << endl;
    return 0;
}
RecallFunc() 函数的第三个参数是一个函数指针,用于外部调用,而 IsGreaterThanTen() 函数通常也是外部已经定义好的,它只接受一个参数的函数。如果此时希望将判定的阈值也作为一个变量传入,变为如下函数就不可行了:
bool IsGreaterThanThreshold(int num, int threshold) {
	return num>threshold ? true : false;
}
虽然这个函数看起来比前面一个版本更具有一般性,但是它不能满足已经定义好的函数指针参数的要求,因为函数指针参数的类型是bool (*)(int),与函数bool IsGreaterThanThreshold(int num, int threshold) 的类型不相符。如果一定要完成这个任务,按照以往的经验,我们可以考虑如下可能途径:
(1)阈值作为函数的局部变量。局部变量不能在函数调用中传递,故不可行;
(2)函数传参。这种方法我们已经讨论过了,多个参数不适用于已定义好的 RecallFunc() 函数。
(3)全局变量。我们可以将阈值设置成一个全局变量。这种方法虽然可行,但不优雅,且容易引入 Bug,比如全局变量容易同名,造成命名空间污染。
4.2 解决方案仿函数
4.2.1 仿函数的定义
仿函数(Functor)又称为函数对象(Function Object)是一个能行使函数功能的类。
仿函数的语法几乎普通的函数调用一样,不过作为仿函数的类,都必须重载 operator() 运算符。因为调用仿函数,实际上就是通过类对象调用重载后的 operator() 运算符。
如果编程者要将某种“操作”当做算法的参数,一般有两种方法:
(1)一个办法就是先将该“操作”设计为一个函数,再将函数指针当做算法的一个参数。上面的实例就是该做法;
(2)将该“操作”设计为一个仿函数(就语言层面而言是个 class),再以该仿函数产生一个对象,并以此对象作为算法的一个参数。
分析
第一种方法扩展性较差,当函数参数有所变化,则无法兼容旧的代码。
利用仿函数:一个简单类,除了维护类的基本成员函数外,只需要重载 operator() 运算符 。这样既可以免去对一些公共变量的维护,也可以使重复使用的代码独立出来,以便下次复用。仿函数还可以进行依赖、组合与继承等,这样有利于资源的管理。
STL种涉及仿函数:
为了函数拥有类的性质,以达到安全传递函数指针、依据函数生成对象、甚至是让函数之间有继承关系、对函数进行运算和操作的效果。例如 STL 中的容器 set 就使用了仿函数 less ,而 less 继承的 binary_function,就可以看作是对于一类函数的总体声明,这是函数做不到的。
// less的定义
template<typename _Tp> struct less : public binary_function<_Tp, _Tp, bool> {
      bool operator()(const _Tp& __x, const _Tp& __y) const
      { return __x < __y; }
};

// set 的申明
template<typename _Key, typename _Compare = std::less<_Key>,typename _Alloc = std::allocator<_Key>> class set;
仿函数中的变量可以是 static 的,同时仿函数还给出了 static 的替代方案,仿函数内的静态变量可以改成类的私有成员,这样可以明确地在析构函数中清除所用内容,如果用到了指针,那么这个是不错的选择。
4.3 仿函数实例
class StringAppend {
public:
    explicit StringAppend(const string& str) : ss(str){}
    void operator() (const string& str) const {
         cout << str << ' ' << ss << endl;
    }
private:
    const string ss;
};

int main() {
    StringAppend myFunctor2("and world!");
    myFunctor2("Hello");
}
输出:
Hello and world!
仿函数的一些作用:它既能像普通函数一样传入给定数量的参数,还能存储或者处理更多我们需要的有用信息。于是仿函数提供了第四种解决方案:成员变量。成员函数可以很自然地访问成员变量,从而可以解决第一节“1.为什么要有仿函数”中提到的问题:计算出数组中大于指定阈值的数字数量。
#include <iostream>
using namespace std;

class IsGreaterThanThresholdFunctor {
public:
	explicit IsGreaterThanThresholdFunctor(int t):threshold(t){}
	bool operator() (int num) const {
		return num > threshold ? true : false;
	}
private:
	const int threshold;
};

int RecallFunc(int *start, int *end, IsGreaterThanThresholdFunctor myFunctor) {
	int count = 0;
	for (int *i = start; i != end + 1; i++) {
		count = myFunctor(*i) ? count + 1 : count;
	}
	return count;
}

int main() {
	int a[5] = {10,100,11,5,19};
	int result = RecallFunc(a, a + 4, IsGreaterThanThresholdFunctor(10));
	cout << result << endl;
}
输出:
3
五 、STL适配器
5.1 设配器概述和分类
适配器(adapters)在STL组件的灵活组合运用功能上,扮演着轴承、转换器的角色。
适配器本身是一个新的自定义类型 class/struct,其中会包含一个或多个辅助的所适配的类型的成员,并对内含的成员的接口进行改造,再以新的适配器类型向外部提供接口
理解:
将要修饰的组件(容器/迭代器/仿函数)进行二次包装,得到有着新面貌的新组件,但是能够利用旧组件所实现的接口和成员,向客户端/调用者提供新的接口或禁止旧组件的接口。
Adapter:一种设计模式(design pattern)。对adapter样式的定义如下:将一个 class 的接口转换为另一个class的接口,使得原本因接口不兼容而不能合作的classes,可以一起运作。
适配器可以对容器、迭代器和仿函数进行适配,进而产生了多种适配器。
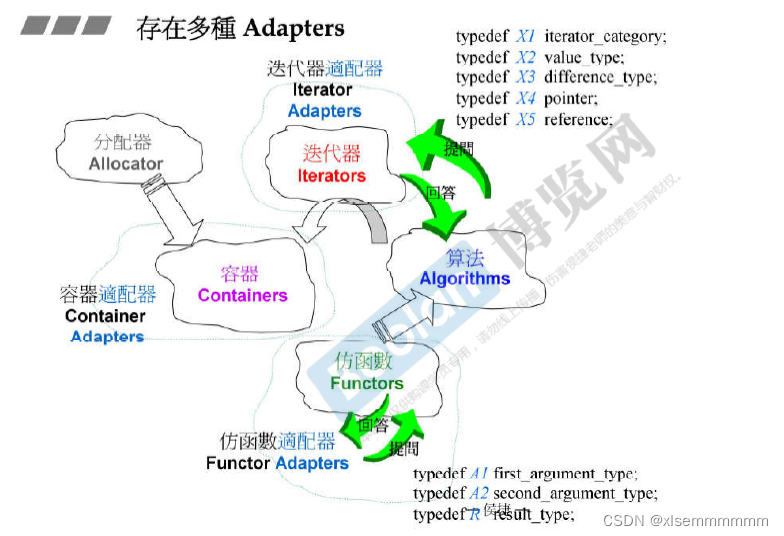
STL 所提供的各种适配器中,改变仿函数(functors)的接口者,称为functor adapter(亦称为function adapter);改变容器(containers)的接口者,称为container adapter;改变迭代器(iterators)接口者,称为iterator adapter。
5.2 适配器分类及应用
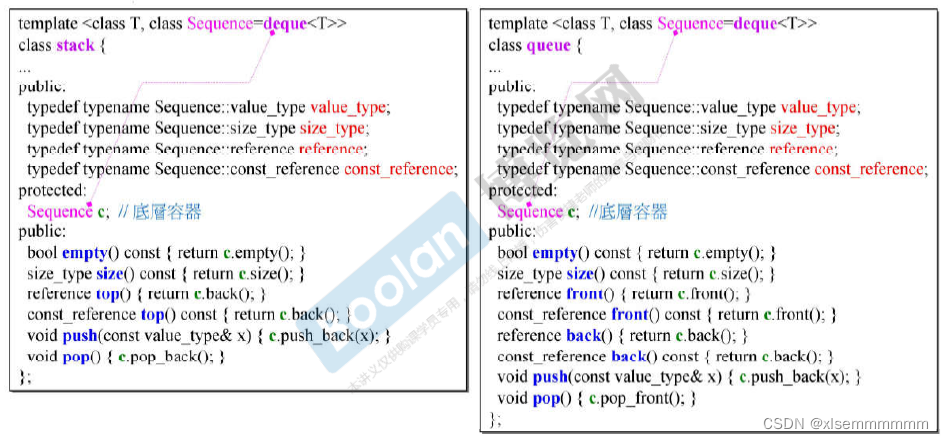
5.2.1 容器适配器stack、queue
stack的底层由deque组成,stack类的源码部分:
template <class T, class Sequence = deque<T> >
class stack {
...
protected:
	Sequence c; //底层容器
...
};
stack封住了所有的deque对外接口(protected成员),只开放几个符合stack先进后出(FILO)原则的几个函数,所以说stack是一个适配器,是作用于容器上的适配器。那么queue和stack大同小异,只是开放的函数是符合先进先出(FIFO)原则的函数。比较和实现见下图所示。
5.2.2 迭代器适配器(iterator adapter)
STL提供了许多应用于迭代器身上的配接器,包括insert iterators, reverse iterators, iostream iterators。C++ standard规定它们的接口可以由**<iterator>**获得,SGI STL则将它们实际定义于<stl_iterator.h>
insert_iterator
对于insert iterator,可以将一般迭代器的赋值(assign)操作,转化为插入(insert)操作。有专司头端插入的front_insert_iterator,专司尾部插入的back_insert_iterator。还有就是下面讲义专门讲的insert_iterator,其可以实现从任意位置执行插入操作
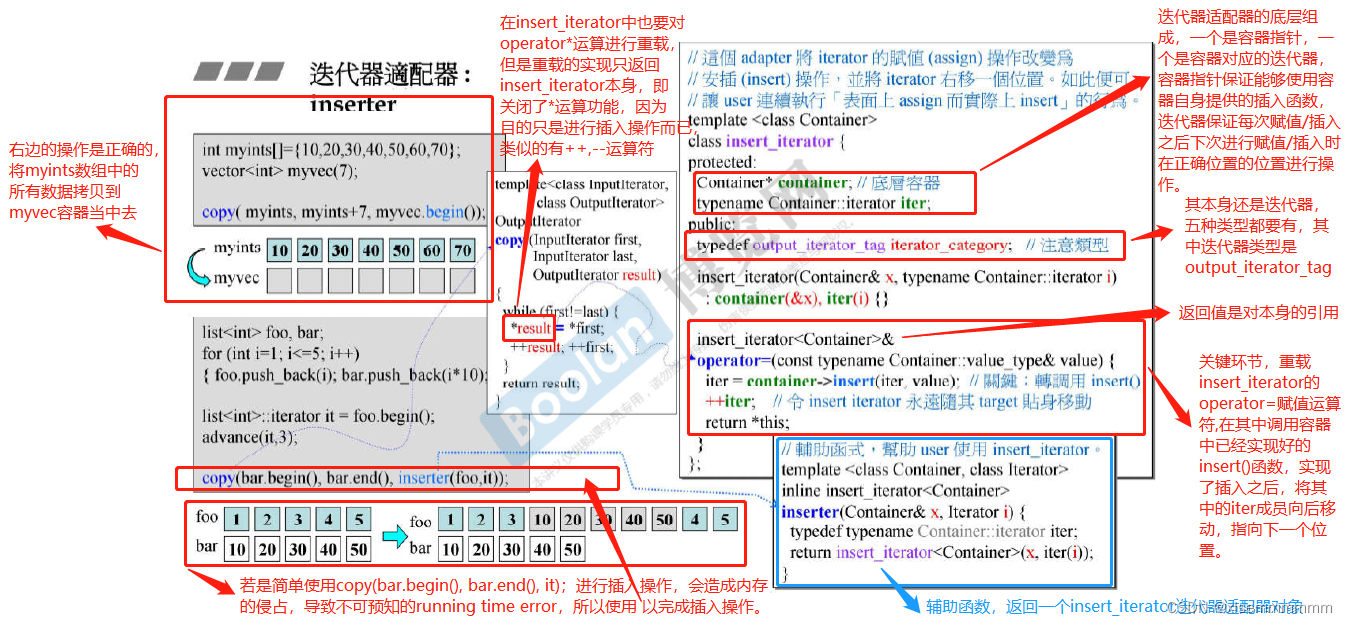
insert_iterator的实现思路为:每个insert_iterators内部都维护一个由用户指定的容器和容器相应的迭代器;当客户端对insert iterators做赋值操作时,就在insert_iterators的**operator=**操作符中调用底层容器的insert() 函数。对于insert iterators的前进、后退、取值、成员取用等操作都是关闭的,或是不允许的。
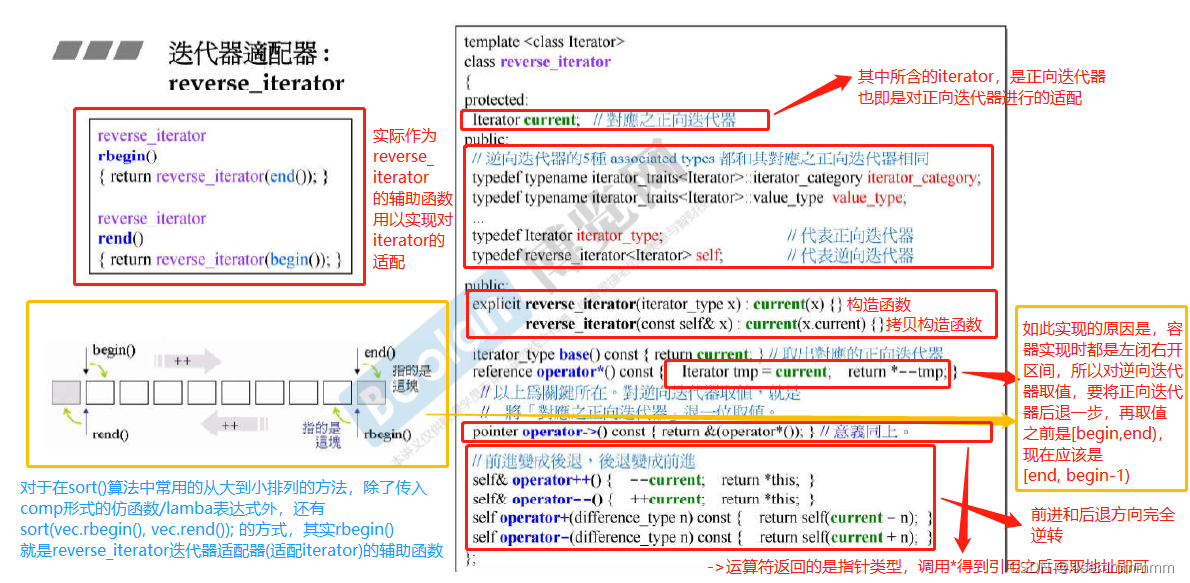
5.2.3 reverse_iterator
逆向迭代器并不改变存储中的实际位置,只是改变了逻辑位置。逆向迭代器reverse_iterator就是对正向迭代器iterator的二次包装,在保持和利用正向迭代器的原有行为的同时,将一个正向迭代器转换为逆向迭代器,实现了逻辑上的相反遍历的功能。
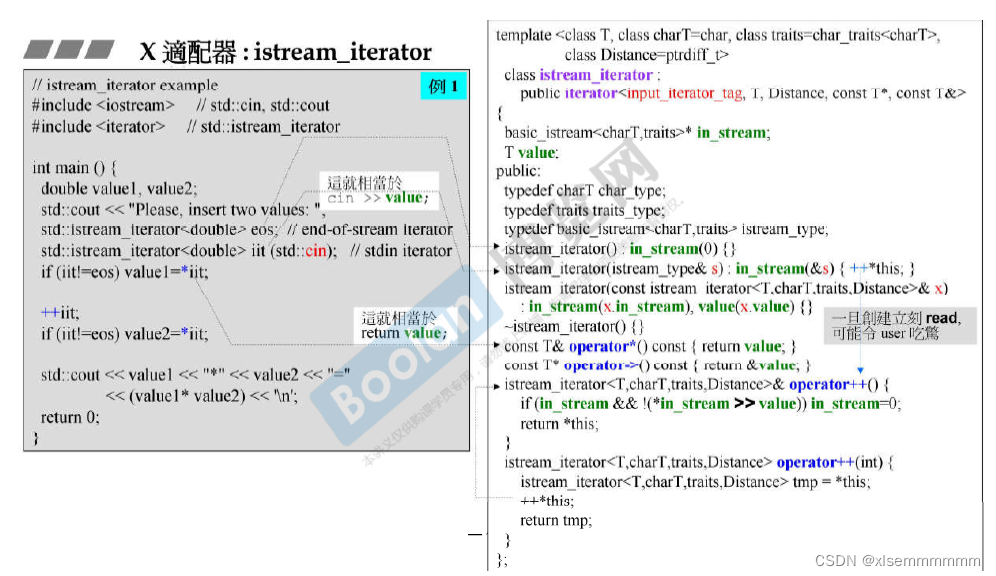
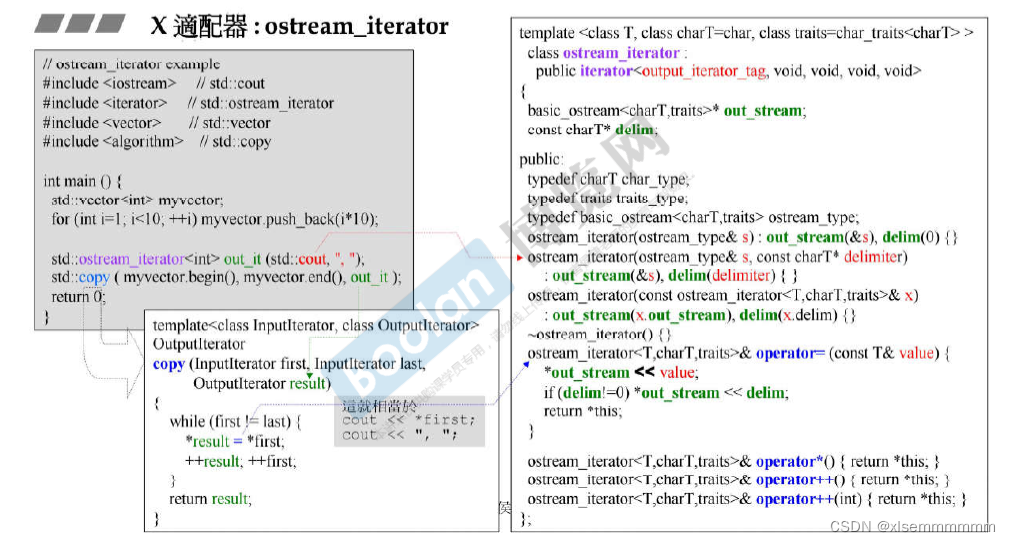
5.2.4 stream_iterator:X适配器
stream iterators:可以将迭代器**绑定到一个stream (数据流)**对象身上,其是容器/迭代器/仿函数的配置器,集三种配置器的特点于一身。 绑定到istream对象(例如std::cin)者,称为 istream_iterator, 拥有输入能力;绑定到 ostream 对象(例如std::cout)者,称为 ostream_iterator , 拥有输出能力。
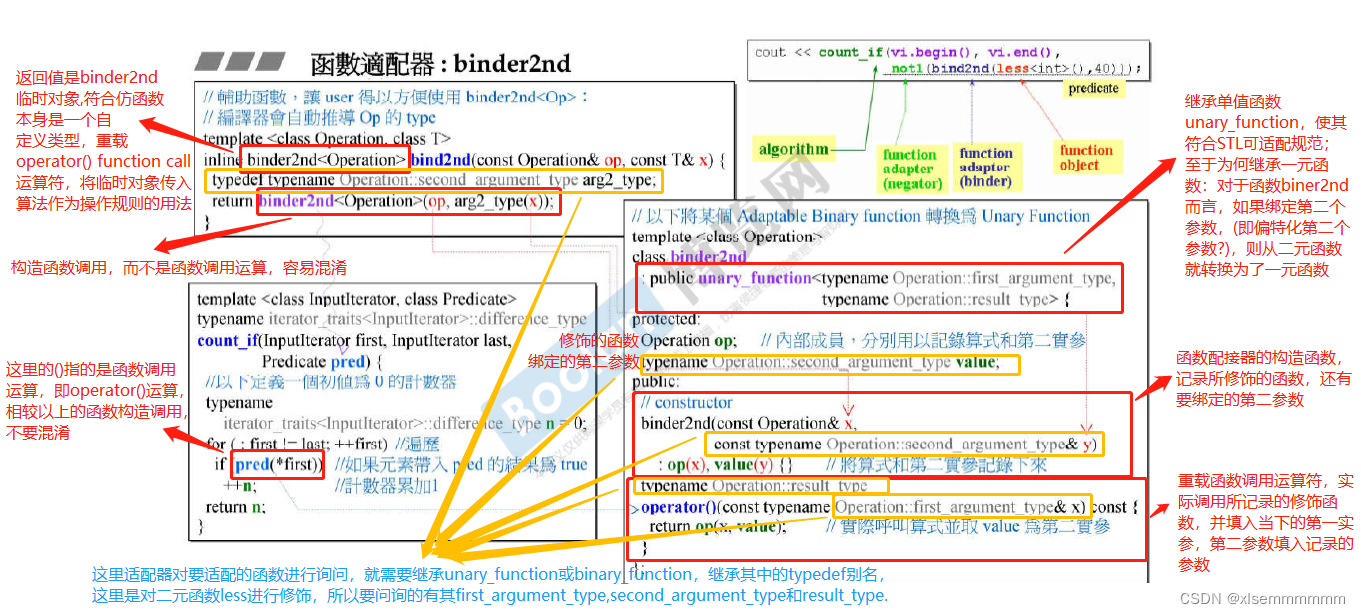
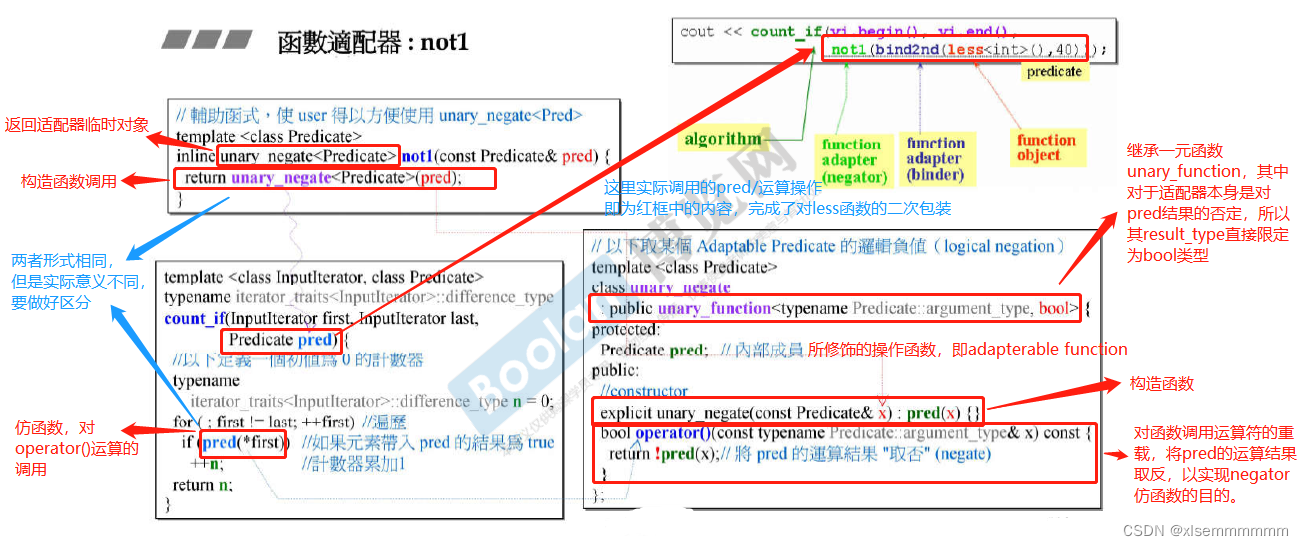
5.2.5 函数适配器(function adapter):bind2nd、not1、bind
一般而言,容器是以 class templates 完成,算法以 function templates 完成,仿函数是一种将 operator() 重载的 class template, 迭代器则是一种将 operator++ 和 operator 等指针习惯常行为重载的 class template*。
修饰仿函数的配接器,如何能够”事先”对一个函数完成参数的绑定(bind、binder1st(depreated)、binder2nd(depreated))、执行结果的否定(negator:not1、not2)、甚至多个函数的组合(compose1、compose2)是个需要设计的问题。其中”事先”一词的意思是, 最后修饰结果(视为一个表达式,expression)将被传给 STL 算法使用,STL 算法才是真正使用这表达式的主格。而我们都知道,只有在真正使用(调用)某个函数或仿函数)时,才有可能对参数和执行结果做任何干涉。
如何做到以上的场景要求?就像 container adapters 有一个 containter member,或是 reverse iterator(adapters)有一个 pointer to container 成员一样,就是在每个 function adapters 内含一个 member function,也即是所要修饰的 adapterable functor。
下面主要对 count_if(vec.begin(), vec.end(), not1(bind2nd(less(), 40)); 进行解析,同时详解 not1 和 bind2nd 的实现。
以上设配器都声明在头文件中,
其内声明的都是函数对象。官方文档对其的介绍为:函数对象是专门设计用于与函数语法相似的语法的对象,在C++中,它们通过operator()在其类中定义成员函数来实现的,它们通常用作函数的参数,例如传递给标准算法的谓词或比较函数。
对于 std::bind 这个新型适配器,其可以绑定四种类型的参数
functions; //绑定函数;
functions object; //绑定函数对象/仿函数;
member functions, //_1必须是某个object地址,_1指的的绑定的函数参数,也即bind()的第一个参数;
data members; //要求同上;
相应例程
// bind example
#include <iostream>     // std::cout
#include <functional>   // std::bind

// a function: (also works with function object: std::divides<double> my_divide;)
double my_divide (double x, double y) {return x/y;}

struct MyPair {
  double a,b;
  double multiply() {return a*b;}
};

int main () {
  using namespace std::placeholders;    // adds visibility of _1, _2, _3,...

  // binding functions:
  auto fn_five = std::bind (my_divide,10,2);               // returns 10/2
  std::cout << fn_five() << '\n';                          // 5

  auto fn_half = std::bind (my_divide,_1,2);               // returns x/2
  std::cout << fn_half(10) << '\n';                        // 5

  auto fn_invert = std::bind (my_divide,_2,_1);            // returns y/x
  std::cout << fn_invert(10,2) << '\n';                    // 0.2

  auto fn_rounding = std::bind<int> (my_divide,_1,_2);     // returns int(x/y)
  std::cout << fn_rounding(10,3) << '\n';                  // 3

  MyPair ten_two {10,2};

  // binding members:
  auto bound_member_fn = std::bind (&MyPair::multiply,_1); // returns x.multiply()
  std::cout << bound_member_fn(ten_two) << '\n';           // 20

  auto bound_member_data = std::bind (&MyPair::a,ten_two); // returns ten_two.a
  std::cout << bound_member_data() << '\n';                // 10

  return 0;
}
六、函数指针
6.1 函数的类型与地址
int foo()
{
    return 5;
}
foo是函数名,
而int是函数返回值的类型。
函数类型:“无参数且返回类型为整型”的函数。
我们可以这么表示这种类型int (*somefunction)(),
同样的,如果是“有两个整形参数且返回值是布尔型”的我们可以这么表示*bool (someotherfunction)(int, int)
#include<iostream>
using namespace std;
int foo()
{
    return 5;
}
int main()
{
    cout << reinterpret_cast<void*>(foo)<<endl;
    cout <<foo<<endl;
    system("pause");
    return 0;
}
输出
0x401550
1
请按任意键继续. . .
6.2 函数指针
对于变量我们可以用int *a这样的语法创建一个指针,如果我们想写一个指向函数的指针我们可以这么写:
int(*funcPtr)();  //funcPtr is short for 'function pointer'/函数指针
//或者我们也可以这么写,如果你需要一个静态的函数指针
int (*const funcPtr)();
//另外,对于 const int(*funcPtr),意思是这个指针指向的函数的返回值是常量
把一个函数赋值给函数指针
#include <iostream>
using namespace std;
int foo()
{
    return 5;
}
int goo()
{
    return 6;
}
int main()
{
    // cout << reinterpret_cast<void*>(foo)<<endl;
    // cout <<foo<<endl;
    int (*funcPtr)() = foo; // funcPtr 现在指向了函数foo
    cout << reinterpret_cast<void*>(funcPtr)<<endl;
    funcPtr = goo;          // funcPtr 现在又指向了函数goo
                            //但是千万不要写成funcPtr = goo();这是把goo的返回值赋值给了funcPtr
    cout << reinterpret_cast<void*>(funcPtr)<<endl;
    system("pause");
    return 0;
}
输出
0x401550
0x401556
请按任意键继续. . .
练习:
int foo();
double goo();
int hoo(int x);

// 给函数指针赋值
int (*funcPtr1)() = foo; // 可以
int (*funcPtr2)() = goo; // 错误!返回值不匹配!
double (*funcPtr4)() = goo; // 可以
funcPtr1 = hoo; // 错误,因为参数不匹配,funcPtr1只能指向不含参数的函数,而hoo含有int型的参数
int (*funcPtr3)(int) = hoo; // 可以,所以应该这么写
另外
int foo(){
    return 5;
}
int main()
{
    int (*funcPtr1)() = foo;
    int (*funcPtr2)() = &foo; // c++会隐式得把foo转换成&foo,所以你无需再加入&
    std::cout << funcPtr1() << std::endl;
    std::cout << funcPtr2() << std::endl;
}
结果:
5
5
6.3 通过函数指针调用函数
int foo(int x)
{
    return x;
}

int main()
{
    int (*funcPtr)(int) = foo;
    (*funcPtr)(5); // 通过funcPtr调用foo(5)
    funcPtr(5) // 也可以这么使用,在一些古老的编译器上可能不行
    return 0;
}
6.4 把函数作为参数传入另一个函数
6.4.1 第一个例子
重要
#include <iostream>
int add(int a, int b){
    return a+b;
}
int sub(int a, int b){
    return a-b;
}
void func(int e, int d, int(*f)(int a, int b)){
// 传入了一个int型,双参数,返回值为int的函数
    std::cout<<f(e,d)<<std::endl;
}
int main()
{
    func(2,3,add);
    func(2,3,sub);

    return 0;
}
6.4.2 第二个例子
冒泡排序:
#include <iostream>

template<typename T>
void bubblesort(T *a, int n){
    bool sorted = false;
    while(!sorted){
        sorted = true;
        for(int i=0; i<n-1; i++)
            if(a[i] > a[i+1]){
                std::swap(a[i], a[i+1]);
                sorted = false;
            }
        n--;
    }
}

int main()
{
    int a[8] = {5,2,5,7,1,-3,99,56};
    bubblesort<int>(a, 8);
    for(auto e:a)
        std::cout << e << " ";


    return 0;
}
// -3 1 2 5 5 7 56 99 [Finished in 0.4s]
用ascending和descending两个函数代替大小判断,这样在调用的时候就可以选择是升序或者降序排列
#include <iostream>
template <typename T>
bool ascending(T x, T y)
{
    return x > y;
}
template <typename T>
bool descending(T x, T y)
{
    return x < y;
}
template <typename T>
void bubblesort(T *a, int n, bool (*cmpfunc)(T, T) = ascending)
{
    bool sorted = false;
    while (!sorted)
    {
        sorted = true;
        for (int i = 0; i < n - 1; i++)
            if (cmpfunc(a[i], a[i + 1]))
            {
                std::swap(a[i], a[i + 1]);
                sorted = false;
            }
        n--;
    }
}

int main()
{
    int a[8] = {5, 2, 5, 7, 1, -3, 99, 56};
    int b[8] = {5, 2, 5, 7, 1, -3, 99, 56};

    bubblesort<int>(a, 8, ascending);

    for (auto e : a)
        std::cout << e << " ";
    std::cout << std::endl;

    bubblesort<int>(b, 8, descending);

    for (auto e : b)
        std::cout << e << " ";
    std::cout << std::endl;
    system("pause");
    return 0;
}
// -3 1 2 5 5 7 56 99
// 99 56 7 5 5 2 1 -3 [Finished in 0.4s]
6.4.3 attention
int* hoo()
{
    int a;
    return &a;
}
这是个返回值类型是int类型指针的函数,上述写法有问题a被析构,地址指向没了
若
cout << hoo()<<endl;
提示address of local variable ‘a’ returned [-Wreturn-local-addr]gcc警告,没有报错
输出0;
七、四种类型转换static_cast、dynamic_cast、const_cast、reinterpret_cast
7.1 static_cast
用法:static_cast < type-id > ( expression )
static_cast是一个强制类型转换操作符。强制类型转换,也称为显式转换
7.1.1 编译器隐式执行的任何类型转换都可以由static_cast来完成,比如int与float、double与char、enum与int之间的转换等。
double a = 1.999;
int b = static_cast<double>(a); //相当于a = b ;
大部分会遇到警告从“double”转换到“int”,可能丢失数据
使用static_cast可以明确告诉编译器,这种损失精度的转换是在知情的情况下进行的,也可以让阅读程序的其他程序员明确你转换的目的而不是由于疏忽。把精度大的类型转换为精度小的类型,static_cast使用位截断进行处理。
7.1.2 使用static_cast可以找回存放在void*指针中的值。
    double a = 1.999;
    void * vptr = & a;
    double * dptr = static_cast<double*>(vptr);
    cout<<*dptr<<endl;//输出1.999
7.1.3 static_cast也可以用在于基类与派生类指针或引用类型之间的转换。
然而它不做运行时的检查,不如dynamic_cast安全。static_cast仅仅是依靠类型转换语句中提供的信息来进行转换,而dynamic_cast则会遍历整个类继承体系进行类型检查,因此dynamic_cast在执行效率上比static_cast要差一些。现在我们有父类与其派生类如下:
class ANIMAL
{
public:
    ANIMAL():_type("ANIMAL"){};
    virtual void OutPutname(){cout<<"ANIMAL";};
private:
    string _type ;
};
class DOG:public ANIMAL
{
public:
    DOG():_name("大黄"),_type("DOG"){};
    void OutPutname(){cout<<_name;};
    void OutPuttype(){cout<<_type;};
private:
    string _name ;
    string _type ;
};
此时我们进行派生类与基类类型指针的转换:注意从下向上的转换是安全的,从上向下的转换不一定安全。
int main()
{
    //基类指针转为派生类指针,且该基类指针指向基类对象。
    ANIMAL * ani1 = new ANIMAL ;
    DOG * dog1 = static_cast<DOG*>(ani1);
    //dog1->OutPuttype();//错误,在ANIMAL类型指针不能调用方法OutPutType();在运行时出现错误。

    //基类指针转为派生类指针,且该基类指针指向派生类对象
    ANIMAL * ani3 = new DOG;
    DOG* dog3 = static_cast<DOG*>(ani3);
    dog3->OutPutname(); //正确

    //子类指针转为派生类指针
    DOG *dog2= new DOG;
    ANIMAL *ani2 = static_cast<DOG*>(dog2);
    ani2->OutPutname(); //正确,结果输出为大黄

    //
    system("pause");

}
static_cast可以把任何类型的表达式转换成void类型。
static_cast把任何类型的表达式转换成void类型。
另外,与const_cast相比,static_cast不能把换掉变量的const属性,也包括volitale或者__unaligned属性。
static_cast常用来进行基本类型直接的转换,如char与int、int与float、enum与int之间;
static_cast也可以转换用户自定义类型,但目标类型必须含有相应的构造函数;
static_cast还可以转换对象的指针类型,但它不进行运行时类型检查,所以是不安全的;
static_cast甚至可以把任何表达式都转换成void类型;
satic_cast不能移除变量的const属性,请参考const_cast操作符;
static_cast进行的是简单粗暴的转换,所以其正确性完全由程序员自己保证。
7.2 dynamic_cast
用法:dynamic_cast < type-id > ( expression)
dynamic_cast是四个强制类型转换操作符中最特殊的一个,它支持运行时识别指针或引用。
首先,dynamic_cast依赖于RTTI信息,其次,在转换时,dynamic_cast会检查转换的source对象是否真的可以转换成target类型,
这种检查不是语法上的,而是真实情况的检查。
Type-id可以是类的指针、类的引用或者void*。如果type-id是类指针类型,那么expression也必须是一个指针,如果type-id是一个引用,那么expression也必须是一个引用。
7.2.1 dynamic_cast进行安全的向下转型
dynamic_cast用于类继承层次间的指针或引用转换。主要还是用于执行“安全的向下转型(safe downcasting)”,
也即是基类对象的指针或引用转换为同一继承层次的其他指针或引用。
至于“先上转型”(即派生类指针或引用类型转换为其基类类型),本身就是安全的,尽管可以使用dynamic_cast进行转换,但这是没必要的, 普通的转换已经可以达到目的,毕竟使用dynamic_cast是需要开销的。
class Base
{
public:
    Base(){};
    virtual void Show(){cout<<"This is Base calss";}
};
class Derived:public Base
{
public:
    Derived(){};
    void Show(){cout<<"This is Derived class";}
};
int main()
{
    Base *base ;
    Derived *der = new Derived;
    //base = dynamic_cast<Base*>(der); //正确,但不必要。
    base = der; //先上转换总是安全的
    base->Show();
    system("pause");
}
7.2.2 dynamic_cast与继承层次的指针
对于“向下转型”有两种情况。
一种是基类指针所指对象是派生类类型的,这种转换是安全的;
另一种是基类指针所指对象为基类类型,在这种情况下dynamic_cast在运行时做检查,转换失败,返回结果为0;
#include "stdafx.h"
#include<iostream>
using namespace std;

class Base
{
public:
    Base(){};
    virtual void Show(){cout<<"This is Base calss";}
};
class Derived:public Base
{
public:
    Derived(){};
    void Show(){cout<<"This is Derived class";}
};
int main()
{
    //这是第一种情况
    Base* base = new Derived;//基类指针指向子类对象
    if(Derived *der= dynamic_cast<Derived*>(base))
    {
        cout<<"第一种情况转换成功"<<endl;
        der->Show();
        cout<<endl;
    }
    //这是第二种情况
    Base * base1 = new Base;
    if(Derived *der1 = dynamic_cast<Derived*>(base1))
    {
        cout<<"第二种情况转换成功"<<endl;
        der1->Show();
    }
    else
    {
        cout<<"第二种情况转换失败"<<endl;
    }

    delete(base);
    delete(base1);
    system("pause");
}
7.2.3 dynamic_cast和引用类型
在前面的例子中,使用了dynamic_cast将基类指针转换为派生类指针,也可以使用dynamic_cast将基类引用转换为派生类引用。
同样的,引用的向上转换总是安全的:
    Derived c;
    Derived & der2= c;
    Base & base2= dynamic_cast<Base&>(der2);//向上转换,安全
    base2.Show();
所以,在引用上,dynamic_cast依旧是常用于“安全的向下转型”。与指针一样,引用的向下转型也可以分为两种情况,与指针不同的是,并不存在空引用,所以引用的dynamic_cast检测失败时会抛出一个bad_cast异常
int main()
{
    //第一种情况,转换成功
    Derived b;
    Base &base1 = b;
    Derived &der1 = dynamic_cast<Derived &>(base1);
    cout << "first state: ";
    der1.Show();
    cout << endl;

    //第二种情况
    Base a;
    Base &base = a;
    cout << "second state: ";
    try
    {
        Derived &der = dynamic_cast<Derived &>(base);
    }
    catch (bad_cast)
    {
        cout << "fail convert, throw bad_cast exception" << endl;
    }
    system("pause");
    return 0;
}
输出
first state: This is Derived class
second state: fail convert, throw bad_cast exception
请按任意键继续. . .
7.2.4 使用dynamic_cast转换的Base类至少带有一个虚函数
当一个类中拥有至少一个虚函数的时候,编译器会为该类构建出一个虚函数表(virtual method table),虚函数表记录了虚函数的地址。如果该类派生了其他子类,且子类定义并实现了基类的虚函数,那么虚函数表会将该函数指向新的地址。虚表是C++多态实现的一个重要手段,也是dynamic_cast操作符转换能够进行的前提条件。当类没有虚函数表的时候(也即一个虚函数都没有定义),dynamic_cast无法使用RTTI,不能通过编译。
当然,虚函数表的建立对效率是有一定影响的,构建虚函数表、由表查询函数 都需要时间和空间上的消耗。所以,除了必须声明virtual(对于一个多态基类而言),不要轻易使用virtual函数。
7.3 const_cast
用法:const_cast< type-id > (expression)
const_cast转换符是用来移除变量的const或volatile限定符
将 const 引用转换为同类型的非 const 引用,将 const 指针转换为同类型的非 const 指针时可以使用 const_cast 运算符。例如:
const string s = "Inception";
string& p = const_cast <string&> (s);
string* ps = const_cast <string*> (&s);  // &s 的类型是 const string*
注意:
不允许修改基础类型的const,只能改类型限定符
代码:
#include <iostream>
#include <string>

using namespace std;

class A
{
public:
    const double i = 5.0;
    const int j = 10;
    const string m_s = "Test String.";
    float f = 2.0f;
};

int main()
{
    A a;
    cout << a.i << '\t' << a.j << '\t' << a.m_s << endl;
    string &p_str = const_cast<string &>(a.m_s);
    p_str = "New Test String!.";
    cout << a.i << '\t' << a.j << '\t' << a.m_s << endl;
    cout << p_str << endl;
    string *ps = const_cast<string *>(&a.m_s);
    *ps = "Point Test String";
    cout << a.i << '\t' << a.j << '\t' << a.m_s << endl;
    cout << ps << '\t' << *ps << endl;
    //int& p_i = const_cast<int&>(a.i); //  不允许修改基础类型的const,只能改类型限定符
    // p_i = 200;

    const A ca;
    A &pa = const_cast<A &>(ca);
    pa.f = 30.0f;
    cout << ca.i << '\t' << ca.j << '\t' << ca.m_s << '\t' << ca.f << endl;
    cout << pa.i << '\t' << pa.j << '\t' << pa.m_s << '\t' << pa.f << endl;
    system("pause");
    return 0;
}
7.4 reinterpret_cast
允许将任何指针转换为任何其他指针类型。 也允许将任何整数类型转换为任何指针类型以及反向转换、、不同类型的引用之间以及指针和能容纳指针的整数类型之间的转换,reinterpret_cast 转换时,执行的过程是逐个比特复制的操作。
滥用 reinterpret_cast 运算符可能很容易带来风险。 除非所需转换本身是低级别的,否则应使用其他强制转换运算符之一。
reinterpret_cast 运算符可用于 char* 到 int* 或 One_class* 到 Unrelated_class*
之类的转换,这本身并不安全。 reinterpret_cast 的结果不能安全地用于除强制转换回其原始类型以外的任何用途。
在最好的情况下,其他用途也是不可移植的。 reinterpret_cast 运算符无法强制转换掉 const、volatile 或
__unaligned 特性。 有关移除这些特性的详细信息,请参阅 const_cast Operator。 reinterpret_cast 运算符将空指针值转换为目标类型的空指针值。 reinterpret_cast
的一个实际用途是在哈希函数中,即,通过让两个不同的值几乎不以相同的索引结尾的方式将值映射到索引。
语法:
reinterpret_cast < type-id > ( expression )
代码
#include <iostream>

using namespace std;

class A
{
public:
    int i;
    int j;
    A(int n) :i(n), j(n) { }
};

int main()
{
    A a(100);
    int &r = reinterpret_cast<int&>(a);             // 强行让 r 引用 a
    r = 200;                                                            // 把 a.i 变成了 200
    cout << a.i << "," << a.j << endl;                  // 输出 200,100
    int n = 300;
    A *pa = reinterpret_cast<A*> (&n);              // 强行让 pa 指向 n
    pa->i = 400;                                                    // n 变成 400
    pa->j = 500;                                                    // 此条语句不安全,很可能导致程序崩溃
    cout << n << endl;                                          // 输出 400
    long long la = 0x12345678abcdLL;
    pa = reinterpret_cast<A*>(la);                      // la太长,只取低32位0x5678abcd拷贝给pa
    unsigned int u = reinterpret_cast<unsigned int>(pa);    // pa逐个比特拷贝到u
    cout << hex << u << endl;                               // 输出 5678abcd
    typedef void(*PF1) (int);
    typedef int(*PF2) (int, char *);
    PF1 pf1 = nullptr;
    PF2 pf2;
    pf2 = reinterpret_cast<PF2>(pf1);                   // 两个不同类型的函数指针之间可以互相转换
}
八、指针的引用*&
https://zhuanlan.zhihu.com/p/139543762
九、std::atomic
9.1 定义
Each instantiation and full specialization of the std::atomic template defines an atomic type. If one thread writes to an atomic object while another thread reads from it, the behavior is well-defined (see memory model for details on data races).
In addition, accesses to atomic objects may establish inter-thread synchronization and order non-atomic memory accesses as specified by std::memory_order.
std::atomic is neither copyable nor movable.
每个 std::atomic 模板的实例化和全特化定义一个原子类型。若一个线程写入原子对象,同时另一线程从它读取,则行为良好定义。
另外,对原子对象的访问可以建立线程间同步,并按 std::memory_order 对非原子内存访问定序。
std::atomic 既不可复制亦不可移动。
线程安全:相比于std::mutex可以大大减小开销
9.2 Member types
| Member type | Definition |
|---|---|
| value_type | T (regardless of whether specialized or not)模板,无论是否被特化 |
| difference_type | value_type (only for atomic and atomic (since C++20) specializations) ;std::ptrdiff_t (only for atomic<U*> specializations) 针对特化的类型不同 |
9.3 Member functions
| Member functions | Meanings |
|---|---|
| store | atomically replaces the value of the atomic object with a non-atomic argument(public member function) 原子地以非原子对象替换原子对象的值 |
| load | atomically obtains the value of the atomic object(public member function) 原子地获得原子对象的值 |
十、std::bind
十一、std::unordered_map
11.1 特点
unordered_map是c++哈希表的实现模板,
#include<unordered_map>
存储key-value的组合,unordered_map可以在常数时间内,根据key来取到value值,支持
[]
运算
11.2 键值查找
11.2.1 find
      //@{
      /**
       *  @brief Tries to locate an element in an %unordered_map.
       *  @param  __x  Key to be located.
       *  @return  Iterator pointing to sought-after element, or end() if not
       *           found.
       *
       *  This function takes a key and tries to locate the element with which
       *  the key matches.  If successful the function returns an iterator
       *  pointing to the sought after element.  If unsuccessful it returns the
       *  past-the-end ( @c end() ) iterator.
       */
      iterator
      find(const key_type& __x)
      { return _M_h.find(__x); }

      const_iterator
      find(const key_type& __x) const
      { return _M_h.find(__x); }
      //@}
如果key存在,则find返回key对应的迭代器,如果key不存在,则find返回unordered_map::end。可以通过
map.find(key) == map.end()
来判断,key是否存在于当前的unordered_map中。
11.2.2 count
      //@}

      /**
       *  @brief  Finds the number of elements.
       *  @param  __x  Key to count.
       *  @return  Number of elements with specified key.
       *
       *  This function only makes sense for %unordered_multimap; for
       *  %unordered_map the result will either be 0 (not present) or 1
       *  (present).
       */
      size_type
      count(const key_type& __x) const
      { return _M_h.count(__x); }
count函数用以统计key值在unordered_map中出现的次数。实际上,c++ unordered_map不允许有重复的key。因此,如果key存在,则count返回1,如果不存在,则count返回0.
11.3 注意
map[key] 会创建这个key出来,val默认为0,
    if(usm[1])
    {
        std::cout<<"11111111111"<<std::endl;
    }
    std::cout<<usm.count(1)<<std::endl;
    std::cout<<usm.count(0)<<std::endl;
    std::cout<<usm.count(0)<<std::endl;
    //如果开始没有key=1,usm[1]会创建key=1,val默认为零,std::cout<<usm.count(1)<<std::endl输出是1,usm.find(key)返回的是创建的key=1的对应迭代器
map.find(key)
十二、std::function
参考链接
https://blog.csdn.net/weixin_43333380/article/details/82935291.
https://blog.csdn.net/u013654125/article/details/100140547.
http://www.jellythink.com/archives/771.
12.1 std::function
类模版std::function是一种通用、多态的函数封装
std::function的实例可以对任何可以调用的目标实体进行:
存储、复制、和调用操作,这些目标实体包括普通函数、Lambda表达式、函数指针、以及其它函数对象等。
std::function对象是对C++中现有的可调用实体的一种类型安全的包裹(像函数指针这类可调用实体,是类型不安全的)。
通常std::function是一个函数对象类,它包装其它任意的函数对象,被包装的函数对象具有类型为T1, …,TN的N个参数,并且返回一个可转换到R类型的值。std::function使用模板转换构造函数接收被包装的函数对象;特别是,闭包类型可以隐式地转换为std::function
通过std::function对C++中各种可调用实体(普通函数、Lambda表达式、函数指针、以及其它函数对象等)的封装,形成一个新的可调用的std::function对象;让我们不再纠结那么多的可调用实体,直接用新的可调用的对象
12.2 代码举例
#include <functional>
#include <iostream>
using namespace std;

std::function<int(int)> Functional;

// 普通函数
int TestFunc(int a)
{
    return a;
}

// Lambda表达式
auto lambda = [](int a) -> int
{ return a; };

// 仿函数(functor)
class Functor
{
public:
    int operator()(int a) //重载()运算符
    {
        return a;
    }
};

// 1.类成员函数
// 2.类静态函数
class TestClass
{
public:
    int ClassMember(int a) { return a; }
    static int StaticMember(int a) { return a; }
};

int main(int argc,char* argv[])
{
    // 普通函数
    Functional = TestFunc;
    int result = Functional(10);
    cout << "普通函数:" << result << endl;

    // Lambda表达式
    Functional = lambda;
    result = Functional(20);
    cout << "Lambda表达式:" << result << endl;

    // 仿函数
    Functor testFunctor;
    Functional = testFunctor;
    result = Functional(30);
    cout << "仿函数:" << result << endl;

    // 类成员函数,在对象创建后的生命周期,需要对象参数
    TestClass testObj;
    Functional = std::bind(&TestClass::ClassMember, testObj, std::placeholders::_1); //std::placeholders::_1 占位符,对参数占位

    result = Functional(40);
    cout << "类成员函数:" << result << endl;

    // 类静态函数
    Functional = TestClass::StaticMember;
    result = Functional(50);
    cout << "类静态函数:" << result << endl;

    return 0;
}
输出:
普通函数:10
Lambda表达式:20
仿函数:30
类成员函数:40
类静态函数:50
[1] + Done                       "/usr/bin/gdb" --interpreter=mi --tty=${DbgTerm} 0<"/tmp/Microsoft-MIEngine-In-fwj3r1cc.14m" 1>"/tmp/Microsoft-MIEngine-Out-5dewoasf.v3n"

Press any key to continue...
12.3 调用的注意事项
- 转换后的std::function对象的参数能转换为可调用实体的参数;
- 可调用实体的返回值能转换为std::function对象的返回值。
std::function对象最大的用处就是在实现函数回调,但它不能被用来检查相等或者不相等,但是可以与NULL或者nullptr进行比较。
12.4 使用时机
std::function实现了一套类型消除机制,可以统一处理不同的函数对象类型。以前我们使用函数指针来完成这些;现在我们可以使用更安全的std::function来完成这些任务。
十三、unordered_set
http://c.biancheng.net/view/7250.html
十四、std::ref和std::cref
https://blog.csdn.net/lmb1612977696/article/details/81543802.
14.1 作用
std::ref 用于包装按引用传递的值。
std::cref 用于包装按const引用传递的值。
14.1.1 Why
bind()是一个函数模板,它的原理是根据已有的模板,生成一个函数,
但是由于bind()不知道生成的函数执行的时候,传递进来的参数是否还有效。
所以它选择参数值传递而不是引用传递。
如果想引用传递,使用std::ref和std::cref
14.2 代码
#include <functional>
#include <iostream>

void f(int& n1, int& n2, const int& n3)
{
    std::cout << "In function: n1[" << n1 << "]    n2[" << n2 << "]    n3[" << n3 << "]" << std::endl;
    ++n1; // 增加存储于函数对象的 n1 副本
    ++n2; // 增加 main() 的 n2
    //++n3; // 编译错误 表达式必须是可修改的左值
    std::cout << "In function end: n1[" << n1 << "]     n2[" << n2 << "]     n3[" << n3 << "]" << std::endl;
}

int main()
{
    int n1 = 1, n2 = 1, n3 = 1;
    std::cout << "Before function: n1[" << n1 << "]     n2[" << n2 << "]     n3[" << n3 << "]" << std::endl;
    std::function<void()> bound_f = std::bind(f, n1, std::ref(n2), std::cref(n3));
    bound_f();
    std::cout << "After function: n1[" << n1 << "]     n2[" << n2 << "]     n3[" << n3 << "]" << std::endl;
}
输出
Before function: n1[1]     n2[1]     n3[1]
In function: n1[1]    n2[1]    n3[1]
In function end: n1[2]     n2[2]     n3[1]
After function: n1[1]     n2[2]     n3[1]
[1] + Done                       "/usr/bin/gdb" --interpreter=mi --tty=${DbgTerm} 0<"/tmp/Microsoft-MIEngine-In-me3rkpx1.rai" 1>"/tmp/Microsoft-MIEngine-Out-jo1ijpvs.ljg"

Press any key to continue...
重点
std::function<void()> bound_f = std::bind(f, n1, std::ref(n2), std::cref(n3));
n1选择了参数值传递,更改只在函数内部作用
n2: std::ref(n2) 作了引用传递处理,函数内部的修改影响外面。
n3: std::cref(n3) 常值引用传递处理,不可更改
十五、c++ emplace_back
https://www.jianshu.com/p/c0cbd9dbf772
十六、memset
https://www.cnblogs.com/anthow/p/3392233.html
十七、std::bind
转载于:
https://blog.csdn.net/u013654125/article/details/100140328.
https://www.cnblogs.com/xusd-null/p/3698969.html.
17.1 std::bind1st和std::bind2nd
bind是这样一种机制,它可以预先把指定可调用实体的某些参数绑定到已有的变量,产生一个新的可调用实体。
C++98中,有两个函数bind1st和bind2nd,它们分别可以用来绑定functor的第 一个和第二个参数,它们都是只可以绑定一个参数。
17.1.1 代码举例
#include <iostream>
#include <algorithm>
#include <functional>
#include <vector>
int main(int argc, char *argv[])
{
    std::vector<int> coll;
    for (int i = 1; i <= 10; ++i)
    {
        coll.push_back(i);
    }

    // 查找元素值大于10的元素的个数
    // 也就是使得10 < elem成立的元素个数
    int res = count_if(coll.begin(), coll.end(), std::bind1st(std::less<int>(), 10));
    std::cout << res << std::endl;

    // 查找元素值小于10的元素的个数
    // 也就是使得elem < 10成立的元素个数
    res = count_if(coll.begin(), coll.end(), std::bind2nd(std::less<int>(), 10));
    std::cout << res << std::endl;
/*
对于上面的代码,less<int>()其实是一个仿函数,如果没有std::bind1st和std::bind2nd,那么我们可以这样使用less<int>(),代码如下:
*/
/*
less<int>()这个仿函数对象是需要两个参数的,比如10<20进行比较,那么10叫做left参数,20叫做right参数。

当使用std::bind1st的时候,就表示绑定了left参数,也就是left参数不变了,而right参数就是对应容器中的element;
当使用std::bind2nd的时候,就表示绑定了right参数,也就是right参数不变了,而left参数就是对应容器中的element。
*/
    std::less<int> functor = std::less<int>();
    bool bRet = functor(10, 20); // 返回true
    std::cout<<bRet<<std::endl;
    return 0;
}
输出:
0
9
1
[1] + Done                       "/usr/bin/gdb" --interpreter=mi --tty=${DbgTerm} 0<"/tmp/Microsoft-MIEngine-In-d55hd1sy.4e4" 1>"/tmp/Microsoft-MIEngine-Out-xf0he1si.ksa"

Press any key to continue...
对于上面的代码,less()其实是一个仿函数,如果没有std::bind1st和std::bind2nd,那么我们可以这样使用less(),代码如下:
    std::less<int> functor = std::less<int>();
    bool bRet = functor(10, 20); // 返回true
    std::cout<<bRet<<std::endl;
less() 进行的是左参数<右参数的运算
less()这个仿函数对象是需要两个参数的,比如10<20进行比较,那么10叫做left参数,20叫做right参数。
当使用std::bind1st的时候,就表示绑定了left参数,也就是left参数不变了,而right参数就是对应容器中的element;
当使用std::bind2nd的时候,就表示绑定了right参数,也就是right参数不变了,而left参数就是对应容器中的element。
17.2 std::bind
std::bind作用:绑定函数调用的某些参数的。
bind的思想实际上是一种延迟计算的思想,将可调用对象保存起来,然后在需要的时候再调用。
绑定是非常灵活的。
不论是普通函数、函数对象、还是成员函数都可以绑定,
而且其参数可以支持占位符,比如你可以这样绑定一个二元函数auto f = bind(&func, _1, _2);,调用的时候通过f(1,2)实现调用。
17.2.1代码示例
std::function可以绑定全局函数,静态函数,但是绑定类的成员函数时,必须要借助std::bind
类的成员函数在类的对象创建后的生命周期,需要绑定类的成员函数的调用对象。
不借助std::bind进行绑定
#include <iostream>
#include <functional>
class View
{
public:
    void onClick(int x, int y)
    {
        std::cout << "X : " << x << ", Y : " << y << std::endl;
    }
};

// 定义function类型, 三个参数
std::function<void(View, int, int)> clickCallback;

int main(int argc, const char *argv[])
{
    View button;

    // 指向成员函数,通过类作用域下找到,但函数调用仍然要传递对象
    clickCallback = &View::onClick;

    // 进行调用
    clickCallback(button, 10, 123);
    return 0;
}
上述代码通过回调函数进行调用
clickCallback(button, 10, 123);
仍然要传入函数调用对象
17.2.1.1 std::bind使用
#include <iostream>
#include <functional>
int TestFunc(int a, char c, float f)
{
    std::cout << a << std::endl;
    std::cout << c << std::endl;
    std::cout << f << std::endl;

    return a;
}

int main(int argc,char*argv[])
{
    auto bindFunc1 = bind(TestFunc, std::placeholders::_1, 'A', 100.1);
    bindFunc1(10);
 /*
 bind(TestFunc, std::placeholders::_1, 'A', 100.1);对第一个参数进行占位
 */
    std::cout << "--"<<std::endl;

    auto bindFunc2 = bind(TestFunc, std::placeholders::_2, std::placeholders::_1, 100.1);
    bindFunc2('B', 10);
 /*
 bind(TestFunc, std::placeholders::_2, std::placeholders::_1, 100.1);对前两个参数进行占位
 std::placeholders::_2表示bind绑定的第二个参数和此占位的参数位置对应(即第一个)
 std::placeholders::_1表示bind绑定的第1个参数和此占位的参数位置对应(即第二个)
 所以输出:
 10
 'B'
 100.1
 */
    std::cout << "--"<<std::endl;

    auto bindFunc3 = bind(TestFunc, std::placeholders::_2, std::placeholders::_3, std::placeholders::_1);
    bindFunc3(100.1, 30, 'C');
    /*
    对三个参数进行占位
    std::placeholders::_2表示bind绑定的第2个参数和此占位的参数位置对应(即第1个)
    std::placeholders::_3表示bind绑定的第3个参数和此占位的参数位置对应(即第2个)
    std::placeholders::_1表示bind绑定的第1个参数和此占位的参数位置对应(即第3个)
    所以输出:
     30
     'C'
     101.1
    */

    return 0;
}
输出:
10
A
100.1
--
10
B
100.1
--
30
C
100.1
[1] + Done                       "/usr/bin/gdb" --interpreter=mi --tty=${DbgTerm} 0<"/tmp/Microsoft-MIEngine-In-pzewuypp.vy4" 1>"/tmp/Microsoft-MIEngine-Out-4h5rav0e.qkd"

Press any key to continue...
std::placeholders是一个占位符。当使用bind生成一个新的可调用对象时,std::placeholders表示新的可调用对象的第 几个参数和原函数的第几个参数进行匹配
17.2.2 注意事项
bind预先绑定的参数需要传具体的变量或值进去,对于预先绑定的参数,是pass-by-value的;
对于不事先绑定的参数,需要传std::placeholders进去,从_1开始,依次递增。placeholder是pass-by-reference的;
bind的返回值是可调用实体,可以直接赋给std::function对象;
对于绑定的指针、引用类型的参数,使用者需要保证在可调用实体调用之前,这些参数是可用的;
类的this可以通过对象或者指针来绑定。
十八、C++多线程
https://zhuanlan.zhihu.com/p/194198073.
https://www.cnblogs.com/zizbee/p/13520823.html.
http://c.biancheng.net/view/8638.html.
https://www.runoob.com/cplusplus/cpp-multithreading.html.
https://blog.csdn.net/ryontang/article/details/98957524.
https://blog.csdn.net/fengbingchun/article/details/78638138.
https://blog.csdn.net/ktigerhero3/article/details/78249266.
https://blog.csdn.net/qq_39736982/article/details/82348672.
http://www.cocoachina.com/articles/84927.
https://blog.csdn.net/u013271656/article/details/115185870.
https://blog.csdn.net/lijinqi1987/article/details/78909479.
https://blog.csdn.net/u012372584/article/details/97108417.
https://blog.csdn.net/fengbingchun/article/details/78943527.
https://blog.csdn.net/m0_46498786/article/details/104724491.
线程:线程是操作系统能够进行运算调度的最小单位,它被包含在进程之中,进程包含一个或者多个线程。进程可以理解为完成一件事的完整解决方案,而线程可以理解为这个解决方案中的的一个步骤,可能这个解决方案就这只有一个步骤,也可能这个解决方案有多个步骤。
多线程:多线程是实现并发(并行)的手段,并发(并行)即多个线程同时执行,一般而言,多线程就是把执行一件事情的完整步骤拆分为多个子步骤,然后使得这多个步骤同时执行。
C++多线程:(简单情况下)C++多线程使用多个函数实现各自功能,然后将不同函数生成不同线程,并同时执行这些线程(不同线程可能存在一定程度的执行先后顺序,但总体上可以看做同时执行)。
18.1 示例一
#include <iostream>
#include <vector>
#include <algorithm>
#include <thread>
#include <numeric>
#include<pthread.h>


//线程要做的事情就写在这个线程函数中
void GetSumT(std::vector<int>::iterator first,std::vector<int>::iterator last,int &result)
{
    result = accumulate(first,last,0); //调用C++标准库算法
    std::cout<<"子线程中的线程id"<<std::this_thread::get_id()<<"+结果"<<result<<std::endl;
}

int main() //主线程
{
    int result1,result2,result3,result4,result5;
    std::vector<int> largeArrays;
    for(int i=0;i<100000000;i++)
    {
        if(i%2==0)
            largeArrays.push_back(i);
        else
            largeArrays.push_back(-1*i);
    }
    std::thread first(GetSumT,largeArrays.begin(),
        largeArrays.begin()+20000000,std::ref(result1)); //子线程1
    std::thread second(GetSumT,largeArrays.begin()+20000000,
        largeArrays.begin()+40000000,std::ref(result2)); //子线程2
    std::thread third(GetSumT,largeArrays.begin()+40000000,
        largeArrays.begin()+60000000,std::ref(result3)); //子线程3
    std::thread fouth(GetSumT,largeArrays.begin()+60000000,
        largeArrays.begin()+80000000,std::ref(result4)); //子线程4
    std::thread fifth(GetSumT,largeArrays.begin()+80000000,
        largeArrays.end(),std::ref(result5)); //子线程5

    first.join();
    second.join();
    third.join();
    fouth.join();
    fifth.join();

    int resultSum = result1+result2+result3+result4+result5; //汇总各个子线程的结果
    std::cout<<resultSum<<std::endl;
    return 0;
}
18.2 示例二
#include <iostream>
#include <thread>
#include <pthread.h>
void proc(int a)
{
    std::cout << "我是子线程,传入参数为" << a << std::endl;
    std::cout << "子线程中显示子线程id为" << std::this_thread::get_id() << std::endl;
}
int main()
{
    std::cout << "我是主线程" << std::endl;
    int a = 9;
    std::thread th2(proc, a); //第一个参数为函数名,第二个参数为该函数的第一个参数,如果该函数接收多个参数就依次写在后面。此时线程开始执行。
    std::cout << "主线程中显示子线程id为" << th2.get_id() << std::endl;
    th2.join(); //此时主线程被阻塞直至子线程执行结束。
    std::cout << "回归主线程" << std::endl;
    return 0;
}
//g++ thread1.cpp -o thread1 -lpthread pthread 库不是 Linux 系统默认的库,,
//连接时需要使用静态库 libpthread.a,所以在使用pthread_create()创建线程,以及调用 pthread_atfork()函数建立fork处理程序时,在编译中要加 -lpthread参数。
18.3 线程创建
18.3.1 头文件(c++ 11)
首先引入头文件
#include<thread>
该头文件中定义了thread类
构造函数
    thread() noexcept = default;
    // _GLIBCXX_RESOLVE_LIB_DEFECTS
    // 2097.  packaged_task constructors should be constrained
    thread(thread&) = delete;
    thread(const thread&) = delete;
    thread(const thread&&) = delete;

    thread(thread&& __t) noexcept
    { swap(__t); }
18.3.1.1实例化线程
创建一个线程即实例化一个该类的对象,实例化对象时候调用的构造函数需要传递一个参数,该参数就是函数名,
thread th1(proc1);
如果传递进去的函数本身需要传递参数,实例化对象时将这些参数按序写到函数名后面,thread th1(proc1,a,b);
18.3.1.2线程执行
只要创建了线程对象(传递“函数名/可调用对象”作为参数的情况下),
线程就开始执行(std::thread 有一个无参构造函数重载的版本,不会创建底层的线程)。
c++启动线程:实例化可调用函数的线程对象
18.4 std::async
在C++11中引入了async异步调用函数,其封装了异步(多线程)实现的复杂过程,将计算结果保存在future<>中,通过get()获取每个对象的最终结果。
18.5
std::allocator_arg
Defined in header
constexpr std::allocator_arg_t allocator_arg = std::allocator_arg_t();
(since C++11)
(until C++17)
inline constexpr std::allocator_arg_t allocator_arg = std::allocator_arg_t();
(since C++17)
std::allocator_arg is a constant of type std::allocator_arg_t used to disambiguate, at call site, the overloads of the constructors and member functions of allocator-aware objects, such as std::tuple, std::function, std::packaged_task, (until C++17)and std::promise.
十九、sort对pair排序
https://blog.csdn.net/qian2213762498/article/details/81773289
https://blog.csdn.net/sugarbliss/article/details/82918419
二十、c++ lower_bound和upper_bound
https://blog.csdn.net/weixin_42051815/article/details/115873582


 1433
1433


 被折叠的 条评论
为什么被折叠?
被折叠的 条评论
为什么被折叠?
 到【灌水乐园】发言


