


Linux 系统硬盘MBR转换为GPT格式并扩容
问题描述
之前创建了一台ubuntu16的服务器虚机,挂载了一块2T的云数据盘,当时文件系统做的是MBR(dos)格式,最近因为存量数据增加,数据盘空间不足就在云平台将2T的数据盘扩容成了4T,结果进入虚机扩容的时候报错MBR格式的硬盘最大支持2T,剩余的空间将不会用到。
需要将硬盘转化为GPT分区格式,来支持2T以上空间的使用才行,但是转化硬盘格式又怕数据丢失,于是又找了一台虚机用来测试。
解决方案
fdisk工具支持MBR分区格式的硬盘操作,查看当前硬盘的信息:
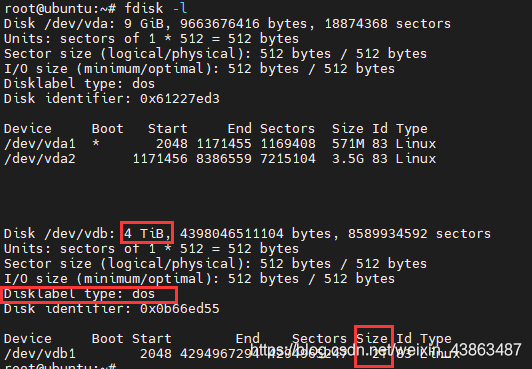
可以看到硬盘大小是4T,但是分区里最大只能用2T。
操作对数据做好备份或快照,防止操作失败数据丢失。
将MBR转化为GPT分区格式
使用gdisk工具,将分区表改为gpt格式:
root@ubuntu:~# gdisk /dev/vdb
GPT fdisk (gdisk) version 1.0.3

Partition table scan:
  MBR: MBR only
  BSD: not present
  APM: not present
  GPT: not present


***************************************************************
Found invalid GPT and valid MBR; converting MBR to GPT format
in memory. THIS OPERATION IS POTENTIALLY DESTRUCTIVE! Exit by
typing 'q' if you don't want to convert your MBR partitions
to GPT format!
***************************************************************


Command (? for help): w

Final checks complete. About to write GPT data. THIS WILL OVERWRITE EXISTING
PARTITIONS!!

Do you want to proceed? (Y/N): y
OK; writing new GUID partition table (GPT) to /dev/vdb.
Warning: The kernel is still using the old partition table.
The new table will be used at the next reboot or after you
run partprobe(8) or kpartx(8)
The operation has completed successfully.
使用gdisk 硬盘盘符 命令进入程序后,直接 输入w保存并退出,然后输入y确认。gdisk就会将硬盘改为gpt格式分区。
注意:gdisk命令后面跟的是硬盘设备路径/dev/vdb,不是分区路径/dev/vdb1,如果指定错了会变更失败丢失数据
这个方法在大部分场景下都是可以转mbr为gpt的,只有磁盘开头前33个扇区,或最后34个扇区被分区占用的场景不支持。(如,原来的硬盘已经使用MBR分区占用了全部的空间,即后34个扇区被占用了,那么操作会失败)但是对于扩容的场景,后34个扇区尚未被占用,一般不会出问题。
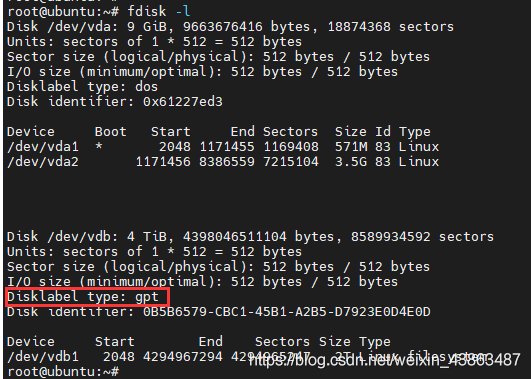
现在查看硬盘分区信息,就会显示其格式为gpt格式:
扩容数据盘及文件系统
扩容数据盘:
growpart /dev/vdb 1
CHANGED: partition=1 start=2048 old: size=4294965247 end=4294967295 new: size=8589932511,end=8589934559
root@ubuntu:~/test#
root@ubuntu:~/test# lsblk
NAME   MAJ:MIN RM  SIZE RO TYPE MOUNTPOINT
fd0      2:0    1    4K  0 disk
sr0     11:0    1 1024M  0 rom
vda    252:0    0    9G  0 disk
|-vda1 252:1    0  571M  0 part /boot
`-vda2 252:2    0  3.5G  0 part /
vdb    252:16   0    4T  0 disk
`-vdb1 252:17   0    4T  0 part /root/test
root@ubuntu:~/test#
root@ubuntu:~/test#
root@ubuntu:~/test# df -h
Filesystem      Size  Used Avail Use% Mounted on
udev            972M     0  972M   0% /dev
tmpfs           200M  2.9M  197M   2% /run
/dev/vda2       3.4G  2.1G  1.1G  66% /
tmpfs           997M     0  997M   0% /dev/shm
tmpfs           5.0M     0  5.0M   0% /run/lock
tmpfs           997M     0  997M   0% /sys/fs/cgroup
/dev/vda1       547M   65M  442M  13% /boot
tmpfs           200M     0  200M   0% /run/user/0
/dev/vdb1       2.0T  8.9G  1.9T   1% /root/test
扩容文件系统:
root@ubuntu:~/test# resize2fs /dev/vdb1
resize2fs 1.44.1 (24-Mar-2018)
Filesystem at /dev/vdb1 is mounted on /root/test; on-line resizing required
old_desc_blocks = 256, new_desc_blocks = 512


The filesystem on /dev/vdb1 is now 1073741563 (4k) blocks long.

root@ubuntu:~/test#
root@ubuntu:~/test#
root@ubuntu:~/test#
root@ubuntu:~/test#
root@ubuntu:~/test# df -h
Filesystem      Size  Used Avail Use% Mounted on
udev            972M     0  972M   0% /dev
tmpfs           200M  2.9M  197M   2% /run
/dev/vda2       3.4G  2.1G  1.1G  66% /
tmpfs           997M     0  997M   0% /dev/shm
tmpfs           5.0M     0  5.0M   0% /run/lock
tmpfs           997M     0  997M   0% /sys/fs/cgroup
/dev/vda1       547M   65M  442M  13% /boot
tmpfs           200M     0  200M   0% /run/user/0
/dev/vdb1       4.0T  8.9G  3.8T   1% /root/test
扩容后,数据盘大小变为4T。
对于xfs文件系统格式,需要使用xfs_growfs命令进行扩容文件系统操作。
现在通过gdisk命令来查看数据盘的信息:
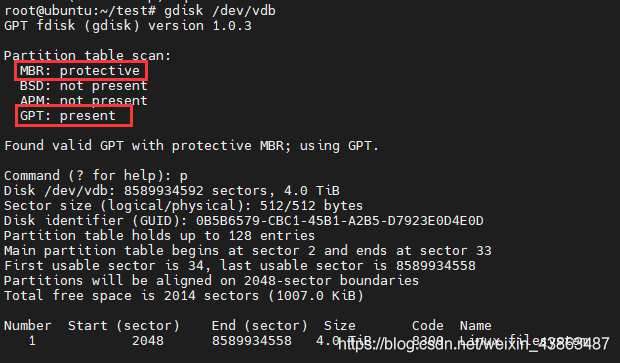
从图中可以看到,数据盘的分区表信息是由两部分组成的,一部分是MBR: protective,另一部分是GPT: present,这种分区格式成为Hybrid MBR,可以将MBR分区表和GPT分区表混合使用。
将文件系统重新挂在后,查看目录下的文件,没有出现数据丢失的情况。
还可以umount卸载挂载的设备,然后使用e2fsck命令检查文件系统有没有错误。


 2751
2751

 被折叠的 条评论
为什么被折叠?
被折叠的 条评论
为什么被折叠?
 到【灌水乐园】发言


