


 该文详细介绍了如何在Ubuntu20.04上配置环境,包括CUDA11.3和NVIDIAGeForceRTX3060,然后下载并安装TensorRT8.2.5.1。接着,作者演示了如何验证ONNX模型,将其转换为TensorRT推理引擎,并进行实际的推理测试。此过程涉及PyTorch到ONNX的转换,以及使用TensorRT进行高效计算。
目录
3-3--基于Tensor RT使用engine模型进行推理
前言
推荐结合官方文档 3.2.3节中的Tar File Installation安装教程进行安装;
1--查看本机环境配置
import torch
print(torch.__version__)
print(torch.version.cuda)
print(torch.backends.cudnn.version())
博主的配置环境:
① Ubuntu 20.04
② Cuda 11.3
③ NVIDIA GeForce RTX 3060
④ Pytorch 1.12.0
⑤ Python 3.9
2--下载并安装Tensor RT
① 下载地址:Tensor RT官方下载地址
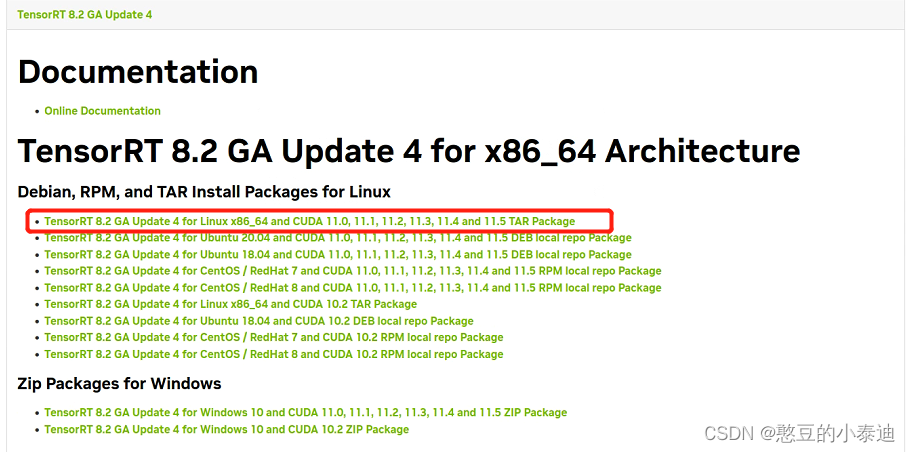
博主下载的版本为Tensor RT 8.2.5.1。
② 安装依赖:
pip install 'pycuda<2021.1'

# 注意onnxruntime-gpu的版本需与实际环境进行匹配,这里博主选择1.11版本
pip install onnxruntime-gpu==1.11
③ 解压并配置环境变量:
# 解压
tar -zxvf TensorRT-8.2.5.1.Linux.x86_64-gnu.cuda-11.4.cudnn8.2.tar.gz
# 配置环境变量
sudo gedit ~/.bashrc # 也可以使用vim
# 末尾添加以下两条路径,需根据解压的实际路径
export LD_LIBRARY_PATH=$PATH:/home/liujinfu/Downloads/TensorRT-8.2.5.1/lib:$LD_LIBRARY_PATH
export LIBRARY_PATH=$PATH:/home/liujinfu/Downloads/TensorRT-8.2.5.1/lib::$LIBRARY_PATH
# 保存后刷新环境变量
source ~/.bashrc④ 安装Tensor RT库:
cd TensorRT-8.2.5.1/python
# 根据Python版本安装,博主为python3.9
pip install tensorrt-8.2.5.1-cp39-none-linux_x86_64.whl

# 安装依赖
cd TensorRT-8.2.5.1/graphsurgeon
pip install graphsurgeon-0.4.5-py2.py3-none-any.whl
⑤ 查看安装版本:
import onnxruntime as ort
import tensorrt
print(ort.get_device())
print(ort.get_available_providers())
print(tensorrt.__version__)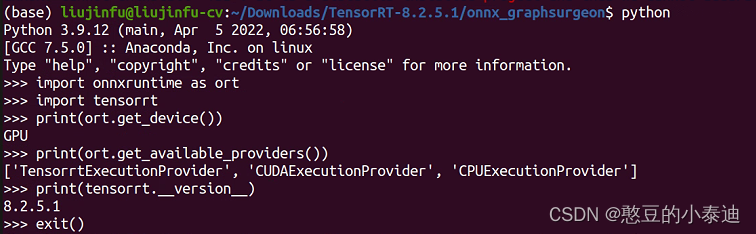
3--实例测试
深度学习模型部署流程一般为:Pytorch → Onnx → TensorRT;这里博主选取一个姿态估计的Onnx模型(ThreeDPose)作为实例测试:Onnx模型下载地址
3-1--验证Onnx模型的可用性
# 导入第三方库
import onnx
import numpy as np
import onnxruntime as ort
import cv2

# 导入下载的Onnx模型
model_path = './Resnet34_3inputs_448x448_20200609.onnx'
onnx_model = onnx.load(model_path)
onnx.checker.check_model(onnx_model)

# 前处理:读入图像并调整为输入维度
img = cv2.imread("data/InitImg.png")
img = cv2.resize(img,(448,448)).transpose(2,0,1)
img = np.array(img)[np.newaxis, :, :, :].astype(np.float32)

# 设置模型session以及输入信息
sess = ort.InferenceSession(model_path,providers= ort.get_available_providers()) # 这一步可能会报错,一般与onnxruntime的版本有关,需根据实际情况进行调整
input_name1 = sess.get_inputs()[0].name
input_name2 = sess.get_inputs()[1].name
input_name3 = sess.get_inputs()[2].name

# 使用Onnx模型进行推理
output = sess.run(None, {input_name1: img, input_name2: img, input_name3: img})

print(output)

# 后处理
# 代码。。。
正常运行,没有报错就表明下载的Onnx模型没有问题;
3-2--将Onnx模型转换为推理引擎engine
借助Tensor RT自带的可执行文件trtexec,将Onnx模型转换为推理引擎:
cd TensorRT-8.2.5.1/bin

./trtexec --onnx=/home/liujinfu/Desktop/Tensor_Test/Resnet34_3inputs_448x448_20200609.onnx --saveEngine=/home/liujinfu/Desktop/Tensor_Test/Resnet34_3inputs_448x448_20200609.trt --workspace=6000

# --onnx=path1 表示待转换的onnx模型
# --saveEngine=path2 表示保存的推理engine模型
3-3--基于Tensor RT使用engine模型进行推理
# 导入第三方库
import torch
import cv2
import tensorrt as trt
import numpy as np

def trt_version():
   return trt.__version__

def torch_device_from_trt(device):
   if device == trt.TensorLocation.DEVICE:
       return torch.device("cuda")
   elif device == trt.TensorLocation.HOST:
       return torch.device("cpu")
   else:
       return TypeError("%s is not supported by torch" % device)


def torch_dtype_from_trt(dtype):
   if dtype == trt.int8:
       return torch.int8
   elif trt_version() >= '7.0' and dtype == trt.bool:
       return torch.bool
   elif dtype == trt.int32:
       return torch.int32
   elif dtype == trt.float16:
       return torch.float16
   elif dtype == trt.float32:
       return torch.float32
   else:
       raise TypeError("%s is not supported by torch" % dtype)

class TRTModule(torch.nn.Module):

    def __init__(self, engine=None, input_names=None, output_names=None):
        super(TRTModule, self).__init__()
        self.engine = engine
        if self.engine is not None:
            # engine创建执行context
            self.context = self.engine.create_execution_context()

        self.input_names = input_names
        self.output_names = output_names

    def forward(self, *inputs):
        batch_size = inputs[0].shape[0]
        bindings = [None] * (len(self.input_names) + len(self.output_names))
        # 创建输出tensor,并分配内存
        outputs = [None] * len(self.output_names)
        for i, output_name in enumerate(self.output_names):
            idx = self.engine.get_binding_index(output_name) # 通过binding_name找到对应的input_id
            dtype = torch_dtype_from_trt(self.engine.get_binding_dtype(idx)) # 找到对应的数据类型
            shape = (batch_size,) + tuple(self.engine.get_binding_shape(idx)) # 找到对应的形状大小
            device = torch_device_from_trt(self.engine.get_location(idx))
            output = torch.empty(size=shape, dtype=dtype, device=device)
            outputs[i] = output
            bindings[idx] = output.data_ptr() # 绑定输出数据指针

        for i, input_name in enumerate(self.input_names):
            idx = self.engine.get_binding_index(input_name)
            bindings[idx] = inputs[0].contiguous().data_ptr() # 应当为inputs[i],对应3个输入。但由于我们使用的是单张图片,所以将3个输入全设置为相同的图片。

        self.context.execute_async(
            batch_size, bindings, torch.cuda.current_stream().cuda_stream
            ) # 执行推理

        outputs = tuple(outputs)
        if len(outputs) == 1:
            outputs = outputs[0]

        return outputs

if __name__ == "__main__":

    logger = trt.Logger(trt.Logger.INFO)

    # 加载推理引擎,返回ICudaEngine对象
    with open("./Resnet34_3inputs_448x448_20200609.trt", "rb") as f, trt.Runtime(logger) as runtime:
        engine = runtime.deserialize_cuda_engine(f.read())

    # 查看输入输出的名字,类型,大小
    for idx in range(engine.num_bindings):
        is_input = engine.binding_is_input(idx)
        name = engine.get_binding_name(idx)
        op_type = engine.get_binding_dtype(idx)
        shape = engine.get_binding_shape(idx)
        print('input id:', idx, ' is input: ', is_input, ' binding name:', name, ' shape:', shape, 'type: ', op_type)

    trt_model = TRTModule(engine, ["input.1", "input.4", "input.7"], ["499", "504", "516", "530"])

    # 加载测试图片
    image = cv2.imread("./test1.jpg")

    # 前处理
    image = cv2.resize(image, (200,64))
    image = image.transpose(2,0,1)
    img_input = image.astype(np.float32)
    img_input = torch.from_numpy(img_input)
    img_input = img_input.unsqueeze(0)
    img_input = img_input.to('cuda:0')

    # 运行模型进行推理
    result_trt = trt_model(img_input)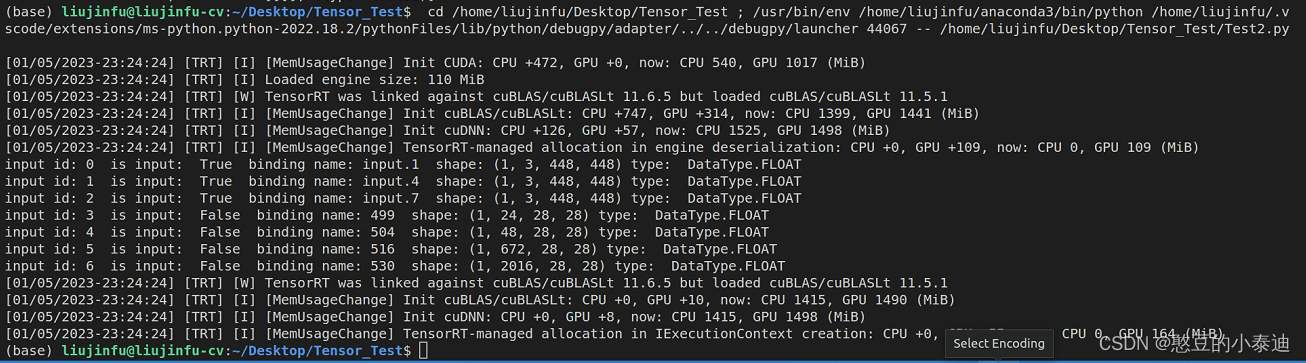


 785
785

 被折叠的 条评论
为什么被折叠?
被折叠的 条评论
为什么被折叠?
 到【灌水乐园】发言


