


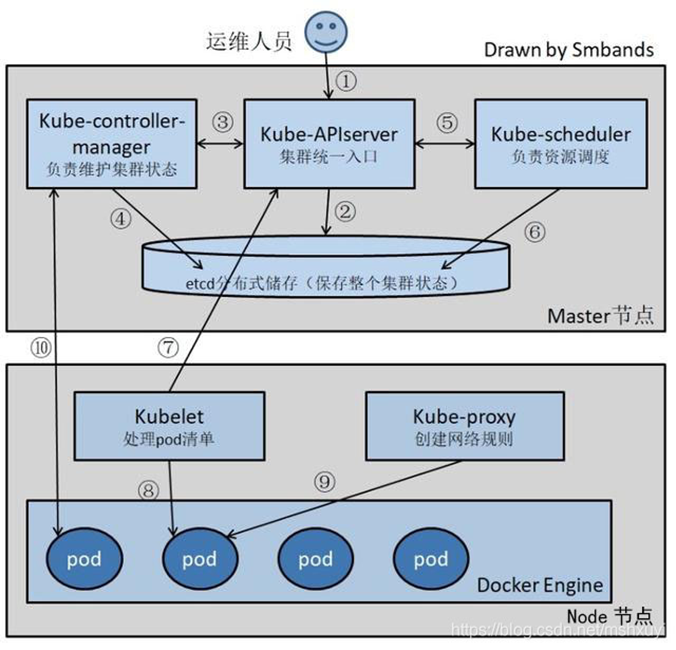
一、Pod诞生流程

二、流程分解
1.代码仓库
一般情况下企业级代码仓库用gitlab。
GitLab 是一个用于仓库管理系统的开源项目,使用Git作为代码管理工具,并在此基础上搭建起来的Web服务。安装方法是参考GitLab在GitHub上的Wiki页面。Gitlab是被广泛使用的基于git的开源代码管理平台, 基于Ruby on Rails构建, 主要针对软件开发过程中产生的代码和文档进行管理, Gitlab主要针对group和project两个维度进行代码和文档管理, 其中group是群组, project是工程项目, 一个group可以管理多个project, 可以理解为一个群组中有多项软件开发任务, 而一个project中可能包含多个branch, 意为每个项目中有多个分支, 分支间相互独立, 不同分支可以进行合并。
2.打包
2.1本地打包
npm run build2.2工具打包
Jenkins是一个开源软件项目,是基于Java开发的一种持续集成工具,用于监控持续重复的工作,旨在提供一个开放易用的软件平台,使软件项目可以进行持续集成。
3.构建镜像
3.1docker commit构建镜像
基于已有容器构建镜像主要是通过docker commit命令来构建新的镜像。
dockercommit构建进行主要有三步:
- 运行容器
- 修改容器
- 将容器保存为新的镜像
比如在centos镜像中安装vim编辑器并存为新的镜像
3.2dockerfile构建镜像
Jenkins集成Dockerfile功能。
Dockerfile是由一组指令组成的文件,其每条指令对应Linux中的一条命令,Docker程序通过读取Dockerfile中的指令最终生成镜像。
Dockerfile指令详情见《Dockerfile详解》
4.上传镜像
Harbor (港湾)是由 VMware 公司使用 Go 语言开发,主要就是用于存放镜像使用,同时我们还可以通过 Web 界面来对存放的镜像进行管理。并且 Harbor 提供的功能有:基于角色的访问控制,镜像远程复制同步,以及审计日志等功能。
5.部署
Pod在k8s里面如何生成详见《初识Kubernetes》“Pod创建流”
使用生成的镜像创建Pod,yaml如下:
apiVersion: apps/v1
kind: Deployment           ##资源类型deployment
metadata:
name: nginx-app            ##pod名称
namespace: test            ##名称空间
spec:
  replicas: 1              ##副本数
  selector:
    matchLabels:           ##标签选择器
      app: nginx
  template:                ##以下是pod模板
    metadata:
      labels:
        app: nginx         ##给pod作标签
    spec:
      containers:
      - name: nginx        ##容器名称
        image: core.harbor.domain/test/nginx-1.16.1:v1    ##镜像版本
        ports:
        - containerPort: 80    ##容器端口
三、演示(从构建镜像开始)
1.编译安装
[root@k8s-node03 nginx]# ls
nginx-1.16.1.tar.gz
[root@k8s-node03 nginx]# tar zxf nginx-1.16.1.tar.gz
[root@k8s-node03 nginx]# ls
nginx-1.16.1  nginx-1.16.1.tar.gz
[root@k8s-node03 nginx]# cd nginx-1.16.1/
[root@k8s-node03 nginx-1.16.1]# ls
auto  CHANGES  CHANGES.ru  conf  configure  contrib  html  LICENSE  man  README  src
[root@k8s-node03 nginx-1.16.1]# yum -y install gcc pcre-devel openssl-devel libxml2 libxml2-devel libxslt libxslt-devel gd gd-devel geoip geoip-devel
[root@k8s-node03 nginx-1.16.1]# ./configure --prefix=/opt/web_app/nginx-1.16.1  --sbin-path=/opt/web_app/nginx-1.16.1/sbin/nginx --conf-path=/opt/web_app/nginx-1.16.1/conf/nginx.conf --http-log-path=/opt/web_app/nginx-1.16.1/logs/access.log --error-log-path=/opt/web_app/nginx-1.16.1/logs/error.log --pid-path=/opt/web_app/nginx-1.16.1/logs/nginx.pid --lock-path=/opt/web_app/nginx-1.16.1/lock/subsys/nginx  --user=root --group=root --with-poll_module --with-threads --with-file-aio --with-http_ssl_module --with-http_v2_module --with-http_realip_module --with-http_addition_module --with-http_xslt_module --with-http_image_filter_module  --with-http_geoip_module --with-http_sub_module --with-http_dav_module --with-http_flv_module  --with-http_mp4_module --with-http_gunzip_module --with-http_gzip_static_module --with-http_auth_request_module --with-http_random_index_module --with-http_secure_link_module --with-http_degradation_module --with-http_slice_module --with-http_stub_status_module
[root@k8s-node03 nginx-1.16.1]# make && make install
[root@k8s-node03 nginx-1.16.1]# /opt/web_app/nginx-1.16.1/sbin/nginx -t -c /opt/web_app/nginx-1.16.1/conf/nginx.conf
nginx: the configuration file /opt/web_app/nginx-1.16.1/conf/nginx.conf syntax is ok
nginx: configuration file /opt/web_app/nginx-1.16.1/conf/nginx.conf test is successful
[root@k8s-node03 nginx-1.16.1]# /opt/web_app/nginx-1.16.1/sbin/nginx
[root@k8s-node03 nginx-1.16.1]# netstat -lntp
Active Internet connections (only servers)
Proto Recv-Q Send-Q Local Address           Foreign Address         State       PID/Program name
tcp        0      0 127.0.0.1:10248         0.0.0.0:*               LISTEN      29243/kubelet
tcp        0      0 127.0.0.1:10249         0.0.0.0:*               LISTEN      32171/kube-proxy
tcp        0      0 127.0.0.1:9099          0.0.0.0:*               LISTEN      9751/calico-node
tcp        0      0 10.5.0.214:9100         0.0.0.0:*               LISTEN      22074/kube-rbac-pro
tcp        0      0 127.0.0.1:9100          0.0.0.0:*               LISTEN      21723/node_exporter
tcp        0      0 0.0.0.0:111             0.0.0.0:*               LISTEN      715/rpcbind
tcp        0      0 0.0.0.0:80              0.0.0.0:*               LISTEN      17511/nginx: master
[root@k8s-node03 nginx-1.16.1]# curl 127.0.0.1
<!DOCTYPE html>
<html>
<head>
<title>Welcome to nginx!</title>
<style>
    body {
        width: 35em;
        margin: 0 auto;
        font-family: Tahoma, Verdana, Arial, sans-serif;
    }
</style>
</head>
<body>
<h1>Welcome to nginx!</h1>
<p>If you see this page, the nginx web server is successfully installed and
working. Further configuration is required.</p>

<p>For online documentation and support please refer to
<a href="http://nginx.org/">nginx.org</a>.<br/>
Commercial support is available at
<a href="http://nginx.com/">nginx.com</a>.</p>

<p><em>Thank you for using nginx.</em></p>
</body>
</html>
[root@k8s-node03 nginx]# tar zxf build.tgz -C /opt/web_app/nginx-1.16.1/html/
[root@k8s-node03 nginx]# cd /opt/web_app/nginx-1.16.1/html/
[root@k8s-node03 html]# ls
50x.html  build  index.html
[root@k8s-node03 html]# cd /opt/web_app/nginx-1.16.1/conf
[root@k8s-node03 build]# vim nginx.conf
......
 server {
        listen       80;
        server_name  localhost;

        #charset koi8-r;

        #access_log  logs/host.access.log  main;

        location / {
            root   html/build/;
            index  index.html index.htm;
            try_files $uri $uri/ /index.html;
        }
......
[root@k8s-master conf]# /opt/web_app/nginx-1.16.1/sbin/nginx -t
nginx: the configuration file /opt/web_app/nginx-1.16.1/conf/nginx.conf syntax is ok
nginx: configuration file /opt/web_app/nginx-1.16.1/conf/nginx.conf test is successful
[root@k8s-master conf]# /opt/web_app/nginx-1.16.1/sbin/nginx -s reload
浏览器访问
2.容器化
2.1构建镜像
准备文件
[root@k8s-master nginx-image]# tree ./
./
├── build.tgz								## 工程tar包
├── Dockerfile							## Dockerfile
├── nginx-1.16.1.tar.gz			## nginx二进制包
└── nginx.conf							## nginx 配置文件

0 directories, 4 files
[root@k8s-master nginx-image]# vim Dockerfile
FROM centos7-base:v1
MAINTAINER OPS_MX
ENV NGINX_VERSION 1.16.1
ENV BUILD_TOOLS gcc pcre-devel openssl-devel make
ADD nginx-${NGINX_VERSION}.tar.gz /opt
RUN mkdir -p /opt/web_app/nginx-${NGINX_VERSION} \
&& useradd nginx && yum -y install ${BUILD_TOOLS} && cd /opt/nginx-${NGINX_VERSION} \
&& ./configure --user=nginx --group=nginx --with-http_ssl_module \
--prefix=/opt/web_app/nginx-${NGINX_VERSION} \
--sbin-path=/opt/web_app/nginx-${NGINX_VERSION}/sbin/nginx \
--conf-path=/opt/web_app/nginx-${NGINX_VERSION}/conf/nginx.conf \
--http-log-path=/opt/web_app/nginx-${NGINX_VERSION}/logs/access.log \
--error-log-path=/opt/web_app/nginx-${NGINX_VERSION}/logs/error.log \
--pid-path=/opt/web_app/nginx-${NGINX_VERSION}/logs/nginx.pid \
--lock-path=/opt/web_app/nginx-${NGINX_VERSION}/lock/subsys/nginx \
--with-http_stub_status_module && make && make install \
&& rm -rf /opt/nginx-${NGINX_VERSION} \
&& yum clean all
ADD build.tgz /opt/web_app/nginx-${NGINX_VERSION}/html/
COPY nginx.conf /opt/web_app/nginx-${NGINX_VERSION}/conf/
WORKDIR /opt/web_app/nginx-${NGINX_VERSION}
EXPOSE 80 443
RUN echo "daemon off;" >> /opt/web_app/nginx-${NGINX_VERSION}/nginx.conf \
&& ln -sf /dev/stdout /opt/web_app/nginx-${NGINX_VERSION}/logs/access.log \
&& ln -sf /dev/stderr /opt/web_app/nginx-${NGINX_VERSION}/logs/error.log
CMD ["/opt/web_app/nginx-1.16.1/sbin/nginx","-g","daemon off;"]构建
[root@k8s-master nginx-image]# docker build -t core.harbor.domain/test/nginx-1.16.1:v2 .
Sending build context to Docker daemon  3.671MB
Step 1/12 : FROM centos7-base:v1
 ---> a24bd37b1ccc
Step 2/12 : MAINTAINER OPS_MX
 ---> Using cache
 ---> 4fd471aaf216
Step 3/12 : ENV NGINX_VERSION 1.16.1
 ---> Using cache
 ---> ea08b5fe8b22
Step 4/12 : ENV BUILD_TOOLS gcc pcre-devel openssl-devel make
 ---> Using cache
 ---> 1735e1fc3618
Step 5/12 : ADD nginx-${NGINX_VERSION}.tar.gz /opt
 ---> Using cache
 ---> 392ba098e371
Step 6/12 : RUN mkdir -p /opt/web_app/nginx-${NGINX_VERSION}         && useradd nginx && yum -y install ${BUILD_TOOLS} && cd /opt/nginx-${NGINX_VERSION}         && ./configure --user=nginx --group=nginx --with-http_ssl_module         --prefix=/opt/web_app/nginx-${NGINX_VERSION}         --sbin-path=/opt/web_app/nginx-${NGINX_VERSION}/sbin/nginx         --conf-path=/opt/web_app/nginx-${NGINX_VERSION}/conf/nginx.conf         --http-log-path=/opt/web_app/nginx-${NGINX_VERSION}/logs/access.log         --error-log-path=/opt/web_app/nginx-${NGINX_VERSION}/logs/error.log         --pid-path=/opt/web_app/nginx-${NGINX_VERSION}/logs/nginx.pid         --lock-path=/opt/web_app/nginx-${NGINX_VERSION}/lock/subsys/nginx         --with-http_stub_status_module && make && make install          && rm -rf /opt/nginx-${NGINX_VERSION}          && yum clean all
 ---> Using cache
 ---> 148b60fd8c84
Step 7/12 : ADD build.tgz /opt/web_app/nginx-${NGINX_VERSION}/html/
 ---> a0190e1674c5
Step 8/12 : COPY nginx.conf //opt/web_app/nginx-${NGINX_VERSION}/conf/
 ---> 7eabd6ab68e6
Step 9/12 : WORKDIR /opt/web_app/nginx-${NGINX_VERSION}
 ---> Running in 274ce38b244a
Removing intermediate container 274ce38b244a
 ---> be92d499ab24
Step 10/12 : EXPOSE 80 443
 ---> Running in 2a5c4e9a4883
Removing intermediate container 2a5c4e9a4883
 ---> 1a76021a793c
Step 11/12 : RUN echo "daemon off;" >> /opt/web_app/nginx-${NGINX_VERSION}/nginx.conf         && ln -sf /dev/stdout /opt/web_app/nginx-${NGINX_VERSION}/logs/access.log         && ln -sf /dev/stderr /opt/web_app/nginx-${NGINX_VERSION}/logs/error.log
 ---> Running in 9d362f578503
Removing intermediate container 9d362f578503
 ---> 35785399eb71
Step 12/12 : CMD ["/opt/web_app/nginx-1.16.1/sbin/nginx","-g","daemon off;"]
 ---> Running in 59fc49a137e2
Removing intermediate container 59fc49a137e2
 ---> 93638d4f8302
Successfully built 93638d4f8302
Successfully tagged core.harbor.domain/test/nginx-1.16.1:v2
2.2上传镜像
[root@k8s-master nginx-image]# docker push core.harbor.domain/test/nginx-1.16.1:v2
The push refers to repository [core.harbor.domain/test/nginx-1.16.1]
60afc4acdeb2: Pushed
0db37f5b5efa: Pushed
e8e5b213b38c: Pushed
079984cc8772: Layer already exists
1e30f34ec1da: Layer already exists
070458f5806a: Layer already exists
174f56854903: Layer already exists
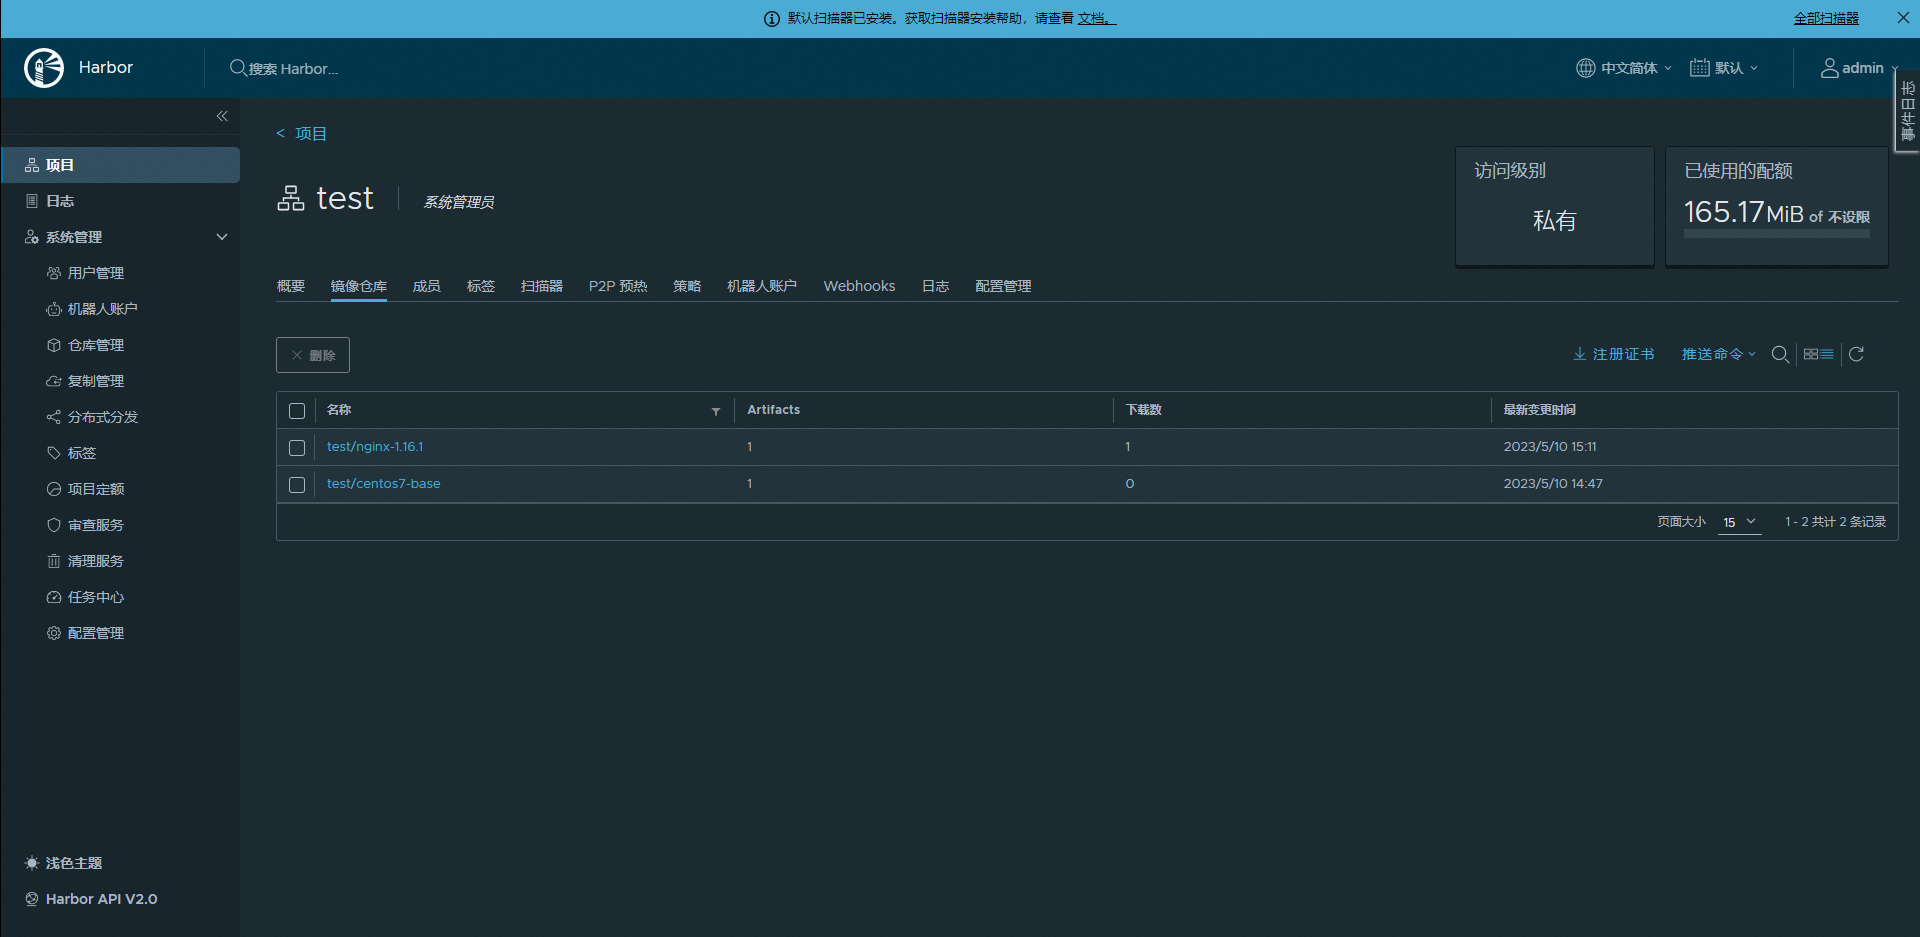
v2: digest: sha256:092299963e8c5cab58da65ea0d30b54629ed4975d81c015cfa718855387c8d4a size: 17903.镜像仓库查看
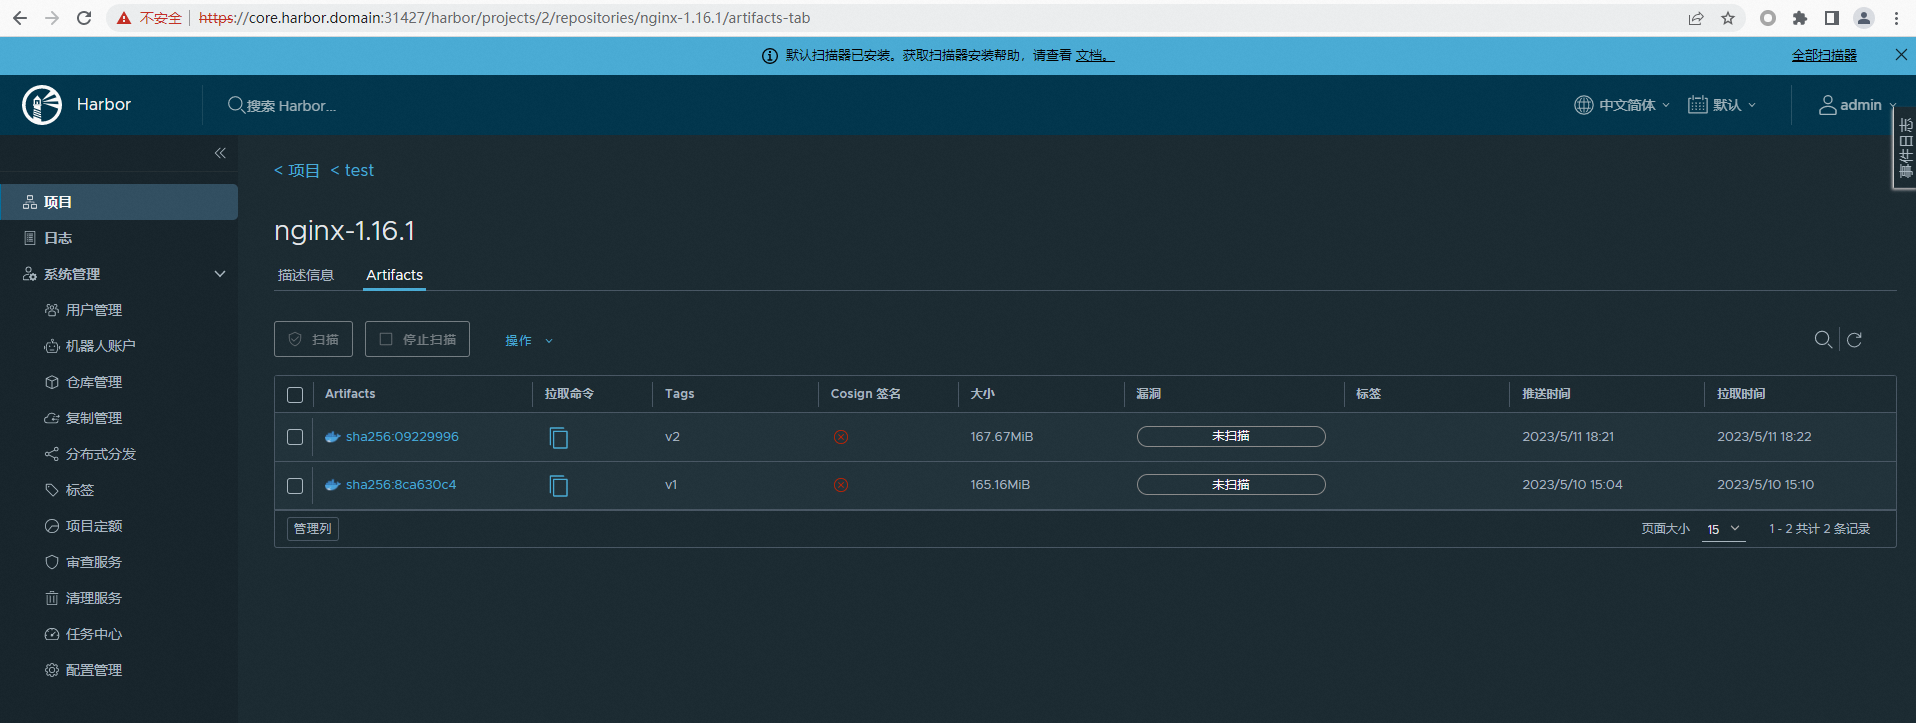
4.部署
[root@k8s-master test]# vim deploy-nginx.yaml
apiVersion: apps/v1
kind: Deployment           ##资源类型deployment
metadata:
  name: nginx-app            ##pod名称
  namespace: test            ##名称空间
spec:
  replicas: 1              ##副本数
  selector:
    matchLabels:           ##标签选择器
      app: nginx
  template:                ##以下是pod模板
    metadata:
      labels:
        app: nginx         ##给pod作标签
    spec:
      containers:
      - name: nginx        ##容器名称
        image: core.harbor.domain/test/nginx-1.16.1:v2    ##镜像版本
        ports:
        - containerPort: 80
      imagePullSecrets:			## 镜像拉取秘钥
      - name: harbor-secret
---
apiVersion: v1
kind: Service								## 资源类型service
metadata:
  name: nginx-svc								## service name
  namespace: test						## 命名空间
spec:
  ports:
    - name: aijdir					## Port name
      port: 80							## service port
      protocol: TCP					## 协议
      targetPort: 80				## pod端口
  selector:									## 标签选择器
    app: nginx							## 标签
  type: ClusterIP						## ClusterIP类型
---
apiVersion: networking.k8s.io/v1
kind: Ingress								## ingress资源类型
metadata:
  name: nginx-ingress				## ingress name
  namespace: test
spec:
  ingressClassName: nginx		## 绑定ingress-controller
  rules:
    - host: www.test-k8s.com	## 域名
      http:									## 协议
        paths:
          - backend:				## 代理的后端服务
              service:
                name: nginx
                port:
                  number: 80
            path: /					## 匹配前缀
            pathType: Prefix
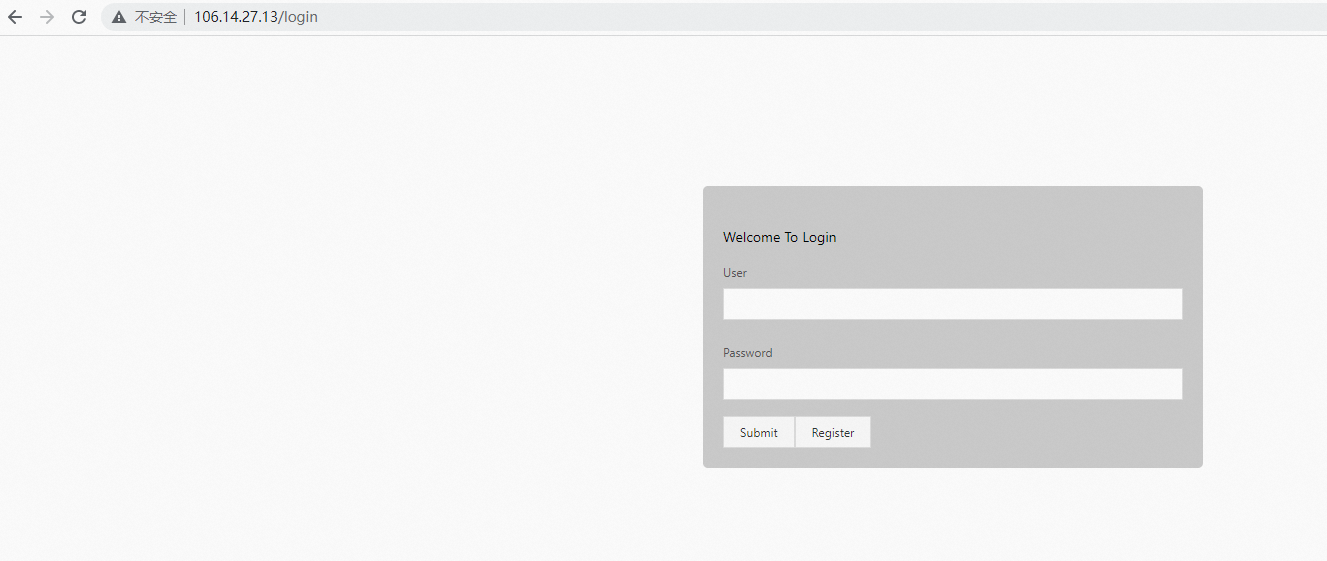
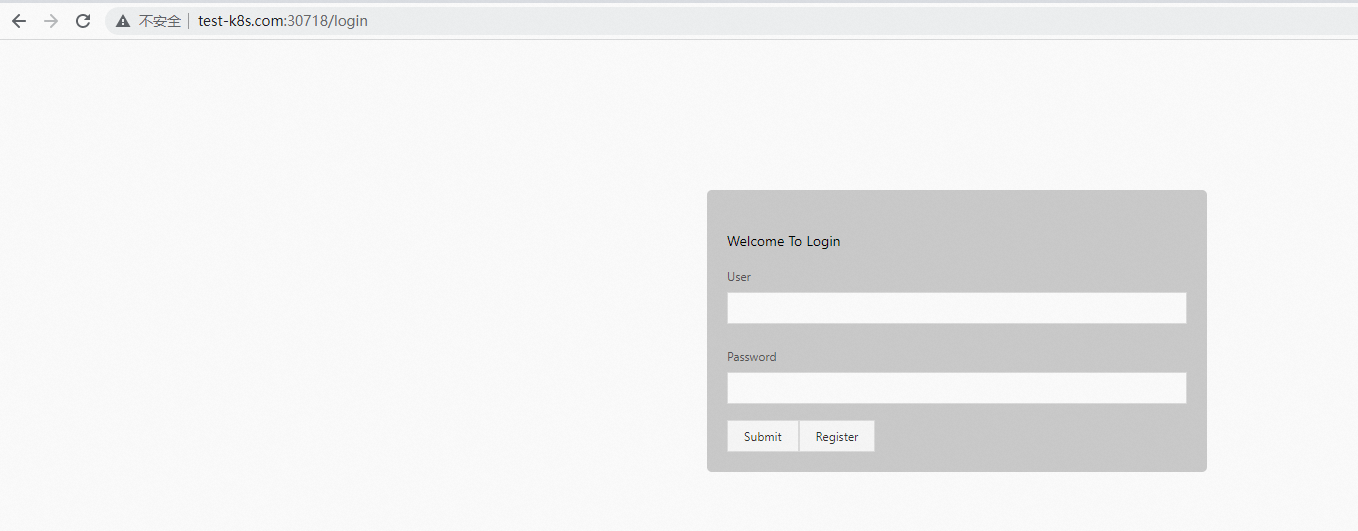
5.浏览器访问前端工程
需要修改本地host文件,加入测试域名和IP地址,如:
106.14.*.* www.test-k8s.com
查看ingress-controller暴露的端口,这里我们能看到http协议暴露的端口是30718
[root@k8s-master ingress]# kubectl get svc -n ingress-nginx
NAME                                       TYPE        CLUSTER-IP       EXTERNAL-IP   PORT(S)                      AGE
ingress-nginx-controller-admission-nginx   ClusterIP   10.106.130.250   <none>        443/TCP                      28h
ingress-nginx-controller-nginx             NodePort    10.105.158.159   <none>        80:30718/TCP,443:31427/TCP   28h
浏览器访问
四、访问流分解
1.概念
ingress:路由转发规则集合,k8s的默认资源
service:提供服务对外暴露功能,模式有4种:ClusterIP(这个是集群内部访问),(nodeport,loadbalance,externalNAME)这三个可以对外提供服务
ingress-controller:实际规则转发工作者, ingress-controller并不是k8s的默认资源
2.工作原理
①ingress-contronler通过与k8s的api进行交互,动态的去感知k8s集群中ingress服务规则的变化,然后读取它,并按照定义的ingress规则,转发到k8s集群中对应的service。
②而这个ingress规则写明了哪个域名对应k8s集群中的哪个service,然后再根据ingress-controller中的nginx配置模板,生成一段对应的nginx配置。
③然后再把该配置动态的写到ingress-controller的pod里,该ingress-controller的pod里面运行着一个nginx服务,控制器会把生成的nginx配置写入到nginx的配置文件中,然后reload一下,使其配置生效。以此来达到域名分配置及动态更新的效果。
④通过ingress-controller访问后端的请求是不走kube-proxy的代理的,也就是下图中的①③不走kube-proxy,②④还是走kube-proxy
⑤ingress-controller有很多种:Kubernetes-Ingress-Controller、NGINX Ingress Controller、Kong Ingress、Traefik、HAProxy Ingress等10多种,用那种需要结合自身实际需求去选择,无特殊场景一般用k8s-ingress-controller
3.访问流
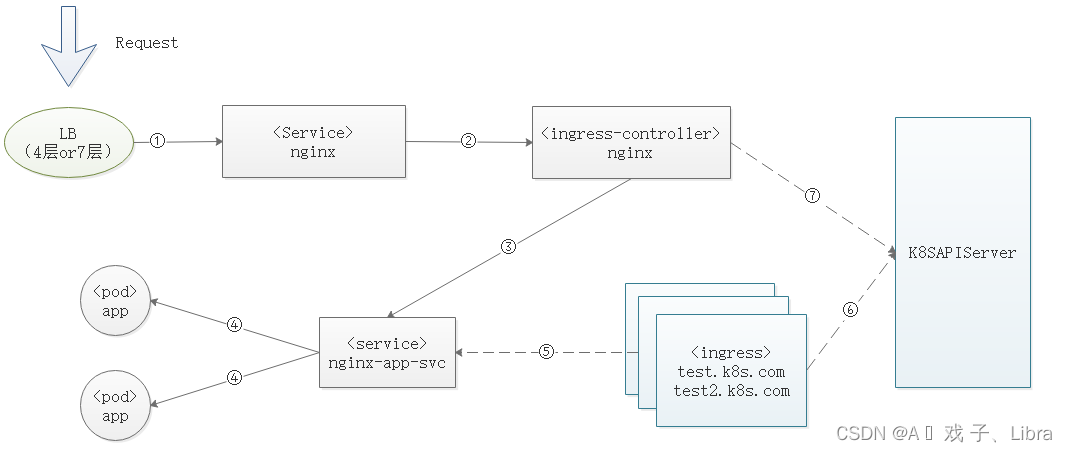
流程分解:
<>里面代表资源类型,无此符号的部分是这个资源的名字
图中实线部分是实际访问流程,虚线部分是路由规则的维护
①企业级应用场景最常用的方式就是用外层4层或7层负载来保证后端服务的可用性,如图是负载nginx这个ingress-controller的svc
②nginx-controller有自己的service,用的是nodeport模式对外暴露端口,关联后端ingress-controller
③ingress-controller拿到请求后转发给后端的service
④service通过标签选择器,找到后面对应的pod
*⑤ingress里面test.k8s.com这个域名的路由规则
*⑥ingress的规则会通过k8s-apiserver对外提供查询
*⑦ingress-controller查询k8s-apiserver拿到ingress路由规则,并更新在自己的配置文件里面


 1307
1307


 被折叠的 条评论
为什么被折叠?
被折叠的 条评论
为什么被折叠?
 到【灌水乐园】发言


