


《OpenShift / RHEL / DevSecOps 汇总目录》
说明
- 本文将说明如何在离线环境中将 CentOS 7.5 更新并迁移至 RHEL 7.9。为了简化准备过程,本文前面将在在线环境中安装用到的各种所需验证软件,而在后面更新迁移的时候再切换到由 ISO 构成的离线 Yum Repo。
- CentOS 7.x 需要先更新到 CentOS 7.9 后才能迁移到 RHEL 7.9(另外还可参见《一步将 CentOS 7.x 原地迁移至 RHEL 7.9》)。
- 以下所安装的验证软件基本都选择了和 CentOS 7.5 一个时期的较早版本,且都是单机安装配置。
- 另外出于方便,以下所有操作都使用的是 root 用户。
Convert2RHEL 简介
Convert2RHEL 是 RedHat 提供的一个命令行工具,用于分析系操作统的情况,并将基于 RPM 的 Linux 操作系统转换为红帽企业 Linux。 它支持将 CentOS Linux 7 和 Oracle Linux 7 以及 Alma Linux 8、Oracle Linux 8、CentOS Linux 8 和 Rocky Linux 8 的转换到对应版本的 RHEL。
准备 CentOS 7.5 VM 及其他被验证软件环境
安装 CentOS VM 并配置 CentOS 7.5 Yum Repo
本文使用的是 VirtualBox 6.1 的虚拟化软件。
- 下载 CentOS-7-x86_64-DVD-1804.iso(CentOS 7.5)、CentOS-7-x86_64-DVD-2009.iso(CentOS 7.9)、rhel-server-7.9-x86_64-dvd.iso 文件。
- 创建一个名为 CentOS7 的 VM,然后用 CentOS-7-x86_64-DVD-1804.iso 在其中最小化安装 CentOS 7.5 即可,过程略。
- 将 CentOS-7-x86_64-DVD-1804.iso 挂载到 CentOS 7.5 文件系统。
$ mkdir /mnt/centos75
$ mount /dev/sr0 /mnt/centos75
- 配置本地 Yum Repo。
$ cat > /etc/yum.repos.d/centos75-local.repo << EOF
[centos75-local-repo]
name = centos75 local repo
baseurl=file:///mnt/centos75
enabled=1
gpgcheck=0
EOF
- 下载以下 repo 文件到 /etc/yum.repos.d 目录中。
https://raw.githubusercontent.com/liuxiaoyu-git/centos-resouce/main/CentOS-Base.repo
https://raw.githubusercontent.com/liuxiaoyu-git/centos-resouce/main/docker-ce.rep
准备 docker 18.06.3.ce 环境
安装 docker
- 安装 docker 所需 Yum Repo。
$ curl -L https://download.docker.com/linux/centos/docker-ce.repo -o /etc/yum.repos.d/docker-ce.repo
- 安装 docker。
$ yum list docker-ce --showduplicates
$ yum install docker-ce-18.06.3.ce-3.el7
- 配置开机启动。
$ systemctl enable --now docker
$ systemctl status docker
验证 docker
- 下载 tomcat:7.0.63 镜像。
$ docker pull tomcat:7.0.63
$ docker images
- 运行 tomcat 镜像
$ docker run -d -p 8080:8080 --name tomcat-test tomcat:7.0.63
$ docker ps -a
- 访问 tomcat
$ curl http://localhost:8080
- 删除镜像
$ docker rm tomcat-test
准备 mysql 5.7 环境
安装 mysql 环境
- 安装 mysql 安装所需 Yum Repo。
$ curl -LO http://dev.mysql.com/get/mysql57-community-release-el7-8.noarch.rpm
$ rpm --import https://repo.mysql.com/RPM-GPG-KEY-mysql-2022
$ yum localinstall mysql57-community-release-el7-8.noarch.rpm
- 确认已经有以下 3 个 mysql 的 Yum Repo。
$ yum repolist enabled | grep mysql
mysql-connectors-community/x86_64       MySQL Connectors Community           242
mysql-tools-community/x86_64            MySQL Tools Community                104
mysql57-community/x86_64                MySQL 5.7 Community Server           696
- 安装 mysql。
$ yum install -y mysql-community-server
- 配置开机启动。
$ systemctl enable --now mysqld
$ systemctl status mysqld
验证 mysql
- 使用临时密码登录 mysql。
$ grep 'temporary password' /var/log/mysqld.log
$ mysql -u root -p
- 修改密码。
mysql> ALTER USER 'root'@'localhost' IDENTIFIED BY 'P@ssw0rd';
- 创建用户。
mysql> CREATE USER 'user1'@'%' IDENTIFIED BY 'P@ssw0rd';
mysql> GRANT ALL PRIVILEGES ON *.* TO 'user1'@'localhost'  WITH GRANT OPTION;
- 操作 database 和 table。
mysql> create database crm;
mysql> use crm;
mysql> create table customer(id int,name varchar(20));
mysql> insert into customer values (1,'Jack');
mysql> insert into customer values (2,'Tom');
mysql> insert into customer values (3,'Bob');
mysql> insert into customer values (4,'James');
mysql> insert into customer values (5,'John');
mysql> select * from crm.customer;
准备 redis 5.0.13 环境
安装 redis
- 安装 epel 所需 Yum Repo。
$ curl -LO https://dl.fedoraproject.org/pub/epel/epel-release-latest-7.noarch.rpm
$ yum install epel-release-latest-7.noarch.rpm
- 安装 redis 所需 Yum Repo。
$ curl -LO http://rpms.remirepo.net/enterprise/remi-release-7.rpm
$ yum install remi-release-7.rpm
- 安装 redis 5.0.13。
$ yum --enablerepo=remi list redis --showduplicates
$ yum --enablerepo=remi install redis-5.0.13-1.el7.remi
- 配置开机启动。
$ systemctl enable --now redis_6379
$ systemctl status redis_6379
验证 redis
- 进入 redis-cli 环境。
$ redis-cli
- 操作redis。
127.0.0.1:6379> SET 1 Jack
127.0.0.1:6379> SET 2 Tom
127.0.0.1:6379> SET 3 Bob
127.0.0.1:6379> SET 4 James
127.0.0.1:6379> SET 5 John
127.0.0.1:6379> GET 4
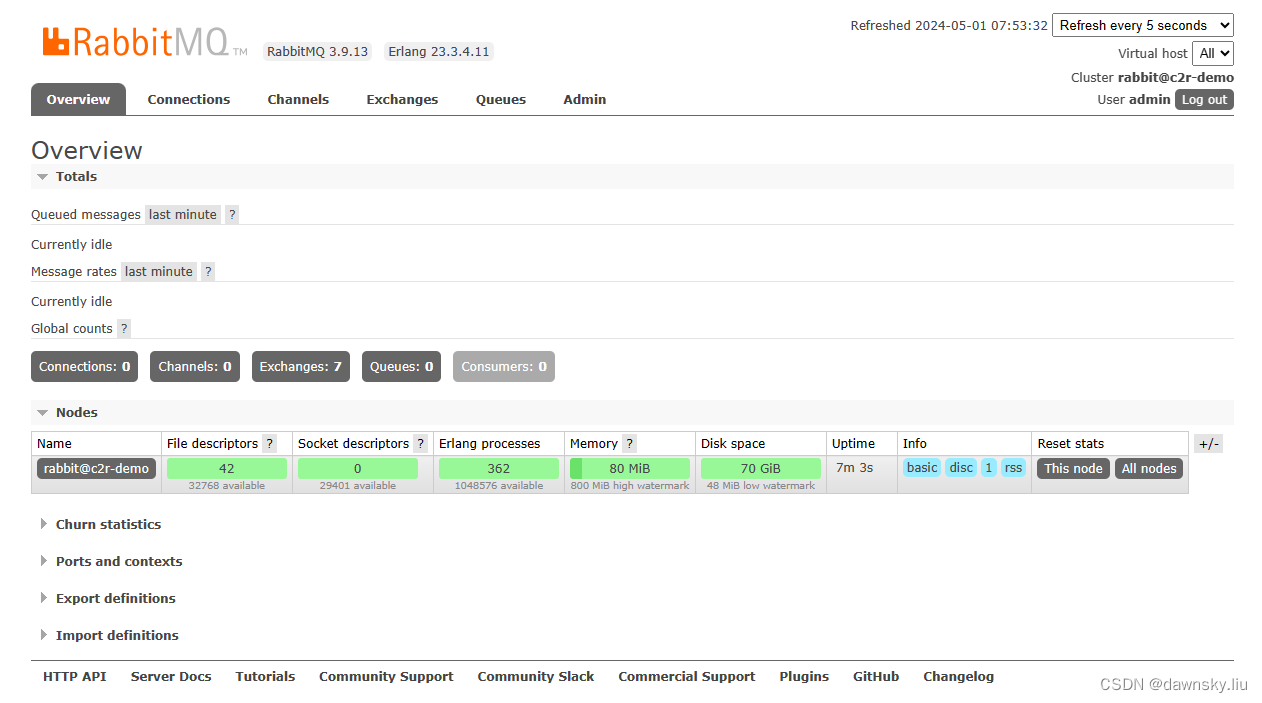
准备 rabbitmq 3.9.13 环境
安装 rabbitmq
- 下载 erlang 和 rabbitmq 的 rpm 安装包。
$ curl -LO https://github.com/rabbitmq/erlang-rpm/releases/download/v23.3.4.11/erlang-23.3.4.11-1.el7.x86_64.rpm
$ curl -LO https://github.com/rabbitmq/rabbitmq-server/releases/download/v3.9.13/rabbitmq-server-3.9.13-1.el7.noarch.rpm
- 安装 erlang 和 rabbitmq。
$ yum localinstall erlang-23.3.4.11-1.el7.x86_64.rpm
$ yum localinstall rabbitmq-server-3.9.13-1.el7.noarch.rpm
- 配置开机启动。
$ systemctl enable --now rabbitmq-server
$ systemctl status rabbitmq-server
启动 webconsole
- 启动 webconsole
$ rabbitmq-plugins enable rabbitmq_management
- 创建用户。
$ rabbitmqctl add_user admin password
$ rabbitmqctl set_user_tags admin administrator
验证 rabbitmq
- 关闭防火墙。
$ systemctl stop firewalld
- 用浏览器打开 webconsole 地址,例如 http://<CENTOS-HOST-IP>:15672
准备 mongodb 4.4.2 环境
安装 mongodb
- 准备安装 mongodb 用到的 Yum Repo。
$ cat > /etc/yum.repos.d/mongodb.repo << EOF
[mongodb-org-4.4]
name=MongoDB Repository
baseurl=https://repo.mongodb.org/yum/redhat/7/mongodb-org/4.4/x86_64/
gpgcheck=0
enabled=1
gpgkey=https://pgp.mongodb.com/server-4.4.asc
EOF
- 安装 mongodb。
$ yum install mongodb-org-4.4.2 mongodb-org-server-4.4.2 mongodb-org-shell-4.4.2 mongodb-org-mongos-4.4.2 mongodb-org-tools-4.4.2
- 配置开机启动。
$ systemctl enable --now mongod
$ systemctl status mongod
验证 mongodb
- 进入 mongo。
$ mongo
- 操作 dbs 和 collections。
> show dbs
> use crm
> db.crm.insert({"1":"Jack"})
> db.crm.insert({"2":"Tom"})
> db.crm.insert({"3":"Bob"})
> db.crm.insert({"4":"James"})
> db.crm.insert({"5":"John"})
> db.crm.find()
准备 postgresql 9.2.23
安装 postgresql
- 安装 postgresql,然后初始化数据库。
$ yum install postgresql-server
$ postgresql-setup initdb
- 配置开机启动。
systemctl enable --now postgresql
systemctl status postgresql
验证 postgresql
- 进入 postgres 用户,然后执行客户端,最后查看 postgresql 的版本。
$ su postgres
bash-4.2$  psql
could not change directory to "/root"
psql (9.2.23)
Type "help" for help.
postgres=# show server_version;
 server_version
----------------
 9.2.23
(1 row)
- 创建测试表。
postgres=# CREATE TABLE playground (
    equip_id serial PRIMARY KEY,
    type varchar (50) NOT NULL,
    color varchar (25) NOT NULL,
    location varchar(25) check (location in ('north', 'south', 'west', 'east', 'northeast', 'southeast', 'southwest', 'northwest')),
    install_date date
);
postgres=# \dt
          List of relations
 Schema |    Name    | Type  |  Owner
--------+------------+-------+----------
 public | playground | table | postgres
(1 row)
- 向表添加数据。
postgres=# INSERT INTO playground (type, color, location, install_date) VALUES ('slide', 'blue', 'south', '2014-04-28');
postgres=# INSERT INTO playground (type, color, location, install_date) VALUES ('swing', 'yellow', 'northwest', '2010-08-16');
- 从表查询数据。
postgres=# SELECT * FROM playground;
equip_id | type  | color  | location  | install_date
----------+-------+--------+-----------+--------------
        1 | slide | blue   | south     | 2014-04-28
        2 | swing | yellow | northwest | 2010-08-16
(2 rows)
准备 Oracle DB 12c 环境
见《在离线环境中将运行 Oracle DB 12c 的 CentOS 7.5 原地迁移至 RHEL 7.9》一文。
准备 CentOS 7.9 和 RHEL 7.9 的离线 Yum Repo
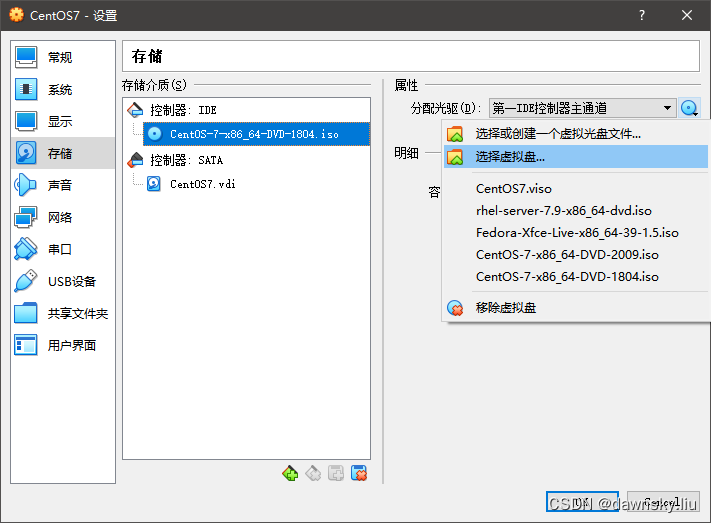
配置 ISO 挂载文件
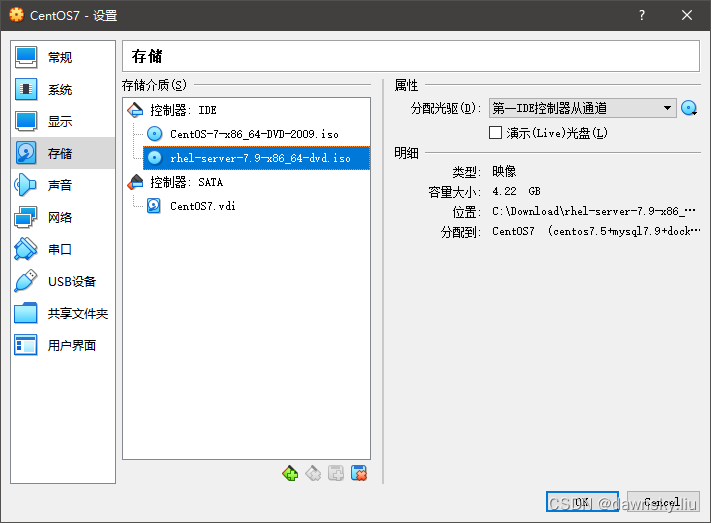
- 设置 CentOS 7.5 VM 的存储。选中 “CentOS-7-x86_64-DVD-1804.iso” 一行,然后点击 “第一IDE控制器主通道” 右侧图标,点击 “选择虚拟盘…” 菜单,然后在弹出窗口选中 CentOS-7-x86_64-DVD-2009.iso 文件,这样第一个 IDE 就会挂载 CentOS-7-x86_64-DVD-2009.iso 文件了。
- 在关闭 VM 后点击下图的 “添加虚拟光驱” 右侧图标,然后在弹出的 “虚拟光盘选择” 窗口中点击 “注册” 图标,再在文件夹中选中 rhel-server-7.9-x86_64-dvd.iso 文件。最后在 “虚拟光盘选择” 窗口中点击 “选择” 按钮,这样第二个 IDE 就会挂载 rhel-server-7.9-x86_64-dvd.iso 文件了。
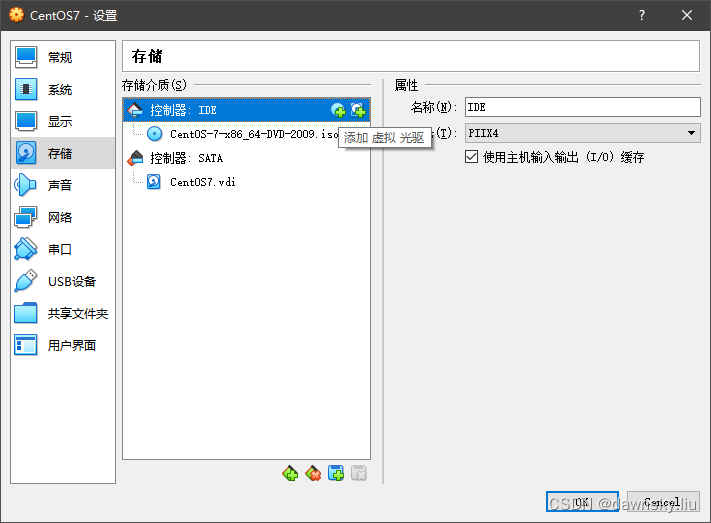
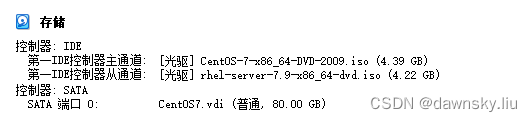
- 完成后 VM 就可以同时挂载 CentOS-7-x86_64-DVD-2009.iso 和 rhel-server-7.9-x86_64-dvd.iso 两个文件了。
配置 CentOS 7.9 和 RHEL 7.9 Yum Repo
- 将 CentOS-7-x86_64-DVD-2009.iso 和 rhel-server-7.9-x86_64-dvd.iso 挂载到运行 CentOS 7.5 的 VM 上。
- 将 ISO 挂载到 CentOS 7.5 文件系统。
$ mkdir /mnt/centos79 /mnt/rhel79
$ mount /dev/sr0 /mnt/centos79
$ mount /dev/sr1 /mnt/rhel79
- 配置本地 Yum Repo。
$ cat > /etc/yum.repos.d/centos79-local.repo << EOF
[centos79-local-repo]
name = centos79 local repo
baseurl=file:///mnt/centos79
enabled=1
gpgcheck=0
EOF

$ cat > /etc/yum.repos.d/rhel79-local.repo << EOF
[rhel79-local-repo]
name = rhel79 local repo
baseurl=file:///mnt/rhel79
enabled=1
gpgcheck=0
EOF
- 确认 CentOS 7.9 和 RHEL 7.9 的离线 Yum Repo 已经可用。
$ yum repolist
Loaded plugins: fastestmirror
Loading mirror speeds from cached hostfile
repo id                                 repo name                                      status
centos79-local-repo                     centos79 local repo                            4,070
rhel79-local-repo                       rhel79 local repo                              5,230
repolist: 9,300
将 CentOS 7.5 原地更新至 CentOS 7.9
- 查看当前发行版和 kernel 版本。
$ cat /etc/redhat-release
$ uname -r
- 确认 Yum Repo 只有 CentOS 7.9。
$ yum repolist
Loaded plugins: fastestmirror
Loading mirror speeds from cached hostfile
repo id                                 repo name                                      status
centos79-local-repo                     centos79 local repo                            4,070
repolist: 4,070
- 查看当前环境中所有可更新的软件包。
$ yum list updates
- 开始更新 CentOS 7.5。
$ yum update
- 确认被更新的 Package 和使用的 Repository。
。。。
Dependencies Resolved

=======================================================================================================================================================================
 Package                                         Arch                     Version                                          Repository                             Size
=======================================================================================================================================================================
Installing:
 grub2                                           x86_64                   1:2.02-0.86.el7.centos                           centos79-local-repo                    32 k
     replacing  grub2.x86_64 1:2.02-0.65.el7.centos.2
 grub2-tools                                     x86_64                   1:2.02-0.86.el7.centos                           centos79-local-repo                   1.8 M
     replacing  grub2-tools.x86_64 1:2.02-0.65.el7.centos.2
 grub2-tools-extra                               x86_64                   1:2.02-0.86.el7.centos                           centos79-local-repo                   1.0 M
     replacing  grub2-tools.x86_64 1:2.02-0.65.el7.centos.2
 grub2-tools-minimal                             x86_64                   1:2.02-0.86.el7.centos                           centos79-local-repo                   174 k
     replacing  grub2-tools.x86_64 1:2.02-0.65.el7.centos.2
 iwl7260-firmware                                noarch                   25.30.13.0-79.el7                                centos79-local-repo                   6.1 M
     replacing  iwl7265-firmware.noarch 22.0.7.0-62.el7
 kernel                                          x86_64                   3.10.0-1160.el7                                  centos79-local-repo                    50 M
Updating:
 GeoIP                                           x86_64                   1.5.0-14.el7                                     centos79-local-repo                   1.5 M
 acl                                             x86_64                   2.2.51-15.el7                                    centos79-local-repo                    81 k
 alsa-lib                                        x86_64                   1.1.8-1.el7                                      centos79-local-repo                   425 k
。。。
- 完成后再次查看当前发行版和 kernel 版本。
$ cat /etc/redhat-release
CentOS Linux release 7.9.2009 (Core)
$ uname -r
3.10.0-862.el7.x86_64
- 为了生效 kernel,需要重启 Linux。
- 重启后再次查看 kernel 版本,确认已更新。
$ uname -r
3.10.0-1160.el7.x86_64
- 使用前面各软件的验证步骤确认所有软件均可正常运行和使用。注意:如果软件是通过 CentOS ISO 安装的,这些软件的版本有可能会随新版的 CentOS 一起更新更新。如果软件是从其他渠道安装的,则版本不会变化。
将 CentOS 7.9 原地迁移至 RHEL 7.9
安装 convert2rhel
方法1
- 下载安装 convert2rhel 所需 Yum Repo。
$ curl -o /etc/yum.repos.d/convert2rhel.repo https://ftp.redhat.com/redhat/convert2rhel/7/convert2rhel.repo
- 修改 /etc/yum.repos.d/convert2rhel.repo 文件,将 gpgcheck 改为 0。
- 安装 convert2rhel。
$ yum -y install convert2rhel
方法2
使用 rpm 安装 convert2rhel。
$ curl -LO https://github.com/oamg/convert2rhel/releases/download/v1.7.1/convert2rhel-1.7.1-1.el7.noarch.rpm
$ yum localinstall convert2rhel-1.7.1-1.el7.noarch.rpm
将 CentOS 7.9 转换到 RHEL 7.9
- 执行以下命令查看已安装的非 CentOS 软件包及其供应商。注意:convert2rhel 只转换由 CentOS 供应的软件。
$ rpm -qa --queryformat "%{VENDOR} = %{NAME}-%{VERSION}-%{RELEASE}.%{ARCH} \n" | sort | grep -v "CentOS"
Docker:docker-ce
Fedora Project:epel-release
Fedora Project:imlib2
Fedora Project:openbox
Fedora Project:openbox-libs
Fedora Project:python2-pyxdg
MongoDB:mongodb-database-tools
MySQL:mysql57-community-release
(none):convert2rhel
(none):gpg-pubkey
(none):gpg-pubkey
(none):gpg-pubkey
(none):gpg-pubkey
(none):gpg-pubkey
(none):gpg-pubkey
(none):mongodb-org
(none):mongodb-org-database-tools-extra
(none):mongodb-org-mongos
(none):mongodb-org-server
(none):mongodb-org-shell
(none):mongodb-org-tools
(none):rabbitmq-server
Oracle and/or its affiliates:mysql-community-client
Oracle and/or its affiliates:mysql-community-common
Oracle and/or its affiliates:mysql-community-libs
Oracle and/or its affiliates:mysql-community-libs-compat
Oracle and/or its affiliates:mysql-community-server
Remi's RPM repository <https://rpms.remirepo.net/>:redis
Remi's RPM repository <https://rpms.remirepo.net/> #StandWithUkraine:remi-release
VMware, Inc.:erlang
- 确认当前可用 Yum Repo 有 CentOS 7.9 和 RHEL 7.9。
$ yum repolist
Loaded plugins: fastestmirror
Loading mirror speeds from cached hostfile
repo id                                 repo name                                      status
centos79-local-repo                     centos79 local repo                            4,070
rhel79-local-repo                       rhel79 local repo                              5,230
repolist: 9,300
- 执行命令,在迁移前先进行分析。
$ convert2rhel analyze --no-rhsm --enablerepo=rhel79-local-repo
- 根据以上返回结果的提示,设置以下环境变量。
$ export CONVERT2RHEL_SKIP_KERNEL_CURRENCY_CHECK=1 			## 跳过是否升为最新内核的检查
$ export CONVERT2RHEL_ALLOW_UNAVAILABLE_KMODS=1				## 检查所有加载的内核模块在 RHEL 资源库中是否可用
$ export CONVERT2RHEL_TAINTED_KERNEL_MODULE_CHECK_SKIP=1	## 跳过污点内核模块检查
$ export CONVERT2RHEL_OUTDATED_PACKAGE_CHECK_SKIP=1			## 跳过对过期包的检查
- 执行迁移。
$ convert2rhel --no-rhsm --enablerepo=rhel79-local-repo
- 完成前会有以下提示,说明部分非 RedHat 的第三方包无法替换。
Listing packages not signed by Red Hat
The following packages were left unchanged.

Package                                                Vendor/Packager                                                       Repository
-------                                                ---------------                                                       ----------
0:mysql-community-libs-5.7.44-1.el7.x86_64             Oracle and/or its affiliates                                          N/A
0:mysql-community-common-5.7.44-1.el7.x86_64           Oracle and/or its affiliates                                          N/A
0:epel-release-7-14.noarch                             Fedora Project                                                        N/A
0:yum-plugin-fastestmirror-1.1.31-54.el7_8.noarch      CentOS                                                                centos79-local-re                         po
0:mongodb-org-4.4.2-1.el7.x86_64                       (none)                                                                N/A
0:erlang-23.3.4.11-1.el7.x86_64                        VMware, Inc.                                                          N/A
0:remi-release-7.9-6.el7.remi.noarch                   Remi's RPM repository <https://rpms.remirepo.net/> #StandWithUkraine  N/A
0:openbox-libs-3.5.2-6.el7.x86_64                      Fedora Project                                                        N/A
0:python2-pyxdg-0.25-8.el7.noarch                      Fedora Project                                                        N/A
0:mongodb-org-server-4.4.2-1.el7.x86_64                (none)                                                                N/A
0:compat-libstdc++-33-3.2.3-72.el7.x86_64              CentOS                                                                N/A
0:rabbitmq-server-3.9.13-1.el7.noarch                  (none)                                                                N/A
2:container-selinux-2.119.2-1.911c772.el7_8.noarch     CentOS                                                                N/A
0:mysql-community-server-5.7.44-1.el7.x86_64           Oracle and/or its affiliates                                          N/A
0:mongodb-org-mongos-4.4.2-1.el7.x86_64                (none)                                                                N/A
0:redis-5.0.13-1.el7.remi.x86_64                       Remi's RPM repository <https://rpms.remirepo.net/>                    N/A
0:mysql-community-client-5.7.44-1.el7.x86_64           Oracle and/or its affiliates                                          N/A
0:docker-ce-18.06.3.ce-3.el7.x86_64                    Docker                                                                N/A
0:convert2rhel-1.7.1-1.el7.noarch                      (none)                                                                N/A
0:openbox-3.5.2-6.el7.x86_64                           Fedora Project                                                        N/A
0:mysql-community-libs-compat-5.7.44-1.el7.x86_64      Oracle and/or its affiliates                                          N/A
0:mongodb-database-tools-100.9.4-1.x86_64              MongoDB                                                               N/A
0:mongodb-org-database-tools-extra-4.4.2-1.el7.x86_64  (none)                                                                N/A
0:mysql57-community-release-el7-8.noarch               MySQL                                                                 N/A
0:mongodb-org-shell-4.4.2-1.el7.x86_64                 (none)                                                                N/A
0:imlib2-1.4.9-8.el7.x86_64                            Fedora Project                                                        N/A
0:mongodb-org-tools-4.4.2-1.el7.x86_64                 (none)                                                                N/A
- 成功迁移后会有 “Conversion successful!” 提示。
- 迁移过程的日志会写到 /var/log/convert2rhel/convert2rhel.log 文件中。
- 重启 Linux 后确认当前发行版和 kernel 版本已迁移到 RHEL 7.9 了。
$ cat /etc/redhat-release
Red Hat Enterprise Linux Server release 7.9 (Maipo)
$ uname -r
3.10.0-1160.el7.x86_64
- 使用前面各软件的验证步骤确认所有软件均可正常运行和使用。
视频
参考
https://www.redhat.com/en/interactive-labs/migrate-red-hat-enterprise-linux-centos-linux
https://www.cnblogs.com/tenghu/p/15887218.html
https://github.com/oamg/convert2rhel/wiki/Environment-variables
https://blog.51cto.com/u_15127570/2710197


 被折叠的 条评论
为什么被折叠?
被折叠的 条评论
为什么被折叠?
 到【灌水乐园】发言


