


Spring框架的简单使用
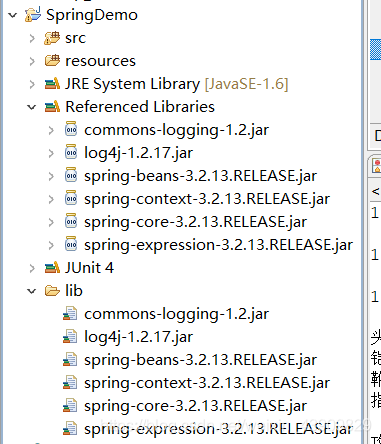
1.创建一个java项目,导入jar包并BuildPath
2.资源文件
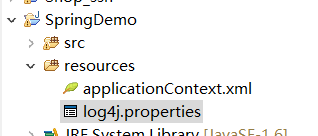
log4j.properties
```java
#rootLogger是所有日志的根日志,修改该日志属性将对所有日志起作用
#下面的属性配置中,所有日志的输出级别是info,输出源是con
log4j.rootLogger=info,con
#定义输出源的输出位置是控制台
log4j.appender.con=org.apache.log4j.ConsoleAppender
 定义输出日志的布局采用的类
log4j.appender.con.layout=org.apache.log4j.PatternLayout
#定义日志输出布局
log4j.appender.con.layout.ConversionPattern=%d{MM-dd HH:mm:ss}[%p]%c%n -%m%n
## 3.建两个实体类
```java
```java
package cn.pojo;
public class Equip {
private String name;// 装备名称
private String type;// 装备类型,头盔、铠甲等
private Long speedPlus;// 速度增效
private Long attackPlus;// 攻击增效
private Long defencePlus;// 防御增效
public String getName() {
return name;
}
public void setName(String name) {
this.name = name;
}
public String getType() {
return type;
}
public void setType(String type) {
this.type = type;
}
public Long getSpeedPlus() {
return speedPlus;
}
public void setSpeedPlus(Long speedPlus) {
this.speedPlus = speedPlus;
}
public Long getAttackPlus() {
return attackPlus;
}
public void setAttackPlus(Long attackPlus) {
this.attackPlus = attackPlus;
}
public Long getDefencePlus() {
return defencePlus;
}
public void setDefencePlus(Long defencePlus) {
this.defencePlus = defencePlus;
}
@Override
public String toString() {
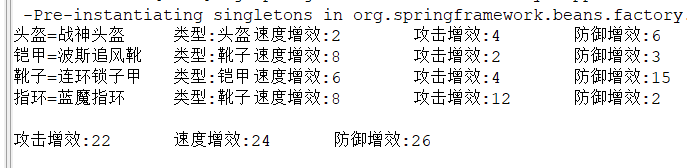
return name+"\t类型:"+type+"\t速度增效:"+speedPlus+"\t攻击增效:"+attackPlus+"\t防御增效:"+defencePlus+"\n";
}
}
```java
package cn.pojo;

public class Player {
	private Equip armet;// 头盔
	private Equip loricae;// 铠甲
	private Equip boot;// 靴子
	private Equip ring;// 指环
	public Equip getArmet() {
		return armet;
	}
	public void setArmet(Equip armet) {
		this.armet = armet;
	}
	public Equip getLoricae() {
		return loricae;
	}
	public void setLoricae(Equip loricae) {
		this.loricae = loricae;
	}
	public Equip getBoot() {
		return boot;
	}
	public void setBoot(Equip boot) {
		this.boot = boot;
	}
	public Equip getRing() {
		return ring;
	}
	public void setRing(Equip ring) {
		this.ring = ring;
	}
	@Override
	public String toString() {
		return "头盔=" + armet + "铠甲=" + boot + "靴子="
				+ loricae + "指环=" + ring;
	}
	public void xingneng(){
		System.out.println("攻击增效:"+(armet.getAttackPlus()+loricae.getAttackPlus()+boot.getAttackPlus()+ring.getAttackPlus())
			+"\t速度增效:"+(armet.getSpeedPlus()+loricae.getSpeedPlus()+boot.getSpeedPlus()+ring.getSpeedPlus())
			+"\t防御增效:"+(armet.getDefencePlus()+loricae.getDefencePlus()+boot.getDefencePlus()+ring.getDefencePlus()));

	}

}
4.编写配置文件
<?xml version="1.0" encoding="UTF-8"?>
<beans xmlns="http://www.springframework.org/schema/beans"
	xmlns:xsi="http://www.w3.org/2001/XMLSchema-instance"
	xsi:schemaLocation="http://www.springframework.org/schema/beans
	http://www.springframework.org/schema/beans/spring-beans-3.2.xsd">
	<!-- 通过bean元素声明需要Spring创建的实例。该实例的类型通过class属性指定,并通过id属性为该实例指定一个名称,以便在程序中使用 -->
	<bean id="clcArmet" class="cn.pojo.Equip">
		<property name="name" value="战神头盔"></property>
		<property name="type" value="头盔"></property>
		<property name="speedPlus" value="2"></property>
		<property name="attackPlus" value="4"></property>
		<property name="defencePlus" value="6"></property>
	</bean>
	<bean id="clcLoricae" class="cn.pojo.Equip">
		<property name="name" value="连环锁子甲"></property>
		<property name="type" value="铠甲"></property>
		<property name="speedPlus" value="6"></property>
		<property name="attackPlus" value="4"></property>
		<property name="defencePlus" value="15"></property>
	</bean>
	<bean id="clcBoot" class="cn.pojo.Equip">
		<property name="name" value="波斯追风靴"></property>
		<property name="type" value="靴子"></property>
		<property name="speedPlus" value="8"></property>
		<property name="attackPlus" value="2"></property>
		<property name="defencePlus" value="3"></property>
	</bean>
	<bean id="clcRing" class="cn.pojo.Equip">
		<property name="name" value="蓝魔指环"></property>
		<property name="type" value="靴子"></property>
		<property name="speedPlus" value="8"></property>
		<property name="attackPlus" value="12"></property>
		<property name="defencePlus" value="2"></property>
	</bean>

	<bean id="clc" class="cn.pojo.Player">
		<property name="armet" ref="clcArmet"></property>
		<property name="loricae" ref="clcLoricae"></property>
		<property name="boot" ref="clcBoot"></property>
		<property name="ring" ref="clcRing"></property>
	</bean>
</beans>
5.编写测试类
package cn.test;

import org.junit.Test;
import org.springframework.context.ApplicationContext;
import org.springframework.context.support.ClassPathXmlApplicationContext;
import cn.pojo.Person;
import cn.pojo.Player;

public class TestDemo {

	@Test
    public void test1() {
	@Test
	public void test2(){
		ApplicationContext context = new ClassPathXmlApplicationContext("applicationContext.xml");
		Player p1=(Player) context.getBean("clc");
		System.out.println(p1);
		p1.xingneng();
	}

}
6.结果输出


 5521
5521


 被折叠的 条评论
为什么被折叠?
被折叠的 条评论
为什么被折叠?
 到【灌水乐园】发言


