


文章目录
- AngularJS1下载链接(百度网盘)
链接:https://pan.baidu.com/s/199_vzDBSjpeIkUMEqETU7Q
提取码:vmri
复制这段内容后打开百度网盘手机App,操作更方便哦
AngularJS1入门
1. 简介
AngularJS 诞生于2009年,由Misko Hevery 等人创建,后为Google所收购。是一款优秀的前端JS框架,已经被用于Google的多款产品当中。AngularJS有着诸多特性,最为核心的是:MVC、模块化、自动化双向数据绑定、依赖注入等等。

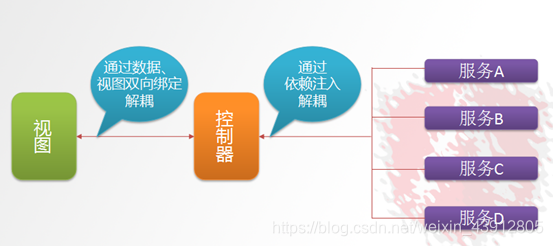
2. Angular四大特征
1. MVC模式
Angular遵循软件工程的MVC模式,并鼓励展现,数据,和逻辑组件之间的松耦合.通过依赖注入(dependency injection),Angular为客户端的Web应用带来了传统服务端的服务,例如独立于视图的控制。 因此,后端减少了许多负担,产生了更轻的Web应用
- Model:数据,其实就是angular变量($scope.XX);
- View: 数据的呈现,Html+Directive(指令);
- Controller:操作数据,就是function,数据的增删改查;
2. 双向绑定
AngularJS是建立在这样的信念上的:即声明式编程应该用于构建用户界面以及编写软件构建,而指令式编程非常适合来表示业务逻辑。框架采用并扩展了传统HTML,通过双向的数据绑定来适应动态内容,双向的数据绑定允许模型和视图之间的自动同步。因此,AngularJS使得对DOM的操作不再重要并提升了可测试性。

3. 依赖注入
依赖注入(Dependency Injection,简称DI)是一种设计模式, 指某个对象依赖的其他对象无需手工创建,只需要“吼一嗓子”,则此对象在创建时,其依赖的对象由框架来自动创建并注入进来,其实就是最少知识法则;模块中所有的service和provider两类对象,都可以根据形参名称实现DI.
4. 模块化设计
- 高内聚低耦合法则
3. 入门案例
表达式
<html>
<head>
	<title>入门小Demo-1</title>
	<!--引入angular的js包-->
	<script src="angular.min.js"></script>
</head>
<body ng-app>
{{100+100}}
</body>
</html>

- 表达式的写法是{{表达式 }} 表达式可以是变量或是运算式
- ng-app 指令 作用是告诉子元素一下的指令是归angularJs的,angularJs会识别的
- ng-app 指令定义了 AngularJS 应用程序的 根元素。
- ng-app 指令在网页加载完毕时会自动引导(自动初始化)应用程序。
双向绑定
<html>
<head>
	<title>入门小Demo-1  双向绑定</title>
	<script src="angular.min.js"></script>
</head>
<body ng-app>
请输入你的姓名:<input ng-model="myname">
<br>
{{myname}},你好
</body>
</html>

- ng-model 指令用于绑定变量,这样用户在文本框输入的内容会绑定到变量上,而表达式可以实时地输出变量
初始化指令
<html>
<head>
	<title>入门小Demo-3  初始化</title>
	<script src="angular.min.js"></script>
</head>
<body ng-app   ng-init="myname='陈大海'">
请输入你的姓名:<input ng-model="myname">
<br>
{{myname}},你好
</body>
</html>
- ng-init设置name的初始化的值为陈大海
控制器
<html>
<head>
	<title>入门小Demo-3  初始化</title>
	<script src="angular.min.js"></script>
	<script>
		//定义了一个叫myApp的模块
		var app=angular.module('myApp',[]);
		//定义控制器名为myController		//触发的函数里面注入$scope
		app.controller('myController',function($scope){
			//给$scope添加一个add函数,使用add函数就会触发后面的方法
			$scope.add=function(){
				//使用$scope取x和y的值,使用parseInt将其转为int类型
				return parseInt($scope.x)+parseInt($scope.y);
			}
		});
	</script>
</head>
<body ng-app="myApp" ng-controller="myController">
x:<input ng-model="x" >
y:<input ng-model="y" >
运算结果:{{add()}}
</body>
</html>

- ng-controller用于指定所使用的控制器。
- 理解 $scope:
$scope 的使用贯穿整个 AngularJS App 应用,它与数据模型相关联,同时也是表达式执行的上下文.有了$scope 就在视图和控制器之间建立了一个通道,基于作用域视图在修改数据时会立刻更新 $scope,同样的$scope 发生改变时也会立刻重新渲染视图.
事件指令
<html>
<head>
	<title>入门小Demo-5  事件指令</title>
	<script src="angular.min.js"></script>
	<script>
		//定义了一个叫myApp的模块
		var app=angular.module('myApp',[]);
		//定义控制器
		app.controller('myController',function($scope){
			$scope.add=function(){
				$scope.z= parseInt($scope.x)+parseInt($scope.y);
			}
		});
	</script>
</head>
<body ng-app="myApp" ng-controller="myController">
x:<input ng-model="x" >
y:<input ng-model="y" >
<button ng-click="add()">运算</button>
结果:{{z}}
</body>
</html>
- ng-click 是最常用的单击事件指令,再点击时触发控制器的某个方法
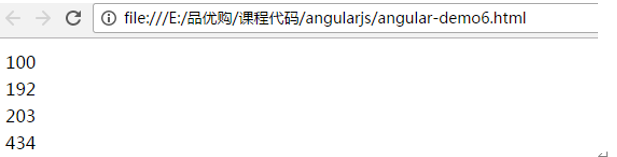
循环数组
<html>
<head>
	<title>入门小Demo-6  循环数据</title>
	<script src="angular.min.js"></script>
	<script>
		//定义了一个叫myApp的模块
		var app=angular.module('myApp',[]);
		//定义控制器
		app.controller('myController',function($scope){
			$scope.list= [100,192,203,434 ];//定义数组
		});
	</script>
</head>
<body ng-app="myApp" ng-controller="myController">
<table>
	//遍历list,将值赋给x
	<tr ng-repeat="x in list">
		<td>{{x}}</td>
	</tr>
</table>
</body>
</html>
- 这里的ng-repeat指令用于循环数组变量。
循环对象数组
<html>
<head>
	<title>入门小Demo-7  循环对象数组</title>
	<script src="angular.min.js"></script>
	<script>
		var app=angular.module('myApp',[]); //定义了一个叫myApp的模块
		//定义控制器
		app.controller('myController',function($scope){
			$scope.list= [
				{name:'张三',shuxue:100,yuwen:93},
				{name:'李四',shuxue:88,yuwen:87},
				{name:'王五',shuxue:77,yuwen:56}
			];//定义数组
		});
	</script>
</head>
<body ng-app="myApp" ng-controller="myController">
<table>
<tr>
	<td>姓名</td>
	<td>数学</td>
	<td>语文</td>
</tr>
<tr ng-repeat="entity in list">
	//类似于el表达式,从对象中取出数据
	<td>{{entity.name}}</td>
	<td>{{entity.shuxue}}</td>
	<td>{{entity.yuwen}}</td>
</tr>
</table>
</body>
</html>
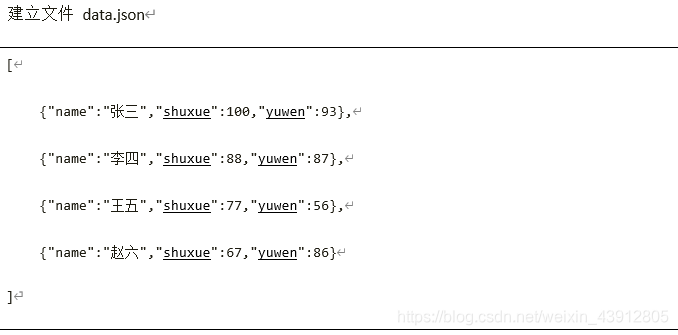
内置服务
<html>
<head>
	<title>入门小Demo-8  内置服务</title>
	<meta charset="utf-8" />
	<script src="angular.min.js"></script>
	<script>
		//定义了一个叫myApp的模块
		var app=angular.module('myApp',[]);
		//定义控制器							  //注入$scope和$http
		app.controller('myController',function($scope,$http){
			//定义一个fingAll函数
			$scope.findAll=function(){
				//使用$http的get方法,括号里面写要请求的链接,
				//如果成功会调用success里面的function函数,
				//将返回来的数据赋给list
				$http.get('data.json').success(
					//function函数里面的参数response就是返回来的数据,
					function(response){
						//将返回来的数据赋给list
						$scope.list=response;
					}
				);
			}
		});
	</script>
</head>
<body ng-app="myApp" ng-controller="myController" ng-init="findAll()">
<table>
	<tr>
		<td>姓名</td>
		<td>数学</td>
		<td>语文</td>
	</tr>
	<tr ng-repeat="entity in list">
		<td>{{entity.name}}</td>
		<td>{{entity.shuxue}}</td>
		<td>{{entity.yuwen}}</td>
	</tr>
</table>
</body>
</html>
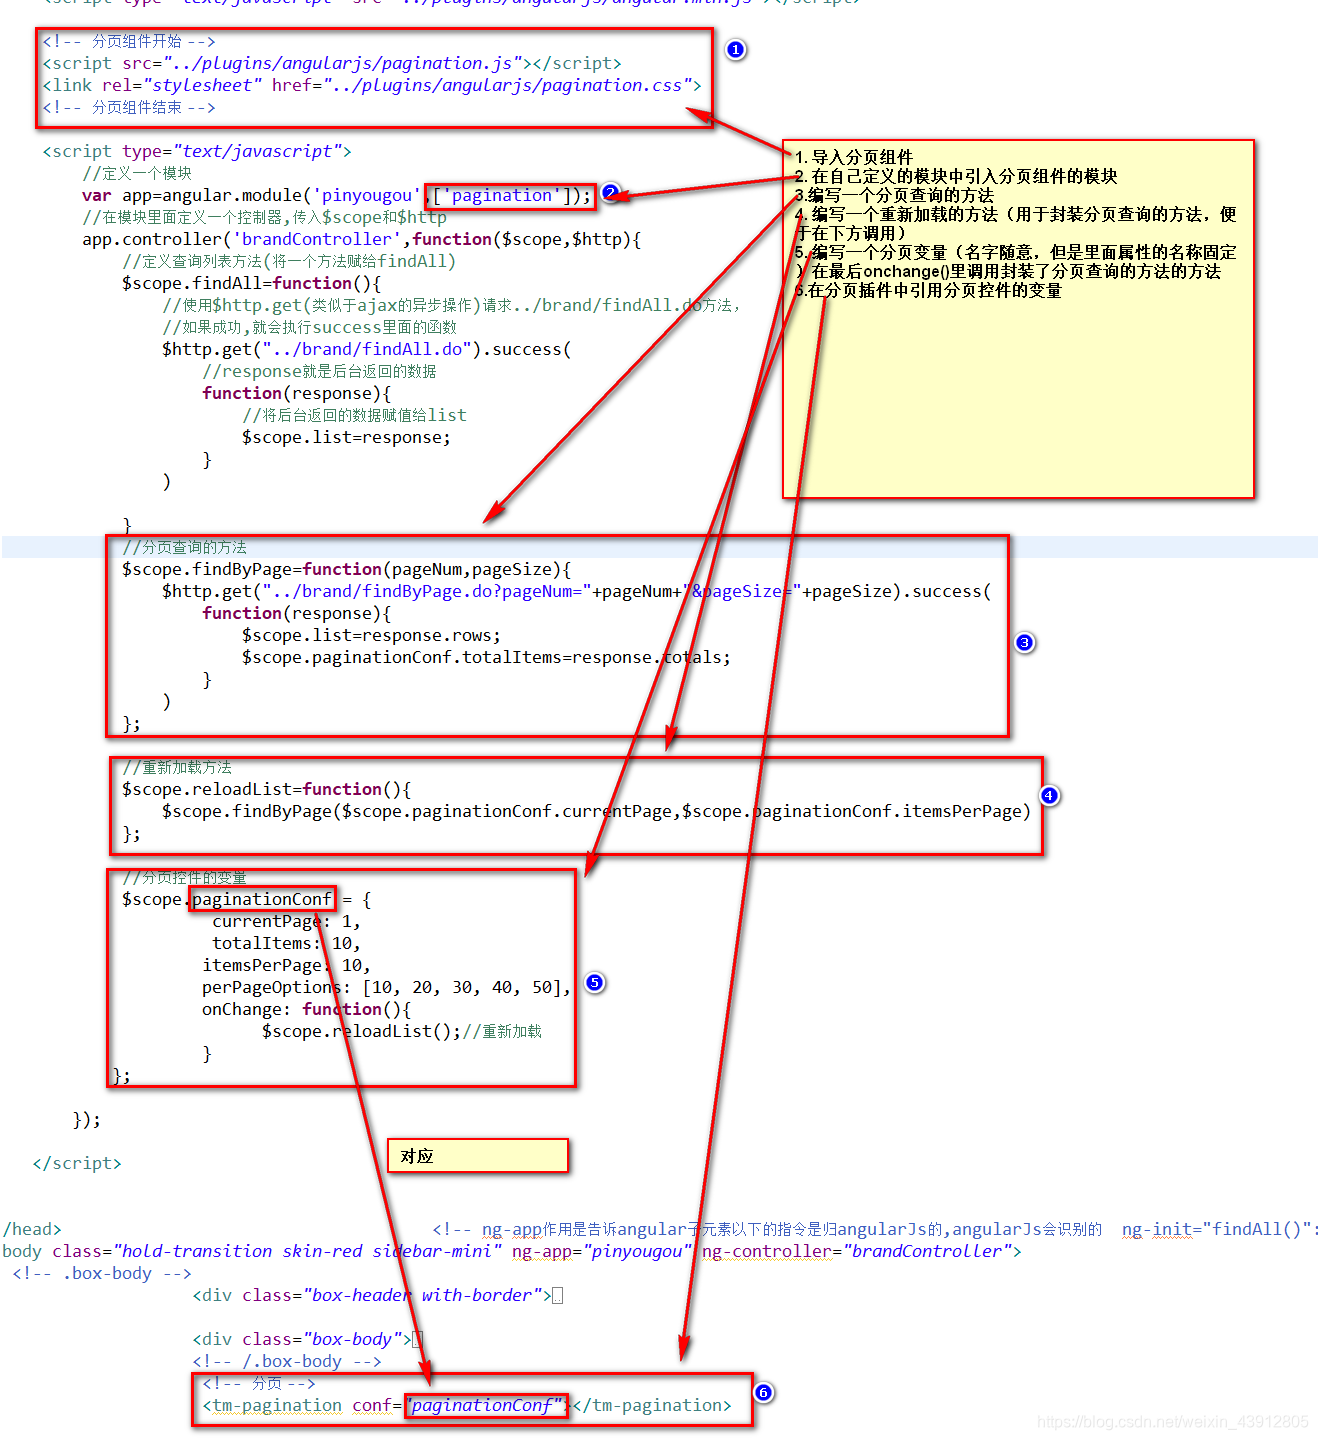
AngularJS1分页插件
1. 在页面引入js和css
<!-- 分页组件开始 -->
	<script src="../plugins/angularjs/pagination.js"></script>
	<link rel="stylesheet" href="../plugins/angularjs/pagination.css">
	<!-- 分页组件结束 -->
2. 定义一个分页的对象,里面存放分页参数
//分页控件的变量
$scope.paginationConf = {
		 currentPage: 1,//当前页
		 totalItems: 10,//总页数
		 itemsPerPage: 10,//每页显示记录数
		 perPageOptions: [10, 20, 30, 40, 50],//调整每页显示记录数
		 onChange: function(){//当改变时调用里面的方法
		       $scope.reloadList();//重新加载
		 }
};
3. 调用的$scope.reloadList();//重新加载方法
//重新加载方法
$scope.reloadList=function(){
	$scope.findByPage($scope.paginationConf.currentPage,$scope.paginationConf.itemsPerPage)
};
4. 调用的$scope.findByPage($scope.paginationConf.currentPage,$scope.paginationConf.itemsPerPage)方法
//分页查询的方法
$scope.findByPage=function(pageNum,pageSize){
		$http.get("../brand/findByPage.do?pageNum="+pageNum+"&pageSize="+pageSize).success(
			function(response){
				$scope.list=response.rows;
				$scope.paginationConf.totalItems=response.totals;
			}
		)
	};
5. 在页面下方引入分页标签
<tm-pagination conf="paginationConf"></tm-pagination>
6. 分析流程
AngularJs使用select2下拉列表插件
1. 简介
-
注意点
-
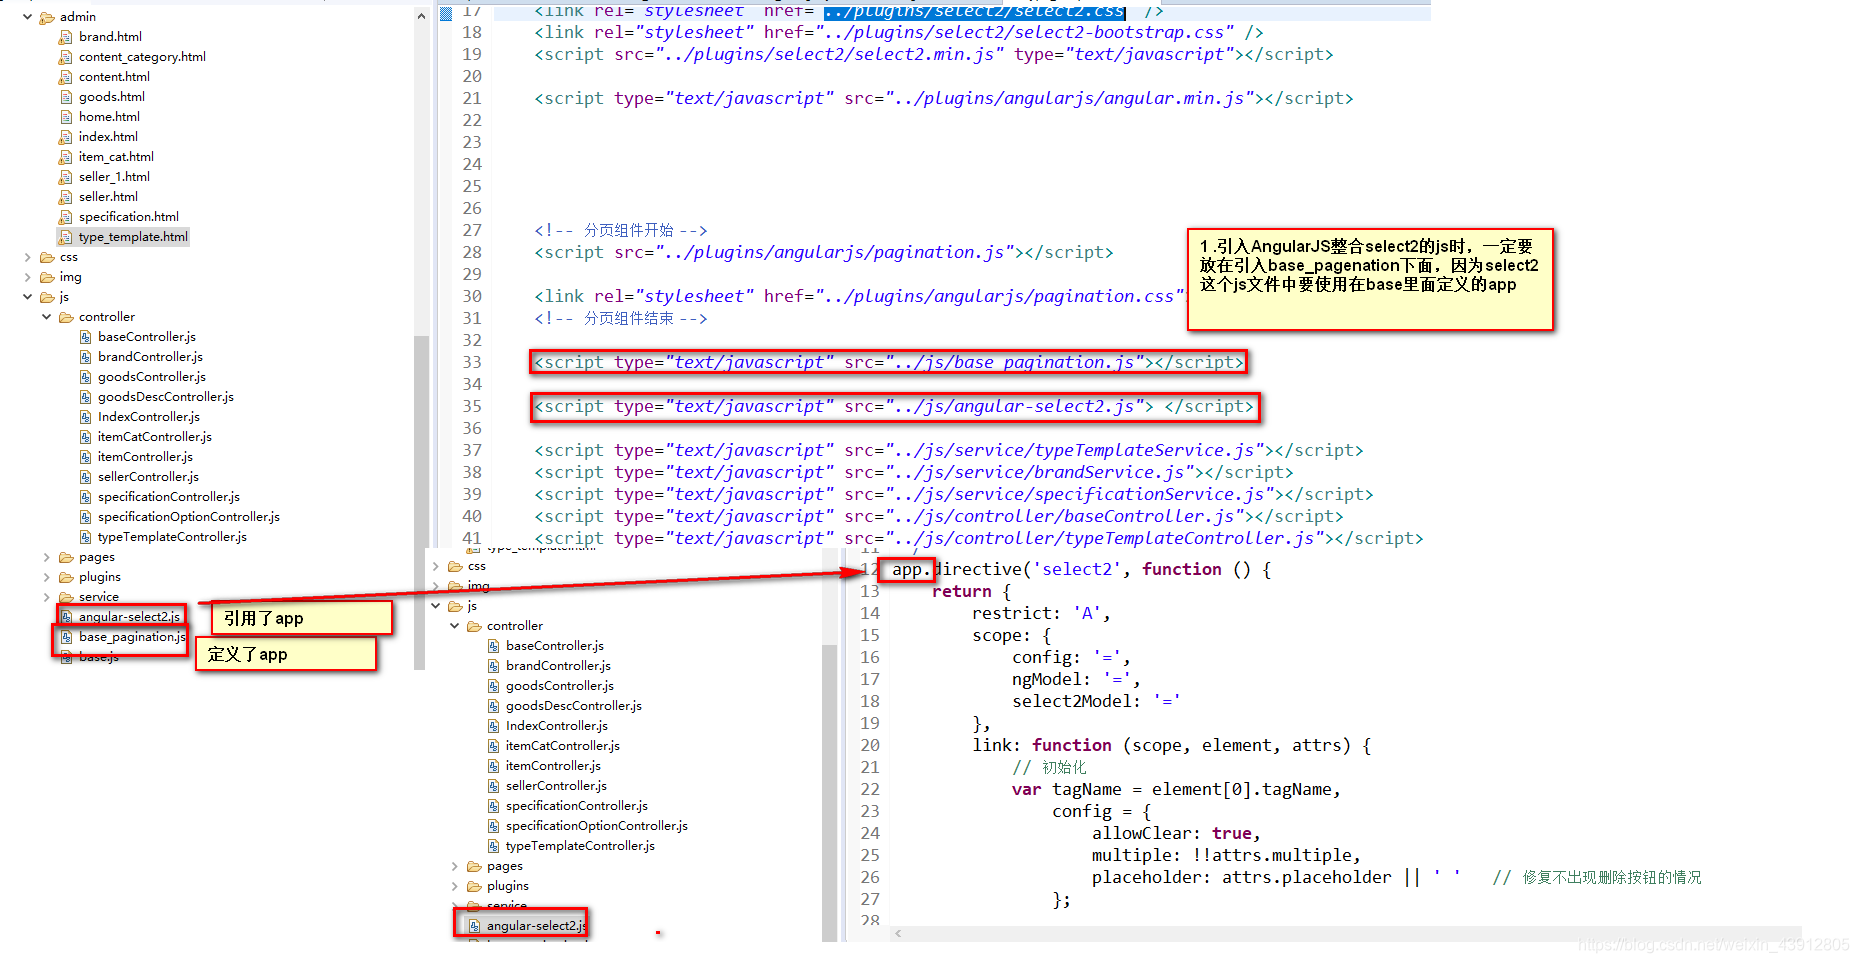
需要引入的文件
<link rel="stylesheet" href="../plugins/select2/select2.css" />
<link rel="stylesheet" href="../plugins/select2/select2-bootstrap.css" />
<script src="../plugins/select2/select2.min.js" type="text/javascript"></script>
<script type="text/javascript" src="../js/angular-select2.js">  </script>
- 在页面的引用

- 识别的数据

注意:前面必须要data
如何在后端返回数据时返回data后面类型的数据
一个list<map>:map集合里面装id:值 text:值
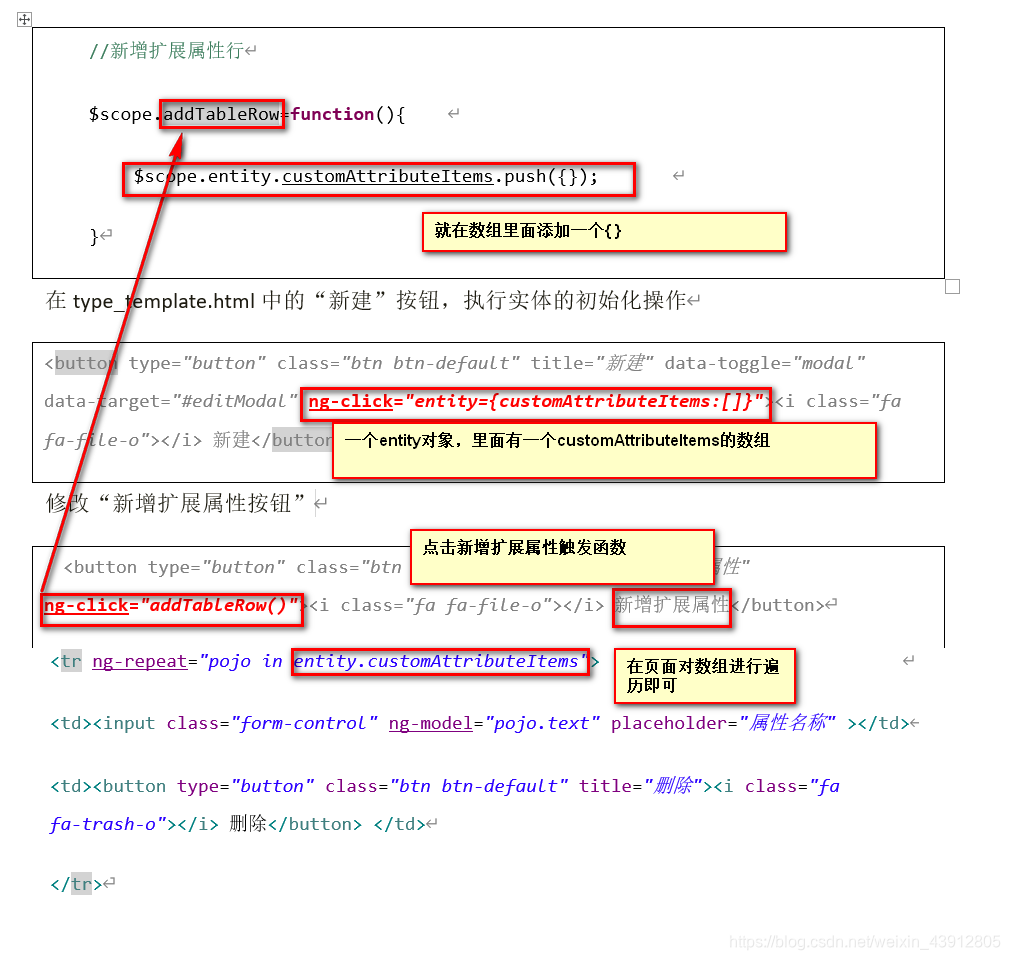
实现点击按钮页面就加一行
- 实例

- 实现思路
- 点击按钮删除一行

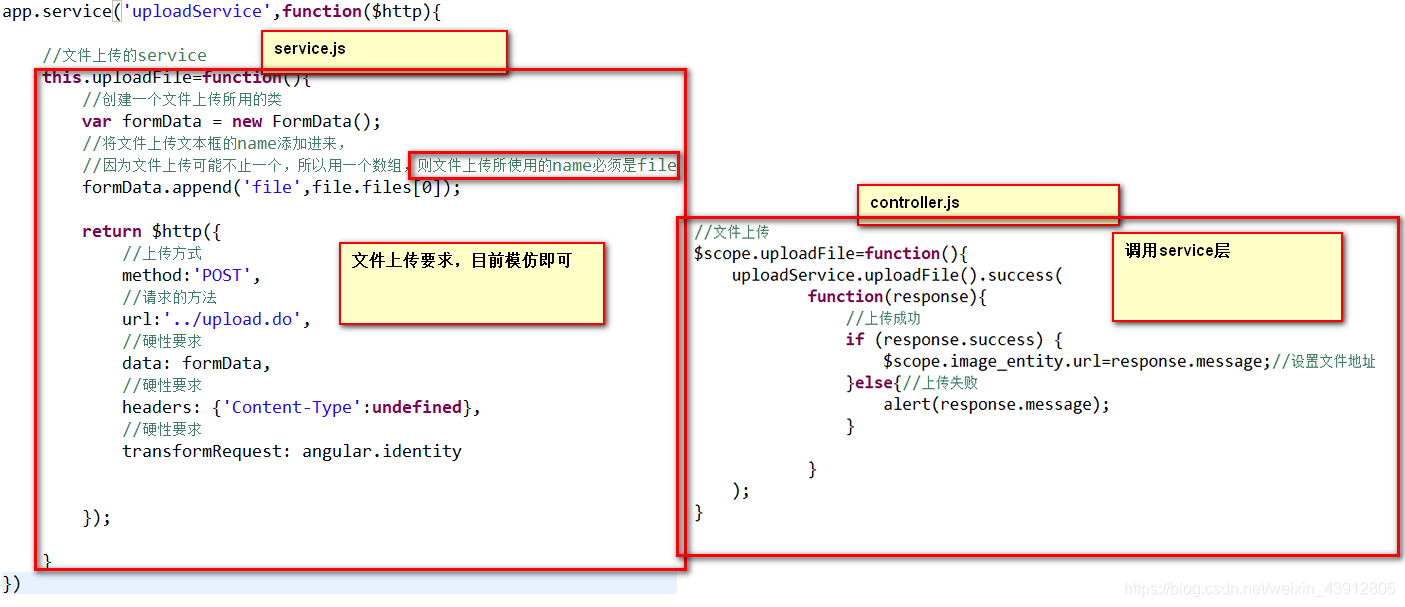
AngularJS进行图片上传
- js代码
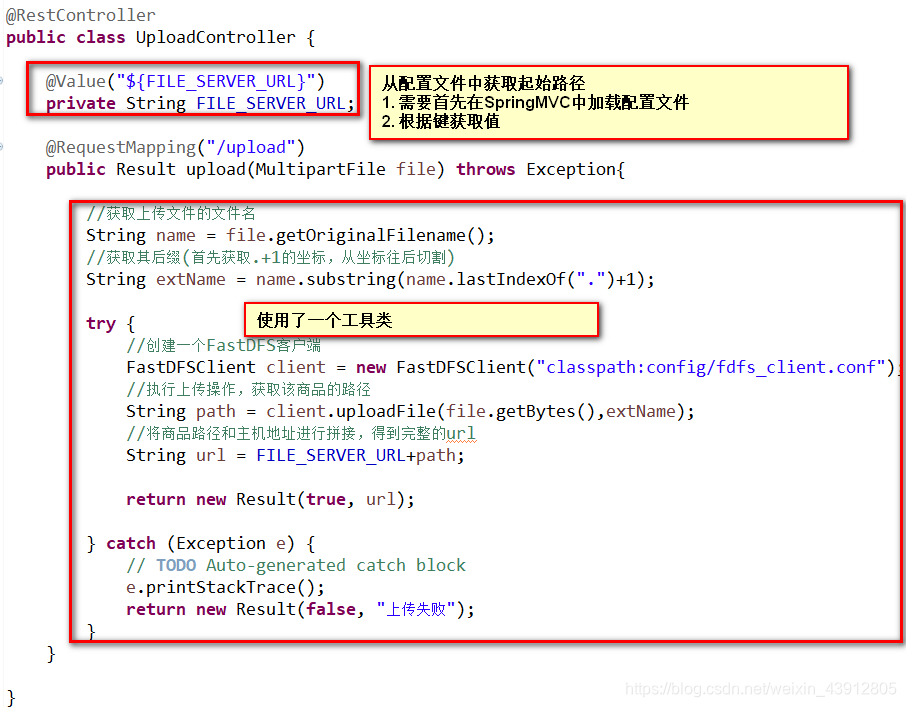
- 后端代码
- 工具类
package util;

import org.csource.common.NameValuePair;

import org.csource.fastdfs.ClientGlobal;
import org.csource.fastdfs.StorageClient1;
import org.csource.fastdfs.StorageServer;
import org.csource.fastdfs.TrackerClient;
import org.csource.fastdfs.TrackerServer;

public class FastDFSClient {

	private TrackerClient trackerClient = null;
	private TrackerServer trackerServer = null;
	private StorageServer storageServer = null;
	private StorageClient1 storageClient = null;

	public FastDFSClient(String conf) throws Exception {
		if (conf.contains("classpath:")) {
			conf = conf.replace("classpath:", this.getClass().getResource("/").getPath());
		}
		ClientGlobal.init(conf);
		trackerClient = new TrackerClient();
		trackerServer = trackerClient.getConnection();
		storageServer = null;
		storageClient = new StorageClient1(trackerServer, storageServer);
	}

	/**
	 * 上传文件方法
	 * <p>Title: uploadFile</p>
	 * <p>Description: </p>
	 * @param fileName 文件全路径
	 * @param extName 文件扩展名,不包含(.)
	 * @param metas 文件扩展信息
	 * @return
	 * @throws Exception
	 */
	public String uploadFile(String fileName, String extName, NameValuePair[] metas) throws Exception {
		String result = storageClient.upload_file1(fileName, extName, metas);
		return result;
	}

	public String uploadFile(String fileName) throws Exception {
		return uploadFile(fileName, null, null);
	}

	public String uploadFile(String fileName, String extName) throws Exception {
		return uploadFile(fileName, extName, null);
	}

	/**
	 * 上传文件方法
	 * <p>Title: uploadFile</p>
	 * <p>Description: </p>
	 * @param fileContent 文件的内容,字节数组
	 * @param extName 文件扩展名
	 * @param metas 文件扩展信息
	 * @return
	 * @throws Exception
	 */
	public String uploadFile(byte[] fileContent, String extName, NameValuePair[] metas) throws Exception {

		String result = storageClient.upload_file1(fileContent, extName, metas);
		return result;
	}

	public String uploadFile(byte[] fileContent) throws Exception {
		return uploadFile(fileContent, null, null);
	}

	public String uploadFile(byte[] fileContent, String extName) throws Exception {
		return uploadFile(fileContent, extName, null);
	}
}
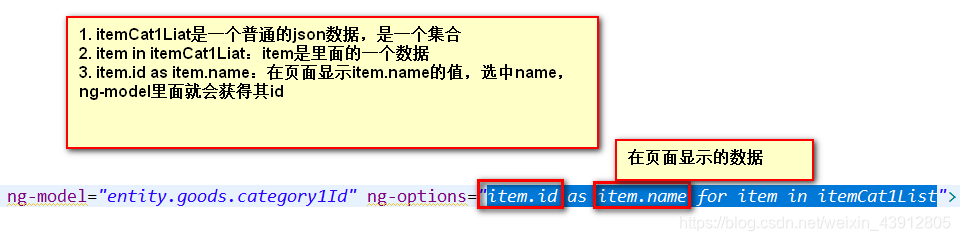
AngularJS实现下拉列表单选
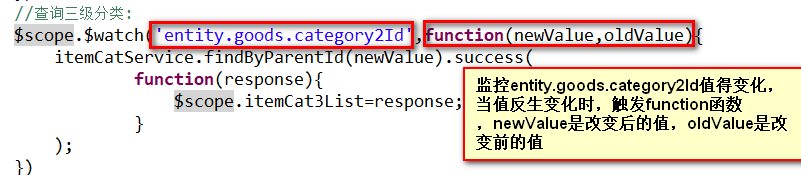
变量监控:
$scope.$watch(‘要监控的变量’,function(newValue,oldValue))
- 可用于做省市联动
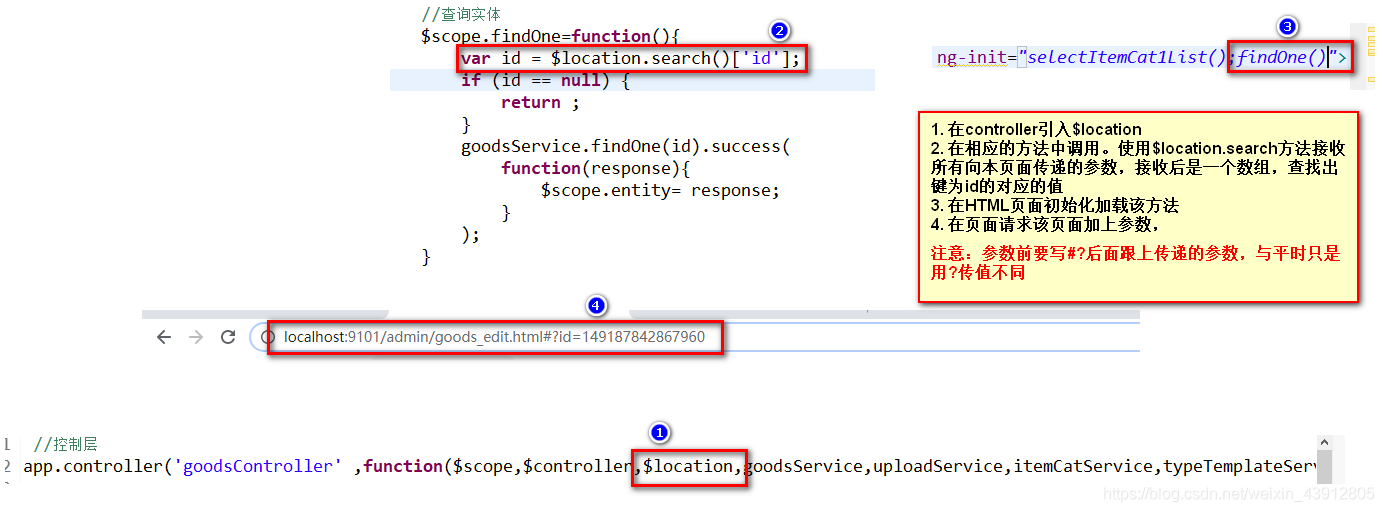
AngularJS静态页面跳转传递参数
判断是否选中
- ng-checked(调用的方法)
方法返回值为true则选中,为false则不选中
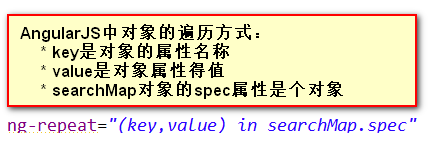
对象的遍历
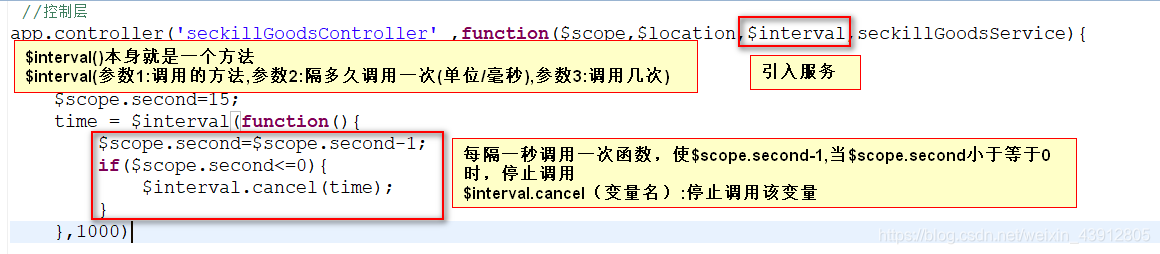
使用$interval服务完成倒计时
1. 入门案例
2. 进行倒计时
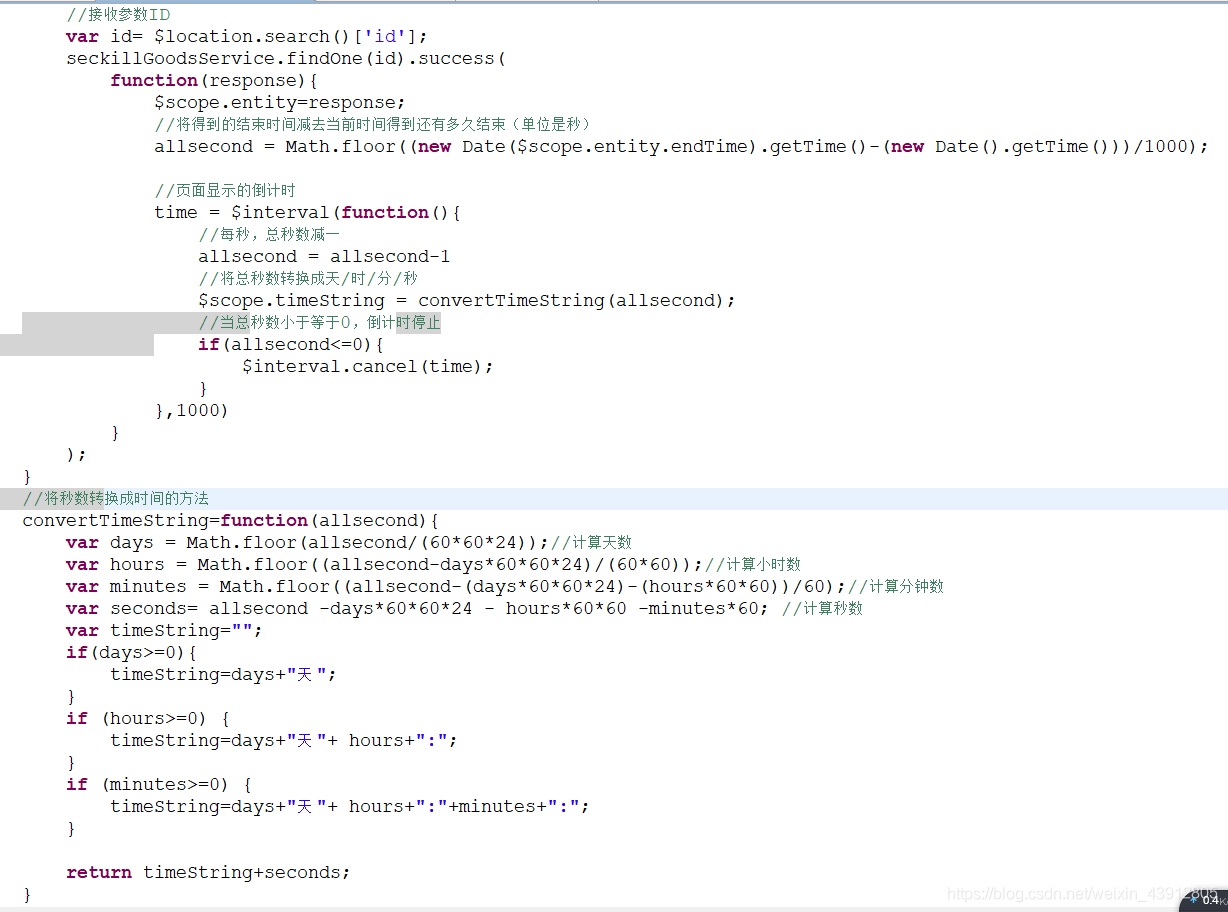
//查询商品
$scope.findOne=function(){
	//接收参数ID
	var id= $location.search()['id'];
	seckillGoodsService.findOne(id).success(
		function(response){
			$scope.entity=response;
			//将得到的结束时间减去当前时间得到还有多久结束(单位是秒)
			allsecond = Math.floor((new Date($scope.entity.endTime).getTime()-(new Date().getTime()))/1000);

			//页面显示的倒计时
			time = $interval(function(){
				//每秒,总秒数减一
				allsecond = allsecond-1
				//将总秒数转换成天/时/分/秒
				$scope.timeString = convertTimeString(allsecond);
				//当总秒数小于等于0,倒计时停止
				if(allsecond<=0){
					$interval.cancel(time);
				}
			},1000)
		}
	);
}
//将秒数转换成时间的方法
convertTimeString=function(allsecond){
	var days = Math.floor(allsecond/(60*60*24));//计算天数
	var hours = Math.floor((allsecond-days*60*60*24)/(60*60));//计算小时数
	var minutes = Math.floor((allsecond-(days*60*60*24)-(hours*60*60))/60);//计算分钟数
	var seconds= allsecond -days*60*60*24 - hours*60*60 -minutes*60; //计算秒数
	var timeString="";
	if(days>=0){
		timeString=days+"天 ";
	}
	if (hours>=0) {
		timeString=days+"天 "+ hours+":";
	}
	if (minutes>=0) {
		timeString=days+"天 "+ hours+":"+minutes+":";
	}

	return timeString+seconds;
}


 139
139


 被折叠的 条评论
为什么被折叠?
被折叠的 条评论
为什么被折叠?
 到【灌水乐园】发言


