


通过kk部署k8sp
这里先说一下,以下都是我从 https://www.kubesphere.io/zh/ 的中文文档里抄的, 只是有些文档写法和步骤和我个人步骤不和谐,仅仅只是做了个整改. 如果想看原版,直接去KubeSphere 的中文文档即可.
环境准备
| 主机名 | IP | CPU | 内存 | 系统盘 | 数据盘 | 用途 |
|---|---|---|---|---|---|---|
| node101 | 192.168.10.101 | 4 | 8 | 40 | 40 | 离线环境 k8s-control-plane |
| node102 | 192.168.10.102 | 4 | 8 | 40 | 40 | 离线环境 k8s-control-plane |
| node103 | 192.168.10.103 | 4 | 8 | 40 | 40 | 离线环境 k8s-control-plane |
| node104 | 192.168.10.104 | 4 | 8 | 40 | 40 | 镜像仓库节点+联网主机制作离线包 |
实战环境涉及软件版本信息
- 操作系统:CentOS7.9
- Kubernetes:v1.28.8
- KubeKey: v3.1.1
1. 制作离线部署资源
本文在node104进行离线资源部署和制作, 并再利用其制作离线仓库,在该节点下载 KubeKey 最新版(v3.1.1),用来制作离线部署资源包。
1.1 下载 KubeKey
- 下载最新版的 KubeKey
mkdir -p /data/kubekey
cd /data/kubekey

# 选择中文区下载(访问 GitHub 受限时使用)
export KKZONE=cn

# 执行下载命令,获取最新版的 kk(受限于网络,有时需要执行多次)
curl -L https://get-kk.kubesphere.io | sh -
# 也可以使用下面的命令指定具体版本
curl -sfL https://get-kk.kubesphere.io | VERSION=v3.1.1 sh -
1.2 创建 manifests 模板文件
KubeKey v3.1.0 之前, manifests 文件需要根据模板手动编写, 现在可以通过 Kubekey 的 create manifest 命令自动生成 manifests 模板。
create manifest支持的参数如下
$ ./kk create manifest --help
Create an offline installation package configuration file

Usage:
  kk create manifest [flags]

Flags:
      --arch stringArray         Specify a supported arch (default [amd64])
      --debug                    Print detailed information
  -f, --filename string          Specify a manifest file path
  -h, --help                     help for manifest
      --ignore-err               Ignore the error message, remove the host which reported error and force to continue
      --kubeconfig string        Specify a kubeconfig file
      --name string              Specify a name of manifest object (default "sample")
      --namespace string         KubeKey namespace to use (default "kubekey-system")
      --with-kubernetes string   Specify a supported version of kubernetes
      --with-registry            Specify a supported registry components
  -y, --yes                      Skip confirm check
官方示例(支持多集群、多架构)[示例]
# 示例:创建包含 kubernetes v1.24.17,v1.25.16,且 cpu 架构为 amd64、arm64 的 manifests 文件。
./kk create manifest --with-kubernetes v1.24.17,v1.25.16 --arch amd64 --arch arm64
- 创建一个 amd64 架构 kubernetes v1.28.8 的 manifests 文件 , 自动生成后自己改名为ksp-v3.4.1-v1.28.8-manifest.yaml
./kk create manifest --name opsxlab --with-kubernetes v1.28.8 --arch amd64 --with-registry "docker registry"
-
修改后的配置文件,最终的 manifest 文件 ksp-v3.4.1-v1.28.8-manifest.yaml。
apiVersion: kubekey.kubesphere.io/v1alpha2
kind: Manifest
metadata:
  name: sample
spec:
  arches:
  - amd64
  operatingSystems:
  - arch: amd64
    type: linux
    id: centos
    version: "7"
    osImage: CentOS Linux 7 (Core)
    repository:
      iso:
        localPath: "/data/kubekey/centos7-rpms-amd64.iso"
        url:
  kubernetesDistributions:
  - type: kubernetes
    version: v1.28.8
  components:
    helm:
      version: v3.14.3
    cni:
      version: v1.2.0
    etcd:
      version: v3.5.13
    containerRuntimes:
    - type: docker
      version: 24.0.9
    - type: containerd
      version: 1.7.13
    calicoctl:
      version: v3.27.3
    crictl:
      version: v1.29.0
    docker-registry:
      version: "2"
    harbor:
      version: v2.5.3
    docker-compose:
      version: v2.2.2
  images:
  - registry.cn-beijing.aliyuncs.com/kubesphereio/pause:3.9
  - registry.cn-beijing.aliyuncs.com/kubesphereio/kube-apiserver:v1.28.8
  - registry.cn-beijing.aliyuncs.com/kubesphereio/kube-controller-manager:v1.28.8
  - registry.cn-beijing.aliyuncs.com/kubesphereio/kube-scheduler:v1.28.8
  - registry.cn-beijing.aliyuncs.com/kubesphereio/kube-proxy:v1.28.8
  - registry.cn-beijing.aliyuncs.com/kubesphereio/coredns:1.9.3
  - registry.cn-beijing.aliyuncs.com/kubesphereio/k8s-dns-node-cache:1.22.20
  - registry.cn-beijing.aliyuncs.com/kubesphereio/kube-controllers:v3.27.3
  - registry.cn-beijing.aliyuncs.com/kubesphereio/cni:v3.27.3
  - registry.cn-beijing.aliyuncs.com/kubesphereio/node:v3.27.3
  - registry.cn-beijing.aliyuncs.com/kubesphereio/pod2daemon-flexvol:v3.27.3
  - registry.cn-beijing.aliyuncs.com/kubesphereio/typha:v3.27.3
  - registry.cn-beijing.aliyuncs.com/kubesphereio/flannel:v0.21.3
  - registry.cn-beijing.aliyuncs.com/kubesphereio/flannel-cni-plugin:v1.1.2
  - registry.cn-beijing.aliyuncs.com/kubesphereio/hybridnet:v0.8.6
  - registry.cn-beijing.aliyuncs.com/kubesphereio/multus-cni:v3.8
  - registry.cn-beijing.aliyuncs.com/kubesphereio/provisioner-localpv:3.3.0
  - registry.cn-beijing.aliyuncs.com/kubesphereio/linux-utils:3.3.0
  - registry.cn-beijing.aliyuncs.com/kubesphereio/haproxy:2.9.6-alpine
  - registry.cn-beijing.aliyuncs.com/kubesphereio/node-feature-discovery:v0.10.0
  - registry.cn-beijing.aliyuncs.com/kubesphereio/ks-installer:v3.4.1
  - registry.cn-beijing.aliyuncs.com/kubesphereio/ks-apiserver:v3.4.1
  - registry.cn-beijing.aliyuncs.com/kubesphereio/ks-console:v3.4.1
  - registry.cn-beijing.aliyuncs.com/kubesphereio/ks-controller-manager:v3.4.1
  - registry.cn-beijing.aliyuncs.com/kubesphereio/kubectl:v1.20.0
  - registry.cn-beijing.aliyuncs.com/kubesphereio/kubectl:v1.22.0
  - registry.cn-beijing.aliyuncs.com/kubesphereio/kubefed:v0.8.1
  - registry.cn-beijing.aliyuncs.com/kubesphereio/tower:v0.2.1
  - registry.cn-beijing.aliyuncs.com/kubesphereio/minio:RELEASE.2019-08-07T01-59-21Z
  - registry.cn-beijing.aliyuncs.com/kubesphereio/mc:RELEASE.2019-08-07T23-14-43Z
  - registry.cn-beijing.aliyuncs.com/kubesphereio/snapshot-controller:v4.0.0
  - registry.cn-beijing.aliyuncs.com/kubesphereio/nginx-ingress-controller:v1.3.1
  - registry.cn-beijing.aliyuncs.com/kubesphereio/defaultbackend-amd64:1.4
  - registry.cn-beijing.aliyuncs.com/kubesphereio/metrics-server:v0.4.2
  - registry.cn-beijing.aliyuncs.com/kubesphereio/redis:5.0.14-alpine
  - registry.cn-beijing.aliyuncs.com/kubesphereio/haproxy:2.0.25-alpine
  - registry.cn-beijing.aliyuncs.com/kubesphereio/alpine:3.14
  - registry.cn-beijing.aliyuncs.com/kubesphereio/openldap:1.3.0
  - registry.cn-beijing.aliyuncs.com/kubesphereio/netshoot:v1.0
  - registry.cn-beijing.aliyuncs.com/kubesphereio/cloudcore:v1.13.0
  - registry.cn-beijing.aliyuncs.com/kubesphereio/iptables-manager:v1.13.0
  - registry.cn-beijing.aliyuncs.com/kubesphereio/edgeservice:v0.3.0
  - registry.cn-beijing.aliyuncs.com/kubesphereio/gatekeeper:v3.5.2
  - registry.cn-beijing.aliyuncs.com/kubesphereio/openpitrix-jobs:v3.3.2
  - registry.cn-beijing.aliyuncs.com/kubesphereio/devops-apiserver:ks-v3.4.1
  - registry.cn-beijing.aliyuncs.com/kubesphereio/devops-controller:ks-v3.4.1
  - registry.cn-beijing.aliyuncs.com/kubesphereio/devops-tools:ks-v3.4.1
  - registry.cn-beijing.aliyuncs.com/kubesphereio/ks-jenkins:v3.4.0-2.319.3-1
  - registry.cn-beijing.aliyuncs.com/kubesphereio/inbound-agent:4.10-2
  - registry.cn-beijing.aliyuncs.com/kubesphereio/builder-base:v3.2.2
  - registry.cn-beijing.aliyuncs.com/kubesphereio/builder-nodejs:v3.2.0
  - registry.cn-beijing.aliyuncs.com/kubesphereio/builder-maven:v3.2.0
  - registry.cn-beijing.aliyuncs.com/kubesphereio/builder-maven:v3.2.1-jdk11
  - registry.cn-beijing.aliyuncs.com/kubesphereio/builder-python:v3.2.0
  - registry.cn-beijing.aliyuncs.com/kubesphereio/builder-go:v3.2.0
  - registry.cn-beijing.aliyuncs.com/kubesphereio/builder-go:v3.2.2-1.16
  - registry.cn-beijing.aliyuncs.com/kubesphereio/builder-go:v3.2.2-1.17
  - registry.cn-beijing.aliyuncs.com/kubesphereio/builder-go:v3.2.2-1.18
  - registry.cn-beijing.aliyuncs.com/kubesphereio/builder-base:v3.2.2-podman
  - registry.cn-beijing.aliyuncs.com/kubesphereio/builder-nodejs:v3.2.0-podman
  - registry.cn-beijing.aliyuncs.com/kubesphereio/builder-maven:v3.2.0-podman
  - registry.cn-beijing.aliyuncs.com/kubesphereio/builder-maven:v3.2.1-jdk11-podman
  - registry.cn-beijing.aliyuncs.com/kubesphereio/builder-python:v3.2.0-podman
  - registry.cn-beijing.aliyuncs.com/kubesphereio/builder-go:v3.2.0-podman
  - registry.cn-beijing.aliyuncs.com/kubesphereio/builder-go:v3.2.2-1.16-podman
  - registry.cn-beijing.aliyuncs.com/kubesphereio/builder-go:v3.2.2-1.17-podman
  - registry.cn-beijing.aliyuncs.com/kubesphereio/builder-go:v3.2.2-1.18-podman
  - registry.cn-beijing.aliyuncs.com/kubesphereio/s2ioperator:v3.2.1
  - registry.cn-beijing.aliyuncs.com/kubesphereio/s2irun:v3.2.0
  - registry.cn-beijing.aliyuncs.com/kubesphereio/s2i-binary:v3.2.0
  - registry.cn-beijing.aliyuncs.com/kubesphereio/tomcat85-java11-centos7:v3.2.0
  - registry.cn-beijing.aliyuncs.com/kubesphereio/tomcat85-java11-runtime:v3.2.0
  - registry.cn-beijing.aliyuncs.com/kubesphereio/tomcat85-java8-centos7:v3.2.0
  - registry.cn-beijing.aliyuncs.com/kubesphereio/tomcat85-java8-runtime:v3.2.0
  - registry.cn-beijing.aliyuncs.com/kubesphereio/java-11-centos7:v3.2.0
  - registry.cn-beijing.aliyuncs.com/kubesphereio/java-8-centos7:v3.2.0
  - registry.cn-beijing.aliyuncs.com/kubesphereio/java-8-runtime:v3.2.0
  - registry.cn-beijing.aliyuncs.com/kubesphereio/java-11-runtime:v3.2.0
  - registry.cn-beijing.aliyuncs.com/kubesphereio/nodejs-8-centos7:v3.2.0
  - registry.cn-beijing.aliyuncs.com/kubesphereio/nodejs-6-centos7:v3.2.0
  - registry.cn-beijing.aliyuncs.com/kubesphereio/nodejs-4-centos7:v3.2.0
  - registry.cn-beijing.aliyuncs.com/kubesphereio/python-36-centos7:v3.2.0
  - registry.cn-beijing.aliyuncs.com/kubesphereio/python-35-centos7:v3.2.0
  - registry.cn-beijing.aliyuncs.com/kubesphereio/python-34-centos7:v3.2.0
  - registry.cn-beijing.aliyuncs.com/kubesphereio/python-27-centos7:v3.2.0
  - registry.cn-beijing.aliyuncs.com/kubesphereio/argocd:v2.3.3
  - registry.cn-beijing.aliyuncs.com/kubesphereio/argocd-applicationset:v0.4.1
  - registry.cn-beijing.aliyuncs.com/kubesphereio/dex:v2.30.2
  - registry.cn-beijing.aliyuncs.com/kubesphereio/redis:6.2.6-alpine
  - registry.cn-beijing.aliyuncs.com/kubesphereio/configmap-reload:v0.7.1
  - registry.cn-beijing.aliyuncs.com/kubesphereio/prometheus:v2.39.1
  - registry.cn-beijing.aliyuncs.com/kubesphereio/prometheus-config-reloader:v0.55.1
  - registry.cn-beijing.aliyuncs.com/kubesphereio/prometheus-operator:v0.55.1
  - registry.cn-beijing.aliyuncs.com/kubesphereio/kube-rbac-proxy:v0.11.0
  - registry.cn-beijing.aliyuncs.com/kubesphereio/kube-state-metrics:v2.6.0
  - registry.cn-beijing.aliyuncs.com/kubesphereio/node-exporter:v1.3.1
  - registry.cn-beijing.aliyuncs.com/kubesphereio/alertmanager:v0.23.0
  - registry.cn-beijing.aliyuncs.com/kubesphereio/thanos:v0.31.0
  - registry.cn-beijing.aliyuncs.com/kubesphereio/grafana:8.3.3
  - registry.cn-beijing.aliyuncs.com/kubesphereio/kube-rbac-proxy:v0.11.0
  - registry.cn-beijing.aliyuncs.com/kubesphereio/notification-manager-operator:v2.3.0
  - registry.cn-beijing.aliyuncs.com/kubesphereio/notification-manager:v2.3.0
  - registry.cn-beijing.aliyuncs.com/kubesphereio/notification-tenant-sidecar:v3.2.0
  - registry.cn-beijing.aliyuncs.com/kubesphereio/elasticsearch-curator:v5.7.6
  - registry.cn-beijing.aliyuncs.com/kubesphereio/opensearch-curator:v0.0.5
  - registry.cn-beijing.aliyuncs.com/kubesphereio/elasticsearch-oss:6.8.22
  - registry.cn-beijing.aliyuncs.com/kubesphereio/opensearch:2.6.0
  - registry.cn-beijing.aliyuncs.com/kubesphereio/opensearch-dashboards:2.6.0
  - registry.cn-beijing.aliyuncs.com/kubesphereio/fluentbit-operator:v0.14.0
  - registry.cn-beijing.aliyuncs.com/kubesphereio/docker:19.03
  - registry.cn-beijing.aliyuncs.com/kubesphereio/fluent-bit:v1.9.4
  - registry.cn-beijing.aliyuncs.com/kubesphereio/log-sidecar-injector:v1.2.0
  - registry.cn-beijing.aliyuncs.com/kubesphereio/filebeat:6.7.0
  - registry.cn-beijing.aliyuncs.com/kubesphereio/kube-events-operator:v0.6.0
  - registry.cn-beijing.aliyuncs.com/kubesphereio/kube-events-exporter:v0.6.0
  - registry.cn-beijing.aliyuncs.com/kubesphereio/kube-events-ruler:v0.6.0
  - registry.cn-beijing.aliyuncs.com/kubesphereio/kube-auditing-operator:v0.2.0
  - registry.cn-beijing.aliyuncs.com/kubesphereio/kube-auditing-webhook:v0.2.0
  - registry.cn-beijing.aliyuncs.com/kubesphereio/pilot:1.14.6
  - registry.cn-beijing.aliyuncs.com/kubesphereio/proxyv2:1.14.6
  - registry.cn-beijing.aliyuncs.com/kubesphereio/jaeger-operator:1.29
  - registry.cn-beijing.aliyuncs.com/kubesphereio/jaeger-agent:1.29
  - registry.cn-beijing.aliyuncs.com/kubesphereio/jaeger-collector:1.29
  - registry.cn-beijing.aliyuncs.com/kubesphereio/jaeger-query:1.29
  - registry.cn-beijing.aliyuncs.com/kubesphereio/jaeger-es-index-cleaner:1.29
  - registry.cn-beijing.aliyuncs.com/kubesphereio/kiali-operator:v1.50.1
  - registry.cn-beijing.aliyuncs.com/kubesphereio/kiali:v1.50
  - registry.cn-beijing.aliyuncs.com/kubesphereio/busybox:1.31.1
  - registry.cn-beijing.aliyuncs.com/kubesphereio/nginx:1.14-alpine
  - registry.cn-beijing.aliyuncs.com/kubesphereio/wget:1.0
  - registry.cn-beijing.aliyuncs.com/kubesphereio/hello:plain-text
  - registry.cn-beijing.aliyuncs.com/kubesphereio/wordpress:4.8-apache
  - registry.cn-beijing.aliyuncs.com/kubesphereio/hpa-example:latest
  - registry.cn-beijing.aliyuncs.com/kubesphereio/fluentd:v1.4.2-2.0
  - registry.cn-beijing.aliyuncs.com/kubesphereio/perl:latest
  - registry.cn-beijing.aliyuncs.com/kubesphereio/examples-bookinfo-productpage-v1:1.16.2
  - registry.cn-beijing.aliyuncs.com/kubesphereio/examples-bookinfo-reviews-v1:1.16.2
  - registry.cn-beijing.aliyuncs.com/kubesphereio/examples-bookinfo-reviews-v2:1.16.2
  - registry.cn-beijing.aliyuncs.com/kubesphereio/examples-bookinfo-details-v1:1.16.2
  - registry.cn-beijing.aliyuncs.com/kubesphereio/examples-bookinfo-ratings-v1:1.16.3
  - registry.cn-beijing.aliyuncs.com/kubesphereio/scope:1.13.0
  registry:
    auths: {}
1.3 获取操作系统依赖包
本实验环境使用的操作系统是 x64 的 CentOS 7.9,所以只下载 centos7 的操作系统依赖包,其他操作系统请读者在 KubeKey releases 页面下载。
执行下面的命令,在能联网的部署服务器上执行下载。网络访问受限时,也可以通过其他方式,将该 ISO 下载后放到制作离线镜像的服务器的 /root/kubekey 目录下。
wget https://github.com/kubesphere/kubekey/releases/download/v3.0.12/centos7-rpms-amd64.iso
如果有个更新的可以在其他最新的包中获取,这里使用的还是v3.0.12里面的,建议自己再上面下载更新版本的.
最终的 ISO(centos7-rpms-amd64.iso,314 MB)实际信息如下:
# 查看文件大小
[root@ksp-deploy kubekey]# ll -h centos7-rpms-amd64.iso
-rw-r--r--. 1 root root 315M Oct 23 18:21 centos7-rpms-amd64.iso

# 验证 sha256sum,确保 ISO 在下载过程中没出问题(官方提供的 sha256sum 信息在 https://github.com/kubesphere/kubekey/releases/download/v3.0.12/centos7-rpms.iso.sha256sum.txt)
[root@ksp-deploy kubekey]# sha256sum centos7-rpms-amd64.iso
2588fbc12acc9f3b95766a0c20382988f2a21da2a36e444b7e1a0f523e75f858  centos7-rpms-amd64.iso
1.4 导出制品 artifact
根据生成的 manifest,执行下面的命令制作制品(artifact)。
export KKZONE=cn
./kk artifact export -m ksp-v3.4.1-v1.28.8-manifest.yaml -o ksp-v3.4.1-v1.28-artifact.tar.gz
正确执行后,输出结果如下 :(受限于篇幅,仅展示最终结果)
....
06:05:28 CST success: [LocalHost]
06:05:28 CST [ChownOutputModule] Chown output file
06:05:28 CST success: [LocalHost]
06:05:28 CST [ChownWorkerModule] Chown ./kubekey dir
06:05:28 CST success: [LocalHost]
06:05:28 CST Pipeline[ArtifactExportPipeline] execute successfully
制品制作完成后,查看制品大小(全镜像,制品包居然达到了 13G,生产环境还是有选择的裁剪吧)上面manifest文件中的镜像 不需要的可以删掉。
$ ls -lh ksp-v3.4.1-v1.28-artifact.tar.gz
-rw-r--r-- 1 root root 13G May 20 06:05 ksp-v3.4.1-v1.28-artifact.tar.gz
我自己整了个小的,可以如下 没有任何不必要的,甚至没有ks:
ksp-v1.28.8-manifest-opsxlab.yaml
apiVersion: kubekey.kubesphere.io/v1alpha2
kind: Manifest
metadata:
  name: opsxlab
spec:
  arches:
  - amd64
  operatingSystems:
  - arch: amd64
    type: linux
    id: centos
    version: "7"
    osImage: CentOS Linux 7 (Core)
    repository:
      iso:
        localPath: "/data/kubekey/centos7-rpms-amd64.iso"
        url:
  kubernetesDistributions:
  - type: kubernetes
    version: v1.28.8
  components:
    helm:
      version: v3.14.3
    cni:
      version: v1.2.0
    etcd:
      version: v3.5.13
    containerRuntimes:
    - type: docker
      version: 24.0.9
    - type: containerd
      version: 1.7.13
    calicoctl:
      version: v3.27.3
    crictl:
      version: v1.29.0
    docker-registry:
      version: "2"
    harbor:
      version: v2.10.1
    docker-compose:
      version: v2.26.1
  images:
  - docker.io/kubesphere/pause:3.9
  - docker.io/kubesphere/kube-apiserver:v1.28.8
  - docker.io/kubesphere/kube-controller-manager:v1.28.8
  - docker.io/kubesphere/kube-scheduler:v1.28.8
  - docker.io/kubesphere/kube-proxy:v1.28.8
  - docker.io/coredns/coredns:1.9.3
  - docker.io/kubesphere/k8s-dns-node-cache:1.22.20
  - docker.io/calico/kube-controllers:v3.27.3
  - docker.io/calico/cni:v3.27.3
  - docker.io/calico/node:v3.27.3
  - docker.io/calico/pod2daemon-flexvol:v3.27.3
  - docker.io/calico/typha:v3.27.3
  - docker.io/flannel/flannel:v0.21.3
  - docker.io/flannel/flannel-cni-plugin:v1.1.2
  - docker.io/cilium/cilium:v1.15.3
  - docker.io/cilium/operator-generic:v1.15.3
  - docker.io/hybridnetdev/hybridnet:v0.8.6
  - docker.io/kubeovn/kube-ovn:v1.10.10
  - docker.io/kubesphere/multus-cni:v3.8
  - docker.io/openebs/provisioner-localpv:3.3.0
  - docker.io/openebs/linux-utils:3.3.0
  - docker.io/library/haproxy:2.9.6-alpine
  - docker.io/plndr/kube-vip:v0.7.2
  - docker.io/kubesphere/kata-deploy:stable
  - docker.io/kubesphere/node-feature-discovery:v0.10.0
  registry:
    auths: {}
1.5 导出 KubeKey 离线安装包
把 KubeKey 工具也制作成压缩包,便于拷贝到离线节点。
tar zcvf kubekey-offline-v3.4.1-v1.28.tar.gz kk kubekey-v3.1.1-linux-amd64.tar.gz
2. 准备离线部署 KubeSphere 和 Kubernetes 的前置数据
2.1 操作系统基础配置
本演示环境使用 KubeKey 自动配置 , 跳过
2.2. 数据盘配置
每台服务器新增一块数据盘 /dev/sdb,用于 Containerd 和 Kubernetes Pod 的持久化存储。
为了满足部分用户希望在生产上线后,磁盘容量不够时可以实现扩容,本文采用了 LVM 的方式配置磁盘(实际上,本人维护的生产环境,几乎不用 LVM)。
本小节的配置比较简单,因此,下面的内容为无废话实操版。
请注意,以下操作无特殊说明时需在所有新增节点上执行。本文只选取 node101 节点作为演示,并假定其余服务器都已按照相同的方式进行配置和设置。
- 创建 PV
pvcreate /dev/sdb
- 创建 VG
vgcreate data /dev/sdb
- 创建 LV
# 使用所有空间,VG 名字为 data,LV 名字为 lvdata
lvcreate -l 100%VG data -n lvdata
- 格式化磁盘
mkfs.xfs /dev/mapper/data-lvdata
- 手工挂载磁盘
mkdir /data
mount /dev/mapper/data-lvdata /data/
- 配置开机自动挂载
tail -1 /etc/mtab >> /etc/fstab
- 创建 openebs 本地数据根目录
mkdir -p /data/openebs/local
- 创建 Containerd 数据目录
mkdir -p /data/containerd
- 创建 Containerd 数据目录软连接
ln -s /data/containerd /var/lib/containerd
说明:KubeKey 不支持在部署的时候更改 Containerd 的数据目录,只能用这种变通的方式(也可以提前手工安装 Containerd,建议)。
2.3 上传离线部署资源包到部署节点
将以下离线部署资源包,上传至离线环境部署(Registry) 节点的 /data/ 目录(可根据实际情况修改)。
- Kubekey:kubekey-offline-v1.28.tar.gz
- 制品 artifact:ksp-offline-v1.28-artifact.tar.gz
执行以下命令,解压 KubeKey:
# 创离线资源存放的数据目录
mkdir /data/kubekey
tar xvf /data/kubekey-offline-v1.28.tar.gz -C /data/kubekey
mv ksp-offline-v1.28-artifact.tar.gz /data/kubekey
2.4 创建离线集群配置文件
- 执行以下命令创建离线集群配置文件
cd /data/kubekey
./kk create config --with-kubernetes v1.28.8 -f ksp-v1228-offline.yaml
命令执行成功后,在当前目录会生成文件名为 ksp-v1228-offline.yaml 的配置文件。
2.5 修改 Cluster 配置
离线集群配置文件中 kind: Cluster 小节的作用是部署 Kubernetes 集群。本示例采用 3 个节点同时作为 control-plane、etcd 节点和 worker 节点。
执行命令,修改离线集群配置文件 ksp-v1228-offline.yaml:
vi ksp-v1228-offline.yaml
修改 kind: Cluster 小节中 hosts 和 roleGroups 等信息,修改说明如下。
- hosts:指定节点的 IP、ssh 用户、ssh 密码、ssh 端口。示例演示了 ssh 端口号的配置方法。同时,新增一个 Registry 节点的配置
- roleGroups:指定 3 个 etcd、control-plane 节点,复用相同的机器作为 3 个 worker 节点
- 必须指定主机组
registry作为仓库部署节点 - internalLoadbalancer: 启用内置的 HAProxy 负载均衡器
- system.rpms:新增配置,部署时安装 rpm 包(openEuler 系统默认没有安装 tar 包,必须提前安装)
- domain:自定义了一个 opsxlab.cn,没特殊需求的场景保留默认值即可
- containerManager:使用 containerd
- storage.openebs.basePath:新增配置,指定 openebs 默认存储路径为 /data/openebs/local
- registry:不指定
type类型,默认安装 docker registry , 我使用的harbor作为私有库,如不需要则无需配置
修改后的完整示例如下:
apiVersion: kubekey.kubesphere.io/v1alpha2
kind: Cluster
metadata:
  name: sample
spec:
  hosts:
  - {name: node101, address: 192.168.10.101, internalAddress: 192.168.10.101, user: root, password: "qwer1234"}
  - {name: node102, address: 192.168.10.102, internalAddress: 192.168.10.102, user: root, password: "qwer1234"}
  - {name: node103, address: 192.168.10.103, internalAddress: 192.168.10.103, user: root, password: "qwer1234"}
  - {name: node104, address: 192.168.10.104, internalAddress: 192.168.10.104, user: root, password: "qwer1234"}
  roleGroups:
    etcd:
    - node101
    - node102
    - node103
    control-plane:
    - node101
    - node102
    - node103
    worker:
    - node101
    - node102
    - node103
    registry:
    - node104
  controlPlaneEndpoint:
    ## Internal loadbalancer for apiservers
    internalLoadbalancer: haproxy

    domain: lb.kubesphere.local
    address: ""
    port: 6443
  system:
    rpms:
      - tar
  kubernetes:
    version: v1.28.8
    clusterName: opsxlab.cn
    autoRenewCerts: true
    containerManager: containerd
  etcd:
    type: kubekey
  network:
    plugin: calico
    kubePodsCIDR: 10.233.64.0/18
    kubeServiceCIDR: 10.233.0.0/18
    ## multus support. https://github.com/k8snetworkplumbingwg/multus-cni
    multusCNI:
      enabled: false
  storage:
    openebs:
      basePath: /data/openebs/local # 默认没有的新增配置,
  registry:
    type: harbor
    auths:
      "registry.opsxlab.cn":
        username: admin
        password: Harbor12345
        skipTLSVerify: true
        certsPath: "/etc/docker/certs.d/registry.opsxlab.cn"
    privateRegistry: "registry.opsxlab.cn"
    namespaceOverride: "kubesphereio"
    registryMirrors: []
    insecureRegistries: []
  addons: []
3. 离线部署镜像仓库
为了验证 KubeKey 部署离线 Harbor 的能力,本实战内容采用 KubeKey 部署 Harbor。生产环境建议提前自建。
请注意,以下操作无特殊说明时需在离线环境部署节点(默认为 ndoe101)上执行。
3.1. 安装 Harbor
执行以下命令安装镜像仓库 Harbor(受限于篇幅,输出结果未展示):
cd /root/kubekey
./kk init registry -f ksp-v1228-offline.yaml -a ksp-offline-v1.28-artifact.tar.gz
说明:
ksp-v3.4.1-artifact.tar.gz我们制作的离线部署资源包中的制品包。
部署完成后,我们 SSH 登陆到 Registry 节点,执行以下的命令,验证 Harbor 的安装情况:
- 查看安装完成后有哪些内容
[root@ksp-registry ~]# ls -lh /opt/harbor/
total 633M
......(受限于篇幅,输出结果未展示)
- 查看安装版本
[root@ksp-registry ~]# docker images
REPOSITORY                      TAG       IMAGE ID       CREATED         SIZE
goharbor/harbor-exporter        v2.5.3    d9a8cfa37cf8   17 months ago   87.2MB
goharbor/chartmuseum-photon     v2.5.3    788b207156ad   17 months ago   225MB
goharbor/redis-photon           v2.5.3    5dc5331f3de8   17 months ago   154MB
goharbor/trivy-adapter-photon   v2.5.3    27798821348a   17 months ago   251MB
goharbor/notary-server-photon   v2.5.3    c686413b72ce   17 months ago   112MB
goharbor/notary-signer-photon   v2.5.3    a3bc1def3f94   17 months ago   109MB
goharbor/harbor-registryctl     v2.5.3    942de6829d43   17 months ago   136MB
goharbor/registry-photon        v2.5.3    fb1278854b91   17 months ago   77.9MB
goharbor/nginx-photon           v2.5.3    91877cbc147a   17 months ago   44.3MB
goharbor/harbor-log             v2.5.3    ca36fb3b68a6   17 months ago   161MB
goharbor/harbor-jobservice      v2.5.3    75e6a7496590   17 months ago   227MB
goharbor/harbor-core            v2.5.3    93a775677473   17 months ago   203MB
goharbor/harbor-portal          v2.5.3    d78f9bbad9ee   17 months ago   52.6MB
goharbor/harbor-db              v2.5.3    bd50ae1eccdf   17 months ago   224MB
goharbor/prepare                v2.5.3    15102b9ebde6   17 months ago   166MB
- 查看安装状态
[root@ksp-registry ~]# cd /opt/harbor/
[root@ksp-registry harbor]# docker-compose ps -a
- 查看 Harbor 配置的域名(确保使用了自定义域名)
[root@ksp-registry harbor]# cat /opt/harbor/harbor.yml | grep hostname:
hostname: registry.opsman.top
- 查看 Docker 是否配置了私有证书(确保使用了自定义域名及证书)
[root@ksp-registry harbor]# ll /etc/docker/certs.d/registry.opsman.top/
total 12
-rw-r--r--. 1 root root 1103 Dec 13 09:47 ca.crt
-rw-r--r--. 1 root root 1253 Dec 13 09:47 registry.opsman.top.cert
-rw-------. 1 root root 1679 Dec 13 09:47 registry.opsman.top.key
小知识:KubeKey 部署 Harbor 时会自动同步自签名证书到集群所有节点,自己部署的 Harbor 必须手动复制 Registry 节点的自签名证书到集群所有节点。
KubeKey 完成复制的动作在下面两个模块:
[InitRegistryModule] Synchronize certs file[InitRegistryModule] Synchronize certs file to all nodes
3.2. 在 Harbor 中创建项目
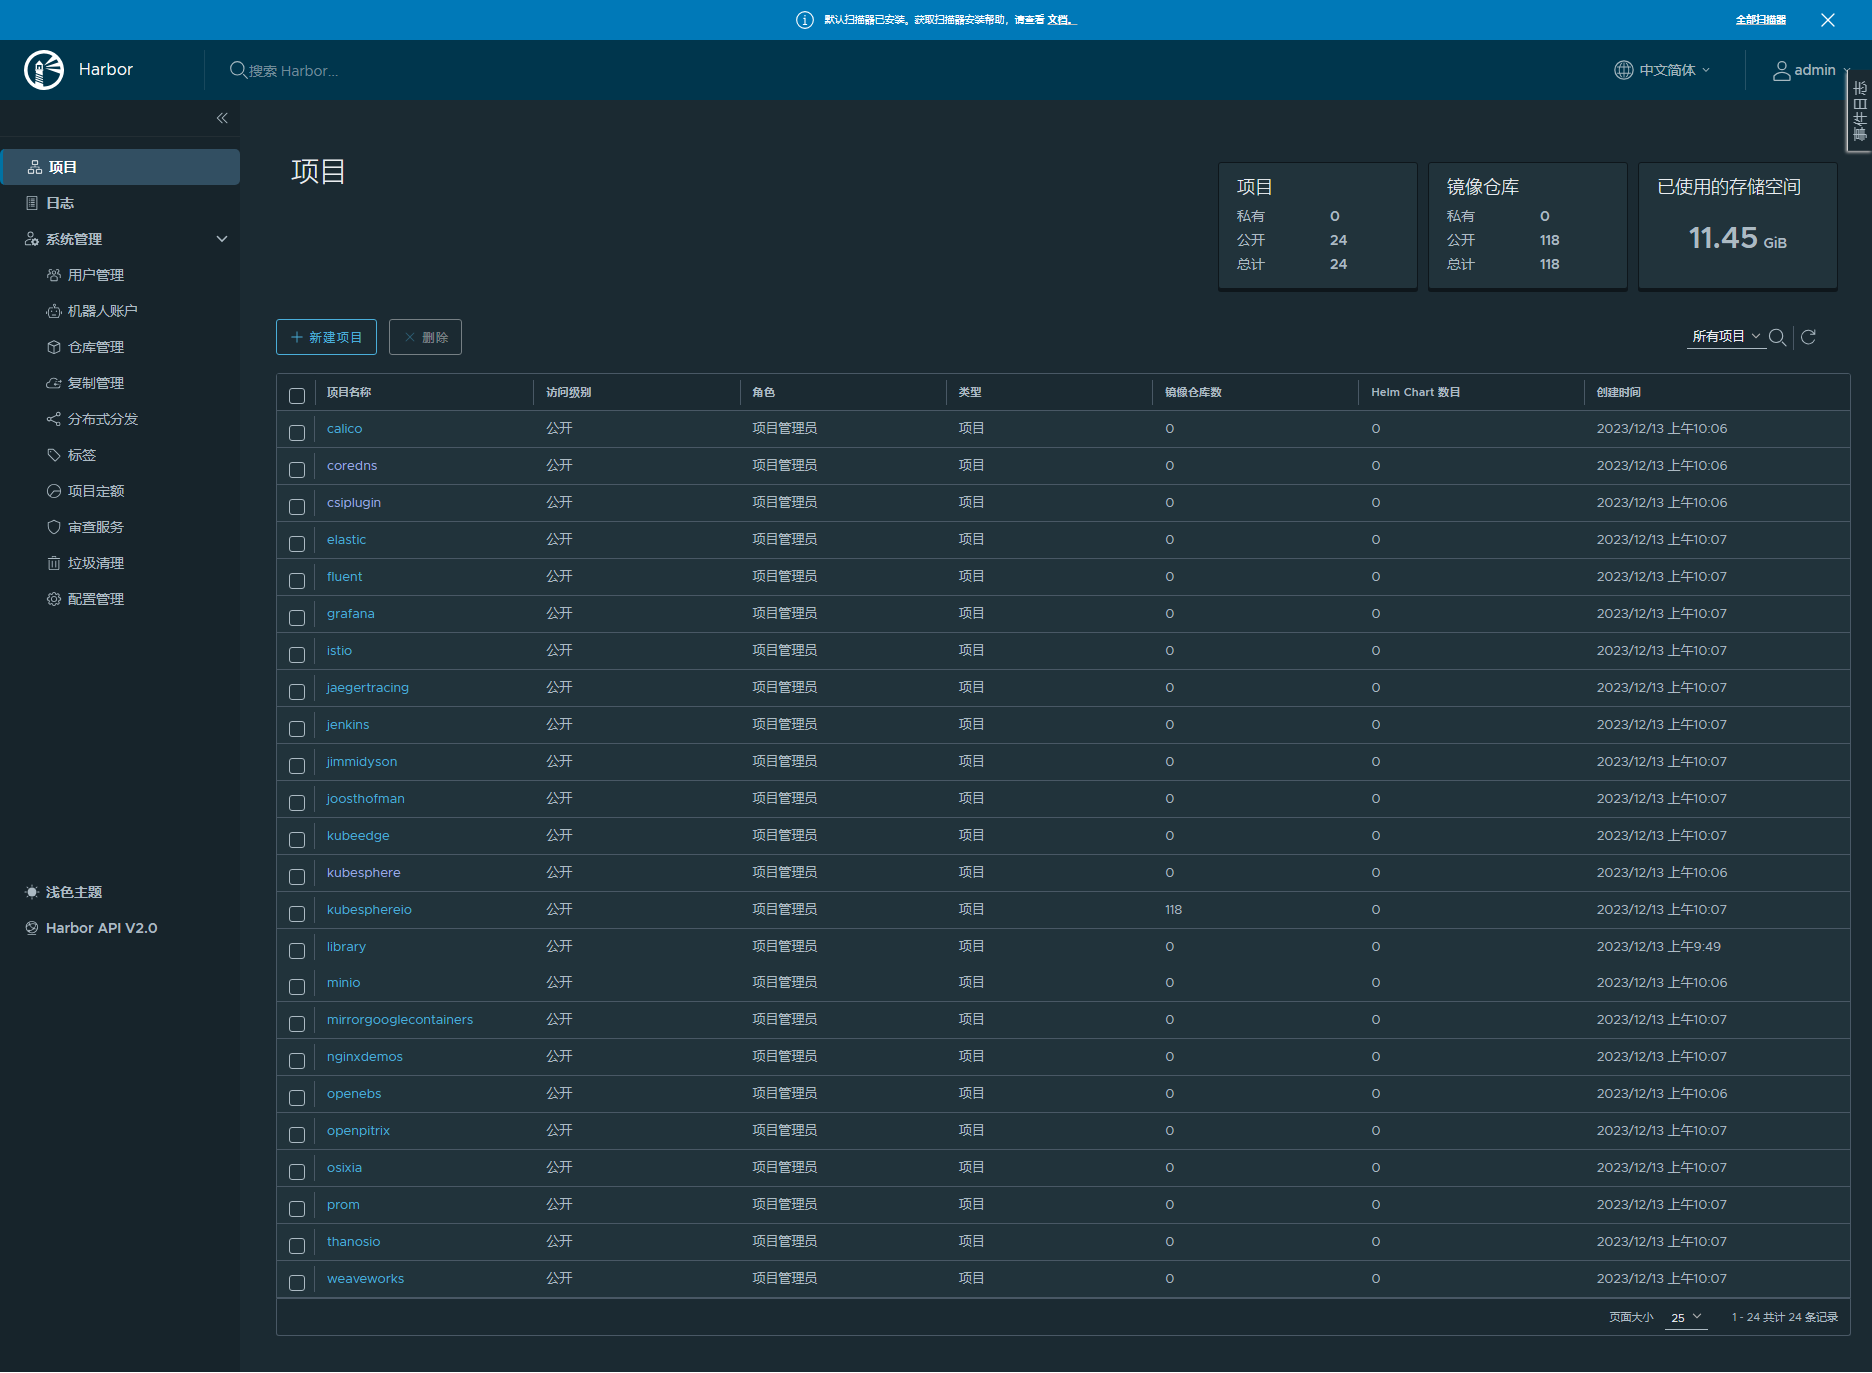
由于 Harbor 项目存在访问控制(RBAC)的限制,即只有指定角色的用户才能执行某些操作。如果您未创建项目,则镜像不能被推送到 Harbor。
Harbor 中有两种类型的项目:
- 公共项目(Public):任何用户都可以从这个项目中拉取镜像。
- 私有项目(Private):只有作为项目成员的用户可以拉取镜像。
使用 KubeKey 安装的 Harbor 默认信息如下:
- 登陆账户信息:管理员账号:admin,密码:Harbor12345(生产环境必须修改)。
- Harbor 安装文件在 /opt/harbor , 如需运维 Harbor,可至该目录下。
接下来的任务需要我们 SSH 登陆到 Registry 节点执行。
执行以下命令,下载官方提供的自动初始化 Harbor 仓库的脚本(可不下载直接用本文提供的脚本):
curl -O https://raw.githubusercontent.com/kubesphere/ks-installer/master/scripts/create_project_harbor.sh
- 根据实际情况,执行以下命令修改脚本配置
vim create_project_harbor.sh。
#!/usr/bin/env bash

# Harbor 仓库地址(写域名,默认配置为 https://dockerhub.kubekey.local)
url="https://registry.opsxlab.cn"

# 访问 Harbor 仓库的默认用户和密码(生产环境建议修改)
user="admin"
passwd="Harbor12345"

# 需要创建的项目名列表,按我们制作的离线包的镜像命名规则,实际上只需要创建一个 kubesphereio 即可,这里保留了所有可用值,各位可根据自己的离线仓库镜像名称规则修改。
harbor_projects=(library
    kubesphere
    calico
    coredns
    openebs
    csiplugin
    minio
    mirrorgooglecontainers
    osixia
    prom
    thanosio
    jimmidyson
    grafana
    elastic
    istio
    jaegertracing
    jenkins
    weaveworks
    openpitrix
    joosthofman
    nginxdemos
    fluent
    kubeedge
    kubesphereio
)

for project in "${harbor_projects[@]}"; do
    echo "creating $project"
    curl -k -u "${user}:${passwd}" -X POST -H "Content-Type: application/json" "${url}/api/v2.0/projects" -d "{ \"project_name\": \"${project}\", \"public\": true}"
done
重点注意:
- harbor_projects 中一定要新增
kubesphereio,默认没有。不加后面报错,详情见 问题 2。- 脚本创建的是 public 项目,如需要私有项目请修改脚本。
- 执行脚本创建项目
sh create_project_harbor.sh
- 正确的执行结果如下(library 会有报错,因为默认已经存在,可忽略)
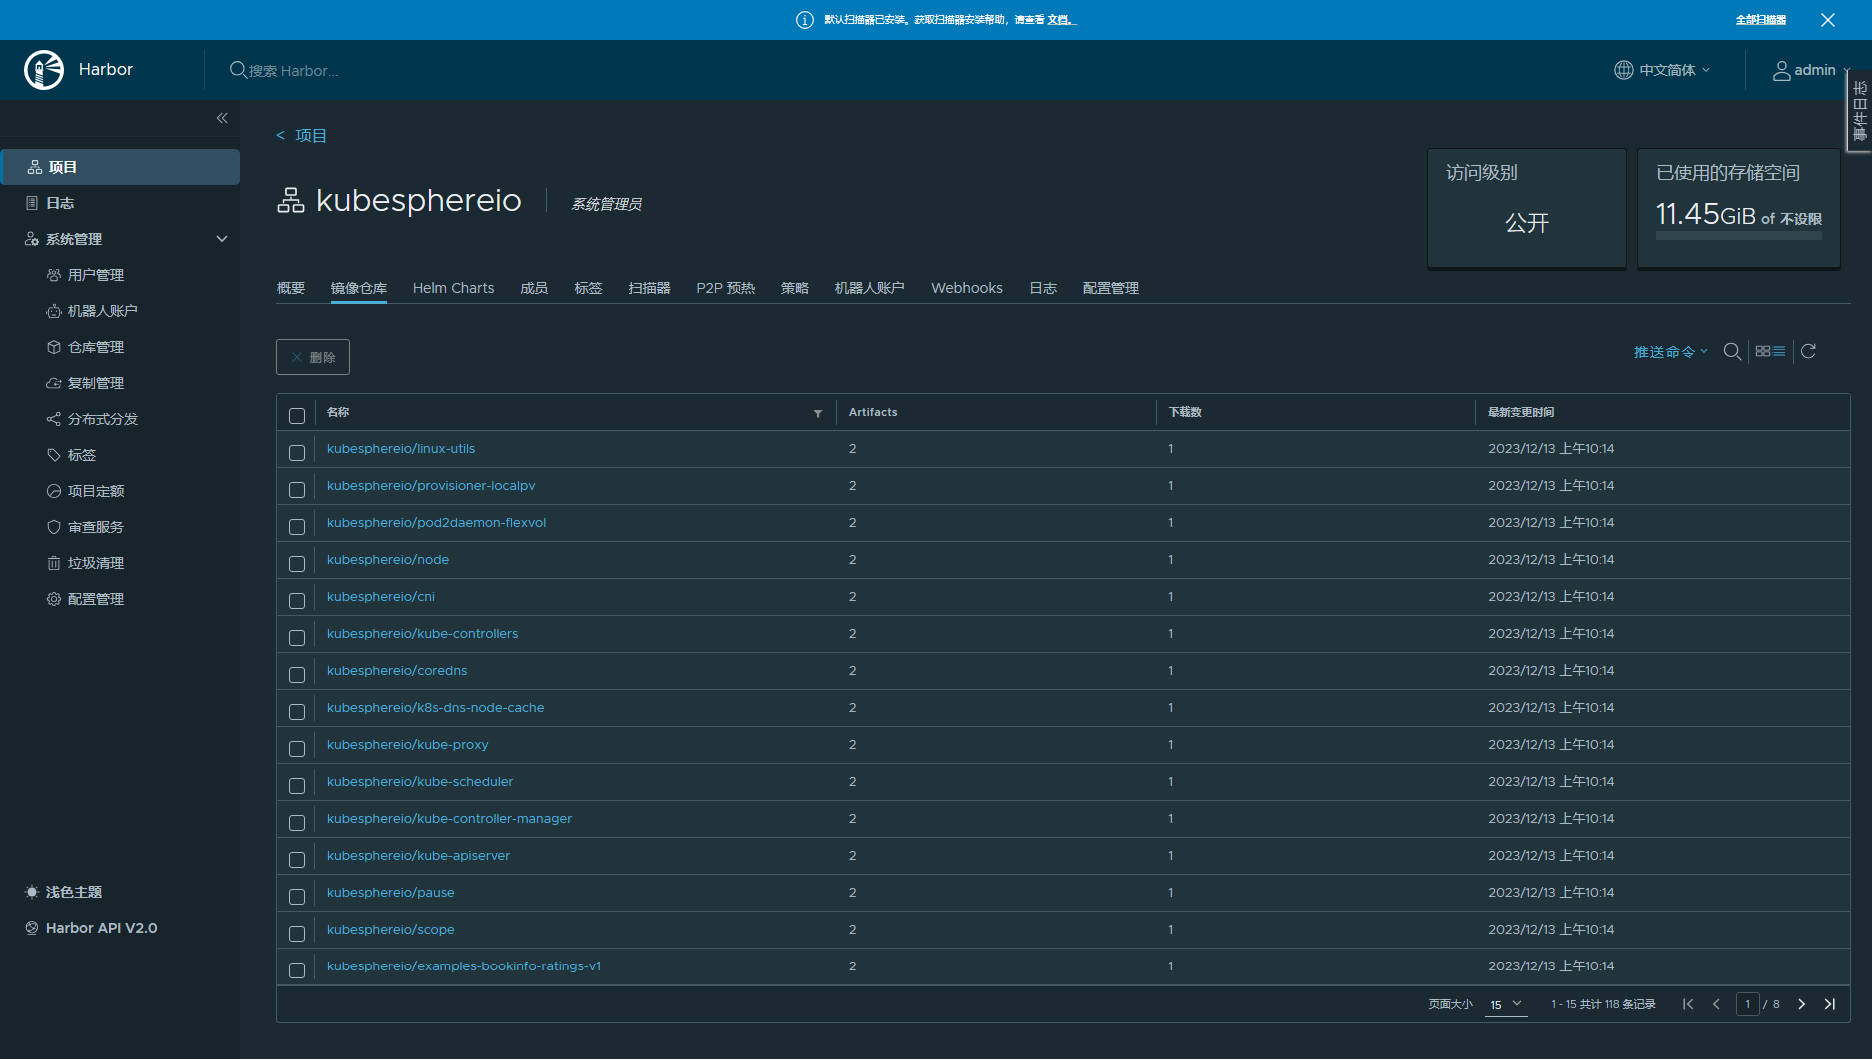
3.3. 推送离线镜像到 Harbor 仓库
将提前准备好的离线镜像推送到 Harbor 仓库,这一步为可选项,因为创建集群的时候默认会推送镜像(本文使用参数忽略了)。为了部署成功率,建议先推送。
- 推送离线镜像
./kk artifact image push -f ksp-v1228-offline.yaml -a ksp-offline-v1.28-artifact.tar.gz
- Harbor 管理页面查看项目和镜像仓库(提前在自己电脑上做好域名解析配置)
4. 离线部署 Kubernetes 集群
4.1 离线部署 Kubernetes 集群
执行以下命令,部署 Kubernetes 集群。
./kk create cluster -f ksp-v1228-offline.yaml -a ksp-offline-v1.28-artifact.tar.gz --with-packages --skip-push-images --debug
参数说明:
- –with-packages:安装操作系统依赖
- –skip-push-images: 忽略推送镜像,前面已经完成了推送镜像到私有仓库的任务
- –debug: 查看日志详情,如果有报错可以更方便看到
部署完成后,您应该会在终端上看到类似于下面的输出。
10:19:10 CST success: [LocalHost]
10:19:10 CST Pipeline[CreateClusterPipeline] execute successfully
Installation is complete.

Please check the result using the command:

        kubectl get pod -A
这里部署KubeSphere
为什么单独部署, 其实在前面生成创建离线集群配置文件时就可以直接配置并生成,但我在测试环境时是选择先在这里成功后打镜像,然后再部署KubeSphere,至少失败也是能保留一个,不过如果已经比较成熟 完全可以在生成创建离线集群配置文时执行即可,再进行配置
./kk create config --with-kubesphere v3.4.1 --with-kubernetes v1.28.8 -f ksp-v341-v1228-offline.yaml
获取版本信息及镜像列表
-
访问 https://get-images.kubesphere.io/
-
选择需要部署的扩展组件。
-
填入邮箱地址。
-
点击获取镜像列表。
-
查看填写的邮箱,获取 KubeSphere 最新的版本信息以及镜像列表文件。
镜像列表文件如下:
文件名 描述 kubesphere-images.txt包含 KubeSphere 及扩展组件涉及的所有镜像,以及在华为云的镜像地址,可根据该文件中的列表将镜像同步至离线仓库中。 kk-manifest.yaml包含 KubeSphere 及扩展组件涉及的所有镜像,可使用 kk 快速构建离线包。 kk-manifest-mirror.yaml包含华为云镜像仓库中 KubeSphere 及扩展组件涉及的所有镜像。访问 DockerHub 受限时可使用该 manifest 文件构建离线包。
创建 manifest 文件。
# 如需使用 kk 离线部署镜像仓库,添加 --with-registry 打包镜像仓库的安装文件
export KKZONE=cn
./kk create manifest --with-kubernetes v1.26.12 --with-registry
-
打开 manifest 文件。
vi manifest-sample.yaml -
复制
kk-manifest.yaml或kk-manifest-mirror.yaml(若访问 DockerHub 受限) 中的镜像列表,添加到新创建的manifest-sample.yaml文件中。注意 以下 manifest 文件中的镜像列表仅为示例,建议通过 https://get-images.kubesphere.io/ 获取最新的镜像列表。
apiVersion: kubekey.kubesphere.io/v1alpha2
kind: Manifest
metadata:
  name: sample
spec:
  arches:
  - amd64
  operatingSystems: []
  kubernetesDistributions:
  - type: kubernetes
    version: v1.28.8
  components:
    helm:
      version: v3.14.3
    cni:
      version: v1.2.0
    etcd:
      version: v3.5.13
    containerRuntimes:
    - type: docker
      version: 24.0.9
    - type: containerd
      version: 1.7.13
    calicoctl:
      version: v3.27.4
    crictl:
      version: v1.29.0
    docker-registry:
      version: "2"
    harbor:
      version: v2.10.1
    docker-compose:
      version: v2.26.1
  images:
  - swr.cn-southwest-2.myhuaweicloud.com/ks/kubesphere/ks-apiserver:v4.1.2
  - swr.cn-southwest-2.myhuaweicloud.com/ks/kubesphere/ks-console:v4.1.2
  - swr.cn-southwest-2.myhuaweicloud.com/ks/kubesphere/ks-controller-manager:v4.1.2
  - swr.cn-southwest-2.myhuaweicloud.com/ks/kubesphere/kubectl:v1.27.16
  - swr.cn-southwest-2.myhuaweicloud.com/ks/kubesphere/redis:7.2.4-alpine
  - swr.cn-southwest-2.myhuaweicloud.com/ks/kubesphere/haproxy:2.9.6-alpine
  - swr.cn-southwest-2.myhuaweicloud.com/ks/kubesphere/ks-extensions-museum:v1.1.2
  - swr.cn-southwest-2.myhuaweicloud.com/ks/curlimages/curl:7.85.0
  - swr.cn-southwest-2.myhuaweicloud.com/ks/grafana/grafana:10.4.1
  - swr.cn-southwest-2.myhuaweicloud.com/ks/library/busybox:1.31.1
  - swr.cn-southwest-2.myhuaweicloud.com/ks/kubesphere/kubectl:v1.27.12
  - swr.cn-southwest-2.myhuaweicloud.com/ks/grafana/loki:3.0.0
  - swr.cn-southwest-2.myhuaweicloud.com/ks/grafana/loki-helm-test:ewelch-distributed-helm-chart-17db5ee
  - swr.cn-southwest-2.myhuaweicloud.com/ks/grafana/loki-canary:3.0.0
  - swr.cn-southwest-2.myhuaweicloud.com/ks/nginxinc/nginx-unprivileged:1.24-alpine
  - swr.cn-southwest-2.myhuaweicloud.com/ks/library/memcached:1.6.23-alpine
  - swr.cn-southwest-2.myhuaweicloud.com/ks/prom/memcached-exporter:v0.14.2
  - swr.cn-southwest-2.myhuaweicloud.com/ks/kiwigrid/k8s-sidecar:1.24.3
  - swr.cn-southwest-2.myhuaweicloud.com/ks/minio/minio:RELEASE.2022-09-17T00-09-45Z
  - swr.cn-southwest-2.myhuaweicloud.com/ks/minio/mc:RELEASE.2022-09-16T09-16-47Z
  - swr.cn-southwest-2.myhuaweicloud.com/ks/kubesphere/metrics-server:v0.7.0
  - swr.cn-southwest-2.myhuaweicloud.com/ks/kubesphere/addon-resizer:1.8.20
  - swr.cn-southwest-2.myhuaweicloud.com/ks/kubesphere/network-extension-apiserver:v1.1.0
  - swr.cn-southwest-2.myhuaweicloud.com/ks/kubesphere/network-extension-controller:v1.1.0
  registry:
    auths: {}
构建离线包
执行以下命令构建包含 ks-core 及各扩展组件镜像的离线安装包。
./kk artifact export -m manifest-sample.yaml -o kubesphere.tar.gz
执行成功后,将显示如下信息:
Pipeline[ArtifactExportPipeline] execute successfully
执行以下命令创建 harbor 项目。
-
创建脚本配置文件。
vi create_project_harbor.sh#!/usr/bin/env bash # Copyright 2018 The KubeSphere Authors. # # Licensed under the Apache License, Version 2.0 (the "License"); # you may not use this file except in compliance with the License. # You may obtain a copy of the License at # # http://www.apache.org/licenses/LICENSE-2.0 # # Unless required by applicable law or agreed to in writing, software # distributed under the License is distributed on an "AS IS" BASIS, # WITHOUT WARRANTIES OR CONDITIONS OF ANY KIND, either express or implied. # See the License for the specific language governing permissions and # limitations under the License. url="https://registry.opsxlab.cn" # 或修改为实际镜像仓库地址 user="admin" passwd="Harbor12345" harbor_projects=( ks kubesphere kubesphereio coredns calico flannel cilium hybridnetdev kubeovn openebs library plndr jenkins argoproj dexidp openpolicyagent curlimages grafana kubeedge nginxinc prom kiwigrid minio opensearchproject istio jaegertracing timberio prometheus-operator jimmidyson elastic thanosio brancz prometheus ) for project in "${harbor_projects[@]}"; do echo "creating $project" curl -u "${user}:${passwd}" -X POST -H "Content-Type: application/json" "${url}/api/v2.0/projects" -d "{ \"project_name\": \"${project}\", \"public\": true}" -k # 注意在 curl 命令末尾加上 -k done -
创建 Harbor 项目。
chmod +x create_project_harbor.sh./create_project_harbor.sh
再将镜像推送到harbor
./kk artifact image push -f ksp-v1228-offline.yaml -a kubesphere.tar.gz
-
安装 KubeSphere。
helm upgrade --install -n kubesphere-system --create-namespace ks-core ks-core-1.1.3.tgz \
     --set global.imageRegistry=registry.opsxlab.cn/ks \
     --set extension.imageRegistry=registry.opsxlab.cn/ks \
     --set ksExtensionRepository.image.tag=v1.1.2 \
     --debug \
     --wait
说明 ksExtensionRepository.image.tag为之前获取到的 Extensions Museum 版本(即 https://get-images.kubesphere.io/ 上展示的最新扩展组件仓库版本)。如需高可用部署 KubeSphere,可在命令中添加--set ha.enabled=true,redisHA.enabled=true。如果显示如下信息,则表明 KubeSphere 安装成功:
NOTES:
Thank you for choosing KubeSphere Helm Chart.

Please be patient and wait for several seconds for the KubeSphere deployment to complete.

1. Wait for Deployment Completion

    Confirm that all KubeSphere components are running by executing the following command:

    kubectl get pods -n kubesphere-system
2. Access the KubeSphere Console

    Once the deployment is complete, you can access the KubeSphere console using the following URL:

    http://192.168.6.6:30880

3. Login to KubeSphere Console

    Use the following credentials to log in:

    Account: admin
    Password: P@88w0rd

NOTE: It is highly recommended to change the default password immediately after the first login.
For additional information and details, please visit https://kubesphere.io.
y.image.tag为之前获取到的 Extensions Museum 版本(即 https://get-images.kubesphere.io/ 上展示的最新扩展组件仓库版本)。如需高可用部署 KubeSphere,可在命令中添加–set ha.enabled=true,redisHA.enabled=true`。 |
如果显示如下信息,则表明 KubeSphere 安装成功:
NOTES:
Thank you for choosing KubeSphere Helm Chart.

Please be patient and wait for several seconds for the KubeSphere deployment to complete.

1. Wait for Deployment Completion

    Confirm that all KubeSphere components are running by executing the following command:

    kubectl get pods -n kubesphere-system
2. Access the KubeSphere Console

    Once the deployment is complete, you can access the KubeSphere console using the following URL:

    http://192.168.6.6:30880

3. Login to KubeSphere Console

    Use the following credentials to log in:

    Account: admin
    Password: P@88w0rd

NOTE: It is highly recommended to change the default password immediately after the first login.
For additional information and details, please visit https://kubesphere.io.


 2056
2056

 被折叠的 条评论
为什么被折叠?
被折叠的 条评论
为什么被折叠?
 到【灌水乐园】发言


