


简介
springboot是Pivotal团队在2013年开始研发,是一款轻量级的框架。它不仅继承了spring框架原有的优秀的特性,还简化了spring应用的配置。同时springboot框架的jar包版本都是规定好的,可以很好的解决spring中jar包版本冲突的问题。
环境配置
1、从spring官网https://start.spring.io/上获取springboot的创建模板工程
2、安装spring tools 4 插件,新建一个spring starter project
在上述过程中有几点问题是要注意一下的:
(1)java的版本一般是选择8版本
(2)要修改的地方有name,group,artifact以及package
(3)spring boot version 默认是正式版不需要后缀
(4)available可选择要使用的插件,一般情况下我们是选择web
创建项目
1、创建maven project
创建步骤可以参考链接: 参考.
只是在本项目中最后一步有些区别
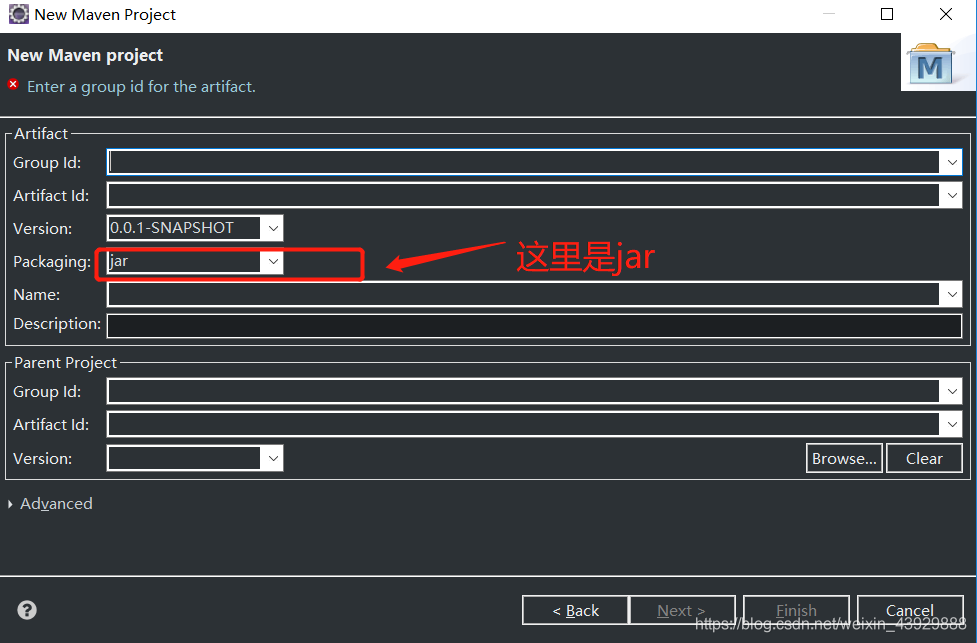
什么时候用maven project,什么时候用maven module呢????
maven project和module相当于父子关系。当新建的项目中不存在父子关系时就用maven project最后一步的Packaging填jar。当项目中存在父子关系时用maven project做父工程最后一步的Packaging填pom;maven module做子工程最后一步的Packaging填jar,使用maven module工程必须要有父工程。
2、写pom.xml文件
<?xml version="1.0" encoding="UTF-8"?>
<project xmlns="http://maven.apache.org/POM/4.0.0"
 xmlns:xsi="http://www.w3.org/2001/XMLSchema-instance"
 xsi:schemaLocation="http://maven.apache.org/POM/4.0.0 https://maven.apache.org/xsd/maven-4.0.0.xsd">
 <modelVersion>4.0.0</modelVersion>
 <parent>
  <groupId>org.springframework.boot</groupId>
  <artifactId>spring-boot-starter-parent</artifactId>
  <version>2.3.5.RELEASE</version>
  <relativePath /> <!-- lookup parent from repository -->
 </parent>
 <groupId>net.seehope</groupId>
 <artifactId>springboot</artifactId>
 <version>0.0.1-SNAPSHOT</version>
 <name>springboot</name>
 <description>Demo project for Spring Boot</description>

 <properties>
  <java.version>1.8</java.version>
 </properties>

 <dependencies>
  <dependency>
   <groupId>org.springframework.boot</groupId>
   <artifactId>spring-boot-starter-web</artifactId>
  </dependency>
  <dependency>
   <groupId>org.springframework.boot</groupId>
   <artifactId>spring-boot-starter-test</artifactId>
   <scope>test</scope>
   <exclusions>
    <exclusion>
     <groupId>org.junit.vintage</groupId>
     <artifactId>junit-vintage-engine</artifactId>
    </exclusion>
   </exclusions>
  </dependency>

  <!-- 开发工具 -->
  <dependency>
   <groupId>org.springframework.boot</groupId>
   <artifactId>spring-boot-devtools</artifactId>
   <optional>true</optional>
  </dependency>
  <dependency>
   <groupId>org.springframework.boot</groupId>
   <artifactId>spring-boot-configuration-processor</artifactId>
   <optional>true</optional>
  </dependency>

  <!-- mybatis -->
  <!-- https://mvnrepository.com/artifact/org.mybatis.spring.boot/mybatis-spring-boot-starter -->
  <dependency>
   <groupId>org.mybatis.spring.boot</groupId>
   <artifactId>mybatis-spring-boot-starter</artifactId>
   <version>2.1.3</version>
  </dependency>

  <!-- mysql -->
  <!-- https://mvnrepository.com/artifact/mysql/mysql-connector-java -->
  <dependency>
   <groupId>mysql</groupId>
   <artifactId>mysql-connector-java</artifactId>
  </dependency>

  <!-- druid -->
  <!-- https://mvnrepository.com/artifact/com.alibaba/druid-spring-boot-starter -->
  <dependency>
   <groupId>com.alibaba</groupId>
   <artifactId>druid-spring-boot-starter</artifactId>
   <version>1.2.3</version>
  </dependency>

  <!-- mapper -->
  <!-- https://mvnrepository.com/artifact/tk.mybatis/mapper-spring-boot-starter -->
  <dependency>
   <groupId>tk.mybatis</groupId>
   <artifactId>mapper-spring-boot-starter</artifactId>
   <version>2.1.5</version>
  </dependency>

  <!-- 分页插件 -->
  <!-- https://mvnrepository.com/artifact/com.github.pagehelper/pagehelper-spring-boot-starter -->
  <dependency>
   <groupId>com.github.pagehelper</groupId>
   <artifactId>pagehelper-spring-boot-starter</artifactId>
   <version>1.3.0</version>
  </dependency>

  <!-- redis -->
  <!-- https://mvnrepository.com/artifact/org.springframework.boot/spring-boot-starter-data-redis -->
  <dependency>
   <groupId>org.springframework.boot</groupId>
   <artifactId>spring-boot-starter-data-redis</artifactId>
  </dependency>

  <!-- 自动文档插件 -->
  <!-- https://mvnrepository.com/artifact/io.springfox/springfox-swagger2 -->
  <dependency>
   <groupId>io.springfox</groupId>
   <artifactId>springfox-swagger2</artifactId>
   <version>2.9.2</version>
  </dependency>

  <!-- https://mvnrepository.com/artifact/io.springfox/springfox-swagger-ui -->
  <dependency>
   <groupId>io.springfox</groupId>
   <artifactId>springfox-swagger-ui</artifactId>
   <version>2.9.2</version>
  </dependency>
 </dependencies>

 <build>
  <plugins>
   <plugin>
    <groupId>org.springframework.boot</groupId>
    <artifactId>spring-boot-maven-plugin</artifactId>
   </plugin>
  </plugins>
  </build>

</project>
3、创建启动类SpringbootApplication
@SpringBootApplication
@MapperScan("net.seehope.**.mapper")
@EnableScheduling
@EnableSwagger2
@EnableAsync
public class SpringbootApplication {
 public static void main(String[] args) {
  SpringApplication.run(SpringbootApplication.class, args);
 }
}
4、创建application.yml文件
在src/main/resource下创建application.yml文件
#连接MySQL数据库
spring:
  datasource:
    url: jdbc:mysql://localhost:3306/spring?characterEncoding=utf8&useSSL=false&serverTimezone=UTC&rewriteBatchedStatements=true&allowPublicKeyRetrieval=true
    driver-class-name: com.mysql.cj.jdbc.Driver
    username: root
    password: '000000'
#连接Redis数据库
  redis:
    host: 10.52.48.72
    port: 6379
    password: 123456
    database: 2
#指定xml文件所在的位置,扫描java 生成代理类,是有注解@MapperScan("net.seehope.**.mapper") 打在主类上实现
mybatis:
  mapper-locations:
  - classpath*:mappers/**/*.xml
#写自己定义的,在java类中有注解@ConfigurationProperties(prefix = "net.seehope")
net:
  seehope:
    qq:
      appid: hello
      appsecret: seehopesecret
到第4步为止一个springboot的项目基本算是搭建好了,接下来可以写代码了。
现在写pojo实体类这一层不用再像以前一样一个个打了,我们可以使用逆向工程和通用mapper。使用逆向工程和通用mapper可以自动生成pojo和mapper。通用mapper满足大多数的sql单表查询。
下载链接: 通用mapper插件的逆向工程.


 4167
4167


 被折叠的 条评论
为什么被折叠?
被折叠的 条评论
为什么被折叠?
 到【灌水乐园】发言


