


序言
前几篇文章详细介绍了Spring中实例化Bean的各种方式,其中包括采用FactoryBean的方式创建对象、使用反射创建对象、自定义BeanFactoryPostProcessor以及构造器方式创建对象。
创建对象
这里再来简单回顾一下对象的创建,不知道大家有没有这样一个疑问,为什么创建对象之前要获取实例策略的?意义在哪?
因为我们在createBeanInstance()中调用instantiateBean()方法进行类的实例化创建时,会有很多种选择 。根据构造器、工厂方法、参数…等等,而其中一部分是采用Cglib动态代理的方式实例化,其中一部分就是普通的Simple实例化。

SimpleInstantiationStrategy
而我们看到SimpleInstantiationStrategy类中方法就会方法,类中共有3个instantiate()同名方法,而每个方法传递的参数也大不一样,根据参数就可判断出是根据不同的条件来创建对象(构造器、工厂方法…)
public class SimpleInstantiationStrategy implements InstantiationStrategy {

	@Override
	public Object instantiate(RootBeanDefinition bd, @Nullable String beanName, BeanFactory owner) {
		// 省略方法逻辑
	}

	protected Object instantiateWithMethodInjection(RootBeanDefinition bd, @Nullable String beanName, BeanFactory owner) {
		throw new UnsupportedOperationException("Method Injection not supported in SimpleInstantiationStrategy");
	}

	@Override
	public Object instantiate(RootBeanDefinition bd, @Nullable String beanName, BeanFactory owner,
			final Constructor<?> ctor, Object... args) {
		// 省略方法逻辑
	}

	protected Object instantiateWithMethodInjection(RootBeanDefinition bd, @Nullable String beanName,
			BeanFactory owner, @Nullable Constructor<?> ctor, Object... args) {

		throw new UnsupportedOperationException("Method Injection not supported in SimpleInstantiationStrategy");
	}

	@Override
	public Object instantiate(RootBeanDefinition bd, @Nullable String beanName, BeanFactory owner,
			@Nullable Object factoryBean, final Method factoryMethod, Object... args) {
		// 省略方法体
	}
}
而继承CglibSubclassingInstantiationStrategy了SimpleInstantiationStrategy,因为在Simple类中已经对instantiate()进行了三种不同的实现,所以在Cglib中没对instantiate()做额外处理,而是实现了instantiateWithMethodInjection方法。
但底层调用的也是instantiate(),并根据构造器来判断具体的实现方式。
public class CglibSubclassingInstantiationStrategy extends SimpleInstantiationStrategy {

	@Override
	protected Object instantiateWithMethodInjection(RootBeanDefinition bd, @Nullable String beanName, BeanFactory owner) {
		return instantiateWithMethodInjection(bd, beanName, owner, null);
	}

	@Override
	protected Object instantiateWithMethodInjection(RootBeanDefinition bd, @Nullable String beanName, BeanFactory owner,
			@Nullable Constructor<?> ctor, Object... args) {

		// Must generate CGLIB subclass...
		return new CglibSubclassCreator(bd, owner).instantiate(ctor, args);
	}

	// 省略部分源码
	public Object instantiate(@Nullable Constructor<?> ctor, Object... args) {
		//根据beanDefinition创建一个动态生成的子类
		Class<?> subclass = createEnhancedSubclass(this.beanDefinition);
		Object instance;
		// 如果构造器等于空,那么直接通过反射来实例化对象
		if (ctor == null) {
			instance = BeanUtils.instantiateClass(subclass);
		}
		else {
			try {
				// 通过cglib对象来根据参数类型获取对应的构造器
				Constructor<?> enhancedSubclassConstructor = subclass.getConstructor(ctor.getParameterTypes());
				// 通过构造器来获取对象
				instance = enhancedSubclassConstructor.newInstance(args);
			}
		// 省略部分源码
	}
}
所以Spring中获取实例话策略后,共5种创建对象的方式。并且Spring中对象的创建也并不都是采用Cglib动态代理。

回顾完了对象的创建,我们顺着代码的逻辑继续向下执行。
现在对象创建了,但是我们还不知道对象的初始化(init)和销毁(destroy)方法是什么。接下来就是对这两个方法做处理。
测试类
Person类中省略了get、set和构造器方法。
而为什么不用@Init注解来表示初始化方法?
因为Spring中并没有提供,下面的两个注解是Java提供的元注解,优先于@Init方法执行。
public class Person {

	private String name;
	private int age;

	@PostConstruct
	public void init(){
		System.out.println("执行init方法");
	}
	@PreDestroy
	public void destroy(){
		System.out.println("执行destroy方法");
	}
}
mergePostProcessor.xml
<?xml version="1.0" encoding="UTF-8"?>
<beans xmlns="http://www.springframework.org/schema/beans"
	   xmlns:xsi="http://www.w3.org/2001/XMLSchema-instance"
	   xmlns:context="http://www.springframework.org/schema/context"
	   xsi:schemaLocation="http://www.springframework.org/schema/beans http://www.springframework.org/schema/beans/spring-beans.xsd http://www.springframework.org/schema/context https://www.springframework.org/schema/context/spring-context.xsd">

	<context:component-scan base-package="org.springframework.mergePostProcessor"></context:component-scan>
	<bean id="person" class="org.springframework.mergePostProcessor.Person">
		<property name="name" value="张三"></property>
		<property name="age" value="18"></property>
	</bean>
</beans>
main
public class TestMergePostProcessor {
	public static void main(String[] args) {

		ClassPathXmlApplicationContext ac = new ClassPathXmlApplicationContext("mergePostProcessor.xml");
		Person person = ac.getBean("person", Person.class);
		ac.close();
	}
}
mergeBeanDefinitionPostProcessor
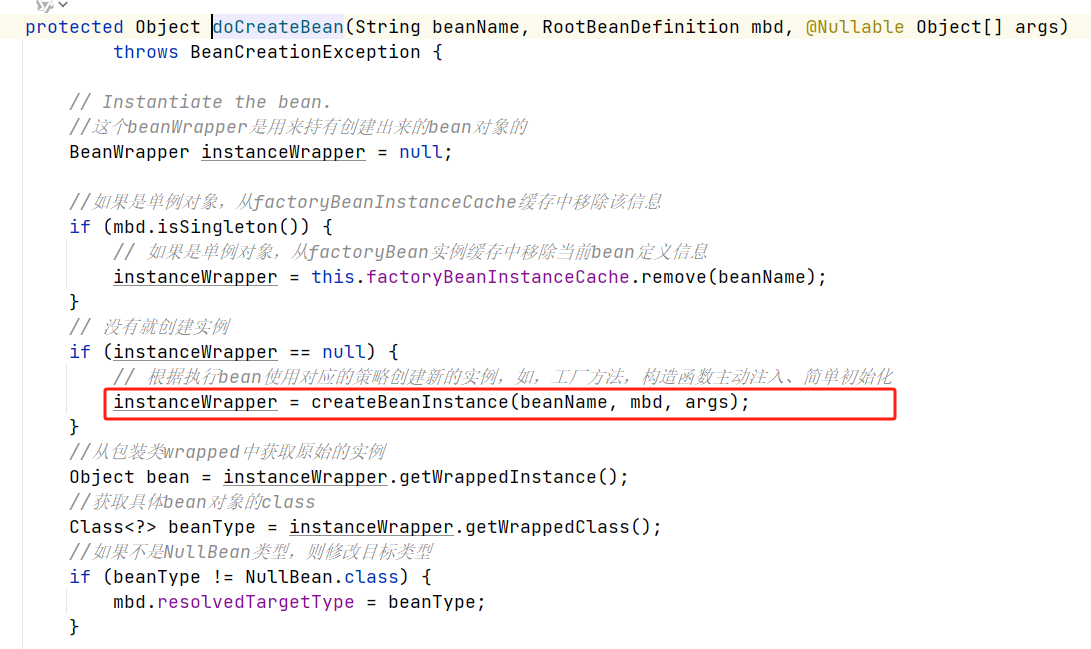
让我们把视线拉回到doCreateBean()中。 此时我们已经通过createBeanInstance()完成了对象的实例化操作。
protected Object doCreateBean(String beanName, RootBeanDefinition mbd, @Nullable Object[] args)
			throws BeanCreationException {

		// Instantiate the bean.
		//这个beanWrapper是用来持有创建出来的bean对象的
		BeanWrapper instanceWrapper = null;

		//如果是单例对象,从factoryBeanInstanceCache缓存中移除该信息
		if (mbd.isSingleton()) {
			// 如果是单例对象,从factoryBean实例缓存中移除当前bean定义信息
			instanceWrapper = this.factoryBeanInstanceCache.remove(beanName);
		}
		// 没有就创建实例
		if (instanceWrapper == null) {
			// 根据执行bean使用对应的策略创建新的实例,如,工厂方法,构造函数主动注入、简单初始化
			instanceWrapper = createBeanInstance(beanName, mbd, args);
		}
		//从包装类wrapped中获取原始的实例
		Object bean = instanceWrapper.getWrappedInstance();
		//获取具体bean对象的class
		Class<?> beanType = instanceWrapper.getWrappedClass();
		//如果不是NullBean类型,则修改目标类型
		if (beanType != NullBean.class) {
			mbd.resolvedTargetType = beanType;
		}

		// Allow post-processors to modify the merged bean definition.
		//允许postProcessor修改合并的BeanDefinition
		synchronized (mbd.postProcessingLock) {
			// 如果没有执行过下面方法。
			if (!mbd.postProcessed) {
				try {
					applyMergedBeanDefinitionPostProcessors(mbd, beanType, beanName);
				}
				catch (Throwable ex) {
					throw new BeanCreationException;
				}
				mbd.postProcessed = true;
			}
		}
		// 省略部分源码
	}
获取BeanPostProcess,并找到MergedBeanDefinitionPostProcessor类型的执行postProcessMergedBeanDefinition方法。
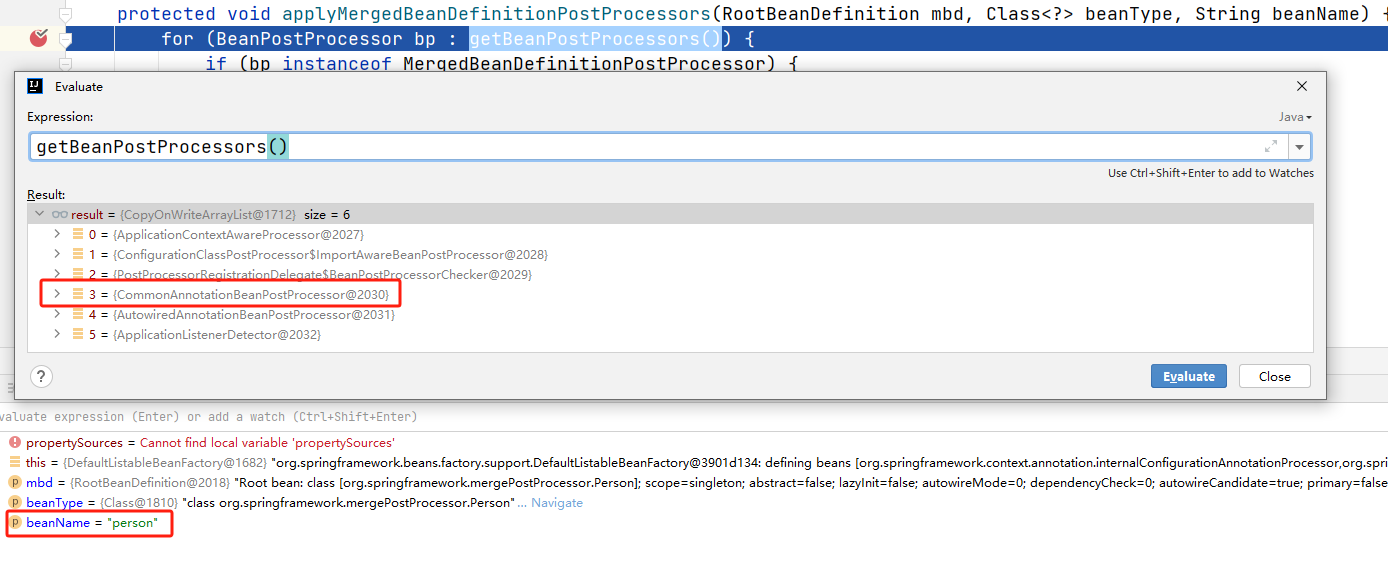
protected void applyMergedBeanDefinitionPostProcessors(RootBeanDefinition mbd, Class<?> beanType, String beanName) {
		for (BeanPostProcessor bp : getBeanPostProcessors()) {
			if (bp instanceof MergedBeanDefinitionPostProcessor) {
				MergedBeanDefinitionPostProcessor bdp = (MergedBeanDefinitionPostProcessor) bp;
				bdp.postProcessMergedBeanDefinition(mbd, beanType, beanName);
			}
		}
	}
先来看眼postProcessMergedBeanDefinition的继承关系。
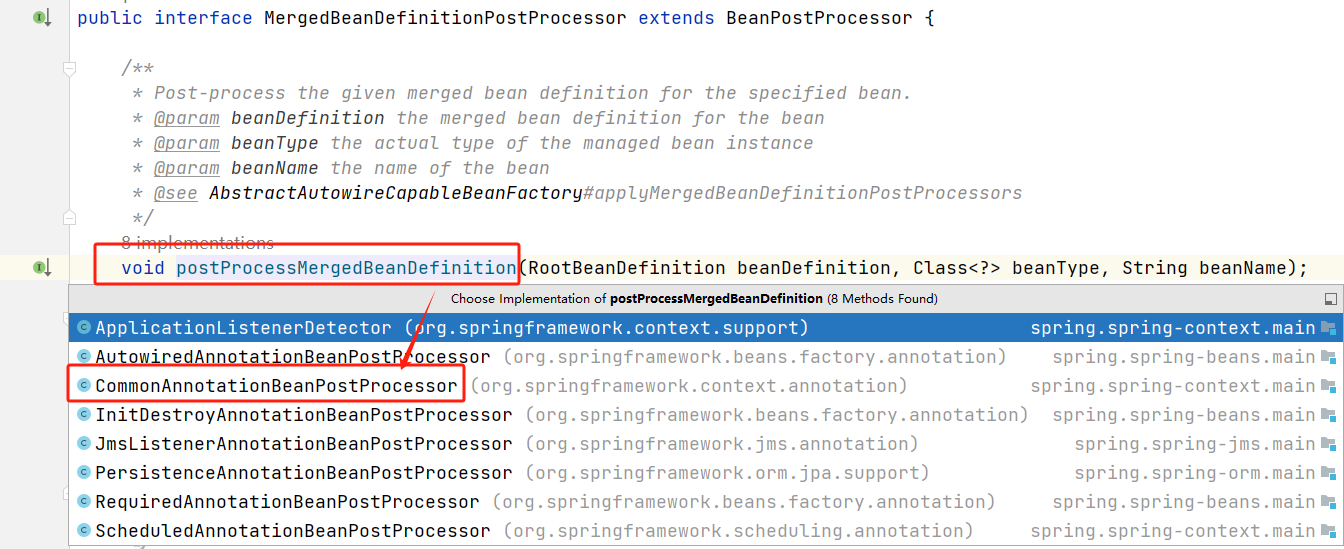
postProcessMergedBeanDefinition()方法的实现有很多,但是其中都有一个特点,就是都是AnnotationBeanPostProcessor后缀,所以都是对注解的处理。
而当我们Person对象加载、解析<context:component-scan>标签时,就会将CommonAnnotationBeanPostProcessor注入到工厂中。所以在上面getBeanPostProcessors()调用时,会获取到CommonAnnotationBeanPostProcessor并执行postProcessMergedBeanDefinition。
关于<context:component-scan>标签解析时如何进行组件的注册可看这篇帖子context: component-scan标签如何扫描、加载Bean。
CommonAnnotationBeanPostProcessor
当我们CommonAnnotationBeanPostProcessor实例创建时,构造方法中会将PostConstruct.class和PreDestroy.class设置到属性中。
public class CommonAnnotationBeanPostProcessor extends InitDestroyAnnotationBeanPostProcessor
		implements InstantiationAwareBeanPostProcessor, BeanFactoryAware, Serializable {

	public CommonAnnotationBeanPostProcessor() {
		setOrder(Ordered.LOWEST_PRECEDENCE - 3);
		setInitAnnotationType(PostConstruct.class);
		setDestroyAnnotationType(PreDestroy.class);
		ignoreResourceType("javax.xml.ws.WebServiceContext");
	}

	public void postProcessMergedBeanDefinition(RootBeanDefinition beanDefinition, Class<?> beanType, String beanName) {
			//处理@PostConstruct 和 @PreDestroy 注解
			super.postProcessMergedBeanDefinition(beanDefinition, beanType, beanName);
			InjectionMetadata metadata = findResourceMetadata(beanName, beanType, null);
			metadata.checkConfigMembers(beanDefinition);
		}
	}
方法首先会调用父类中InitDestroyAnnotationBeanPostProcessor的postProcessMergedBeanDefinition方法。
postProcessMergedBeanDefinition
获取生命周期元数据信息并保存
public void postProcessMergedBeanDefinition(RootBeanDefinition beanDefinition, Class<?> beanType, String beanName) {
		//获取生命周期元数据信息并保存
		LifecycleMetadata metadata = findLifecycleMetadata(beanType);
		metadata.checkConfigMembers(beanDefinition);
	}
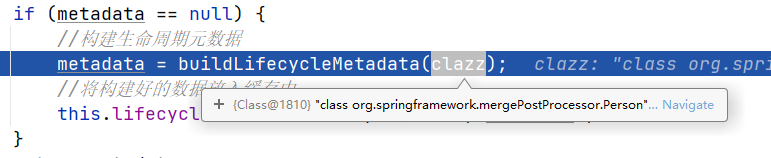
findLifecycleMetadata
依然是先从缓存中获取,获取不到则构建LifecycleMetadata对象并放到缓存中。
private LifecycleMetadata findLifecycleMetadata(Class<?> clazz) {
		//如果生命周期元数据缓存为空,则直接构建生命周期元数据 (默认创建了一个ConCurrentHashMap)
		if (this.lifecycleMetadataCache == null) {
			// Happens after deserialization, during destruction...
			return buildLifecycleMetadata(clazz);
		}
		// Quick check on the concurrent map first, with minimal locking.
		//快速检查生命周期元数据缓存,如果没有,则构建生命周期元数据
		LifecycleMetadata metadata = this.lifecycleMetadataCache.get(clazz);
		//缓存中不存在
		if (metadata == null) {
			//双层锁,防止多线程重复执行
			synchronized (this.lifecycleMetadataCache) {
				//再次从缓存中获取
				metadata = this.lifecycleMetadataCache.get(clazz);
				if (metadata == null) {
					//构建生命周期元数据
					metadata = buildLifecycleMetadata(clazz);
					//将构建好的数据放入缓存中
					this.lifecycleMetadataCache.put(clazz, metadata);
				}
				return metadata;
			}
		}
		return metadata;
	}
buildLifecycleMetadata
将 init 方法和 destroy 方法分类,如果父类中也包含注解,则循环处理。
因为会优先执行父类初始化方法, 所以 init 放入集合时,会放在 index = 0 的位置。
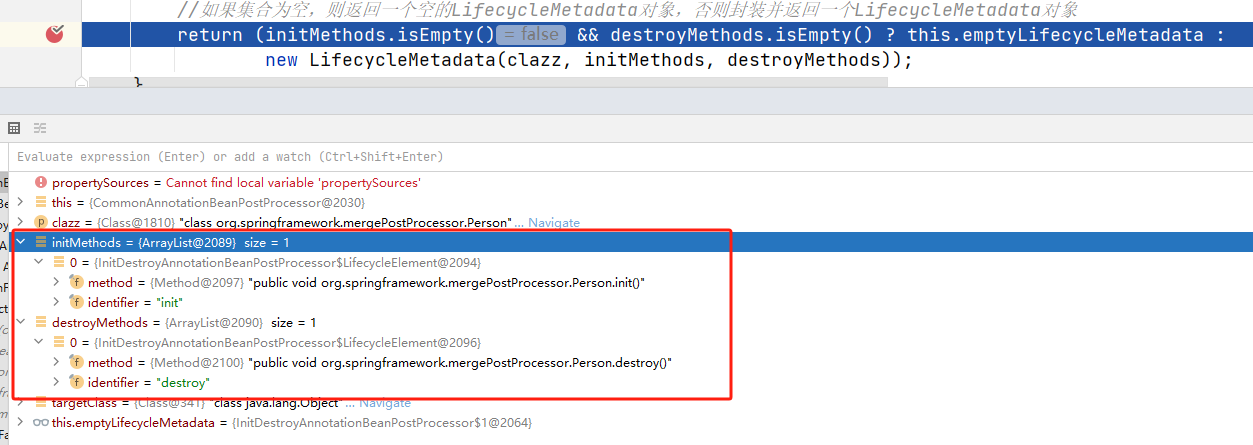
private LifecycleMetadata buildLifecycleMetadata(final Class<?> clazz) {
		//是否包含@PostConstruct注解和@PreDestroy注解
		if (!AnnotationUtils.isCandidateClass(clazz, Arrays.asList(this.initAnnotationType, this.destroyAnnotationType))) {
			return this.emptyLifecycleMetadata;
		}
		//声明初始化方法集合
		List<LifecycleElement> initMethods = new ArrayList<>();
		//声明销毁方法集合
		List<LifecycleElement> destroyMethods = new ArrayList<>();
		//目标类型
		Class<?> targetClass = clazz;

		do {
			//保存当前正在处理的方法
			final List<LifecycleElement> currInitMethods = new ArrayList<>();
			final List<LifecycleElement> currDestroyMethods = new ArrayList<>();

			// 反射获取当前类中的所有方法并依次对其调用第二个参数的lambda表达式
			ReflectionUtils.doWithLocalMethods(targetClass, method -> {
				//当前方法包含initAnnotationType注解时(@PostConstruct)
				if (this.initAnnotationType != null && method.isAnnotationPresent(this.initAnnotationType)) {
					//封装成LifecycleElement对象,添加到currInitMethods集合中
					LifecycleElement element = new LifecycleElement(method);
					currInitMethods.add(element);

				}
				// 当前方法包含destroyAnnotationType注解时(@PreDestroy)
				if (this.destroyAnnotationType != null && method.isAnnotationPresent(this.destroyAnnotationType)) {
					//封装成LifecycleElement对象,添加到currDestroyMethods集合中
					currDestroyMethods.add(new LifecycleElement(method));

				}
			});
			//每次都将currInitMethods集合中的元素添加到initMethods集合最前面
			// 因为可能父类中也包含@PostConstruct注解的方法,所以需要先执行父类的方法
			initMethods.addAll(0, currInitMethods);
			//放入destroyMethod的总集合中
			destroyMethods.addAll(currDestroyMethods);
			//获取父类
			targetClass = targetClass.getSuperclass();
		}
		//如果父类不是Object.class,则继续循环
		while (targetClass != null && targetClass != Object.class);
		//如果集合为空,则返回一个空的LifecycleMetadata对象,否则封装并返回一个LifecycleMetadata对象
		return (initMethods.isEmpty() && destroyMethods.isEmpty() ? this.emptyLifecycleMetadata :
				new LifecycleMetadata(clazz, initMethods, destroyMethods));
	}
而当我们处理完后会进行检查,并放入beanDefinition中,等待执行。
public void checkConfigMembers(RootBeanDefinition beanDefinition) {
			Set<LifecycleElement> checkedInitMethods = new LinkedHashSet<>(this.initMethods.size());
			for (LifecycleElement element : this.initMethods) {
				String methodIdentifier = element.getIdentifier();
				if (!beanDefinition.isExternallyManagedInitMethod(methodIdentifier)) {
					// 注册初始化调用方法
					beanDefinition.registerExternallyManagedInitMethod(methodIdentifier);
					checkedInitMethods.add(element);

				}
			}
			Set<LifecycleElement> checkedDestroyMethods = new LinkedHashSet<>(this.destroyMethods.size());
			for (LifecycleElement element : this.destroyMethods) {
				String methodIdentifier = element.getIdentifier();
				if (!beanDefinition.isExternallyManagedDestroyMethod(methodIdentifier)) {
					// 注册销毁调用方法
					beanDefinition.registerExternallyManagedDestroyMethod(methodIdentifier);
					checkedDestroyMethods.add(element);

				}
			}
			this.checkedInitMethods = checkedInitMethods;
			this.checkedDestroyMethods = checkedDestroyMethods;
		}
执行完成后,beanDefinition中也有了待执行的初始化方法和销毁方法。
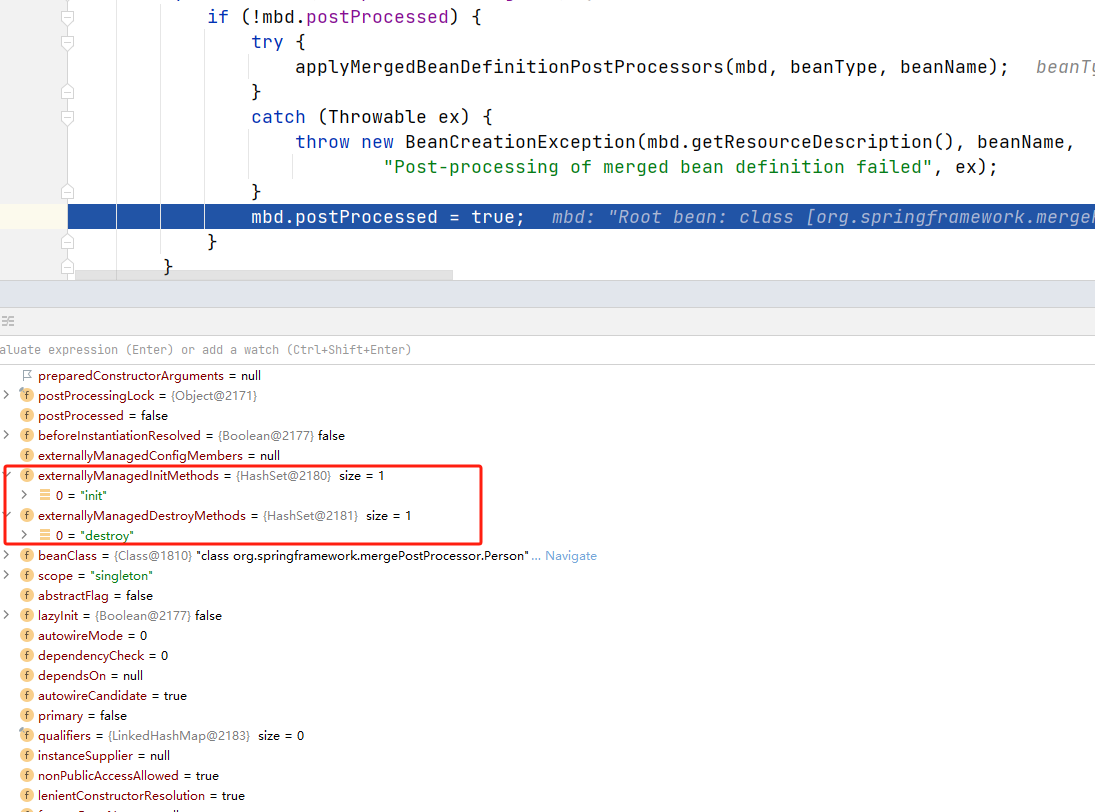
因为整个Bean的实例化、加载过程只有BeanDefinition是伴随始终的,所以处理完之后要设置到BD中,也正好印证了方法上的那个注释:允许postProcessor修改合并的BeanDefinition


 1万+
1万+

 被折叠的 条评论
为什么被折叠?
被折叠的 条评论
为什么被折叠?
 到【灌水乐园】发言


