


最近工作中用到了SpringSecurity来做 SSO登录,之前一直用的是shiro+cas的方式做SSO登录,学习过程中也是遇到了不少的坑,写点东西记录学到的知识,也做个知识分享。
一、SpringSecurity简介
SpringSecurity基于Spring框架,提供一套web安全性的解决方案。主要包括用户认证和用户授权两个方面:用户认证就是我们常说的登录,给予这个用户访问我们的程序的权利;用户授权是指登录之后系统对用户可以访问的内容访问的控制。
二、引入SpringSecurity
网上对SpringSecurity的相关教程已经非常多了,却缺少基于SpringBoot的使用。
1.用idea创建一个SpringBoot工程:File->New->Project->Spring Initializr
2.用maven引入SpringWeb和SpringSecurity的jar
SpringWeb
<dependency>
    <groupId>org.springframework.boot</groupId>
    <artifactId>spring-boot-starter-web</artifactId>
</dependency>
SpringSecurity
<dependency>
    <groupId>org.springframework.boot</groupId>
    <artifactId>spring-boot-starter-security</artifactId>
</dependency>

<dependency>
    <groupId>org.springframework.security</groupId>
    <artifactId>spring-security-test</artifactId>
    <scope>test</scope>
</dependency>
3.编写一个简单的controller
@RestController
@RequestMapping("/test")
public class MyController {
    @GetMapping("/getUser")
    public String getUser(){
        return "目前获取不到用户详细";
    }
}
4.启动程序、浏览器访问我们的接口
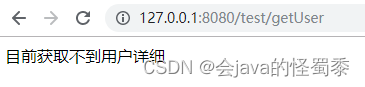
访问127.0.0.1:8080/test/getUser
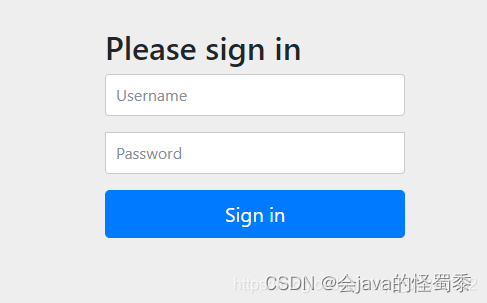
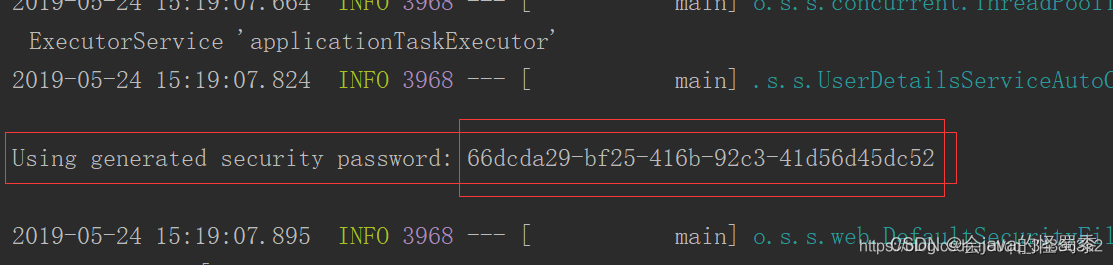
可以看到我们的链接转跳到了 http://127.0.0.1:8080/login上,用户名输入“user”,查看idea的启动信息找到密码
登录后成功访问接口,转跳回了我们原本访问的路径
此时我们已经成功的完成了SpringSecurity的引入,并且走了一次用户认证的流程,可以看到加入jar包后SpringSecurity会拦截所有的请求,然后转跳到自带的用户登录页面。
三、编写简单的SpringSecurity的配置
SpringSecurity默认配置显然无法满足要求,我们来创建一个简单的配置来自定义SpringSecurity。
1.创建MySecurityConfig类继承WebSecurityConfigurerAdapter类,重写configure(HttpSecurity http)方法。
public class MySecurityConfig extends WebSecurityConfigurerAdapter {
    @Override
    protected void configure(HttpSecurity http) throws Exception {
        //标识通过form表单进行登录
        http.formLogin()
                .and()
                //对请求做一个授权,那么是个什么样子的授权?
                .authorizeRequests()
                //任何的请求
                .anyRequest()
                //都需要身份认证
                .authenticated();
    }
}
这实际上就是一个默认的配置,除了formLogin()还可以使用httpBasic()切换成httpBasic的方式来进行登录
四、SpringSecurity基本原理
1.基本原理
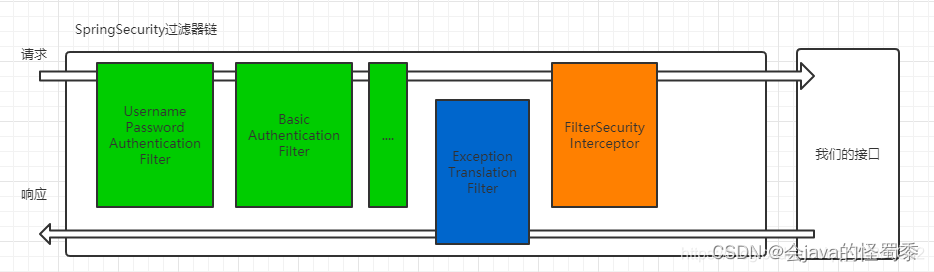
SpringSecurity主要是通过一个拦截器链来执行相关的操作,通过各种过滤器之后来到访问的接口。
绿色的过滤器:主要功能是检验信息并且登录,例如 UsernamePasswordAuthenticationFilter这个过滤器就会检验是否是用户名和密码的登录方式,如果是就会继续坚持用户名密码是否填写,全都填写之后开始尝试登录。这种类型的类型的过滤器,可以通过配置来设置开启和关闭,其他类型的过滤器无法关闭。
黄色的过滤器:它是访问我们接口前的最后的一个过滤器,会根据我们的配置来判断请求是否允许访问。
蓝色的过滤器:这是一个异常处理过滤器,他会接收 FilterSecurityInterceptor传来的异常信息作出相应的处理,例如 FilterSecurityInterceptor返回没有登录, ExceptionTranslationFilter就会弹出登录页面。
2.简单的查看源码
我们再次访问接口,跟着访问的来查看源码深入的理解SpringSecurity的原理。为了防止思路混乱先把访问类的顺序贴出来:
FilterSecurityInterceptor->ExceptionTranslationFilter->进行登录->UsernamePasswordAuthenticationFilter->FilterSecurityInterceptor->我们的接口
1)访问接口,由于我们没有登录“绿色的过滤器”将接受不到任何信息,也无法尝试登录,信息将直接被传到FilterSecurityInterceptor(黄色的过滤器),过滤器的doFilter()方法会调用invoke(FilterInvocation fi)方法将会处理我们请求,当beforeInvocation()方法认证失败的时候就会抛出异常。
public void invoke(FilterInvocation fi) throws IOException, ServletException {
   if ((fi.getRequest() != null)
         && (fi.getRequest().getAttribute(FILTER_APPLIED) != null)
         && observeOncePerRequest) {
      ..........
   }
   else {
      // first time this request being called, so perform security checking
      if (fi.getRequest() != null && observeOncePerRequest) {
         fi.getRequest().setAttribute(FILTER_APPLIED, Boolean.TRUE);
      }
        //beforeInvocation()方法将会根据我们的配置对请求进行认证
      InterceptorStatusToken token = super.beforeInvocation(fi);
      try {
            //doFilter()方法就是调用我们的接口处理响应求
         fi.getChain().doFilter(fi.getRequest(), fi.getResponse());
      }
      finally {
         super.finallyInvocation(token);
      }
      super.afterInvocation(token, null);
   }
}
2.抛出的异常会被ExceptionTranslationFilter过滤器接收到,可以看到异常过滤器的dofilter()方法非常简单,直接调用了下一个过滤器的dofilter()方法,但是他的异常处理部分非常复杂,这次异常过滤器会将请求做个重定向转跳到登录页面上。
public void doFilter(ServletRequest req, ServletResponse res, FilterChain chain)
      throws IOException, ServletException {
   HttpServletRequest request = (HttpServletRequest) req;
   HttpServletResponse response = (HttpServletResponse) res;
   try {
        //调用FilterSecurityInterceptor的dofilter方法。
      chain.doFilter(request, response);
      logger.debug("Chain processed normally");
   }
   catch (IOException ex) {
      throw ex;
   }
   catch (Exception ex) {
      // Try to extract a SpringSecurityException from the stacktrace
      Throwable[] causeChain = throwableAnalyzer.determineCauseChain(ex);
      RuntimeException ase = (AuthenticationException) throwableAnalyzer
            .getFirstThrowableOfType(AuthenticationException.class, causeChain);
      if (ase == null) {
         ase = (AccessDeniedException) throwableAnalyzer.getFirstThrowableOfType(
               AccessDeniedException.class, causeChain);
      }
      if (ase != null) {
         if (response.isCommitted()) {
            throw new ServletException("Unable to handle the Spring Security Exception because the response is already committed.", ex);
         }
         handleSpringSecurityException(request, response, chain, ase);
      }
      else {
         // Rethrow ServletExceptions and RuntimeExceptions as-is
         if (ex instanceof ServletException) {
            throw (ServletException) ex;
         }
         else if (ex instanceof RuntimeException) {
            throw (RuntimeException) ex;
         }
         // Wrap other Exceptions. This shouldn't actually happen
         // as we've already covered all the possibilities for doFilter
         throw new RuntimeException(ex);
      }
   }
}
3.登录后进入 UsernamePasswordAuthenticationFilter,看到源码中有这样一句代码,这个拦截器只拦截/login访问路径的Post请求
public UsernamePasswordAuthenticationFilter() {
   super(new AntPathRequestMatcher("/login", "POST"));
}
//请求信息中获取到用户名密码,尝试登录。
public Authentication attemptAuthentication(HttpServletRequest request,
      HttpServletResponse response) throws AuthenticationException {
   if (postOnly && !request.getMethod().equals("POST")) {
      throw new AuthenticationServiceException(
            "Authentication method not supported: " + request.getMethod());
   }
    //获取用户名和密码
   String username = obtainUsername(request);
   String password = obtainPassword(request);
   if (username == null) {
      username = "";
   }
   if (password == null) {
      password = "";
   }
   username = username.trim();
    //对用户名密码进行封装
   UsernamePasswordAuthenticationToken authRequest = new UsernamePasswordAuthenticationToken(
         username, password);
   // Allow subclasses to set the "details" property
   setDetails(request, authRequest);
    //尝试登录,具体登录方法在这里面
   return this.getAuthenticationManager().authenticate(authRequest);
}
4.最后再次回到FilterSecurityInterceptor中判断请求是否可以访问。
五、总结
我们搭建了一个简单使用SpringSecurity的项目,并且大致了解了SpringSecurity对于一个请求的完整处理链路,对SpringSecurity的使用和原理也应该有了一个基本的认知。但这样的项目完全不足以应对我们的使用需求,我们的密码需要加密,需要从数据库中获取用户信息来认证密码,下一章我们学习自定义用户认证流程。


 284
284

 被折叠的 条评论
为什么被折叠?
被折叠的 条评论
为什么被折叠?
 到【灌水乐园】发言


