


这篇文章将介绍Spring整合MyBatis!
想要查看MyBatis使用教程、MyBatis批量新增、MyBatis的in条件查询(foreach使用),MyBatis二级缓存、MyBatis工作原理、MyBatis插件使用在另外一篇文章中。点击查看
Spring是一个非常优秀的IOC框架,让MyBatis和Spring整合的主要目的是想使用 Spring 管理各个组件的功能和他的事务管理还有其他的一些功能。
整合操作示例:
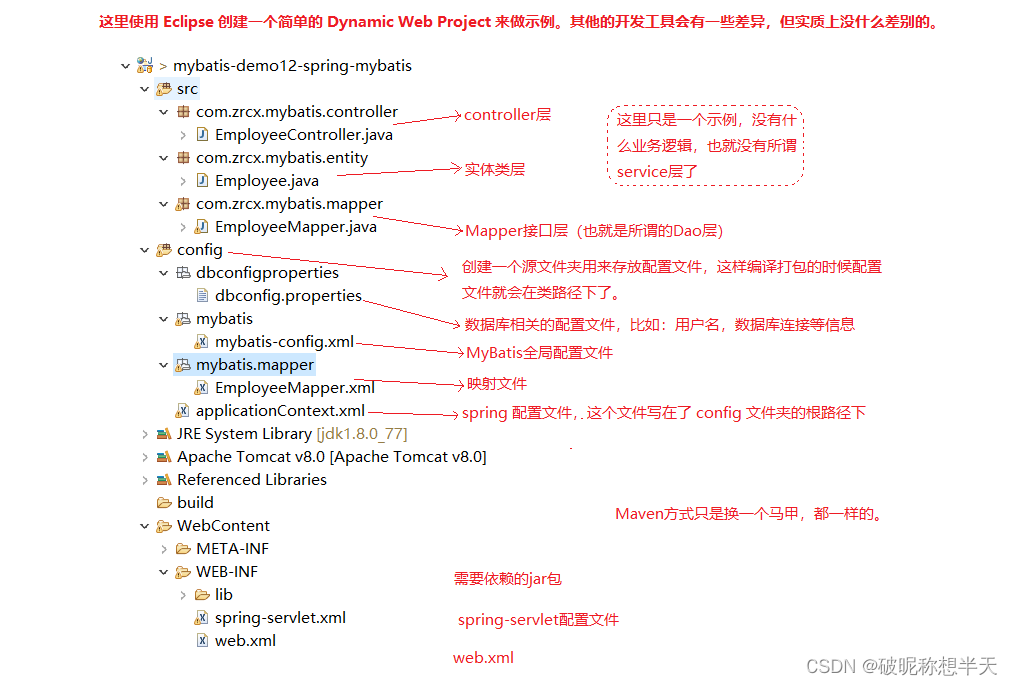
代码结构介绍图如下所示:
1、引入依赖

2、写上mybatis的全局配置文件。
注意:和spring整合需要用spring创建一个<bean id="sqlSessionFactory" class="org.mybatis.spring.SqlSessionFactoryBean"> 那些全局配置项都可以写在这个<bean>节点的子节点里面。如果只是写一部分,mybatis-config.xml全局配置文件就不用写这么多了,像数据源就可以删掉了,<mappers>可以删掉了。(mybatis-spring适配包帮我们做了许多东西的,像配置SqlSessionFactoryBean 我们就不用写全局配置文件了,Mapper接口代理实现全部加入spring容器等)。mybatis的全局配置文件可以写也可以不写,这里举例还是写上。这个配置文件一般都是写在类路径下,在类路径下设置多层级的目录也可以,这里写在了\mybatis\mybatis-config.xml
<?xml version="1.0" encoding="UTF-8" ?>
<!DOCTYPE configuration
PUBLIC "-//mybatis.org//DTD Config 3.0//EN"
"http://mybatis.org/dtd/mybatis-3-config.dtd">

<configuration>

	<!-- 重要的标签就几个<settings>、<typeAliases>、 <mappers>、<databaseIdProvider>、<plugins>。还有注意这些所有标签的顺序。 -->

	<settings>
		<!-- 这个设置项的作用是:开启类字段的驼峰命名规则; (
		          数据库里面字段带下划线 ,然后会自动的将字段映射为类中的驼峰命名。如:数据库为user_name,会自动映射为类里面的userName,
		          这样在没有配置数据库字段和类中属性的映射规则下,带下划线的数据库字段就能给类的属性赋值了。就不会出现userName=null的情况了)
		 -->
		<setting name="mapUnderscoreToCamelCase" value="true"/>
	</settings>

	<typeAliases>

		<!--
		  <package>: 为某个包下的所有类批量起别名; 用<typeAlias>起别名的话,如果很多类,就要写很多个,我们可以用 <package> 批量起别名
			   name属性:   指定包名(为当前包以及下面所有的子包的每一个类都起一个默认别名(类名小写),别名不区分大小写)

			   name=com.xxx.mybatis.entity就是给这个包,和他的所以子包起别名。
		-->
		<package name="com.xxx.mybatis.entity"/>


	</typeAliases>

	<!--
	     单个数据库环境可以不用写这个节点的内容
	     没有切换不同数据库的需求的情况也可以不用写这个节点的内容
	     不考虑这种切换不同数据库方式的也可以不用写这个节点的内容
	 -->
	<databaseIdProvider type="DB_VENDOR">
		<!--
			为不同的数据库厂商起别名
			然后去mapper文件里告诉mybatis这个sql是哪个数据库厂商发出的就行了。

			操作:比如在<select>节点上的databaseId属性写上这里配置的别名 <select databaseId="mysql">
			    <select id="findEmpById" resultType="employee"> select * from table </select>
			    <select id="findEmpById" resultType="employee" databaseId="mysql"> select * from table </select>
			    <select id="findEmpById" resultType="employee" databaseId="oracle"> select * from table </select>

			这样写了databaseId属性,就可以写多个 id 值相同的<select>了。如果像上面写了3个,他会优先去找带有合适 databaseId="mysql" 的去执行
			至于不配别名,然后在mapper文件执行不同数据库的语句起不起效果不清楚
		-->
		<property name="MySQL" value="mysql"/><!-- 为MySQL标识的数据库起一个别名叫小mysql -->
		<property name="Oracle" value="oracle"/>
		<property name="SQL Server" value="sqlserver"/>
	</databaseIdProvider>

</configuration>
3、写上数据库的配置文件(可选)
这个文件或者不写也行。不写就要具体配置。(要写的话在类路径下编写,设置多层级的目录也可以。命名 dbconfig.properties。自定义其他命名也行)
jdbc.driver=com.mysql.jdbc.Driver
jdbc.url=jdbc:mysql://localhost:3306/mybatis
jdbc.username=root
jdbc.password=root

orcl.driver=oracle.jdbc.OracleDriver
orcl.url=jdbc:oracle:thin:@localhost:1521:orcl
orcl.username=scott
orcl.password=123456
4、编写代码
写代码,entity,mapper,server,controller等
5、编写 mapper.xml 映射文件
注意:假设以后我们将所有的mapper.xml都写在类路径下mybatis/mapper的文件夹下;前面说过,如果在全局配置文件里配置<mappers>是包扫描的话,xxxmapper.xml文件应该要和mapper.java类所在的包是一样的,现在写成不一样也没事,因为和spring整合会解决这个问题。mapper.xml文件的位置和mapper接口的包不一样需要在<bean id="sqlSessionFactory" class="org.mybatis.spring.SqlSessionFactoryBean">中指定mapper.xml文件的位置。**如果我们是用全局配置文件配置包扫描来定位mapper.xml文件的话,需要mapper.xml文件和mapper接口在同一包下 **
<?xml version="1.0" encoding="UTF-8" ?>
<!DOCTYPE mapper
 PUBLIC "-//mybatis.org//DTD Mapper 3.0//EN"
 "http://mybatis.org/dtd/mybatis-3-mapper.dtd">
 <!-- namespace:这个例子 命名空间要和 mapper接口的全类名相同    接口的编程方式,所有要写成一样   -->
<mapper namespace="com.xxx.mybatis.mapper.EmployeeMapper">

	<!--
		id:              唯一标识              sql的唯一标识       要和 mapper接口的方法名相同
		resultType:       返回值类型,将查询出来的结果封装成什么类型的对象     要和 mapper接口的相同的方法名字的返回值类型相同    写别名或者全类名
		parameterType      参数类型   可以不传,MyBatis会根据TypeHandler自动推断
		#{id}:            从传递过来的参数中取出id值
	 -->
	<select id="findEmpById" resultType="employee">
		select * from employee where id = #{id}
	</select>

</mapper>
6、编写spring配置文件 applicationContext.xml。
在类路径下编写 applicationContext.xml 配置文件。怎么写可以参照这个例子的applicationContext.xml 或者 官方文档(https://www.mybatis.org/spring/getting-started.html) 或者 参照Mybatis开源项目官网的下的 jpetstore-6 他直接就是一个spring mybatis的整合演示项目(https://github.com/mybatis/jpetstore-6)
<?xml version="1.0" encoding="UTF-8"?>
<beans xmlns="http://www.springframework.org/schema/beans"
	xmlns:xsi="http://www.w3.org/2001/XMLSchema-instance"
	xmlns:context="http://www.springframework.org/schema/context"
	xmlns:mybatis-spring="http://mybatis.org/schema/mybatis-spring"
	xmlns:tx="http://www.springframework.org/schema/tx"
	xsi:schemaLocation="http://www.springframework.org/schema/beans http://www.springframework.org/schema/beans/spring-beans.xsd
		http://mybatis.org/schema/mybatis-spring http://mybatis.org/schema/mybatis-spring-1.2.xsd
		http://www.springframework.org/schema/tx http://www.springframework.org/schema/tx/spring-tx-4.0.xsd
		http://www.springframework.org/schema/context http://www.springframework.org/schema/context/spring-context-4.0.xsd">

	<!--
		springmvc的配置文件只是用于控制网站跳转逻辑;(主要用于配置springMVC的相关东西的 例如:视图解析器什么的,还有其他springmvc配置的)

		而这个spring配置文件  是配置管理所有的业务逻辑组件,等。。。(也就是配置spring相关内容的地方,例如:bean组件,事务。有些甚至连事务也单独分一个组件)

		所以说标注了@controller注解的是属于控制网站跳转逻辑的,就把扫描controller的组件的配置放在了springmvc的配置文件;

		这里配置的意思是扫描com.xxx.mybatis下的所有组件,但是他除了控制器不要,剩下的都要;标注了@Controller注解的不要,剩下的都要

	 -->
	<context:component-scan base-package="com.xxx.mybatis">
		<!-- 关键字是 exclude; 表示:标注了@Controller注解的不要,剩下的都要让他加入spring容器-->
		<context:exclude-filter type="annotation" expression="org.springframework.stereotype.Controller" />
	</context:component-scan>


	<!-- 引入数据库的配置文件 -->
	<context:property-placeholder location="classpath:dbconfigproperties/dbconfig.properties" />
	<!-- Spring用来控制业务逻辑。数据源、事务控制、aop -->
	<bean id="dataSource" class="com.mchange.v2.c3p0.ComboPooledDataSource">
		<property name="jdbcUrl" value="${jdbc.url}"></property>
		<property name="driverClass" value="${jdbc.driver}"></property>
		<property name="user" value="${jdbc.username}"></property>
		<property name="password" value="${jdbc.password}"></property>
	</bean>


	<!-- spring事务管理 -->
	<bean id="dataSourceTransactionManager" class="org.springframework.jdbc.datasource.DataSourceTransactionManager">
		<property name="dataSource" ref="dataSource"></property>
	</bean>

	<!-- 开启基于注解的事务 -->
	<tx:annotation-driven transaction-manager="dataSourceTransactionManager"/>


	<!--
		整合mybatis
		       关键点就是:配置sqlSessionFactory  和扫描mapper接口让spring将这些mapper接口创建出他们的代理对象,并放入spring容器中。。。就这两个

			目的:1、spring管理所有组件。包括让spring管理mapper的实现类。
					 例如:service调用Dao  就可以用 @Autowired:自动注入mapper;这样就避免了我们每次要用一个mapper操作增删改查之前要去SqlSessionFactory.openSession()的一系列操作

				  2、spring用来管理事务,spring声明式事务
	-->

	<!--创建出SqlSessionFactory对象,这一步相当于就是让springioc一启动就自己去创建sqlSessionFactory对象  -->
	<bean id="sqlSessionFactoryBean" class="org.mybatis.spring.SqlSessionFactoryBean">
		<!--
			这块创建出的SqlSessionFactory里边的所有信息 ,我们之前是在全局配置配置文件中定义的,我想现在直接可以定义成SqlSessionFactoryBean的属性
			就是说我们的全局配置文件可以不用写了,可以在这里定义了。一般建议留下
		 -->
		<!-- 指定数据源 -->
		<property name="dataSource" ref="dataSource"></property>
		<!-- configLocation指定全局配置文件的位置 -->
		<property name="configLocation" value="classpath:mybatis/mybatis-config.xml"></property>
		<!--mapperLocations: mapper.xml文件的位置和mapper接口的包不一样需要指定mapper.xml文件的位置。如果我们是用全局配置文件配置包扫描来定位mapper.xml文件的话,需要mapper.xml文件和mapper接口在同一包下 -->
		<property name="mapperLocations" value="classpath:mybatis/mapper/*.xml"></property>
        <!--typeAliasesPackage:批量别名处理。全局配置文件写了这里就不用写了 -->
        <!-- <property name="typeAliasesPackage" value="com.atguigu.bean"></property> -->
	</bean>

	<!--
		扫描所有的mapper接口的实现,让这些mapper能够自动注入; base-package:指定mapper接口的包名。
		其实就是扫描mapper接口所在的包,将这些mapper的代理实现全都创建出来,并加入到spring容器中。这样才能用 @Autowired:自动注入mapper; 这些都是mybatis-spring适配包帮我们做的
	 -->
	<mybatis-spring:scan base-package="com.xxx.mybatis.mapper"/>
	<!-- 或者(两者选其一) -->
	<!--
		<bean class="org.mybatis.spring.mapper.MapperScannerConfigurer">
			<property name="basePackage" value="com.atguigu.mybatis.dao"></property>
		</bean>
	-->
	<!-- (mybatis-spring适配包帮我们做了许多东西的,像配置SqlSessionFactoryBean 我们就不用写全局配置文件了,Mapper接口代理实现全部加入spring容器等) -->


	<!--配置一个可以进行批量执行的sqlSession  -->
	<!-- <bean id="sqlSession" class="org.mybatis.spring.SqlSessionTemplate">
		<constructor-arg name="sqlSessionFactory" ref="sqlSessionFactoryBean"></constructor-arg>
		<constructor-arg name="executorType" value="BATCH"></constructor-arg>
	</bean> -->

</beans>
7、编写spring-servlet.xml文件。
在WEB-INF目录下编写 spring-servlet.xml 文件
<?xml version="1.0" encoding="UTF-8"?>
<beans xmlns="http://www.springframework.org/schema/beans"
	xmlns:xsi="http://www.w3.org/2001/XMLSchema-instance"
	xmlns:context="http://www.springframework.org/schema/context"
	xmlns:mvc="http://www.springframework.org/schema/mvc"
	xsi:schemaLocation="http://www.springframework.org/schema/mvc http://www.springframework.org/schema/mvc/spring-mvc-4.0.xsd
		http://www.springframework.org/schema/beans http://www.springframework.org/schema/beans/spring-beans.xsd
		http://www.springframework.org/schema/context http://www.springframework.org/schema/context/spring-context-4.0.xsd">

	<!--
		springmvc的配置文件只是用于控制网站跳转逻辑;(主要用于配置springMVC的相关东西的 例如:视图解析器什么的,还有其他springmvc配置的);

		只扫描控制器,让他扫描com.xxx.mybatis下的所有组件,但是呢这个文件既然是springmvc的配置文件,让他就只扫描控制器是就行了,
		use-default-filters=false   让他禁用掉默认的过滤行为,这样的话呢我们这个只包含(context:include-filter)就会生效,只包含我们这个控制器让他只扫描这个控制器。

		而spring配置文件  是配置管理所有的业务逻辑组件,等。。。(也就是配置spring相关内容的地方,例如:bean组件,事务。有些甚至连事务也单独分一个组件)

		所以说:标注了@controller注解的是属于  控制网站跳转逻辑的,就把扫描controller的组件的配置放在了springmvc的配置文件;
		这里配置的意思是扫描com.xxx.mybatis下的所有组件,但是他只要标注了@Controller注解的,剩下的都不要


		use-default-filters=false   让他禁用掉默认的过滤行为,这样的话呢我们这个只包含(context:include-filter)就会生效,只包含我们这个控制器让他只扫描这个控制器。
	 -->
	<context:component-scan base-package="com.xxx.mybatis" use-default-filters="false">
		<!-- 我们只按照注解(type=annotation)扫描,只扫描标注了org.springframework.stereotype.Controller注解的这些控制器。 -->
		<context:include-filter type="annotation" expression="org.springframework.stereotype.Controller"/>
	</context:component-scan>
	<!-- 这里只扫描控制器,然后在spring的配置文件中有让他不扫描控制器只扫描其他组件。有一些项目他不区分这个,直接就在Spring的applicationContext文件里将组件全部一起全部扫描了 -->


	<!-- 视图解析器 -->
	<bean class="org.springframework.web.servlet.view.InternalResourceViewResolver">
		<property name="prefix" value="/WEB-INF/pages/"></property>
		<property name="suffix" value=".jsp"></property>
	</bean>

	<!-- 他能处理动态资源 -->
	<mvc:annotation-driven></mvc:annotation-driven>

	<!-- 他能正确的处理静态资源 -->
	<mvc:default-servlet-handler/>
</beans>
8、编写web.xml文件
<?xml version="1.0" encoding="UTF-8"?>
<web-app xmlns:xsi="http://www.w3.org/2001/XMLSchema-instance" xmlns="http://xmlns.jcp.org/xml/ns/javaee" xsi:schemaLocation="http://xmlns.jcp.org/xml/ns/javaee http://xmlns.jcp.org/xml/ns/javaee/web-app_3_1.xsd" id="WebApp_ID" version="3.1">

  <display-name>mybatis-demo12-spring-mybatis</display-name>

    <!--Spring配置: needed for ContextLoaderListener -->
    <!--
    	让spring的ioc容器随web一起启动;也就是在web容器中实例化spring容器
     -->
	<context-param>
		<param-name>contextConfigLocation</param-name>
		<param-value>classpath:applicationContext.xml</param-value>
	</context-param>

	<!-- Bootstraps the root web application context before servlet initialization -->
	<listener>
		<listener-class>org.springframework.web.context.ContextLoaderListener</listener-class>
	</listener>

  	<!-- SpringMVC配置 -->

	<!-- The front controller of this Spring Web application, responsible for handling all application requests -->
	<servlet>
		<servlet-name>spring</servlet-name>
		<servlet-class>org.springframework.web.servlet.DispatcherServlet</servlet-class>
		<load-on-startup>1</load-on-startup>
	</servlet>

	<!-- Map all requests to the DispatcherServlet for handling -->
	<servlet-mapping>
		<servlet-name>spring</servlet-name>
		<url-pattern>/</url-pattern>
	</servlet-mapping>

</web-app>


 6322
6322

 被折叠的 条评论
为什么被折叠?
被折叠的 条评论
为什么被折叠?
 到【灌水乐园】发言


